Exchange 2016 to Office 365 Migration
Microsoft Exchange Server 2016 reached the end of mainstream support on October 13, 2020, and its extended support officially ended on October 14, 2025. With no further updates, patches, or technical assistance from Microsoft, organizations still running Exchange 2016 face increased security, compliance, and reliability risks. To maintain a modern and secure communication environment, businesses are strongly encouraged to migrate Exchange 2016 to Office 365.
Migrating from Exchange 2016 to Office 365 enables organizations to embrace a cloud-first approach, reduce infrastructure costs, and simplify administration. With Office 365, companies gain access to advanced productivity tools such as Microsoft Teams, OneDrive, and SharePoint Online, empowering employees to collaborate efficiently and work securely from anywhere.
EdbMails Exchange Migration software offers a reliable and hassle-free solution for Exchange 2016 migration to Office 365. Built to ensure zero downtime and maintain complete data integrity, it allows direct migration of mailboxes, public folders, archive mailboxes, and shared mailboxes without the need for PST files. This streamlined approach ensures a secure, full-scale data transfer with minimal disruption to business operations, helping organizations transition smoothly to the cloud.
Best Method to Migrate Exchange 2016 to Office 365
Many organizations initially consider manual methods for Exchange 2016 migration to Office 365. However, these traditional approaches are often time-consuming, complex, and prone to errors that can lead to data loss or prolonged downtime. To ensure a secure and efficient transition, businesses increasingly prefer using EdbMails Exchange Migration software, a reliable solution designed to simplify every step of the Exchange 2016 to Office 365 migration process.
EdbMails automates and streamlines the entire workflow, supporting incremental migration that transfers only new or modified data after the initial migration. This feature reduces overall migration time, optimizes bandwidth usage, and eliminates redundant data transfers. The software also automatically creates mailboxes on the target Office 365 server, removing the need for manual setup and making it easier to migrate from Exchange 2016 to Office 365 efficiently.
With automatic mailbox mapping, EdbMails intelligently matches source mailboxes with their corresponding target mailboxes. Administrators can also configure custom folder mapping to organize migrated data precisely within the target environment, maintaining structure and consistency throughout the migration.
The software enables concurrent mailbox migration, allowing multiple mailboxes to be transferred simultaneously for faster performance. In addition, EdbMails supports selective migration, giving administrators the flexibility to migrate only specific mailboxes, folders, or items, ensuring that critical business data is prioritized.
Security remains a top priority during migration. EdbMails uses secure modern Office 365 authentication and adheres to the latest Microsoft security standards to guarantee data protection and compliance with organizational policies. This ensures a safe, reliable, and fully compliant migration experience throughout the transfer.
Exchange 2016 to Office 365 migration checklist
Before you migrate Exchange 2016 to Office 365 you must carefully plan the approach based on your current environment and migration requirements. Following is a checklist of items to identify and prepare your environments.
- Plan ahead: Get familiar with Microsoft 365 and learn how it is different compared to the on-premises environment.
- Make sure to allocate enough time and resources for the migration.
- Identify the type of your current migration environment (Hybrid or non-Hybrid) and determine whether you want to move everything at once or in stages.
- Prepare your source environment: Before you begin the migration, ensure that your Exchange 2016 environment has the latest Exchange 2016 cumulative update and is properly configured. This may include tasks such as setting impersonation rights, checking your internet connection speed, network configuration and firewall rules.
- Test the migration process: It is highly recommended to perform a test migration before attempting to migrate your entire Exchange 2016 environment to Office 365. This can help identify any issues or problems that may arise during the migration and allow you to address them in time.
- Monitor the migration: After the migration operation, it's important to check the status of mailboxes, verify that all data has been migrated, and troubleshoot any issues that may arise.
- Plan for post-migration tasks: There are a number of post-migration tasks that need to be completed, including updating user profiles, training your end users, configuring client access, and decommissioning the Exchange 2016 environment. Make sure to allocate enough time and resources for these tasks.
- Plan ahead: Get familiar with Microsoft 365 and learn how it is different compared to the on-premises environment.
Migrate Exchange 2016 to Office 365 Prerequisites
- Step 1: Decide on the best approach to migrate Exchange 2016 to Office 365.
The first step is to plan how you want to migrate Exchange 2016 to Office 365. The following migration paths are available depending on your source and target environment.
Current environment and migration requirement Ideal migration approach Migration flow You want to migrate all emails, calendars, and contacts from Exchange 2016 to Office 365 in one go. Exchange cutover migration Transfers all mailbox data at once to Office 365. Best suited for migrating a large number of mailboxes. You prefer to move mailboxes from Exchange 2016 in smaller batches or during weekends. Staged Exchange migration Migrates data in phases, starting with the most recent, then moving the rest over time. You want to gradually move to Office 365 while still maintaining your on-premises Exchange. Hybrid migration Allows coexistence between Exchange 2016 and Office 365, enabling a smooth, phased transition. Use the Microsoft 365 mail migration advisor to determine which migration method is best for you.
- Step 2: Check the network and bandwidth requirements
Estimate the bandwidth requirements to migrate to Office 365 and that the network settings allow you to transfer the data. See networking roadmap for Microsoft 365 which explains how to plan and deploy your network.
- Network connectivity
- Ensure you have a stable and reliable internet connection at both the source and destination locations.
- You should ensure that your network is configured correctly to allow communication with the Office 365 servers.
- Open the necessary ports and allow traffic to and from the Office 365 servers.
- If you have a firewall or proxy server in place, configure these to allow communication with the Office 365 servers. Consult with your network administrator or the vendor of your firewall or proxy server for specific instructions.
- Test your existing network
- With tools like Microsoft Remote Connectivity Analyzer and Microsoft 365 network connectivity test tool, you can test your existing network.
- Bandwidth
- The actual bandwidth required depends on the size of your mailboxes and the amount of data you are migrating. For example, if you have a large number of large attachments or folders, you may need more bandwidth.
- As a general rule, it is recommended to allow the bandwidth 1.5 times the size of your mailbox data.
- It's also important to consider the available bandwidth at the source and destination locations.
See best practices for network planning and improving migration performance.
- Network connectivity
- Step 3: Choose a suitable Microsoft 365 license plan for your requirements
Microsoft 365 is available as a cloud-based subscription service or as a one-time purchase of a perpetual license. Office 365 has business and enterprise plans, each suited to different user requirements. Compare Office 365 business plans and compare Office 365 enterprise plans. You can choose an Office 365 licensing plan specific to your needs or sign up for a 30 day free trial and decide to go with a suitable one later.
- Step 4: Set up your target Office 365 tenant for the migration
- Plan for your tenant implementation and deploy your tenant. See tenant roadmap for Microsoft 365.
- Understand the subscriptions, licenses, Azure AD tenants and how to use third-party SSL certificates.
- Create user accounts: Create user accounts for all users who will be using Office 365 through the Microsoft 365 admin center.
- Configure security and compliance: Configure the required settings to ensure that your data is secure and compliant with relevant regulations. Set up data loss prevention policies, configure multi-factor authentication, and set up data retention policies.
- Set up your Office 365 environment: Configure any additional services you will be using, such as SharePoint, OneDrive and Teams.
- If you plan to install Office apps on your computer, see system requirements for Microsoft 365 and Office configuration support matrix. Because Office 365 is a cloud based solution, it is also important to learn where your Microsoft 365 customer data is stored.
- Step 5: Add and verify the custom domain on Office 365
If you have a custom email domain from your hosting provider to which you want to migrate and receive emails, you must add and verify the domain on Office 365. This will enable you to use your own domain name (such as example.com) for your email addresses and other Office 365 services.
To set up your custom domain, follow these steps:
- Verify that you own the domain by adding a TXT record to your DNS configuration.
- Add a new domain to your Office 365 tenant. You can use an existing domain that you own or purchase a new one. The domain is used to access your Office 365 services.
- Update your DNS records to point to Office 365. This step is required to ensure that your email is delivered to the correct mailbox.
- Step 6: Create mailboxes and mail-enabled Public folders
Before you migrate Exchange 2016 to Office 365, ensure that you create mailboxes for your users in your organization and assign suitable licenses to them. EdbMails automatically creates mailboxes on your target servers, if you want to manually create mailboxes refer to the links below:
Add users and assign licenses to Office 365 users
Add several users at the same time to Office 365
Assign Microsoft 365 licenses to user accounts
To create multiple user accounts at once, you can use the 'Bulk add users' option to create user accounts in bulk using a CSV file.
If you want to migrate Public folders from Exchange 2016, ensure that you create and configure Public folders and make them mail enabled on Office 365.
If you want to migrate to archive mailboxes ensure to enable in-place archive mailboxes in Office 365.
- Step 7: Verify the mailbox of the admin account
Check to see if the admin account that has been assigned management roles has a valid and non-hidden mailbox on the Exchange 2016 server. See how to configure user mailbox properties for the users from the Exchange admin center (EAC).
- Step 8: Configure Office 365 to send and receive large messages
Follow the steps to increase the message size on Office 365.
- Step 1: Decide on the best approach to migrate Exchange 2016 to Office 365.
Migrate Exchange 2016 to Office 365 Step by Step Using EdbMails
Step 1: Download and install the EdbMails Exchange migration software
- Download and install the EdbMails application on your Windows computer that can be connected to your Source Exchange 2016 server.
See system requirements for Exchange 2016 to Office 365 migration.
- Launch the EdbMails application and either ‘login’ with your email ID and password or click ‘Start Your Free Trial’ to begin.
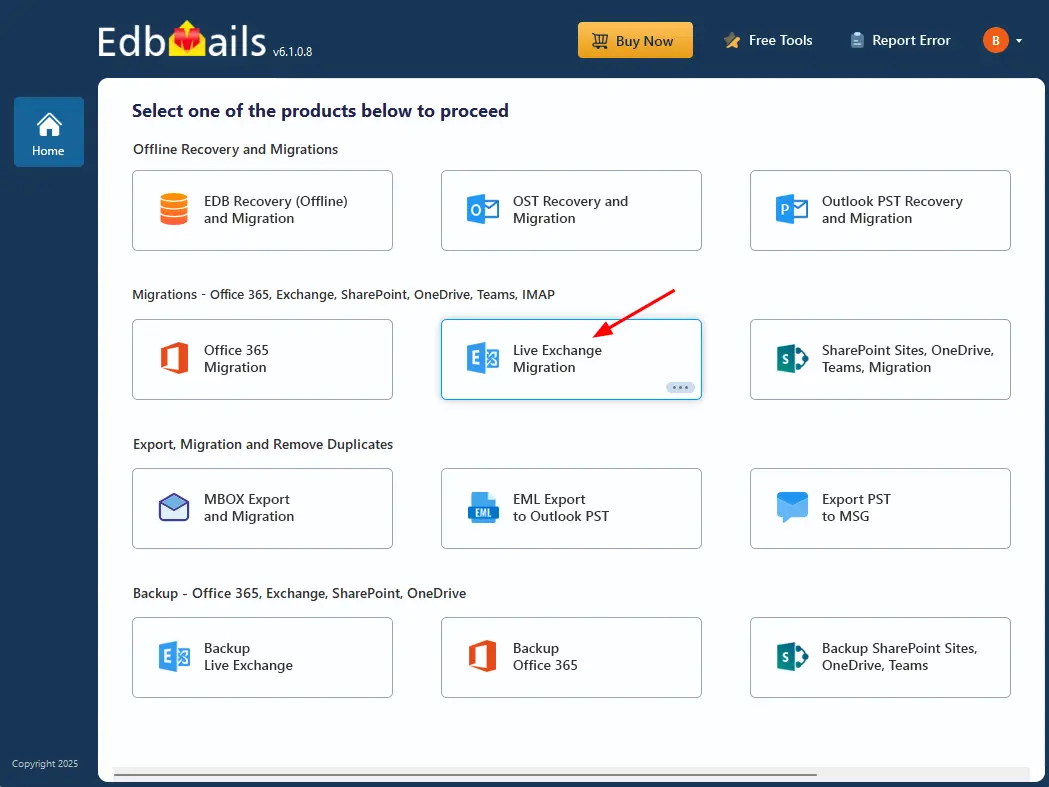
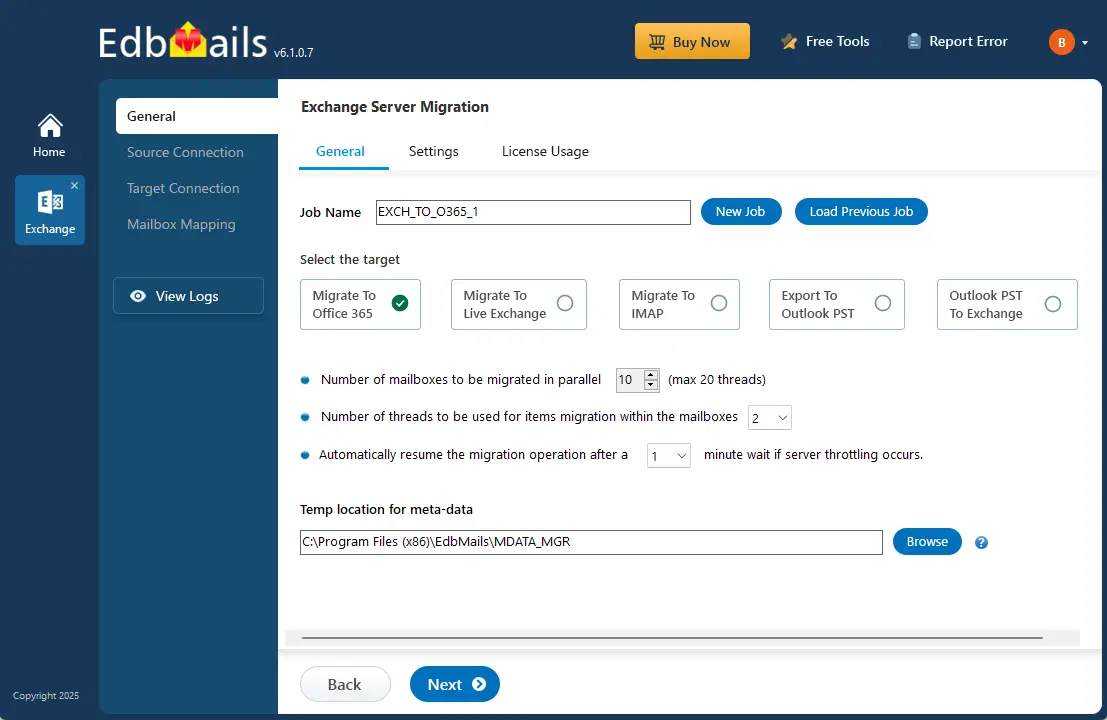
- Select ‘Live Exchange Migration’ option.
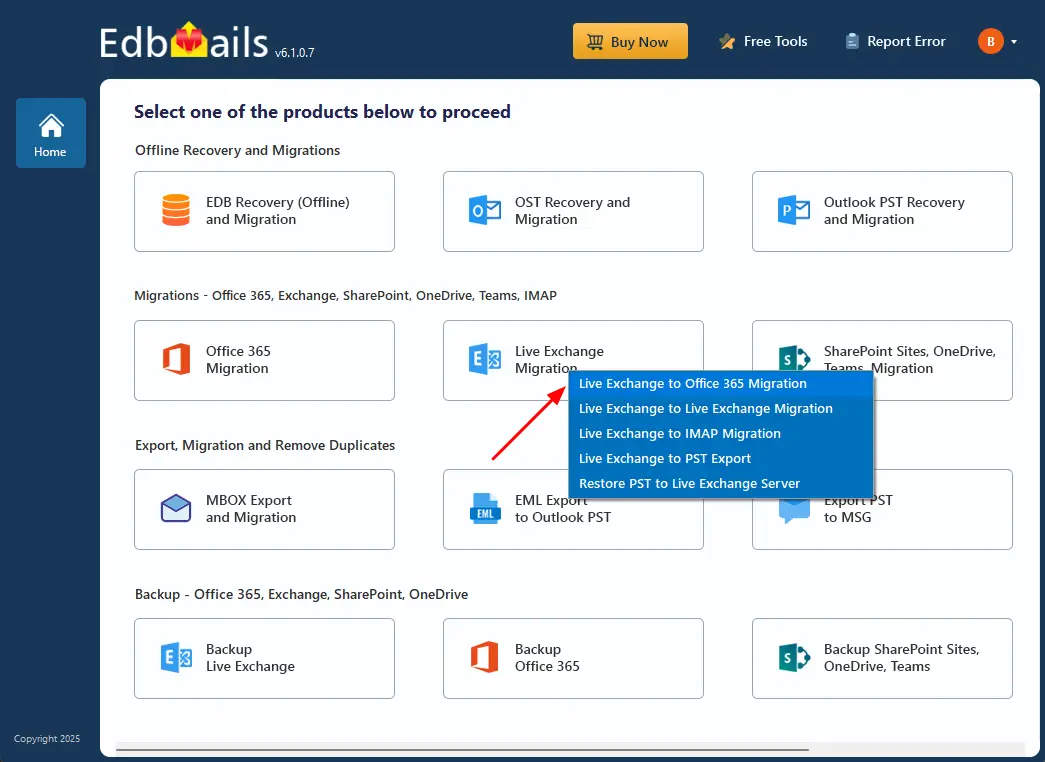
- Select 'Live Exchange to Office 365 Migration' option.
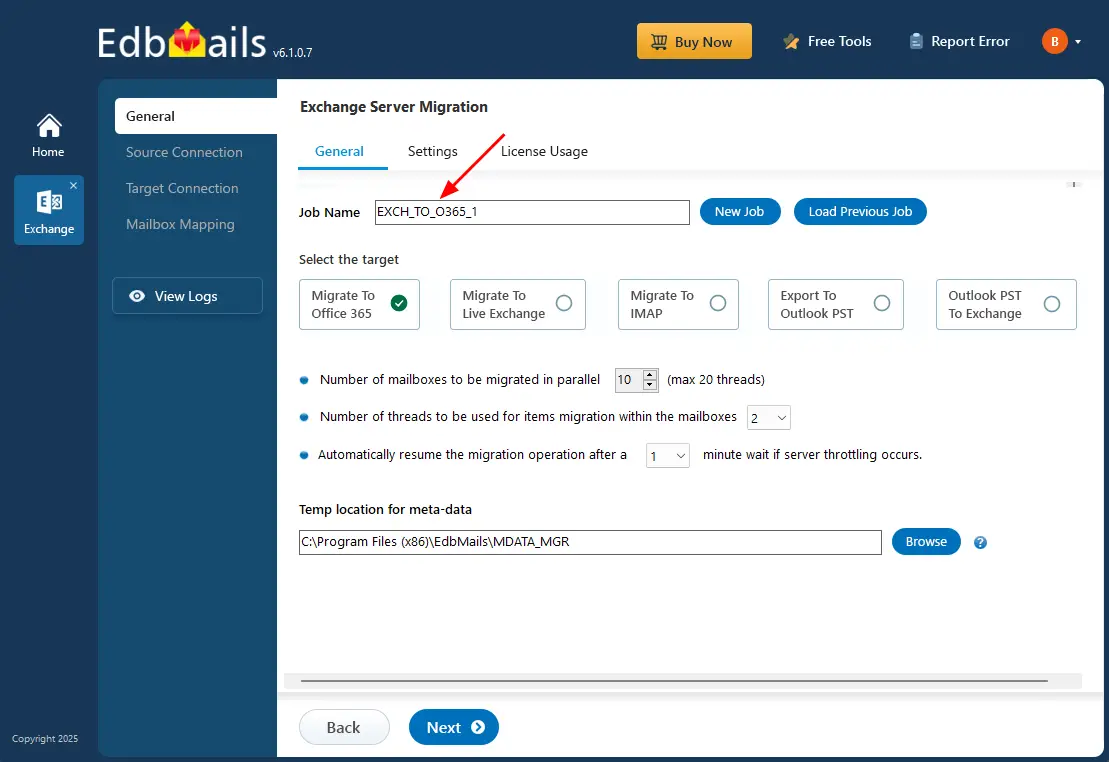
- Use the default job name or click 'New Job' to modify the job name.
- Download and install the EdbMails application on your Windows computer that can be connected to your Source Exchange 2016 server.
Step 2: Connect to source Exchange 2016 server
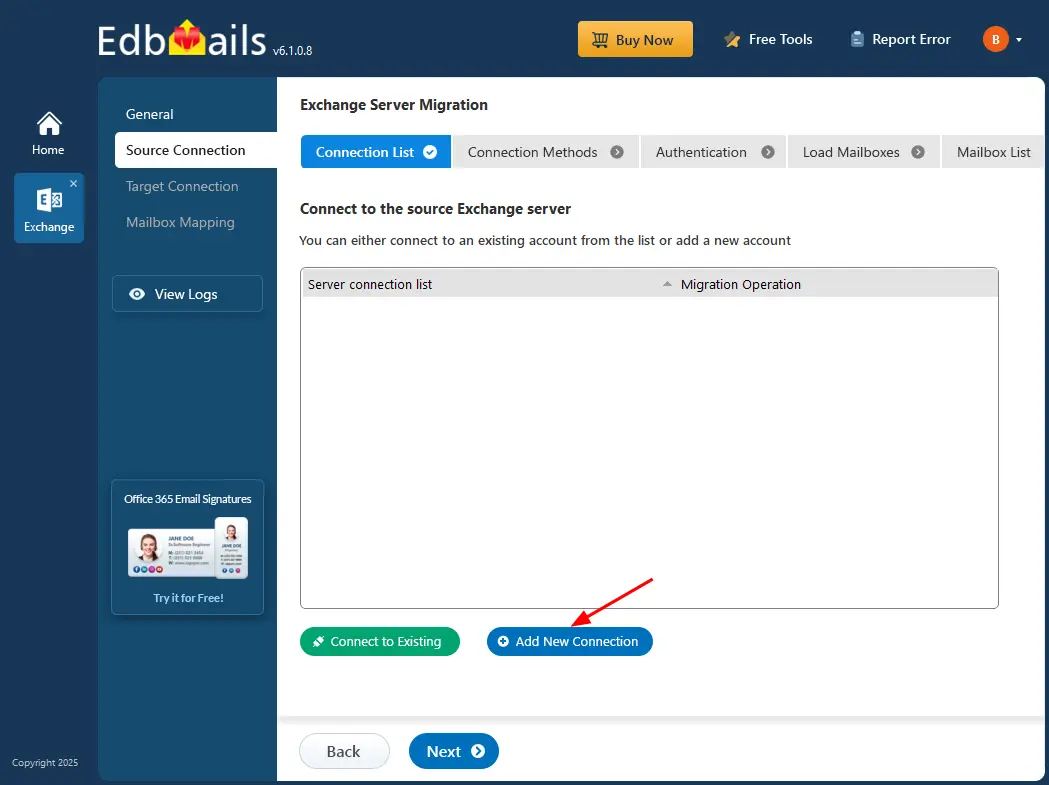
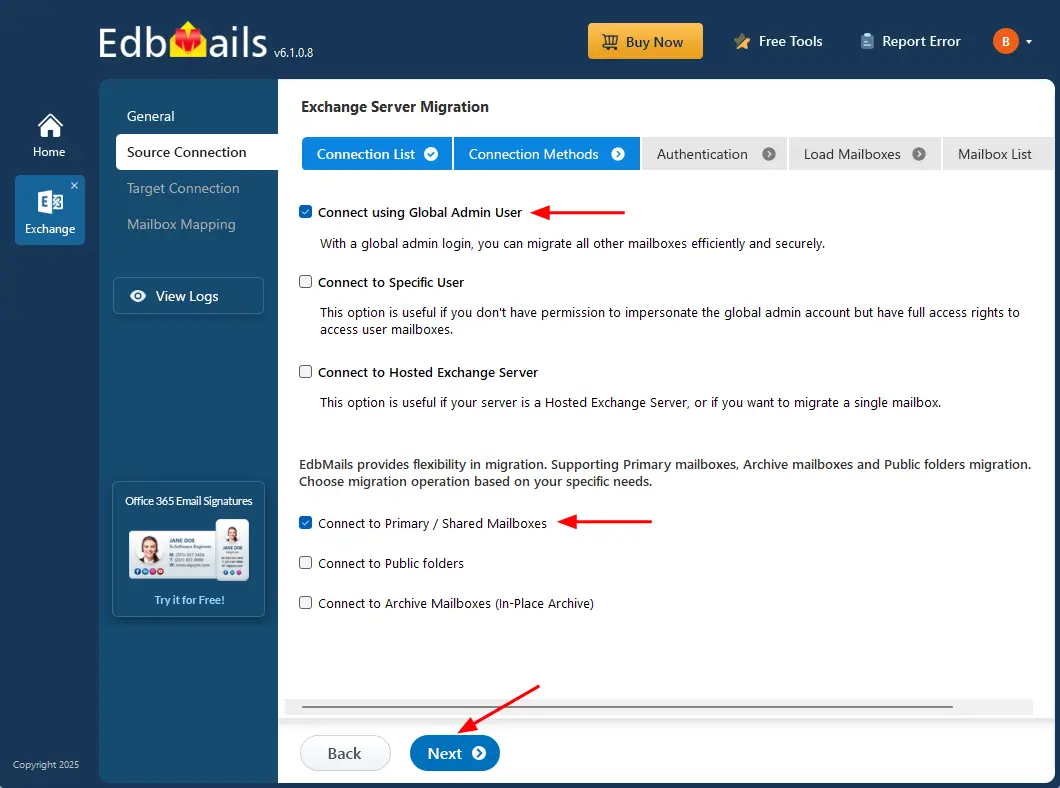
- To create a new connection to your source Exchange 2016 server, click ‘Add New Connection’. If you’ve previously saved a connection, select it from the list and click ‘Connect to Existing’.
- Select the required connection options and click the ‘Next’ button.
See Different options to connect to Exchange server in EdbMails.
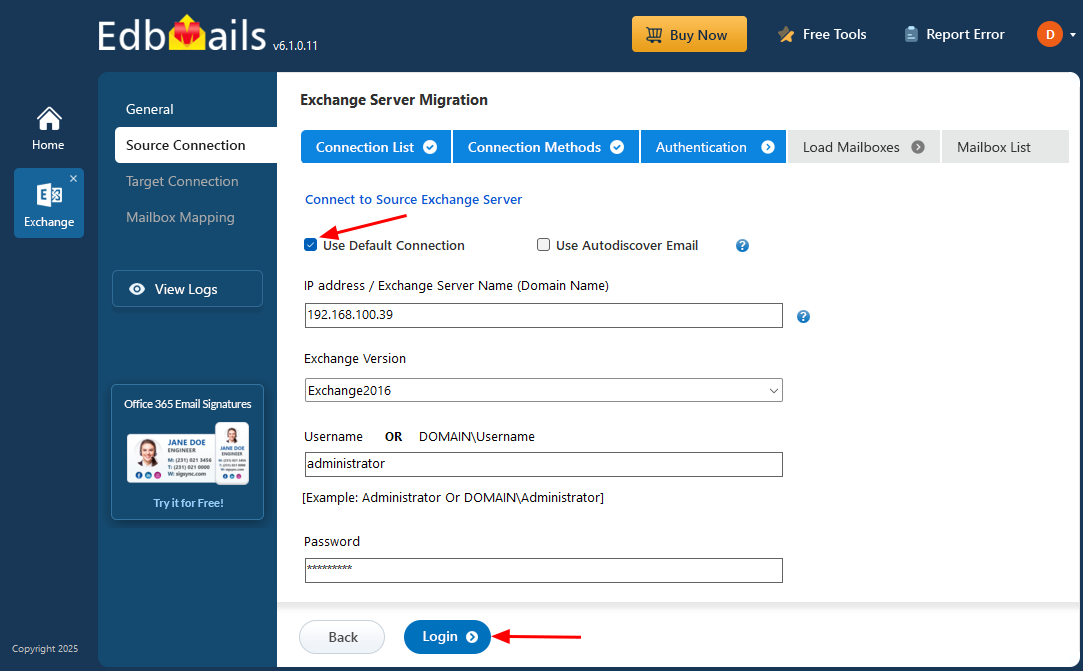
- Enter your source Exchange 2016 server details, then click ‘Login’ to continue.
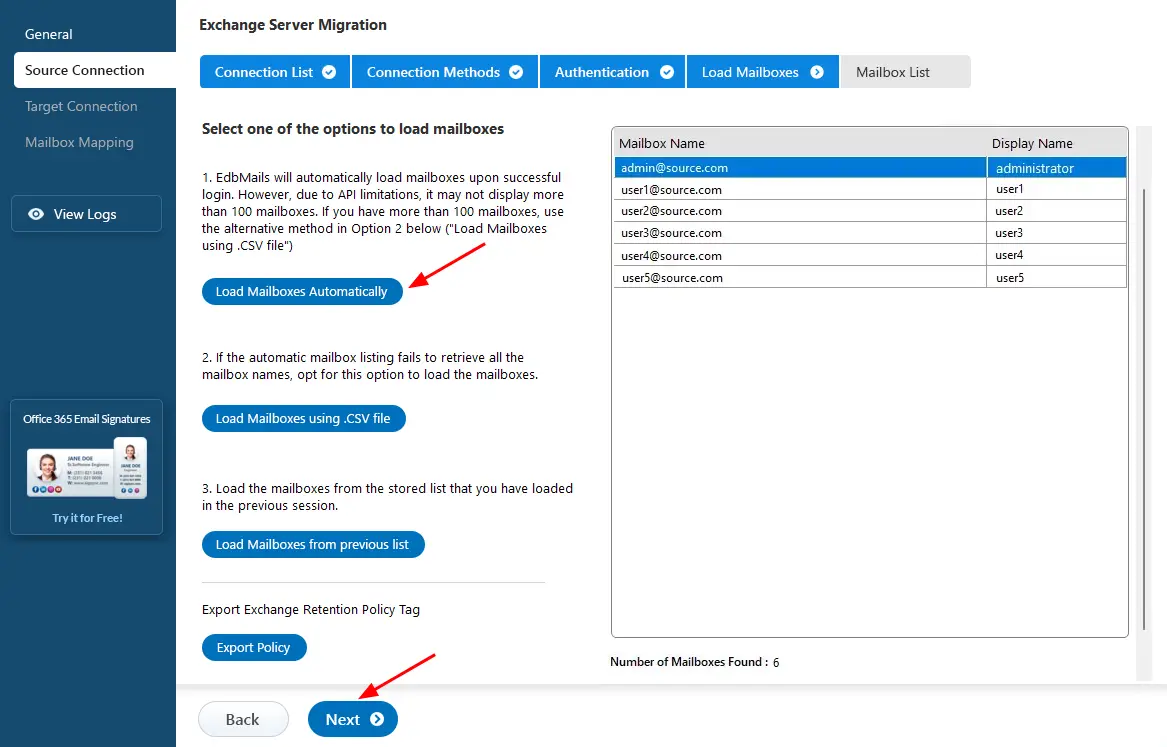
- EdbMails auto-detects and loads mailboxes from your Exchange 2016 server. However, due to Microsoft API limits, only the first 100 mailboxes may appear. To load more, use the CSV file import option.
Step 3: Select the Exchange 2016 mailboxes
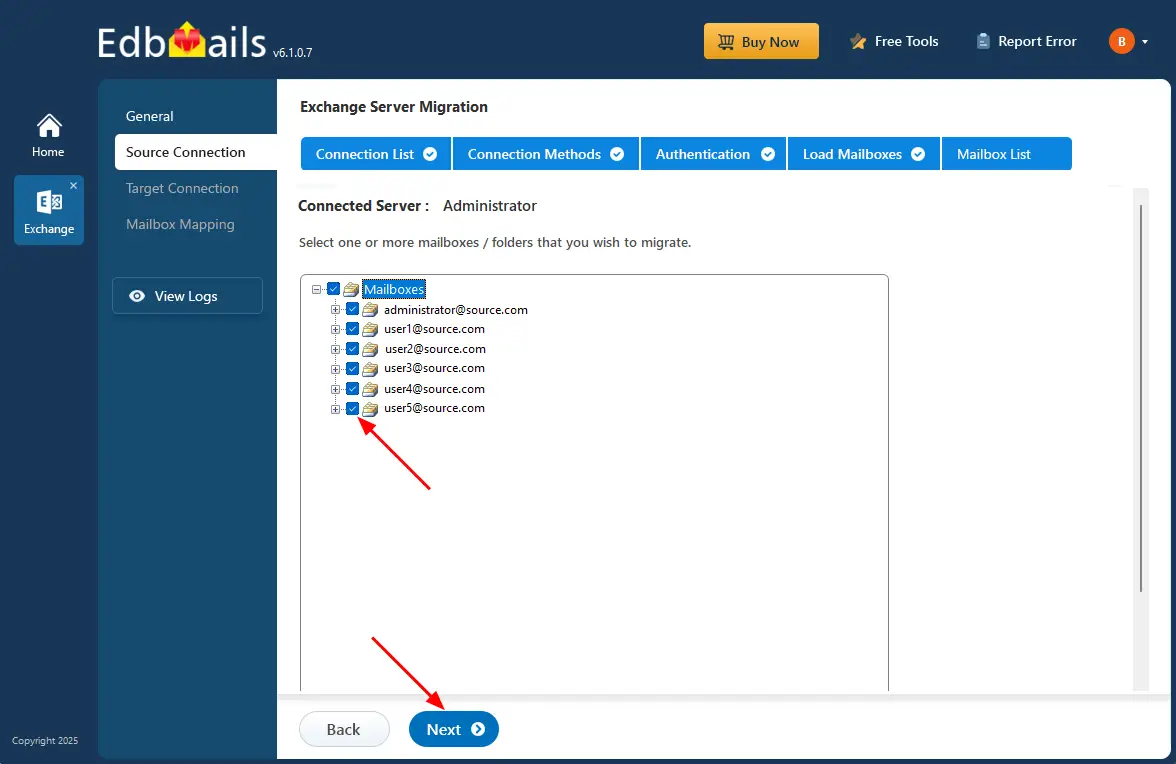
- Select the mailboxes and folders you want to migrate from your Exchange 2016 server, then click ‘Next’ to proceed.
Step 4: Connect to target Office 365 server
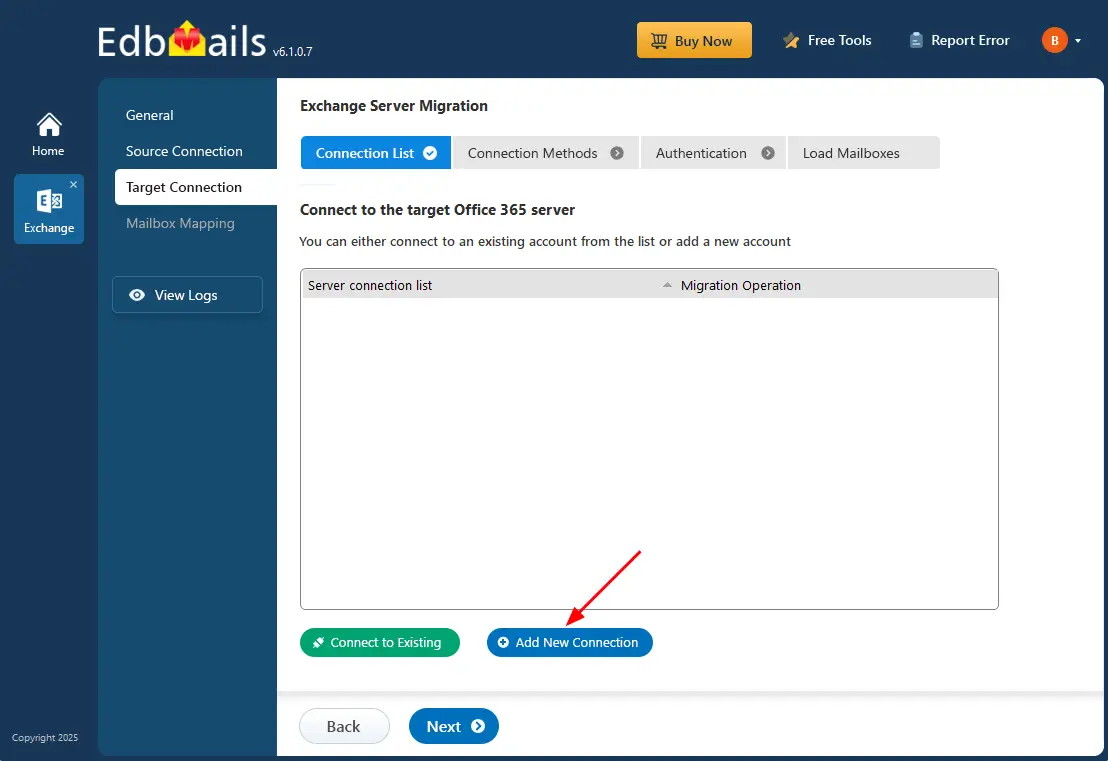
- To establish a fresh connection with the target Office 365, click ‘Add New Connection’. If you have an existing connection, select it from the list and click ‘Connect to Existing’ to continue..
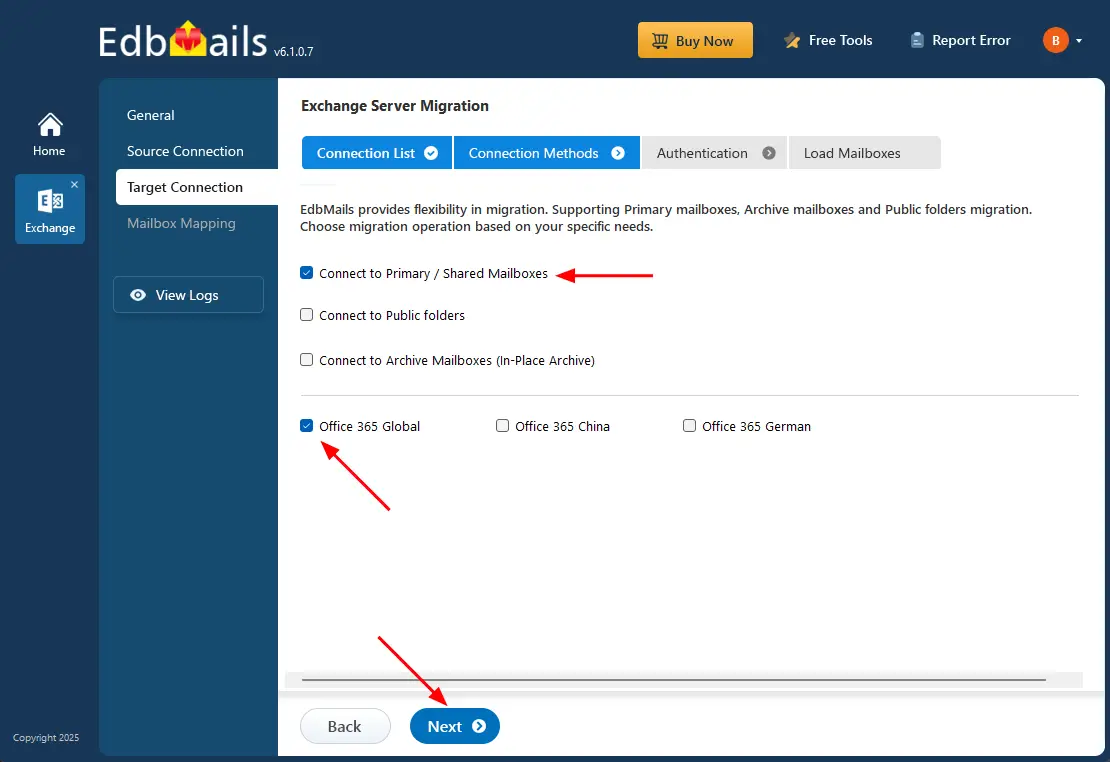
- Select the required connection options and click the ‘Next’ button.
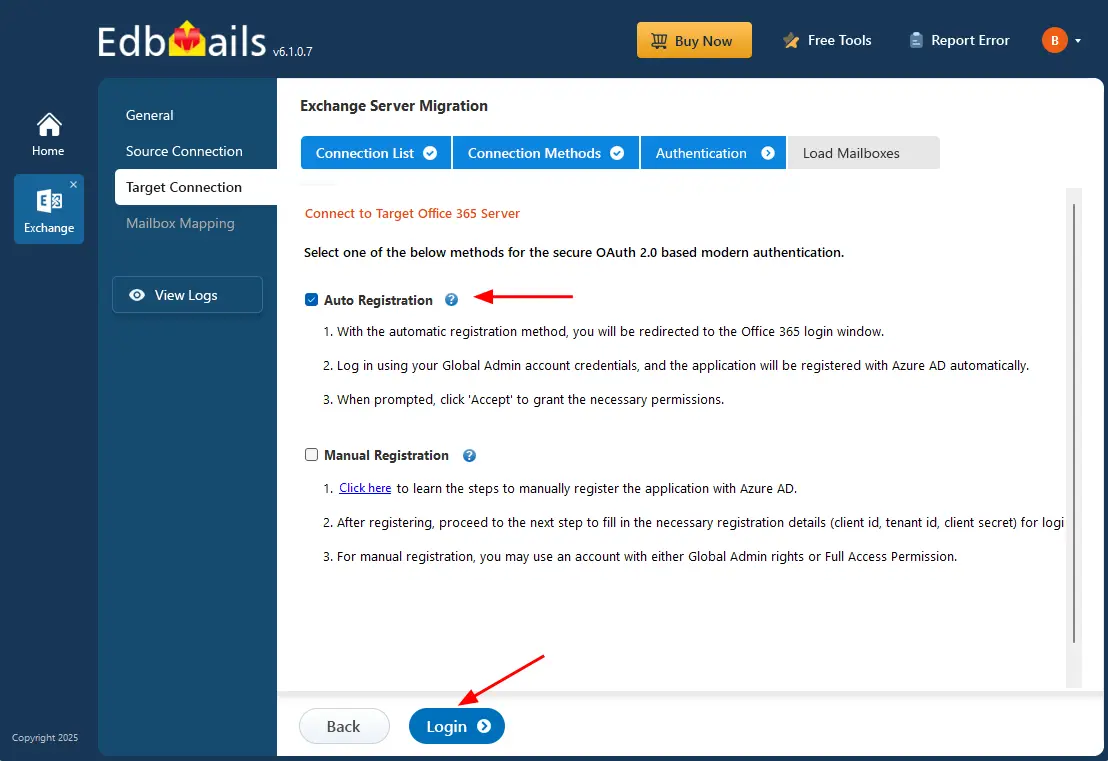
- Choose an authentication method to connect to Office 365, then click the ‘Login’ button to proceed.
Connect to Office 365 server using secure modern authentication.
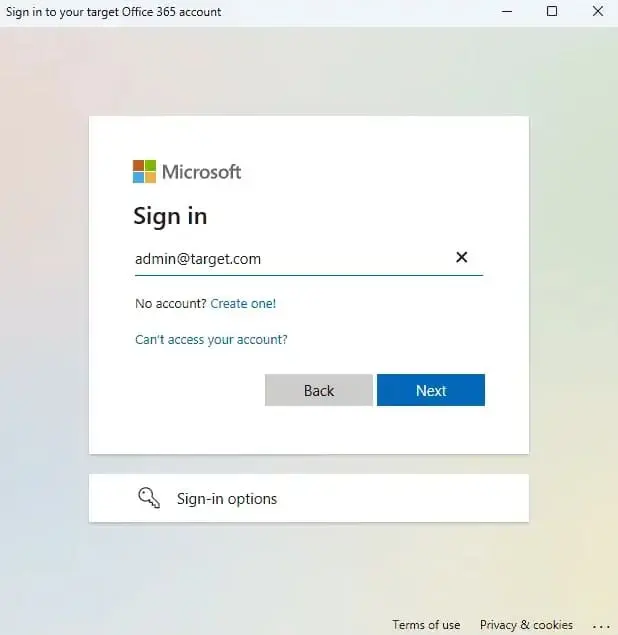
- Authenticate on Microsoft sign-in page.
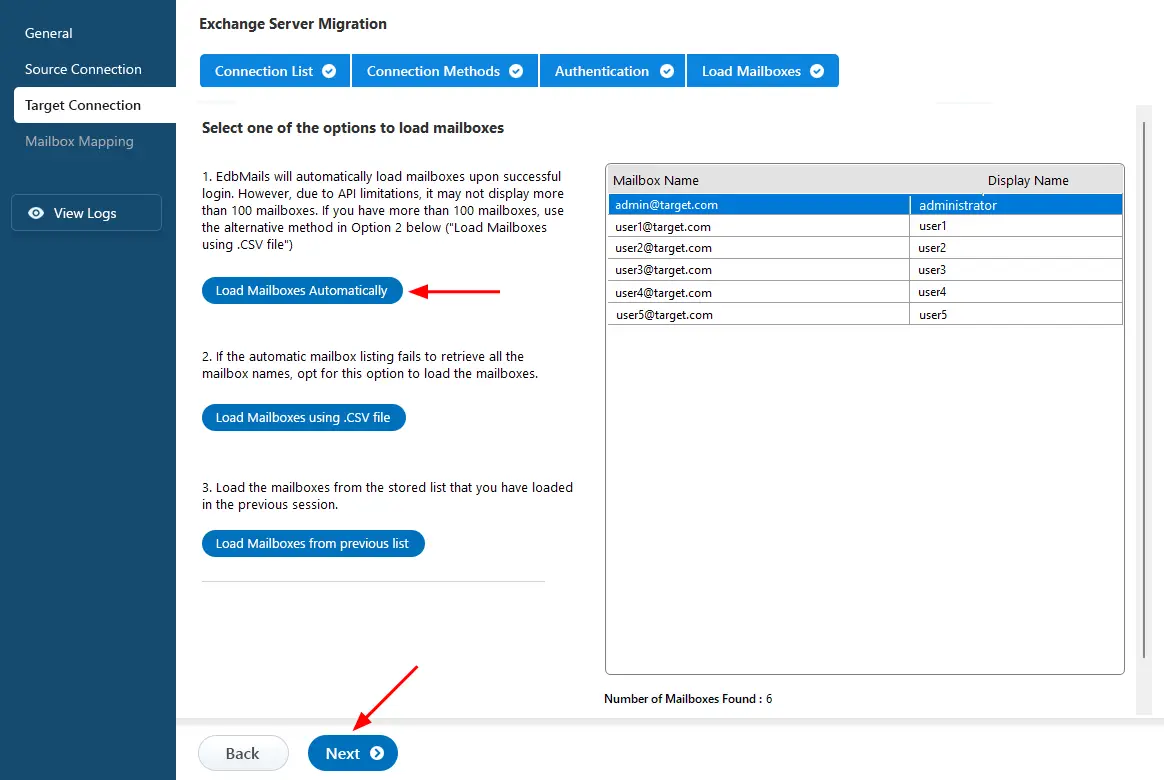
- Choose a method to load the Office 365 mailboxes and click ‘Next’. If you'd like to load mailboxes using a CSV file, follow the instructions below.
Step 5: Exchange 2016 to Office 365 mailboxes mapping
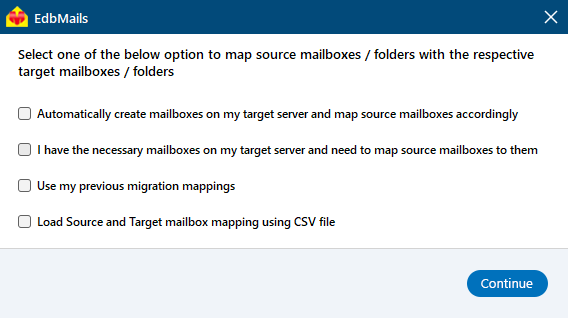
- Choose one of the available mapping options.
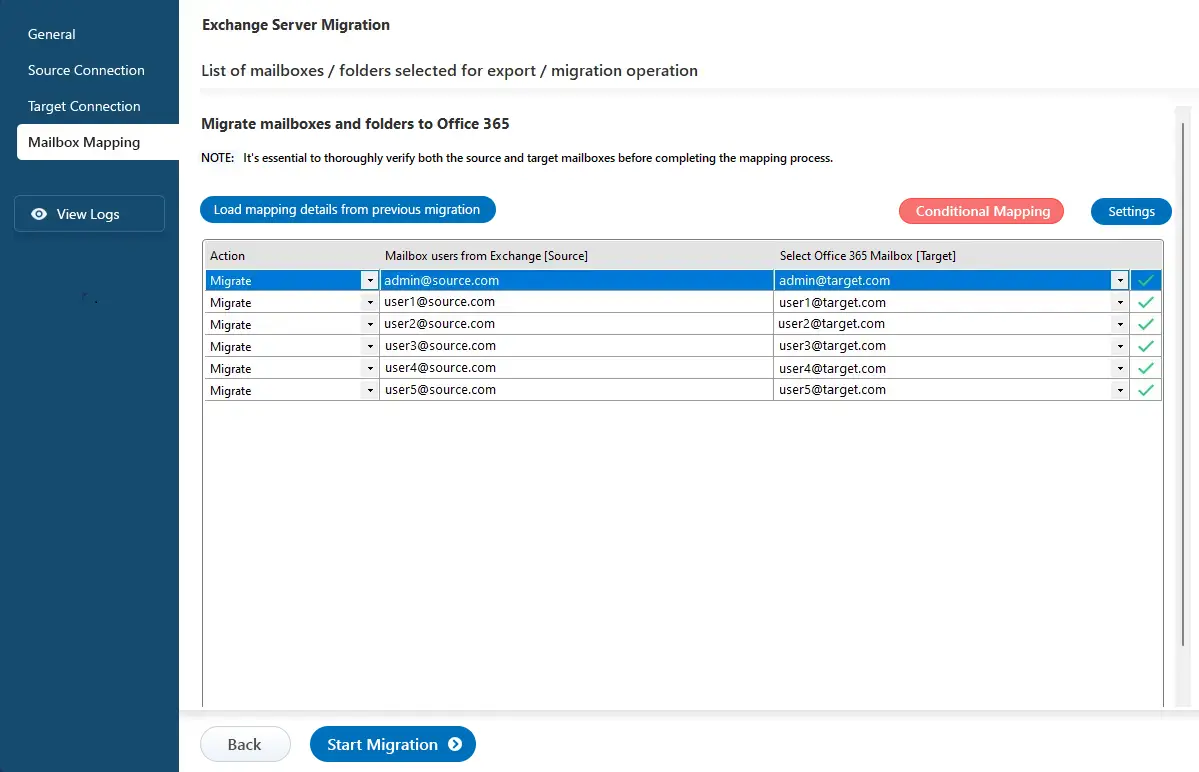
- EdbMails provides an automatic feature to create mailboxes on the target Office 365 server and map mailboxes and folders between Exchange 2016 and Office 365. Alternatively, you can manually map mailboxes or use the CSV file method for mapping.
Step 6: Start Exchange 2016 to Office 365 migration
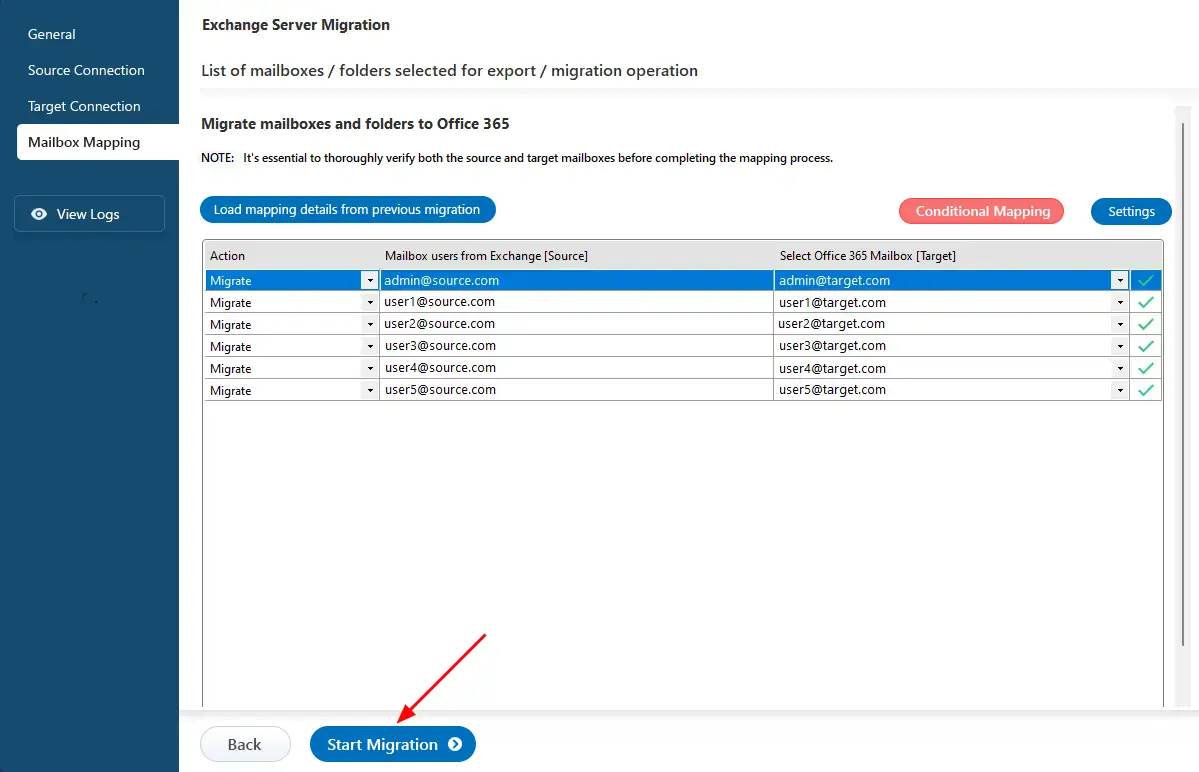
- After completing the mailbox mapping, click the ‘Start Migration’ button.
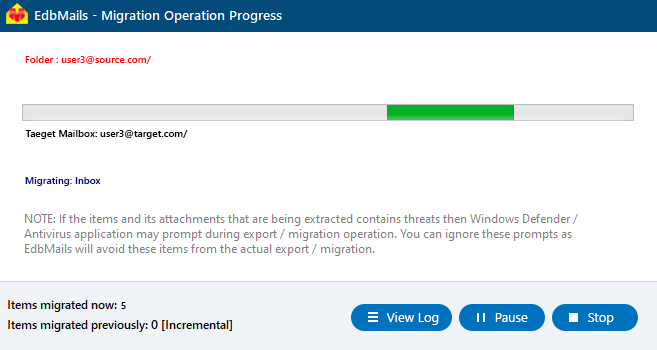
- Monitor the migration progress using the progress bar. Once the migration is complete, EdbMails will display a completion message and prompt you to view the migration status. Click the ‘View Logs’ button to access the detailed migration report.
Exchange 2016 to Office 365 post migration tasks
- Step 1: Verify that all mailboxes have been migrated successfully
It is important to verify that all mailboxes have been transferred to Office 365 and that all data has been migrated correctly. Ask your users to log in to their accounts and check if they have all their emails, contacts, calendars. It is also a good practice to change the passwords.
- Step 2: Update the MX records to point to Office 365
Update the MX record in your DNS to enable and receive emails on Office 365. In addition, configure the Autodiscover record to allow Outlook to connect to the migrated mailboxes.
- Step 3: Notify and train your users to be familiar with Office 365
After the migration, you should notify your users so that they can start using Office 365. You may also want to provide them with suitable training or documentation to help them get started with the new email system.
- Step 4: Test email connectivity
It is important to test the email connectivity after the migration to ensure that you are able to send and receive emails correctly.
- Step 5: Create a new Outlook profile for users in the new domain
Ensure you have the latest version of Outlook installed to avoid compatibility issues. Configure the Outlook profile for each user in your domain if Outlook has problems connecting to Office 365 mailboxes.
- Step 6: Decommission and uninstall Exchange server 2016
Wait for a few days and test if everything is working as expected. Finally, uninstall and decommission Exchange server 2016.
- Remove the server from any database availability groups (DAGs) it is a member of.
- Remove any send connectors, receive connectors, and OAB (offline address book) generation servers that are configured on the server.
- Remove the server from the organization by running the Remove-ExchangeServer cmdlet in the Exchange Management Shell.
- Uninstall Exchange 2016 from your computer
- Open the Control Panel and navigate to Programs and Features.
- Select Microsoft Exchange server 2016 and click Uninstall.
- Follow the prompts to uninstall Exchange from the server.
- Remove the server from Active Directory by decommissioning it.
- Open the Active Directory Users and Computers console.
- Right-click the server object and select Delete.
See the list of post-migration tasks to complete after you finish the Office 365 migration.
- Step 1: Verify that all mailboxes have been migrated successfully
Exchange 2016 Migration to Office 365 Troubleshooting
Refer to the Exchange migration troubleshooting guide for potential solutions to any migration errors you may encounter.
Benefits of Using EdbMails for Exchange 2016 Migration to Office 365
EdbMails offers a comprehensive and reliable solution for organizations planning to migrate Exchange 2016 to Office 365. Its advanced features and intuitive design make the entire process efficient, secure, and straightforward for both IT professionals and end-users. Below are the key benefits of using EdbMails for your Exchange 2016 to Office 365 migration:
- User-Friendly Interface EdbMails features an intuitive interface that simplifies the migration process for users of all technical levels. With clear, step-by-step migration instructions, both administrators and non-technical users can perform migrations confidently and efficiently.
- Incremental Migration The incremental migration feature allows organizations to transfer only new or modified data after the initial migration. This approach minimizes bandwidth usage, reduces duplication, and ensures a faster, more efficient data transfer.
- Concurrent Mailbox Migration EdbMails supports concurrent mailbox migration, enabling multiple mailboxes to be migrated simultaneously using a multi-threaded architecture. This significantly speeds up the migration from Exchange 2016 to Office 365, optimizes system resources, and ensures minimal downtime during the process.
- Secure Modern Authentication for Office 365 Security is a core focus in any migration. EdbMails integrates modern Office 365 authentication (OAuth 2.0) and TLS encryption, ensuring your credentials remain safe. The software redirects users to Microsoft’s official login page for authentication, guaranteeing a secure migration environment.
- Migrate Mailboxes, Folders, and Additional Items EdbMails enables the migration of a wide range of mailbox items, including emails, contacts, calendars, tasks, notes, journals, and attachments. Whether you’re performing a full Exchange 2016 migration to Office 365 or a selective data transfer, all items are preserved with complete folder hierarchy and metadata integrity.
- Exchange Public Folders to Office 365 Migration Beyond standard mailboxes, EdbMails also supports the migration of Exchange public folders to Office 365, including in-place archives and shared mailboxes. The tool’s user-friendly interface eliminates the need for complex configurations, allowing you to migrate data effortlessly without technical expertise.
- Migrate with Zero Downtime One of EdbMails standout advantages is its ability to migrate Exchange 2016 to Office 365 with zero downtime. Users can continue accessing their mailboxes during the migration without any disruption or the need to take servers offline, ensuring continuous business productivity.
Frequently Asked Questions (FAQ)
How to migrate Exchange 2016 Public folders to Office 365?
Here’s how you can perform Exchange 2016 public folder migration to Office 365 in a few simple steps:
- Step 1: Create Public folders in Office 365 from the Admin Center
- Step 2: Download and Install EdbMails software for Exchange migration
- Step 3: Connect to Exchange 2016 Public folders
- Step 4: Select Exchange 2016 public folders for migration
- Step 5: Connect to Office 365 Public folders
- Step 6: Start the Public folder migration from Exchange 2016 to Office 365
After the migration is complete, you can log in to your Office 365 account to verify that the public folder data has been successfully migrated. Also learn how to backup and export the Exchange Public folder to PST.
Will the migration affect my existing email and calendar data?
Do I need to install any new software or updates after the migration?
Which license do I need to migrate from Exchange 2016 to Office 365?
Does EdbMails support cutover, staged, and hybrid migration methods when moving from Exchange 2016 to Office 365?


