Exchange 2007 to 2019 Migration
Migrating from Exchange Server 2007 to Exchange 2016 or 2019 might be challenging, but with the EdbMails Exchange Migration tool, the process becomes simple and reliable. The step-by-step guidance provided by EdbMails ensures a smooth and secure transition with minimal effort. As Microsoft has ended support for Exchange 2007, upgrading to a newer Exchange environment is essential to maintain security, performance, and compatibility with modern systems. EdbMails makes this upgrade effortless by enabling direct mailbox migration without downtime or data loss.
With its advanced automation, secure data handling, and built-in compatibility management, EdbMails helps organizations move confidently to Exchange 2016 or 2019. It minimizes disruptions, resolves security and compatibility challenges, and ensures that businesses can take full advantage of the latest Exchange features and improved reliability.
Pre Migration Activities for Exchange Server Migration
Before upgrading Exchange 2010 to 2019, ensure that the source and destination Exchange environments are ready and you meet the system requirements. By preparing the source and destination environments correctly in advance, you can perform a hassle free Exchange server 2010 to 2019 migration.
- Step 1: Prepare a clean destination Exchange environment
Based on your Destination Exchange server version, click on the below link accordingly
- Step 2: Create a forest trust (optional)
Know how to create a forest trust on Windows Server 2008
This process will most likely reveal if there are any issues, otherwise you have to fix during migration.
Note: Creating a trust relationship is not required for SBS based environments.
- Step 3: Configuration send and receive connectors
- Create an SMTP Connector to Route Mail to a Specific Host
- Managing Connectors in Exchange Server 2010 SP3, Exchange Server 2010 SP2
- Create a Send connector for email - Exchange 2013
- Receive connectors for email - Exchange 2013
- Create a Send connector for email - Exchange 2016 / 2019
- Receive connectors for email - Exchange 2016 / 2019
Note: During the Exchange server installation process, a default receive connector will be created
- Step 4: Create domain and mailboxes on the target server
Note: Before Exchange server migration, mailbox-enabled user accounts should be created on your target server for each user which are included in the migration.
- You can migrate domain accounts between the Active Directory forests automatically using Active Directory Migration Tool (ADMT) or you can do it manually by creating the accounts on the target forest.
- You can create mailboxes and the corresponding users automatically mapped during the mailbox mapping.
- Step 5: Ensure that the admin account used to connect to the source server belongs to the appropriate Active Directory group and its mailbox is configured.
- Ensure that selected account belongs to the Domain Admins group.
- Ensure that this account has a valid, non-hidden mailbox on the source Exchange server.
- Step 6: Confirm the Admin account configuration and rights that will be used to connect to the Source and target server
- Make sure the following roles are assigned to the target admin account
- ApplicationImpersonation rights
- View-Only Recipients rights
- View-Only Configuration rights
- Assigned mailboxes to the Public Folders
- Verify the access to the Exchange server's service using IP or Domain Name
https://[Exchange_IP]/EWS/Exchange.asmx or
https://[Exchange_Name]/EWS/Exchange.asmx
- If a client connects from outside the local network then client required to have external URL configured correctly:
Open the Exchange Management Shell on the target or source server and verify if the ExternalUrl is defined:
Command: Copy & Paste it on PowerShellGet-WebServicesVirtualDirectory | fl
If there's no address in the ExternalUrl line it needs to be defined. Execute the following script:
Command: Copy & Paste it on PowerShellGet-WebServicesVirtualDirectory | Set-WebServicesVirtualDirectory -ExternalUrl https://[Target server's internet name]/EWS/Exchange.asmx
- Make sure the following roles are assigned to the target admin account
- Step 7: Configure the maximum size limit of sent mail and throttling settings
- To speed up the migration process, change the throttling settings on target Exchange.
- To allow migration of big items, change message size limits on target Exchange.
- Step 1: Prepare a clean destination Exchange environment
Exchange 2007 to 2019 Migration using EdbMails
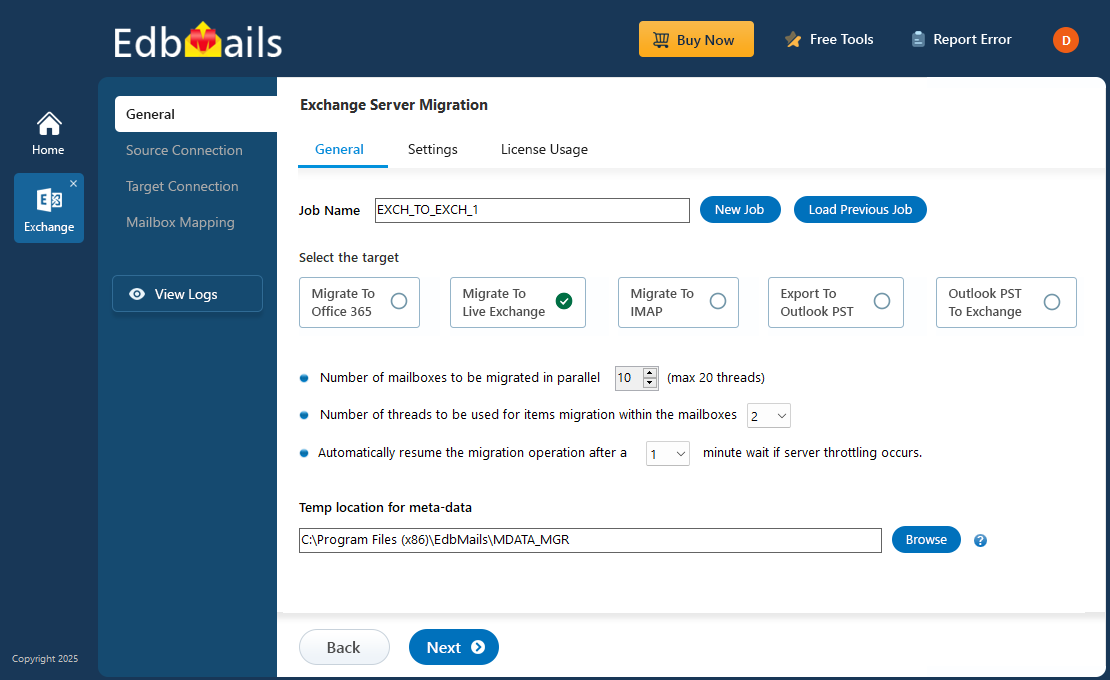
Step 1: Install and Set Up EdbMails
- Download and install EdbMails Exchange migration software on a Windows system
- Launch the application and log in with your email and password or click the Start Your Free Trial button.
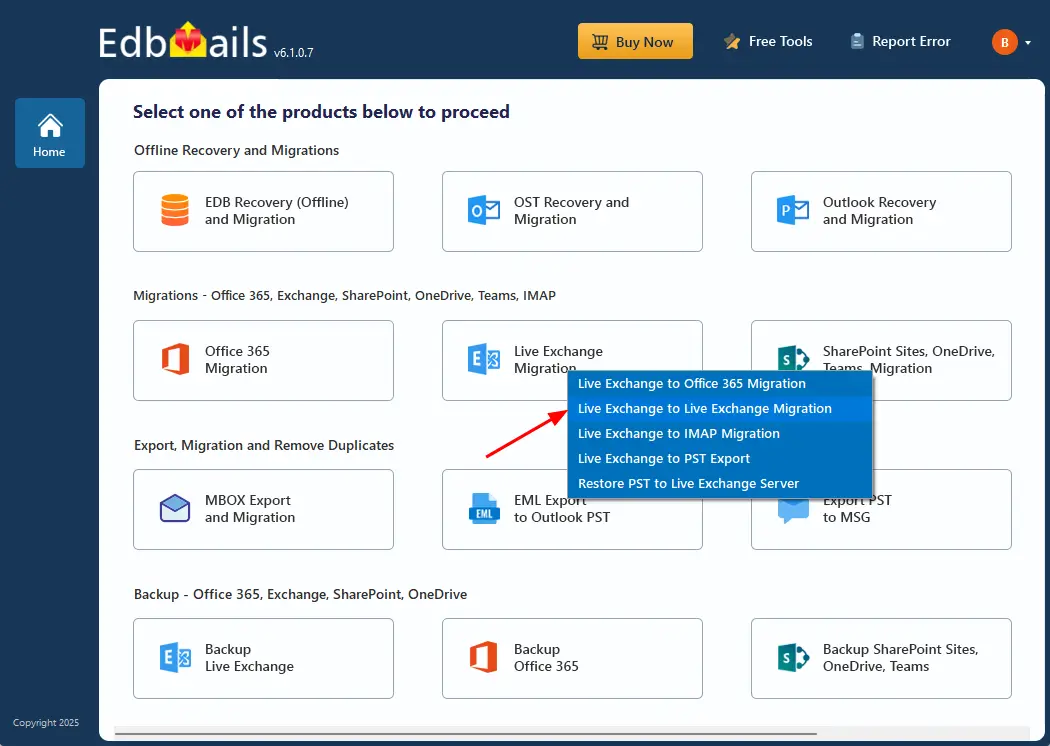
- Choose ‘Live Exchange Migration’ → ‘Live Exchange to Live Exchange Migration’.
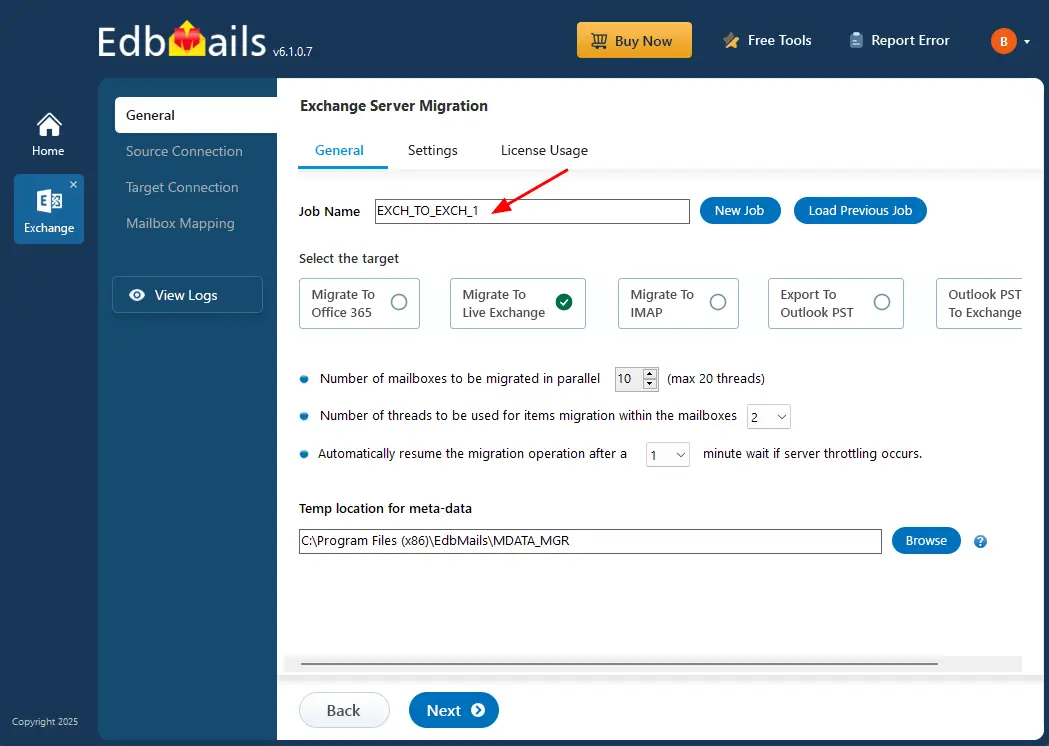
- You can either keep the default job name or click the ‘New Job’ button to change the job name.
Step 2: Connect to Source Exchange 2007 server
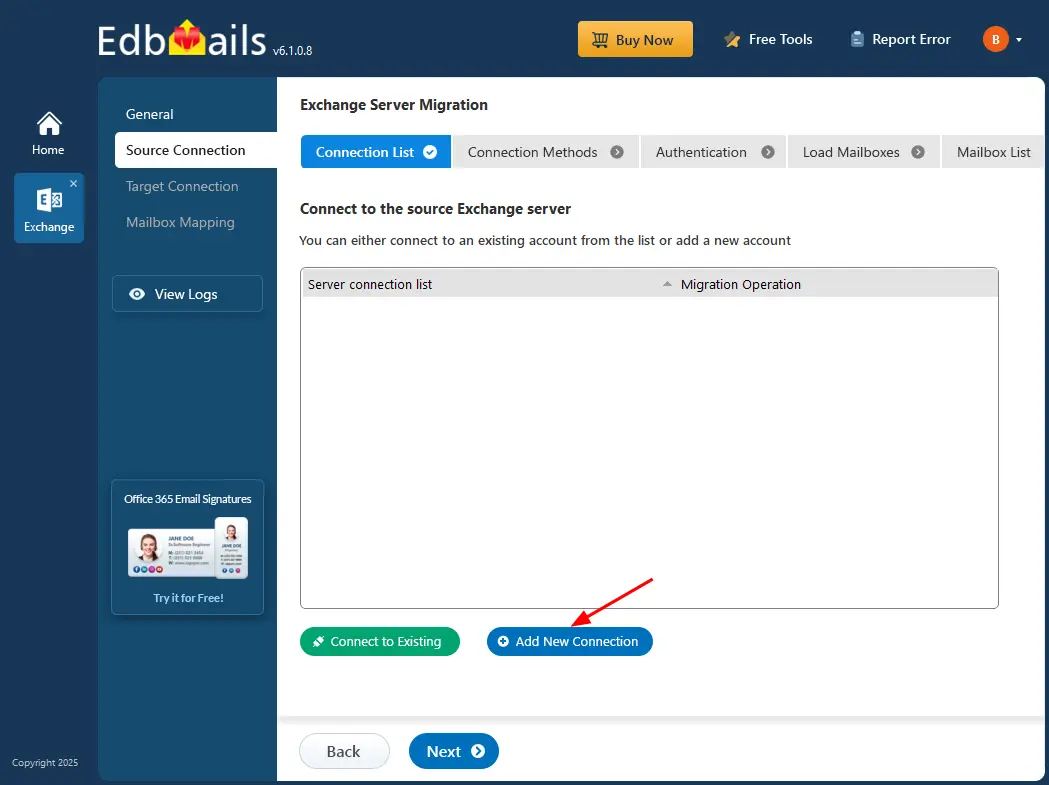
- Click the ‘Add New Connection’ button to establish a new connection to the source Exchange server. To use a previous connection, select it from the connection list and click the ‘Connect to Existing’ button to proceed.
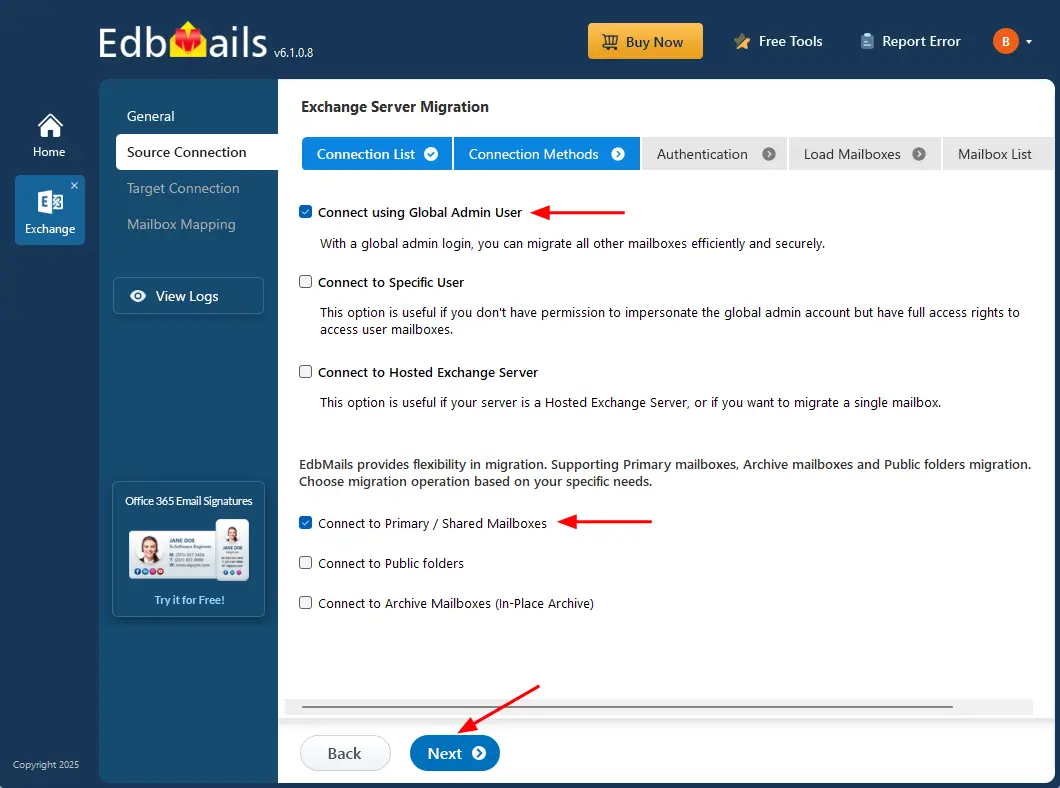
- Select the required connection methods and click the ‘Next’ button.
Different options to connect to Exchange server in EdbMails
- Enter the source Exchange server details and click the ‘Login’ button
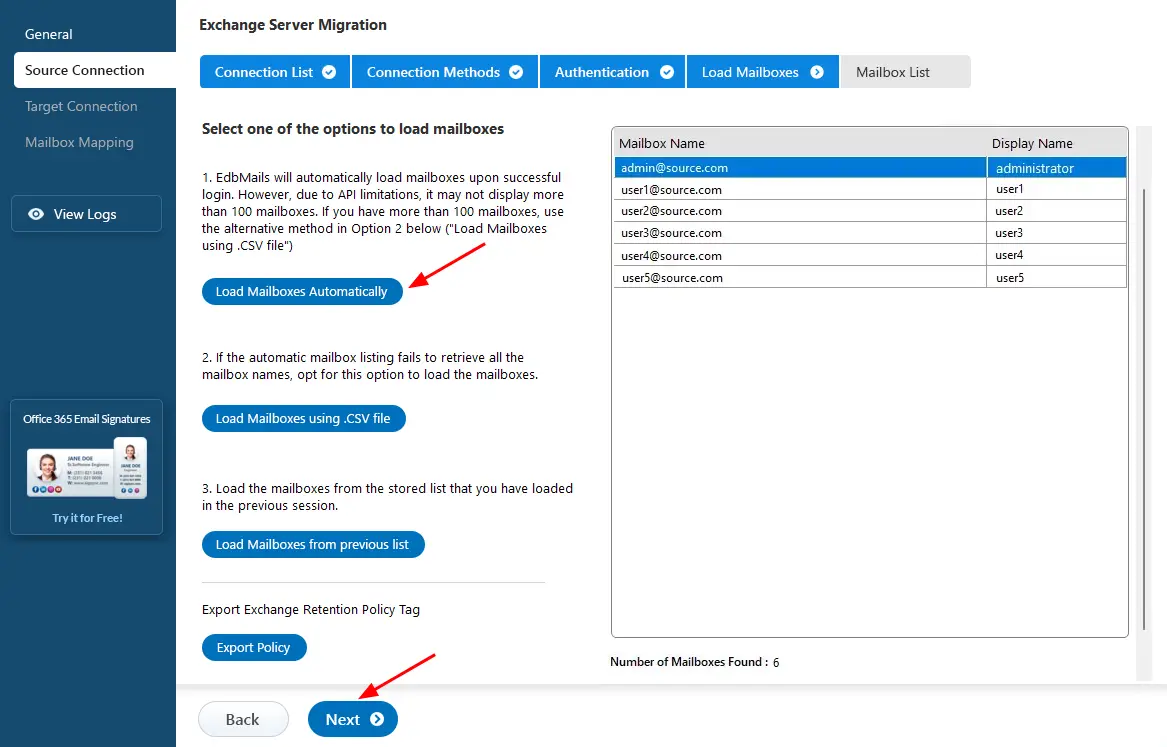
- Load mailboxes automatically or use a .CSV file if there are more than 100 mailboxes
Step 3: Select Exchange 2007 mailboxes
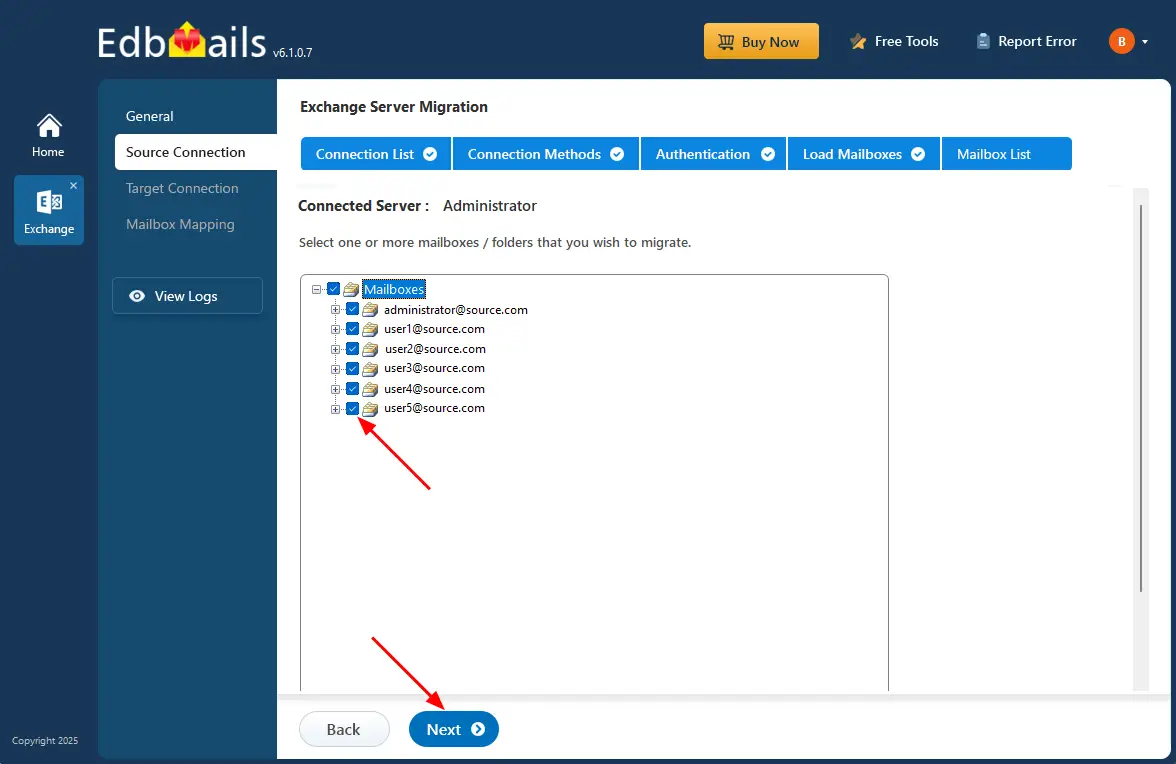
- Choose the mailboxes or folders you want to migrate from the source server and click ‘Next’.
Step 4: Connect to target Exchange 2019 migration
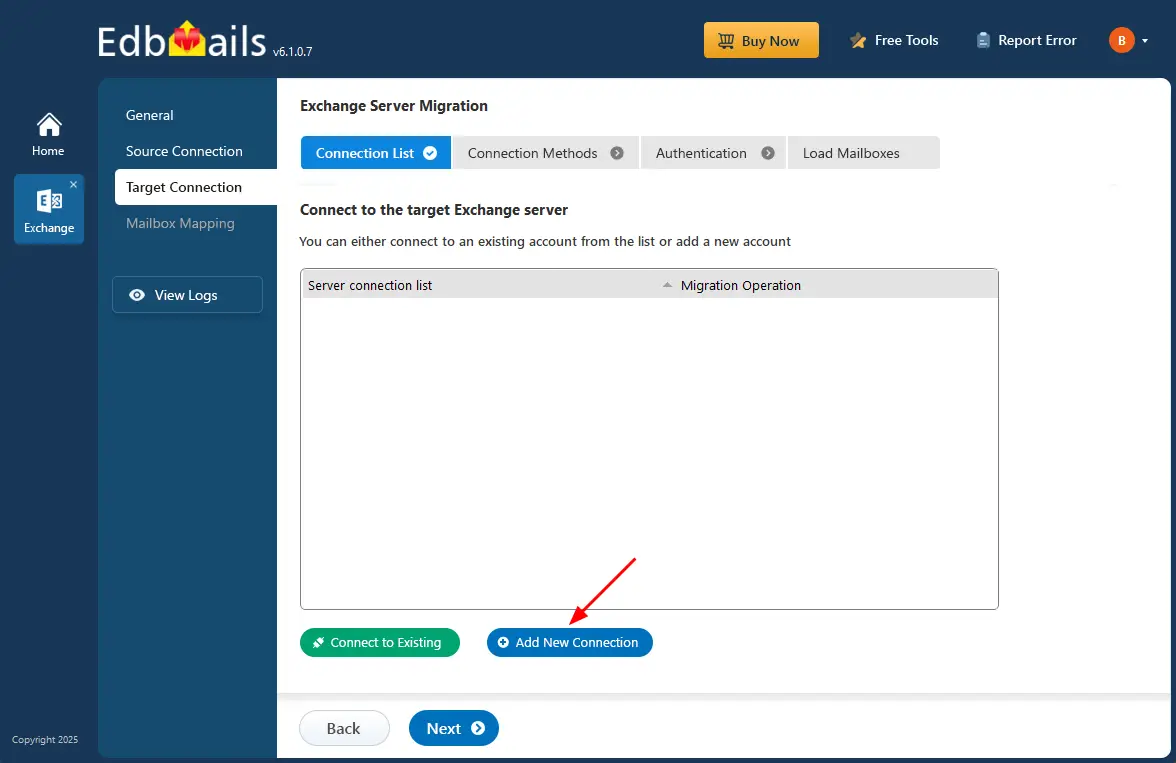
- Click the ‘Add New Connection’ button to set up a new target connection. If you’ve already connected before, simply choose the existing connection from the list and click ‘Connect to Existing’ to continue.
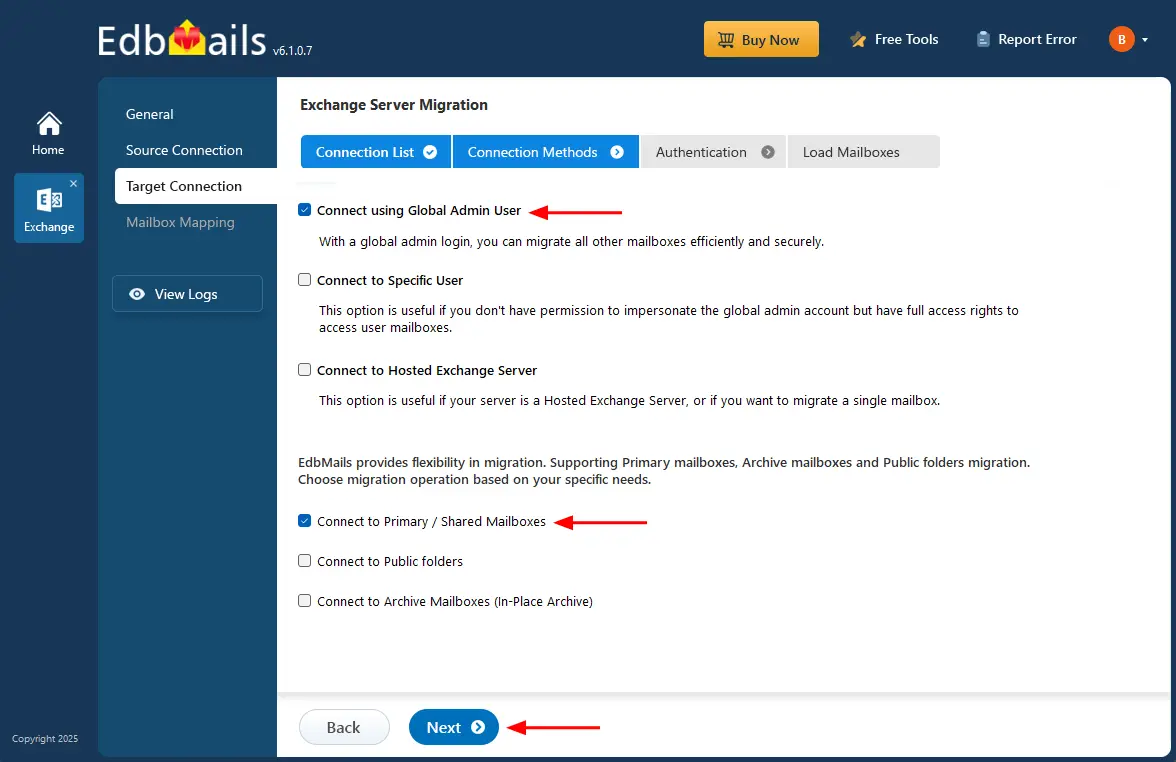
- Choose the required options to connect to your target Exchange server and click the ‘Next’ button.
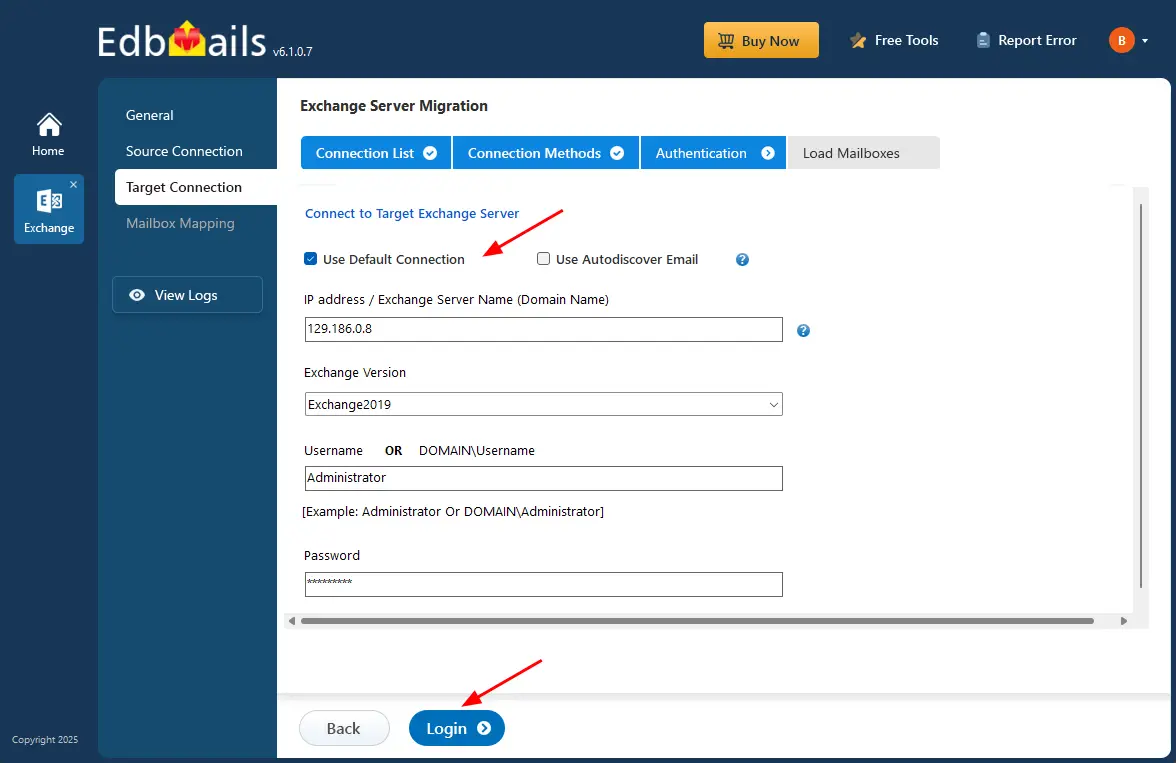
- Enter the target Exchange server details and click the ‘Login’ button.
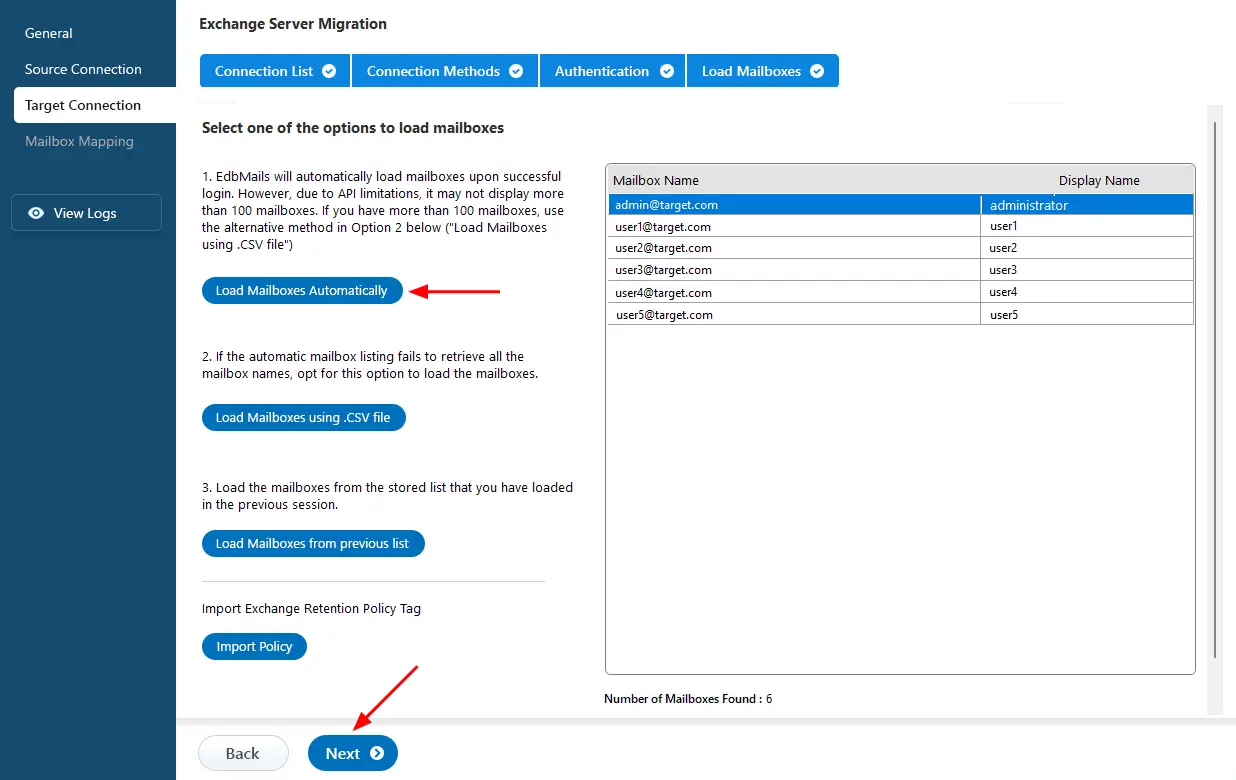
- Select one of the methods to load the mailboxes.
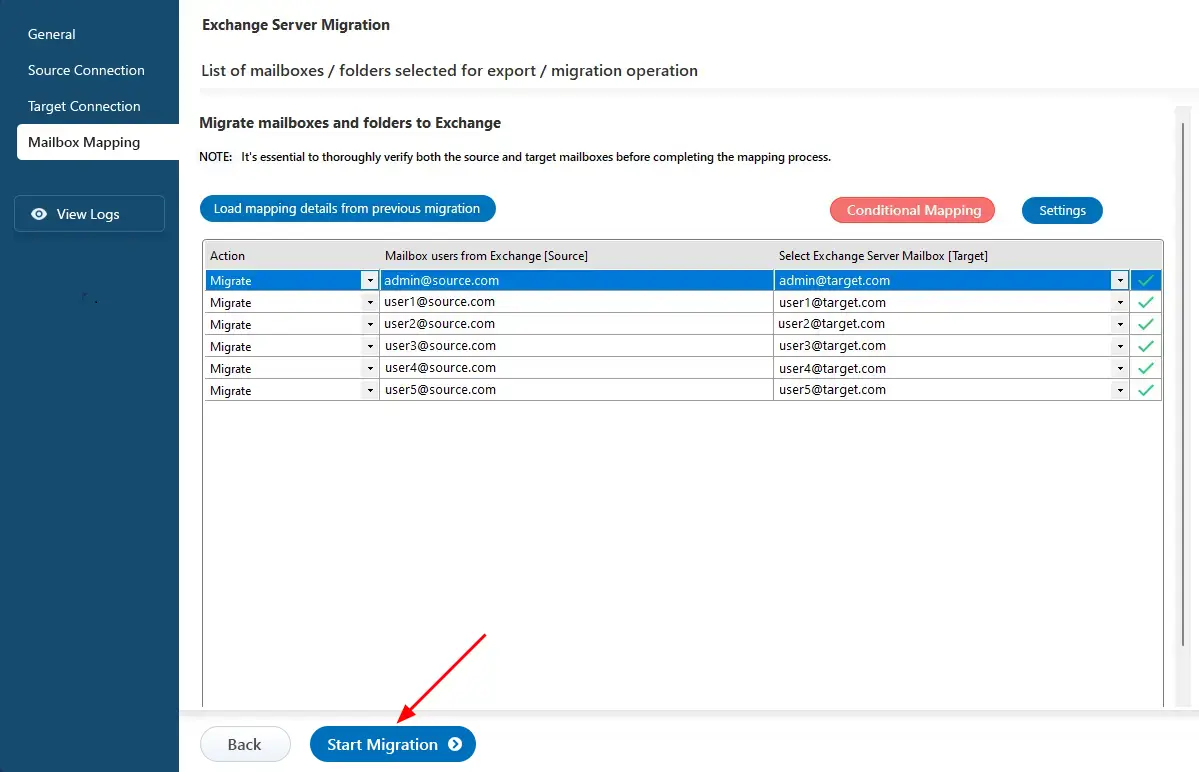
Step 5: Map source and target server mailboxes
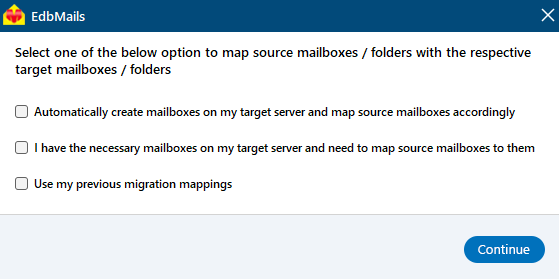
- Choose the required mailbox mapping option.
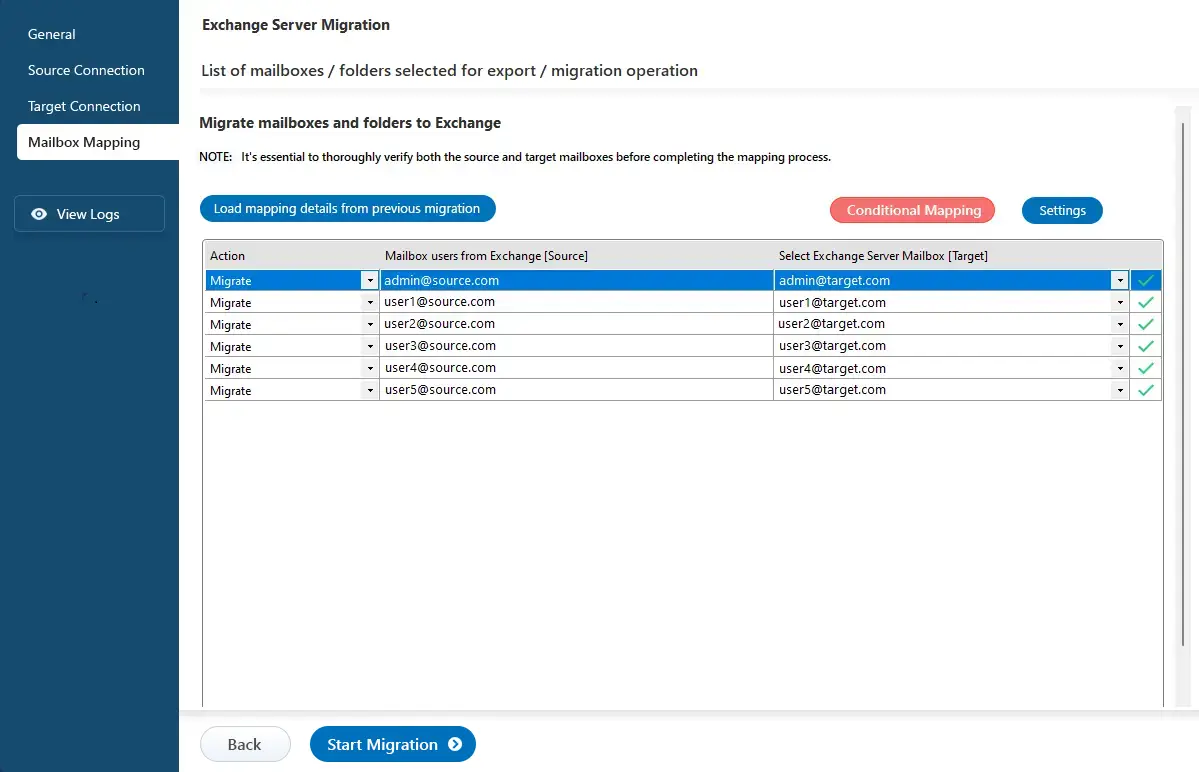
- EdbMails auto-map source and target mailboxes or do it manually. If needed, allow automatic mailbox creation on the target server.
Step 6: Start Exchange 2007 to Exchange 2019 migration
- Click ‘Start Migration’ to begin the process.
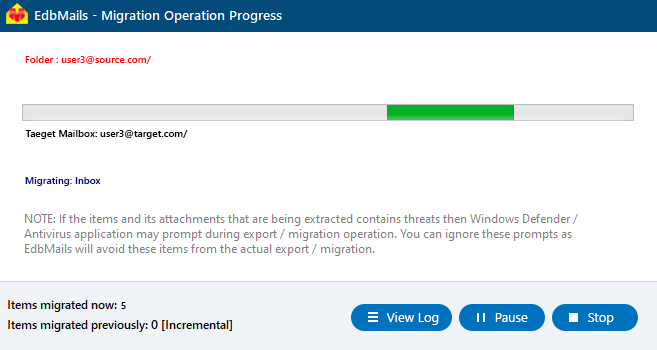
- Monitor the progress, then review the migration reports and verify the items on the target Exchange server.
Exchange 2007 to 2019 Migration: Post-Migration Steps
- Step 1: Update MX records, Autodiscover URL
To enable email to work with a new server, you need to update the MX records. In addition, you need to setup Autodiscover record.
- Step 2: Decommission your source Exchange server
Follow the instructions provided in this article on Microsoft's website to learn how to uninstall Exchange Server 2013.
- Step 3: Outlook profiles
If your Outlook has problems connecting to the new Exchange server, you need to create a new Outlook profile for each user in your domain.
- Step 1: Update MX records, Autodiscover URL
Benefits of Using EdbMails to Migrate Exchange 2007 to 2019
Migrating from Exchange 2007 to 2019 Exchange server can be a complex task, but EdbMails Exchange Migration software simplifies the entire process with reliability, speed, and security. Here are the key benefits:
- No Downtime or Data Loss: EdbMails ensures a seamless transition with zero downtime, allowing users to continue working without interruptions while preserving complete data integrity.
- Incremental (delta) Migration: Migrates only new or modified items during subsequent migrations, preventing duplicate data and saving time and bandwidth. Learn more
- Automatic Mailbox Mapping: EdbMails automatically maps source and target mailboxes, minimizing manual effort.
- Supports Public Folder and Archive Migration: Migrate not only user mailboxes but also public folders and archive mailboxes with full folder hierarchy and permissions intact.
- Advanced Filtering Options: Filter data by date, folder, subject, or item type to migrate only what you need, improving efficiency and control. Learn more
- User-Friendly Interface: Designed for both IT professionals and non-technical users, EdbMails offers a simple graphical interface that makes migration easy to perform.
- Comprehensive Log Reports: Get a detailed text-based log report, tracking, and compliance verification. Learn more
- Free 24/7 Technical Support: EdbMails provides 24/7 assistance and a free trial version, helping you test the tool before committing.


