Migrate Exchange 2016 to 2019
Migrating from Exchange Server 2016 to 2019 may seem straightforward due to their similar architecture, but Exchange 2019 brings significant enhancements that boost performance and reliability. Features like the MetaCache Database (MCDB) speed up data access by storing frequently used information on SSDs, while the Dynamic Database Cache (DDC) optimizes memory usage based on server load.
EdbMails Exchange migration software ensures a smooth and secure Exchange 2016 to 2019 migration. It supports direct mailbox transfers, including Public folders and Archive mailboxes, and automates key tasks to reduce manual effort. With EdbMails, organizations can confidently upgrade to Exchange 2019, preserving data integrity and minimizing downtime throughout the process.
EdbMails provides a range of advanced features designed to simplify and accelerate the Exchange 2016 to 2019 migration. Incremental migration ensures that only new or changed data is transferred, eliminating duplicates and saving bandwidth. Concurrent mailbox migration allows multiple mailboxes to move simultaneously, speeding up the overall process. The automatic mailbox mapping feature intelligently pairs source and target mailboxes, reducing manual effort, while automatic throttling management handles server-imposed limits to maintain a smooth, uninterrupted migration. With these capabilities and user-friendly automation, EdbMails is a reliable solution for individuals and organizations looking to migrate from Exchange 2016 to 2019 efficiently and securely.
The following sections provide a comprehensive, step-by-step guide to carrying out your Exchange 2016 to 2019 migration.
Reasons to migrate Exchange 2016 to 2019
If you're still running Exchange Server 2016, it’s important to note that Microsoft ended mainstream support for Exchange 2016 on October 13, 2020, and extended support ended on October 14, 2025. This means no further security updates, patches, or technical assistance will be provided, leaving your system more vulnerable to potential risks. Upgrading to Exchange Server 2019 ensures improved security, reliability, and performance. Exchange 2019 offers several enhancements, including better hardware utilization, faster performance, and a modern user experience that supports today’s business needs.
The EdbMails Exchange migration tool simplifies this transition by providing a seamless and secure way to migrate Exchange 2016 to 2019, ensuring data integrity and minimal downtime throughout the migration process.
Enhanced security
Exchange 2019 introduces advanced security measures, including support for Windows Server Core, upgraded encryption protocols, and robust data loss prevention mechanisms. EdbMails Exchange migration software ensures that your data is securely migrated while maintaining compliance with these new security standards, giving organizations peace of mind during the transition.
Optimized performance
Exchange 2019 provides enhanced performance through its MetaCache database, improved search infrastructure, and greater scalability compared to Exchange 2016. These advancements make it exceptionally well-suited for large organizations with significant email usage requirements. EdbMails Exchange Migration software designed to optimize the migration process, ensuring that performance improvements are realized quickly and efficiently.
Revamped mailbox experience
Exchange 2019 brings forth new capabilities, such as modern attachments, which enable users to share OneDrive file links instead of sending actual copies. This feature not only optimizes mailbox storage but also fosters improved collaboration among users. By using EdbMails, organizations can ensure that all mailbox data, including these new features, is transferred accurately, preserving the enhanced user experience.
Advanced Public folder support
Exchange 2019 offers enhanced support for modern public folders, integrating them with the In-Place eDiscovery and Hold workflows. This integration ensures improved search performance and scalability, providing a more effective solution compared to traditional public folders for organizations. The EdbMails Exchange migration tool seamlessly migrates public folders, ensuring that all data is retained and optimized for the new environment.
Enhanced Hybrid deployment support
Exchange 2019 features upgraded capabilities for hybrid deployments, including a cloud-based Hybrid Configuration Wizard (HCW). This improvement simplifies the migration process to Office 365 for organizations, facilitating a smoother transition. With EdbMails Exchange migration software, users can easily perform migration in a Hybrid environment.
Beyond the new capabilities introduced in Exchange 2019, it is important to consider and know what has been discontinued in 2019.
Exchange 2016 and Exchange 2019 Coexistence
Exchange Server 2016 and Exchange Server 2019 can coexist within the same Active Directory environment. However, it’s important to consider several key factors to ensure reliable coexistence and a smooth migration.
Application integration
Confirm that all software used in your organization is compatible with Exchange 2019. This encompasses email clients, antivirus solutions, backup tools, and monitoring systems to ensure smooth operation and effective integration.
Cumulative updates
Ensure that all Exchange 2016 servers, including Edge Transport servers, are updated to Cumulative Update 11 (CU11) or a later version. This is necessary to maintain compatibility and ensure stable communication between Exchange 2016 and 2019 servers.
System Requirements
Exchange 2019 has specific hardware and software prerequisites that must be met for successful installation and operation. Verify that your environment meets the required specifications for operating system version, processor type and speed, memory, and storage before starting the migration process.
Licensing Considerations
Before upgrading from Exchange 2016, confirm that your organization has the appropriate Exchange Server 2019 licenses to remain compliant and avoid service interruptions.
Best software to migrate Exchange 2016 to 2019
Migrating from Exchange 2016 to 2019 using traditional methods—such as manual mailbox transfers, PowerShell scripts, built-in migration tools, or PST imports—can be complex and time-consuming. These approaches often require detailed configuration, advanced command-line expertise, and carry a heightened risk of data loss or prolonged downtime. For example, importing PST files may work for individual mailboxes but typically involves lengthy processes and additional steps to verify data integrity. Organizations lacking dedicated IT teams may find these methods particularly challenging, as they demand a deep understanding of both the source and destination environments.
EdbMails Exchange Migration offers a streamlined and reliable alternative. It simplifies the entire process by enabling the seamless transfer of all mailbox data—including user folders, public folders, emails, contacts, calendars, tasks, notes, journals, and permissions—while ensuring full data consistency. EdbMails supports cross-version Exchange migrations as well as migrations to Office 365 and hosted Exchange servers. Its user-friendly interface requires no technical expertise, making it an ideal solution for organizations of any size.
Exchange 2016 to 2019 migration checklist
Here’s a checklist to consider when transitioning from Microsoft Exchange server 2016 to 2019:
- Ensure your existing Exchange server environment meets the necessary prerequisites for installing Exchange server 2019. Confirm the versions of both Exchange and Windows server in use.
- Communicate any potential changes to end users and stakeholders.
- Assess the costs associated with migration, as well as the required network infrastructure and bandwidth.
- Proceed with the installation of Exchange server 2019 on your server, including any additional roles and permissions.
- Set up the new Exchange server 2019 environment by creating mailboxes, public folders, and client access rules.
- Conduct thorough testing of the new Exchange server 2019 environment to verify its proper functionality.
- Migrate mailbox and public folder data from the previous Exchange server 2016 environment to Exchange 2019 using EdbMails.
- After successful migration and testing, decommission the old Exchange server 2016.
Exchange 2016 to 2019 migration prerequisites
- Step 1: Check that your system meets the Exchange 2019 setup requirements.
Before you migrate Exchange 2016 to 2019, ensure that your current environment and hardware is compatible for the migration. The following links will help you to know about the hardware, network, .NET framework and operating system requirements for installing Exchange server 2019.
- Network and directory requirement for Exchange 2019
- Hardware Requirements for Exchange 2019
- Supported operating systems for Exchange 2019
- Supported .NET Frameworks for Exchange 2019
- Supported Outlook clients in Exchange 2019
- Lync/Skype Business Server integration with Exchange 2019
Exchange server version Coexistence scenario Requirement Migration Exchange 2019 Supported – can coexist with Exchange 2016 Exchange 2016 must have Cumulative Update 11 (CU11) or later EdbMails enables direct migration from Exchange 2016 to Exchange 2019 Additional Notes:
- Exchange 2019 requires Active Directory forest functional level of Windows Server 2012 R2 or higher.
- The Domain Controllers need to be running on Windows Server 2012 R2 Standard or Datacenter and higher.
- You must install .NET Framework 4.8 on a Cumulative Update (CU) of 4 to 12.
- The Mailbox and Edge Transport servers require Windows Server 2019 Standard or Datacenter and higher. See the Exchange server 2019 supportability matrix for more information.
- Step 2: Prepare your system with the following prerequisites for Exchange 2019
Complete the following prerequisites for Active Directory, Windows 2019 Mailbox server, and Windows 2019 Edge Transport servers before installing Exchange server 2019.
- Step 3: Determine the migration path from Exchange 2016 to 2019
Evaluate whether a staged, cutover, or hybrid Exchange migration suits your needs. EdbMails facilitates these migrations seamlessly, ensuring zero server downtime or data loss. Notably, it allows continued mailbox usage throughout the migration process, eliminating the need to disconnect your Exchange server.
Current environment and requirement Ideal migration approach Migration flow You want to perform a full migration to Exchange 2019 in a single event within a limited time frame. Exchange 2016 to 2019 cutover migration Set up the target Exchange 2019 server and migrate all mailboxes in one go. Ideal for large-scale migrations completed in a single session. You have limited time and prefer to migrate mailboxes in phases (e.g., over weekends). Exchange staged migration Migrate mailbox data gradually, starting with recent emails, followed by the rest. Allows flexible scheduling. You want to migrate Exchange 2016 mailboxes to a Hybrid 2019 and Office 365 environment Migrate Exchange 2016 to 2019 Hybrid Migrate from the source server to a Hybrid Exchange and Office 365 environment. Note: The migration path depends on the number of mailboxes you want to migrate, size of the data and your organizational requirements. Use the Exchange deployment assistant to help you decide on the path.
- Step 4: Set up the target Exchange server 2019 for migration
The following is a list of key points for installing and preparing the Exchange 2019 server for migration:
- Prepare the Active Directory forest and domains
- Before installing Exchange Server 2019, prepare your Active Directory forest and its domains for the new version of Exchange.
- If you have a separate team to manage the Active Directory schema, you must extend the active directory schema, else proceed to the next step to prepare the Active Directory.
- If you have multiple domains you need to additionally prepare the Active Directory domains.
- Install Exchange server 2019
Ensure that you meet the server system requirements and prerequisites as outlined previously. Next, install Exchange 2019 mailbox server and edge transport server using the setup wizard. Microsoft recommends installing Exchange 2019 on Windows Server core for best experience.
- Prepare a clean Exchange 2019 target environment
- Install and upgrade Exchange 2019 to the latest cumulative update to keep your server up to date.
- Create and configure a Send connector to send mail outside the Exchange organization.
- By default, Exchange automatically creates receive connectors for inbound mail flow when the mailbox server is installed. However, if you want to configure custom receive connectors for certain mail flow scenarios, follow the steps in the link.
- Add accepted domains to allow recipients to send and receive email from another domain.
- Configure the default email address policy to add the accepted domain to every recipient in the organization.
- Configure external URLs (domains) on the virtual directories in the Client Access (frontend) services on the Mailbox server to allow clients to connect to your server from the internet (outside the organization’s network).
- Configure internal URLs on the virtual directories in the Client Access (frontend) services on the Mailbox server to allow clients to connect to your server from the internal network.
- Configure SSL certificates from a third-party certificate authority for services such as Outlook Anywhere and Exchange ActiveSync.
- Verify the Exchange server installation by running the command Get-ExchangeServer on the Exchange Management Shell (EMS)
- Create mailboxes and Public folder on Exchange 2019 server
Ensure that mailboxes are created on the target Exchange 2019 server. You can choose to allow EdbMails to automatically create mailboxes on the target server. However, if you prefer to create mailboxes manually, refer to the link below:
Steps to create mailboxes in Exchange server
If you are planning to migrate public folders from Exchange 2016 to 2019, ensure that public folders are created on the target server and that admin permissions are assigned on both the source and target servers.
- Install cumulative updates (CU) on Exchange server 2016
For Exchange 2016 to 2019 migration, ensure to install the latest cumulative updates (CU) on the source 2016 server.
- Create trust relationship between forests (Optional)
A forest trust is an authentication between two domains within the same Active Directory forest which creates a trust between two root domains for exchanging information. By creating a trust in advance, it is possible to address the trust issues during or after the migration.
Note: This step applies to Windows Server 2008, Windows Server 2008 R2 and Windows Server 2012. Creating a trust relationship is not required for SBS based environments.
- Assign management roles to the admin account
Ensure that you have set the following permissions to the admin account on the source (2016) and target server (2019)
- On the source
- ApplicationImpersonation
- View-Only Configuration - Run the cmdlet New-ManagementRoleAssignment using the Exchange Management Shell to assign the View-Only Configuration role to the admin.
- Organization Management role group. It is an elevated permission that is required to migrate Public folders.
- On the target
- ApplicationImpersonation
- View-Only Recipients
- View-Only Configuration
- On the source
- Verify the mailbox of the admin account
Check to see if the admin account that has been assigned management roles has a valid and non-hidden mailbox on the Exchange 2016 server.
- Configure the throttling and message-size limits
Change the EWS throttling and message size limits on the target Exchange 2019 server by following the steps outlined in the links.
- Prepare the Active Directory forest and domains
- Step 1: Check that your system meets the Exchange 2019 setup requirements.
Steps to migrate Exchange 2016 to 2019
Step 1: Download and install EdbMails Exchange migration tool
- Download and install the EdbMails application on any Windows computer that can connect to both your source and target Exchange servers.
See what your system needs before starting the Exchange 2016 to 2019 migration.
- Once EdbMails is installed, open the application. If you already have an account, log in using your email and password. If you're not registered, simply click 'Start Your Free Trial' to begin without signing up right away.
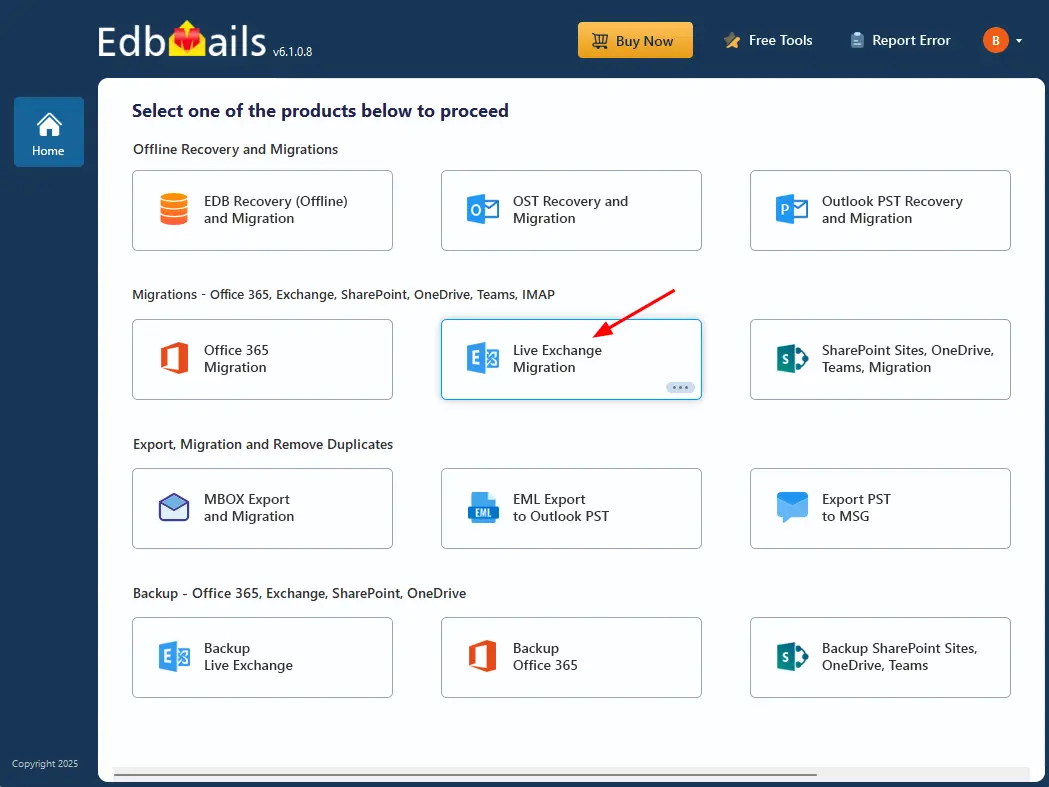
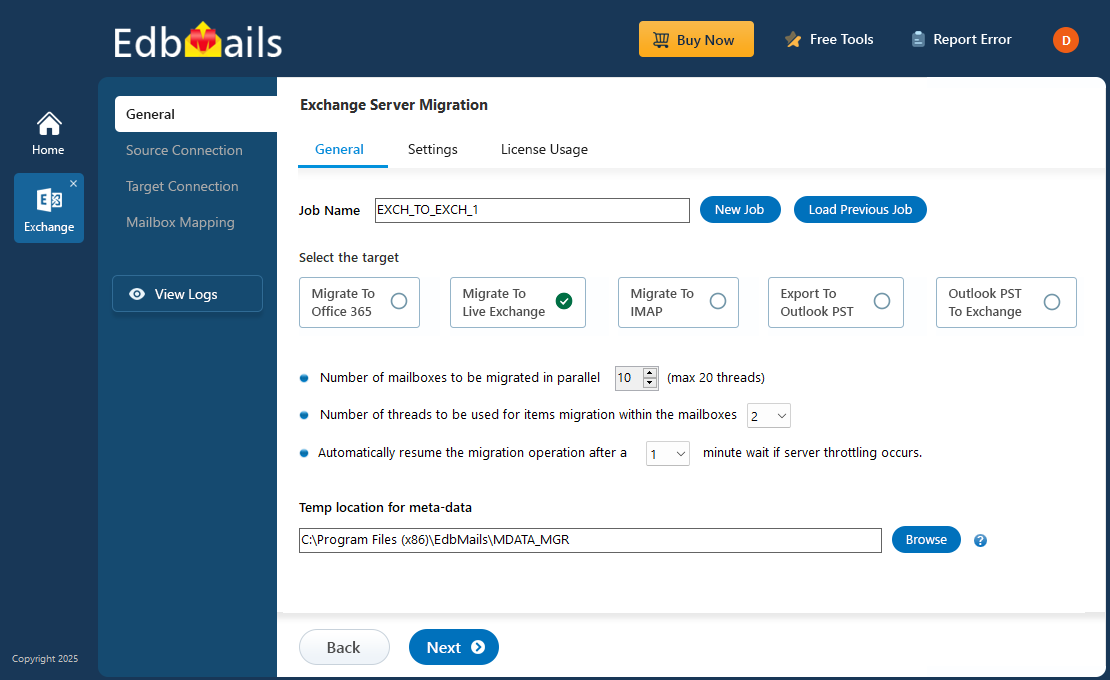
- Select ‘Live Exchange Migration’ option.
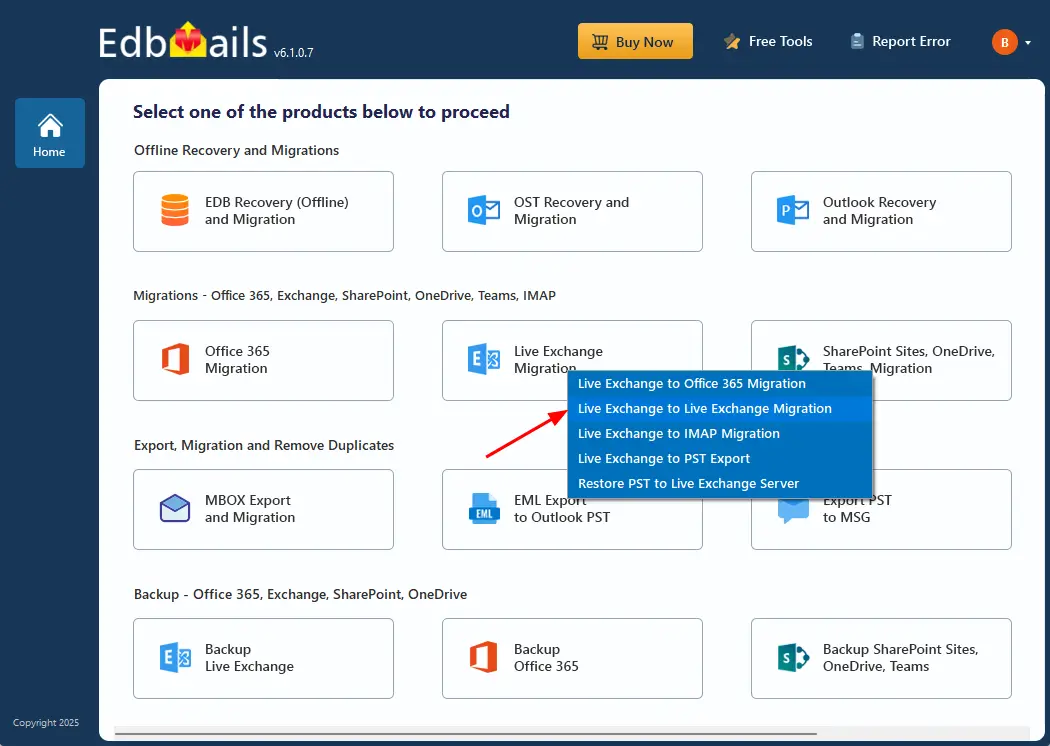
- Select 'Live Exchange to Live Exchange Migration' option.
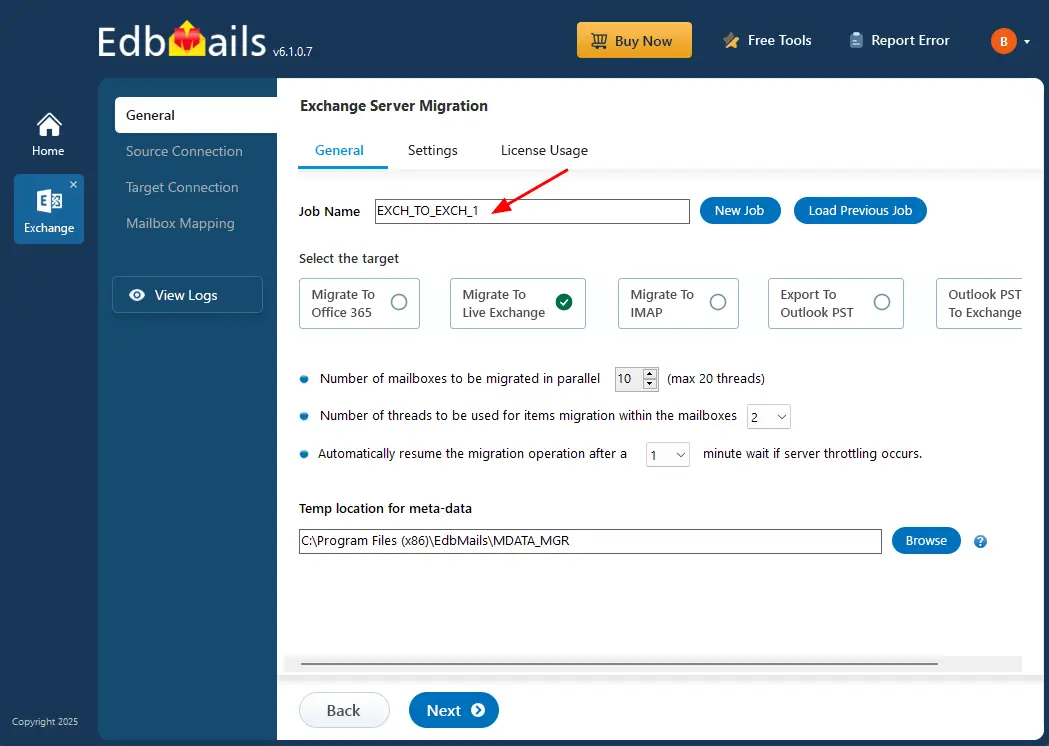
- Use the existing job name or create a new one by clicking ‘New Job’. After that, click ‘Next’ to proceed.
- Download and install the EdbMails application on any Windows computer that can connect to both your source and target Exchange servers.
Step 2: Connect to the source Exchange 2016 server
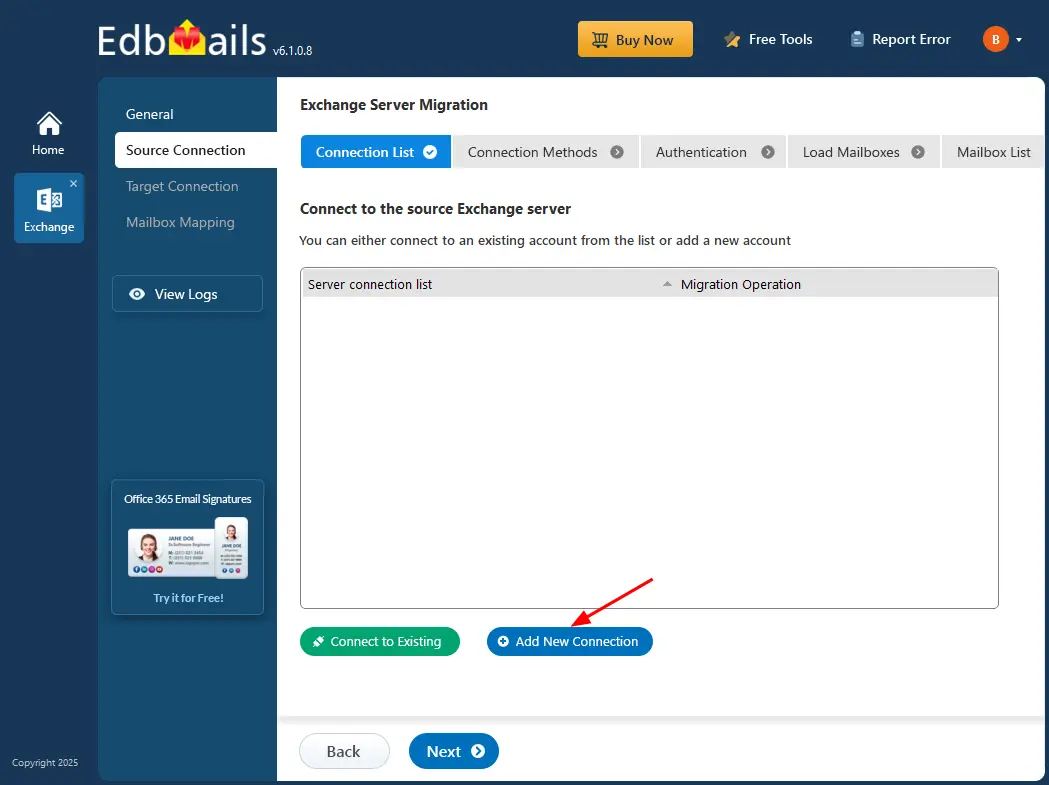
- To connect to your source Exchange server, click on ‘Add New Connection’ to create a new connection. If you’ve already set up a connection, simply select it from the list and click ‘Connect to Existing’.
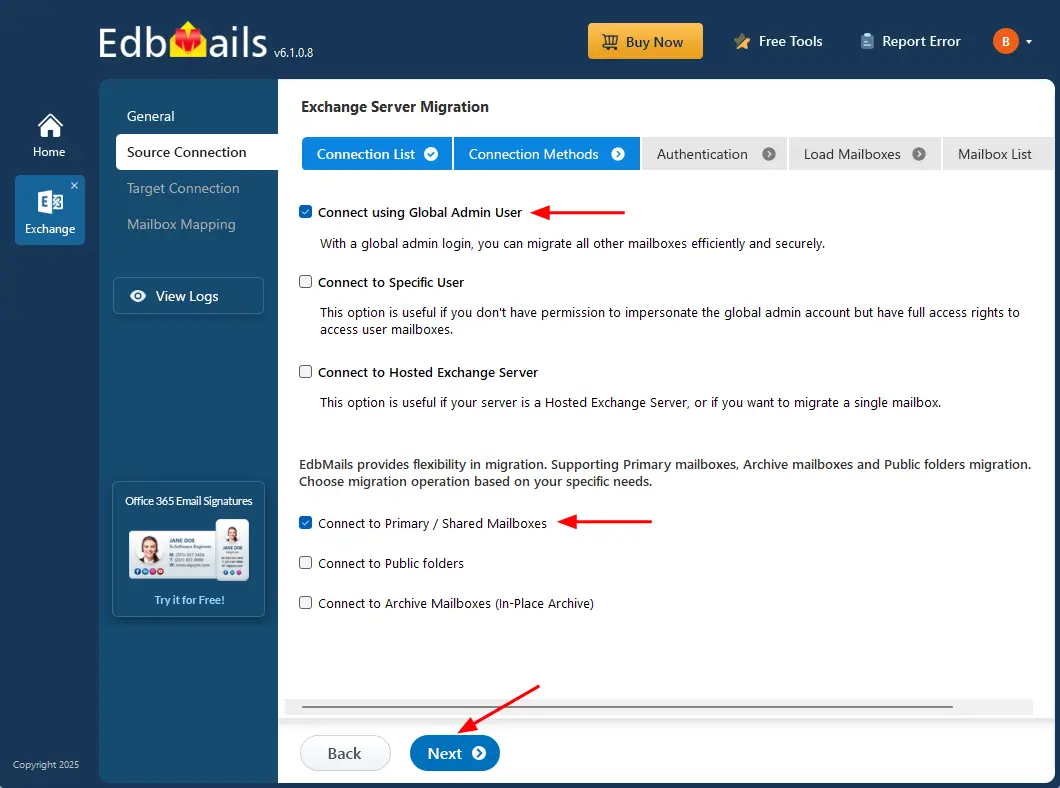
- Select the required connection options and click the ‘Next’ button.
Learn more about the various connection methods supported by EdbMails for connecting to your Exchange server.
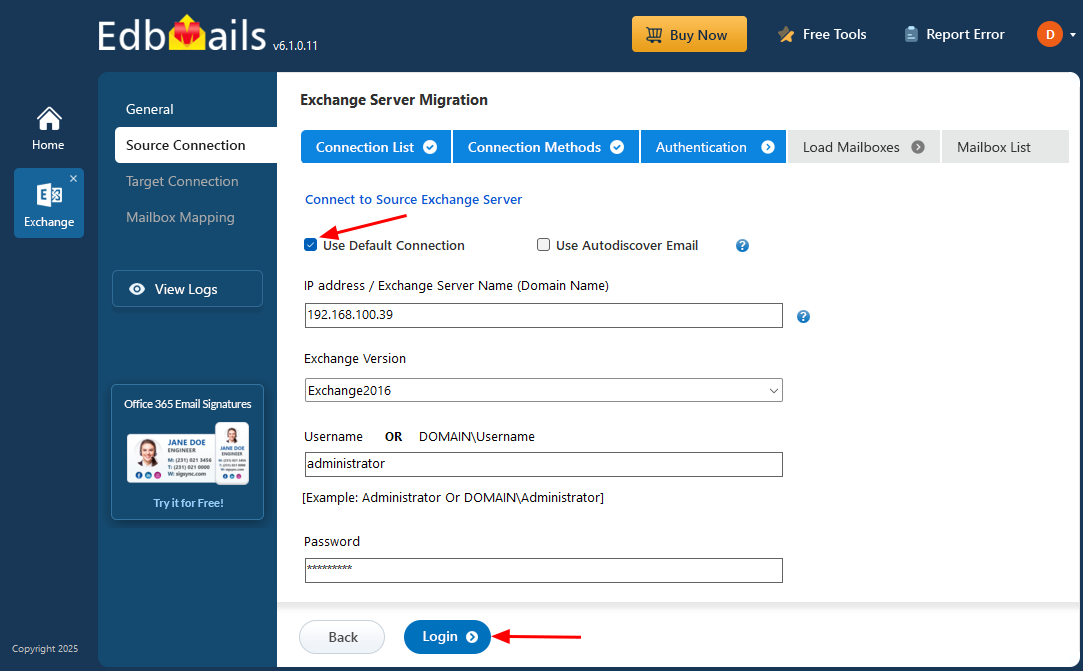
- Enter the Exchange 2016 server details and click the ‘Login’ button.
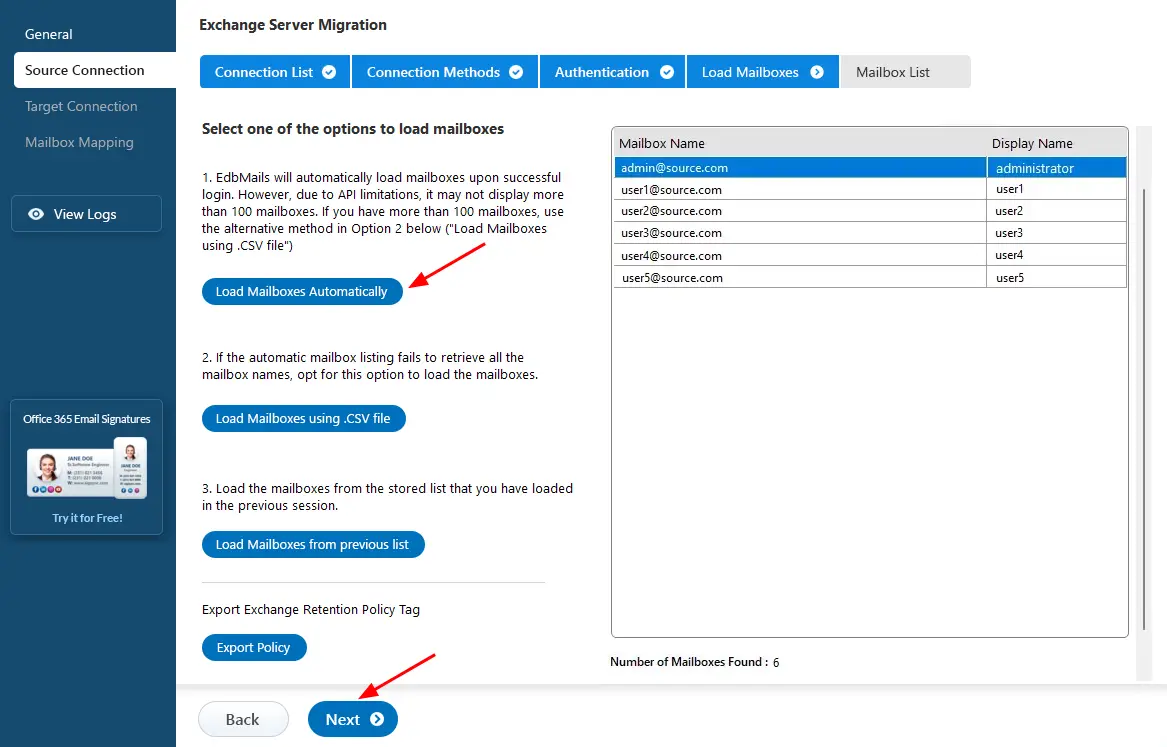
- After a successful login, you can choose to load mailboxes. EdbMails provides an automated mailbox loading feature. Also, You have the option to manually load mailboxes using a CSV file.
Step 3: Select Exchange 2016 mailboxes
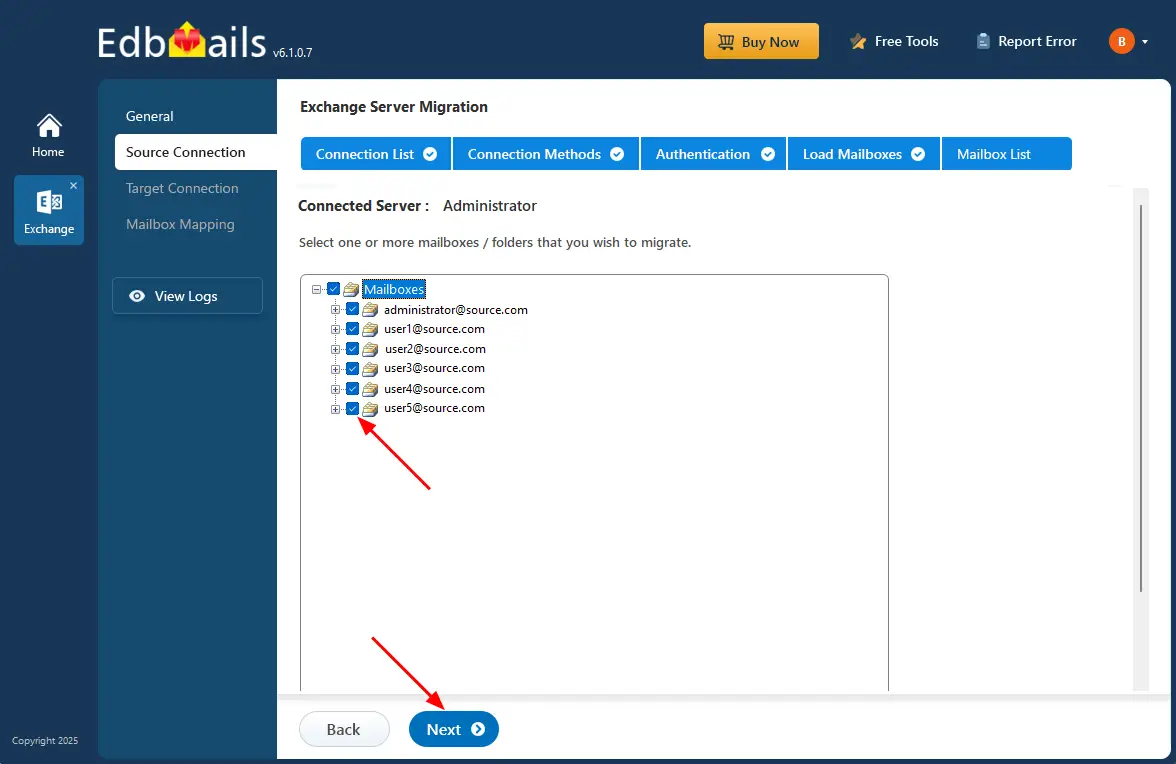
- Select the Exchange 2016 mailboxes or folders you wish to migrate, then click the ‘Next’ button.
Step 4: Connect to target Exchange server 2019
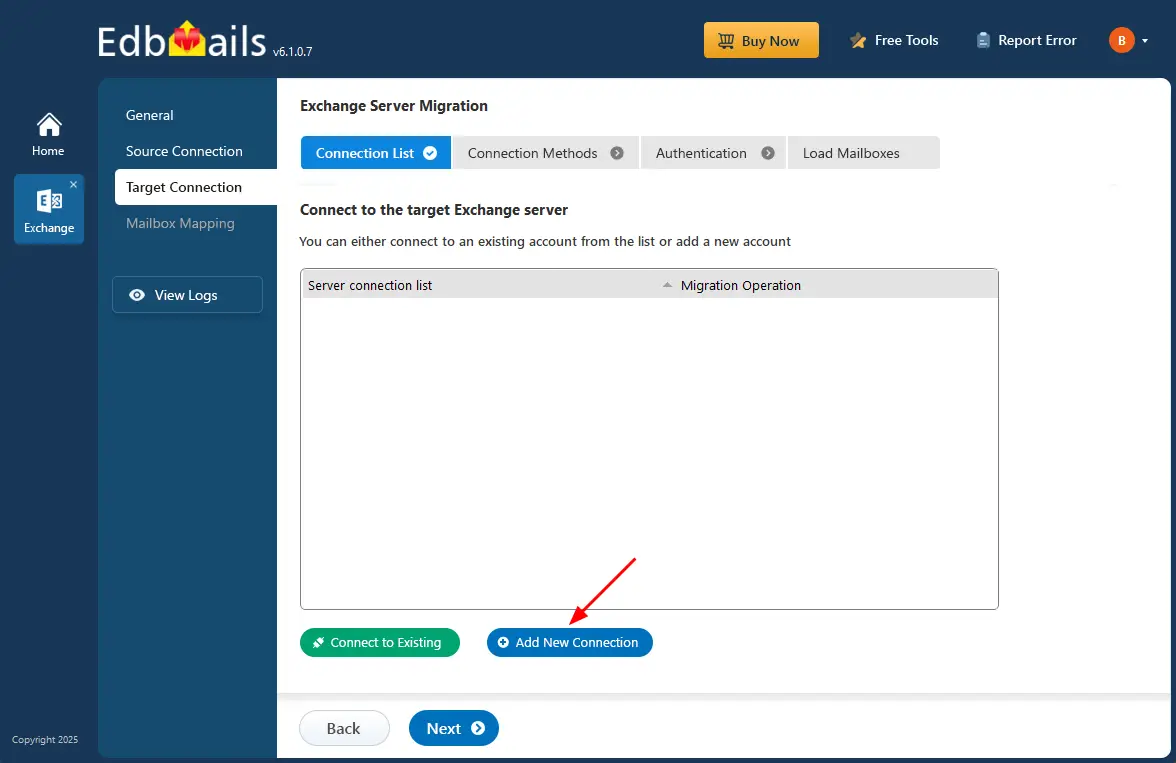
- Click ‘Add New Connection’ to set up a connection with your Exchange 2019 server. If you’ve already configured one earlier, simply select it from the list and click ‘Connect to Existing’ to proceed.
- Select the required connection options and click the ‘Next’ button.
Check Different options to connect to Exchange server in EdbMails.
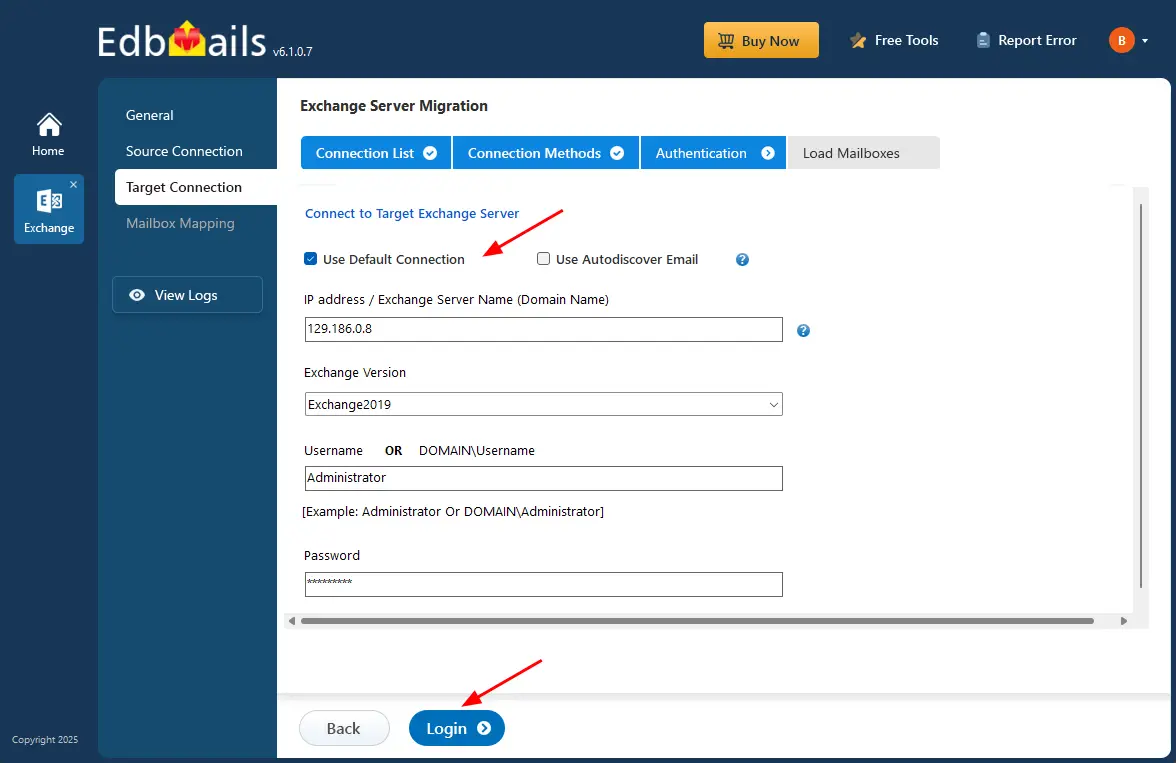
- Enter the target Exchange server details and click the ‘Login’ button.
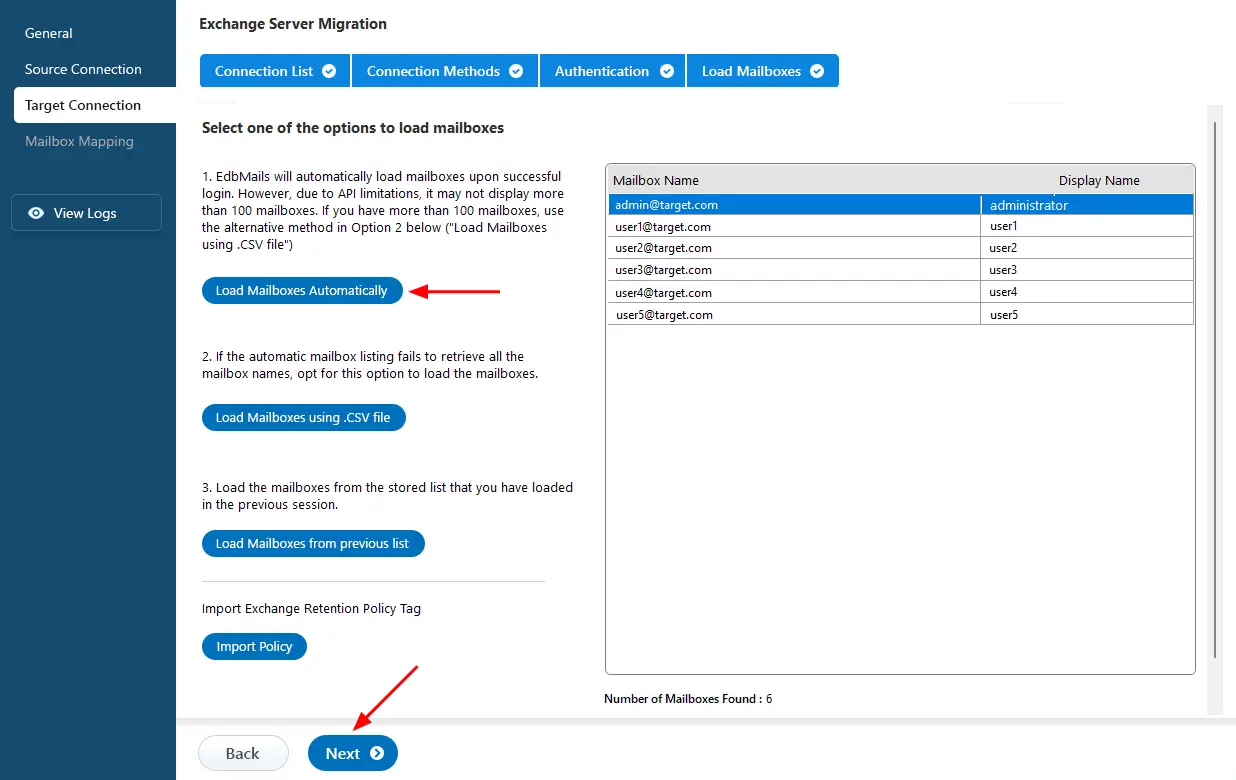
- Select one of the options to load mailboxes. or you can load them manually using a CSV file.
Step 5: Exchange 2016 to 2019 mailbox mapping
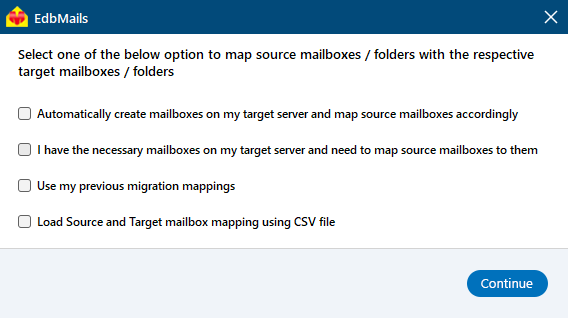
- Select the required mailbox mapping option.
- If you install EdbMails on your target Exchange server, you can choose to automatically create mailboxes on the target Exchange server.
Click here to know more about automatic mailbox creation.
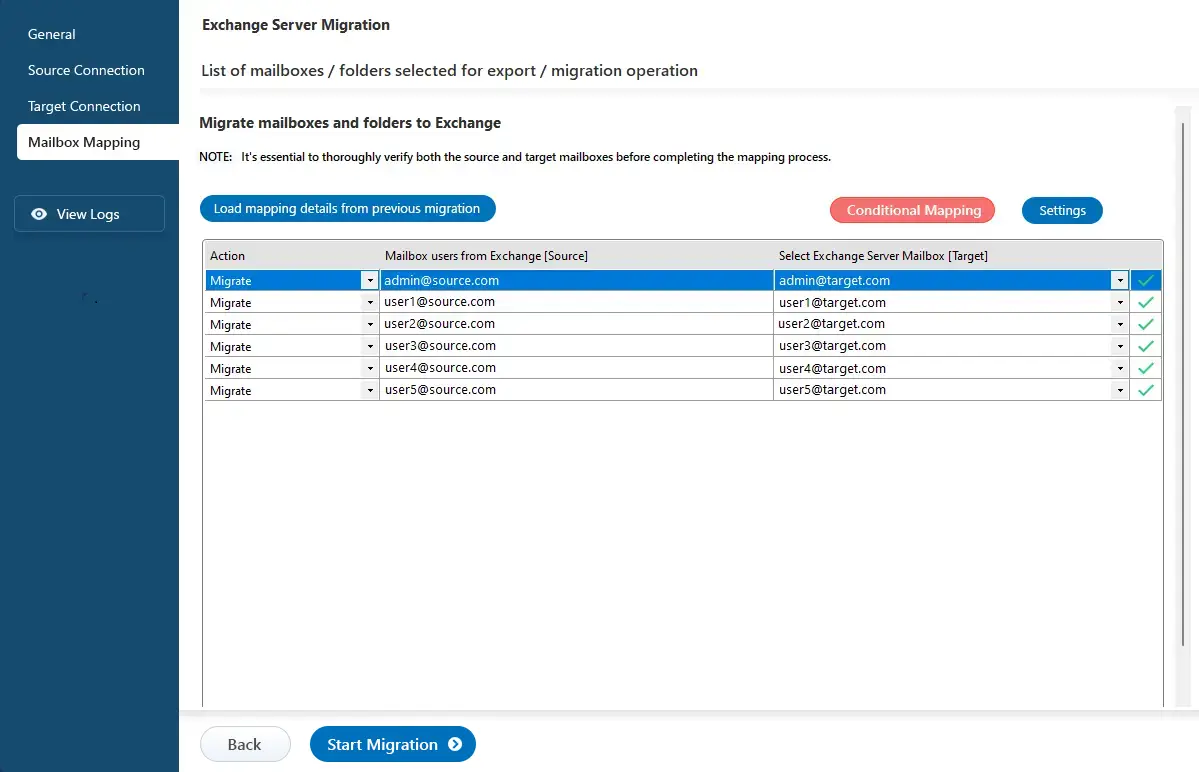
- EdbMails automatically maps mailboxes between the source and target Exchange servers.
Step 6: Start Exchange 2016 to 2019 migration
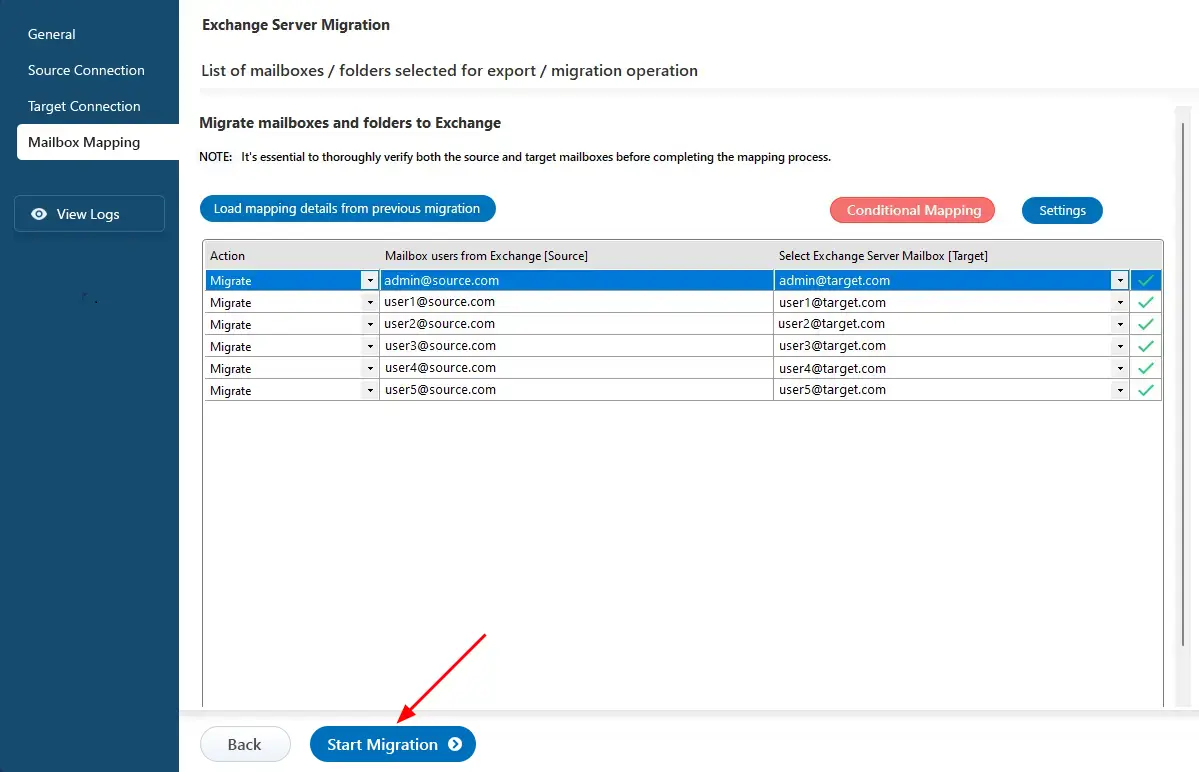
- Confirm that the mailbox mapping is correct, then click ‘Start Migration’ to begin the migration process.
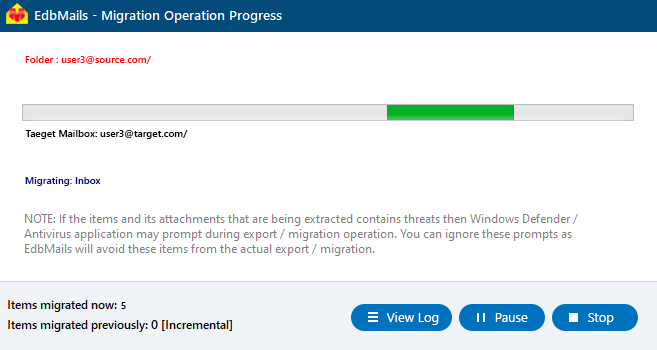
- Track the progress of the migration in real-time. When it’s finished, you’ll see a confirmation message. Click ‘View Logs’ to access the full migration report.
Exchange 2016 to 2019 post-migration tasks
- Step 1: Update the MX records to point to Exchange 2019 server
To receive messages on the Exchange server 2019, update the MX records to enable email to work with the new server you have migrated to. In addition, configure the Autodiscover record to allow Outlook to connect to the migrated mailboxes.
- Step 2: Create a new Outlook profile for users in the new domain
Ensure that you have the latest version of Outlook that is supported with Exchange 2019. Configure the Outlook profile for each user in your domain if Outlook has problems connecting to the new Exchange server.
- Step 3: Decommission and uninstall Exchange server 2016
Wait for a few days to check that you’re receiving emails correctly and that everything is working as expected and finally decommission the source server.
Steps to decommission Exchange 2016 server:
- Remove all connectors that were configured on the Exchange 2016 server.
- Remove the Exchange 2016 server from the list of accepted domains on Exchange 2019.
- Remove the Exchange 2016 servers from the network and uninstall any Exchange-related components.
- Remove the Exchange 2016 server from the Exchange organization.
- Uninstall the Exchange 2016 software from the Control Panel.
- Remove the server from the Active Directory domain.
- Reclaim the server's license.
Note: Test the migration thoroughly and ensure that all data and configurations have been successfully transferred to the new server. It is recommended that you contact Microsoft Support before decommissioning Exchange 2016 for your organization.
- Step 1: Update the MX records to point to Exchange 2019 server
Exchange 2016 to 2019 migration troubleshooting
Please refer to the Exchange migration troubleshooting guide for effective solutions to common migration errors.
Advantages of EdbMails for Exchange 2016 to 2019 upgrade
EdbMails offers a wide range of advantages for migrating from Exchange 2016 to 2019, including:
- Direct, single-hop migration from Exchange 2016 to 2019 without intermediate steps.
- Migrate specific items with more control, reducing unnecessary data transfer.
- Migrate multiple mailboxes at once, speeding up the process, especially for larger organizations.
- Automatic mailbox mapping between Exchange 2016 and 2019 reduces manual work.
- Easily migrate public folders into shared mailboxes, ensuring smooth data transfer.
- Access free, 24/7 expert support for any migration-related issues.
- Ensure data is migrated accurately with no loss or corruption.
- The user-friendly interface makes migration easy for users of all skill levels, minimizing the need for extra training.
- Supports migrations not just to Exchange 2019, but also to Office 365, offering more flexibility.
- Generate detailed migration reports that track progress and provide full transparency.
Frequently Asked Questions (FAQ)
What are the main steps to migrate Exchange 2016 to 2019?
Here are the main steps to migrate and upgrade the Exchange server from 2016 to 2019
- Step 1 : Configure the prerequisites for Exchange 2019
- Step 2 : Upgrade Exchange Server 2016 to the latest Cumulative Update
- Step 3 : Install Exchange Server 2019 on a new server or virtual machine
- Step 4 : Migrate your mailboxes from 2016 to 2019 with EdbMails
- Step 5 : Test the migration and configure MX records
- Step 6 : Finally, decommission Exchange Server 2016
What are the requirements for migrating from Exchange 2016 to 2019?
- Your current Exchange Server 2016 deployment must be at least at Service Pack 1 (SP1) level.
- You must have a 64-bit version of Windows Server operating system installed on the server where you want to install Exchange Server 2019.
- Your current Active Directory (AD) forest and domain functional levels should be at least Windows Server 2008 R2.
- You should have sufficient disk space to install Exchange Server 2019.
What are the changes in Exchange 2019 compared to Exchange 2016?
The following are some of the changes in Exchange 2019 compared to Exchange 2016
- Exchange 2019 no longer supports Outlook 2003 or older versions.
- Exchange 2019 supports only the latest version of Outlook on the web (formerly known as Outlook Web App).
- Exchange 2019 supports only the latest version of the Exchange Management Shell.
- Exchange 2019 introduces new features, such as support for modern authentication and support for Edge Transport servers on Windows Server 2019.
How to migrate Exchange 2016 Public folders to 2019?
EdbMails supports Exchange 2016 to 2019 Public folder migration. Here are the steps for the approach.
- Ensure that both Exchange 2016 and Exchange 2019 are fully patched and up to date.
- Create a new public folder mailbox on the Exchange 2019 server.
- Launch EdbMails and select the Exchange migration
- Select the source and destination servers, as well as the specific public folders you want to migrate.
- Select if you want to include subfolders and items.
- Migrate the source Exchange Public folders to the target Exchange.
What are the methods for Exchange 2016 to Exchange 2019 migration?
There are several methods you can use to migrate from Exchange 2016 to Exchange 2019.
- In-place upgrade: This method involves upgrading the existing Exchange 2016 servers to Exchange 2019 servers.
- Side-by-side migration: This method involves installing Exchange 2019 on a new server and then moving mailboxes and other data from the Exchange 2016 servers to the new Exchange 2019 servers.
- Hybrid deployment: This method involves integrating Exchange 2016 and Exchange 2019 in a hybrid configuration, allowing you to move mailboxes between on-premises Exchange servers and Exchange Online in Office 365.
Exchange 2016 cross forest migration: In this method, you create a trust relationship and migrate your 2016 mailboxes to 2019 across AD forests.
Additional resources:


