Migrate Archive mailbox to Office 365
Migrating archive mailboxes to Office 365 helps organizations take advantage of scalable cloud storage, ranging from 50 GB to 1.5 TB per user. It also supports both cloud and hybrid environments, giving flexibility for different setups. Each user gets a built-in archive mailbox included with most Microsoft plans or available as an add-on, making email storage and management easier. The migration process can be tricky, but EdbMails Exchange Migration makes it simple and secure. It helps you move Exchange archive mailboxes to Office 365 without data loss, downtime, or security risks. This reduces the IT team’s workload and lets users continue their work without interruptions.
EdbMails provides a clear and easy way to migrate In-Place Archives from Exchange to Office 365. It transfers emails, contacts, calendars, folders, and mailbox permissions while keeping everything intact. Features like incremental migration ensure only new or modified items are transferred in later runs, saving time and bandwidth. With automatic mailbox mapping, the tool matches mailboxes on its own, reducing manual work and speeding up the entire migration process.
EdbMails keeps your data safe during the migration process. It is ISO 27001:2013 certified and GDPR compliant, ensuring the highest standards of data security. The software uses SSL/TLS encryption to protect data in transit, OAuth 2.0 for secure login authorization, and multi-factor authentication (MFA) for added account protection. EdbMails also supports modern authentication for Microsoft 365, offering stronger security than older methods.
The following sections explain the migration plan, requirements, step-by-step process, and post-migration tasks to help you complete the transition smoothly and successfully.
Plan to migrate Exchange Archive mailbox to Office 365
- Ensure that you create and enable the In-Place Archiving on Office 365.
- Determine whether you want to migrate Archive mailbox to Office 365 primary mailbox or Archive mailbox.
- If you want to migrate the Archive mailbox directly to Office 365 Archive mailbox, enable the auto-expanding archiving feature on Office 365.
- Enable the auto-expanding feature only if you require more storage space.
- By default, the Archives have 100GB of storage when you enable them and the auto-expanding adds additional storage (unlimited archiving) when the threshold is reached. This limit is expandable up to 1.5TB per mailbox.
- Remember that the auto-expanding works only on Office 365 and you cannot run it on the on-premises Exchange server.
See the list of auto-expanding archiving restrictions and consider the following points for all users.
- If you would like to learn more about archiving, see how the auto-expanding archiving works
- Unlimited archiving is a premium feature that requires Exchange online plan 2 or Exchange online archiving license.
- Verify if your Exchange online mailbox license allows the archiving feature.
- If your on-premises archive mailboxes are greater than the Exchange online auto-expanding limits, you can split them into PST files and migrate the PST to Office 365 using EdbMails Office 365 migration tool.
Pre-Migration Activities for Archive Mailbox Migration to Office 365
Before you migrate Exchange Archive mailbox to Office 365, you must prepare the target Office 365 server as described in the following section.
- Ensure that you meet the network and bandwidth requirements for the migration. See network and migration planning, performance factors and best practices for Office 365 migration.
- Prepare your target Office 365 tenant. See tenant roadmap for Microsoft 365.
- Purchase an Office 365 licensing plan specific to your needs. You can also sign up for a 30 day free trial and decide to go with a suitable one later. Compare Office 365 business plans and Compare Office 365 enterprise plans
- Create mailboxes for your users in your organization and assign suitable licenses to them. For more information, see the following links.
- Enable the archive mailbox on the target Office 365 server.
- If you are using a global admin account to connect to the source Exchange server, ensure to set impersonation rights.
- Configure Office 365 to send and receive large messages
Follow the steps to increase the message size on Office 365 to 150MB.
- If you have a custom email domain from the source to which you want to receive emails after the migration, you must add and verify the custom domain on Office 365.
See steps to add a custom domain to Office 365 and steps to add DNS records to connect your domain.
Steps to migrate Archive mailbox to Office 365 using EdbMails
Step 1: Download and install EdbMails software
- Download and install EdbMails on your computer that can be connected to source Exchange server.
System requirements for Exchange Archive mailbox to Office 365 migration.
- Launch the EdbMails application and ‘login’ with your email address and password or choose 'Start Your Free Trial'.
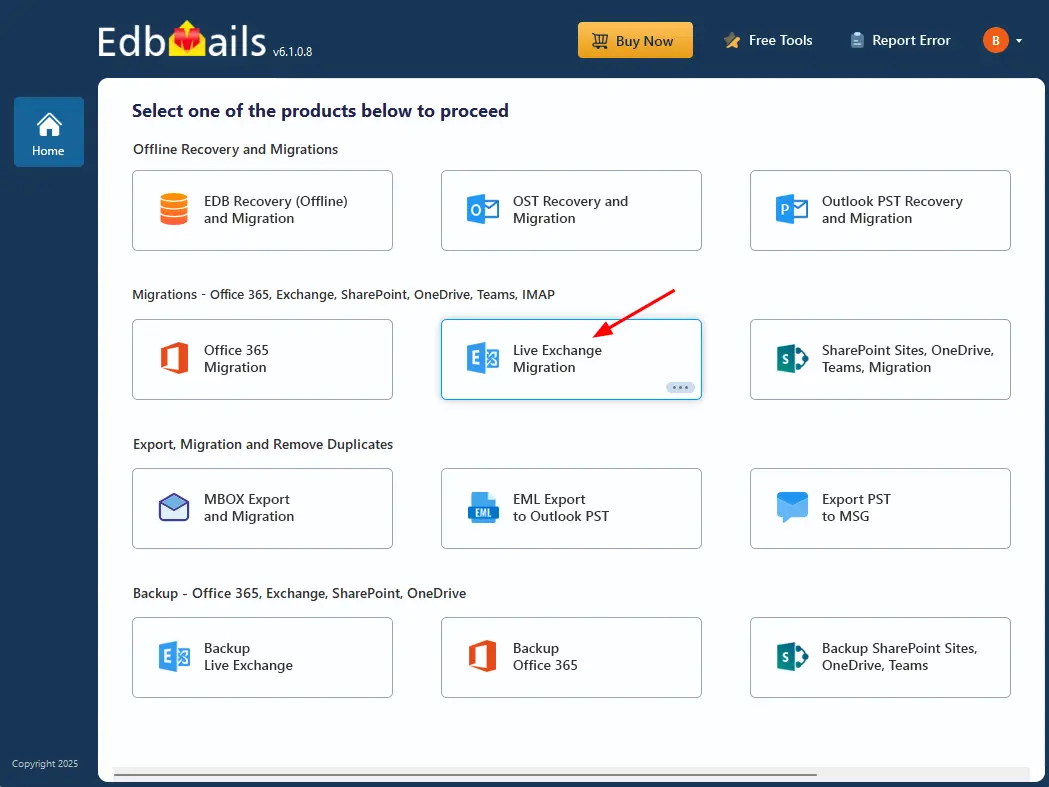
- Select the ‘Live Exchange migration’ option.
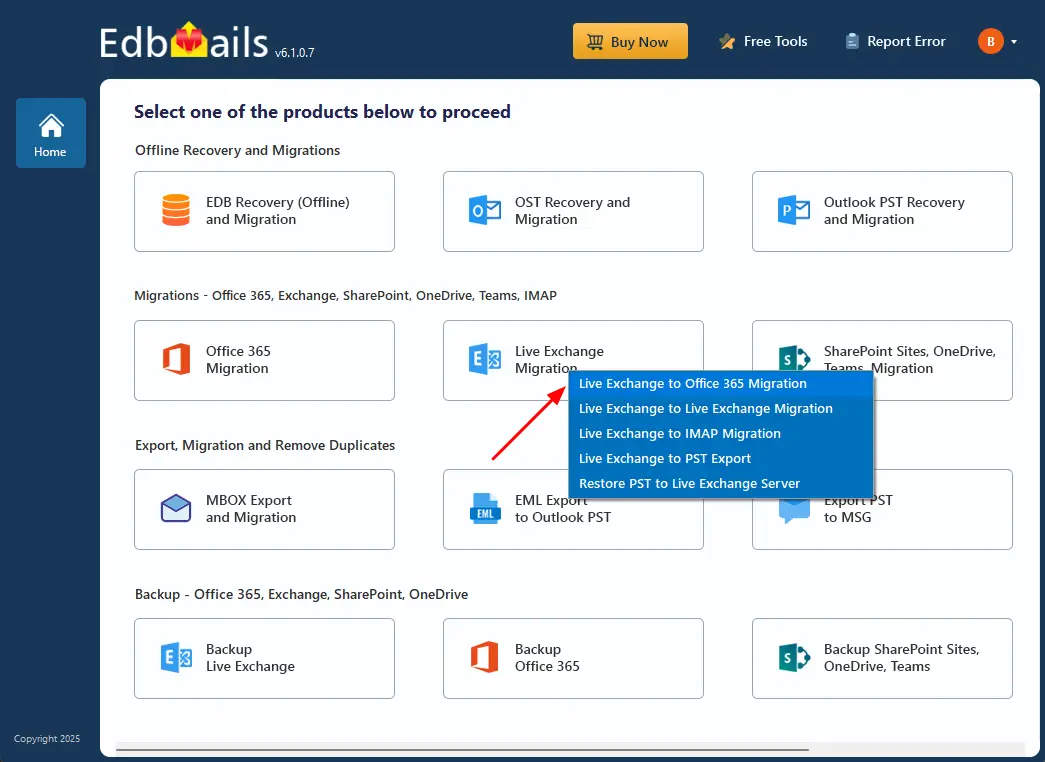
- Select 'Live Exchange to Office 365 Migration'
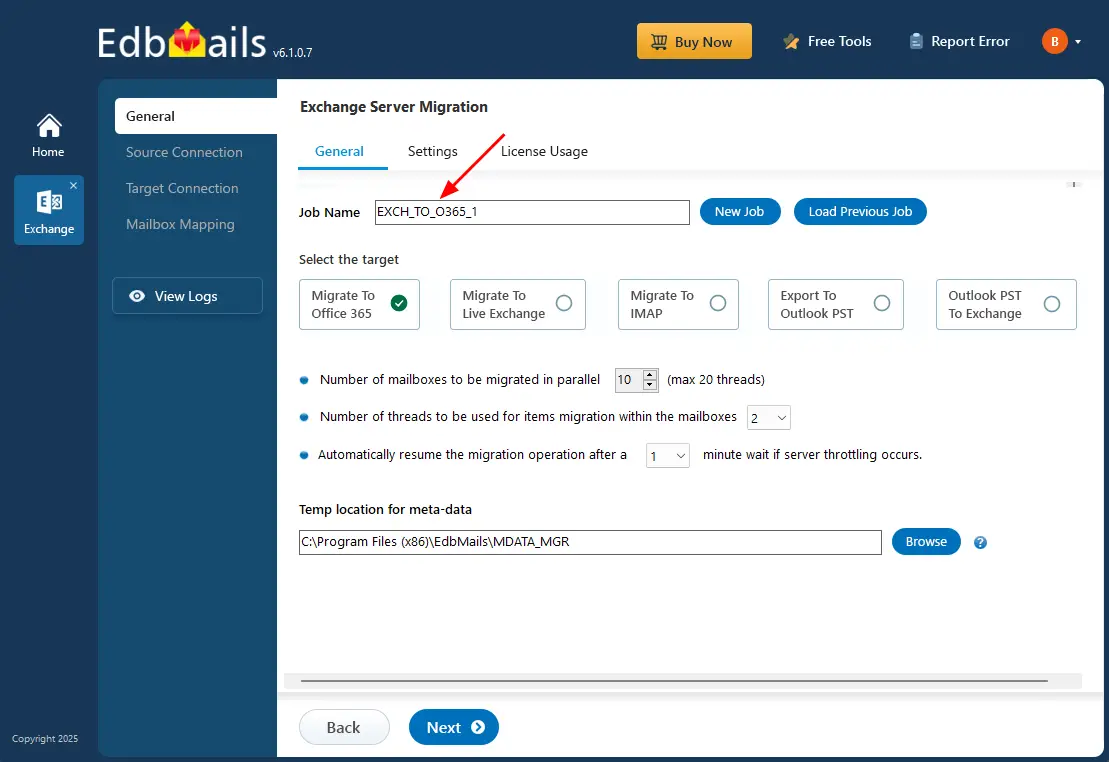
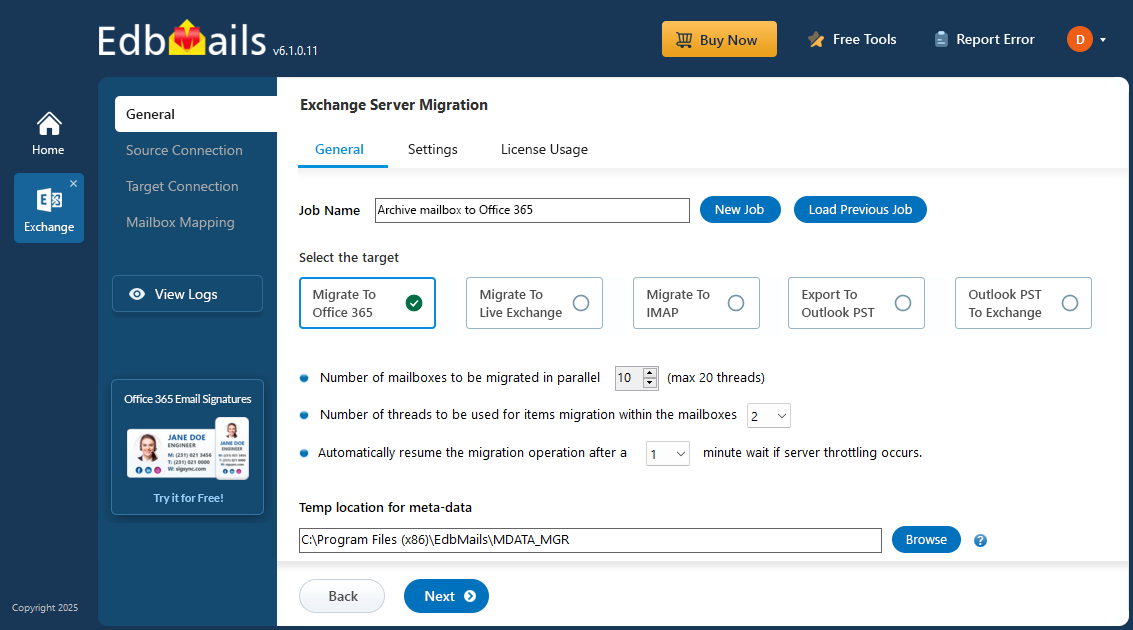
- You can use the default job name or click the 'New Job' button to modify the job name and continue.
- Download and install EdbMails on your computer that can be connected to source Exchange server.
Step 2: Connect to source Exchange server
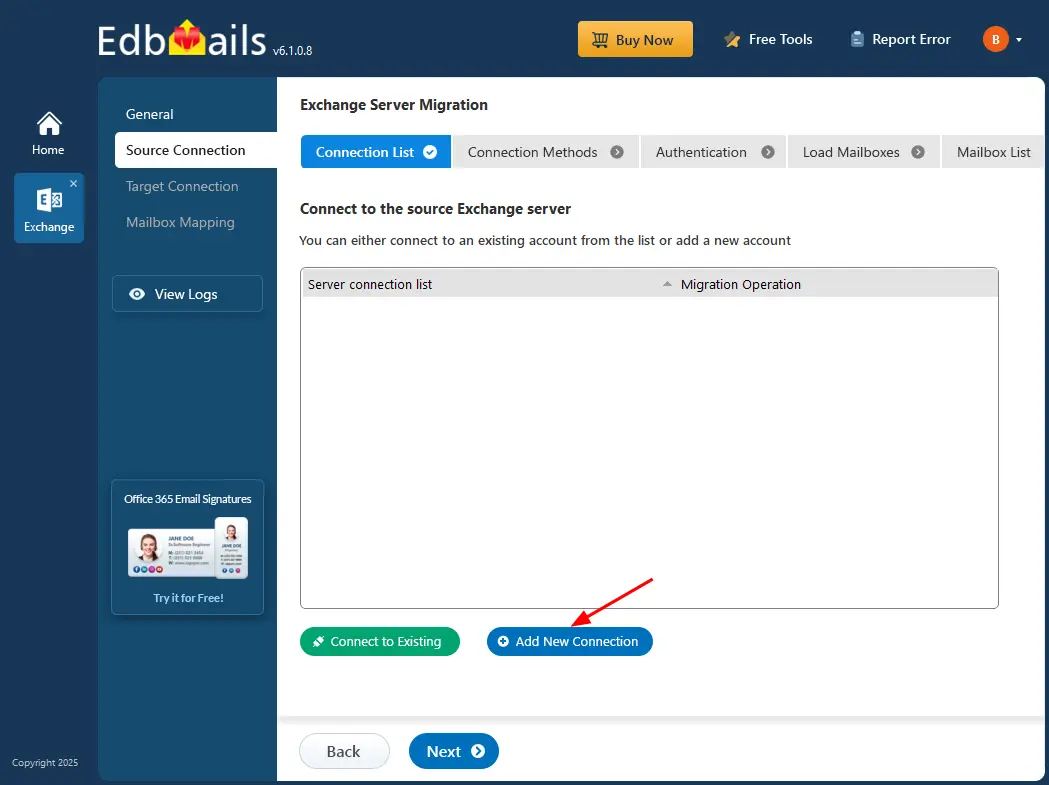
- Click 'Add New Connection' to create a fresh connection to the source Exchange server. If you wish to reconnect to a previously used connection, just select it from the list and click 'Connect to Existing'.
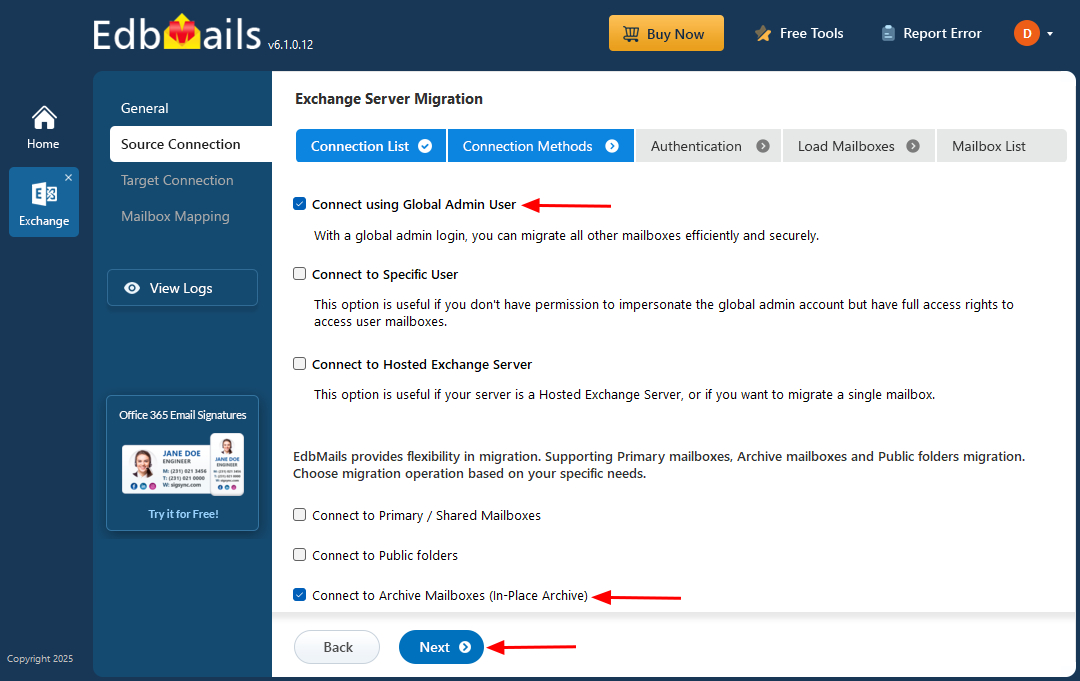
- Select ‘Connect to Archive Mailboxes (In-place Archive)’ option for archive migration and click ‘Next’ to proceed.
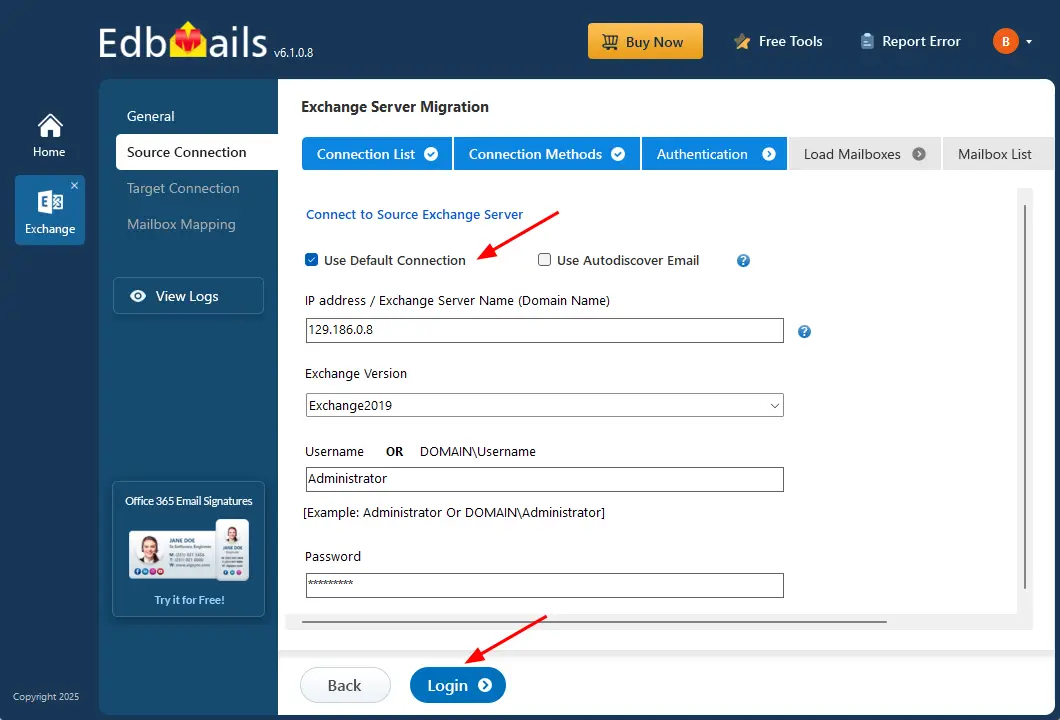
- Enter the source server details and click the ‘Login’ button
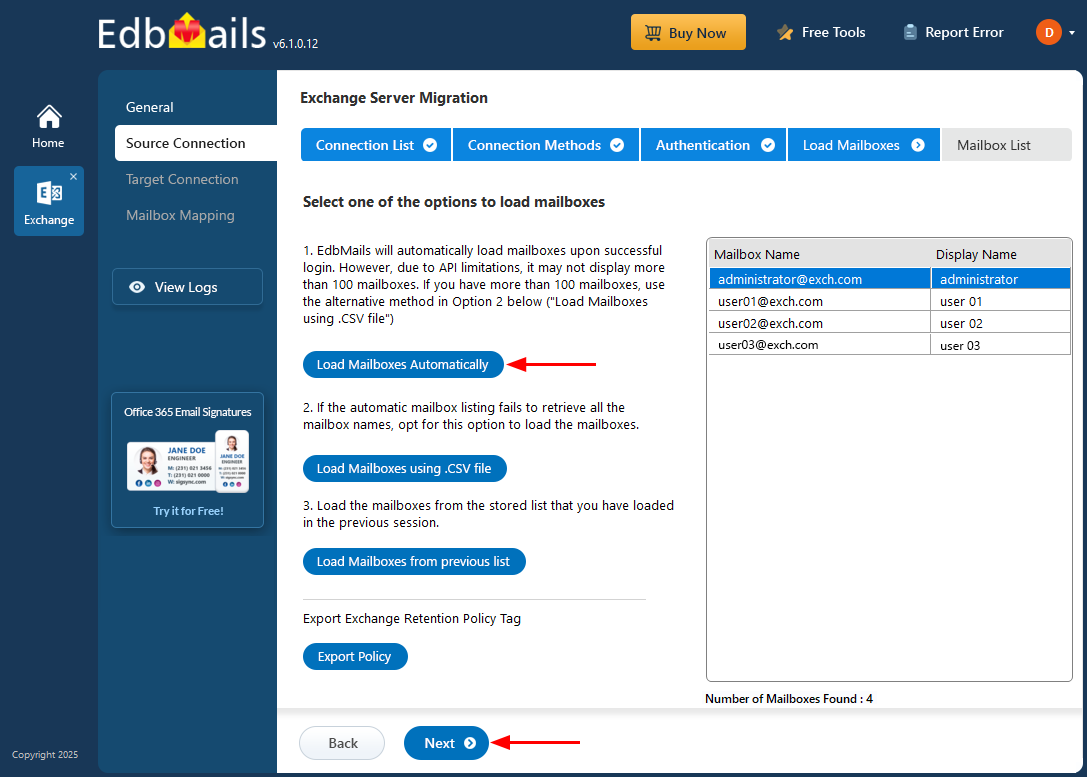
- Select one of the methods to load the mailboxes.
Step 3: Select Exchange Archive mailboxes
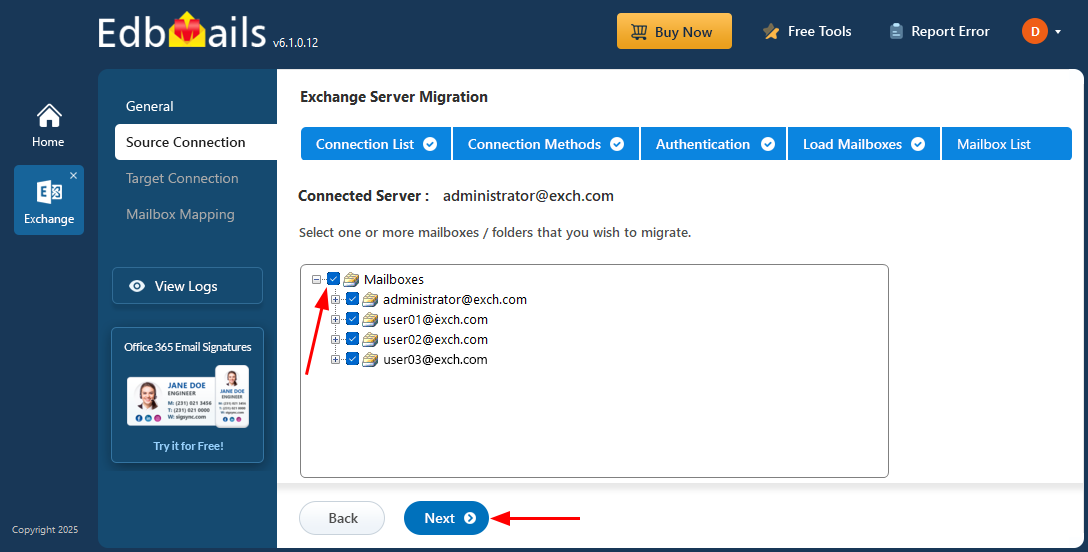
- Choose the Archive mailboxes you wish to migrate
Step 4: Connect to target Office 365 server
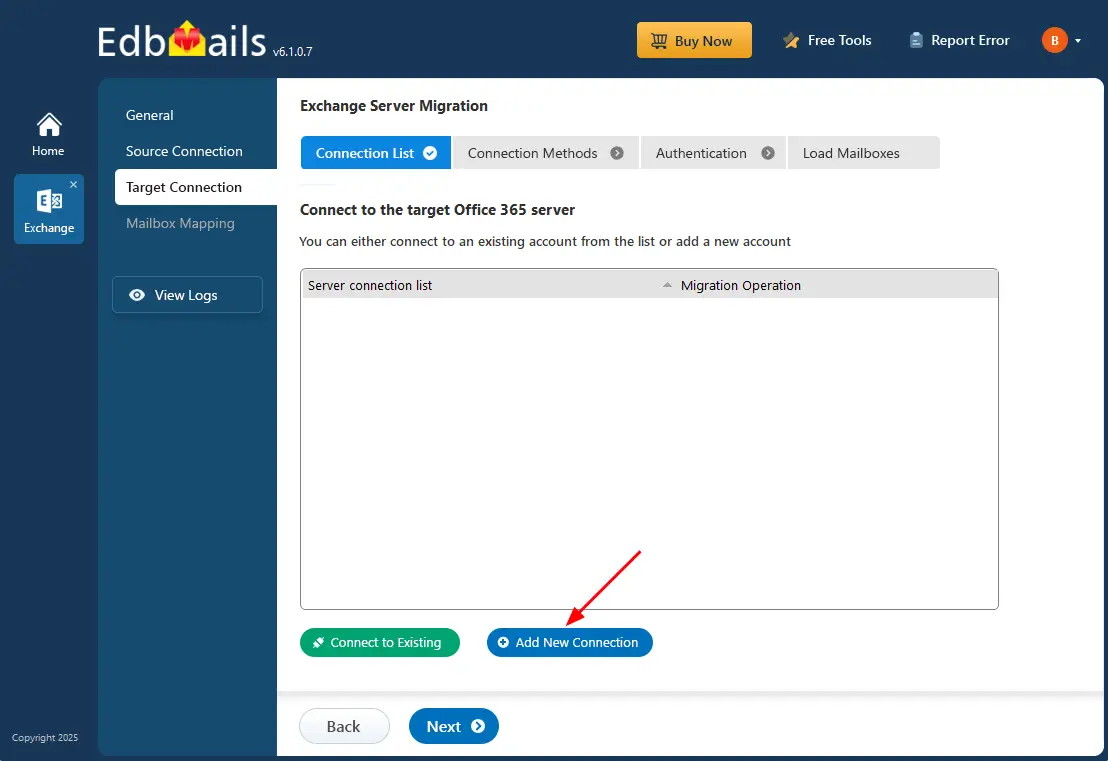
- Click ‘Add New Connection’ to link to the target Office 365. For a previously used connection, select it from the list and click ‘Connect to Existing’ to continue.
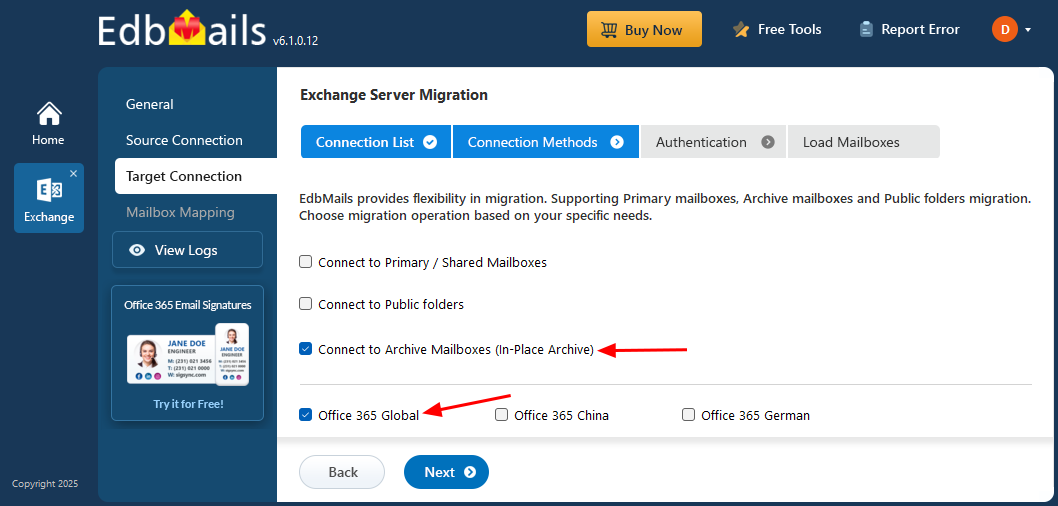
- Select ‘Connect to Archive Mailboxes (In-Place Archive)’ option, and click the ‘Next’ button.
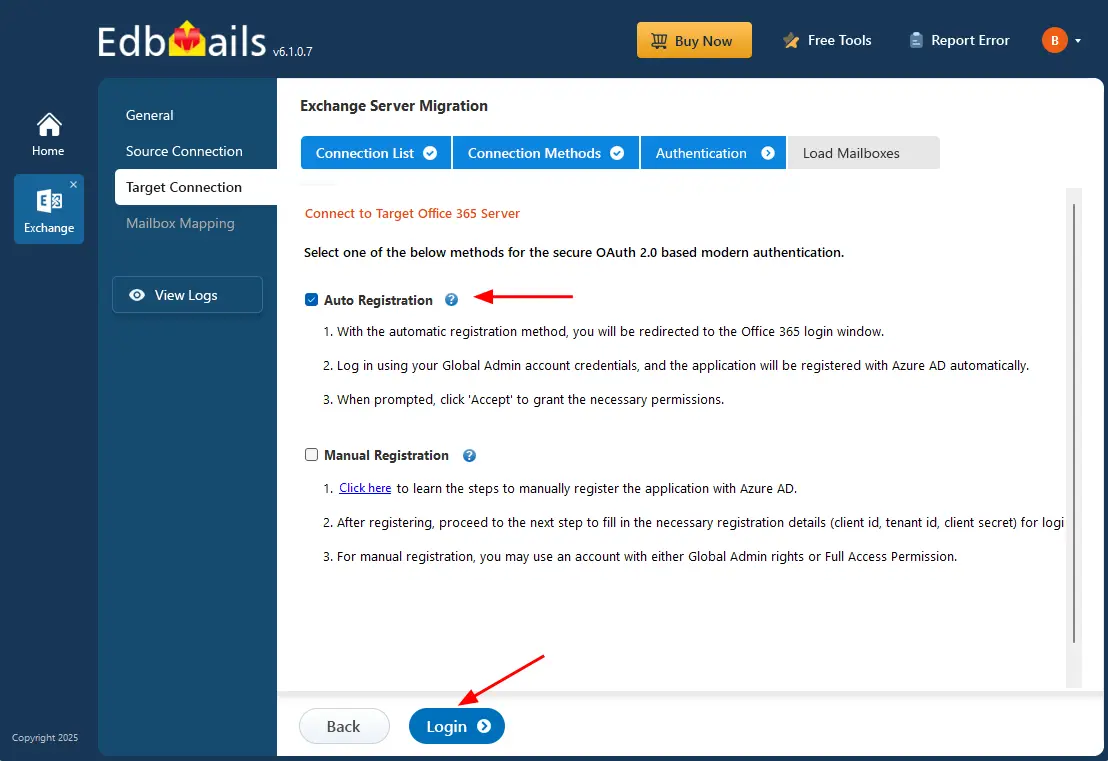
- Choose the required registration method and click the ‘Login’ button.
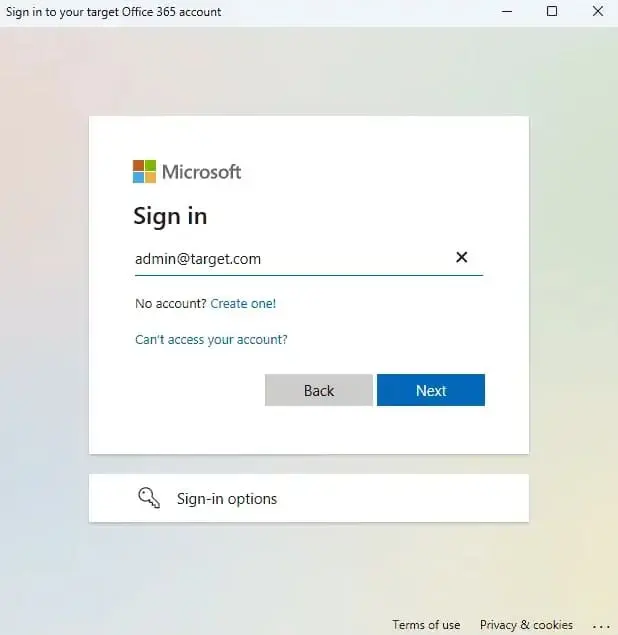
- Authenticate on Microsoft sign-in page.
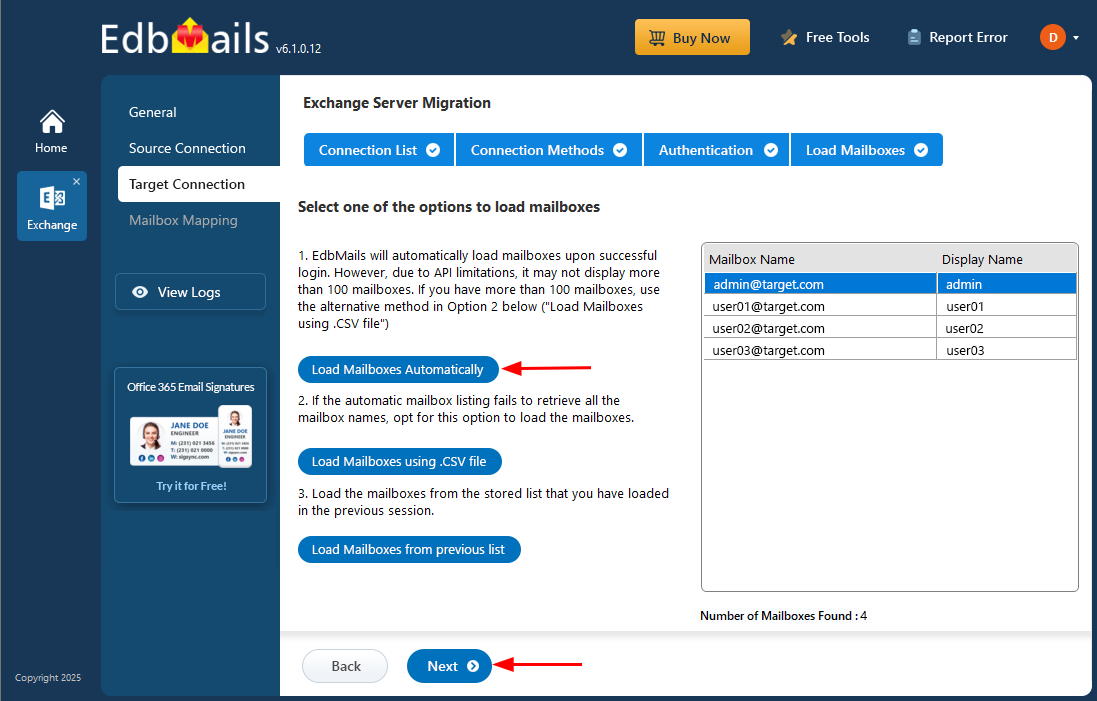
- After successfully connecting to your target Office 365 server, choose one of the options to load the mailboxes.
Step 5: Exchange to Office 365 Archive mailboxes mapping
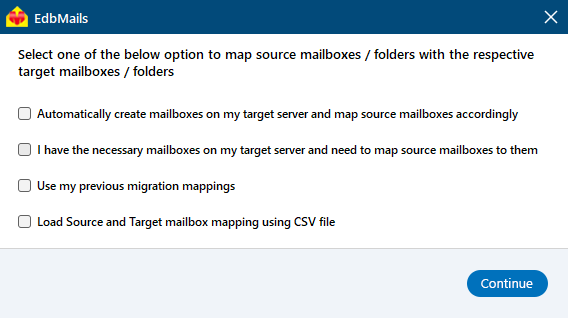
- Choose the required mailbox mapping option.
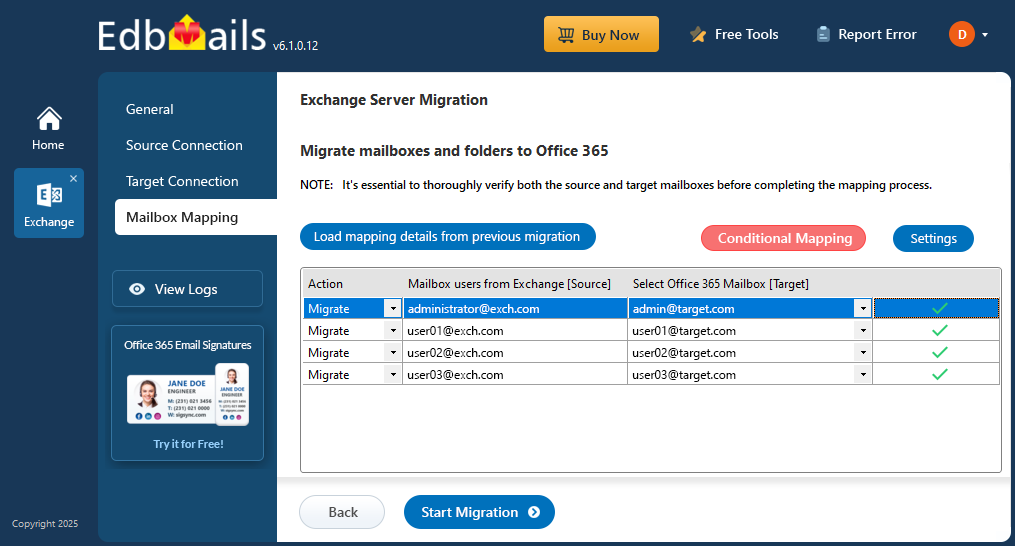
- EdbMails automatically maps the source mailboxes to the target mailboxes, saving you the manual effort.
Step 6: Start Exchange Archive mailbox to Office 365 migration
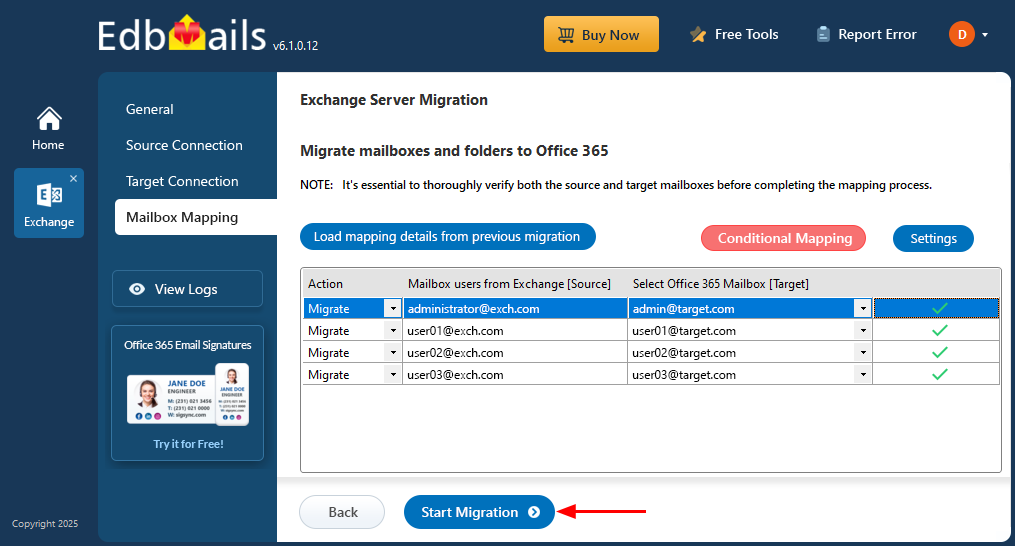
- Click the 'Start Migration’ button to initiate the migration process.
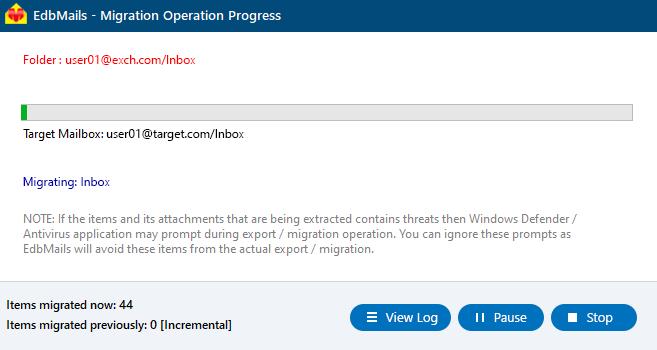
- You can track the migration in real time using the progress bar, with the flexibility to pause or resume the process at any time. Once the migration is complete, click the ‘View Log’ button to view detailed information about the migrated folders and mailbox items in the migration report.
Archive mailbox to Office 365: Post-migration actions
Step 1: Modify MX records to direct email to Office365Update MX records for directing email to the new server. Additionally, configure the Autodiscover record to ensure that migrated mailboxes connect smoothly with email clients like Outlook.
Step 2: Create a new Outlook profile for users in the updated domainIf users experience difficulties connecting Outlook to Office 365 mailboxes, manually set up their Outlook profiles in the new domain.
Step 3: Uninstall and decommission the source Exchange serverFollow these steps to safely decommission your on-premises Exchange server after migrating to Office 365:
- Verify mailbox migration: Ensure all mailboxes have been successfully migrated to Office 365.
- Check migration status: Use the Exchange Admin Center or the Get-MailboxStatistics PowerShell cmdlet to confirm mailbox data.
- Confirm Outlook connectivity: Make sure all Outlook clients are connected to Office 365. Test connectivity using the Test-OutlookWebServices cmdlet.
- Disable mail flow: Stop mail delivery through the old server by removing the Receive Connector or disabling the SMTP service.
- Verify public folder migration: Confirm that all public folders are migrated to Office 365 using the Get-PublicFolder cmdlet.
- Uninstall Exchange: Remove the Exchange Server software through the Control Panel.
- Remove related resources: Delete any remaining Exchange-related hardware, virtual machines, or configurations.
- Clean up directory entries: Ensure no mailboxes or public folders remain, then remove the server from Active Directory and DNS.
- Finalize decommissioning: Once all services and connections are verified as functional, proceed to decommission the on-premises Exchange server completely.
Troubleshooting guide to migrate Exchange Archive mailbox to Office 365
Explore the Exchange migration troubleshooting guide and public folder troubleshooting section for possible fixes related to migration errors. For additional insights on EdbMails Exchange migration, visit the frequently asked questions
Benefits of EdbMails to migrate Archive mailbox to Office 365
EdbMails Exchange migration tool simplifies the migration of archive mailboxes to Office 365. With its intuitive graphical interface, you can easily choose and migrate folders, mailboxes, and email items without relying on PowerShell scripts, making the process more efficient than manual methods.
- No data loss or downtime : EdbMails guarantees that your data remains intact and that there is no downtime during the process to migrate Exchange archive mailbox to Office 365.
- Flexible migration capabilities : Easily migrate Exchange archive mailboxes of any size between Exchange server and Office 365 without hassle.
- Suitable for all business sizes : EdbMails Exchange migration software is perfect for both small businesses and large enterprises seeking to migrate Exchange archive mailboxes to Office 365.
- Incremental migration feature : EdbMails supports incremental migration functionality and ensures that no duplicate items are migrated during subsequent migration operations.
- Automated features for efficiency : EdbMails streamlines the migration process with automated mailbox and folder mapping, eliminating manual setup. It automatically creates mailboxes on the target server and manages Office 365 throttling to optimize bandwidth usage. These features significantly reduce administrative effort and enhance overall efficiency during migration.
- Safe data replication : EdbMails Exchange migration accurately migrates mailbox items and folders from the source to the destination without affecting the integrity of your data.
- Enhanced Security : EdbMails utilizes modern authentication along with TLS encryption to ensure secure migration to Office 365.
- 24/7 free tech support : Benefit from free 24/7 tech, along with a trial option that allows you to evaluate the softwares performance.
Additional resources:


