Exchange 2013 to 2019 Migration
Exchange Server 2013 is reaching the end of support, and organizations face increased risks such as security vulnerabilities, software issues, and performance instability. Migrating to Exchange Server 2019 is the best way to strengthen your IT infrastructure with improved security, scalability, and modern collaboration features.
Exchange 2019 simplifies the server architecture by combining roles into Mailbox and Edge Transport servers, making management more efficient. It also offers a faster Outlook on the Web (OWA), better integration with SharePoint 2019, and enhanced data protection capabilities, helping businesses boost productivity and reduce administrative overhead. Before you migrate from Exchange 2013 to 2019, proper planning and environment assessment are crucial. Understanding system prerequisites, supported configurations, and the step-by-step migration process ensures a seamless migration with zero data loss or downtime.
Manual Exchange migrations are often complex, time-consuming, and prone to errors. EdbMails Exchange Migration software offers a secure and automated way to migrate Exchange 2013 to 2019 with ease. It enables seamless transfer of mailboxes, public folders, and archive mailboxes while maintaining complete data integrity. With features like incremental migration to prevent duplicates, automatic mailbox mapping, and concurrent mailbox migration, EdbMails ensures speed, accuracy, and minimal downtime during the process. Its intuitive interface and advanced security features make it a trusted choice for organizations looking for a reliable Exchange 2013 to 2019 migration solution.
In the sections below, you’ll learn how to configure Exchange 2013 and 2019 coexistence, prepare your environment, follow a step-by-step migration plan, complete post-migration tasks, and leverage EdbMails to achieve a smooth and successful Exchange migration.
Exchange 2013 and Exchange 2019 coexistence scenario
A significant advantage is that Exchange 2013 and 2019 can coexist within the same Active Directory forest, provided that Cumulative Update 21 (CU21) is installed. This setup allows organizations to run both versions of Exchange simultaneously, ensuring that users can access their mailboxes through either platform without interruption.
To configure between Exchange 2013 and 2019 coexistence, you'll need to undertake a few important steps.
- Deploy Exchange 2019 in your existing Exchange 2013 setup.
- Set up the Exchange 2013 and Exchange 2019 servers to function collaboratively.
- Migrate mailboxes from Exchange 2013 to Exchange 2019.
- After all mailboxes have been migrated, remove the Exchange 2013 server from your infrastructure.
It is crucial to recognize that Exchange 2013 and 2019 coexistence is supported only in specific scenarios, particularly during the upgrade Exchange 2013 to Exchange 2019 migration. Furthermore, it is necessary to utilize Windows Server 2016 domain controllers, which are compatible with both Exchange versions. Operating both versions within a production environment is generally not recommended, as it may introduce complexity and elevate the risk of encountering issues. Ideally, organizations should aim to upgrade all Exchange servers to the same version or execute a complete mailbox migration to ensure optimal performance and stability.
Best Way to Migrate Exchange 2013 to 2019
When planning an Exchange 2013 to 2019 upgrade, EdbMails Exchange Migration software stands out as a reliable and efficient solution. Designed to simplify complex migration tasks, EdbMails includes advanced features such as automated throttling management for optimal performance and supports the migration of multiple mailboxes simultaneously.
The software ensures a secure and complete data transfer, preserving emails, contacts, calendars, attachments, folder structures, and permissions without any risk of data loss. Its intuitive interface makes the migration process simple and accessible, even for users with minimal technical experience. EdbMails also supports various migration scenarios, making it a dependable choice for organizations moving from Exchange 2013 to Exchange 2019. For businesses seeking a smooth, secure, and well-managed Exchange migration, EdbMails offers a comprehensive, all-in-one solution.
Exchange 2013 to 2019 Migration Planning
Effective planning is crucial for a successful Exchange 2013 to 2019 migration. Proper preparation helps ensure smooth data transfer, minimal downtime, and accurate configuration of the target Exchange environment. The following checklist outlines key steps to simplify and streamline the migration process:
- Prepare the target Exchange environment and verify that sufficient bandwidth and system resources are available.
- Document your existing setup, including Active Directory details, operating systems, firewall and network configurations, port numbers, installed applications, and user lists.
- Install Exchange Server 2019 and configure mailboxes, public folders, and permissions as required.
- Run a pilot migration with a few mailboxes to test connectivity, performance, and data integrity before proceeding with the full migration.
- Perform the Exchange 2013 to 2019 migration, and update MX records to route emails correctly to the new server.
- Create new Outlook profiles for all users and confirm that emails are being received accurately.
- Once validation is complete, decommission the Exchange 2013 server and notify end users about the upgrade and new environment access details.
Thorough planning at each stage ensures a seamless transition to Exchange 2019 with no data loss or workflow disruption.
Exchange 2013 to 2019 Migration Prerequisites
- Step 1: Check that your system meets the Exchange 2019 setup requirements
Before you migrate your mailbox data to Exchange 2019, ensure that your current environment and hardware is compatible for the transfer. The following links will help you to know about the Exchange 2019 system requirements for hardware, network, .NET framework and operating system.
- Network and directory requirement for Exchange 2019
- Hardware Requirements for Exchange 2019
- Supported operating systems for Exchange 2019
- Supported Outlook clients in Exchange 2019
- Lync/Skype Business Server integration with Exchange 2019
Exchange server version Coexistence scenario Requirement Migration Exchange 2019 Exchange 2019 can coexist with 2013 Exchange 2013 must be updated to CU21 or later EdbMails Exchange migration software enables direct Exchange 2013 to 2019 migration Note: If you have the Domain Controllers (DC) running on Windows Server 2008, ensure that you first transfer the roles to a Domain Controller running Windows 2012 R2 or higher before you decommission any of the earlier DC’s. Exchange 2019 requires Active Directory forest functional level of Windows Server 2012 R2 or higher. See the Exchange 2019 server supportability matrix.
- Step 2: Prepare your system with the following Exchange server 2019 prerequisites
Complete the following prerequisites for Active Directory, Windows 2019 Mailbox server, and Windows 2019 Edge Transport servers before installing Exchange server 2019. Ensure you have .NET Framework 4.8 installed along with Visual C++ Redistributable Package for Visual Studio 2012.
- Step 3: Select the Exchange 2013 to 2019 migration approach
Evaluate staged, cutover, or Hybrid Exchange migration options. EdbMails supports all the migration methods. The software allows uninterrupted mailbox usage, ensuring continuous Exchange server access throughout the migration process.
Current environment and requirement Ideal migration approach Migration flow You want to perform a full migration to Exchange 2019 in a single event and in a limited time frame. Exchange 2013 to 2019 cutover migration Set up your target Exchange 2019 server and migrate all mailboxes at once. Best suited for migrating large mailboxes in a single sitting. You have limited time and want to migrate mailboxes in phases or during weekends. Exchange staged migration Migrate mailbox data in batches, starting with the most recent data, followed by the older items. You want to migrate Exchange 2013 mailboxes to a hybrid Exchange 2019 and Office 365 environment. Migrate Exchange 2013 to 2019 Hybrid Migrate mailboxes from the source server to a hybrid Exchange 2019 and Office 365 setup for flexible management. Note: The migration path depends on the number of mailboxes you want to migrate, size of the data and your organizational requirements. Use the Exchange deployment assistant to help you decide on the path.
- Step 4: Prepare the destination Exchange server 2019 for migration
Following are the essential steps for installing and configuring the Exchange 2019 server for migration.
- Prepare the AD and domains
- Before installing Exchange server 2019, prepare your Active Directory forest and its domains for the new version of Exchange server.
- If you have a separate team to manage the Active Directory schema, must extend the active directory schema, else proceed to the next step to prepare the Active Directory.
- If you have multiple domains you need to additionally prepare the Active Directory domains.
- Install Exchange server 2019
Ensure that you meet the server system requirements and prerequisites as outlined previously. Next, install Exchange 2019 mailbox server and edge transport server using the setup wizard. Microsoft recommends installing Exchange 2019 on Windows Server core for best experience.
- Prepare a clean Exchange 2019 target environment
- Install and upgrade Exchange to the latest cumulative update to keep your server up to date.
- Create and configure a Send connector to send mail outside the Exchange organization.
- By default, Exchange automatically creates receive connectors for inbound mail flow when the mailbox server is installed. However, if you want to configure custom receive connectors for certain mail flow scenarios, follow the steps in the link.
- Add accepted domains to allow recipients to send and receive email from another domain.
- Configure the default email address policy to add the accepted domain to every recipient in the organization.
- Configure external URLs (domains) on the virtual directories in the Client Access (frontend) services on the Mailbox server to allow clients to connect to your server from the internet (outside the organization’s network).
- Configure internal URLs on the virtual directories in the Client Access (frontend) services on the Mailbox server to allow clients to connect to your server from the internal network.
- Configure SSL certificates from a third-party certificate authority for services such as Outlook Anywhere and Exchange ActiveSync.
- Verify the Exchange server installation by running the command Get-ExchangeServer on the Exchange Management Shell (EMS)
- Create mailboxes on the target Exchange 2019 server
You can choose EdbMails to automatically create mailboxes on your target Exchange 2019 server. However, if you prefer to create them manually, refer to the link below:
Steps to create mailboxes in Exchange 2019 server
If you are planning to migrate public folders from Exchange 2013 to Exchange 2019, ensure that you create the public folder on the target server and assign the necessary admin permissions.
- Install cumulative updates (CU) on Exchange server 2013
To migrate Exchange 2013 to 2019, ensure to install the latest cumulative updates (CU) on the source server (2013).
- Create trust relationship between forests (Optional)
A forest trust is an authentication between two domains within the same Active Directory forest which creates a trust between two root domains for exchanging information. By creating a trust in advance, it is possible to address the trust issues during or after the migration.
Note: This step applies to Windows Server 2008, Windows Server 2008 R2 and Windows Server 2012. Creating a trust relationship is not required for SBS based environments.
- Assign management roles to the admin account
Ensure that you have set the following permissions to the admin account on the source (2013) and target server (2019)
- On the source server:
- ApplicationImpersonation
- View-Only Configuration - Run the cmdlet New-ManagementRoleAssignment using the Exchange Management Shell to assign the View-Only Configuration role to the admin.
- Organization Management role group. It is an elevated permission that is required to migrate Public folders.
- On the target server:
- ApplicationImpersonation
- View-Only Recipients
- View-Only Configuration
- On the source server:
- Verify the mailbox of the admin account
Check to see if the admin account that has been assigned management roles has a valid and non-hidden mailbox on the Exchange 2013 server. This property also applies to all the other user mailboxes.
- Configure the throttling and message-size limits
You can manually change the EWS throttling and message size limits on the target Exchange 2019 server by following the steps outlined in the links below.
- Prepare the AD and domains
- Step 1: Check that your system meets the Exchange 2019 setup requirements
Exchange 2013 to 2019 Migration Step-by-Step Guide
Upon completion of the pre-migration preparations, proceed with the Exchange 2013 to 2019 migration using EdbMails.
- Download and install the EdbMails application on a Windows computer.
System requirements for Exchange 2013 to 2019 migration.
- Start the EdbMails application and log in using your registered email ID and password. If you haven't registered yet, click the 'Start Your Free Trial' button to proceed.
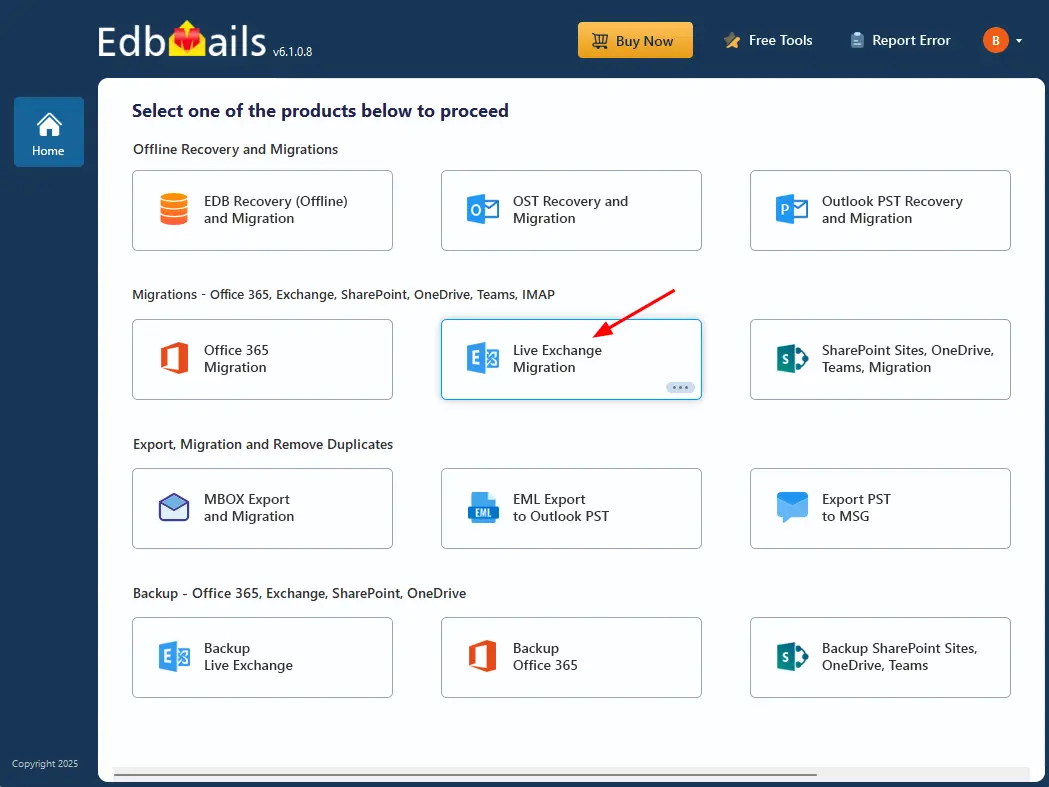
- Select ‘Live Exchange Migration’ option.
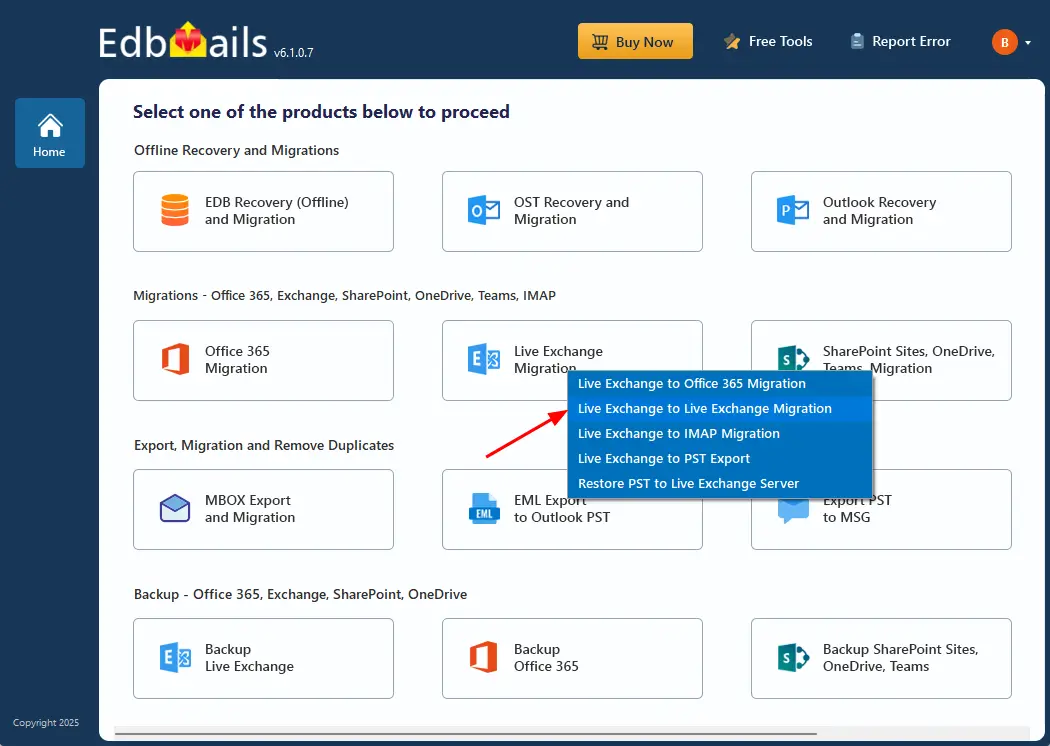
- Select 'Live Exchange to Live Exchange Migration' option.
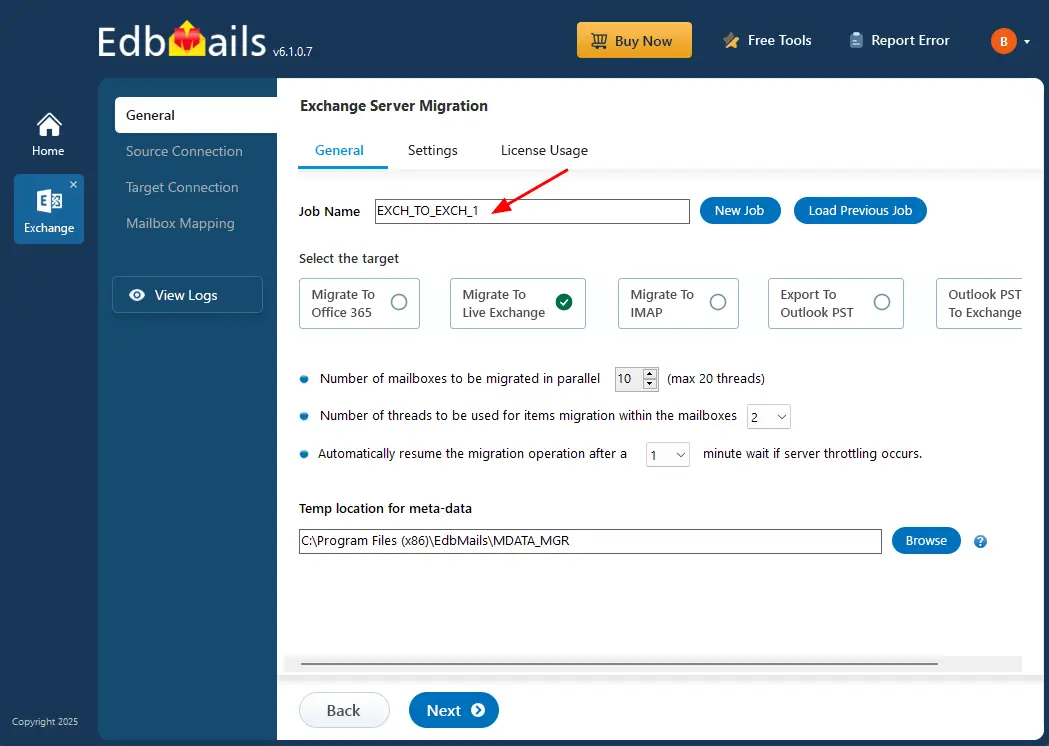
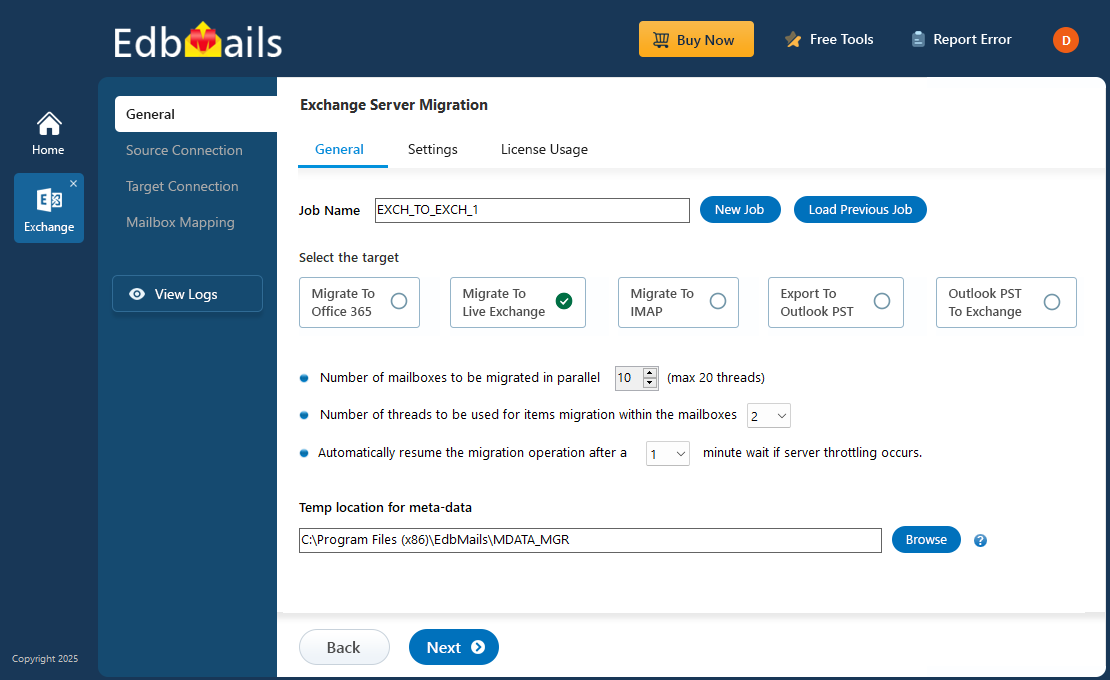
- You can proceed with the default name or click 'New Job' to rename it as needed.
Step 2: Connect to source Exchange server 2013
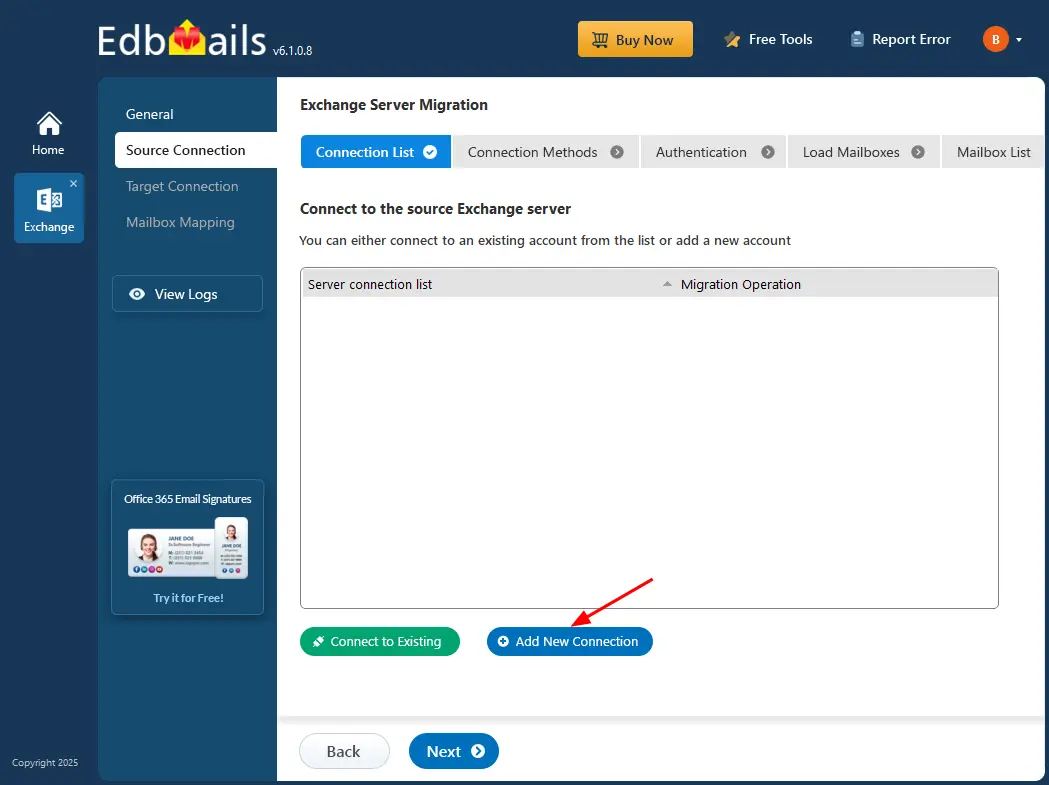
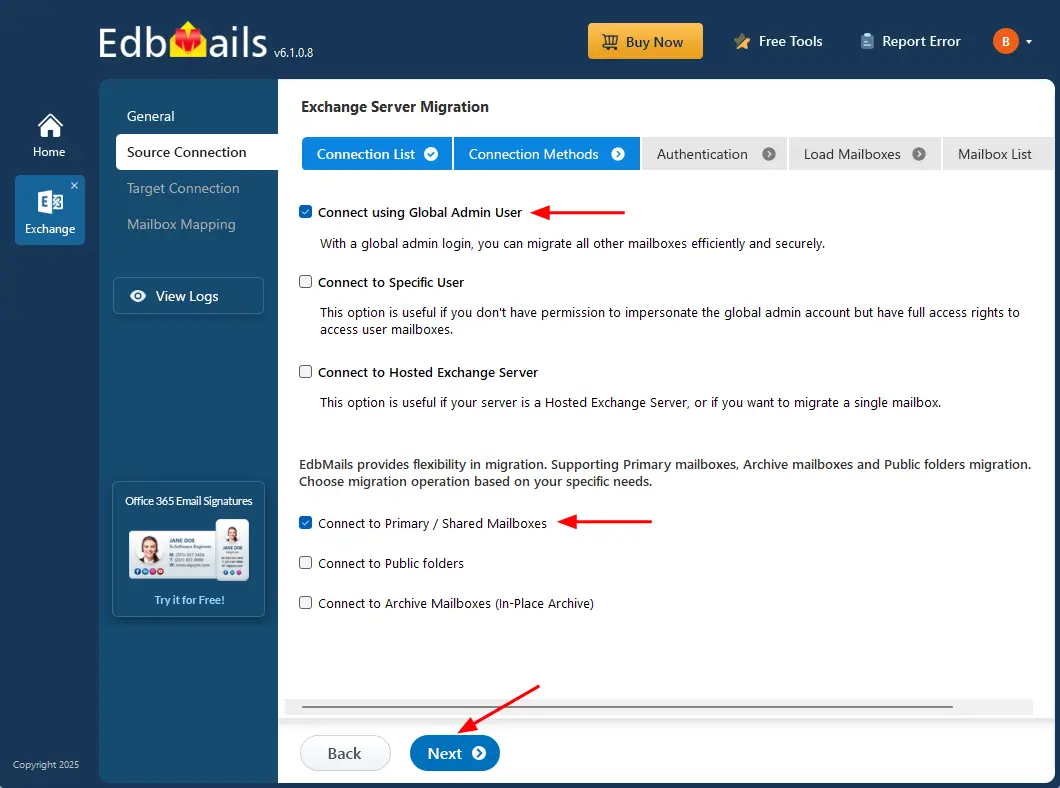
- Click ‘Add New Connection’ to set up a fresh source Exchange 2013 server connection, or select an existing one from the list and click ‘Connect to Existing’ to proceed.
- Select the required connection options and click the ‘Next’ button.
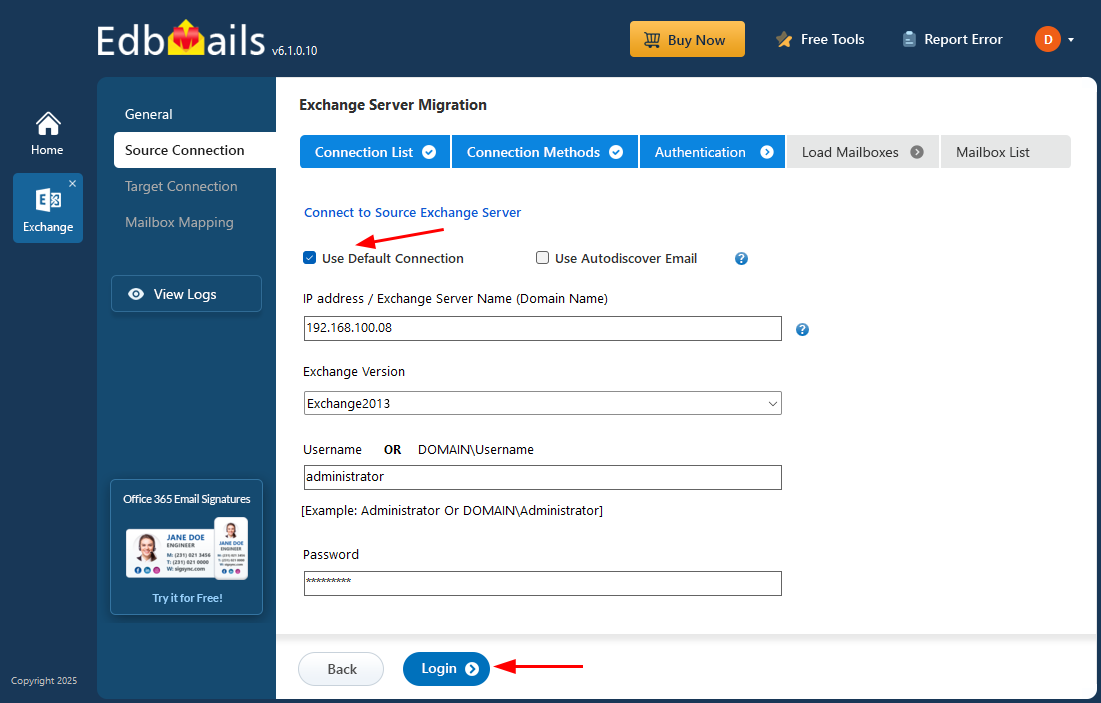
- Enter the source Exchange 2013 server details and click the ‘Login’ button
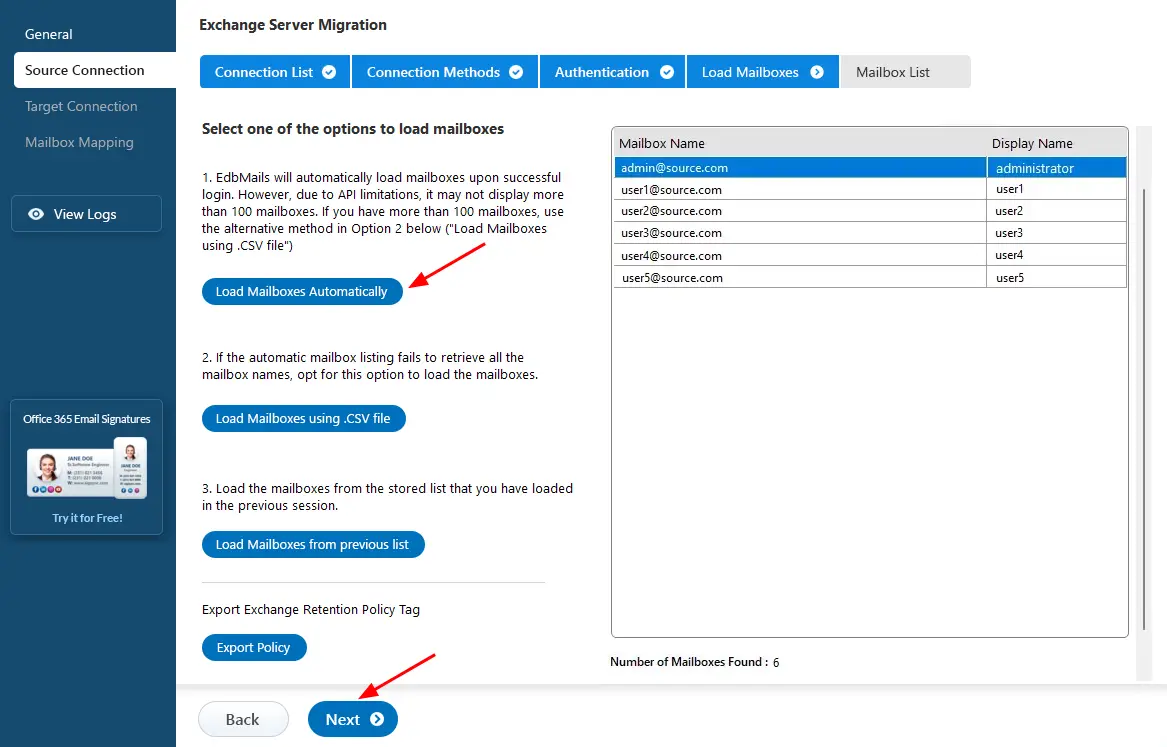
- After successfully logging in to your source Exchange server, EdbMails automatically loads the mailboxes. However, due to Microsoft API limitations, you may see only up to 100 mailboxes listed. If you have more than 100 mailboxes, use the 'Load Mailboxes using .CSV file' option to load the complete list.
Step 3: Select Exchange 2013 mailboxes
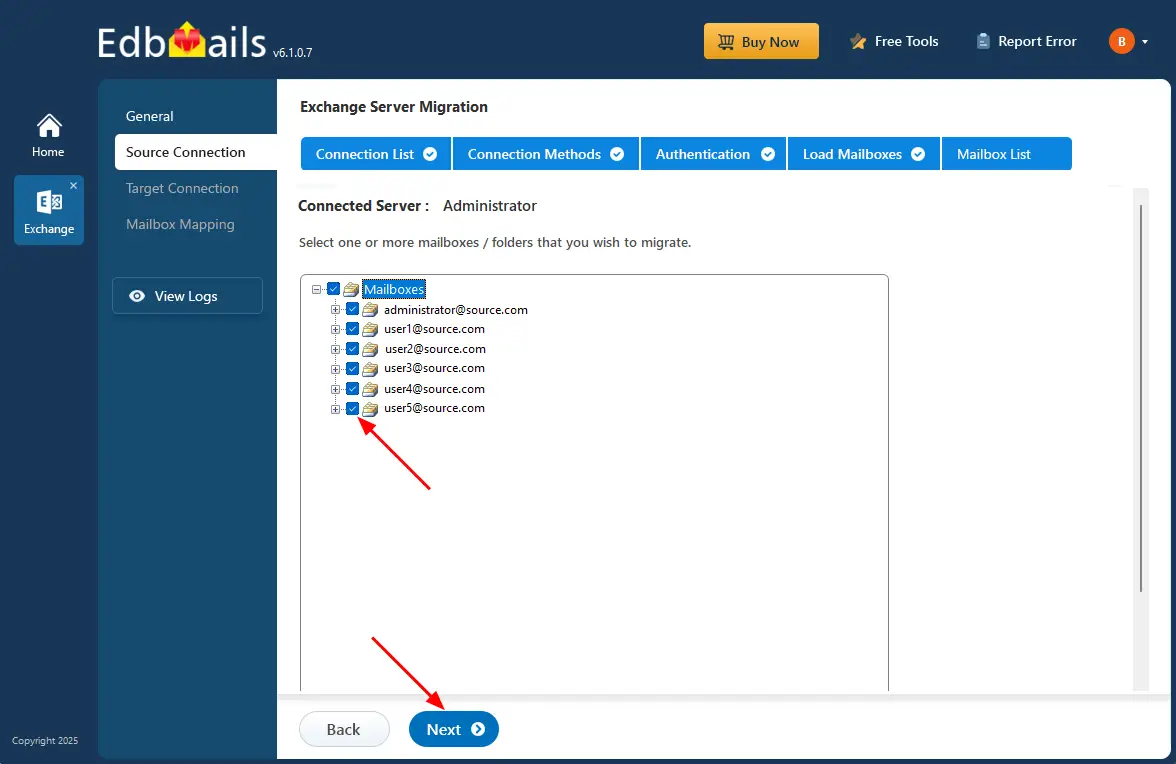
- Choose the mailboxes or folders you wish to migrate from the source Exchange 2013 server.
- Click the ‘Next’ button.
Step 4: Connect to target Exchange server 2019
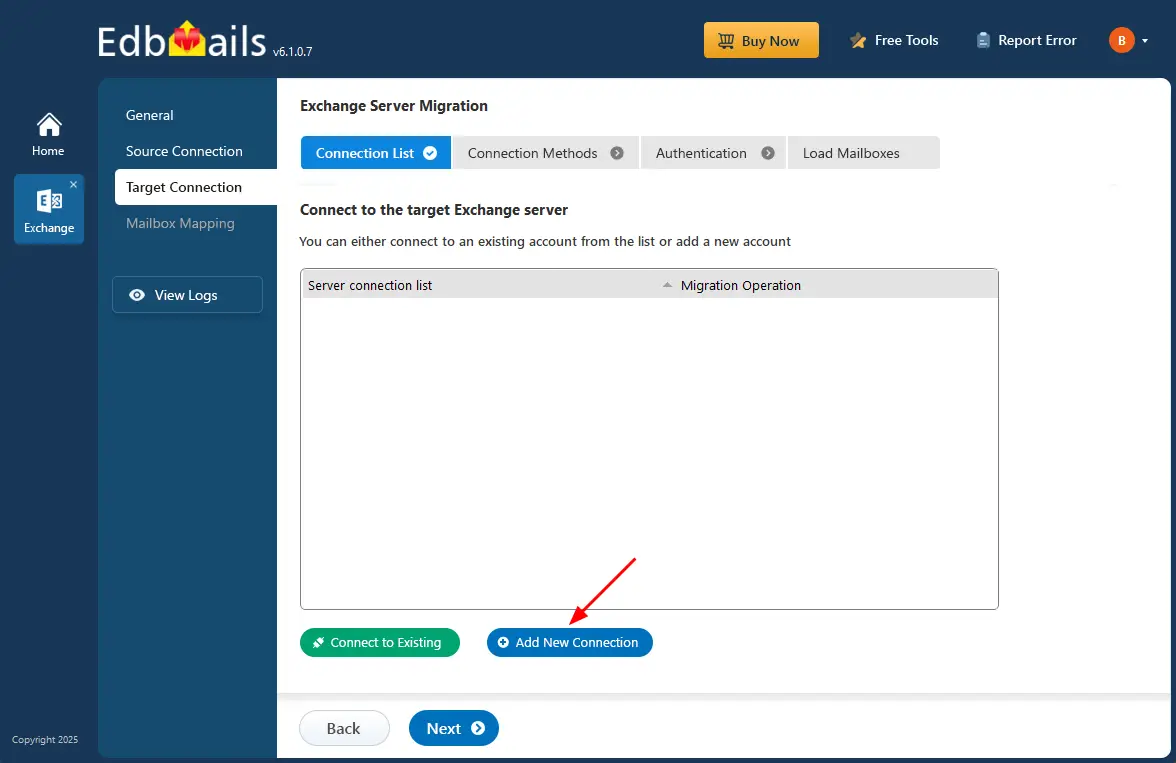
- To establish a new connection with the target Exchange 2019 server, click ‘Add New Connection’. If you've connected previously, select an existing connection from the list and click ‘Connect to Existing’ to proceed.
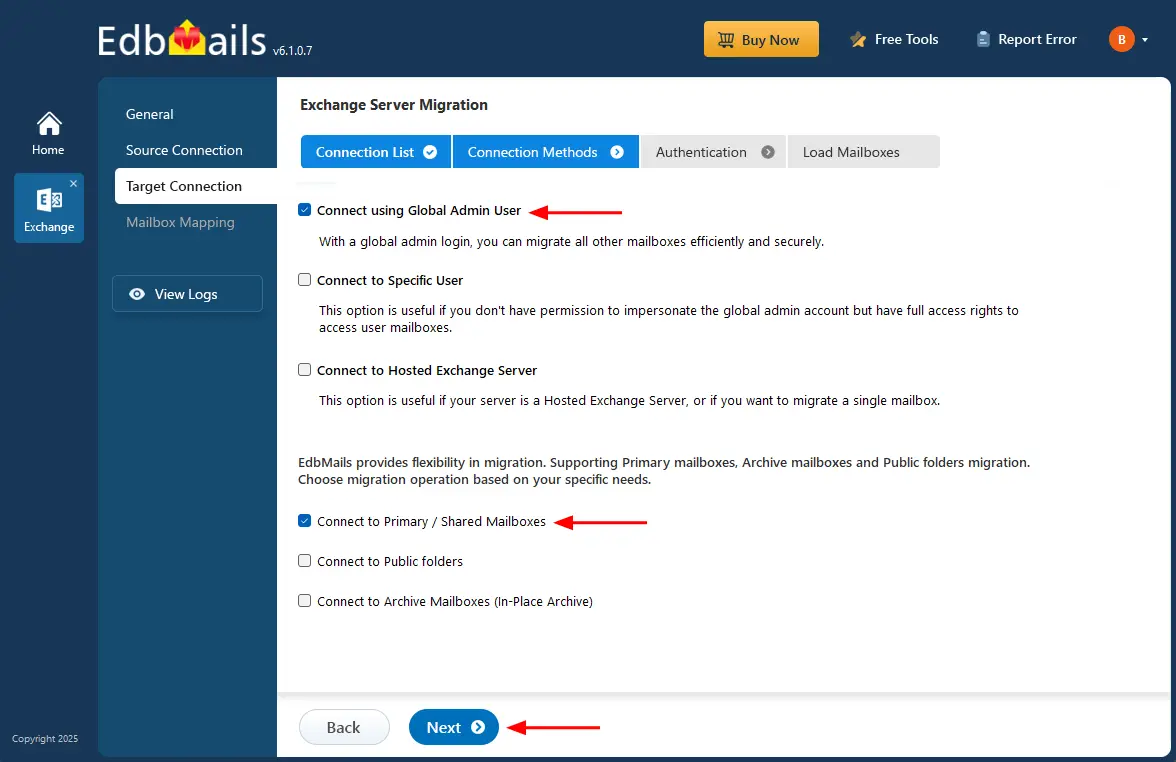
- Choose the required options and click the ‘Next’ button.
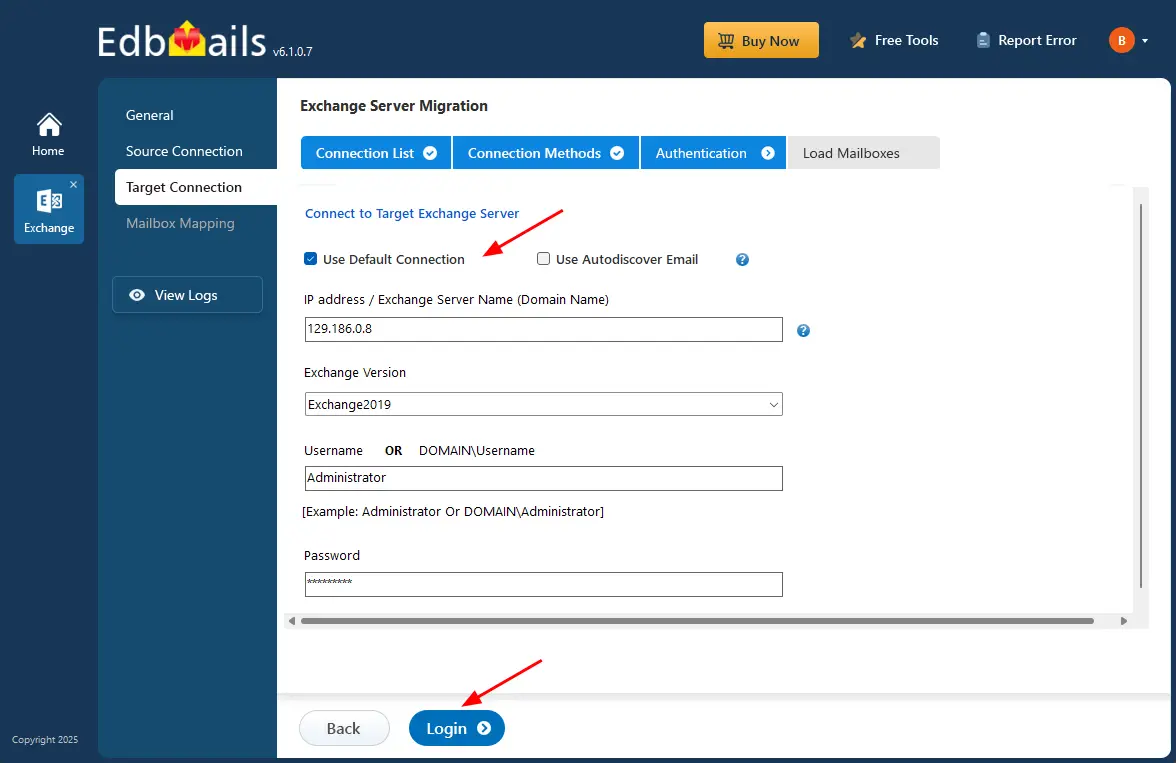
- Enter the target Exchange 2019 server details and click ‘Login’ to continue.
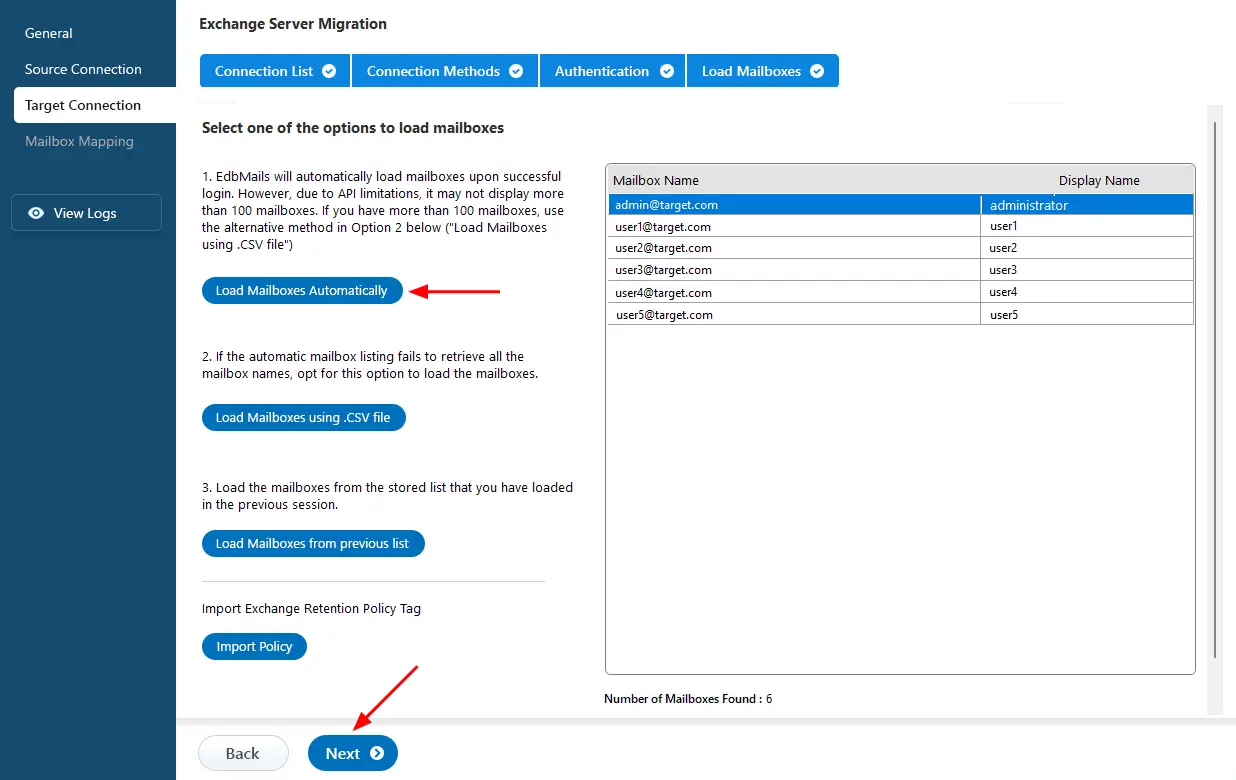
- select the required option for loading the target Exchange 2019 server mailboxes.
Step 5: Exchange 2013 to 2019 mailbox mapping
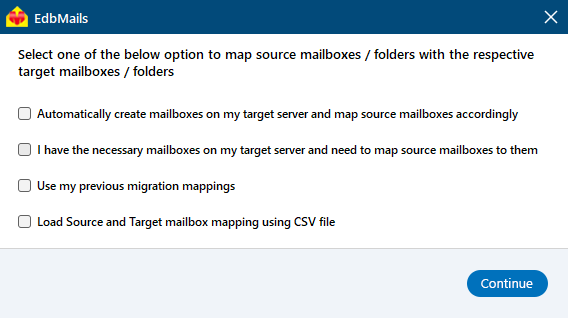
- Select the required mapping option.
- If EdbMails is installed on your target Exchange server, you can opt to automatically create mailboxes on the target Exchange server
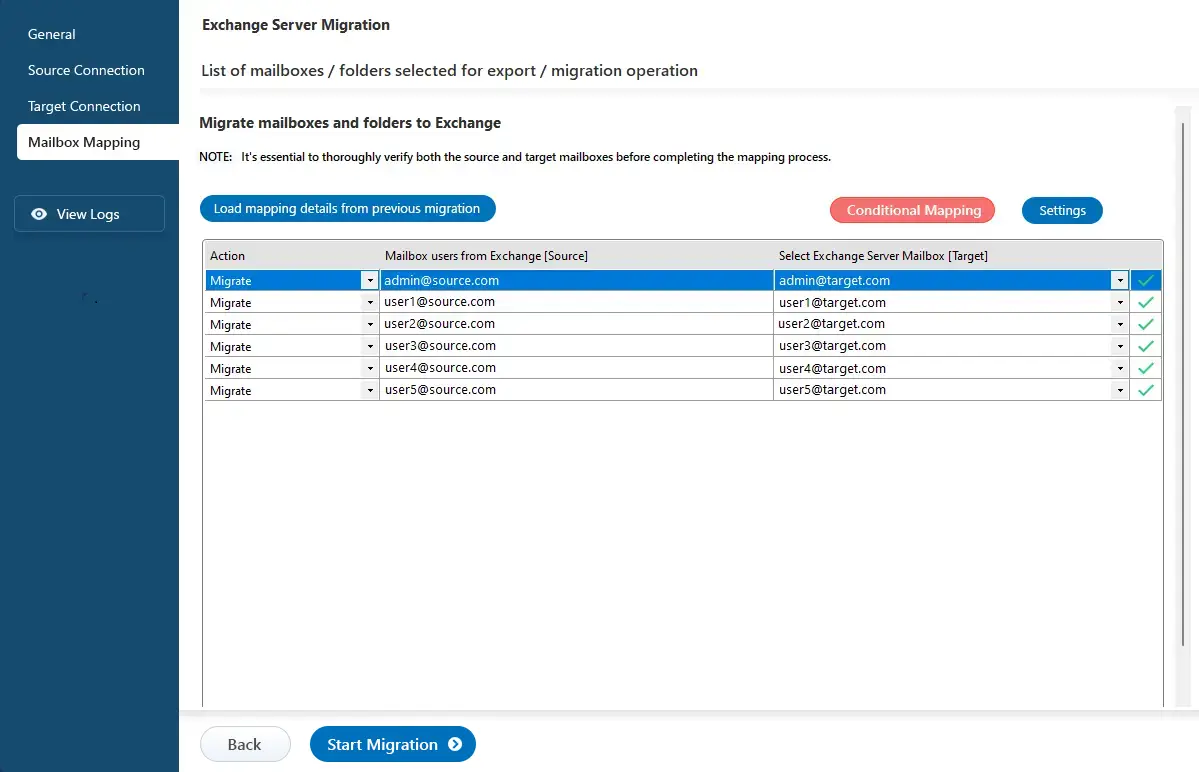
- EdbMails automatically maps mailboxes between the source and the target Exchange servers. This feature is especially useful when migrating a large number of mailboxes, as it reduces manual effort and saves time during the overall migration process.
Step 6: Start Exchange 2013 to 2019 migration
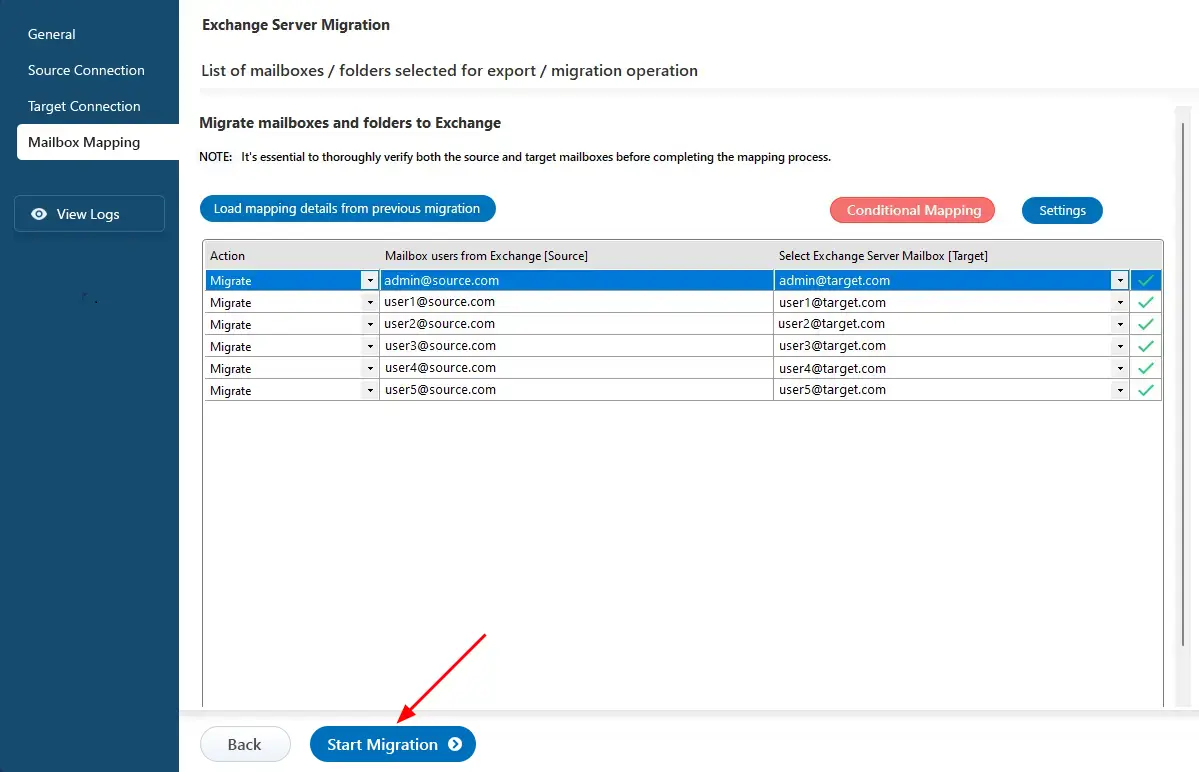
- After completing the mailbox mapping, click the ‘Start Migration’ button to initiate the migration process.
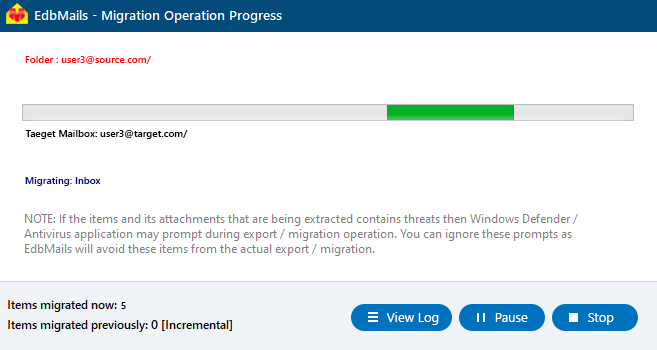
- Track the migration status via the progress bar in real time. Once the migration is complete, you will see a migration completion message. Click the ‘View Logs’ button to access the migration report.
- Download and install the EdbMails application on a Windows computer.
Exchange 2013 to 2019 post-migration tasks
The following post-migration activities help you with the proper mail flow so that your users correctly receive emails.
- Step 1: Update the MX records to point to Exchange 2019 server
To ensure email functionality on Exchange Server 2019, update the MX record for proper message delivery to the new server. Also, configure the Autodiscover record so Outlook can connect to the migrated mailboxes.
- Step 2: Create a new Outlook profile for users in the new domain
Exchange 2019 is compatible with Outlook 2013 and later. Uninstall any earlier versions and ensure that you have the latest client installed to prevent conflicts. Next, configure the Outlook profile for each user in your domain if Outlook has problems connecting to the new Exchange server.
- Step 3: Test email connectivity and monitor the server performance
Test email connectivity from various clients and devices to ensure that all users can send and receive email. Monitor the performance of the new servers and make sure that they are running smoothly.
- Step 4: Decommission Exchange 2013 after the 2019 migration
- Remove the Exchange server from the organization: Remove the Exchange server from the organization by using the Exchange Management Console or PowerShell.
- Uninstall Exchange 2013: After the server has been removed from the organization, uninstall Exchange from the computer.
- Open the Control Panel and select 'Uninstall a program'.
- Find 'Microsoft Exchange Server 2013' in the list of installed programs
- Select 'Uninstall'.
- Remove the server from Active Directory: Finally, remove the server from Active Directory. To do this, open the Active Directory Users and Computers console, locate the server in the list of computers, and delete it.
Note: Before you start the decommission, it is important to ensure that all Exchange services have been stopped and that there are no active connections to the server. This will prevent any data loss or disruption to your organization during the decommission process. Follow the instructions provided on Microsoft's website to learn how to decommission Exchange Server 2013
- Step 1: Update the MX records to point to Exchange 2019 server
Troubleshooting guide for Exchange 2013 to 2019 migration
Refer to the Exchange migration troubleshooting guide for potential solutions to any migration errors you may encounter. For additional information about EdbMails Exchange migration, please check the frequently asked questions (FAQs).
Exchange 2013 to 2019 Migration Best Practices
Following best practices ensures a smooth, secure, and efficient Exchange 2013 to 2019 migration with minimal disruption and optimal performance.
- Create a detailed migration plan: Define the migration scope, timeline, goals, and resources. Identify key stakeholders and assign clear responsibilities to ensure proper coordination.
- Assess and clean up existing data: Review mailbox data and remove unnecessary or outdated items such as redundant emails and obsolete attachments. This helps reduce migration time and storage requirements.
- Test in a pilot environment: Set up a test environment and perform a trial migration with a small dataset. This helps identify potential issues and validate the overall process before the full migration.
- Set impersonation rights for admin accounts: If you’re using a Global admin account to connect to Exchange servers, assign the required impersonation permissions on both the source and target servers for a seamless migration.
- Optimize migration performance with EdbMails: EdbMails allows concurrent mailbox migration by default, 10 mailboxes at once, which can be increased up to 20 to speed up performance. Installing EdbMails on multiple systems can further improve migration efficiency and reduce total time.
- Use incremental migration to avoid duplicates: Utilize EdbMails incremental migration feature to transfer only new or modified items during subsequent migrations. This prevents data duplication and saves bandwidth.
- Verify mailbox mapping before migration: Double-check that source and target mailboxes are accurately mapped to avoid missing or misplaced items.
- Post-migration validation: After migration, test email flow, calendar synchronization, contacts, and shared mailbox access to confirm everything is functioning correctly.
- Decommission Exchange 2013 safely: Once Exchange 2019 is fully tested and stable, remove unused Exchange 2013 components. Cleaning up legacy infrastructure enhances security, reliability, and reduces maintenance overhead.


