EdbMails EDB Recovery and Migration software
  • Products
    Exchange EDB / Email Recovery Tools
    • EDB Recovery and MigrationRecover EDB to PST, EDB to Office 365 and Exchange NO Duplicate Migration
    • OST Recovery and MigrationRecover OST to PST, OST to Office 365 and Exchange Migration
    • PST Recovery and MigrationRecover Outlook PST, PST to Office 365 and Exchange Migration
    • MBOX Export and MigrationExport MBOX to PST, MBOX to Office 365 and Exchange Migration
    • NSF Export and MigrationExport NSF to PST, NSF to Office 365 and Exchange Migration
    • EML to PST ExportEML files export to Outlook PST format
    • PST to MSG ExportOutlook PST files export to MSG format
    • MSG to PST ExportExport MSG files Outlook PST files
    Exchange and Office 365 Migration
    • Exchange Server MigrationMigrate Exchange 2007, 2010, 2013, 2016, 2019 to Office 365 tenants. Also, migrate between Exchange servers and PST
    • Office 365 MigrationMigrate Source Office 365 tenants to Destination Office 365 tenants. Also, migrate to Exchange Server and PST
    • IMAP Email Backup & MigrationMigrate all IMAP email servers (Gmail, Zimbra, Zoho, Yahoo etc.), Office 365, Exchange and Backup to Outlook PST
    • SharePoint Online MigrationMigrate documents, files and folders from SharePoint sites
    • OneDrive for Business MigrationMigrate documents, files and folders from OneDrive
    • Microsoft Teams MigrationMigrate Teams, documents, files and folders etc.
    Exchange and Office 365 Backup
    • Office 365 BackupIncremental, Granular, Encrypted and Compressed Office 365 Mailboxes Backup
    • Exchange Server BackupIncremental, Granular, Encrypted and Compressed Exchange Mailboxes Backup
    • SharePoint, OneDrive & Teams BackupBackup Online site collections, Team sites, Office 365 groups, all documents etc.
    • Duplicate Remover - Office 365 & Exchange Remove duplicate emails, calendars, contacts, journal etc. from Office 365 and Exchange
    Go to products
  • Features
  • FAQ
  • Pricing
  • Download
  • Support
  • Sign in
User’s Manual
Exchange Server Migration

User Manual

User Manual

  • Exchange Migration Overview
  • Initial Setup
  • System Requirements
  • Installation
    • Installation process
    • Reinstall or Upgrade
    • How to uninstall
    • Migration speed
  • FAQ
    • General
    • Migration Free Trial / Demo
    • Migration License
    • Before Migration
    • Migration - Steps
    • After Migration
  • Videos
    • Exchange to Exchange
    • Exchange to Office 365
    • Exchange to IMAP
    • Exchange to PST
    • Public Folder to Office 365
    • Archive Mailbox to Office 365
    • Public Folder to Exchange
    • Archive Mailbox to Exchange
    • Restore Bulk PST files to Exchange
  • Screenshots
    • Exchange to Exchange
    • Exchange to Office 365
    • Exchange to PST
  • How it works?
    • Exchange to Exchange
    • Exchange to Office 365
    • Exchange to PST
    • Exchange to IMAP
    • Exchange Public Folder to Office 365
    • Exchange Public Folder to Exchange
    • Exchange 2010 to 2016 Public folder
    • Exchange 2013 Public folder to Office 365
    • Exchange 2016 Public folder to Office 365
    • Exchange Public Folder to Shared Mailbox
    • Archive Mailbox to Office 365
    • Archive Mailbox to Exchange
    • Hosted Exchange Migration
    • Hosted Exchange to Live Exchange Migration
    • Hosted Exchange to Office 365 Migration
    • Live Exchange to Hosted Exchange Migration
    • Hosted Exchange Public Folder to Office 365 Migration
    • Cross-forest migration from Exchange 2013 to Exchange 2019/2016
    • Hybrid Migration
    • Public folder Migration in Hybrid Environment
    • Migrate GAL and all address list
    • Disable msExchMailboxGuid
    • Exchange to Gmail Migration
    • Multiple PST files to Exchange server
  • Connect to Exchange server for multiple mailboxes migration
    • Connect with Global Admin
    • Connect to Multiple users using CSV file
    • Connect using full access permission
    • Connect individual users for Single / Specific user Migration
  • Connect to Hosted Exchange for its Migration
    • Connect with Full Access permissions
    • Connect to multiple users using CSV file
    • Connect to Individual user for migration
  • Connect to Office 365
    • Modern Authentication Using OAuth 2.0
      • Microsoft 365 modern authentication
      • Automatic Registration
      • Manual Registration
    • Connect with Global Admin
    • Connect to Office 365 with full access permission
    • Connect to Office 365 with CSV file option
    • Connect to Office 365 as single user mailbox
  • Set Exchange Server Impersonation rights
    • Exchange 2007 and below
    • Exchange 2010, 2013, 2016 and 2019
    • Set using Exchange Server GUI
  • Knowledge Base
    • Exchange to Exchange Migration
    • Exchange to Office 365 Migration
    • Migrate Legacy Exchange to Latest Exchange
    • Cross-forest and cross-domain migration
    • Public folder, Shared mailbox migration
    • Archive mailbox migration
    • Hosted Exchange Migration
    • Incremental migration
    • Cutover, staged and hybrid migration
    • Migrate SBS 2003, 2008, 2011 to a Modern Exchange Environment
    • Export Exchange Mailbox to PST
    • Secure Exchange Migration
    • Selective Mailbox / Folder Migration
    • Automatic Mailbox Mapping
    • Assign Public Folder to one target destination
    • Multiple PST Restore
    • No Impact on users - Zero downtime
    • Migrate Email Rules, Forwarding and Junk Email Configuration
    • Exchange migration speed and throttling management
    • Support for all the languages
    • Advanced settings and options
    • GAL and all address lists Migration
    • Exchange migration reports
    • Best Exchange Migration software
    • Exchange migration checklist
    • Exchange migration manager
    • Feature rich Exchange migration software
    • Exchange to Office 365 migration planning
    • Exchange server migration tips
    • Export Exchange server users to CSV
  • Understanding the Application
    • Program's Component
    • Migration
    • Incremental Migration
    • Exchange Throttling Policy
  • Migration Types
    • Cutover Migration
    • Staged Migration
    • Hybrid Migration
  • Map the Mailboxes
  • Migration Walkthrough
    • From Exchange 2003
    • From Exchange 2007
    • From Exchange 2010 to Exchange 2019
    • From Exchange 2010 to Exchange 2016
    • From Exchange 2010 to Office 365
    • From Exchange 2013 to Exchange 2019
    • From Exchange 2013 to Exchange 2016
    • From Exchange 2013 to Office 365
    • From Exchange 2016 to Exchange 2019
    • From Exchange 2016 to Office 365
    • From Exchange 2019 to Office 365
    • From Office 365
    • Exchange 2013 mailbox to PST
    • Exchange 2016 mailbox to PST
    • Exchange 2019 mailbox to PST
    • Exchange 2010 mailbox to PST
  • Multifactor Authentication
    • Enable MFA in Office 365
    • Create App password for MFA
    • Disable Security Defaults
  1. Home
  2. Product
  3. Exchange Public folder migration to Exchange server | EdbMails
Download Buy Now

Exchange public folder migration

Public folders are a key feature of Microsoft Exchange, designed to enable seamless data sharing and collaboration among Outlook users. They serve as a central hub for accessing shared resources, helping teams stay organized and productive. Exchange Administrators manage access to these folders by assigning appropriate permissions, ensuring both secure and convenient data sharing.

EdbMails Exchange migration software provides a reliable and feature-rich solution for migrating public folders to any version of Exchange server, including Exchange 2019, 2016, 2013, 2010, and 2007. It ensures a smooth, secure migration with zero data loss, making it an ideal tool for organizations upgrading their Exchange servers.

EdbMails preserves the entire structure of your public folders, including all data, permissions, and hierarchies, ensuring that the post-migration environment mirrors the original setup. This eliminates the need for complex manual reconfigurations and guarantees that users experience uninterrupted access to shared resources.

Exchange Public folder to Exchange

One of the standout features of EdbMails is its incremental migration capability that migrates only new or modified data during subsequent migration operations. , preventing duplicates and optimizing band width. This is particularly useful for large-scale migrations, where data is continuously updated. It ensures that no items are lost during the migration process.

EdbMails includes advanced filtering options, allowing you to selectively migrate specific items, reducing the amount of unnecessary data transferred. Its automated folder mapping feature between the source and target Exchange servers simplifies the process further, eliminating manual effort.

With EdbMails, you get a user-friendly interface that requires no scripting or complex setups, allowing users to easily handle the migration. The software supports all versions of Exchange server, making it a versatile and comprehensive tool for anyone looking to perform an Exchange public folder migration.

  1. Top reasons for Exchange public folder to Exchange migration

    Exchange public folder migration is a strategic decision that can significantly enhance organizational efficiency and collaboration. Here are the top reasons to consider this migration:

    Access to enhanced features

    Migrating to a newer Exchange server allows organizations to leverage the latest features and functionalities, such as improved collaboration tools and advanced administrative capabilities. EdbMails Exchange migration software simplifies this migration process, ensuring a smooth transition so that users can take advantage of these enhancements immediately.

    Improved performance and scalability

    Newer Exchange versions are designed for better performance and can handle larger volumes of data efficiently. Migrating public folders using EdbMails ensures a seamless transfer, optimizing overall system performance and enabling organizations to scale as needed.

    Stronger security measures

    Each new version of Exchange introduces advanced security features to protect sensitive information. EdbMails Exchange migration tool facilitates a secure migration process, helping to safeguard public folder data against potential threats during the transition.

    Simplified management and administration

    Upgrading to a newer Exchange server reduces the complexity involved in managing public folders. EdbMails offers an intuitive interface and automated processes, making it easier for IT teams to manage and administer public folder data efficiently.

    Compliance with modern standards

    Migrating to the latest Exchange server ensures compliance with current regulatory standards and best practices. EdbMails supports the Exchange public folder migration process, helping organizations maintain compliance by accurately transferring public folder data with all data along with the permissions.

  2. Plan to Exchange public folder to Exchange migration

    Before Exchange Public Folder migration, it is essential to assess the requirements and prerequisites involved.

    Here are essential factors to evaluate when preparing your environment:

    • Total size and folder count: Analyze the overall size and number of public folders planned for migration.
    • Migration approach: Decide whether to migrate all folders at once or prioritize based on usage.
    • Network assessment: Evaluate your internet bandwidth and network configurations to ensure they can support the migration.
    • Destination options: Determine whether to transfer folders to dedicated public folders or shared mailboxes on the target server.

    Addressing these considerations will help ensure a smoother migration process.

  3. Pre migration activities on Exchange server

    It is essential to ensure that Exchange Server 2013 is updated to at least Cumulative Update 15 (CU15) or later, while Exchange Server 2016 should be at Cumulative Update 4 (CU4) before initiating the migration process.

    • For Exchange Server 2010, Service Pack 3 Release 3 or a higher version must be installed.
    • Assign the Server Management role group within Exchange Server.
    • Confirm that the management role for the admin account on the source Exchange server has been granted Application Impersonation permissions, and ensure that the mailboxes and associated folders intended for import are not excluded from address lists.
    • Assign admin access to all the public folders on the source Exchange server.

      Steps to assign admin permissions to Exchange public folders

    • Create public folder on the target Exchange server and assign admin permissions
  4. Steps for Exchange public folder to Exchange migration

    • Step 1: Download and Install the EdbMails application

      • Download and install the EdbMails application on your computer, ensuring it has the appropriate access to connect with your source Exchange server.

        EdbMails software installation

      • Launch EdbMails software and log in with your email and password or choose ‘Start Your Free Trial’.

        Login to EdbMails application

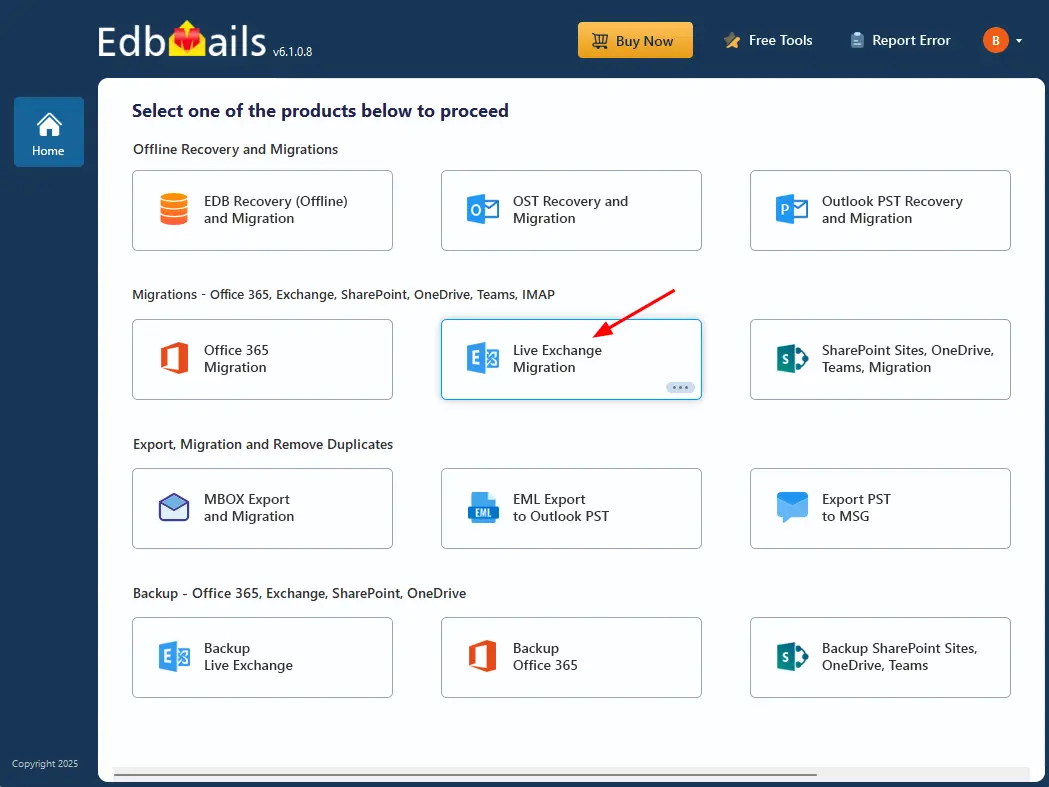
      • Choose the 'Live Exchange Migration' option.

        Choose ‘Live Exchange Migration’ option

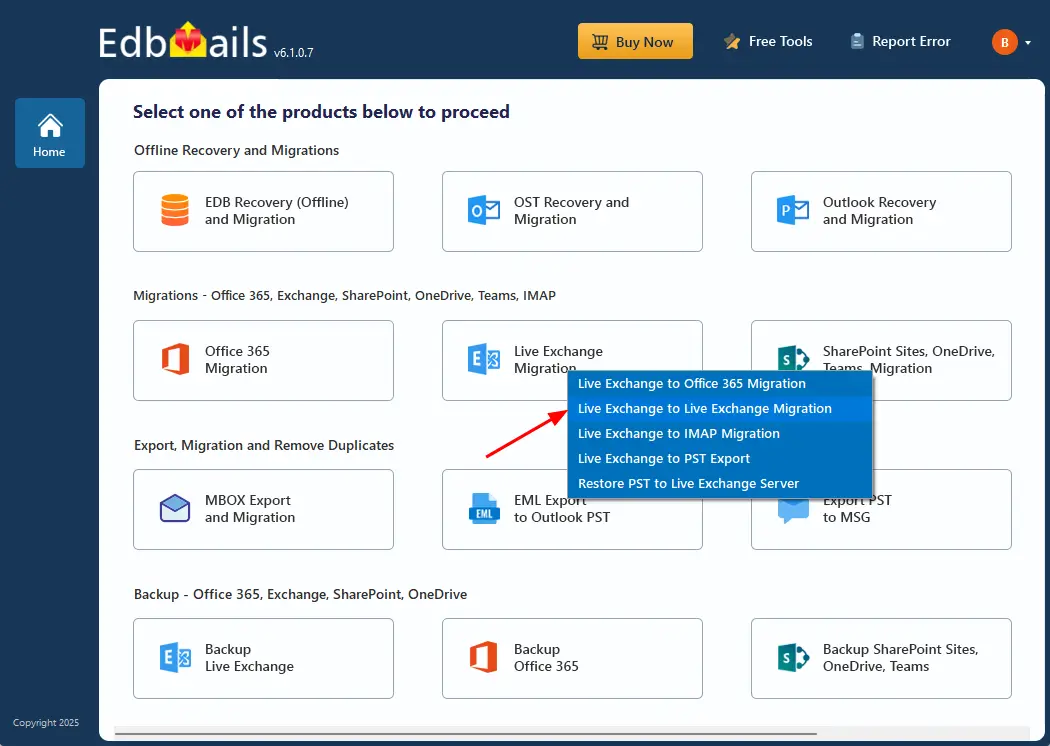
      • Select 'Live Exchange to Live Exchange Migration'

        Select Live Exchange to  Live Exchange

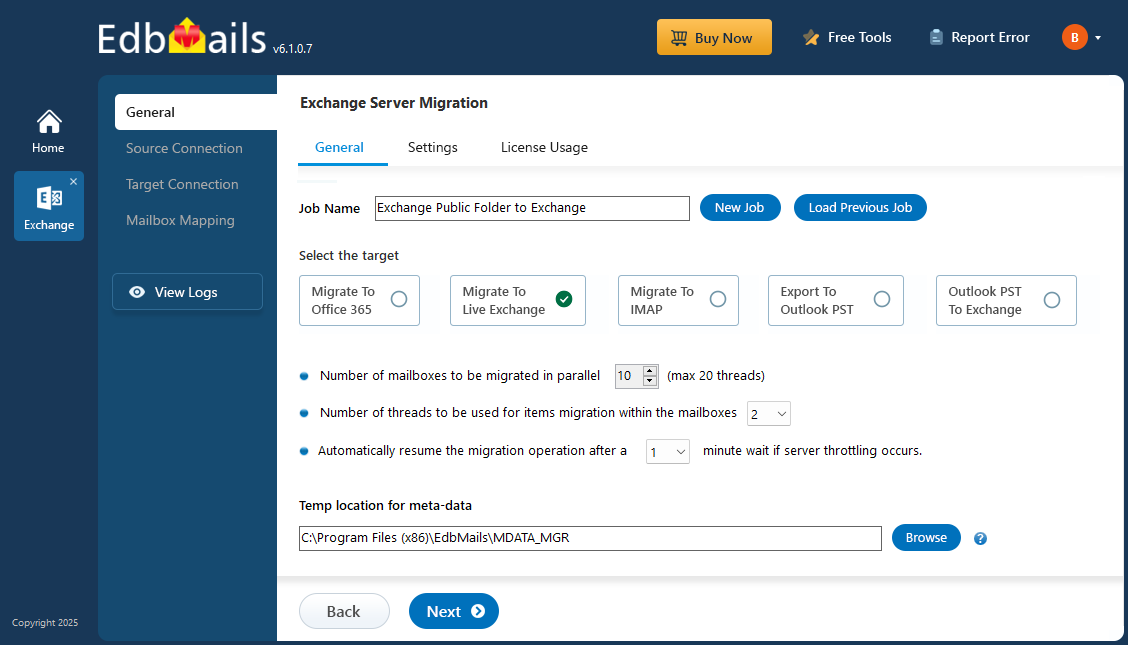
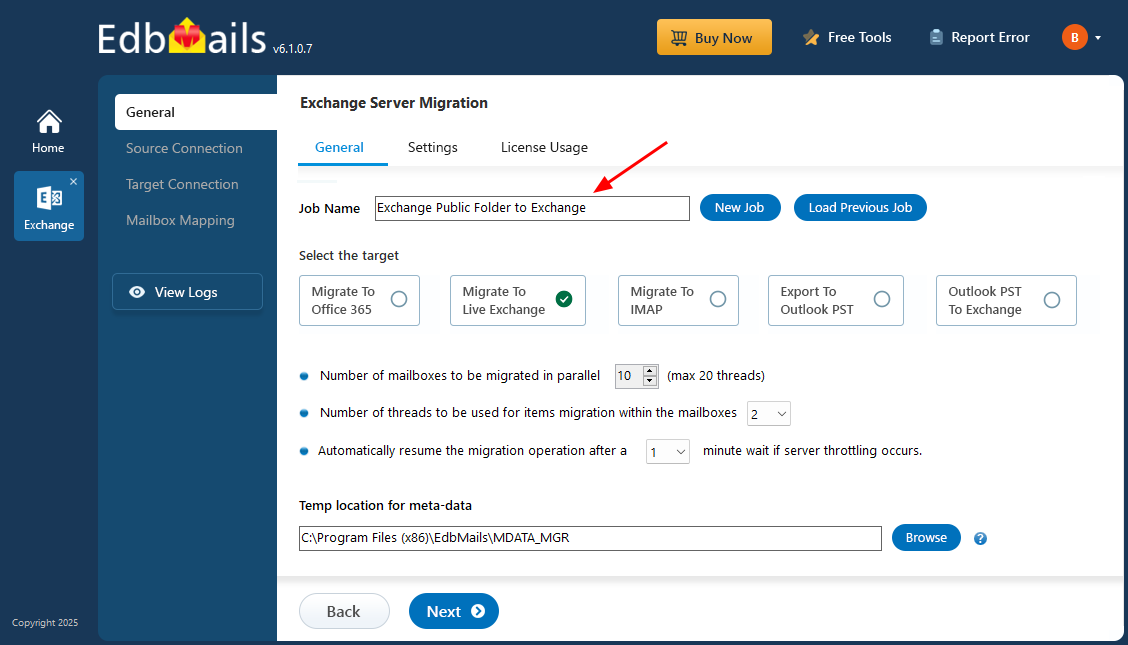
      • You can either keep the default job name or click the ‘New Job’ button to change the job name.

        Exchange Public Folder to Exchange job name

    • Step 2: Connect to Source Exchange server

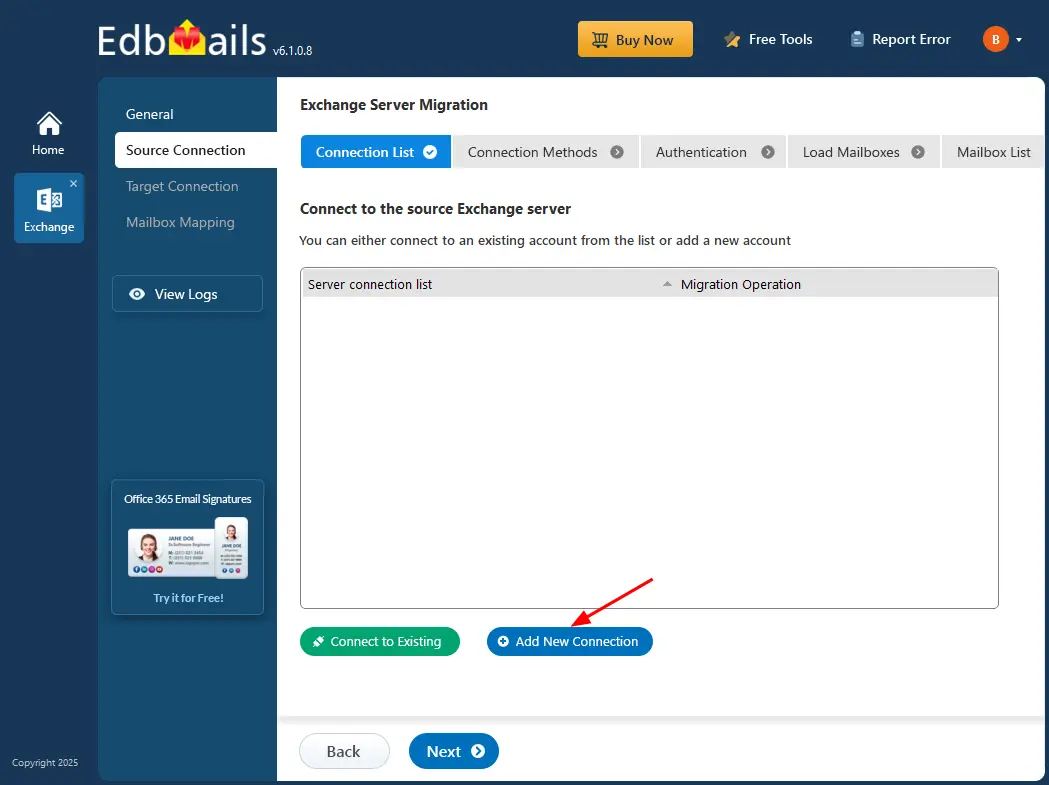
      • Click the ‘Add New Connection’ button to establish a new connection to the source Exchange server. To use a previous connection, select it from the connection list and click the ‘Connect to Existing’ button to proceed.

        Click Add New Connection

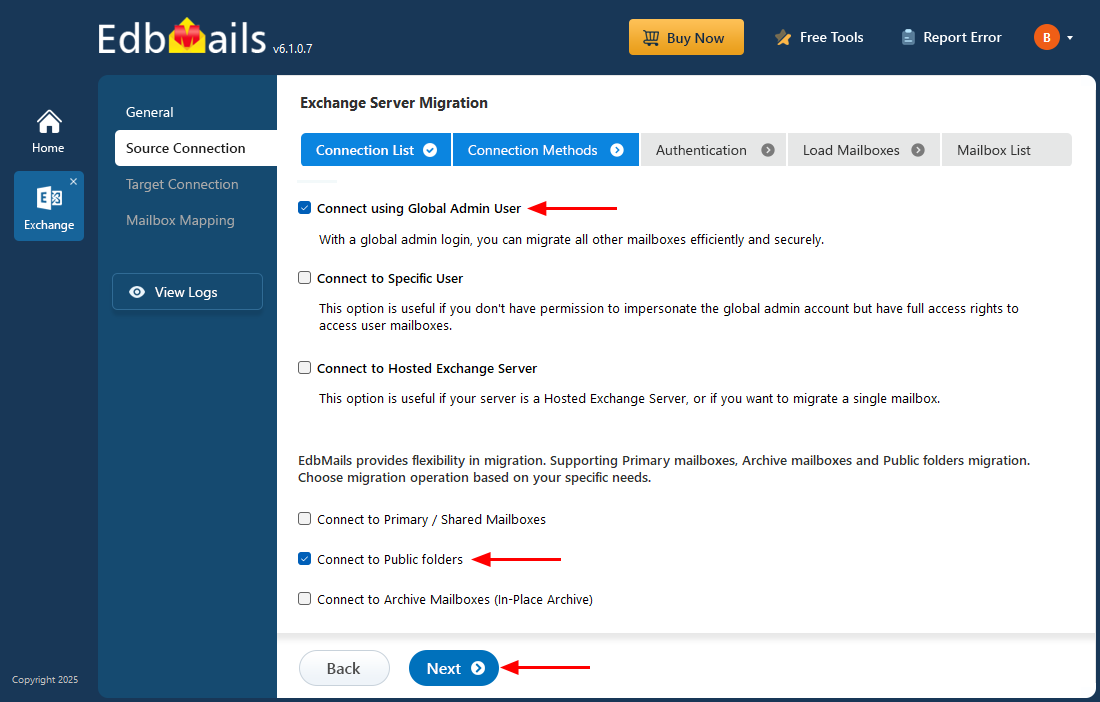
      • Select the required connection options and click the ‘Next’ button.

        Choose ‘Connect to public folders’ option

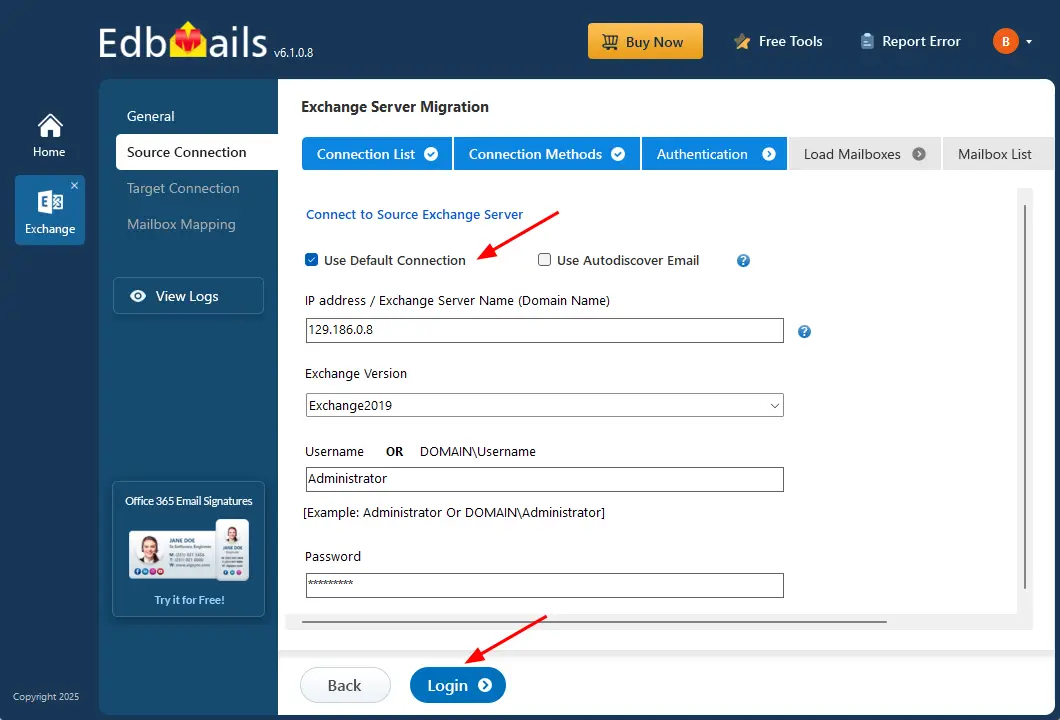
      • Enter the source Exchange server details and click the ‘Login’ button

        Login to source Exchange server

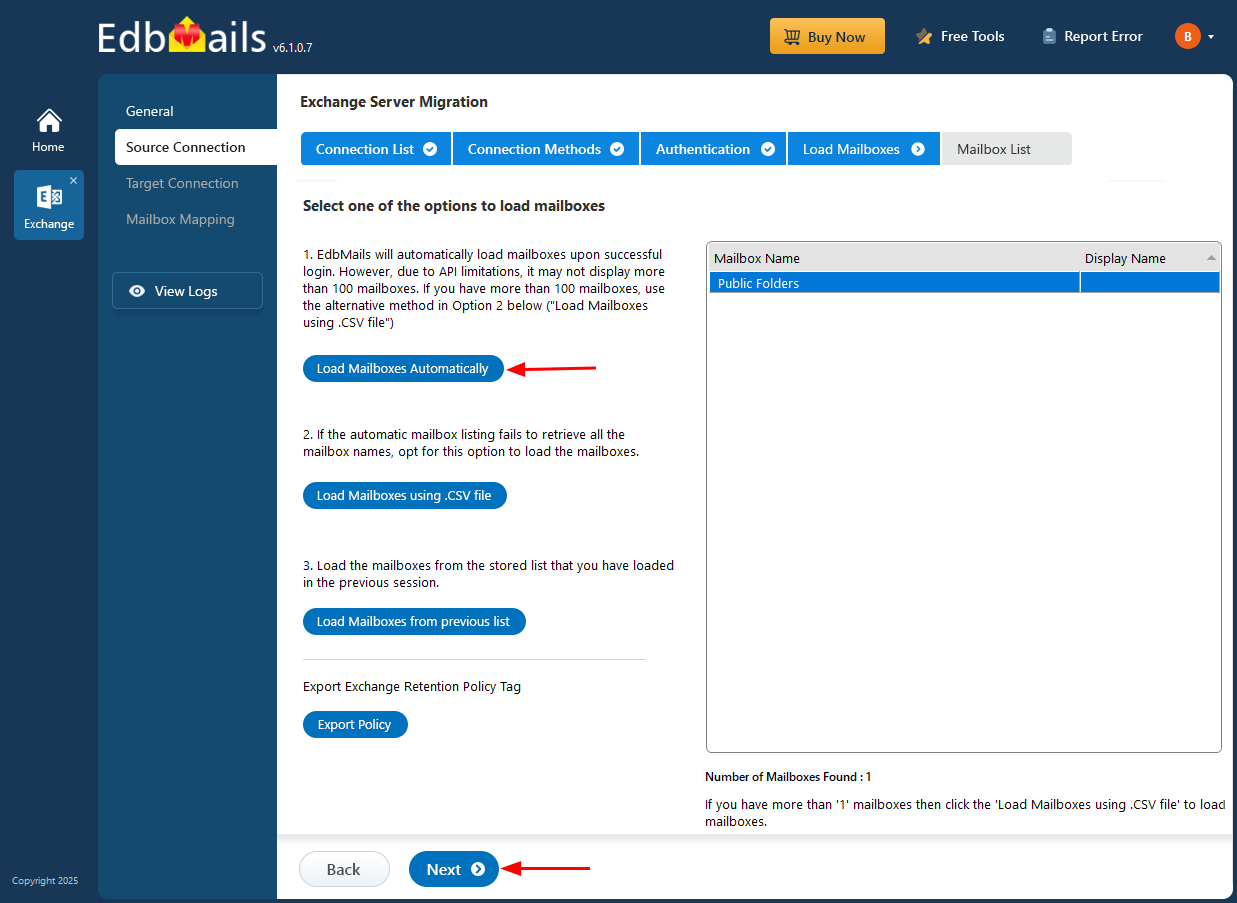
      • Select one of the methods to load the public folders.

        Select Public Source load mailboxes option

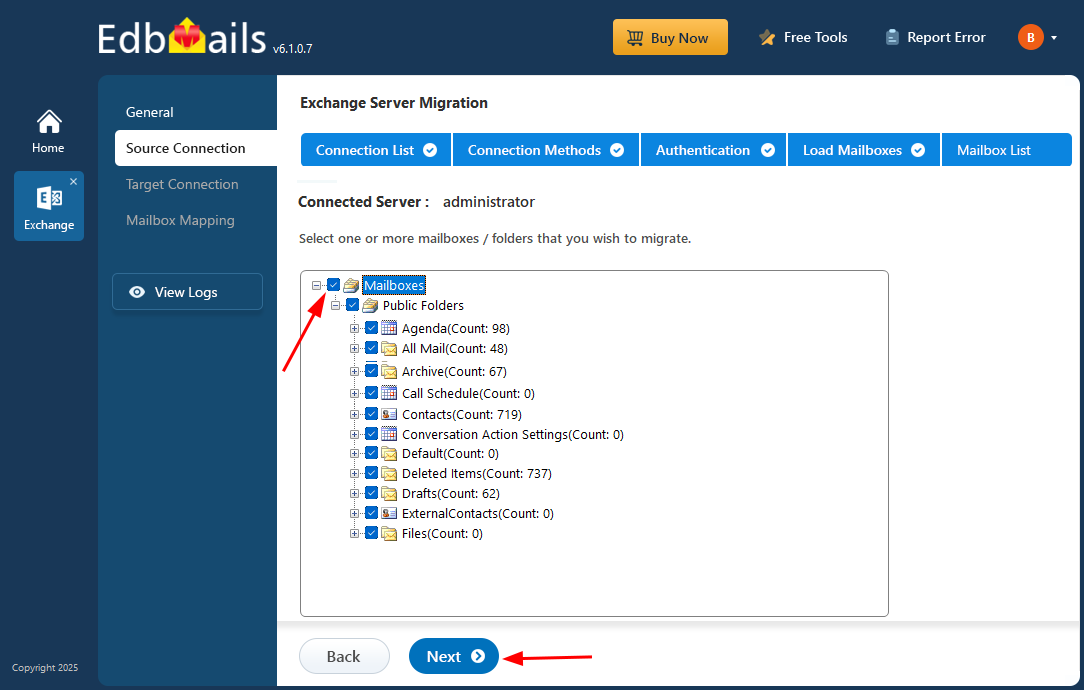
    • Step 3: Select the Exchange Public folders for migration

      • Select the public folders on the Exchange server that you wish to migrate.
      • Then, click the 'Next' button to initiate the connection with the destination server.

        Select the mailboxes

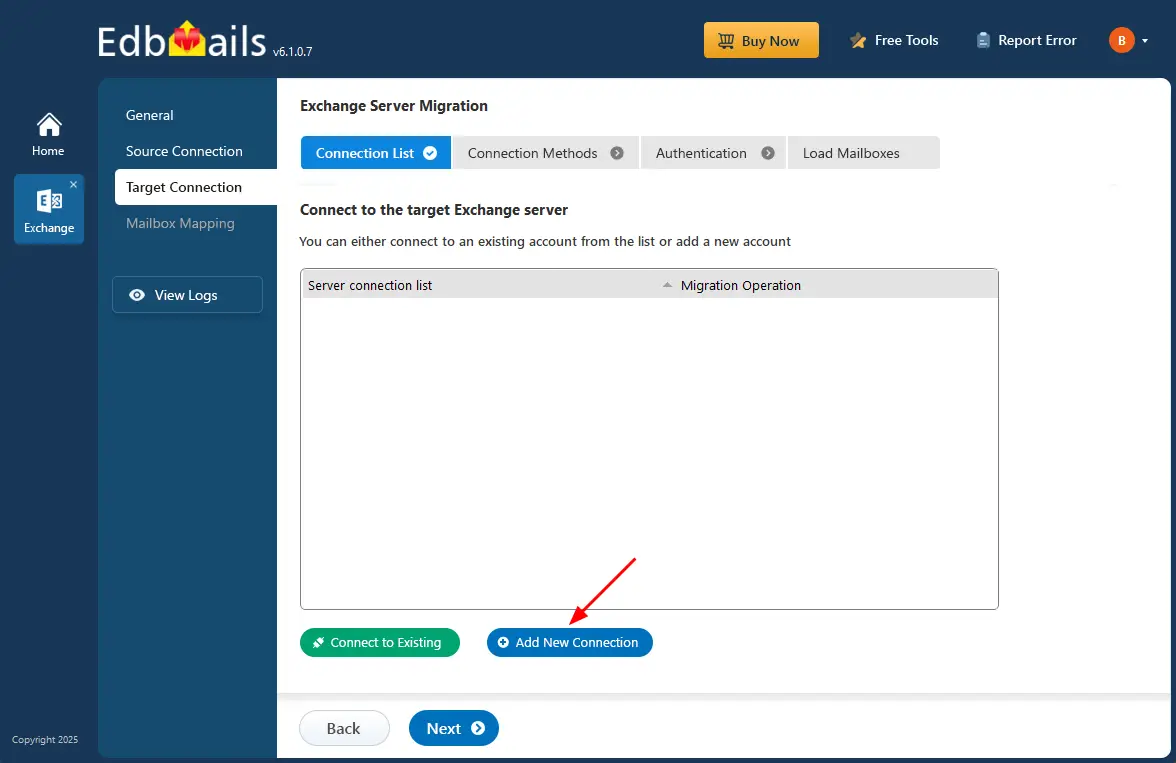
    • Step 4: Connect to target Exchange server

      • Click the ‘Add New Connection’ button to create a new connection to the target Exchange server. To use an existing connection, select it from the list and click ‘Connect to Existing’ to proceed.

        Target Exchange Server Connection

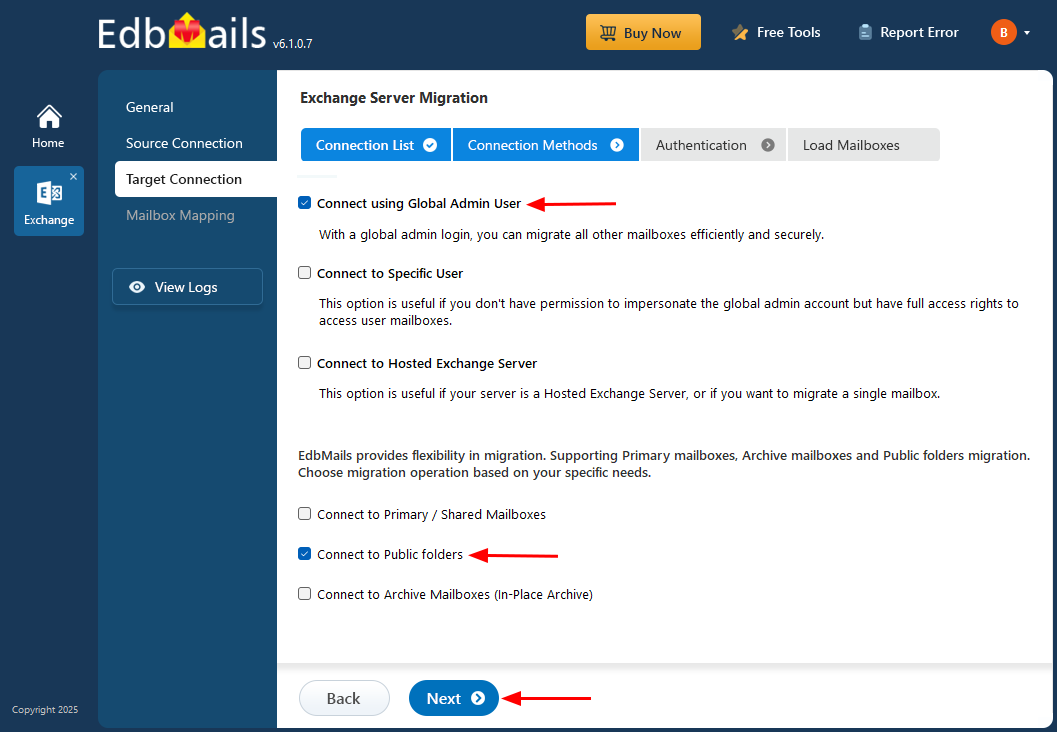
      • Select the required connection options and click the ‘Next’ button.

          Different options to connect to Exchange server in EdbMails

        Choose ‘Connect to public folders’ option

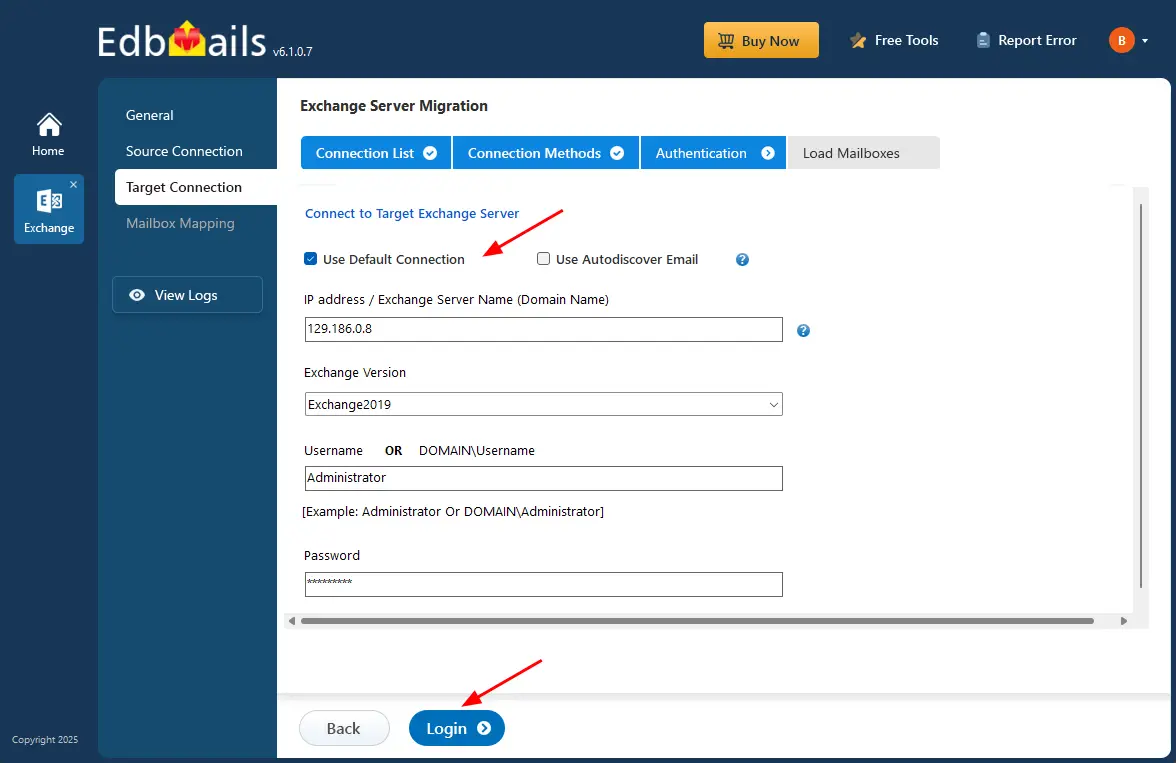
      • Enter the source Exchange server details and click the ‘Login’ button

        Login to Exchange server

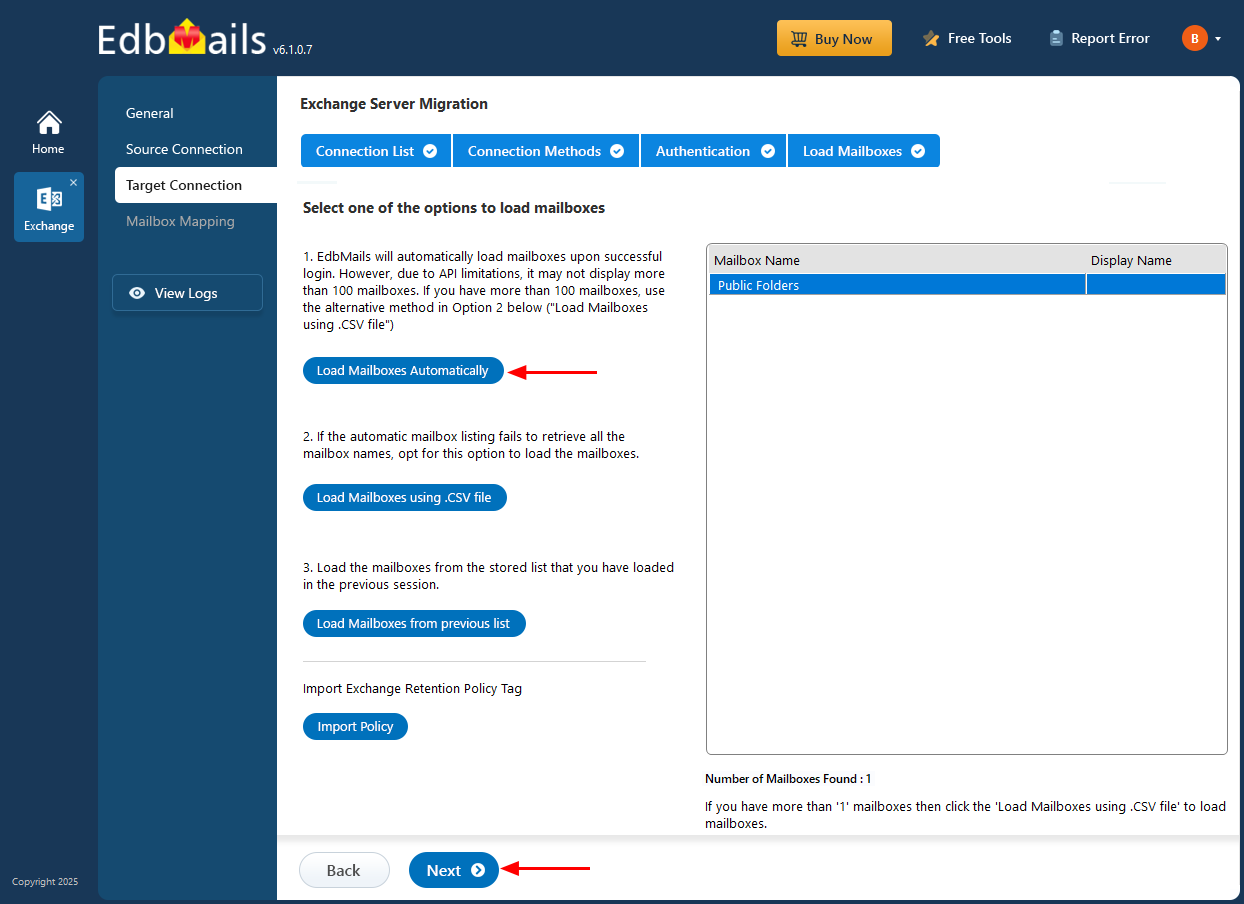
      • Choose one of the methods to load the target Exchange server public folders.

        Select Public Target load mailboxes option

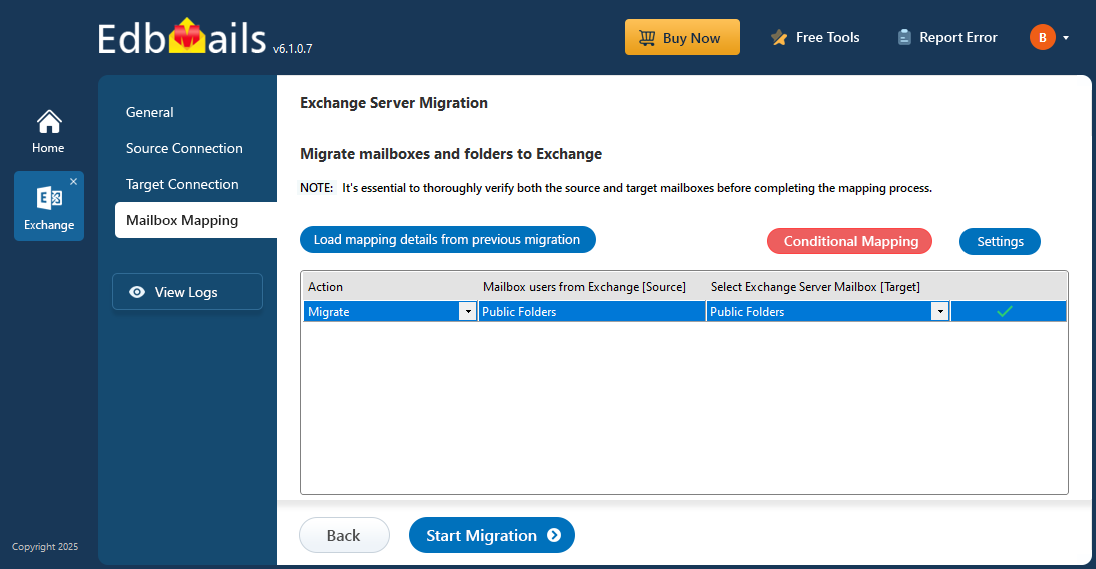
    • Step 5: Public folder mapping between source and target servers

      • EdbMails automatically maps public folders between the source and target servers. You can also manually map source mailboxes to the target mailboxes.

        Exchange Public Folder to Exchange mailboxes mapping

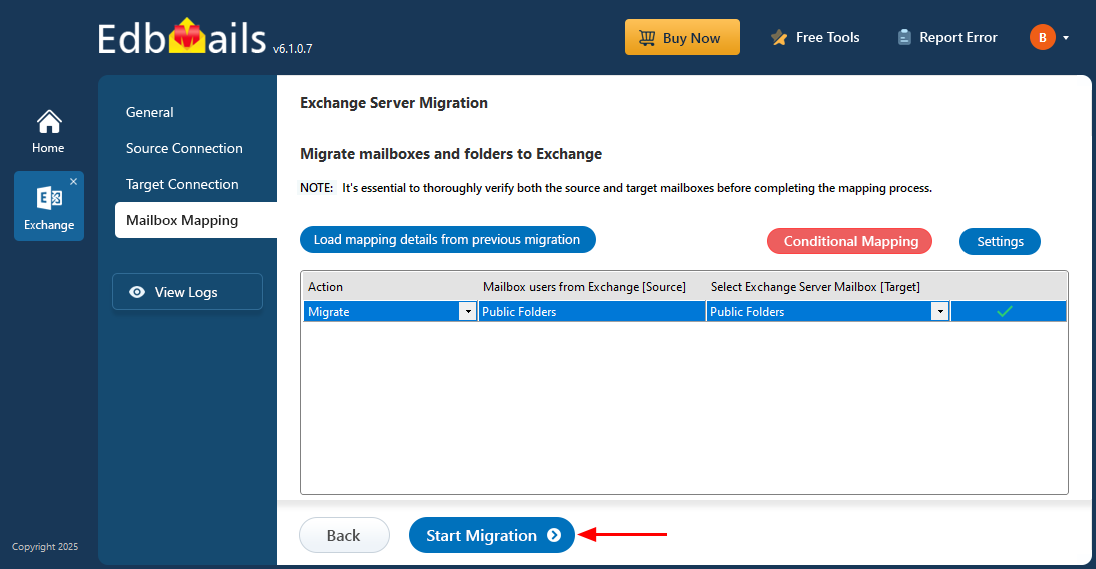
    • Step 6: Start Exchange Public folder migration

      • Once the public folder mapping is complete, click the ‘Start Migration’ button to begin the process.

        Exchange public folder to Exchange migration

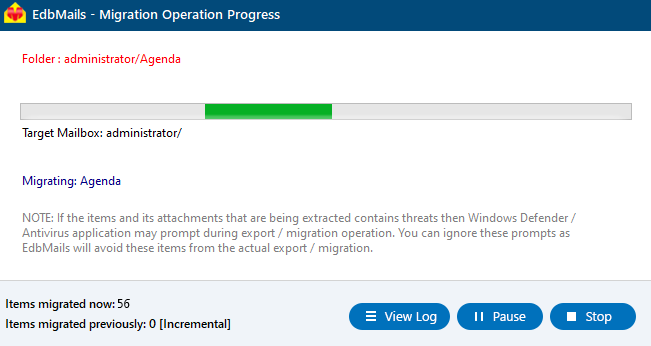
      • During migration, you can track progress in real-time. Once completed, a confirmation message will appear.

        Exchange public folder to Exchange migration.

      • Clicking the 'View Logs' button to view the migration report. Additionally, log in to your target exchange server to confirm that items such as emails, calendars, contacts, and other data have been migrated successfully.
  5. Exchange public folder to Exchange: post migration tasks

    Step 1: Update MX records to route emails to the new Exchange server

    To ensure proper email delivery to the target Exchange server, update the MX records to direct traffic to the newly migrated server. Additionally, configure the Autodiscover record to facilitate seamless connections between Outlook and the migrated mailboxes.

    Step 2: Create new Outlook profiles for users in the new domain

    If users experience connectivity issues with the new Exchange server, it is advisable to create new Outlook profiles for each user within your domain to ensure reliable access.

    Step 3: Decommission and uninstall the old Exchange server

    Upon successful migration, proceed to uninstall and decommission the original Exchange server.

    • Instructions for uninstalling Exchange Server 2013
    • Instructions for uninstalling Exchange Server 2010
  6. Exchange Public folder migration troubleshooting

    Navigate to Exchange migration troubleshooting guide and the Public folder troubleshooting for potential solutions to any errors you may encounter during the migration process. For further insights regarding EdbMails Exchange migration, refer to the frequently asked questions.

    Solution to Exchange public folders migration failing due to insufficient permissions

Benefits of EdbMails for Exchange public folder to Exchange migration

  1. Targeted migration for Public folders: EdbMails specializes in migrating public folders with precision, ensuring the accurate transfer of unique properties, permissions, and folder hierarchies. This targeted approach guarantees that all data is preserved without any loss, maintaining the integrity of their public folder structures throughout the migration process.
  2. Incremental migration capabilities: EdbMails supports incremental migration, migrating only new and modified data during subsequent migration operations. This approach reduces overall migration time and optimizes bandwidth usage.
  3. Advanced filtering options: Users can selectively migrate specific folders or items based on criteria such as email sent/received date, subject, attachment names, cc address, bcc address, read and unread status of the messages providing enhanced control over the migration process.
  4. Detailed migration reports: EdbMails generates comprehensive reports for each migration session, providing complete transparency throughout the migration process. These detailed reports outline the status of the migration, including the number of items migrated.
  5. Compatibility with all Exchange versions: EdbMails is compatible with a wide range of Exchange versions such as 2007, 2010, 2013, 2016 and 2019, enabling organizations with diverse environments to execute migrations without encountering compatibility issues.
  6. Comprehensive support: EdbMails offers free 24/7 customer support to ensure a smooth and successful migration experience at every step of the process.

Additional resources:

  • EdbMails Exchange migration software
  • Exchange public folder migration to Office 365
  • Exchange to Exchange migration
  • Exchange to Office 365 migration
  • Exchange to IMAP migration
  • Exchange to PST export
lady image

 In this manual

Exchange PF MigrationPF Migration PlanExchange Pre-MigrationPF Migration StepsPost-Migration TasksTroubleshootingEdbMails Benefits

Live Exchange Migration

100 Mailboxes $299 Only

Buy Now

Need help?

24/7 Customer support

Contact us on Live chat

Personalized Demo

Book a personalized demo

Still need help?

Email us / Call us

@edbmails.com All rights are reserved Privacy Policy | Terms of Use | GDPR | Security | Press Releases

hidden msg
Live Chat

Hi, May I help you?

Hide Chat Now