- Reseller
- Products
EDB Recovery and Migration
EdbMails lets you recover corrupted, damaged, and offline Exchange EDB files, convert EDB mailboxes to PST format, and directly migrate mailbox data to Office 365 and live Exchange Server.
 EDB to PSTRecover corrupted, damaged, offline EDB files and convert Exchange EDB mailboxes to PST file format
 Public Folder to ExchangeMigrate public folders from an Exchange offline EDB file to live Exchange Server
 EDB to Live Exchange MigrationDirectly migrate offline Exchange database (EDB) files to live Exchange server
 Archive Mailbox to Office 365Migrate archive mailboxes from offline EDB files directly to Office 365
 EDB to Office 365 MigrationDirectly migrate offline Exchange database (EDB) files to Office 365
Public Folder to Office 365Migrate public folders from an offline Exchange EDB file to Office 365
EDB to Office 365 MigrationDirectly migrate offline Exchange database (EDB) files to Office 365
Public Folder to Office 365Migrate public folders from an offline Exchange EDB file to Office 365OST, PST, MBOX, NSF, EML, MSG Export and Migration
EdbMails lets you to recover OST and PST files, export OST, PST, MBOX, NSF, EML, and MSG files to PST files, and directly migrate OST, PST, MBOX, and NSF mailbox data to Office 365 and live Exchange Server.
 OST Recovery and MigrationRecover offline OST files, convert OST to PST, and migrate OST to Office 365 and Exchange Server
 PST Recovery and MigrationRecover Outlook PST files , Export PST to PST, migrate PST to Office 365 and Exchange Server
 MBOX Export and MigrationExport MBOX to PST, migrate MBOX to Office 365 and Exchange Server
 NSF Export and MigrationExport NSF to PST, migrate NSF to Office 365 and Exchange Server
 EML to PST ExportConvert EML files to Outlook PST files
 PST to MSG ExportConvert Outlook PST file to MSG file format
 MSG to PST ExportExport MSG files to Outlook PST files
Office 365, Exchange Migration
EdbMails lets you securely migrate mailboxes across Microsoft 365, Exchange, Google Workspace (G Suite), and IMAP-supported servers such as Outlook, Gmail, Zimbra, Zoho Mail, and cPanel, ensuring zero downtime.
 Office 365 MigrationMigrate between Office 365 tenants, Office 365 to Exchange, Office 365 to PST, PST files to Office 365.
 Exchange MigrationMigrate between any Exchange Servers, Exchange to Office 365, Exchange to PST, PST files to Exchange.
 Tenant to Tenant MigrationMigrate Mailboxes, Public Folders, Archive Mailboxes between Office 365 Tenants.
 Exchange to Office 365Migrate Mailboxes, Public Folders, Archive Mailboxes from live Exchange server to Office 365.
 Office 365 to IMAPMigrate Office 365 to IMAP, Office 365 to Gmail, Office 365 to Outlook, Office 365 to Zoho etc.
 Exchange to IMAPMigrate from live Exchange Server to IMAP servers such as Gmail, Outlook, and Zoho Mail.
 Public Folder to Office 365Migrate Public Folders between Office 365 tenants with complete folder hierarchy and mailbox data integrity.
 Exchange to PSTExport live Exchange Server mailboxes, public folders, and archive mailboxes to Outlook PST files.
SharePoint, OneDrive & Microsoft Teams Migration
EdbMails lets you migrate SharePoint sites, OneDrive data, Microsoft Teams, teams, channels, chats, permissions, and documents between Microsoft 365 tenants while maintaining the existing folder structure and data integrity.
Google Workspace / G Suite Migration
EdbMails Google Workspace Migration Tool migrates emails, calendars, contacts, and more from Google Workspace to Office 365, Exchange, and IMAP using a Google Admin account without requiring individual user credentials.
 Google Workspace MigrationMigrate emails, calendars, contacts, tasks from G Suite to Office 365, G Suite to Exchange, G Suite to IMAP Servers
 Google Workspace to Office 365Migrate emails, calendars, contacts, tasks from Google Workspace / G Suite to Office 365
 Google Workspace to Exchange ServerMigrate emails, calendars, contacts, tasks from Google Workspace / G Suite to on-Premise Exchange Server
 Google Workspace to IMAPMigrate emails, calendars, contacts, tasks from Google Workspace / G Suite to IMAP, Outlook, Zimbra, Zoho etc.
IMAP Migration
EdbMails IMAP Migration tool lets you easily migrate emails from IMAP servers such as Outlook, Gmail, Zoho Mail, Zimbra, cPanel, and more. Supports IMAP to IMAP, Office 365, Exchange Server, PST, and bulk PST to IMAP migration.
 IMAP Email Backup & MigrationBackup and migrate emails from IMAP servers to PST, Office 365, and On-Premises Exchange Server
 IMAP to Office 365Migrate emails, folders, and attachments from IMAP servers to Office 365
 IMAP to ExchangeMigrate emails, folders, and attachments from IMAP servers to on-premises Exchange Server
 IMAP to PSTExport emails, folders, and attachments from IMAP servers to Outlook PST files for backup
 PST to IMAPMigrate emails, folders, and attachments from bulk PST files to IMAP servers
Duplicate Remover
EdbMails Duplicate Remover lets you easily remove duplicate items from Office 365 and Exchange Server, and from IMAP, Outlook, Gmail, Zimbra, Zoho Mail, etc., ensuring a clean and organized mailbox.
 Remove DuplicatesEasily clean up your Office 365, Exchange, Outlook and IMAP accounts by removing duplicate emails.
 Remove Duplicates from Office 365Remove duplicate emails, calendars, contacts, journal tasks, etc. from Office 365.
 Remove Duplicates from Exchange ServerRemove duplicate emails, calendars, contacts, journal tasks, etc. from live Exchange Server.
 Remove Duplicates from IMAP, OutlookRemove duplicate emails, attachments from IMAP, Outlook, Gmail, Zimbra, Zoho Mail etc.
Exchange, SharePoint, OneDrive, Teams and Office 365 Backup
EdbMails enables secure, automated backup and recovery for Microsoft 365 services including Exchange Online, SharePoint, OneDrive, Teams, and Live Exchange Server with complete data protection and restore flexibility.
Office 365 BackupIncremental, Granular, Encrypted and Compressed Office 365 Mailboxes Backup
Exchange Server BackupIncremental, Granular, Encrypted and Compressed Exchange Mailboxes Backup SharePoint, OneDrive & Teams BackupBackup Online site collections, Team sites, Office 365 groups, all documents etc.
Windows Data Recovery
EdbMails Windows Data Recovery Software lets you recover permanently deleted data, including photos, videos, documents, and archived files, from partitions on hard drives, SSDs, USB drives, SD cards, and external storage devices.
- Features
- Video Tutorials
- Free Tools
- FAQ
- Knowledge Base
Create Exchange Public Folders and assign to user mailboxes
Steps to create Public Folder in Exchange 2013/2016/2019
The below steps describe the process of creating a public folder in your Exchange server and assigning it to a user mailbox
- To access the classic Exchange admin center, simply use your domain admin account to log in. If you are directly accessing Exchange Server, enter the address https://localhost/ecp in your web browser.
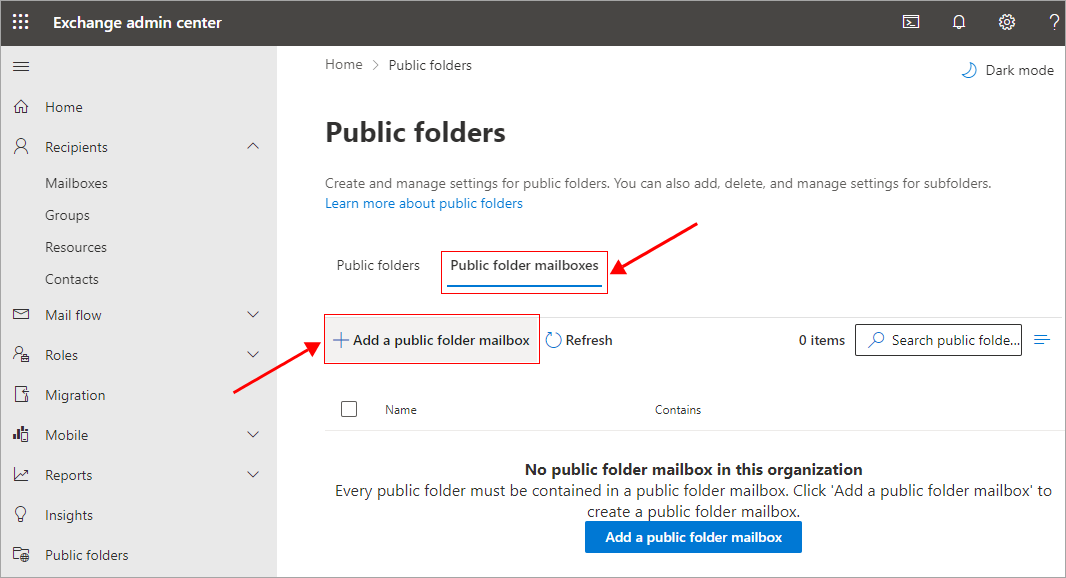
- From the left panel, select the ‘Public folders’ tab

- Navigate to the 'Public folder mailboxes' tab and click the '+ Add a public folder mailbox' button
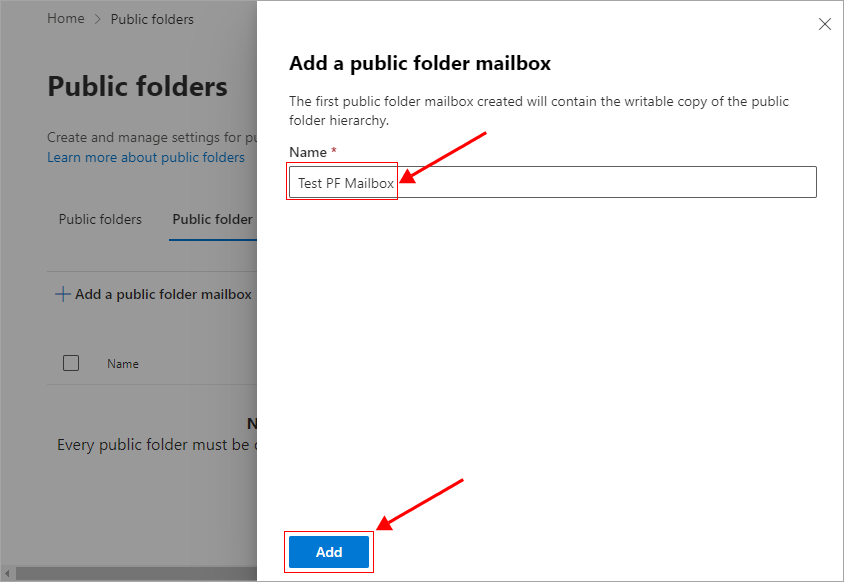
- Specify a name to the Public folder mailbox and click the ‘Add’ button.
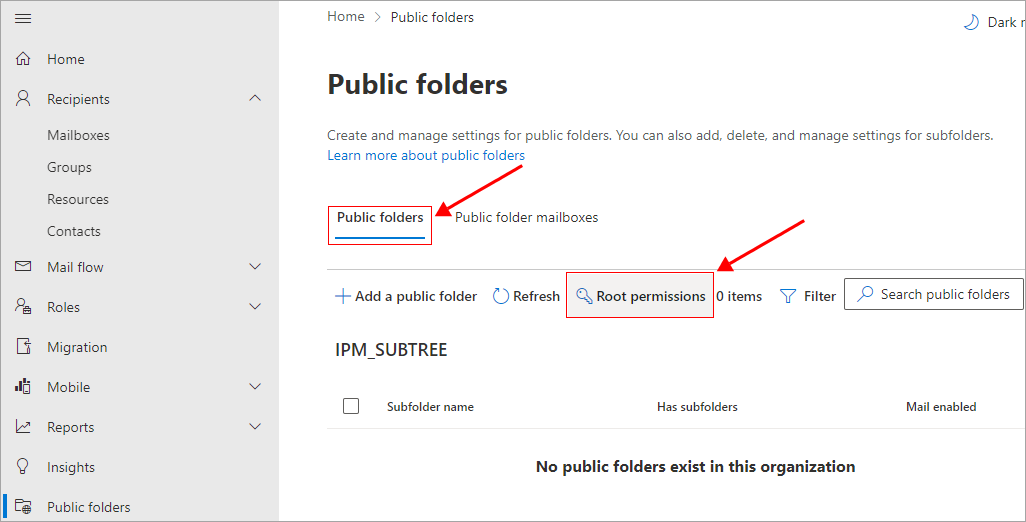
- Close the window and navigate to the ‘Public folders’ tab and click 'Root permissions'
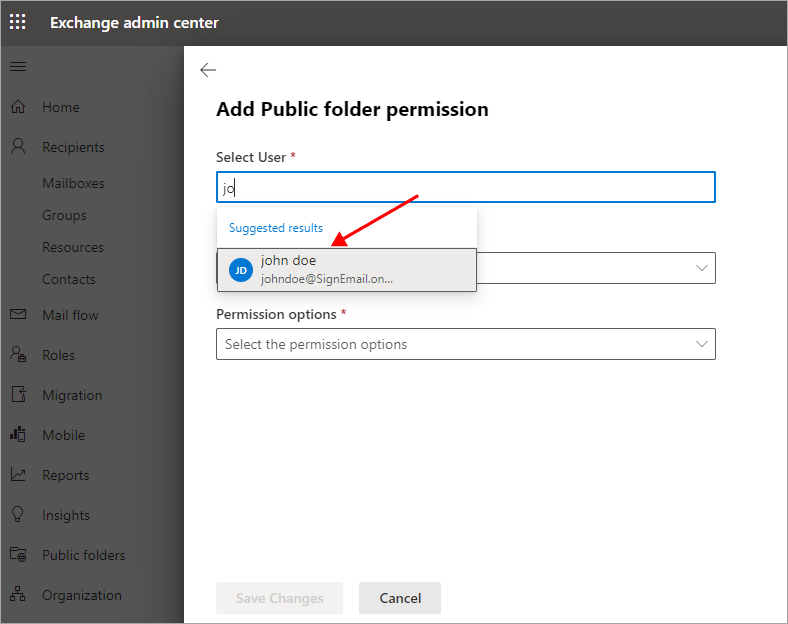
- Click the ‘+ Add permissions’ button
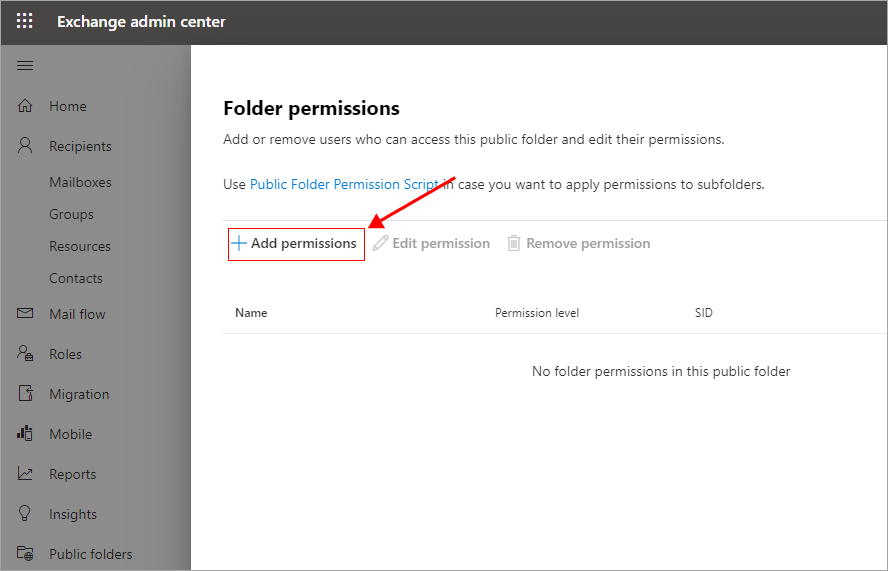
- Find the administrator account and select
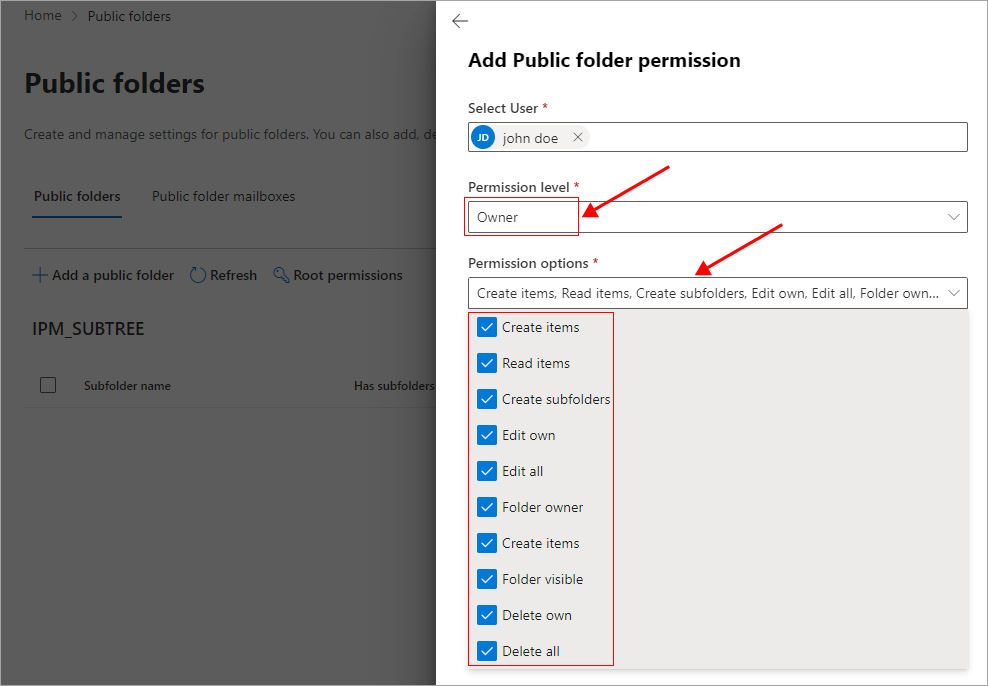
- Set the permission level as ‘Owner’ and set the other required permissions
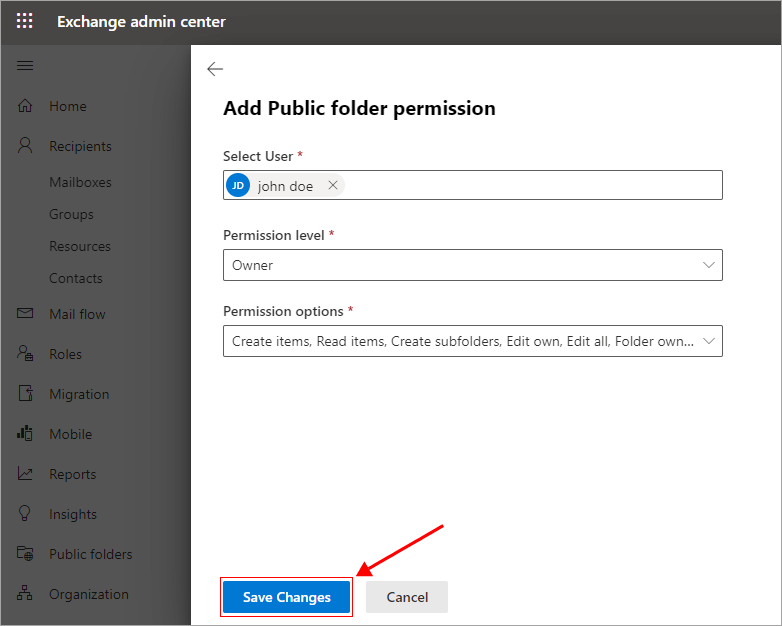
- Save the changes
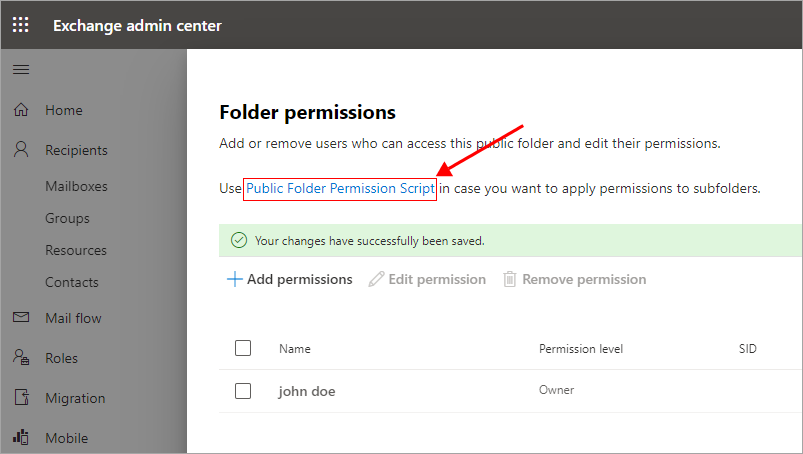
- To configure permissions for subfolders, locate and click on the link as shown in the below screenshot. Download the script and execute it to apply the desired modifications across the entire folder hierarchy.
Refer to this Microsoft article to learn more about managing your public folders.
Steps to assign Public Folders to mailboxes in Exchange Server 2010
To assign public folders to mailboxes in Exchange Server 2010
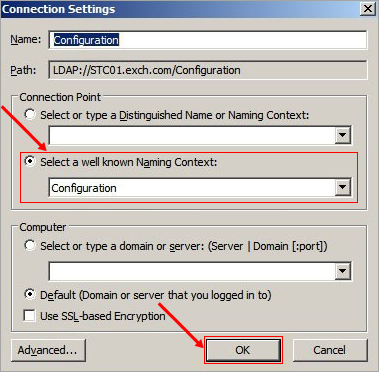
- Go to 'Start' > 'Run' and type: ADSIEdit.msc and then click 'Action' in the menu bar and click 'Connect to'
- In the ‘Connection Point’ group box, click 'Select a well known Naming Context' and select 'Configuration' option from the drop-down menu and click the 'Ok' button.
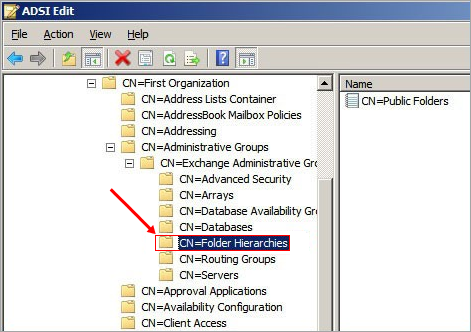
- Click the 'Configuration' in the left pane and navigate to ‘CN=Folder Hierarchies’
- CN=Configuration,DC=<Your_Domain_Name>,DC=<Domain>
- CN=Services
- CN=Microsoft Exchange
- CN=<Organization_Name>
- CN=Administrative Groups
- CN=Exchange Administrative Group (FYDIBOHF23SPDLT)
- CN=Administrative Groups
- CN=<Organization_Name>
- CN=Microsoft Exchange
- CN=Services
and click the ‘CN=Folder Hierarchies’
- CN=Configuration,DC=<Your_Domain_Name>,DC=<Domain>
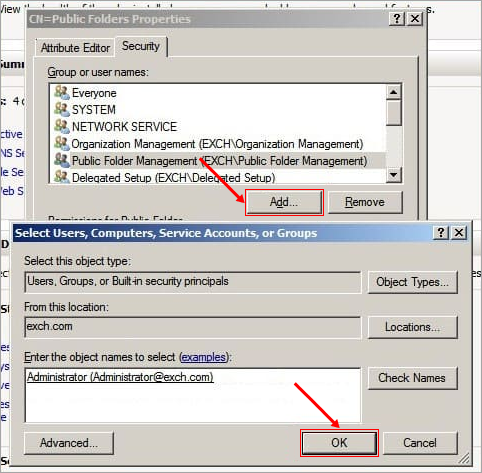
Add full control over public folders to the user
Right click on the 'CN=Public Folders' and select 'Properties' option. In the 'Security' tab check if the user to whom you want to give the full control over public folders is listed under Group or user name. If not, click 'Add', type the name of the user and click the 'Check Names'. Once the correct name is found and displayed, click the 'OK' button.
Select the user and in the Allow column select the checkbox for ‘Full control’. Click the 'OK' button to confirm.
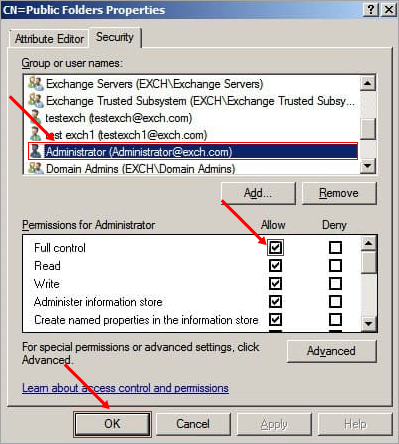
This user account will now have full access rights to the root Public Folders in Exchange Server 2010.
EdbMails Demo / Trial Version
Step 1. Download and install EdbMails
Step 2. Click the 'Start Your Free Trial' button


Hi, May I help you?
Hide Chat Now