- Products Exchange EDB / Email Recovery Tools
- EDB Recovery and MigrationRecover EDB to PST, EDB to Office 365 and Exchange NO Duplicate Migration
- OST Recovery and MigrationRecover OST to PST, OST to Office 365 and Exchange Migration
- PST Recovery and MigrationRecover Outlook PST, PST to Office 365 and Exchange Migration
- MBOX Export and MigrationExport MBOX to PST, MBOX to Office 365 and Exchange Migration
- NSF Export and MigrationExport NSF to PST, NSF to Office 365 and Exchange Migration
- EML to PST ExportEML files export to Outlook PST format
- PST to MSG ExportOutlook PST files export to MSG format
- MSG to PST ExportExport MSG files Outlook PST files
Exchange and Office 365 Migration- Exchange Server MigrationMigrate Exchange 2007, 2010, 2013, 2016, 2019 to Office 365 tenants. Also, migrate between Exchange servers and PST
- Office 365 MigrationMigrate Source Office 365 tenants to Destination Office 365 tenants. Also, migrate to Exchange Server and PST
- IMAP Email Backup & MigrationMigrate all IMAP email servers (Gmail, Zimbra, Zoho, Yahoo etc.), Office 365, Exchange and Backup to Outlook PST
- SharePoint Online MigrationMigrate documents, files and folders from SharePoint sites
- OneDrive for Business MigrationMigrate documents, files and folders from OneDrive
- Microsoft Teams MigrationMigrate Teams, documents, files and folders etc.
Exchange and Office 365 Backup- Office 365 BackupIncremental, Granular, Encrypted and Compressed Office 365 Mailboxes Backup
- Exchange Server BackupIncremental, Granular, Encrypted and Compressed Exchange Mailboxes Backup
- SharePoint, OneDrive & Teams BackupBackup Online site collections, Team sites, Office 365 groups, all documents etc.
- Duplicate Remover - Office 365, Exchange, IMAP & Outlook Remove duplicate emails, calendars, contacts, journal etc. from Office 365, Exchange, IMAP, Outlook, Gmail, Zimbra, Zoho Mail etc.
- More Products
- Features
- FAQ

Microsoft Teams Migration
User Manual
User Manual
Microsoft Teams Migration guide
EdbMails Microsoft Teams Migration Tool is designed to help you move Microsoft Teams data between Microsoft 365 tenants with ease. It supports the migration of Teams sites, files, documents, lists, and libraries—ensuring important collaboration data is securely transferred to the target environment.
With powerful features built in, the EdbMails makes large-scale migrations more manageable. It offers automatic mapping of Teams sites and allows concurrent migration of multiple sites, reducing manual work and helping you maintain consistency across tenants.
The software supports incremental migration, transferring only newly added or modified items during subsequent runs. This minimizes bandwidth usage, shortens overall migration time, and eliminates the risk of duplicating previously migrated data.
- Microsoft Teams Pre-migration Activities
On Source server:
- Get the appropriate SharePoint source server URL, Admin center url, Office 365 Admin account and Password.
- Grant admin access to each Team site. You can choose to let EdbMails automatically grant admin access through the SharePoint login window. However, if you prefer to grant admin access manually, refer to the link below:
Steps to add Global admin as a member of each Team site on the source server
On Target server:
- Get the appropriate SharePoint target server URL, Admin center url, Office 365 Admin account and Password.
- Create the Teams sites on the target server. EdbMails can automatically create these sites, saving time and effort.
- Make sure each Team site on the target server has admin access. EdbMails can handle this automatically through the SharePoint login window. If you’d rather do it yourself, follow the manual steps in the link below.
Steps to add Global admin as a member of each Team site on the target server
- Microsoft Teams Migration Steps
Step 1: Download and Install EdbMails
- Download and install the EdbMails Microsoft Teams migration software on your computer.
- Launch the EdbMails software, enter the email address & password and click the ‘Login’ button or click the ‘Start Your Free Trial’.
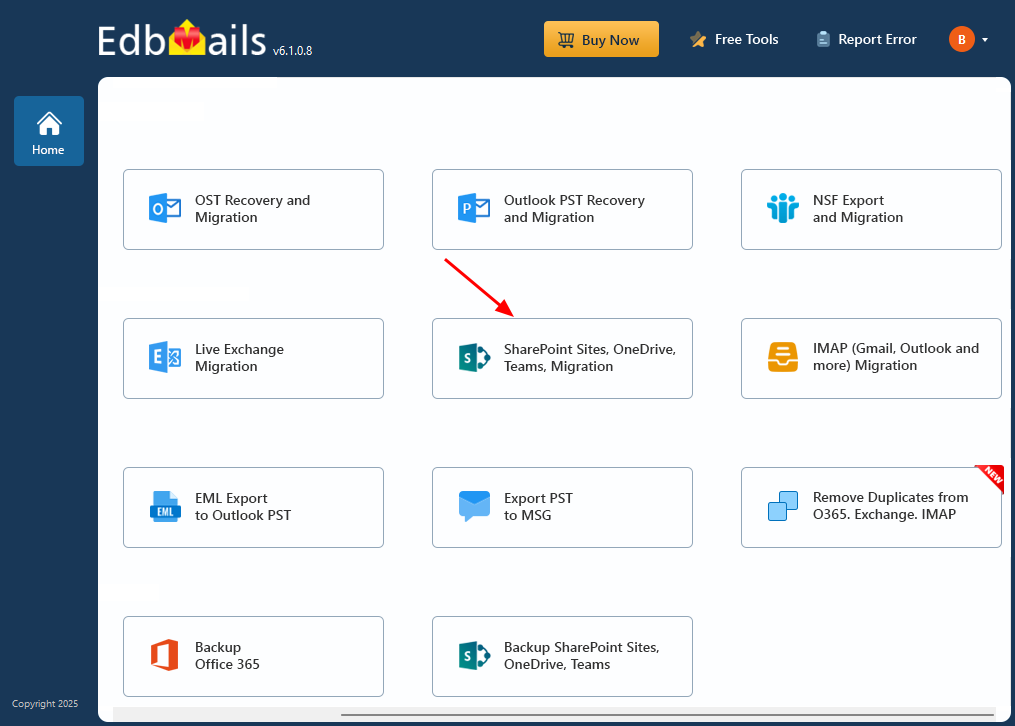
- Select ‘SharePoint Sites, OneDrive, Teams, Migration’.
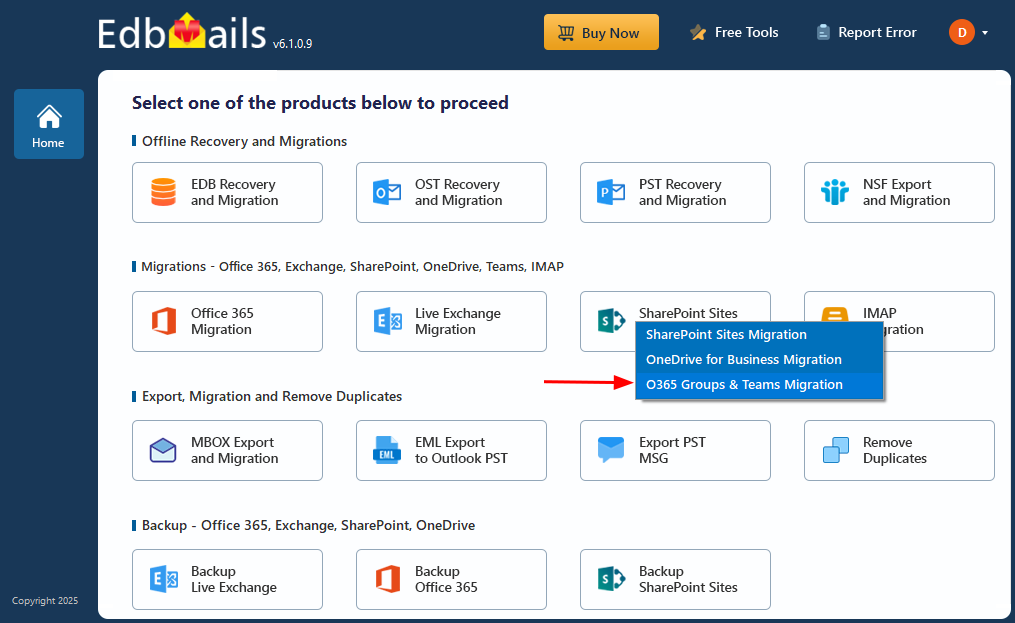
- Select ‘O365 Groups & Teams Migration’.
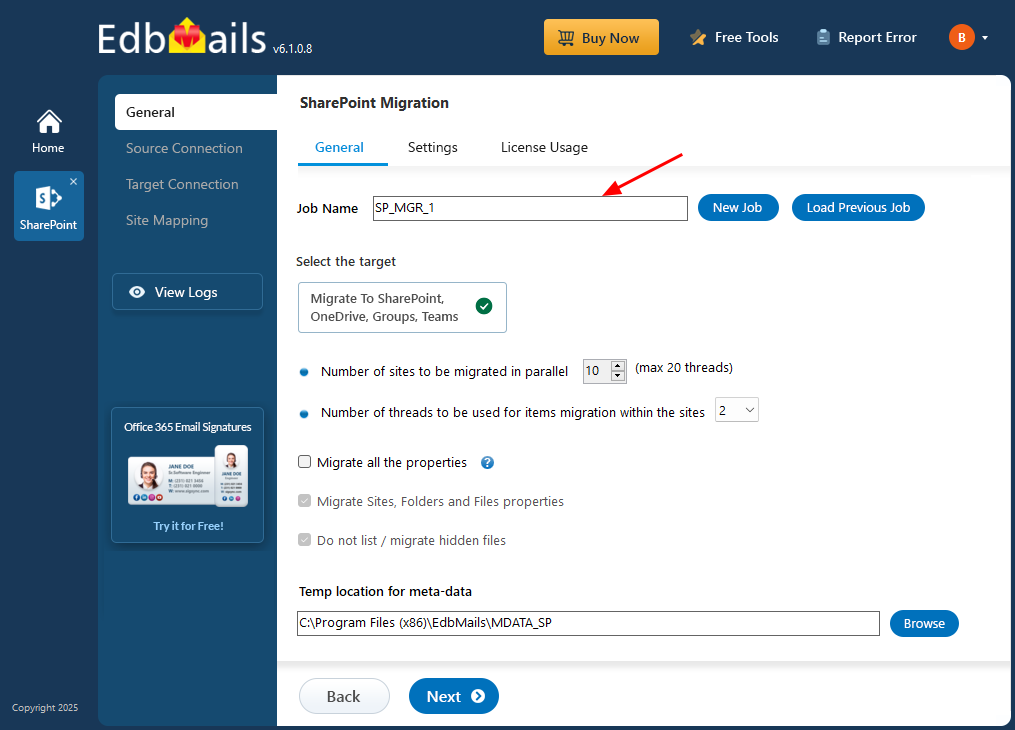
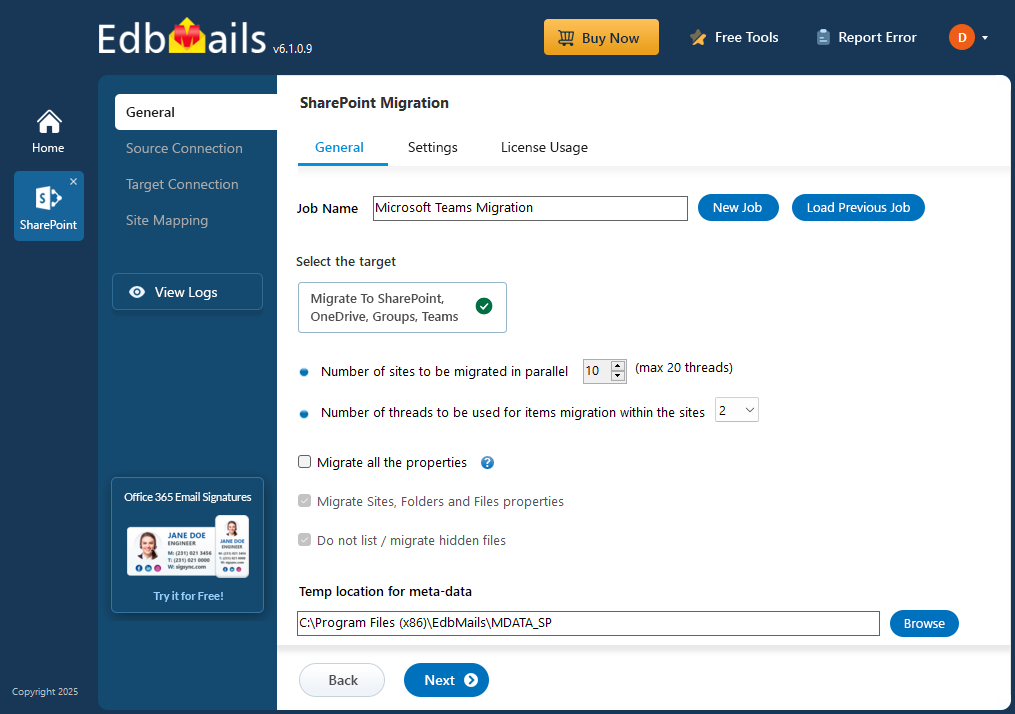
- You can either keep the default job name or click the ‘New Job’ button to change the job name.
Step 2: Connect to Source server
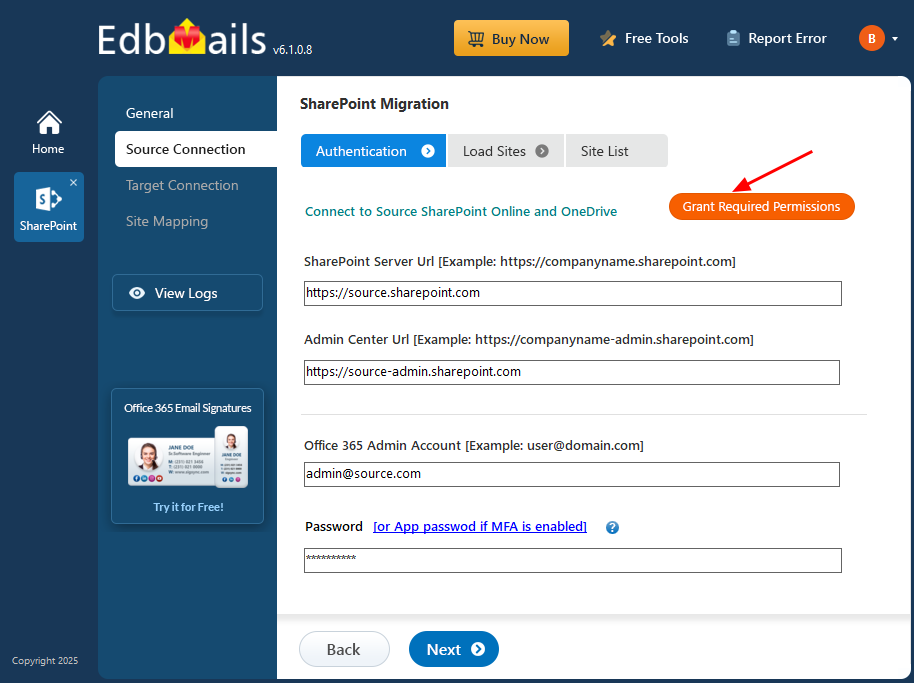
- Enter the source SharePoint server url, admin center url, Office 365 Global admin account email address and password.
- Then, click the ‘Grant Required Permissions’ button.
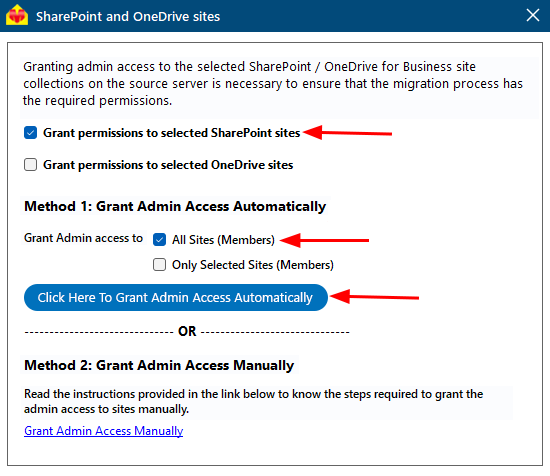
- Check the option ‘Grant permissions to selected SharePoint sites’
- Check the option ‘All Sites (Members) or ‘Only selected Sites (Members)’
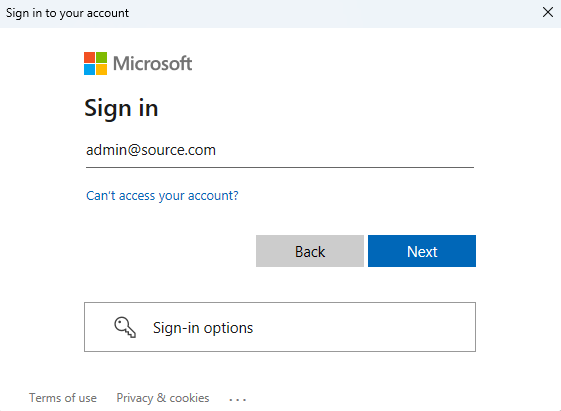
- A PowerShell window will appear in the taskbar, prompting you to authenticate on the Microsoft Sign-In page with a Global admin account.
Note: Keep checking the taskbar, as you may be prompted to authenticate multiple times.
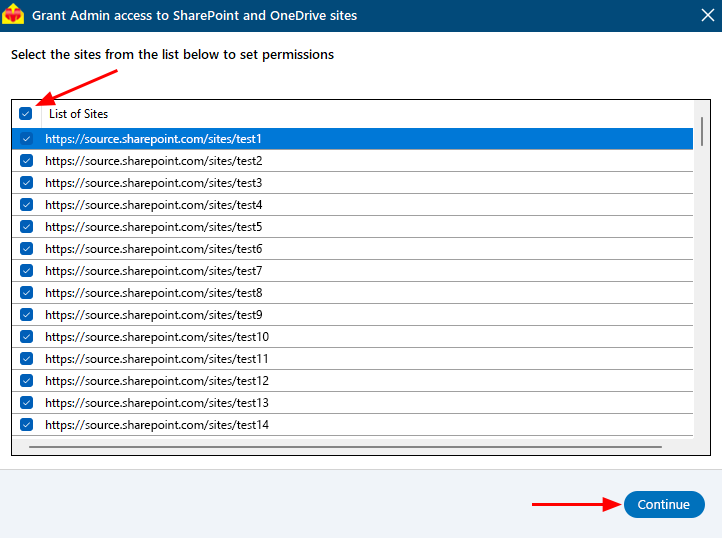
- Select the required sites to set the permissions from the list, then click ‘Continue’.
- A PowerShell window will pop up in the taskbar, asking you to sign in with a Global Admin account on the Microsoft Sign-In page.
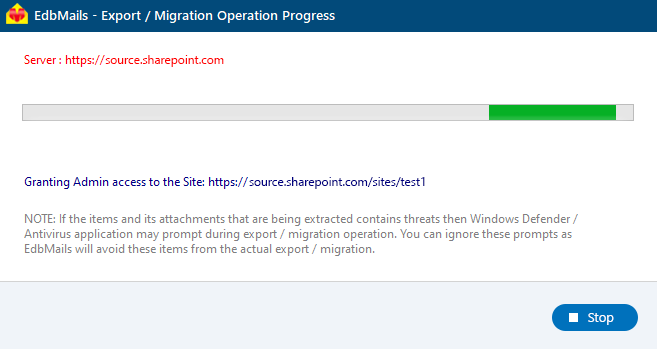
- After signing in, you’ll see the progress of admin access being granted to the selected SharePoint sites.
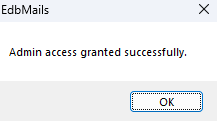
- Once permissions are granted to the selected sites, a confirmation message will appear.
- If you want to manually grant the admin access, refer to the link below:
Steps to add Global admin as a member of each Team site on the source server
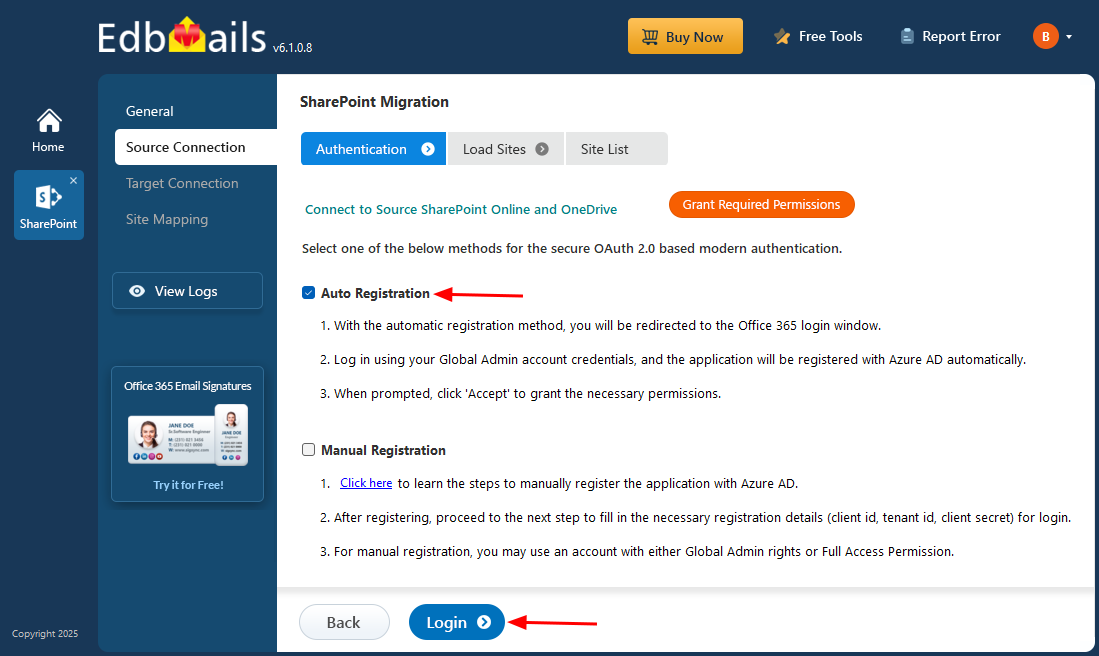
- Select one of the authentication methods and click the ‘Login’ button to continue.
Click here for the steps to manually register the EdbMails application in Azure Active Directory (AD)
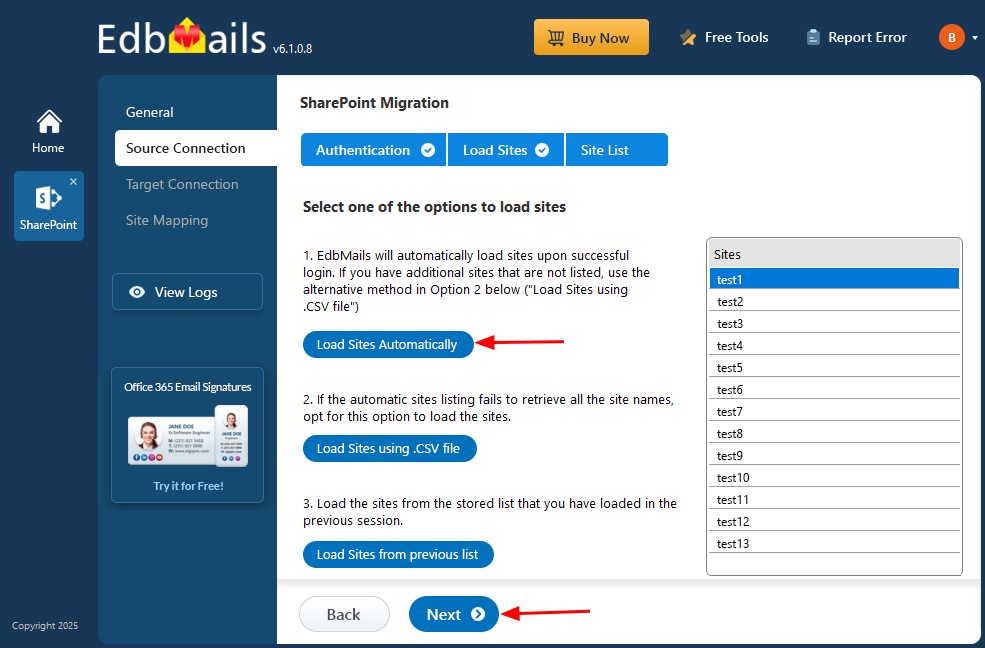
- Select one of the methods to load the SharePoint Sites. If you have additional sites that are not listed you load the sites using .CSV file
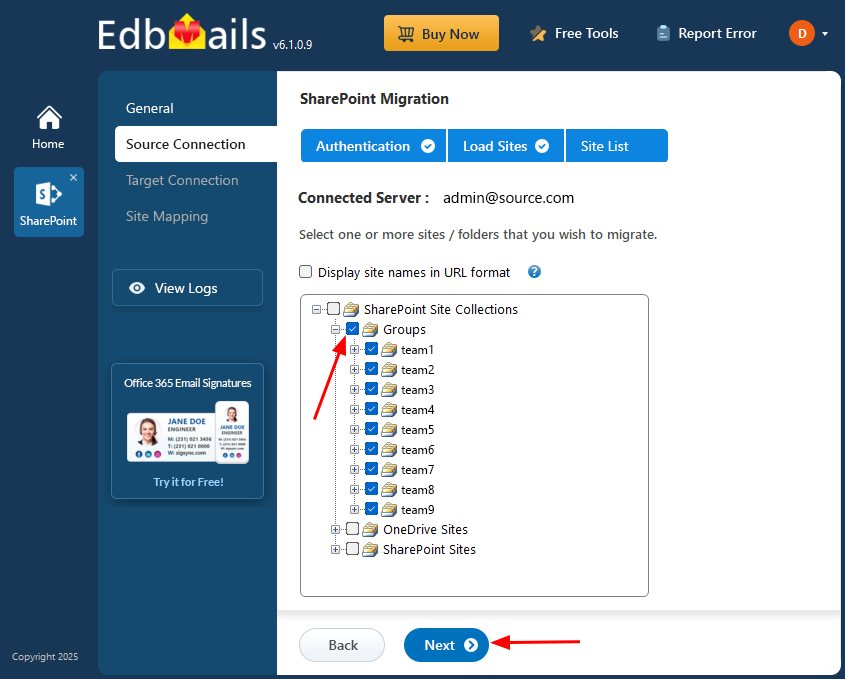
Step 3: Select Microsoft Teams sites
Step 4: Connect to target Teams server
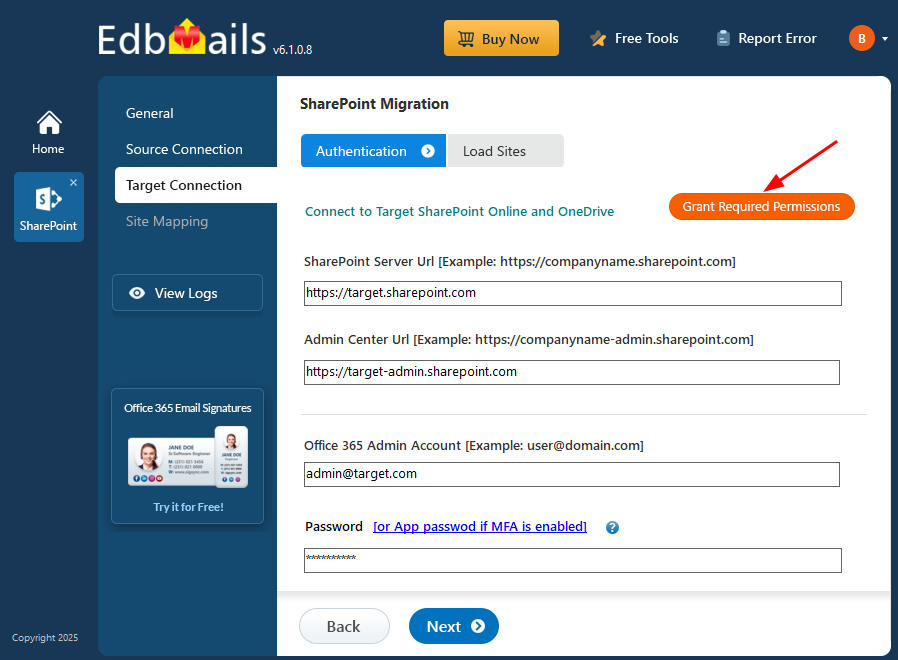
- Enter the target SharePoint server url, admin center url, Office 365 Global admin account email address and password.
- Then, click the ‘Grant Required Permissions’ button.
- Check the option ‘Grant permissions to selected SharePoint sites’.
- Check the option ‘All Sites (Members)' or ‘Only selected Sites (Members)’.
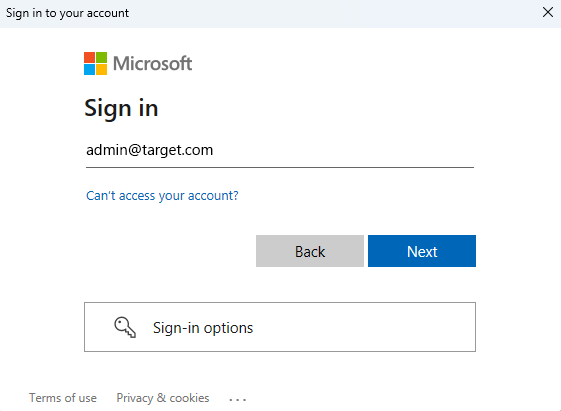
- A PowerShell window will appear in the taskbar, prompting you to authenticate on the Microsoft Sign-In page with a Global admin account.
Note: Keep checking the taskbar, as you may be prompted to authenticate multiple times.
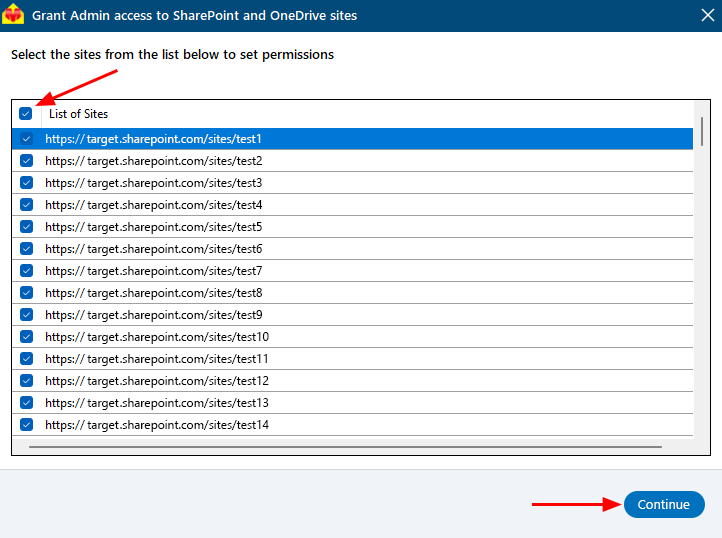
- Select the required sites to set the permissions from the list, then click ‘Continue’.
- A PowerShell window will pop up in the taskbar, asking you to sign in with a Global Admin account on the Microsoft Sign-In page.
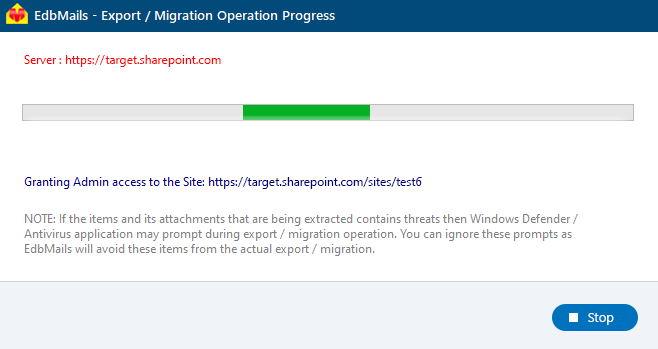
- After signing in to the target server, you’ll see the progress of admin access being granted to the selected SharePoint sites.
- Once permissions are granted to the selected sites, a confirmation message will appear.
- If you want to manually grant the admin access, refer to the link below:
Steps to add Global admin as a member of each Team site on the target serve
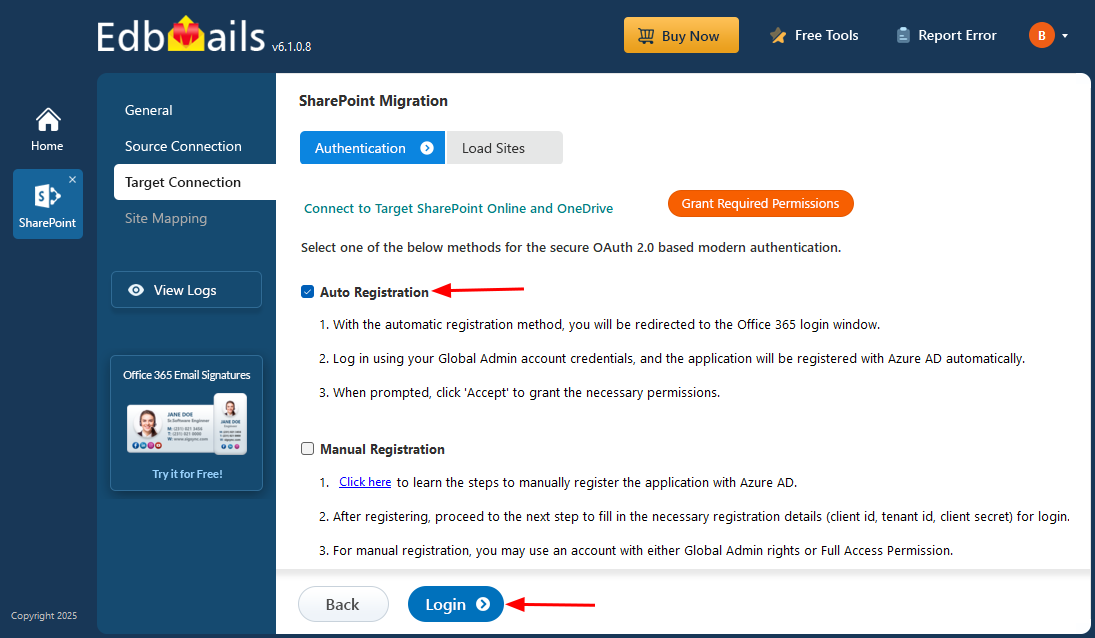
- Select one of the authentication methods and click the ‘Login’ button to continue.
To manually register the EdbMails application in Azure Active Directory (AD), click here for the steps.
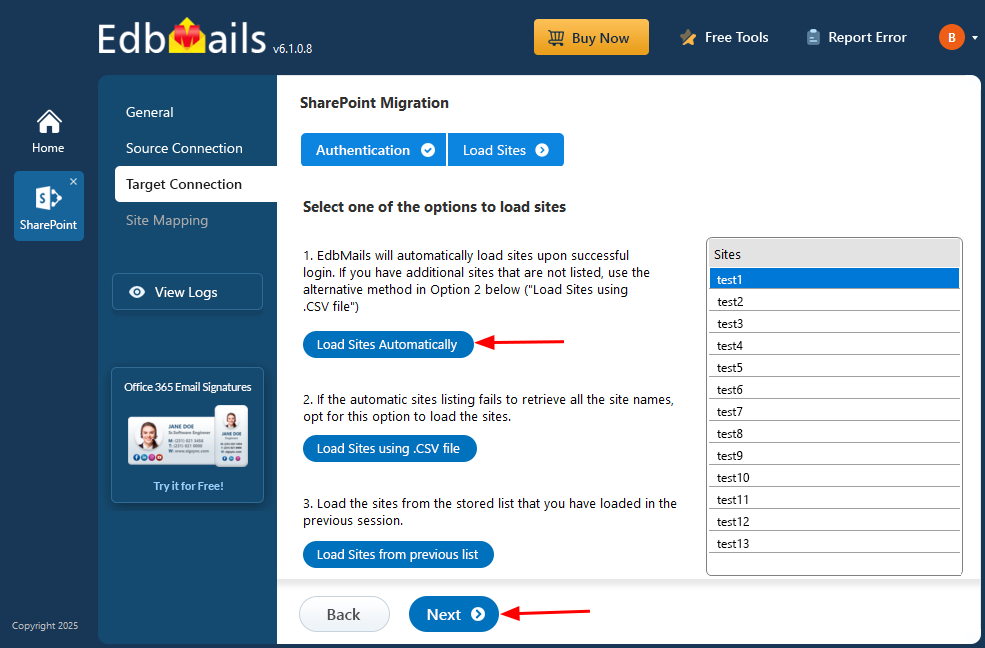
- Select one of the methods to load the SharePoint Sites. If you have additional sites that are not listed you load the sites using .CSV file
Step 5: Microsoft Teams source and target sites mapping
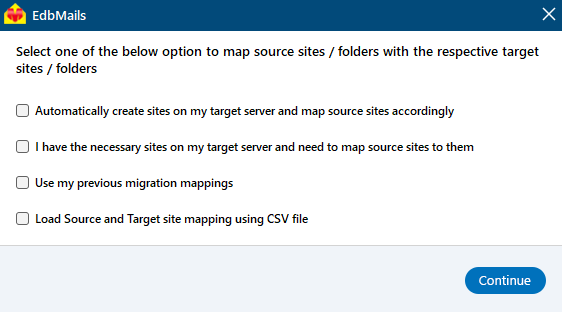
- Select an option to map the Teams sites between the source and the target servers.
- EdbMails Automatically maps the Teams sites between the source and the target servers. Also, you can manually map the sites or select the option to map using previous migration mapping.
Step 6: Start Microsoft Teams Migration
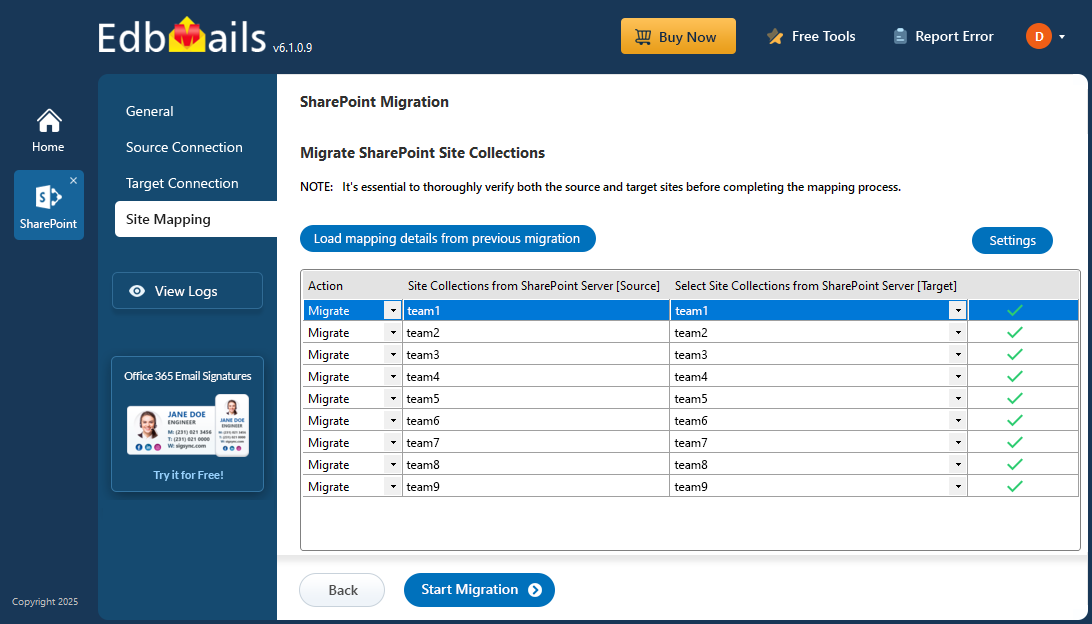
- Verify the sites mapping between the source and target servers, then click the ‘Start Migration’ button to initiate the migration.
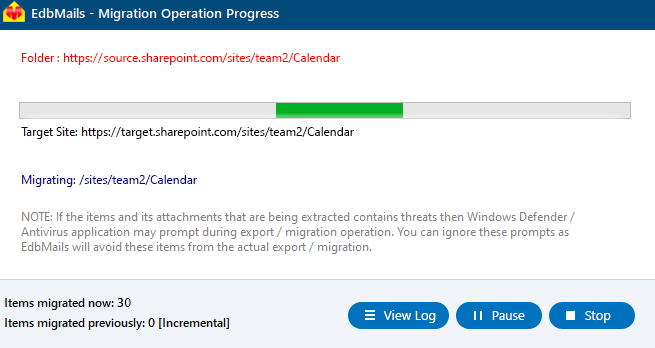
- During the migration, you can monitor the progress in real-time. EdbMails also allows you to pause and resume the migration whenever needed. Once the migration is complete, a message will appear prompting you to review the migration status.
- Click the ‘View Log’ button to verify the migrated items from each folder with the items count.
Microsoft Teams Migration Best Practices
- Start by thoroughly assessing your Microsoft Teams setup. Identify what needs migrating, like teams, files, documents, files, folders etc. Plan out the migration steps, timeline etc
- EdbMails offers handy features like delta migration and automatic mapping of Teams sites. Make use of these to streamline your migration process.
- Click the ‘View log’ button on the migration window to view the detailed migration reports of the Teams data
Benefits of EdbMails software for Teams Migration
- No limitations on the size of the Team's data with EdbMails
- EdbMails supports simultaneous migration of multiple Teams sites
- Automatic mapping of sites between the source and the target servers.
- EdbMails features incremental migration during consecutive migration of Teams data that which migrates only the items which are not migrated in the previous runs
- Migration of selective data with the filtering
- 24x7 free tech support to address any queries regarding Microsoft Teams migration.


