Complete Guide to OneDrive Backup
OneDrive is a widely-used cloud storage solution for businesses and individuals to store and share important files. However, data loss can occur due to accidental deletions, corruption, or security threats, leading to disruptions and hindering productivity.
EdbMails OneDrive Backup Tool provides a simple yet effective solution to mitigate these risks. With this tool, you can securely back up your files, folders, and entire OneDrive accounts, ensuring that your critical data remains protected and easily recoverable at any time.

Key features of EdbMails include scheduled backups, efficient incremental backups, and the ability to restore both individual files and complete accounts with full data integrity. It supports both personal and business OneDrive accounts, offering reliable protection for any type of user.
This guide will walk you through the steps of setting up and using EdbMails OneDrive Backup. Follow the instructions to ensure your OneDrive data is backed up and protected at all times.
Prerequisites to backup OneDrive data:
- Get the SharePoint source server URL, Admin center url, Office 365 Admin account, Password.
- Grant admin access to each OneDrive user site on the source server. EdbMails can automatically assign admin access for you, or if you prefer to do it manually, follow the instructions in the link below:
Steps to assign Admin access to all OneDrive site collections on the source server.
Step by Step Guide for OneDrive Backup
Step 1: Download and install EdbMails Application
- Download and install the EdbMails application on your computer

- Log in with your registered email address and password, or select the 'Start Your Free Trial' to get started.

- Select ‘Backup SharePoint Sites’.

- Select the backup option as ‘SharePoint OneDrive Backup’.

- You can use the default job name or click the ‘New Job’ button to enter a custom name.
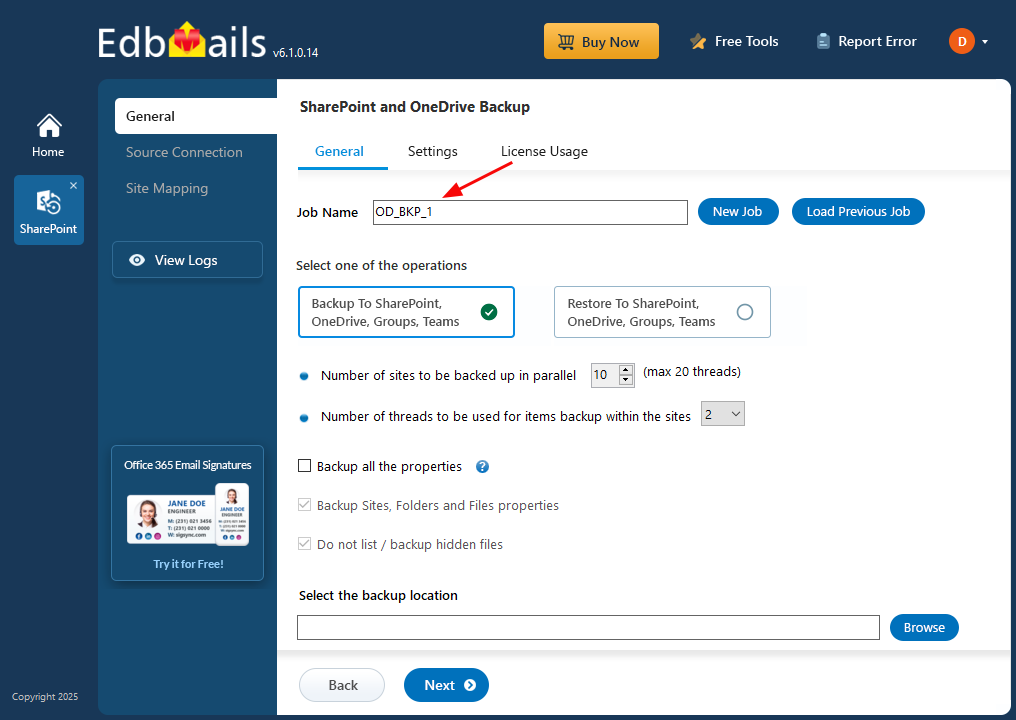
- Click ‘Browse’ to choose the location where you want to save the backup file.

- Choose the destination where you want to store the backup data.

- Click the ‘Next’ button to continue.

- Download and install the EdbMails application on your computer
Step 2: Connect to SharePoint Online and OneDrive Source server
- Enter the source SharePoint server url, admin center url, Office 365 Global admin account email address and password.
- Then, click the ‘Grant Required Permissions’ button.

- Click the option ‘Grant permissions to selected OneDrive sites’.
- Choose either ‘All Sites (Members)’ or ‘Only selected Sites (Members)’ based on your preference.
- Click on ‘Click Here To Grant Admin Access Automatically’.

- A PowerShell window will open in the taskbar, directing you to sign in through the Microsoft authentication page using a Global Admin account.
Note: Keep an eye on the taskbar, as you might be prompted to authenticate multiple times during the process.

- Select the required sites to set the permissions from the list, then click ‘Continue’.

- When the PowerShell window appears in the taskbar, click on it to sign in using a Global Admin account through the Microsoft Sign-In page. This will initiate the migration process.
- After signing in, you’ll see the progress of admin access being granted to the selected OneDrive sites.

- After permissions are successfully granted to the selected sites, a confirmation message will be displayed.

- If you want to manually grant the admin access, refer to the link below:
Steps to Grant admin access to all OneDrive for business site collections on the source server
- Select the method for the secure OAuth 2.0 based modern authentication and click on ‘Login’.

- Enter the password to login to your Global admin account.

- Select the required sites to set the permissions from the list, then click ‘Continue’.

- Select the required sites or folders you want to backup and click 'Next'.
- When you click on sub-folders, EdbMails will retrieve the folders automatically.

Step 3: Site Mapping
- Review the folders selected for backup. Ensure the 'Action' is set to 'Backup', then click the 'Start Backup' button to begin the process.

- The backup process is now underway. You can monitor its status through the progress bar. When the backup is finished, EdbMails will show a completion message. Click ‘View Logs’ to access the detailed backup report.

- Review the folders selected for backup. Ensure the 'Action' is set to 'Backup', then click the 'Start Backup' button to begin the process.
Additional Resources:

