


Office 365 Migration Guide: Step-by-Step with EdbMails
Migrating Office 365 data requires the source and target environments to be prepared correctly before the migration starts. Mailbox availability, public folders, archive mailboxes, permissions, authentication, mailbox mapping, and post-migration configuration should be reviewed as part of the migration workflow.
This guide explains the complete EdbMails Office 365 migration process from preparation through post-migration activities. EdbMails Office 365 Migration Tool provides modern authentication via OAuth 2.0, source-to-target mailbox mapping, incremental migration, and parallel mailbox migration. The steps below show how to use these capabilities during an Office 365 migration.
Who this guide is for
This guide is for administrators who want to follow the EdbMails workflow for migrating Office 365 mailbox data from a source Microsoft 365 environment to a target Microsoft 365 environment. The same workflow can be used when organizations move mailbox data as part of consolidation, restructuring, rebranding, mergers and acquisitions, or divestiture projects. If you're coming from on-premises Exchange instead, that's covered in our Exchange to Office 365 guide. For PST consolidation into Microsoft 365, see PST to Office 365. And for the other direction, Office 365 to PST export covers exporting Microsoft 365 data to PST.
Prefer a condensed action list instead? Our Office 365 migration checklist covers the same planning stages in a quick-reference format.
Planning and preparation
Before starting the migration, review the source and target environments so that the migration scope, required resources, and cutover activities are clear. See common Office 365 migration challenges for issues that should be considered before the production migration.
The four steps below summarize the preparation directly related to this migration workflow. Review mailbox scope, client and application dependencies, the migration method, licensing, responsibilities, validation, cutover activities, and rollback considerations before starting the production migration.
- Step 1: Map out what you actually have
Start with an inventory. Not a fancy one — a spreadsheet is fine. List the mail servers on the source side, every client device that touches them (Outlook on Windows, Outlook on Mac, mobile users, the OWA-only crowd), and the bandwidth at each office. Then list every application that sends or receives mail through the current setup. CRMs, ticketing systems, network scanners, any custom app with an SMTP relay configured. These are the things that will break first if you forget about them.
Pay special attention to older Outlook installations, low-bandwidth locations, and applications that are configured for the current environment. These dependencies may require updates before or after cutover. If workloads other than Exchange Online mailbox data are in scope, review their current Microsoft 365 service limits and migration requirements separately before including them in the migration plan.
- Step 2: Pick the right migration method
Choose the migration approach that matches the source environment and migration requirement. Cutover, staged, hybrid, and IMAP migration methods serve different source environments and deployment requirements. Review the requirements and limitations of the applicable method before deciding how the migration will be performed.
See our full comparison of Office 365 migration methods for a side-by-side breakdown of org size, source environment, and downtime for each option.
- Step 3: Decide what's moving
Three buckets here. Stuff that moves to the new tenant as-is — active mailboxes, the public folders teams actually use, shared mailboxes that haven't been decommissioned. Stuff that's better off archived rather than migrated — old leavers' mailboxes, project folders from three years ago, anything where the lift-and-shift cost outweighs the access value. And stuff that should just be deleted before you even start — automated bounce notifications, ancient calendar invites, the Junk folder in its entirety.
Getting this list right keeps the migration window short and the post-migration cleanup minimal. Getting it wrong means you'll spend six months after cutover wondering why everyone's mailbox is over quota.
- Step 4: Document the plan
Write it down. Even if it's just an internal wiki page. Cover the tenant-to-tenant migration approach you picked, the order of operations, who's responsible for each step, and the rollback plan if something goes wrong on the cutover weekend. The rollback plan matters. Most migrations never need it. The ones that do are the ones where nobody wrote one.
- Step 1: Map out what you actually have
Office 365 to Office 365 Migration Prerequisites
On the source tenant:
- A Global Administrator account with a mailbox for automatic app registration against Microsoft Entra ID. If automatic registration is not used, configure manual registration with the account and permissions required for the selected connection method.
- Bandwidth. Verify that sufficient network bandwidth is available for the migration. Actual migration throughput varies with data volume, network conditions, Microsoft 365 service behavior and throttling, and the number of mailboxes being processed. Review Microsoft's detailed performance guidance before scheduling the production migration.
- Public folder permissions. If public folders are in scope, set the admin permissions now rather than at midnight on cutover weekend.
- Archive mailboxes. If In-Place Archives are migrating, they need to be enabled on the source first. Here's how.
- If directory synchronization is part of the source environment, review the identity and domain cutover plan before changing or disabling synchronization. Do not disable directory synchronization only because the mailbox data migration is starting; coordinate the change according to the tenant transition plan.
- Language gotcha. If your source mailboxes use localized folder names — Boîte de réception instead of Inbox, for example — direct migration may not map them to the standard English folders on the target. This FAQ entry covers the workaround.
On the target tenant:
- Set the tenant up properly. Microsoft's Tenant roadmap for Microsoft 365 is a sensible reference if this is your first time.
- Mailbox creation and licensing. EdbMails handles both automatically — creates the mailbox, assigns the license, moves on. If you'd rather do it by hand for governance reasons:
- Pick a licensing plan. The 30-day trial is the right place to start if you haven't committed yet — it gives you enough room to validate the migration before signing anything. Microsoft's comparison pages for business plans and enterprise plans lay out the differences.
- Public folder structure on the target. If you're moving public folders, create them on the target before the migration runs.
- Archive mailboxes on the target. Same story — enable them before the migration. Steps here.
- Use a global admin account on the target as well, with a mailbox, for the automatic EdbMails registration.
- Custom domain. If you're keeping the same domain on the target side — most companies do — it needs to be added and verified in Office 365 before cutover. One catch worth flagging: Microsoft only allows a given domain to exist on one Office 365 tenant at a time. So if you're keeping the same domain across both tenants, expect a brief downtime window when you detach it from the source and reattach it to the target. Add a custom domain and add DNS records cover the two halves of this.
- ADFS. If you're running Active Directory Federation Services, you'll need to set up a new domain on the target tenant for it before starting.
- Message size limit. Bump it up to 150 MB on the target. Here's how.
Office 365 to Office 365 Migration using EdbMails
The actual migration is mostly clicking through a wizard. EdbMails handles emails, contacts, calendars, tasks, journals, public folders, archive mailboxes, shared mailboxes, Office 365 Groups, and everything in the mailbox structure. Here's the flow.
Step 1: Install
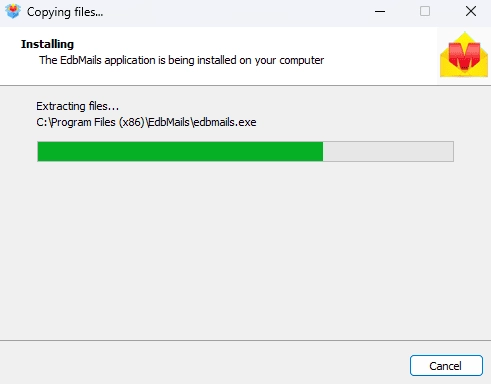
- Download the installer, run EdbMailsSetup.exe, follow the prompts. System requirements are on the docs site if you want to check first.
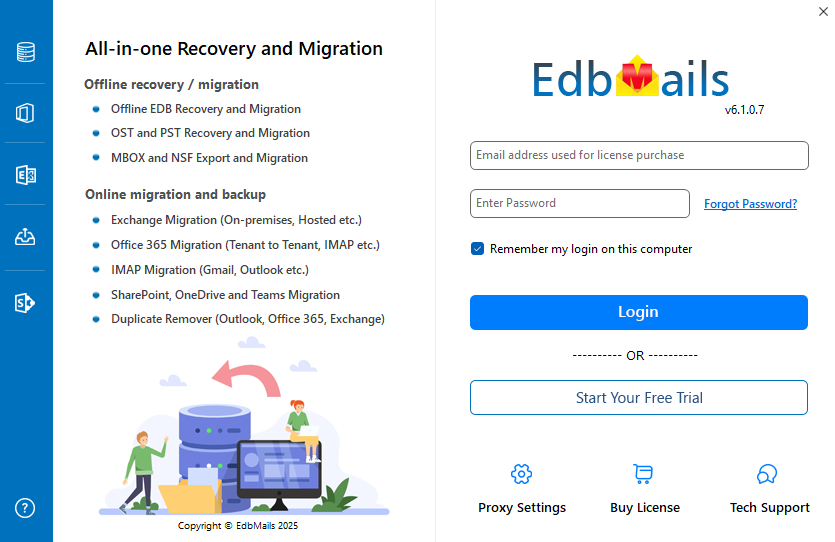
- Once installed, hit ,'Login' if you've got an account, or 'Start Your Free Trial' if you don't.
- Download the installer, run EdbMailsSetup.exe, follow the prompts. System requirements are on the docs site if you want to check first.
Step 2: Pick the migration type
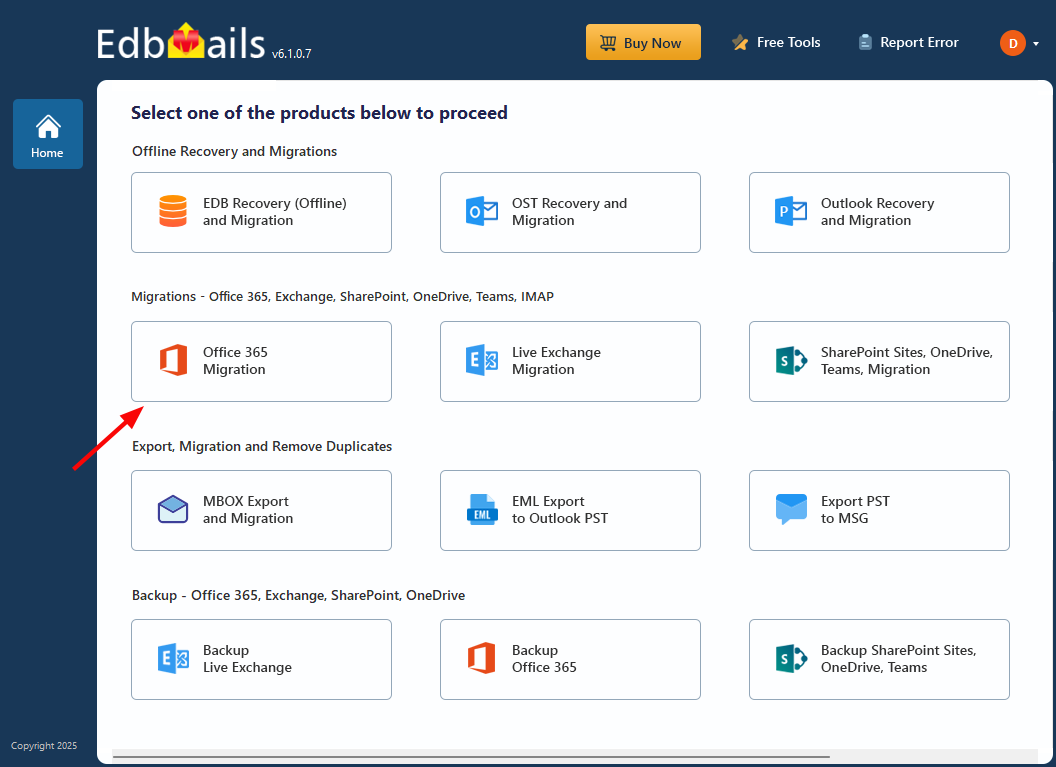
- Choose 'Office 365 Migration' from the main screen, then 'Office 365 to Office 365 Migration' from the sub-menu.
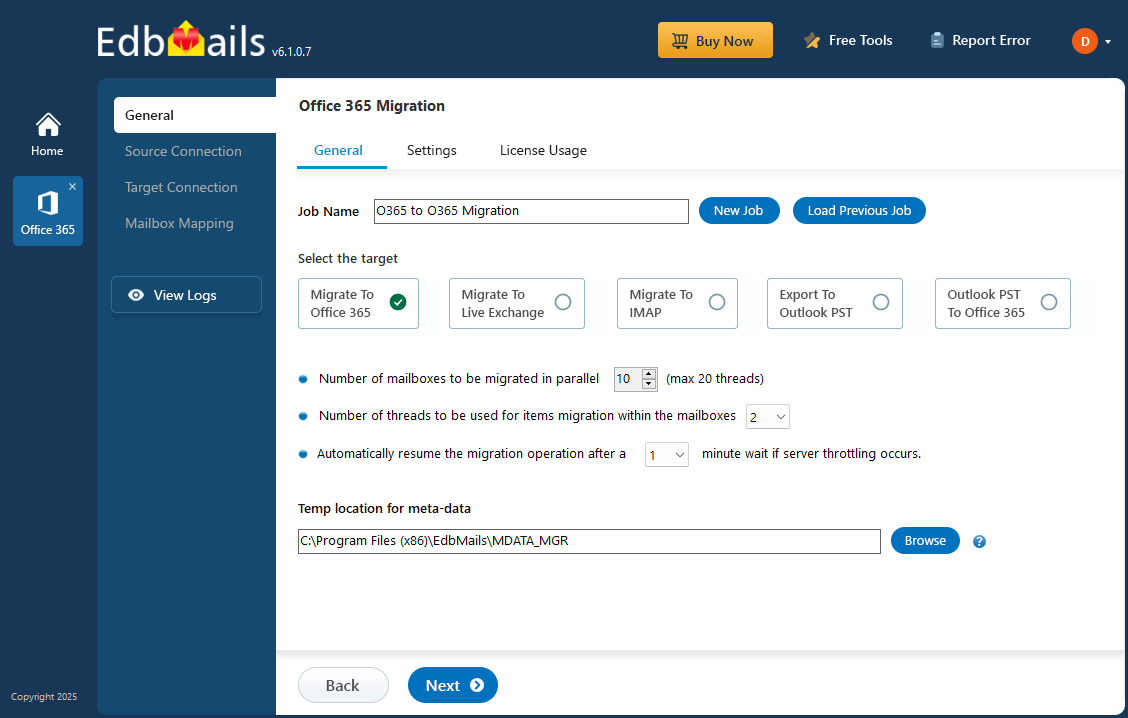
- Proceed with the default job, or click 'New Job' to modify the job name.
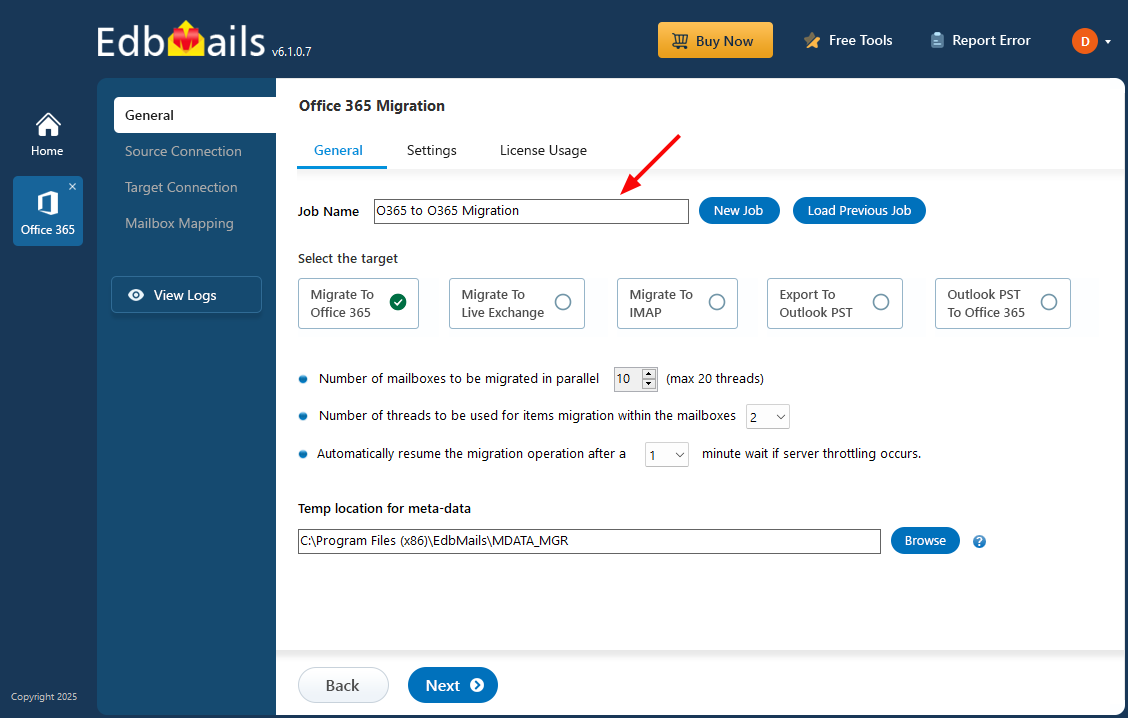
- Choose 'Office 365 Migration' from the main screen, then 'Office 365 to Office 365 Migration' from the sub-menu.
Step 3: Connect to the source
- Click 'Add New Connection'. For a previously-saved connection, pick it from the list and choose 'Connect to Existing'.
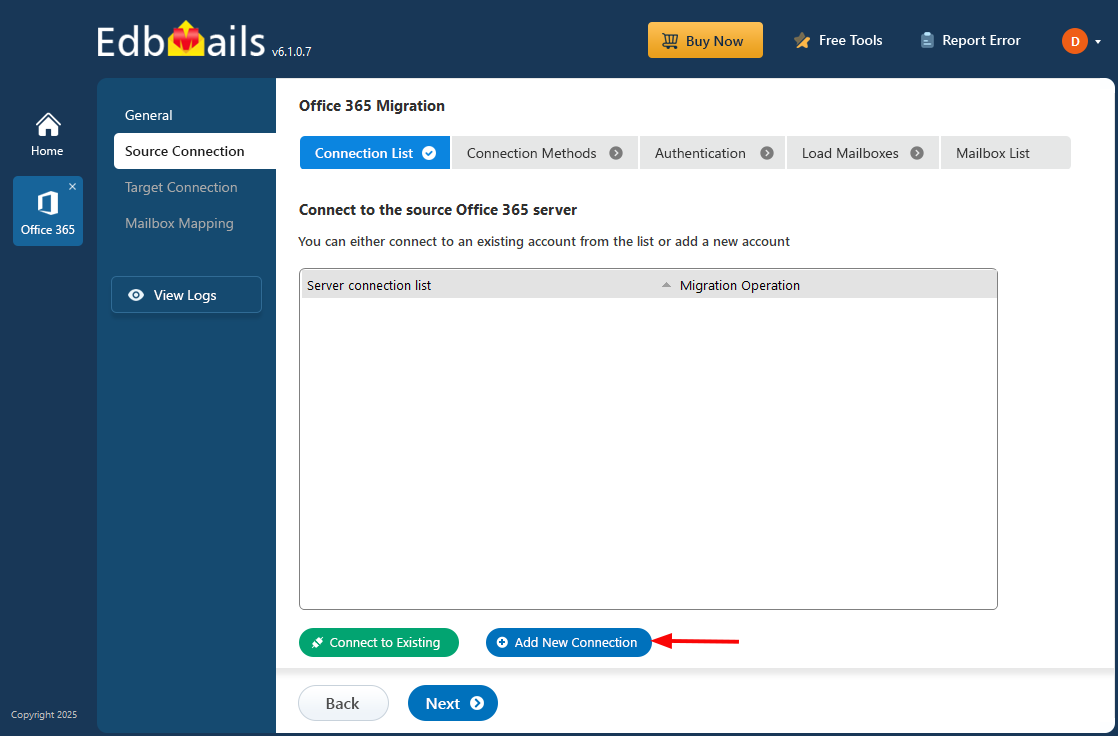
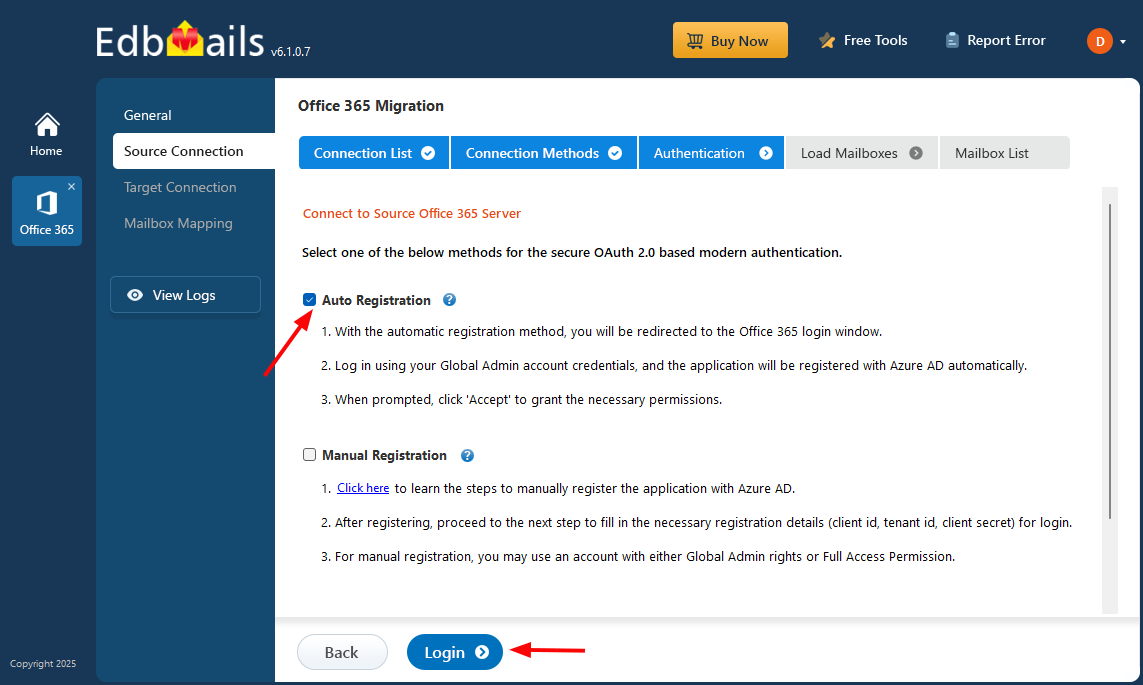
- Select your connection options, click 'Next', then pick an OAuth 2.0 modern authentication method. Reference here if you need it
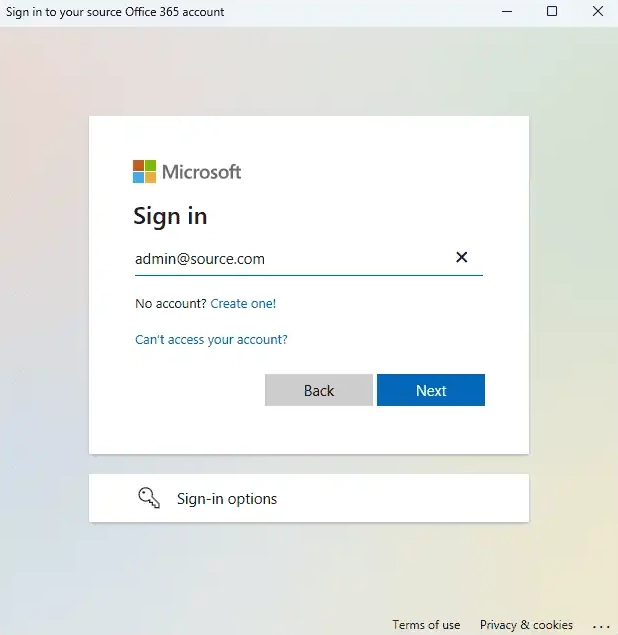
- Sign in on Microsoft's authentication page. After that's done, choose how mailboxes get loaded. By default, EdbMails automatically loads the first 100 mailboxes from the tenant — this is fine for most small to mid-sized migrations. However, due to a Microsoft-imposed limitation, tenants with more than 100 mailboxes cannot be enumerated directly beyond that count, so for larger environments you'll need to load mailboxes from a CSV file instead. The CSV method also gives you explicit control over exactly which mailboxes appear in the list, which is useful even on smaller tenants when you want a curated scope.
- Tick the mailboxes you want to migrate. Hit 'Next'.
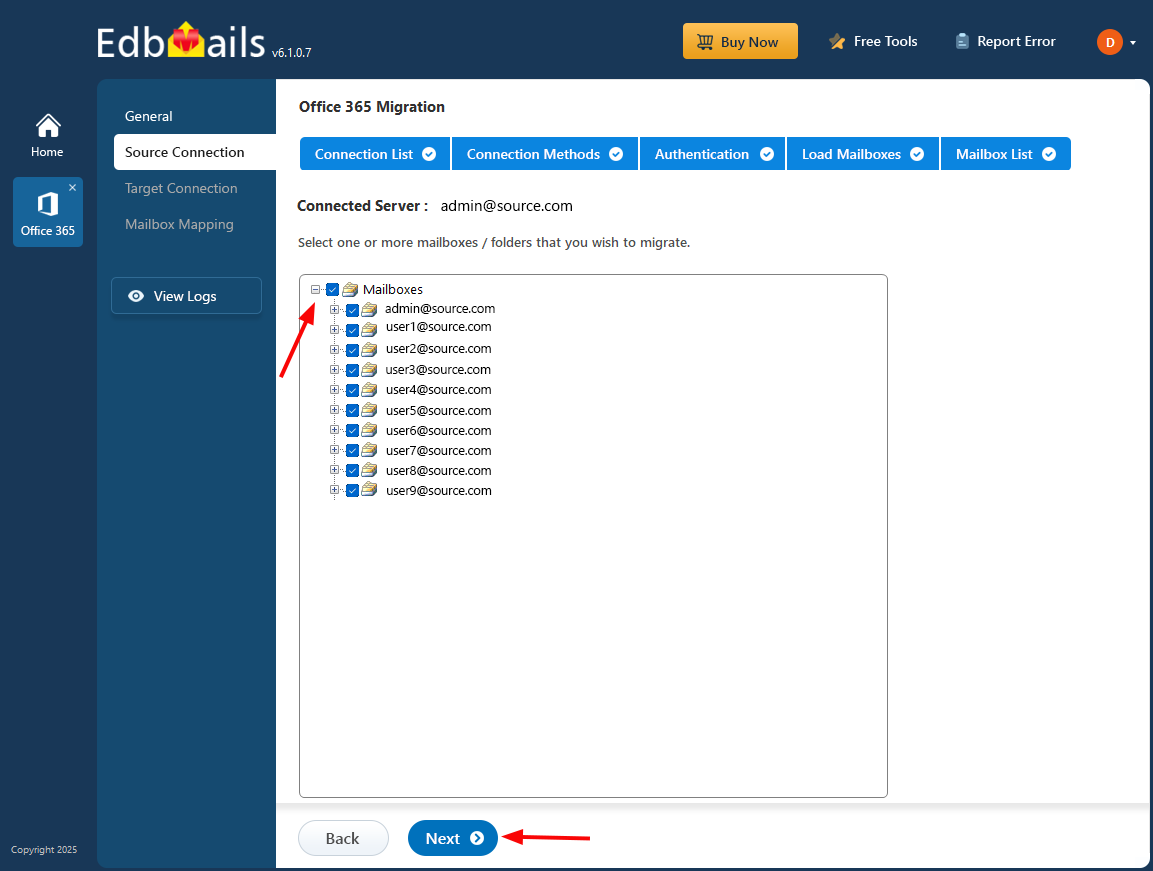
- Click 'Add New Connection'. For a previously-saved connection, pick it from the list and choose 'Connect to Existing'.
Step 4: Connect to the target
- Same pattern as the source side. 'Add New Connection' for a fresh setup, 'Connect to Existing' to reuse one.
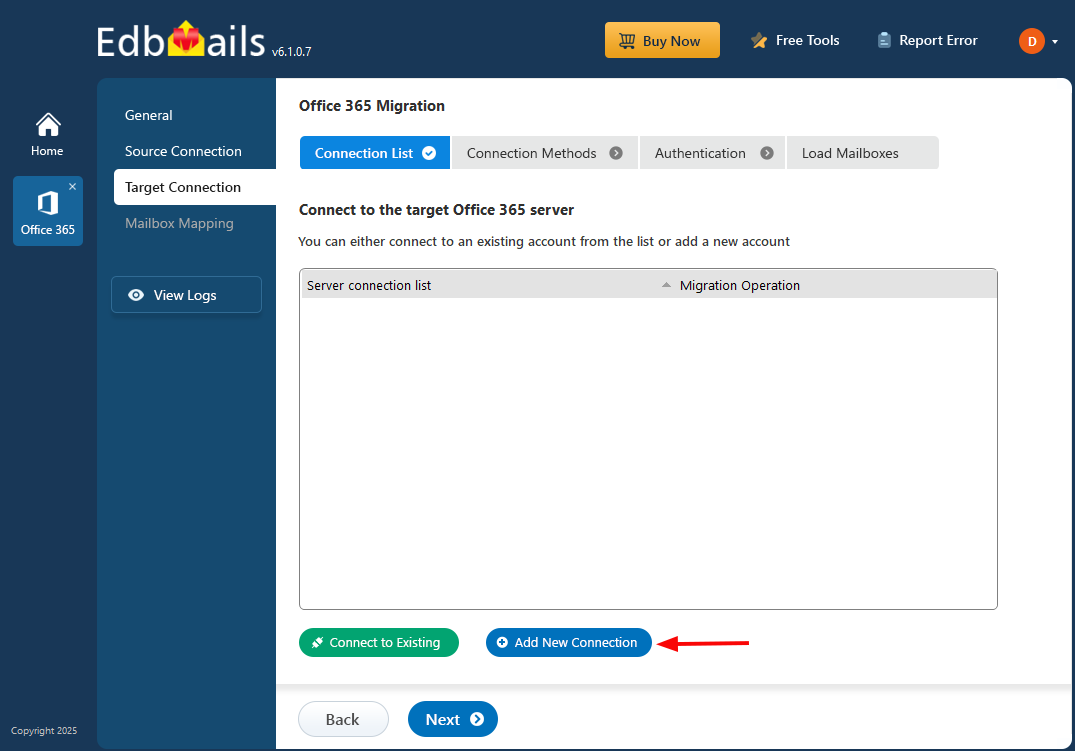
- Pick your connection options and authentication method, then sign in to Microsoft. As on the source side, EdbMails loads up to 100 target mailboxes automatically by default. If the destination tenant has more than 100 mailboxes — which is common in M&A and consolidation scenarios — you'll need to supply the list via CSV to work around the Microsoft enumeration limit. Load the target mailboxes using whichever method fits your tenant size.
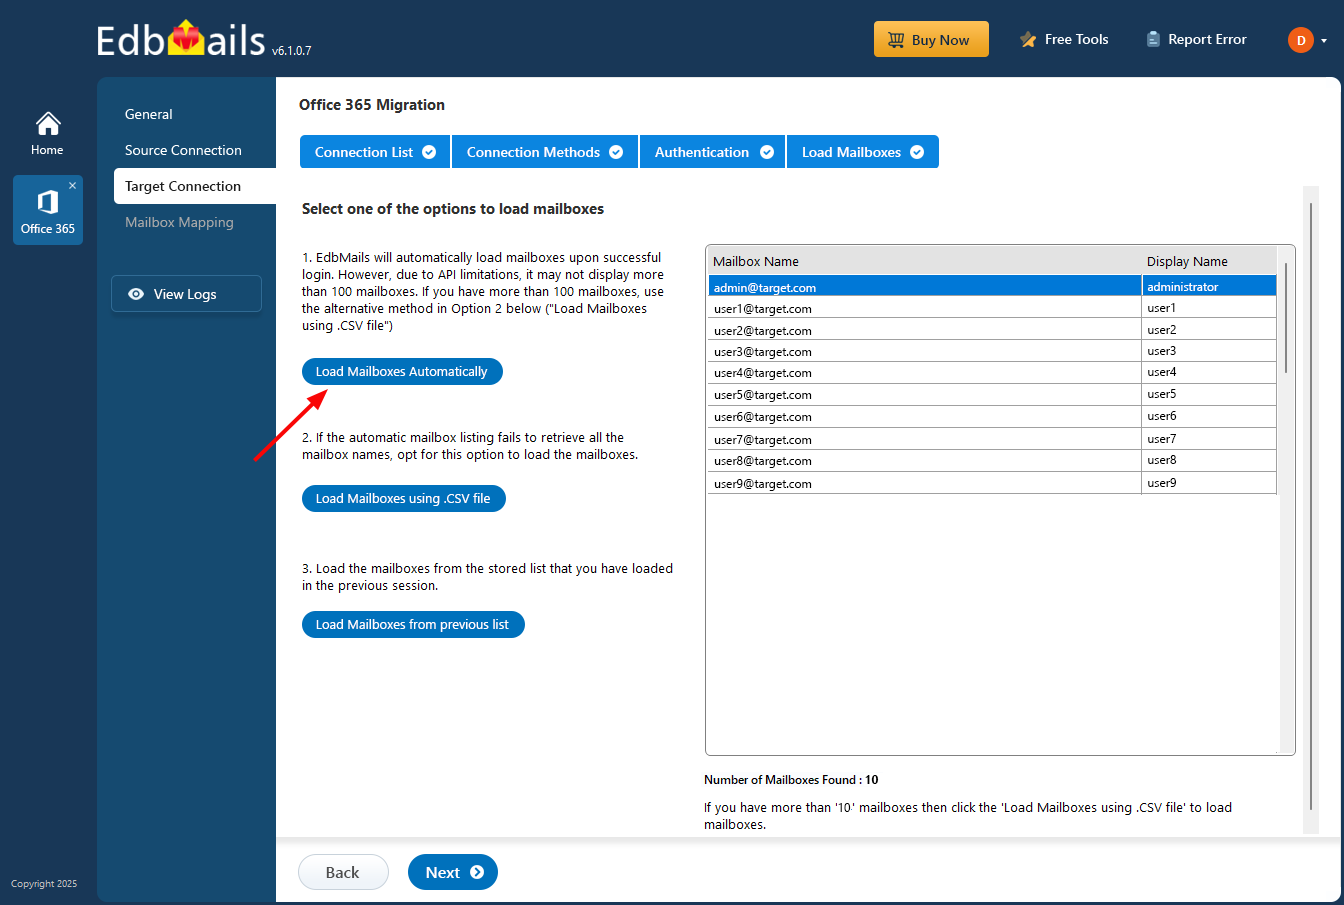
- Same pattern as the source side. 'Add New Connection' for a fresh setup, 'Connect to Existing' to reuse one.
Step 5: Map source to target
- Pick a mapping option. EdbMails can automatically match source and target mailboxes using available mailbox attributes such as display name, first/last name, and email address. Review the mapping before starting the migration.
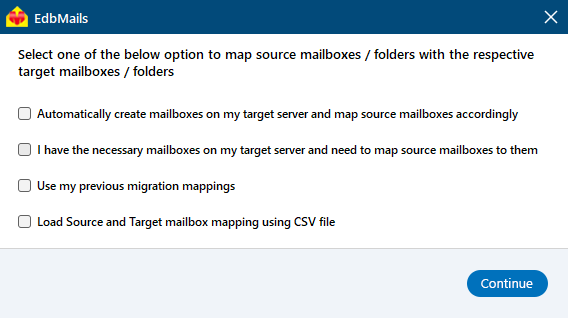
- Override the automatic mapping manually wherever you need to. Common cases: people who changed their last name between source and target, mailbox consolidation where two source mailboxes map to one target, or test mailboxes you want to point somewhere specific.
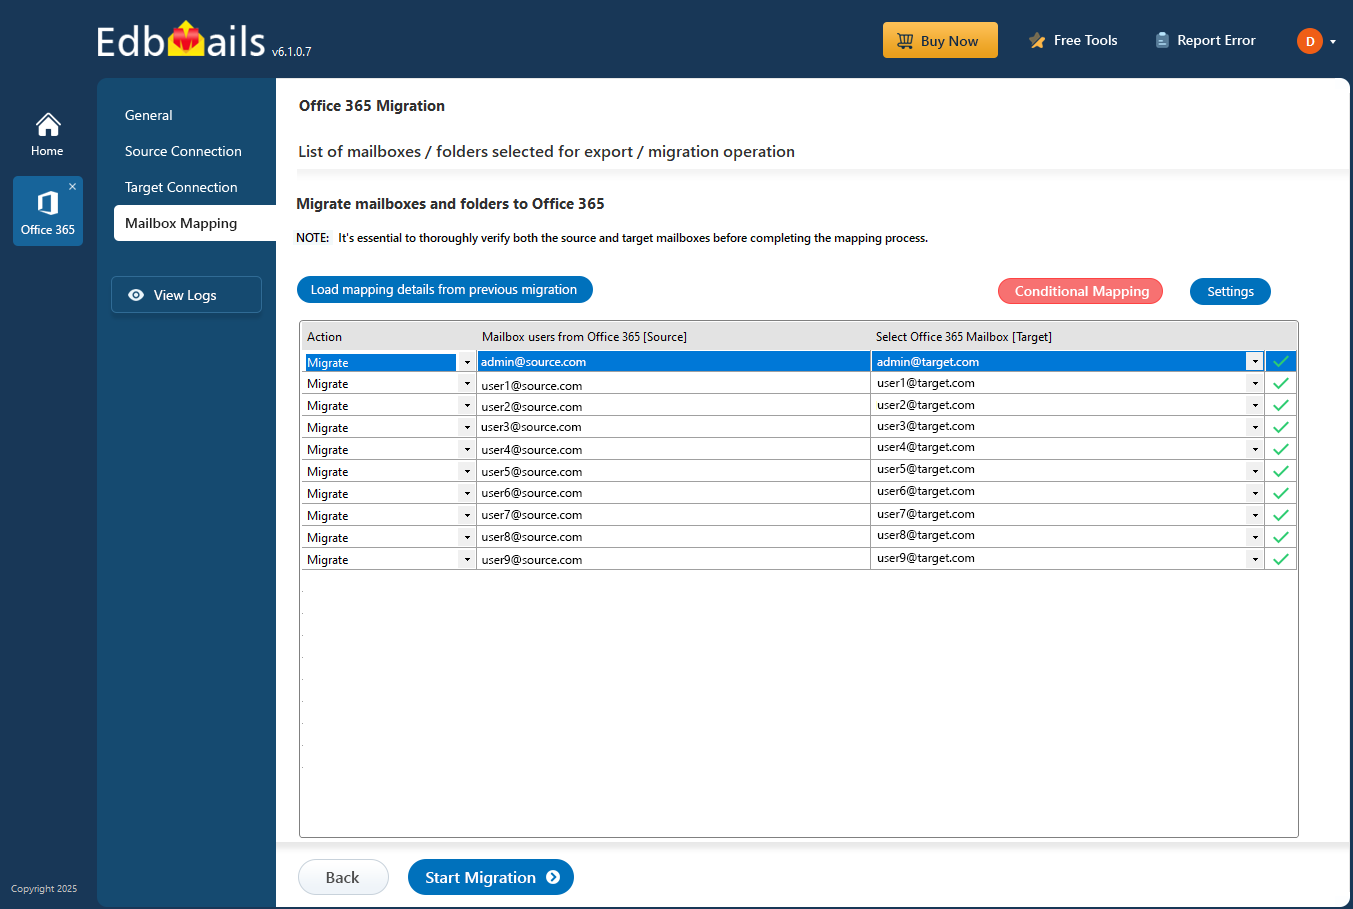
- Pick a mapping option. EdbMails can automatically match source and target mailboxes using available mailbox attributes such as display name, first/last name, and email address. Review the mapping before starting the migration.
Step 6: Start the production run
- Hit 'Start Migration'. The tool runs in the background. You'll get a notification when it's done.
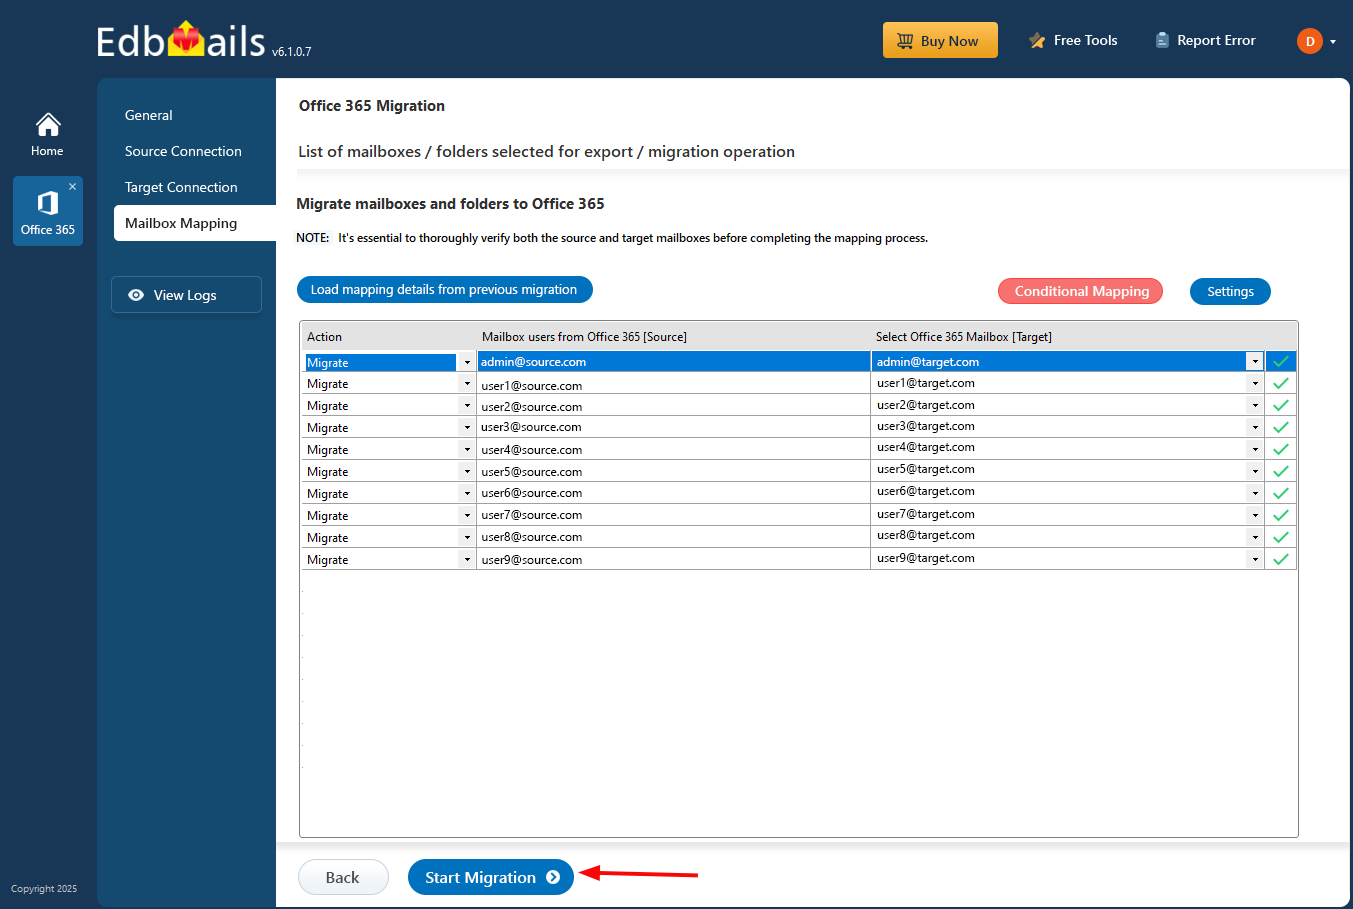
- Click 'View Logs' any time to see the migration report. Pause and resume work at any point — handy if something else needs the bandwidth, or if you need to take the migration machine down for an update
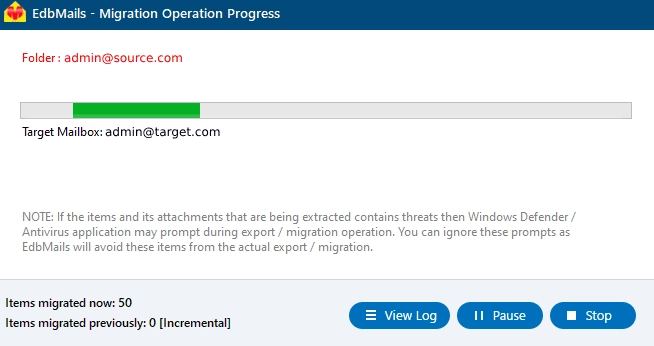
- Hit 'Start Migration'. The tool runs in the background. You'll get a notification when it's done.
Office 365 Post-migration Activities
The migration run finishing does not mean the project is done. These steps must be completed before users are fully cut over to the target tenant.
- MX records and Autodiscover
Add your domain to Office 365 if you haven't already. Then update the MX records so new mail starts routing to the target tenant. Autodiscover needs configuring too — otherwise Outlook won't know how to find the migrated mailboxes.
- Run a final delta sync
Between the time the main migration finished and the MX cutover, new mail kept arriving in the source tenant. Run one more incremental migration pass after the MX switchover to pick up anything that landed in the gap. EdbMails uses subsequent migration passes to process eligible items that were not migrated in the earlier pass, according to the selected migration settings.
- Clear Outlook's Auto-Complete list
This catches people. Outlook caches the email addresses users have sent to, and those cached entries still point to the old tenant after migration — so a reply to a colleague will silently fail. Microsoft's guide to managing Auto-Complete covers the cleanup.
- Recreate Outlook profiles
- Make sure everyone's on a current version of Outlook. Old versions can have authentication issues against the new tenant.
- Rebuild Outlook profiles for any user reporting connection problems.
- Set the new server details — address, username, password.
- Send a test email both ways to confirm everything's flowing.
- Reapply shared mailbox permissions
Worth calling out separately: After migration, validate shared mailbox access and delegation on the target, including Full Access, Send As, Send on Behalf, and folder-level permissions where applicable. Reapply permissions that are not present on the target and verify access with representative users.
- Retire the old subscription
Once you've verified the migration succeeded and nobody's still working out of the old tenant, cancel the old Office 365 subscription and remove any domains that aren't needed anymore. Retire the source only after the migrated data, user access, mail flow, required permissions, and target configuration have been validated.
- MX records and Autodiscover
Why Choose EdbMails for Office 365 Migration?
The following EdbMails capabilities support the migration workflow described in this guide. For complete product details, supported scenarios, licensing, and commercial information, refer to the Office 365 Migration Tool page:
- No PowerShell scripting — the whole workflow is GUI-driven, which matters if the person running it is a sysadmin who hasn't touched PowerShell in years.
- OAuth 2.0 sign-in through Microsoft's own sign-in page — credentials never touch EdbMails servers.
- Incremental delta migrations — re-run the same job and only the changes since last time get moved. No duplicates.
- Concurrent mailbox transfer — process multiple mailboxes concurrently according to the supported application configuration. Actual migration duration depends on data volume, network conditions, Microsoft 365 service behavior, and throttling.
- Business continuity during migration — users can continue working in the source environment during supported data-migration stages. Final domain, DNS, identity, Outlook, or other cutover changes may still require coordination.
Migration series
- Office 365 Migration Methods — choose the right approach
- Migration Checklist — pre-migration preparation list
- Migration Best Practices — what the top teams do differently
- Migration Challenges — common failure points and fixes
Frequently Asked Questions (FAQ)
How long does an Office 365 migration take?
Can I migrate between Office 365 tenants in different geographic regions?
Is there any downtime during the migration?
Can I migrate only some of the data, not everything?