EdbMails EDB Recovery and Migration software
  • Products
    Exchange EDB / Email Recovery Tools
    • EDB Recovery and MigrationRecover EDB to PST, EDB to Office 365 and Exchange NO Duplicate Migration
    • OST Recovery and MigrationRecover OST to PST, OST to Office 365 and Exchange Migration
    • PST Recovery and MigrationRecover Outlook PST, PST to Office 365 and Exchange Migration
    • MBOX Export and MigrationExport MBOX to PST, MBOX to Office 365 and Exchange Migration
    • NSF Export and MigrationExport NSF to PST, NSF to Office 365 and Exchange Migration
    • EML to PST ExportEML files export to Outlook PST format
    • PST to MSG ExportOutlook PST files export to MSG format
    • MSG to PST ExportExport MSG files Outlook PST files
    Exchange and Office 365 Migration
    • Exchange Server MigrationMigrate Exchange 2007, 2010, 2013, 2016, 2019 to Office 365 tenants. Also, migrate between Exchange servers and PST
    • Office 365 MigrationMigrate Source Office 365 tenants to Destination Office 365 tenants. Also, migrate to Exchange Server and PST
    • IMAP Email Backup & MigrationMigrate all IMAP email servers (Gmail, Zimbra, Zoho, Yahoo etc.), Office 365, Exchange and Backup to Outlook PST
    • SharePoint Online MigrationMigrate documents, files and folders from SharePoint sites
    • OneDrive for Business MigrationMigrate documents, files and folders from OneDrive
    • Microsoft Teams MigrationMigrate Teams, documents, files and folders etc.
    Exchange and Office 365 Backup
    • Office 365 BackupIncremental, Granular, Encrypted and Compressed Office 365 Mailboxes Backup
    • Exchange Server BackupIncremental, Granular, Encrypted and Compressed Exchange Mailboxes Backup
    • SharePoint, OneDrive & Teams BackupBackup Online site collections, Team sites, Office 365 groups, all documents etc.
    • Duplicate Remover - Office 365 & Exchange Remove duplicate emails, calendars, contacts, journal etc. from Office 365 and Exchange
    Go to products
  • Features
  • FAQ
  • Pricing
  • Download
  • Support
  • Sign in
User’s Manual
Office 365 Migration

User Manual

User Manual

  • Office 365 Migration Overview
  • System Requirements
  • Software Setup
    • EdbMails Installation Process
    • Upgrading the Software
  • Understanding the Application
    • Software's Main Components
    • Understanding the Migration
  • FAQ
    • General
    • Migration Free Trial / Demo
    • Migration License
    • Before Migration
    • Migration - Steps
    • After Migration
  • Videos
    • Office 365 to Office 365
    • Office 365 to Exchange
    • Office 365 to IMAP
    • Office 365 to PST
    • Public Folder to Office 365
    • Archive Mailbox to Office 365
    • Public Folder to Exchange
    • Archive Mailbox to Exchange
    • Restore Bulk PST files to Office 365
    • Automatically Create Office 365 Mailboxes
    • Export Office 365 user to CSV file
  • Screenshots
    • Office 365 to Office 365
    • Office 365 to Exchange
    • Office 365 to PST
  • How it works?
    • Office 365 to Office 365
    • Office 365 to Exchange
    • Office 365 to IMAP
    • Office 365 to PST
    • Public Folder to Office 365
    • Public Folder to Exchange
    • Public Folder to Shared Mailbox
    • Archive Mailbox to Office 365
    • Archive Mailbox to Exchange
    • Office 365 to Hosted Exchange
    • Multiple PST to Office 365
    • Office 365 to Gmail Migration
    • Office 365 Shared mailbox to Exchange
    • Office 365 Public folders to PST
    • Office 365 archive mailbox to PST
    • Office 365 Shared mailbox to PST
    • Office 365 shared mailbox to Public folder
    • Office 365 Archive mailbox to Shared mailbox
    • Office 365 Shared mailbox to Archive mailbox
  • Connect to source Office 365
  • Connect to target Office 365
  • Modern Authentication Using OAuth 2.0
    • Microsoft 365 modern authentication
    • Automatic Registration
    • Manual Registration
  • Connect to Exchange server
  • Knowledge Base
    • Migrate between Office 365 tenants
    • Migrate Office 365 mailbox
    • Public folder migration
    • Office 365 to Exchange Migration
    • Office 365 Migration with same Domain
    • Office 365 Group Migration
    • Selective Mailbox Migration
    • Migration to Exchange 2007, 2010, 2013, 2016 and 2019
    • User-Defined Mailbox/Folder Mapping
    • Export Office 365 users to CSV
    • GoDaddy to Microsoft 365 migration
    • Rackspace to Office 365 migration
    • Office 365 migration methods
    • Office 365 migration checklist
    • Migrate Shared mailbox to Office 365
    • Office 365 migration best practices
    • Office 365 migration challenges
    • Convert shared mailbox to regular mailbox
    • Office 365 to Exchange 2019 migration
    • Office 365 multiple mailbox migration
    • Office 365 Server to Server Migration
    • Cross-Tenant Office 365 migration
    • Office 365 to iCloud migration
    • Office 365 to Yahoo Mail migration
  • Set Office 365 Impersonation rights
    • Using PowerShell commands
    • Using Office 365 GUI
  • Migration Types
    • Cutover Migration
    • Staged Migration
  • Set Exchange Server Impersonation rights
  • Map the Mailboxes
  • Migration Walkthrough
    • Office 365 tenant to tenant migration
    • Office 365 to Exchange migration
    • Office 365 to PST Export
  • Multifactor Authentication
    • Enable MFA in Office 365
    • Create App password for MFA
    • Disable Security Defaults
  1. Home
  2. Product
  3. Office 365 Migration with same Domain
Download Buy Now

Office 365 Migration Keeping the same Domain Name

Office 365 to Office 365 migrations having the same domain name differ from the standard migration because Microsoft allows a domain to reside in one tenant at a time. In order to perform the same domain migration, the user addresses should be changed to use the 'onmicrosoft.com' domain names on both source and destination server, rather than the vanity domain names. While adding the domain to the destination tenant, you may observe a minor downtime. This is because Microsoft only allows the same domain to exist on one Office 365 tenant at a time.

There will be some email downtime with this migration due to the time required to remove the domain on the Source tenant and add it to the Destination tenant.
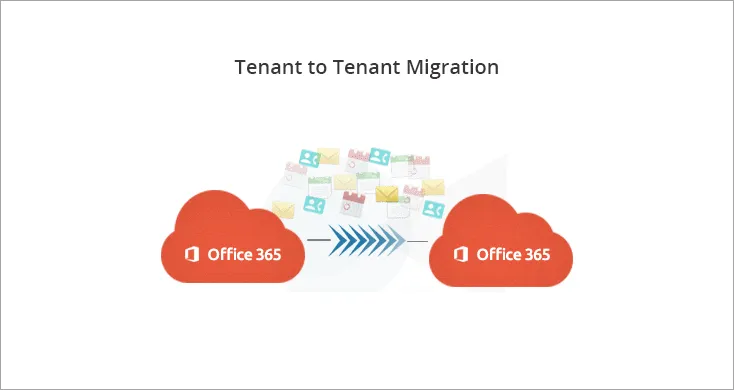
Office 365 to Office 365 Migration with same domain

  1. Reason for moving the Office 365 tenants with same domain

    1. You may need to change the Office 365 providers like Godaddy, Rackspace, Comcast to directly move it to Microsoft.
    2. To avoid the latency of emails you wish to change your Office 365 servers from Germany to the USA or from China to the USA or vice versa.
    3. Companies may prefer to switch to a different Office 365 tenant while keeping the domain name the same during business acquisitions and mergers. 
    4. Performing Microsoft O365 migration with the same domain name means that users can continue to use their existing email addresses, which reduces the risk of confusion or disruption to business operations.
    5. By keeping the same domain name, companies can maintain their branding and reputation with their customers, suppliers, and partners, as the email addresses and website URLs will remain the same.
    6. Changing domain names can also result in email delivery issues, as emails may be marked as spam or blocked by email servers due to the change in domain name. By keeping the same domain name, companies can avoid these issues.
  2. Steps involved before migrating Office 365 in the same domain

    Step 1: Move the users of source Office 365 to another domain

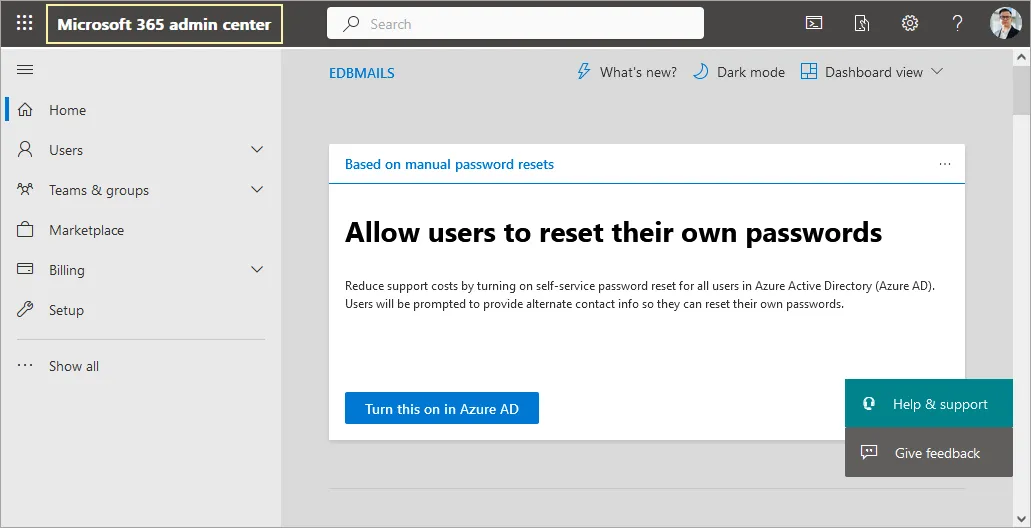
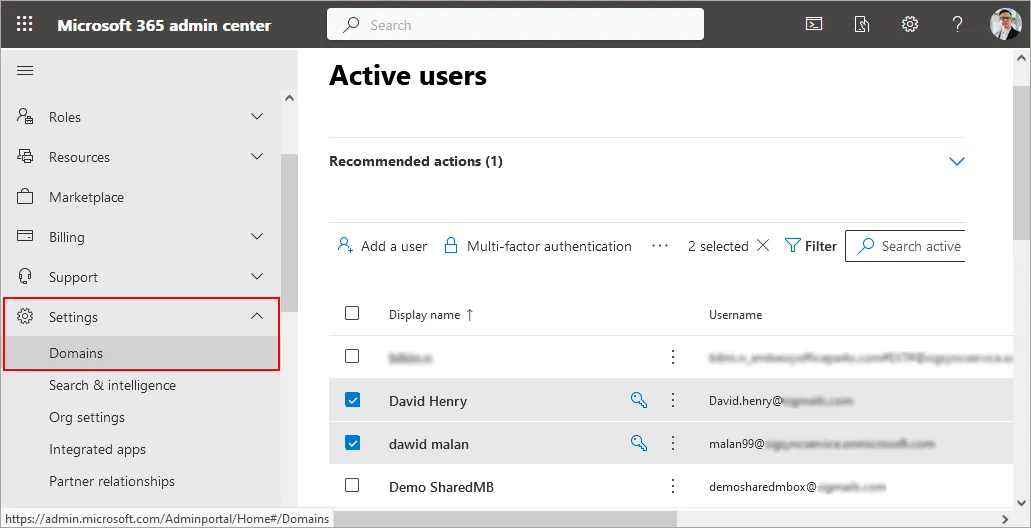
    • Go to the Microsoft 365 admin center

      Open Microsoft 365 admin center

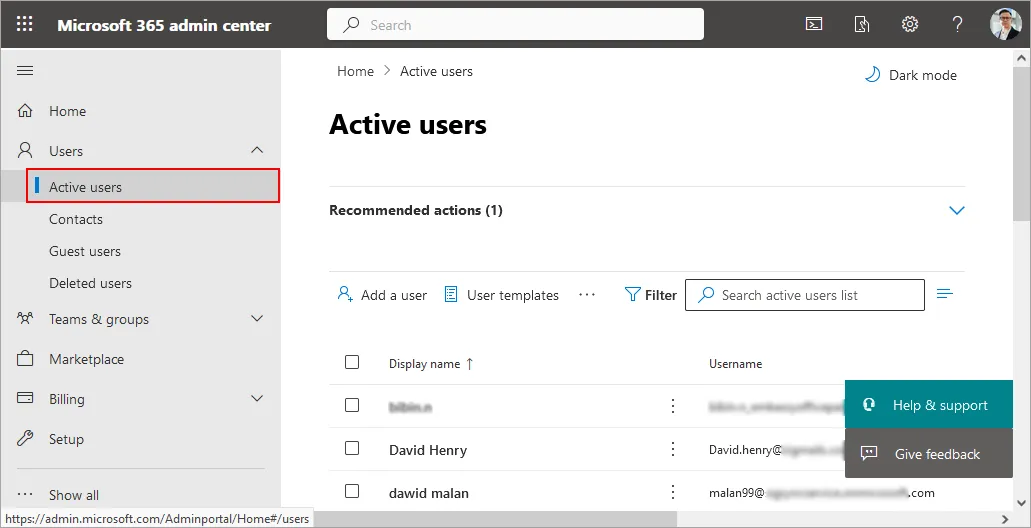
    • Select ‘Users’ > ‘Active users’.

      Navigate to Active users

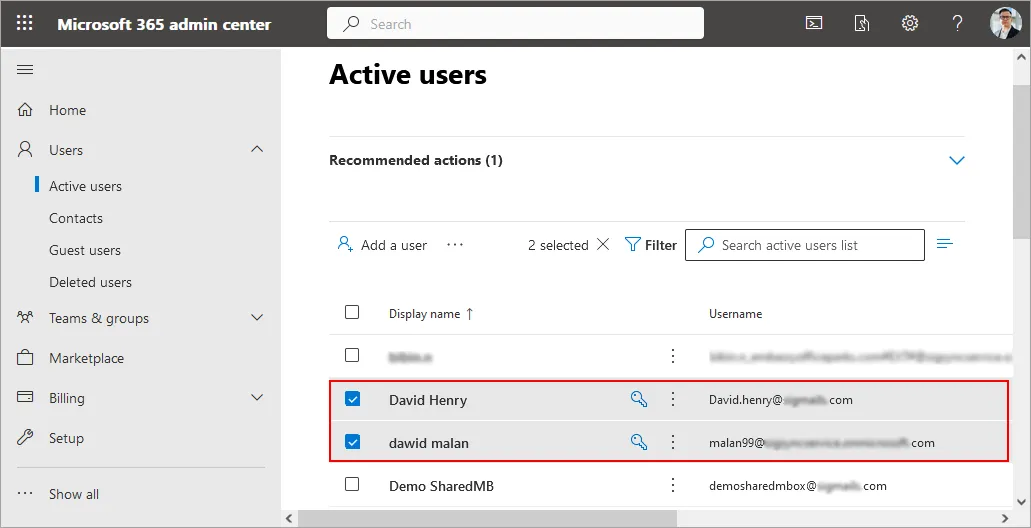
    • Select the boxes next to the names of all the users you want to move.

      Check the user names

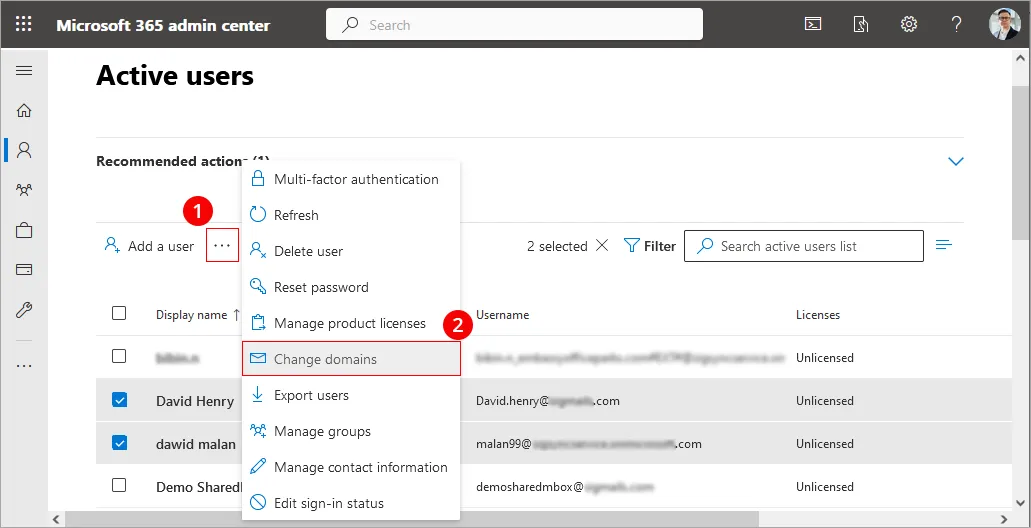
    • Select ‘More options (…)’, at the top of the page, and then choose ‘Change domains’.

      Change domains

    • In the Change domains pane, select a different domain like xxx.onmicrosoft.com

    You'll need to do this for yourself too, if you're on the domain that you want to remove. When you edit the domain for your account, you'll have to log out and login back in using the new domain you chose to continue.

    Step 2: Remove the domain from source Office 365 server

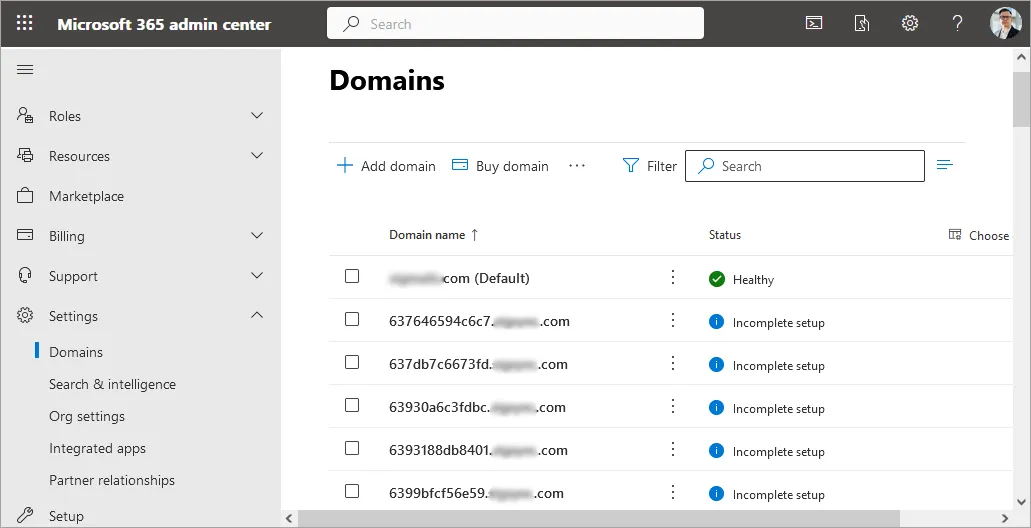
    • In the admin center, go to ‘Settings’ > ‘Domains page’

      Open Domains page

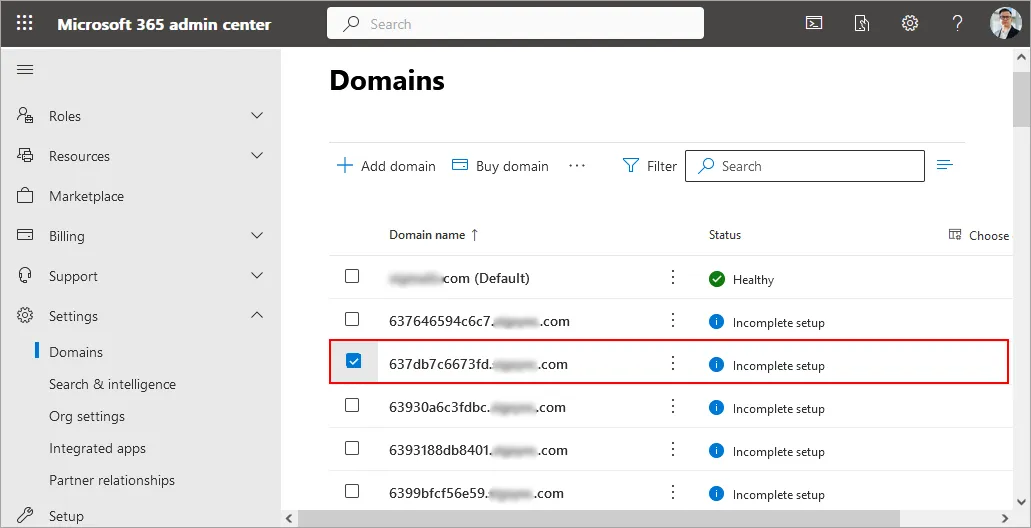
    • On the Domains page, select the domain that you want to remove

      select the domain

    • In the toolbar pane, select ‘Remove domain’

      select remove domain

    • Follow any additional prompts, and then select Close

    Note: It can take as little as 5 minutes for Office 365 to remove a domain if it's not referenced in a lot of places such as security groups, distribution lists, users, and Office 365 groups. If there are many references that use the domain it can take several hours (a day) for the domain to be removed.

    After the domain removal is complete, users will not be able to access their email, unless they know their tenant name and log in with their tenantname.onmicrosoft.com email addresses.

    Step 3: Admin account creation on source for migration

    • In the Office 365 admin portal, change the UPN of the admin account to the onmicrosoft.com address.
    • Create an administrator account (Global admin) in Office 365 to be used for migration.
    • Test the mailbox and email access by logging into the tenant

    Note: Test the access to the tenantname.onmicrosoft.com addresses, not to the domainname.com addresses. Make sure that the tenantname.onmicrosoft.com account is attached to each mailbox in Office 365. By default, it should be attached.

    Step 4: Verify the domain on destination Office 365 server

    • Verify the domain in the Destination Office 365 account. We recommend the use of the wizard in Office 365 for this operation, because after the domain is verified with the Text record, it offers to change all the users to the new Default Domain.

    Note: Since the domain was previously added to the account, all that needs to be done is to click the Verify button. If the domain is unable to be verified, and there is an error saying the domain already exists on another account, contact Microsoft and inform them that the domain needs to be manually deprovisioned.

    • Create an administrator account in Office 365 to be used for migration
    • Set up accounts on Office 365 and assign licenses. These can be created in several ways:
      • Manually create the mailboxes, one at a time.
      • By bulk import, via CSV file. Import the CSV file and create the mailboxes.
      • By DirSync, AAD Sync or AAD connect.
    • Confirm that every user has the Destination ‘domain.com’ domain name added to their mailbox. Add manually if necessary.
    • Prepare the tenant to send and receive large mail items in Office 365.

    Step 5: Update your DNS records

    MX Record update: On the DNS provider's portal, change the primary MX record to reflect the DNS settings for the new Office 365 organization. The DNS settings to change include Autodiscover, MX, and SPF records. Also, remove the old settings.

    These settings can be found in the Office 365 admin portal,

    • Inside Office 365, click Admin in the header.
    • On the Admin page, click Domains in the left pane.
    • Click the domain name to be set up, and then click DNS Settings. 
    • This page lists the DNS records necessary to set in order to use the Office 365 services. Steps to add DNS records to connect to your domain.

    Step 6: Migrate your Source Office 365 to the target Office 365

    Finally, migrate mailboxes from one tenant to another with EdbMails migration tool.

Download
Buy Now

Need help?

24/7 Customer support

Contact us on Live chat

Personalized Demo

Book a personalized demo

Still need help?

Email us / Call us

@edbmails.com All rights are reserved Privacy Policy | Terms of Use | GDPR | Security | Press Releases

hidden msg
Live Chat

Hi, May I help you?

Hide Chat Now