How to Convert a Shared Mailbox to a User Mailbox in Microsoft 365
You can convert a shared mailbox to a user mailbox from the Exchange admin center or Exchange Online PowerShell. After the conversion, assign the required Microsoft 365 license, confirm the associated user account is enabled, set or reset its password, and test sign-in before handing the mailbox to the user.
This is a mailbox type conversion within the same Microsoft 365 tenant. It is different from a mailbox migration, which copies supported mailbox data between separate source and target mailboxes or environments.
A user mailbox is intended for one licensed user who signs in with their own credentials. A shared mailbox is designed for delegated access by several people and normally is not used for direct sign-in.

Organizations commonly use shared mailboxes for addresses such as support@ or sales@. Conversion is useful when that mailbox must become a sign-in-enabled account for an individual user.
Before converting the mailbox
- Use an Exchange or Microsoft 365 administrator account with permission to manage recipients.
- Record existing Full Access, Send As, and Send on Behalf permissions so you can review or remove access that is no longer required.
- Confirm that an appropriate Exchange Online or Microsoft 365 license is available for the new user mailbox.
- If the mailbox is synchronized from on-premises Exchange, manage its type from the on-premises environment and allow directory synchronization to update Microsoft 365.
When a shared mailbox is the better choice
- Several authorized users need to read and reply from a common address.
- A team needs a shared calendar and contact list alongside email.
- Messages sent to a departmental address must be managed by more than one person.
- Microsoft documents the available configuration and delegation options for shared mailboxes in Microsoft 365.
Some of the key points about shared and regular mailboxes
- A user mailbox requires an appropriate license. Assign it promptly after converting a shared mailbox to a user mailbox.
- An unlicensed shared mailbox is generally limited to 50 GB. A license is required for a larger mailbox and for certain compliance or archiving features.
- Mailbox contents remain in place during a native type conversion, but permissions, sign-in, licensing, retention, and client access should still be checked afterward.
Optional: Convert a user mailbox to a shared mailbox
Use these steps only for the reverse scenario. Confirm that the mailbox has been provisioned before changing its type, and review Microsoft licensing requirements before removing a license.
Step 1: Log in to the Office 365 Admin center
- Login to Office 365 account and click on ‘Admin’ to open Office 365 Admin center.

- Login to Office 365 account and click on ‘Admin’ to open Office 365 Admin center.
Step 2: Select Active users under Users
- In the Office 365 admin center, expand ‘Users’ and choose ‘Active users’.

- In the Office 365 admin center, expand ‘Users’ and choose ‘Active users’.
Step 3: Convert the Regular mailbox to a Shared mailbox
- Select the user whose mailbox you want to convert to a Shared mailbox, then go to ‘Mail’ and under ‘More Actions’, select ‘Convert to shared mailbox’.

- Now click the ‘Convert’ button.

- A success message will be displayed showing ‘Mailbox has been converted’. Click ‘Done’ to finish the conversion operation.

- Select the user whose mailbox you want to convert to a Shared mailbox, then go to ‘Mail’ and under ‘More Actions’, select ‘Convert to shared mailbox’.
Convert a shared mailbox to a user mailbox using PowerShell
Exchange Online PowerShell is useful when you need a repeatable command or want to verify the recipient type after conversion.
- Step 1: Open PowerShell on your computer
Open PowerShell with administrator privileges.
- Step 2: Connect to Office 365 tenant account
Connect to your Office 365 account by running the following command:
Command: CopyConnect-ExchangeOnline -UserPrincipalName admin@contoso.com
Replace admin@contoso.com with your Office 365 administrator account's UPN.
- Step 3: Convert the shared mailbox to a user mailbox
Run the following command to convert the shared mailbox to a regular mailbox:
Command: CopySet-Mailbox -Identity sharedmailbox@contoso.com -Type Regular
Replace sharedmailbox@contoso.com with the primary SMTP address of the mailbox you want to convert. Existing delegate permissions are not required for this command and should be reviewed separately.
- Step 4: Verify the conversion
Run the following command to verify that the shared mailbox has been converted to a regular mailbox:
Command: CopyGet-Mailbox -Identity sharedmailbox@contoso.com | Select-Object DisplayName, PrimarySmtpAddress, RecipientTypeDetails
Confirm that RecipientTypeDetails returns UserMailbox. Then assign the required license, enable the associated user account if necessary, set a password, and test sign-in.
- Step 1: Open PowerShell on your computer
Convert a shared mailbox to a user mailbox in Exchange admin center
Step 1: Go to the Office 365 Admin center
- Login to Office 365 admin account and click the ‘Admin’ gear icon.
- Login to Office 365 admin account and click the ‘Admin’ gear icon.
Step 2: Select Exchange to open the Exchange admin center
- In the Office 365 admin center, select ‘Exchange’ to open the Exchange admin center.

- In the Office 365 admin center, select ‘Exchange’ to open the Exchange admin center.
Step 3: Select the Mailbox which you want to convert
- In the Exchange admin center, select ‘Mailboxes’ under ‘Recipients’

- In the Exchange admin center, select ‘Mailboxes’ under ‘Recipients’
Step 4: Convert the Shared mailbox to a regular mailbox
- Select the Shared mailbox that you wish to convert to a regular mailbox. Under ‘More Actions’ select the option ‘Convert to regular mailbox’.

- Click ‘Confirm’ to convert the shared mailbox to a regular user mailbox.

- A success message will be displayed showing ‘Mailbox converted successfully’. Click ‘Close’ to finish the conversion.

- Select the Shared mailbox that you wish to convert to a regular mailbox. Under ‘More Actions’ select the option ‘Convert to regular mailbox’.
Complete licensing and post-conversion checks
The mailbox type change is only part of the task. Complete these checks before the user starts working with the mailbox:
- Assign an Exchange Online or Microsoft 365 license that matches the organization's requirements.
- Confirm the Microsoft Entra user account is enabled and set or reset the password.
- Test Outlook on the web sign-in and verify that new messages can be sent and received.
- Review aliases, forwarding, inbox rules, retention settings, archive status, and mailbox size.
- Review Full Access, Send As, and Send on Behalf permissions; remove access that is no longer needed.
- Allow time for the change to appear across Microsoft 365 services and Outlook clients.
For a hybrid deployment, change the remote mailbox type from the on-premises Exchange Management Shell where applicable, for example: Set-RemoteMailbox -Identity sharedmailbox@contoso.com -Type Regular. Allow directory synchronization to complete, then verify the recipient type in both environments.
When to migrate a shared mailbox with EdbMails
Use native conversion when the mailbox stays in the same tenant. Use EdbMails when supported mailbox data must be copied to a different mailbox, tenant, or supported target environment.
Step 1: Download and Install EdbMails software
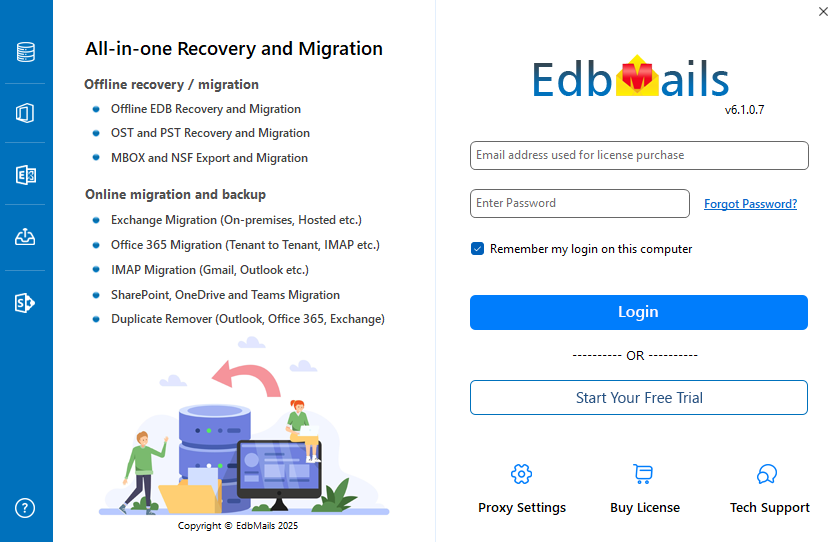
- Download EdbMails and install it on your PC to get started.
- Click on ‘Login’ or choose ‘Start Your Free Trial’ to open the application.
Check the EdbMails system requirements for Office 365 migration.
Step 2: Select Office 365 to Office 365 migration option
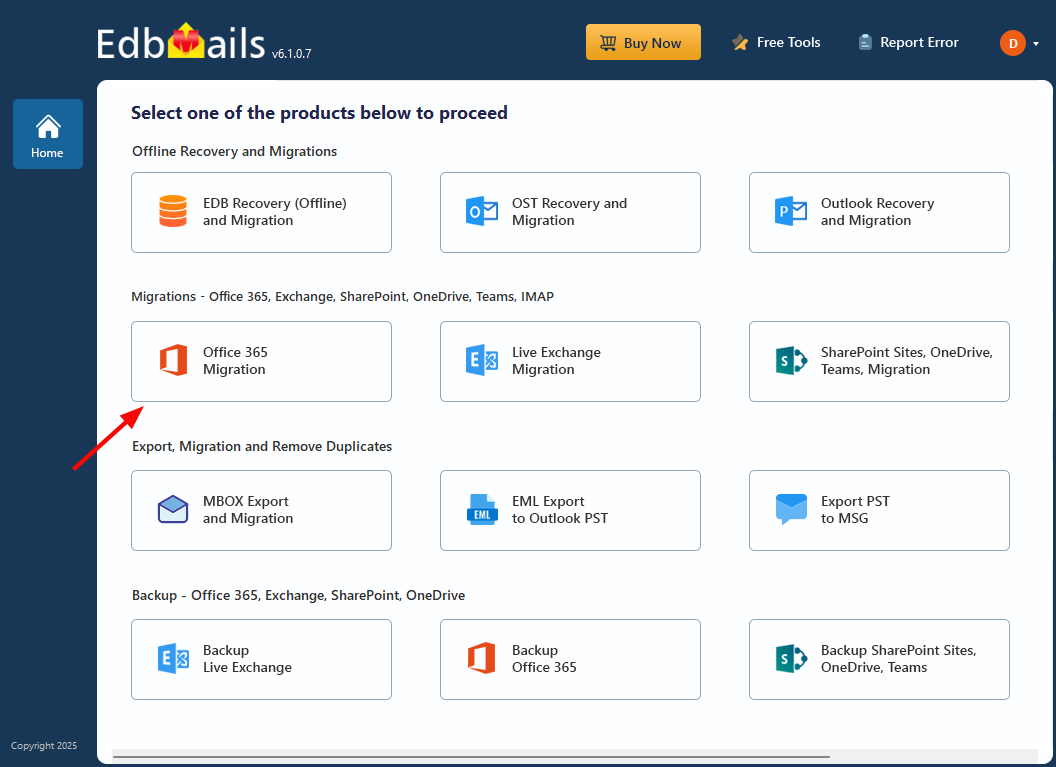
- Select 'Office 365 Migration' products from the dashboard.
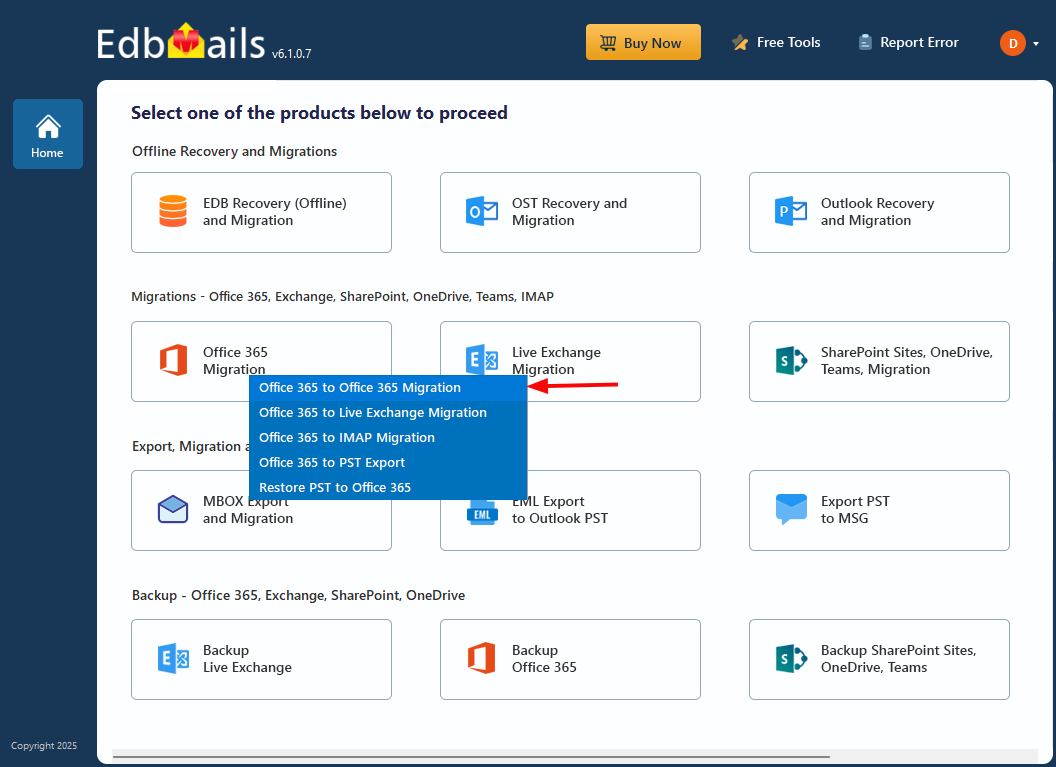
- Choose ‘Office 365 to Office 365 Migration’ option.
- Use the default job name or click ‘New Job’ to give it a different name.

- Select 'Office 365 Migration' products from the dashboard.
Step 3: Connect to source Microsoft 365 server
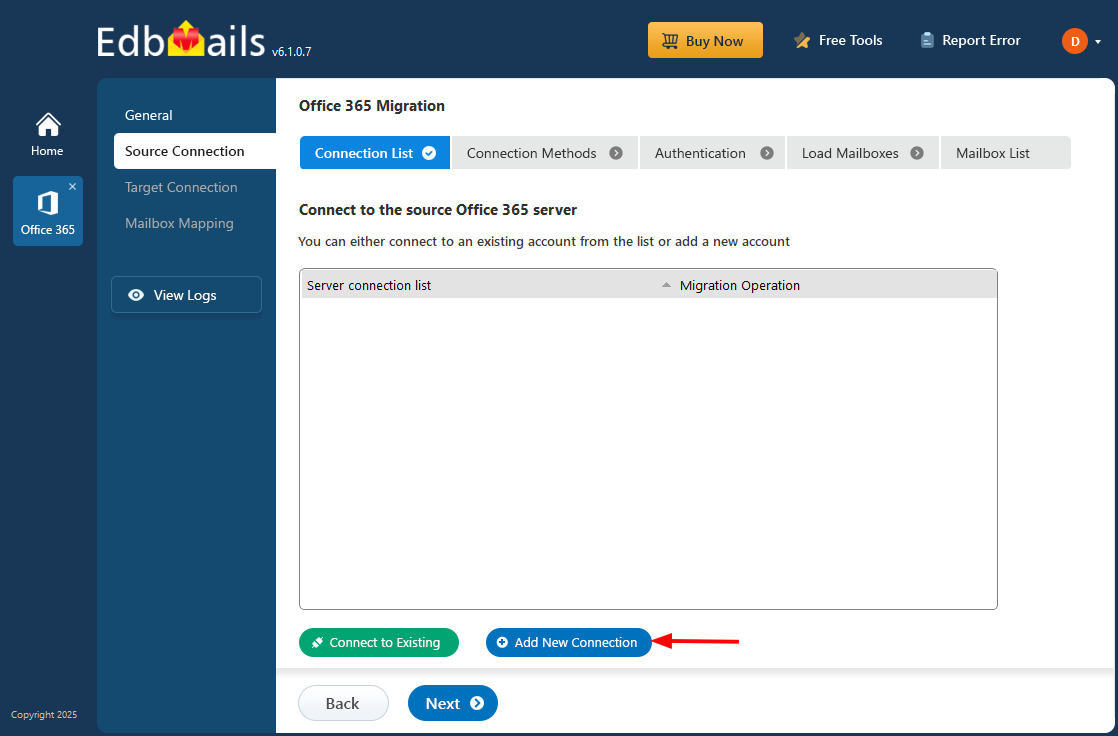
- Click ‘Add New Connection’ to set up a new source Office 365 connection. To reuse an existing one, pick it from the list and click ‘Connect to Existing’.
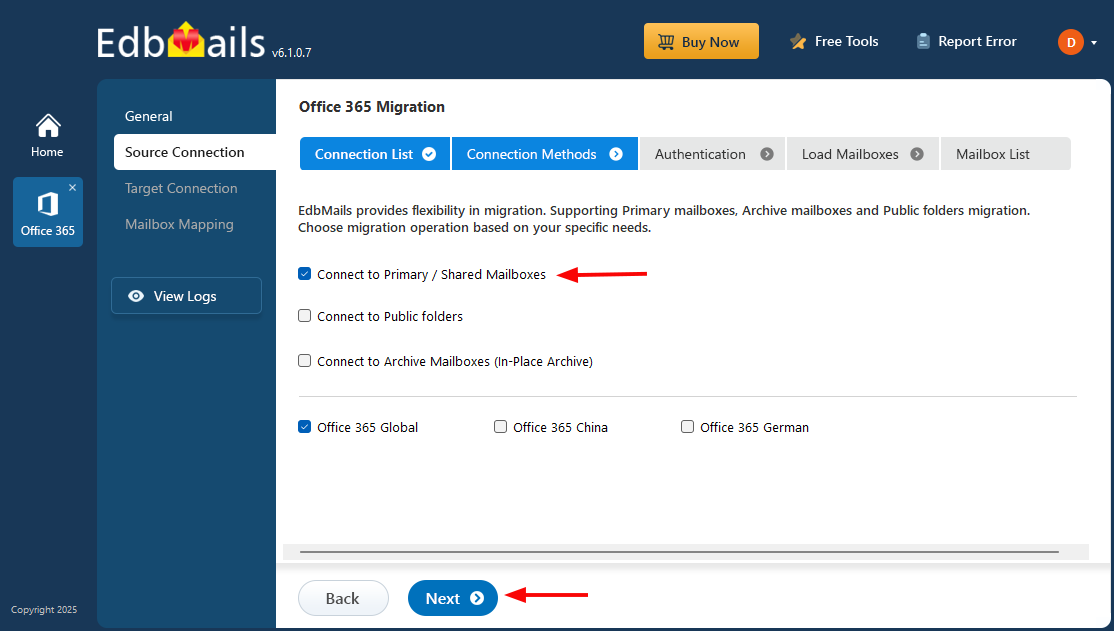
- Select the ‘Connect to Primary/Shared Mailboxes’ option and click ‘Next’ to continue.
- Choose a secure OAuth 2.0 authentication method and click ‘Login’ to proceed.
- Authenticate on Microsoft sign-in page.
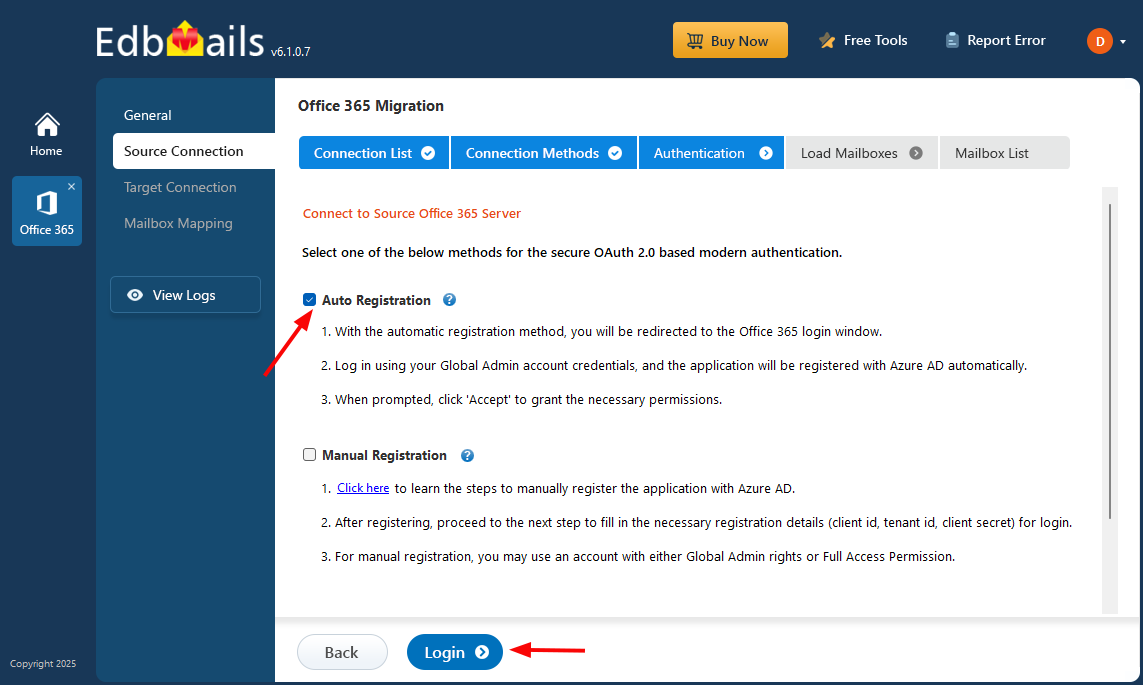
Connect to Office 365 server using secure modern authentication.
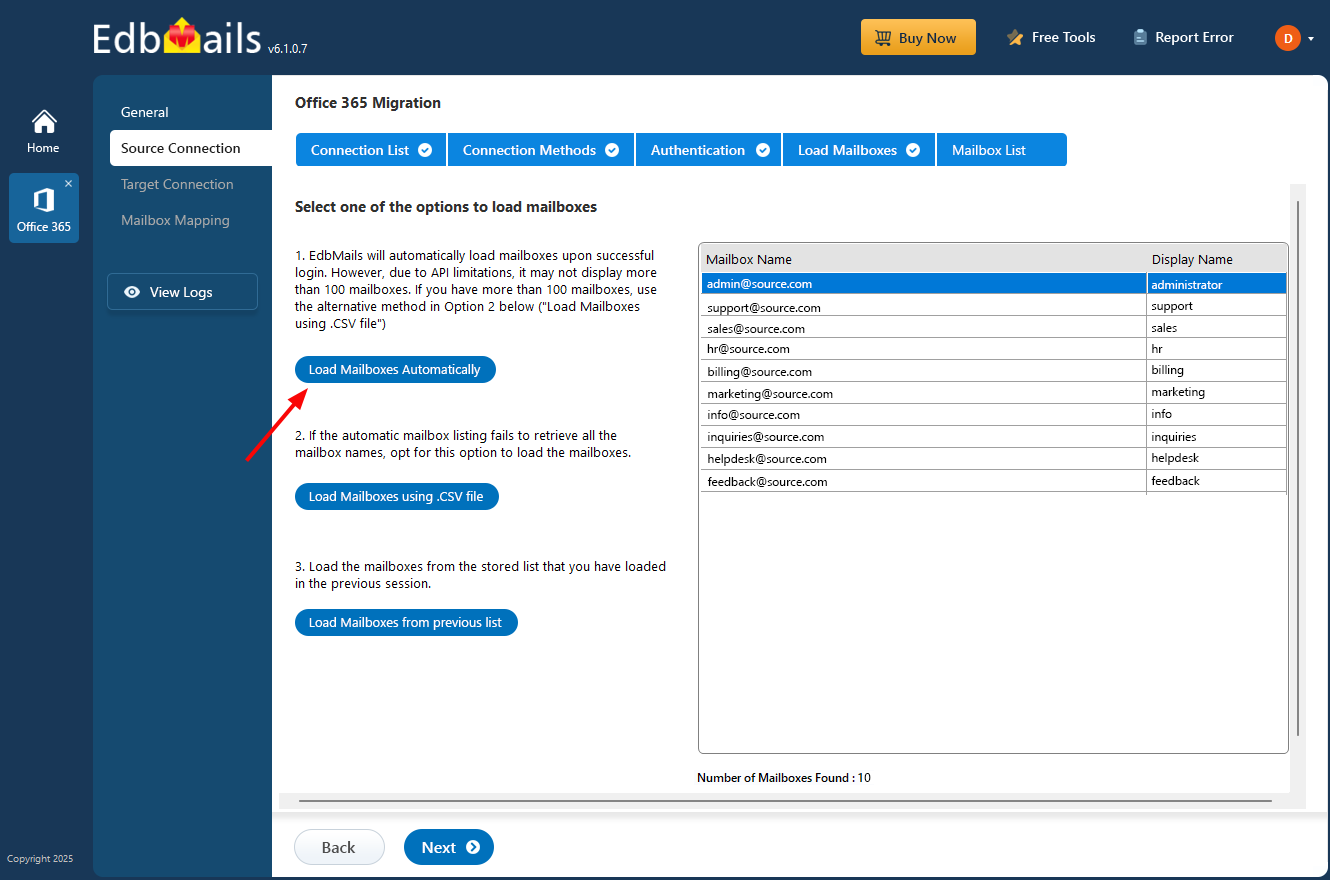
- Once authenticated, select a method to load the mailboxes. You can also use a CSV file to load and migrate them.
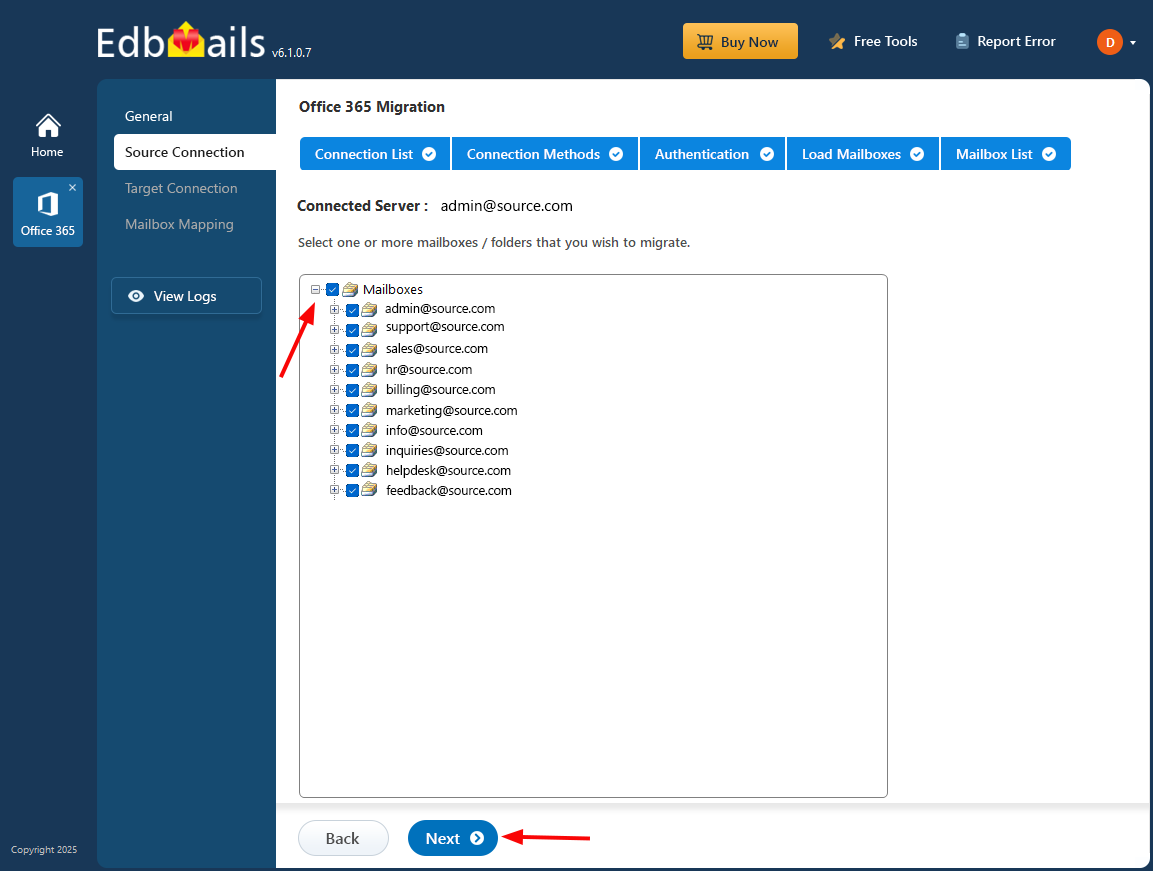
- Choose the Shared mailboxes to migrate from the source Office 365, then click ‘Next’ to continue.
- Click ‘Add New Connection’ to set up a new source Office 365 connection. To reuse an existing one, pick it from the list and click ‘Connect to Existing’.
Step 4: Connect to the target Office 365 server
- Click ‘Add New Connection’ to set up the target Office 365. To reuse an existing one, select it from the list and click ‘Connect to Existing’.
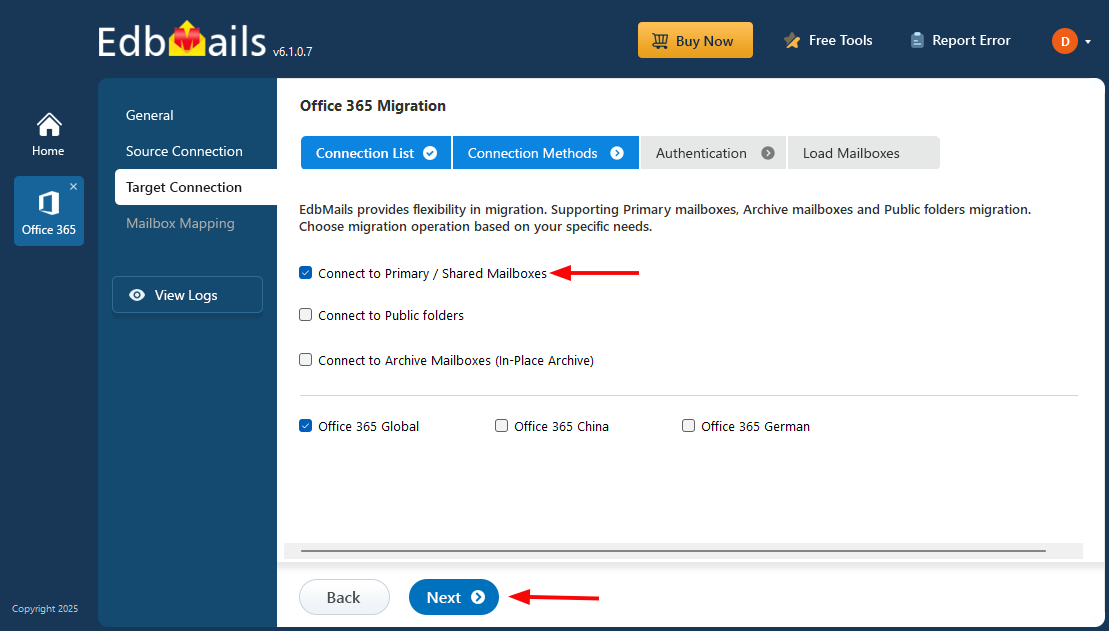
- Select the required connection options and click the ‘Next’ button.
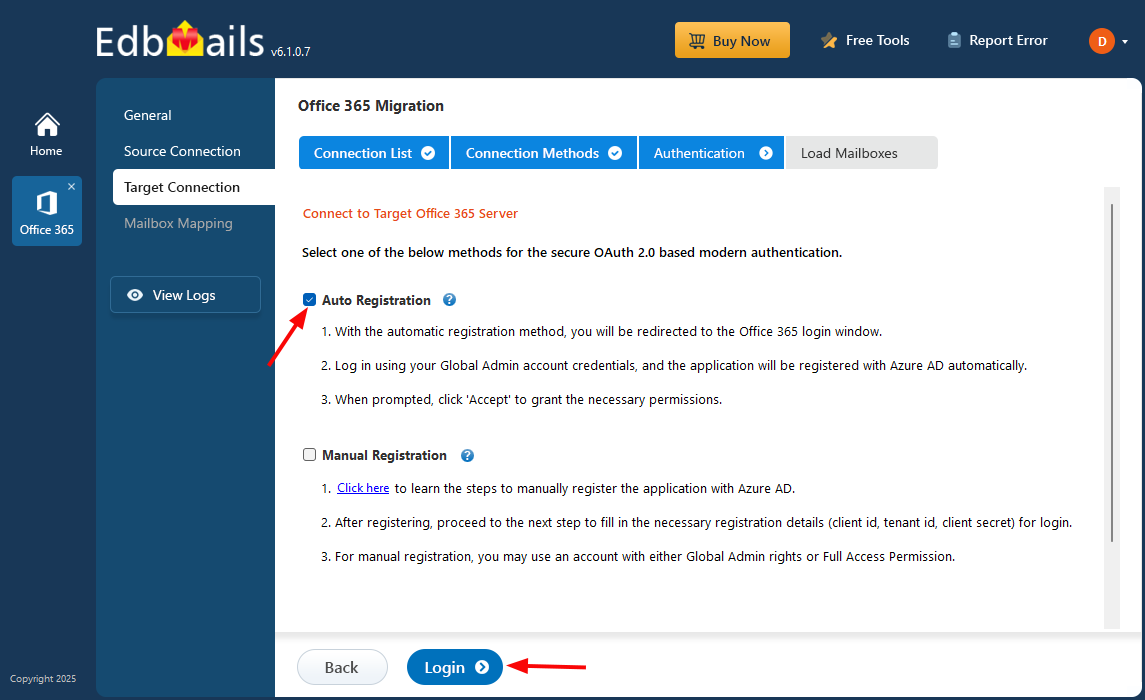
- Choose the required target connection method and click ‘Login’ to proceed.
- Authenticate on Microsoft login page.
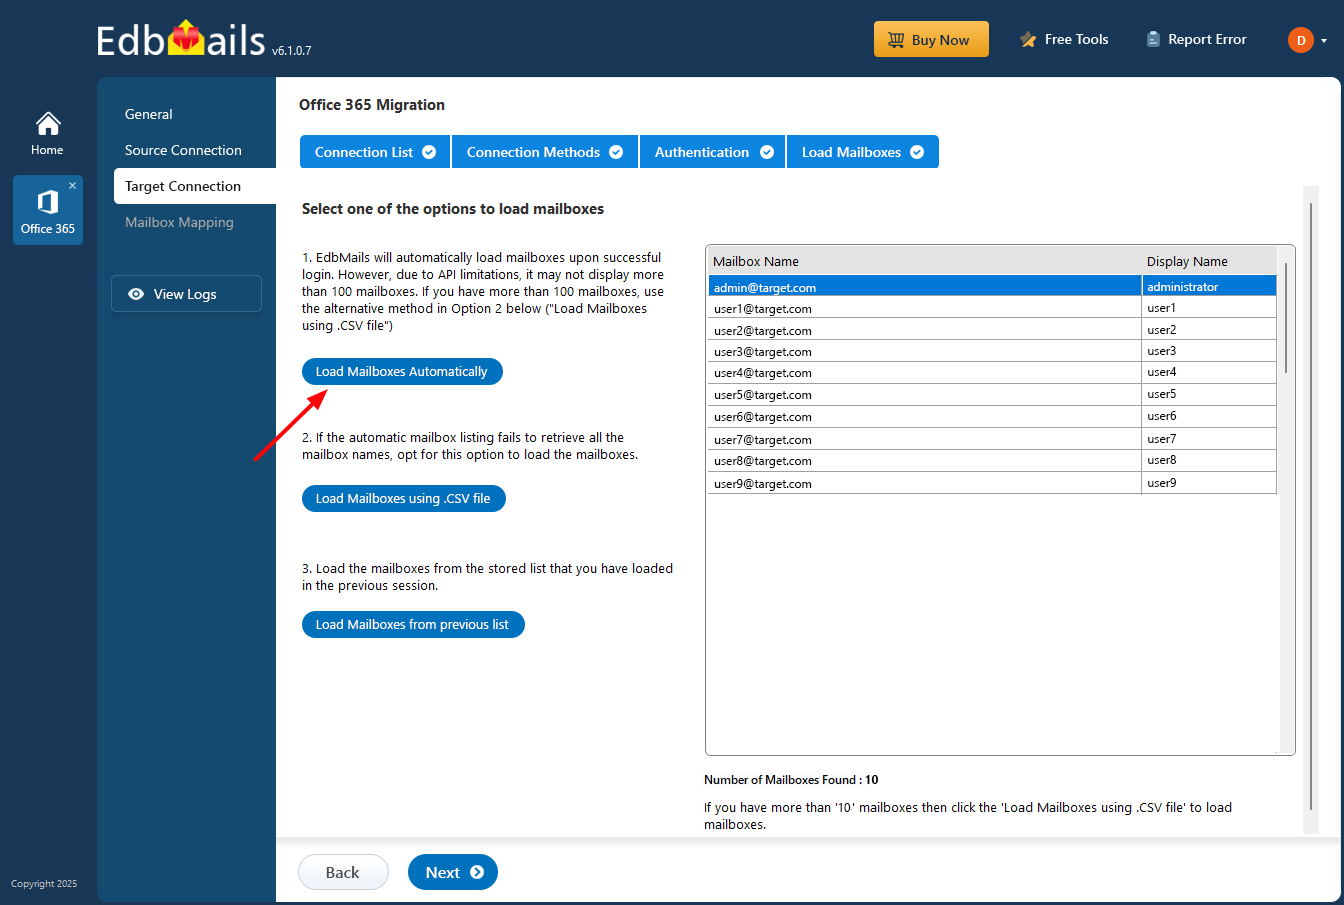
- Choose a method to load the mailboxes. You can also use a CSV file to load them.
Step 5: Map source and target mailboxes
- Select the mailbox mapping option you need.
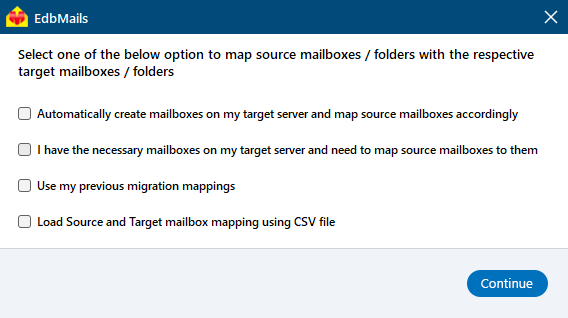
- Once mailboxes are created on the target server, EdbMails automatically maps mailboxes and folders between source and target servers. And, you can also map folders and subfolders manually.

- Select the mailbox mapping option you need.
Step 6: Start Office 365 Shared mailbox to User mailbox migration
- Click ‘Start Migration’ to begin the process.

- EdbMails starts the migration automatically and alerts you when it’s done. Click ‘View Logs’ to see the migration report. You can also pause or resume the migration anytime.
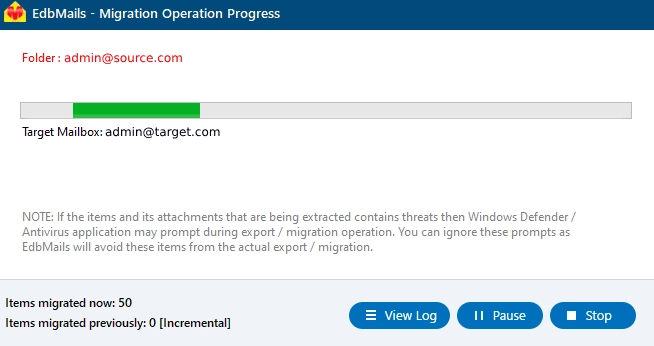
- Click ‘Start Migration’ to begin the process.
Why do organizations prefer EdbMails for Microsoft 365 migration?
- Supports various mailbox migration scenarios: EdbMails covers a wide range of mailbox migration scenarios from Exchange on-premise to Office 365 migration, IMAP to Office 365 migration and PST to Office 365 migration.
- Supports migration of regular and shared mailboxes: EdbMails helps with migrating both regular and shared mailboxes to Office 365. This includes migrating different sizes of mailboxes and complexities.
- Hosted Exchange migration: EdbMails handles shared mailbox migration across various Hosted Exchange providers. That covers GoDaddy email to Microsoft 365, Rackspace to Office 365, Comcast, Bluehost, and several others.
- Incremental migration: With incremental mailbox migration, EdbMails picks up only new and updated items since the last run, saving time and bandwidth on every subsequent pass.
- Include and Exclude Filters: Migrating shared or regular mailboxes to Office 365 doesn't have to mean migrating everything. The advanced filter options let you target specific emails, contacts, calendars, and folders.
- Advanced mapping options: Mailbox mapping helps administrators pair source and target mailboxes. Review the mapping before starting and validate the migrated data afterward.
- Reduced interruption: Administrators can run migration passes while users continue working, then validate reports and plan the final cutover based on the source and target configuration.
- Modern authentication: EdbMails supports OAuth 2.0 authentication for Microsoft 365 connections. Review the documented security practices and configure access for the migration environment.
- Supported Exchange sources: EdbMails supports shared mailbox migration from documented Exchange Server versions. Confirm the exact source version and prerequisites on the supported-platforms page before migration.
Frequently asked questions
Does converting a shared mailbox move its email?
No. A native mailbox type conversion changes how the mailbox is represented in Exchange Online; it does not copy the mailbox to another tenant or mailbox. Review the mailbox and its settings after conversion.
Does a converted user mailbox need a license?
Yes. Assign an appropriate Exchange Online or Microsoft 365 license after converting the shared mailbox to a user mailbox. The required plan depends on mailbox size and the features your organization uses.
Can the user sign in immediately after conversion?
Not always. Confirm that the associated user account is enabled, assign a license, set or reset the password, and allow time for Microsoft 365 to process the changes before testing sign-in.
What happens to shared mailbox permissions?
Existing delegate permissions may remain. Review Full Access, Send As, and Send on Behalf assignments after conversion and remove permissions that are no longer appropriate.
How do I convert a shared mailbox in a hybrid environment?
When the recipient is managed on premises, change the remote mailbox type in the on-premises Exchange environment, allow directory synchronization to complete, and then verify the result in Exchange Online.
When should I use EdbMails instead of native conversion?
Use native conversion when the mailbox remains in the same Microsoft 365 tenant. Use EdbMails when supported mailbox data must be migrated to a different mailbox, tenant, or supported target environment.