Office 365 to cPanel Migration
Migrating mailboxes from Microsoft 365 (formerly Office 365) to a cPanel-hosted IMAP server involves transferring email messages, folder structures, and metadata from Microsoft’s cloud platform to the email service associated with your cPanel hosting account. This process is particularly useful for businesses shifting to private hosting environments or consolidating email and web hosting under a single provider.
EdbMails Software for Office 365 Migration offers a secure and straightforward solution to carry out this migration. It directly connects to both the Office 365 source and the cPanel target server without relying on intermediate file formats such as PST. This direct approach reduces the risk of data corruption and saves significant time.
With EdbMails, all folders - including Inbox, Sent Items, Drafts, Custom folders, and Subfolders are migrated completely. The software supports the automatic mapping of source and target mailboxes and allows you to perform selective migrations using filters such as date, subject, sender, and recipient. Whether you are a business migrating a few accounts or a large organization with hundreds of users, EdbMails scales efficiently and supports concurrent mailbox transfers to speed up the process.
Office 365 Migration Issues Eliminated by EdbMails
- Authentication / Credential Errors: EdbMails uses OAuth 2.0 / Modern Authentication with TLS/SSL encryption to connect securely to Office 365, avoiding errors due to deprecated basic auth or weak credentials.
- Slow Migration or Throttling by Office 365: EdbMails implements automatic throttling management, ensuring smooth and efficient transfer even under server limits.
- Duplicate Emails After Re-Migration: EdbMails provides a built-in delta migration feature, which migrates only new and changed items, preventing duplicates and ensuring clean mailbox data.
- Migration Taking Too Long for Bulk Users: EdbMails maintains parallel mailbox processing and supports batch-wise migration, allowing admins to split workloads for faster throughput.
Key features of EdbMails Office 365 to cPanel migration
- Modern Authentication: Supports Microsoft OAuth 2.0 authentication for secure login to Office 365.
- Automatic Mailbox Mapping: Automatically detects and matches source and target mailboxes, reducing manual effort.
- Incremental Migration: Supports delta sync to migrate only newly added or modified items, avoiding duplicates in repeated runs.
- Advanced Filters: Enables selective migration based on date, subject, sender, recipient, etc.
- Concurrent Mailbox Migration: Supports migrating up to 20 mailboxes in parallel, improving speed and efficiency.
- Intuitive Interface: A clean and simple UI makes it easy even for non-technical users to execute complex migration tasks.
- Compatibility: Works with all major IMAP email platforms and cPanel servers across hosting providers like HostGator, Bluehost, SiteGround, A2 Hosting, and more.
Whether you're migrating for cost savings, better control, or compliance reasons, EdbMails offers a hassle-free and robust migration path from Microsoft 365 to cPanel.
Why migrate from Office 365 to cPanel?
There are several reasons why organizations choose to migrate from Microsoft 365 to a cPanel-based email hosting solution. The move can be driven by operational, financial, or administrative preferences, like below.
- Cost Control and Flexibility: Office 365 subscriptions involve ongoing licensing fees, which can become expensive for small businesses or teams with limited needs. In contrast, cPanel hosting offers predictable costs, often bundled with website hosting services, making it more budget-friendly in the long run.
- Self-Hosted Email Management: With cPanel, organizations gain full control over email configuration, storage limits, quotas, and retention policies. You can manage all email settings via cPanel dashboard without being locked into Microsoft’s predefined structure.
- Unified Control Panel: cPanel allows you to manage your website, DNS, SSL, and email from a single interface. This simplifies administrative tasks and reduces reliance on multiple service providers.
- Customization and Branding: Businesses can customize their cPanel Webmail interface, email signatures, and branding elements more freely, offering greater flexibility compared to the standardized environment of Office 365.
- Simplified Infrastructure: For web developers, freelancers, and SMBs, having both email and website hosting under one platform (via cPanel) reduces complexity and simplifies troubleshooting, backups, and updates.
- Data Residency and Compliance: Organizations hosting emails on their cPanel servers can ensure better control over data residency and comply with regional data protection policies more easily than with global cloud services.
Pre-migration checklist for Office 365 to cPanel
1. Prepare the source: Office 365
Before starting the migration, ensure the following tasks are completed on Microsoft 365:
- Make sure you have a global admin account with an active mailbox for automatic registration of the EdbMails application in your Entra ID (Azure Active Directory). Alternatively, for manual registration, you can use either a global admin account or any user account that has full access permissions.
- Make sure your network meets the bandwidth requirements.
- If your mailboxes contain large messages, increase the message size limit to accommodate.
2. Prepare the target: cPanel
On the cPanel side, ensure the following:
- Create the corresponding email accounts (e.g., user@yourdomain.com) in cPanel before the migration.
- Collect login credentials: IMAP hostname (e.g., mail.yourdomain.com), port (usually 993), email address, and password.
- If you want to migrate multiple users at once, download the sample CSV file from the EdbMails application and fill in each user’s email address, password, IMAP host name, and port number.
- Enable SSL/TLS on your cPanel mail server for secure communication.
Office 365 to cPanel migration using EdbMails
Step 1: Download and Install EdbMails application
- Download and install EdbMails on your computer.
- Run the EdbMails setup (EdbMailsSetup.exe) by double-clicking the file. Follow the on-screen prompts to complete the installation process.
See EdbMails system requirements for Office 365 migration
- Open the EdbMails application and proceed by clicking ‘Login’ using your registered email and password, or select ‘Start Your Free Trial’ to begin without an account.
Step 2: Select Office 365 to IMAP migration option
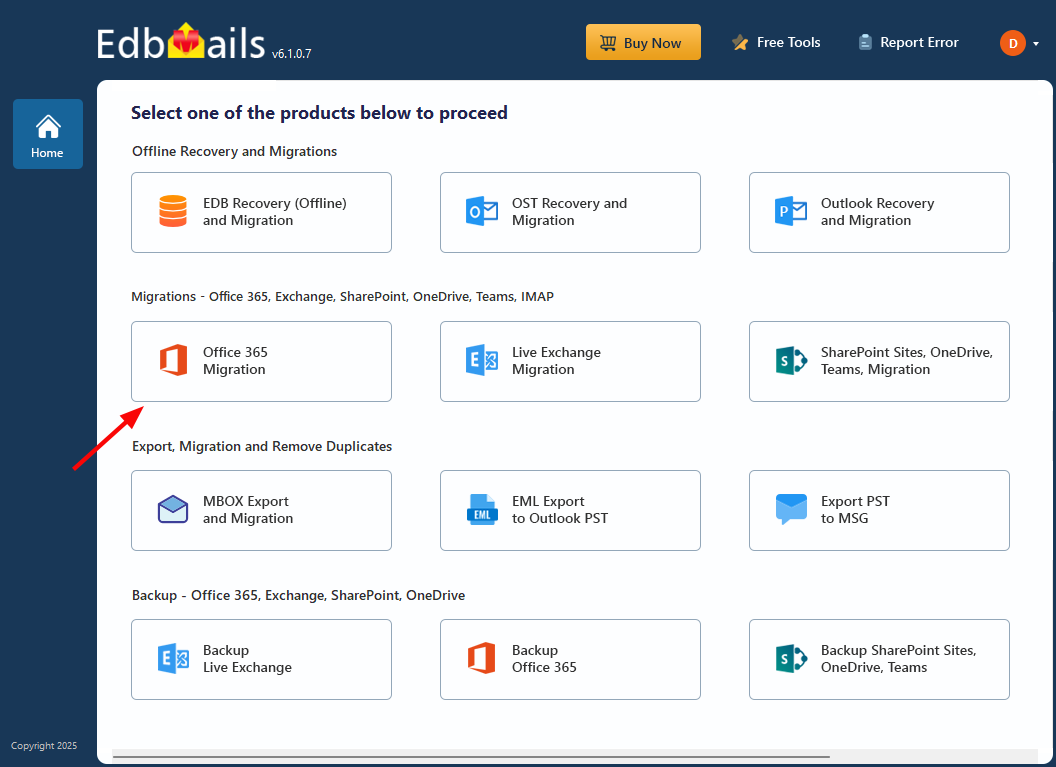
- Select the option 'Office 365 Migration'
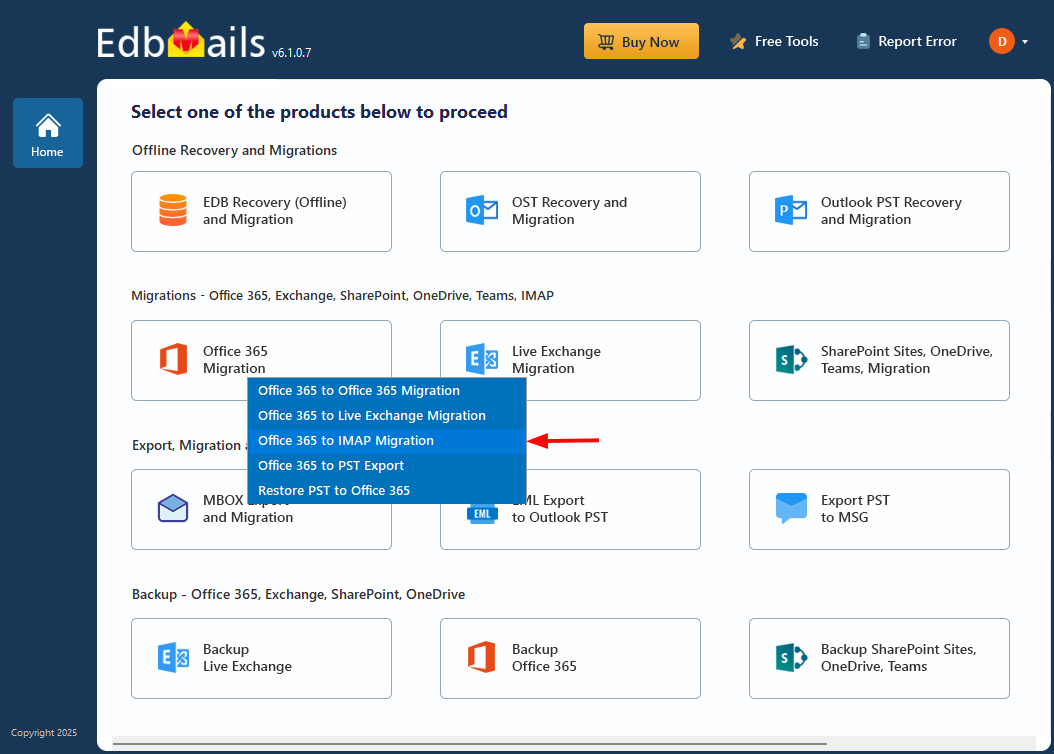
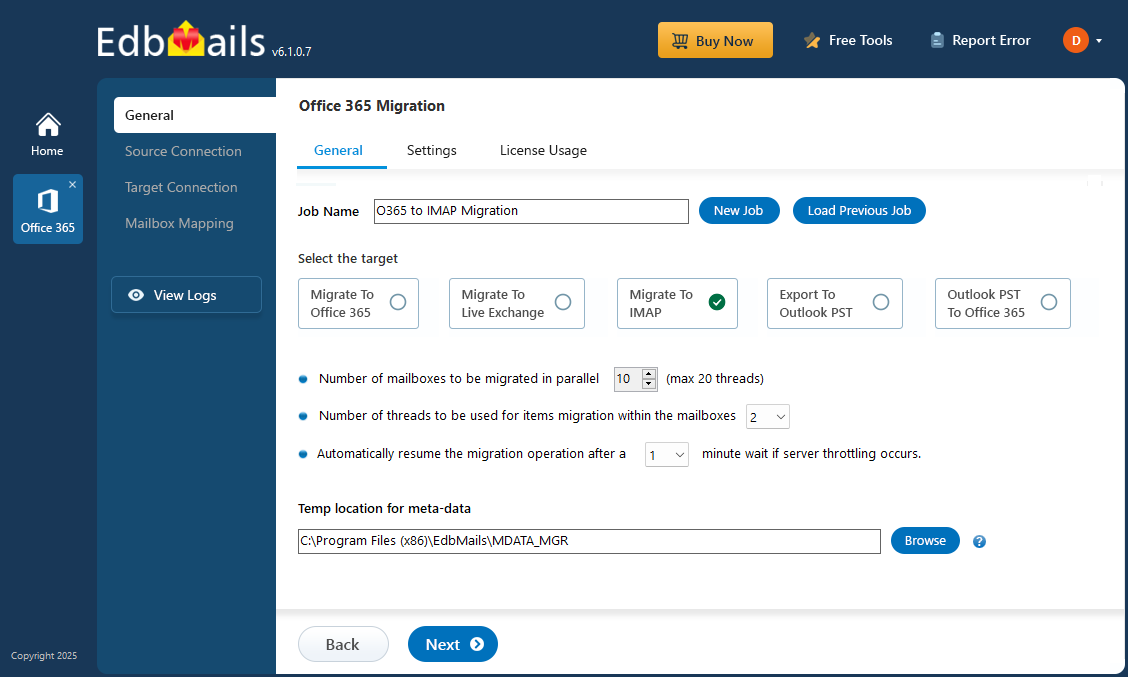
- Select ‘Office 365 to IMAP Migration’
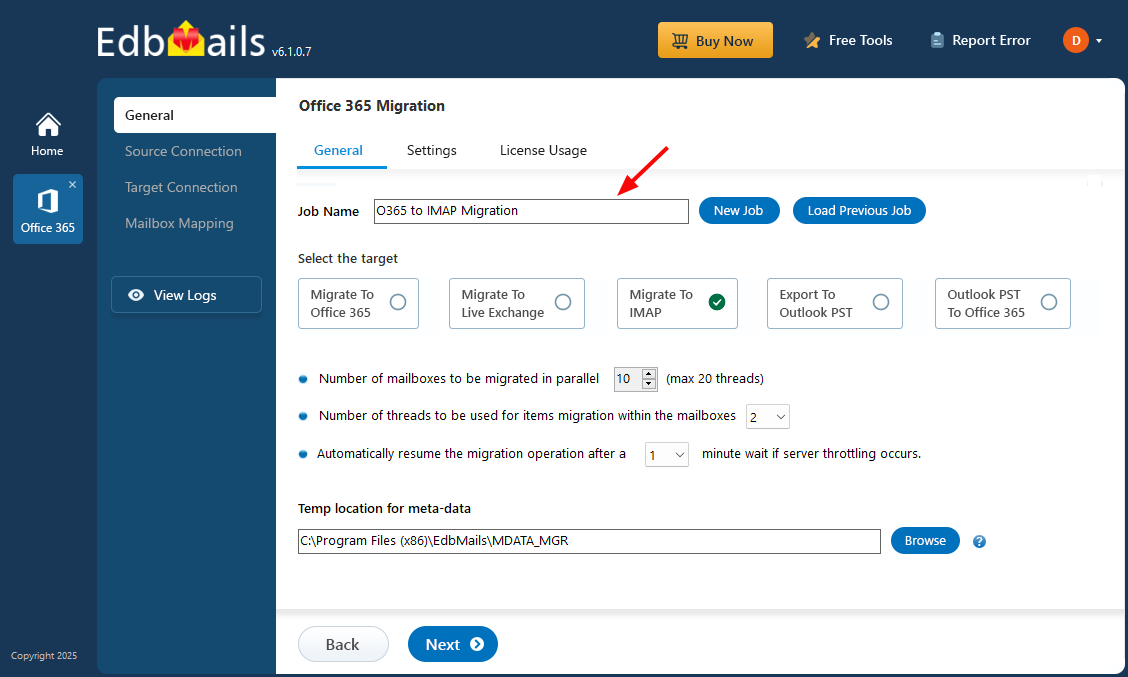
- You can use the default job name provided or enter a custom name of your choice, then click ‘Next’ to continue with the setup.
Step 3: Connect to the source Office 365 server
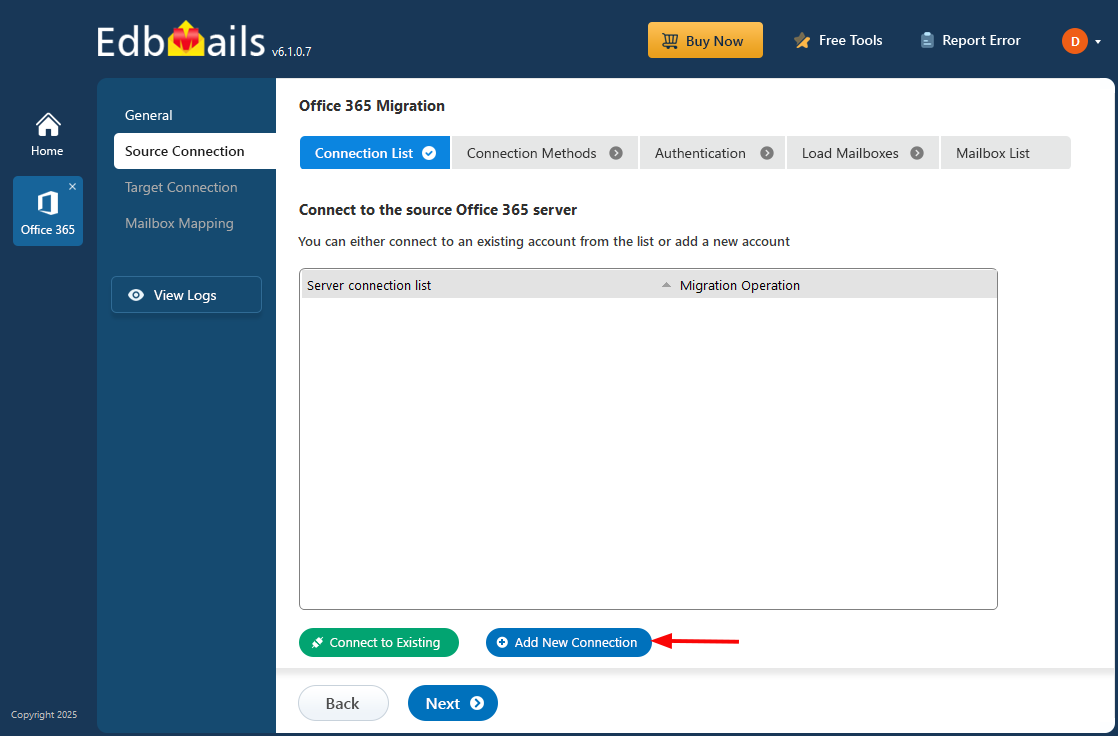
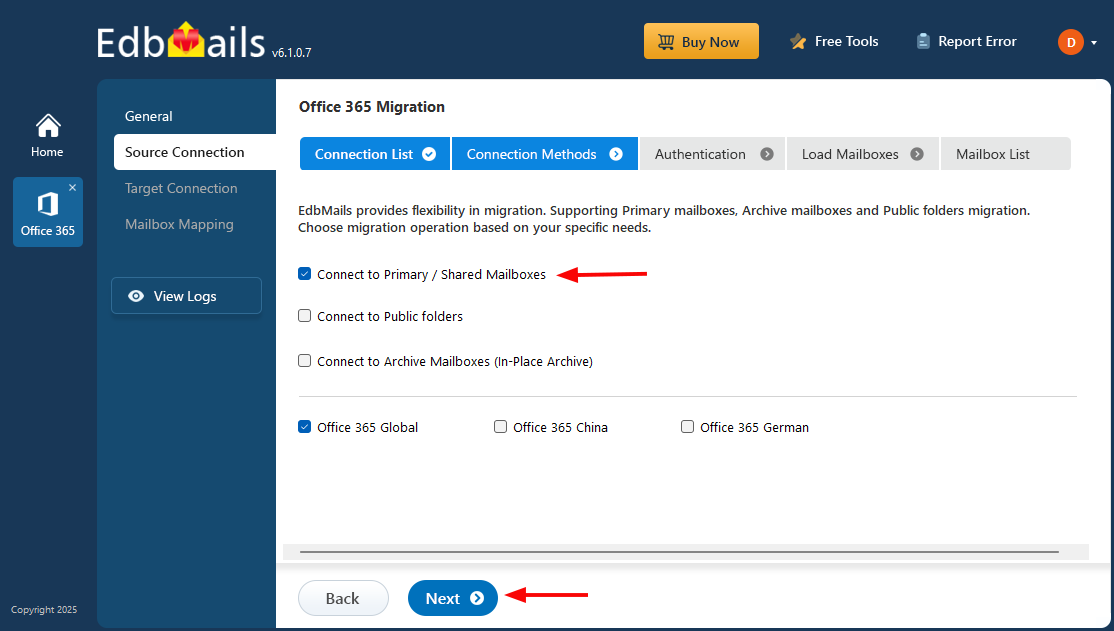
- To set up a new source connection, click ‘Add New Connection’. If you’ve already configured one earlier, simply select it from the list and click ‘Connect to Existing’ to continue.
- Choose the required connection options and click the ‘Next’ button.
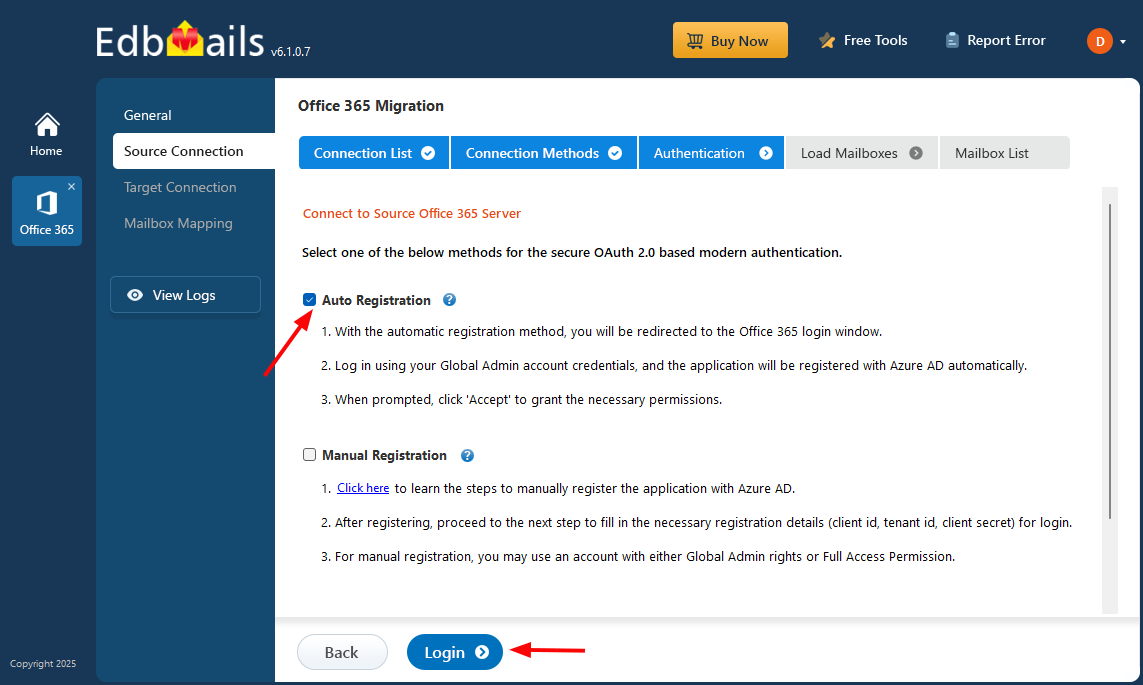
- Select one of the secure OAuth 2.0-based modern authentication methods and click the ‘Login’ button to continue.
Connect to Office 365 server using secure modern authentication
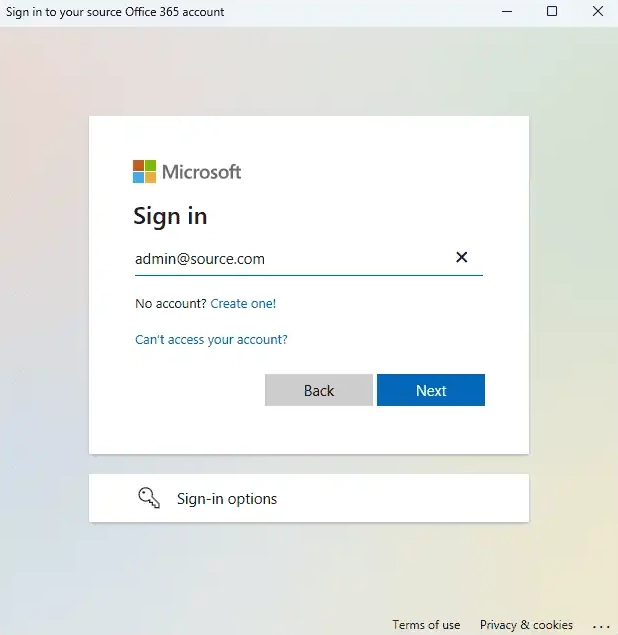
- Complete the authentication by signing in through the Microsoft login page when prompted.
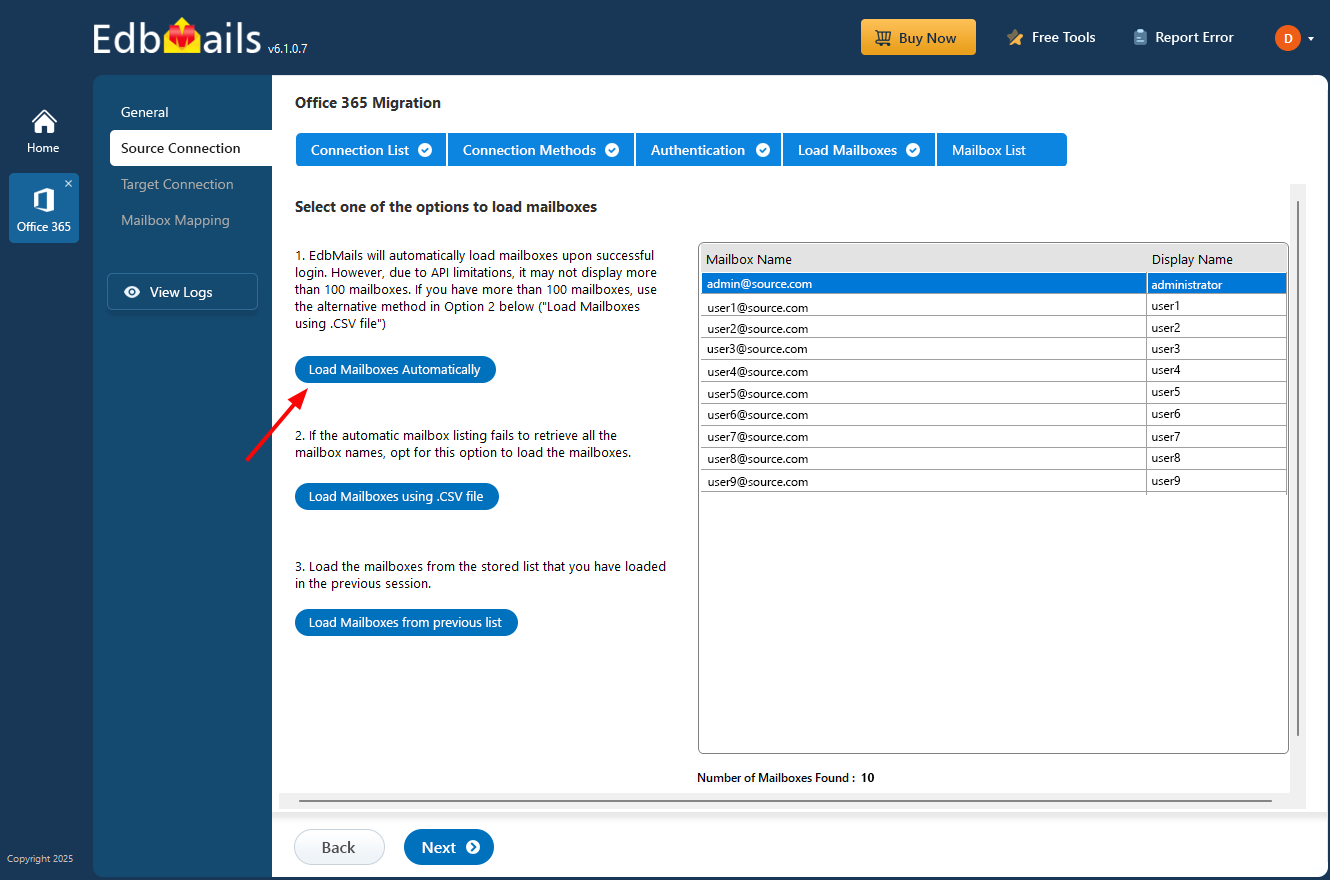
- After the successful authentication, choose one of the methods to load the mailboxes. You can also load and migrate the mailboxes using a CSV file.
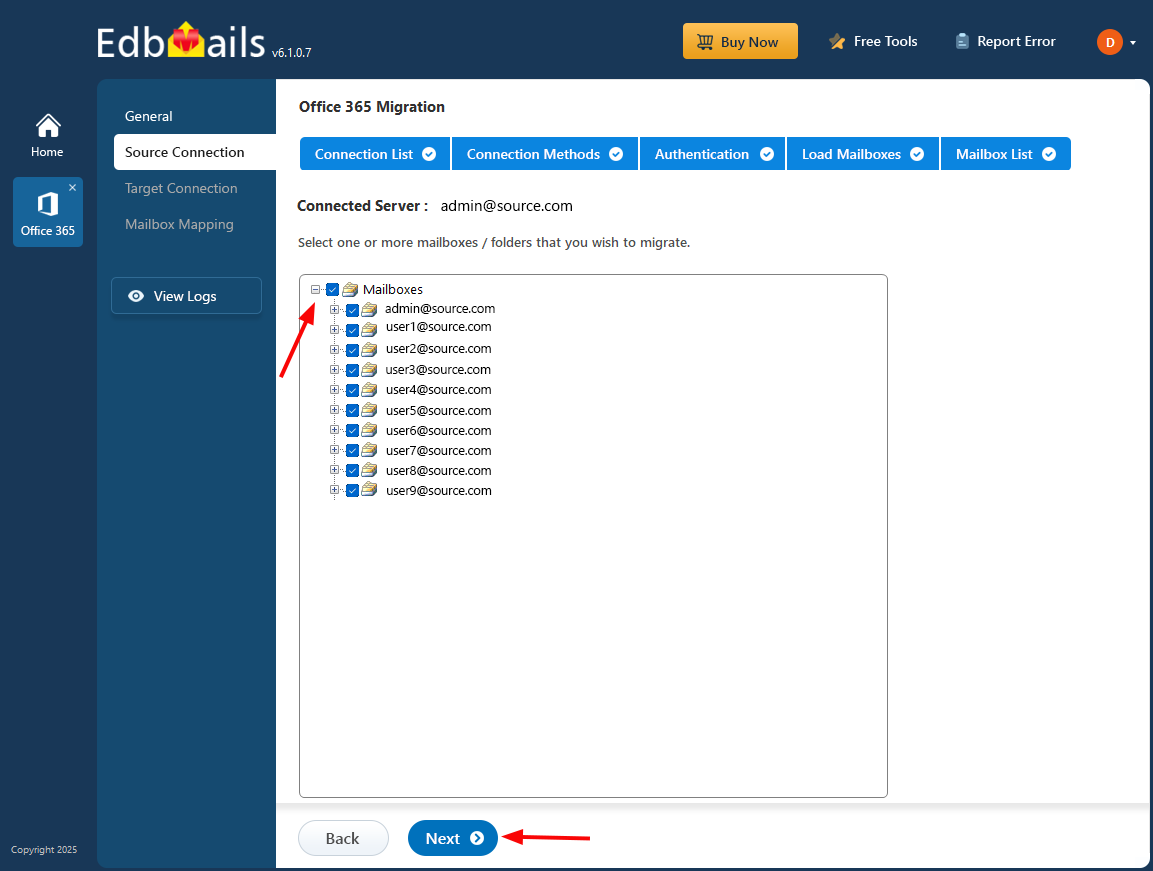
- Choose the mailboxes you wish to migrate from the source Office 365 account, then click ‘Next’ to move forward with the migration process.
Step 4: Configure and connect to the cPanel IMAP server (target)
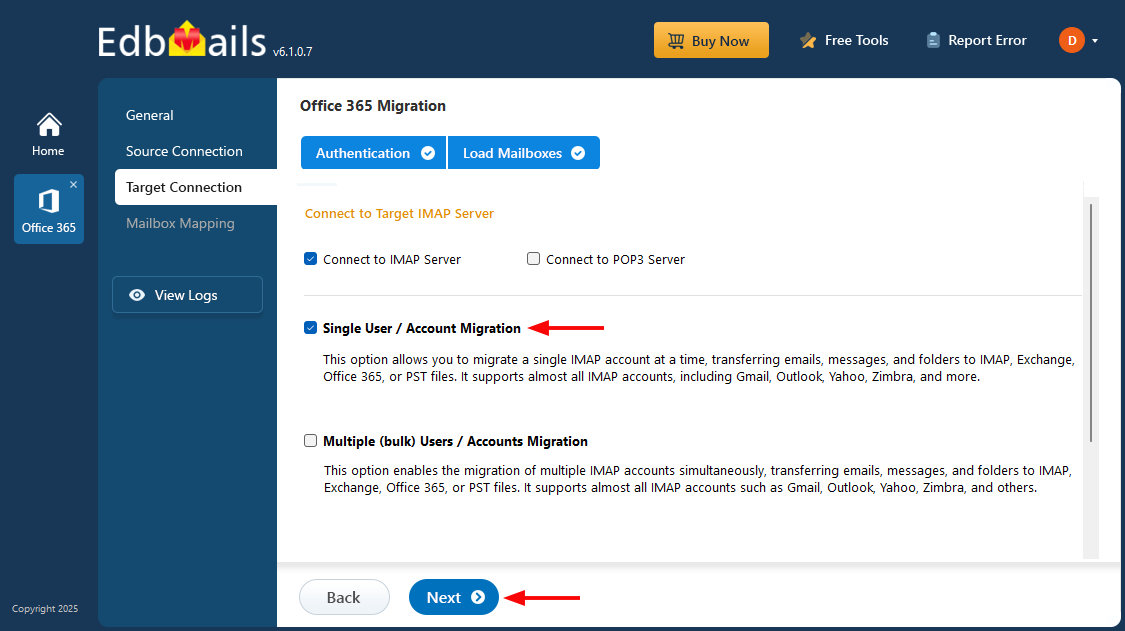
- Select the appropriate protocol, like ‘Connect to IMAP Server’ or ‘Connect to POP3 Server’, based on your destination server.
- For individual mailbox migration, choose the ‘Single User / Account Migration’ option.
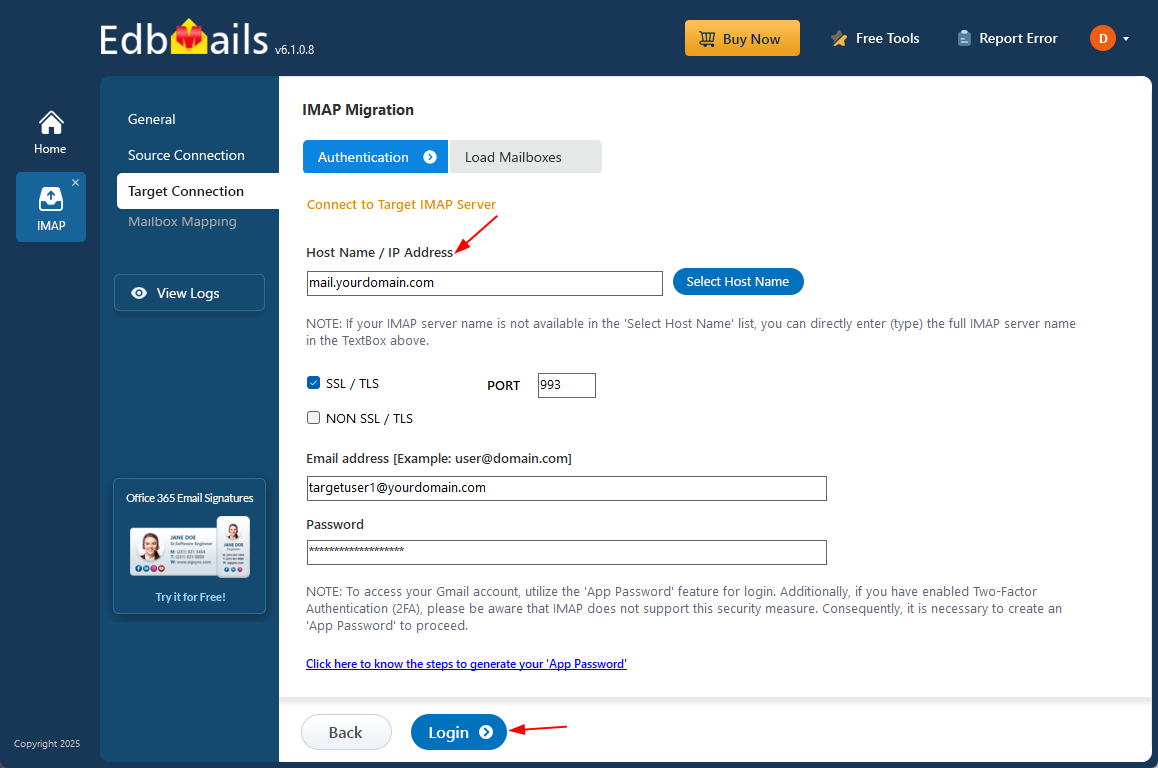
- Select the appropriate cPanel IMAP server hostname from the dropdown or manually enter it (e.g., mail.yourdomain.com). Then, provide the email address and password of the target cPanel mailbox. Ensure that the mailbox is already created and IMAP access is enabled in cPanel.
- Click the ‘Login’ button to establish a connection with the cPanel server and proceed to load the mailbox.
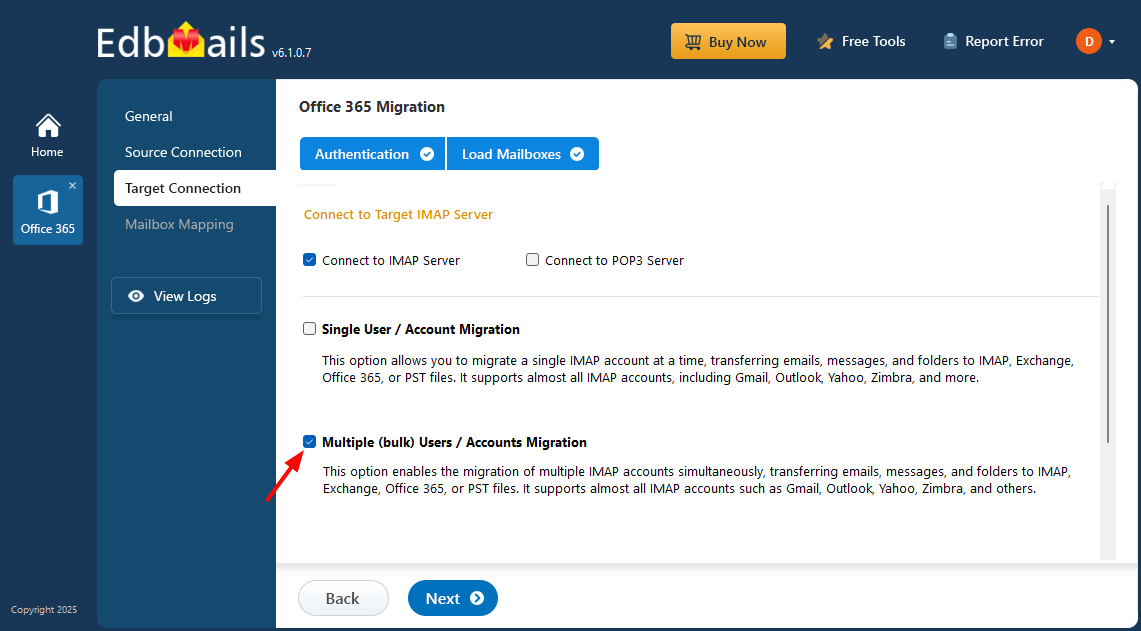
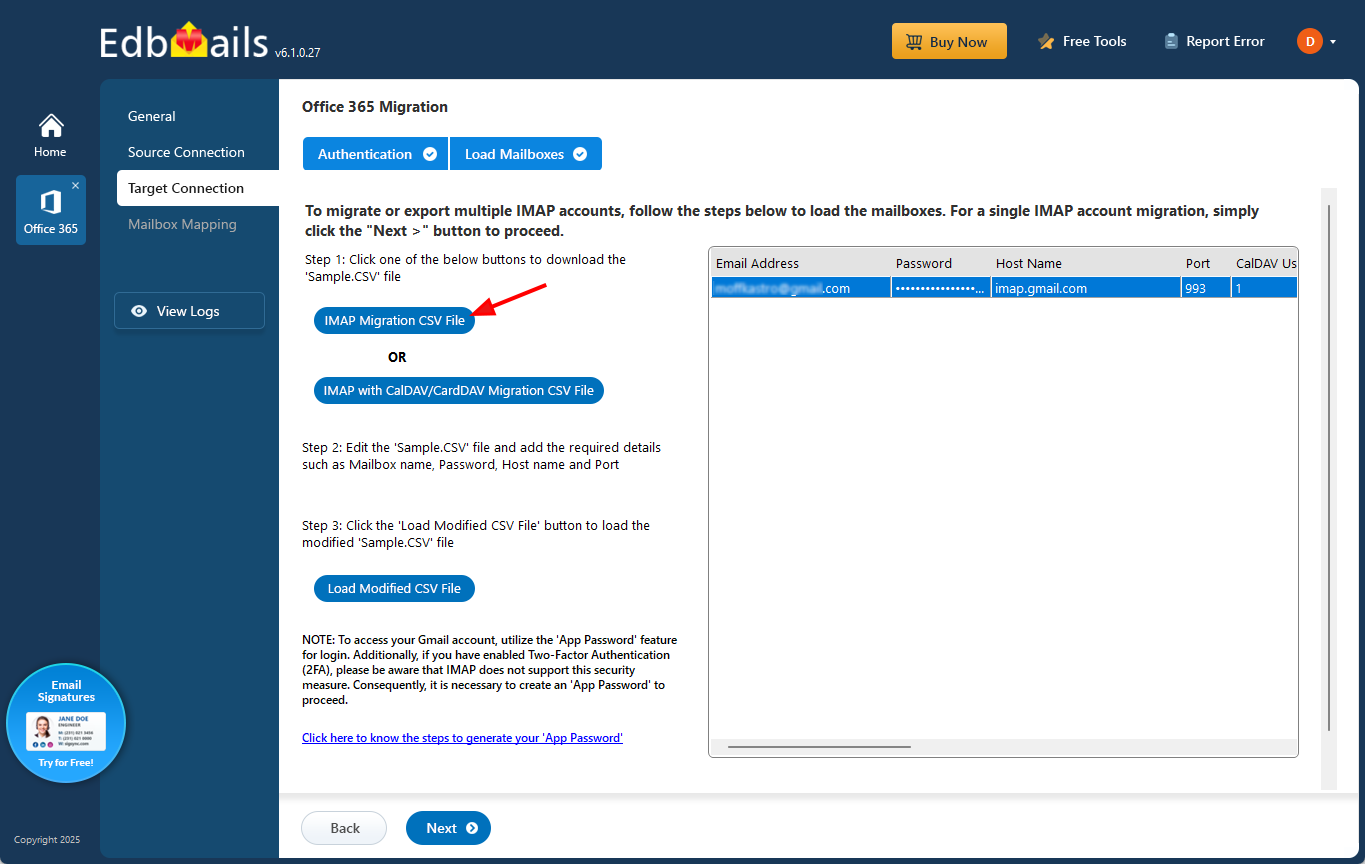
- For migrating multiple mailboxes, choose 'Multiple (Bulk) Users/Accounts Migration,' and click 'Next' to proceed.
- Click ‘IMAP Migration CSV File’ to continue.
- You’ll be prompted to download the sample .csv file. Choose a location on your computer to save it
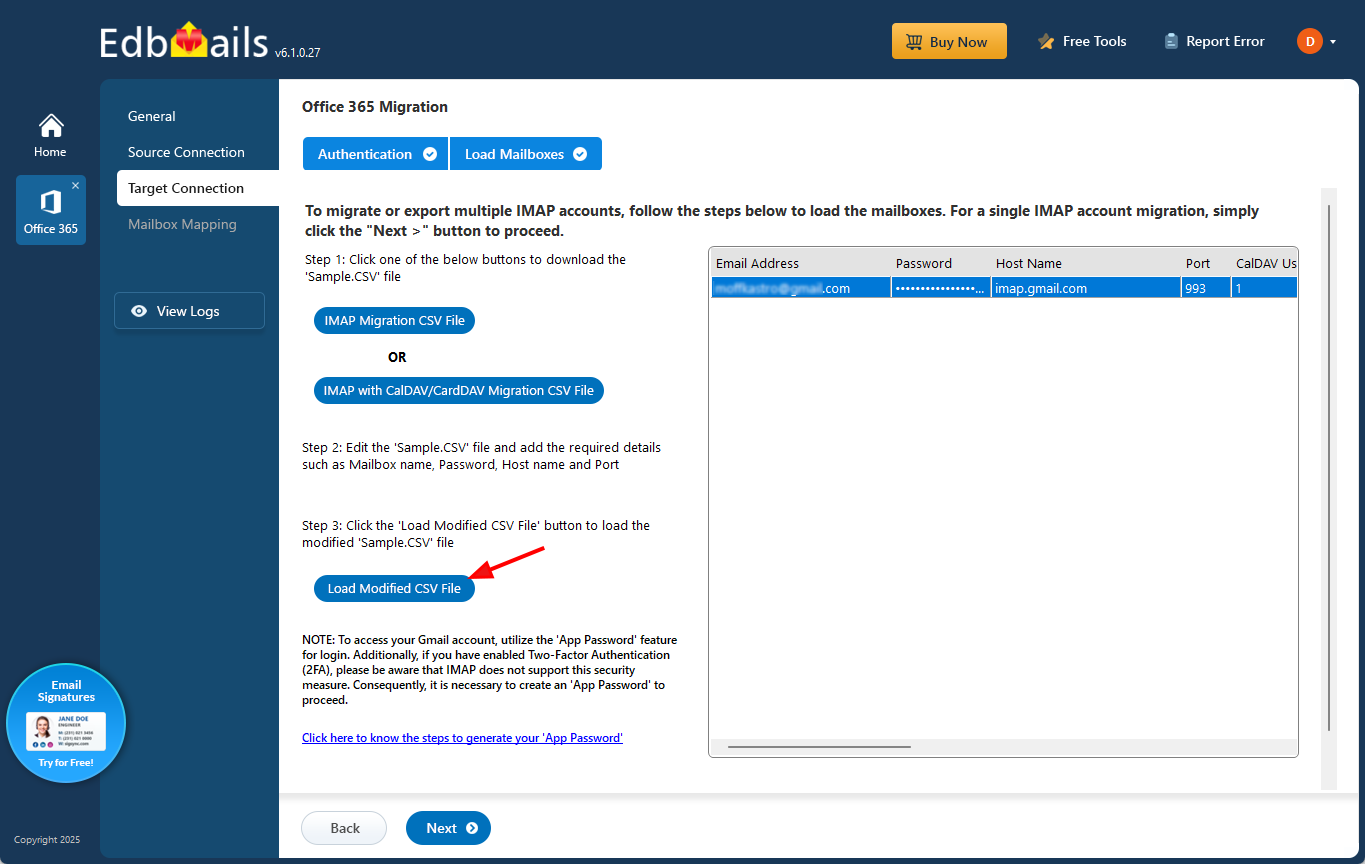
- Open the downloaded CSV file and fill in the required details: email address (mailbox name), password, host name, and port. Any fields not needed for migration can be marked as ‘NA’. After updating, save and close the file.
- Select ‘Load Modified CSV File’ to upload your updated CSV.
- Check the mailboxes displayed, then click ‘Next’ to proceed.
Step 5: Perform mailbox mapping between source and target
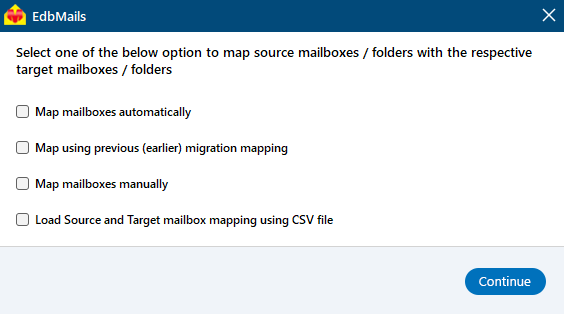
- Choose the required mailbox mapping option
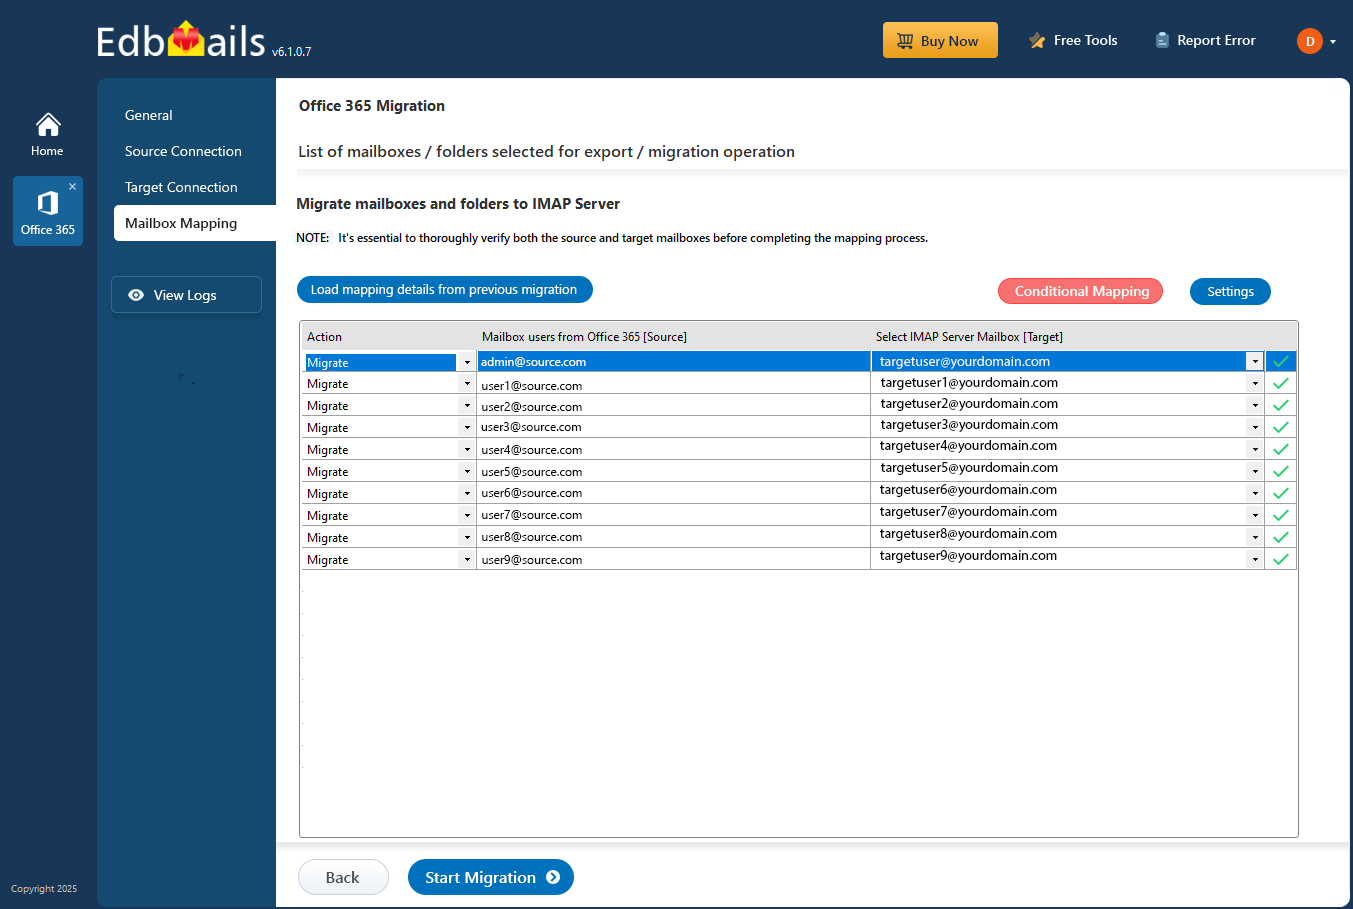
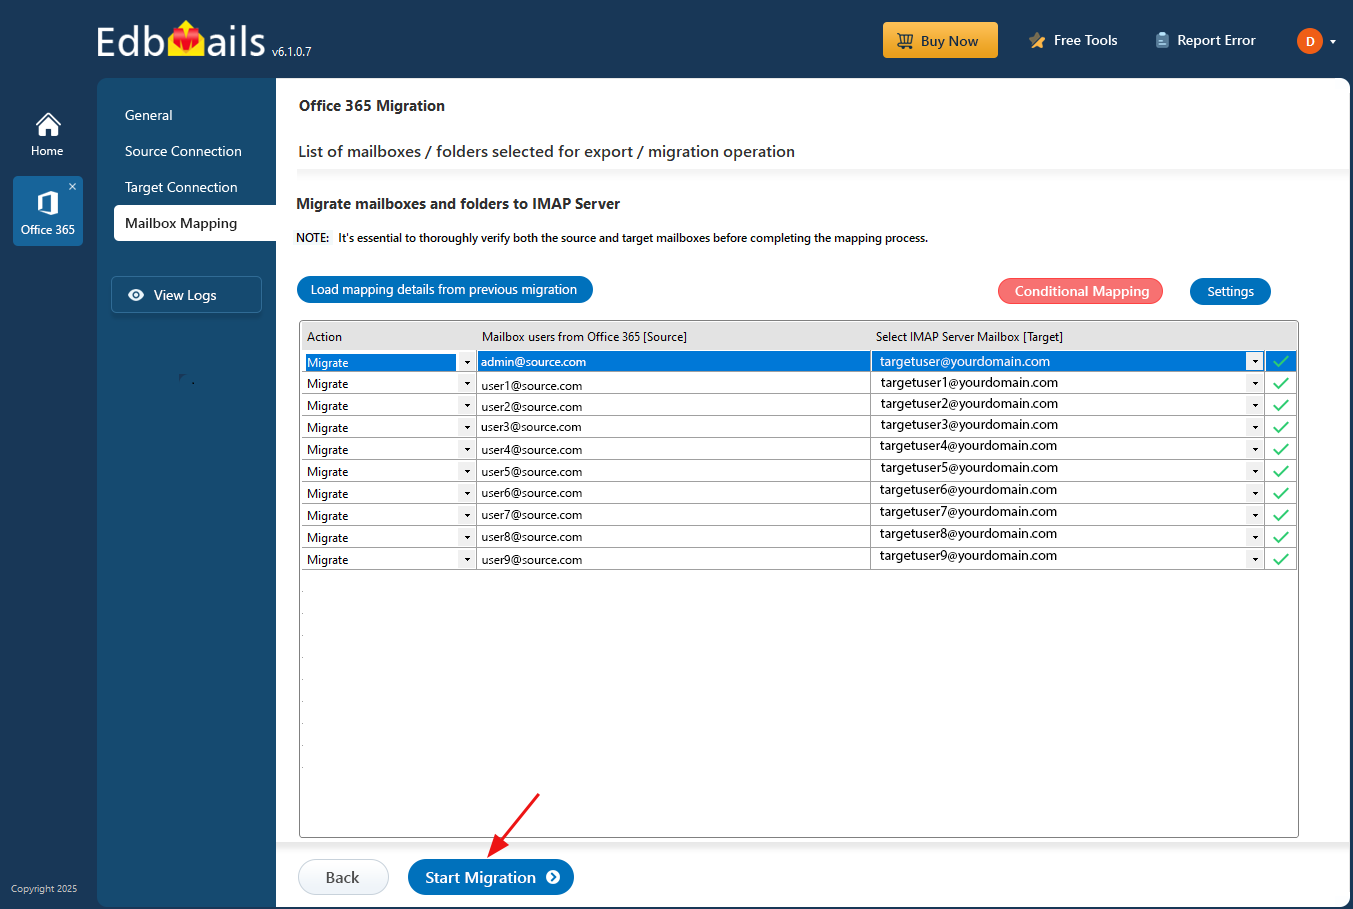
- EdbMails automatically maps mailboxes between the source and target servers. You can also manually map mailboxes if needed.
Step 6: Start Office 365 to cPanel migration operation
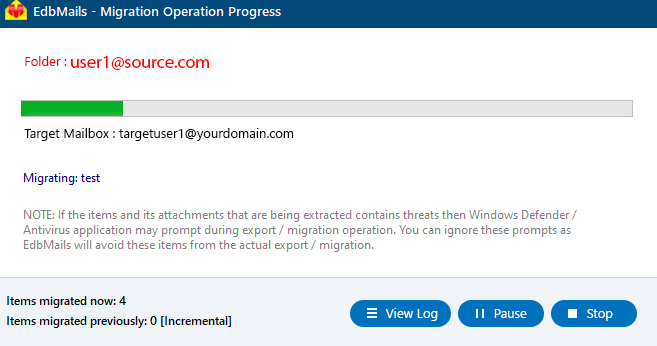
- After mapping the mailboxes, click the ‘Start Migration’ button and initiate the migration process.
- To review the migration report, click the ‘View Log’ button, which provides a comprehensive report detailing the number of emails, folders, and mailbox items successfully migrated.
- Also, log in to your target server and verify the migrated items.
Microsoft 365 to cPanel Post-migration activities
After the migration is complete, modify your MX records to direct mail flow to the new server.
Frequently Asked Questions (FAQs)
What types of mailbox data does EdbMails migrate when transferring from Office 365 to a cPanel IMAP server?
EdbMails migrates full mailbox contents, including emails, folder structure (Inbox, Sent, Drafts, custom folders, subfolders), attachments, and metadata.
Does EdbMails support large mailboxes?
Yes. EdbMails supports the migration of very large mailboxes and can handle multi-GB data transfers. It also supports incremental (delta) migration to optimize repeated transfers.
Can I migrate multiple Office 365 mailboxes at once to cPanel?
Yes. EdbMails supports bulk migration by allowing multiple mailboxes to be migrated in parallel, via a CSV-based bulk import or concurrent mailbox migration.
Is the migration reversible?
EdbMails does not provide a one-click reverse migration feature. However, you can migrate data again manually by selecting the opposite source/target if required.
Is it secure and direct (without intermediate storage) when migrating from Office 365 to cPanel using EdbMails?
Yes. EdbMails connects directly between Office 365 (source) and the target cPanel IMAP server, avoiding intermediate PST or manual export/import, thereby minimizing risk of data corruption and ensuring secure, end-to-end transfer.
Which license do I need for Office 365 to cPanel Migration?
You need an Office 365 Migration License to perform Office 365 to cPanel migration using EdbMails.
Click here to know Office 365 to cPanel migration pricing details


