GoDaddy to Office 365 Migration
GoDaddy provides email hosting along with domain registration, web hosting, and SSL services, making it a practical option for businesses that need straightforward communication solutions. Based on the configuration, GoDaddy mailboxes can be linked to an Office 365 tenant or operate through an IMAP server supported by platforms like Zoho, Plesk, or cPanel. Although GoDaddy’s email offerings satisfy common business needs, many organizations are migrating toward Office 365 to take advantage of its enhanced email capabilities, integrated collaboration tools, and cloud-driven environment, creating a stronger demand for a dependable migration approach.
Migrating from GoDaddy to Office 365 often comes with challenges like data mapping errors, unexpected downtime, and compatibility concerns. EdbMails streamlines the entire process with an automated migration solution that ensures a seamless and interruption-free move to Office 365.

For organizations transitioning from a GoDaddy Office 365 tenant, EdbMails IMAP migration software ensures a secure migration of emails, contacts, calendars, and tasks while preserving complete data integrity. Businesses using GoDaddy’s IMAP-based services such as Zoho or cPanel can rely on EdbMails’ IMAP to Office 365 migration solution to transfer email data smoothly and reliably with zero downtime.
EdbMails provides advanced capabilities such as delta migration, which helps transfer only new or modified items after the initial migration, saving time and avoiding duplicate data. The pause and resume feature adds flexibility by allowing users to control the migration process as needed without disruption. In addition, EdbMails supports multiple languages, ensuring global accessibility and eliminating language-related barriers during migration.
By choosing EdbMails, businesses can efficiently migrate from GoDaddy to Office 365 while addressing technical challenges and benefiting from the enhanced productivity tools of Office 365. This ensures a seamless migration experience with minimal impact on day-to-day operations.
User Query
"We wanted to switch from GoDaddy to Office 365 while keeping the same domain name. We have a large number of users, and we need the migration to be as seamless as possible without affecting the users or their data. Is there a solution that will allow us to migrate everything in the shortest time possible?"
Plan to Migrate from GoDaddy to Microsoft 365
Planning is a crucial step before starting your GoDaddy to Office 365 migration. The checklist below outlines the key points to review and prepare before you begin:
- Determine the total size of your data and the number of mailboxes to be migrated.
- List all mailboxes, permissions, and data types you plan to migrate from GoDaddy.
- Decide whether to migrate only user mailboxes or include archive and shared mailboxes as well.
- Create corresponding user mailboxes in Office 365 and assign the necessary licenses.
- Ensure adequate bandwidth and network capacity to handle the migration efficiently.
- Communicate the migration plan, timeline, and expected impact to all users involved.
GoDaddy to Office 365 Migration Prerequisites
- Ensure that you have a Global Admin account with a mailbox configured for the Automatic Registration of the EdbMails application in your Entra ID (Azure Active Directory). Alternatively, for the Manual Registration method, you can use either a Global Admin account or a user account with full access permissions.
- Before migrating from GoDaddy to Office 365, ensure that user mailboxes are created in your organization and that the appropriate licenses are assigned.
- If you plan to migrate emails from GoDaddy to Office 365 by using IMAP connection, find and note down the server name on GoDaddy.
- If you have a custom email domain from GoDaddy to which you want to receive emails after the migration, you must add and verify the domain on Office 365.
- Configure Office 365 to send and receive large messages.
- Follow the steps to increase the message size on Office 365 to 150MB.
- See message size limits on Office 365 for more information
Steps to Migrate from GoDaddy to Office 365
Method 1:
Migrate from GoDaddy Office 365 to Microsoft Office 365 using EdbMails
If you have an Office 365 tenant with GoDaddy and want to migrate to another Office 365 tenant on a Microsoft server, follow the in-detailed steps outlined below.
Step 1: Download and Install EdbMails software
- Download and install the application on any computer having Windows Operating System.
See a detailed list of EdbMails system requirementsfor Office 365 migration.

- Start the EdbMails application on your system.
- Enter your registered email ID and password, then click ‘Login’. If this is your first time using EdbMails, click ‘Start Your Free Trial’ to begin with the trial version.Note: The trial version gives you access to all essential features and allows exporting up to 30 items per folder. To unlock unlimited exports and remove this limit, purchase a valid license from the official EdbMails website.After purchasing, close and reopen the application. Log in again with the same email ID and password used during the purchase to activate your license successfully.

- Select the migration option as ‘Office 365 Migration.’

- Select ‘Office 365 to Office 365 Migration’.

- You can continue with the default job name, or select the ‘New Job’ option if you want to rename it.

- Download and install the application on any computer having Windows Operating System.
Step 2: Connect to Source GoDaddy Office 365 Server
- Select ‘Add New Connection’ to create a new connection to the source Office 365 account. If you have already configured a connection earlier, simply choose it from the list and click ‘Connect to Existing’ to continue.

- EdbMails provides flexible migration options, allowing you to migrate primary mailboxes, archive mailboxes, and public folders seamlessly in a single solution.
- Choose the required connection options and click the ‘Next’ button.

- Select one of the available options to establish a secure connection using OAuth 2.0 modern authentication.
- Select Auto Registration for a fast and simple setup. Just sign in using a Global Admin account and grant the required permissions to automatically register the application in Azure AD.
- Alternatively, choose Manual Registration if you prefer to enter the Azure AD application details yourself. This option works with both Global Admin accounts and accounts that have Full Access permissions.
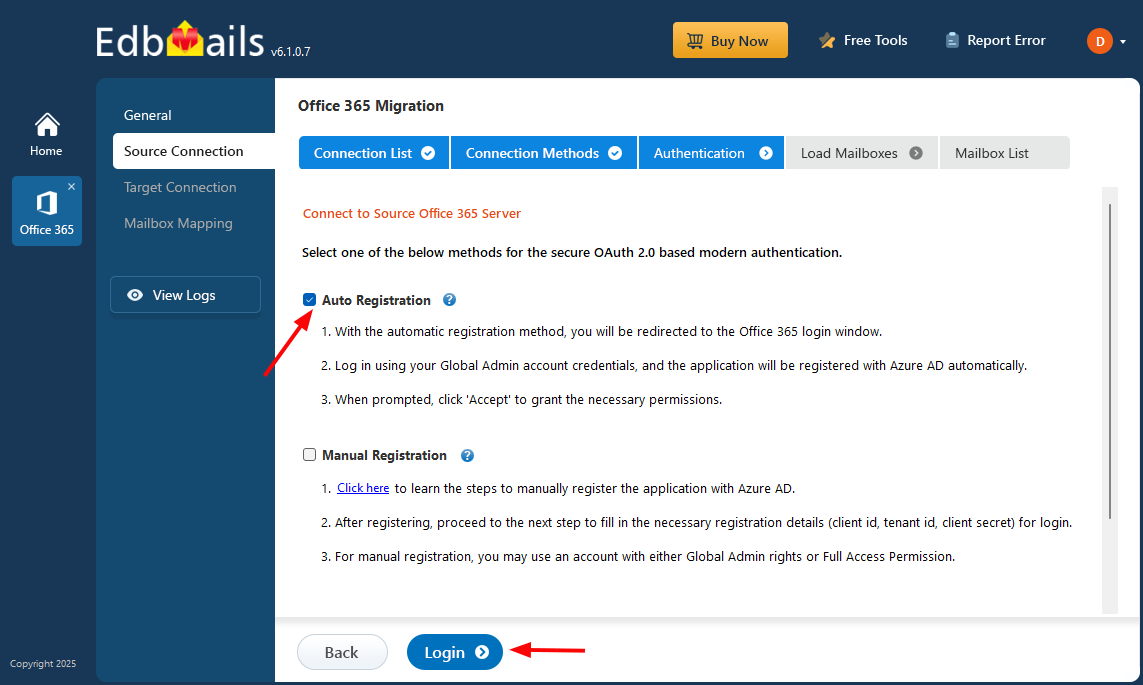
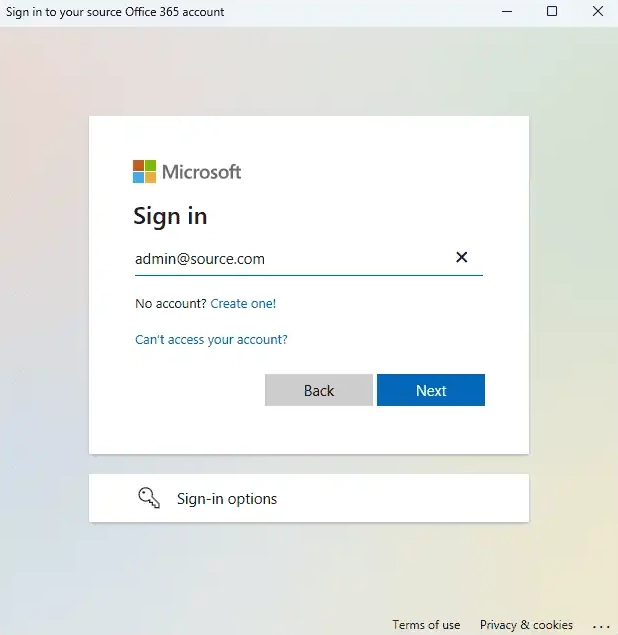
- Authenticate on Microsoft sign-in page.
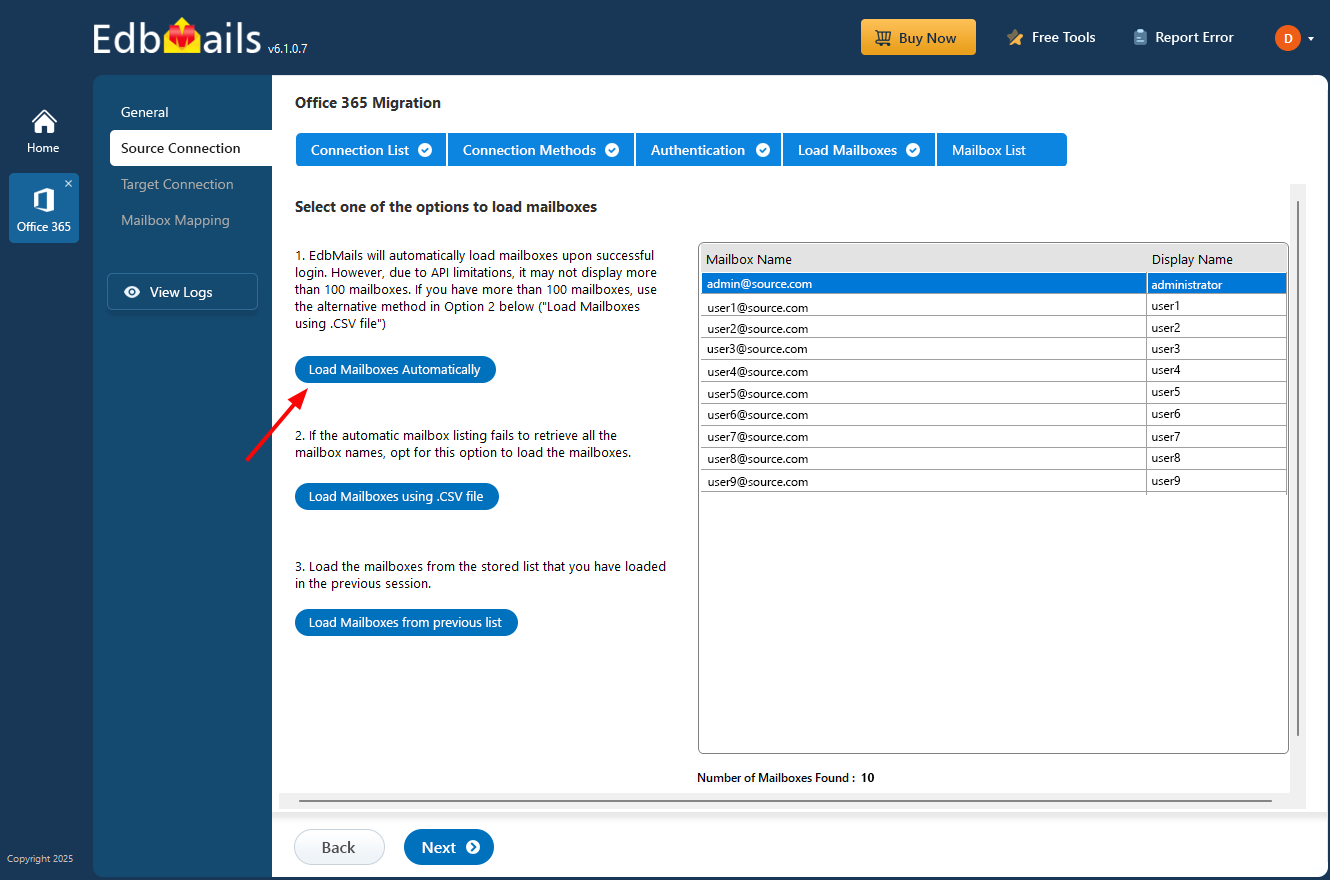
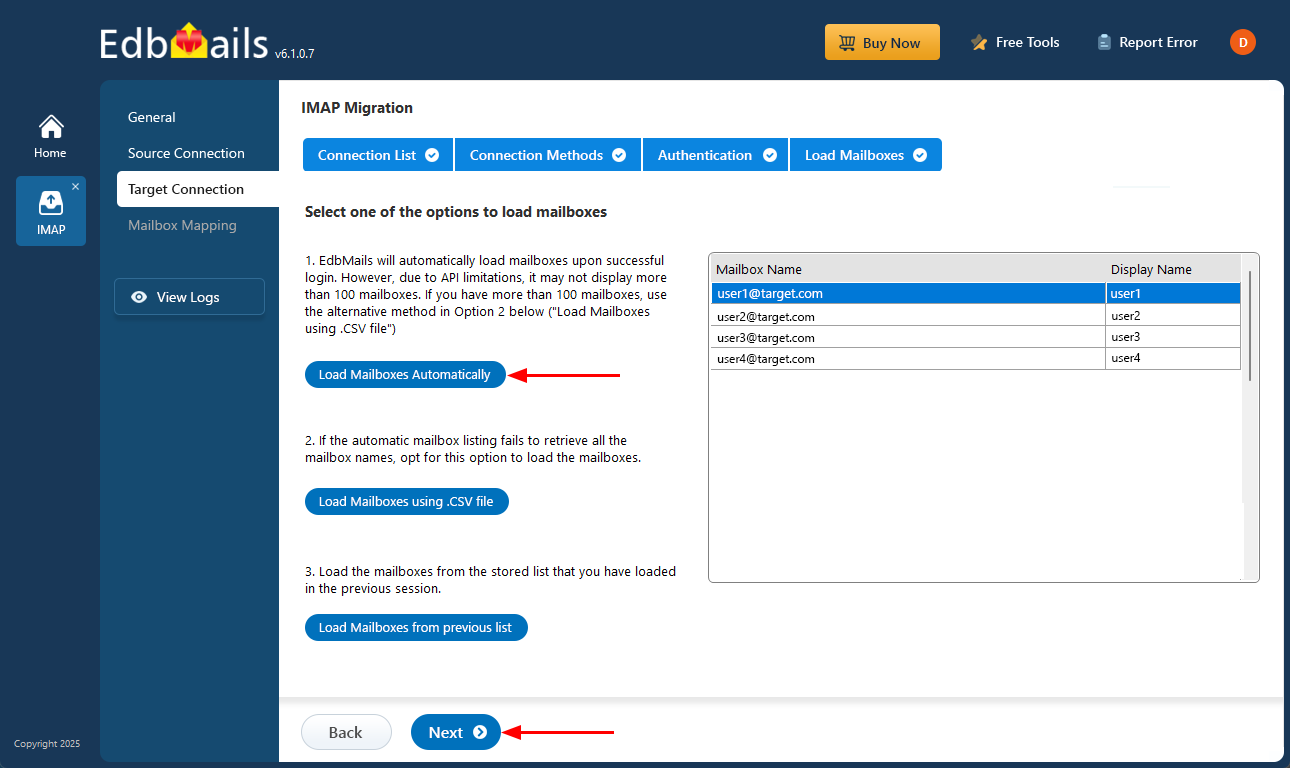
- After the successful authentication, choose one of the below methods to load the mailboxes:
- i) Load Mailboxes Automatically: EdbMails automatically loads mailboxes upon successful login making the setup process simple. Because of Microsoft API limits, it may not display more than 100 mailboxes. If you have more than 100 mailboxes, use the below option as an alternative.
- ii) Load Mailboxes using CSV file: If loading mailboxes automatically fails to retrieve all the mailbox names, choose ‘Load Mailboxes using .CSV file’ option that allows manual selection.
- iii) Load Mailboxes from previous list: Access the mailboxes directly from the stored list you imported during your previous session.
- Select ‘Load Mailboxes Automatically’ and then click ‘Next’ to continue with the process.
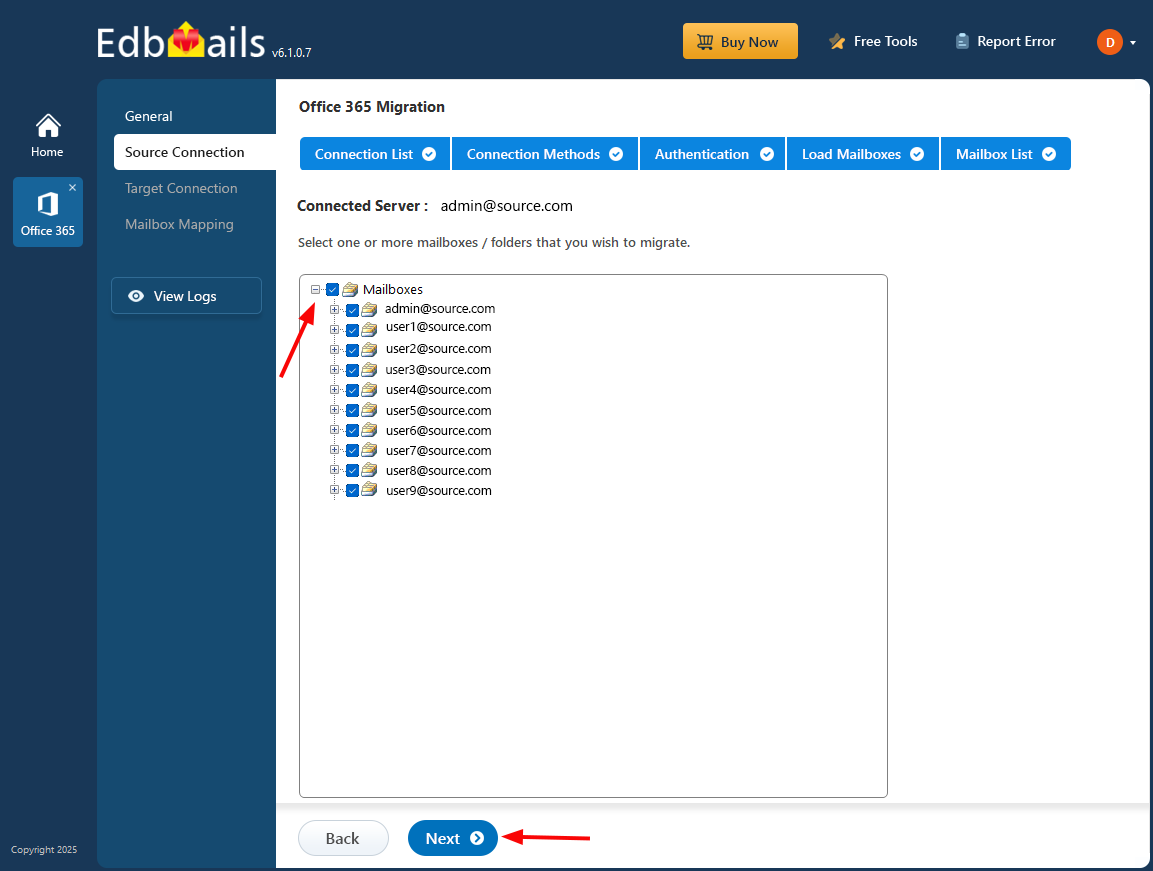
- Select one or more mailboxes and folders that you want to migrate to Office 365.
- Click ‘Next’ to proceed.
- Select ‘Add New Connection’ to create a new connection to the source Office 365 account. If you have already configured a connection earlier, simply choose it from the list and click ‘Connect to Existing’ to continue.
Step 3: Connect to Target Office 365 Server
- Select the ‘Add New Connection’ option to establish a connection with your target Office 365 account.
- If you have previously set up a connection, you can choose it from the available list and click ‘Connect to Existing’ to proceed.

- EdbMails offers flexible migration capabilities that let you move primary mailboxes, archive mailboxes, and public folders smoothly, all within one complete solution.
- Select the required connection options and click the ‘Next’ button.

- Select the secure authentication option you prefer for the target Office 365 account.
- You will be redirected to the official Microsoft sign-in page, where your credentials are verified securely using OAuth 2.0 to ensure safe and protected access.
- Click on the ‘Login’ button to continue.

- Authenticate on Microsoft sign-in page.

- Select one of the methods to load the mailboxes. You can also load the mailboxes using a CSV file.

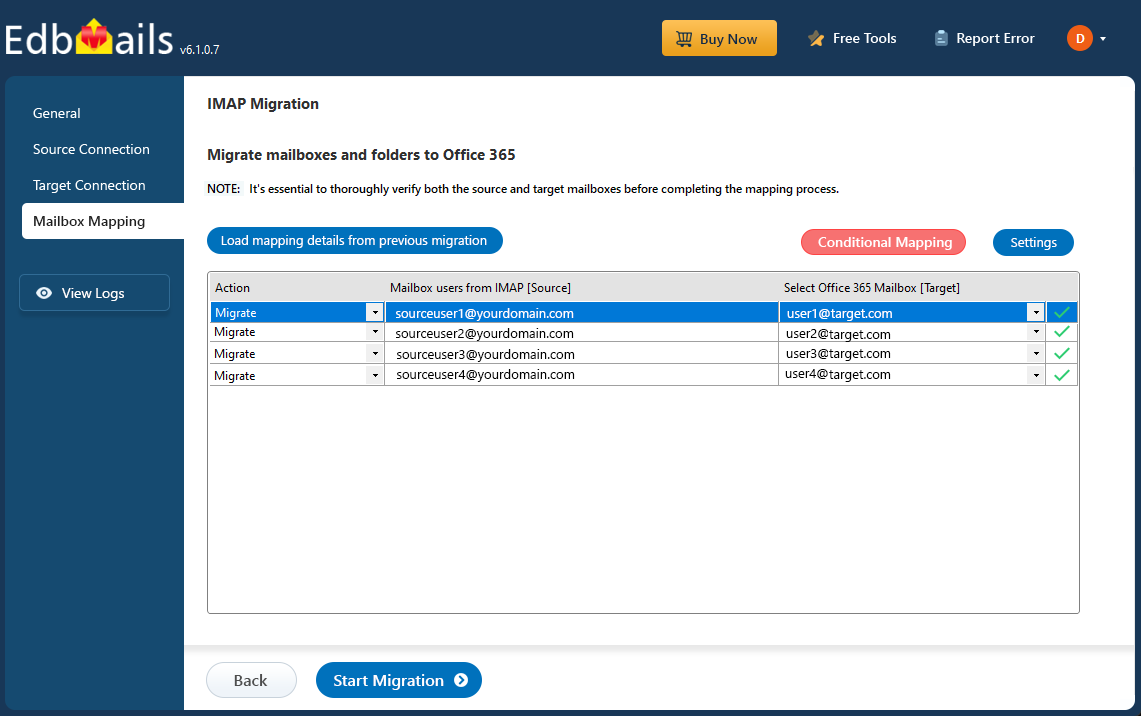
Step 4: Map Source and Target mailboxes
- Choose the required mailbox mapping option.

- Once the mailboxes are created on the target server, EdbMails automatically maps the mailboxes and folders between the source and target Office 365 tenants.
- This feature is particularly helpful for large-scale migrations as it improves accuracy and reduces the time required to complete the process. If required, you also have the option to manually map specific source folders and subfolders to the appropriate locations on the target server.

- Choose the required mailbox mapping option.
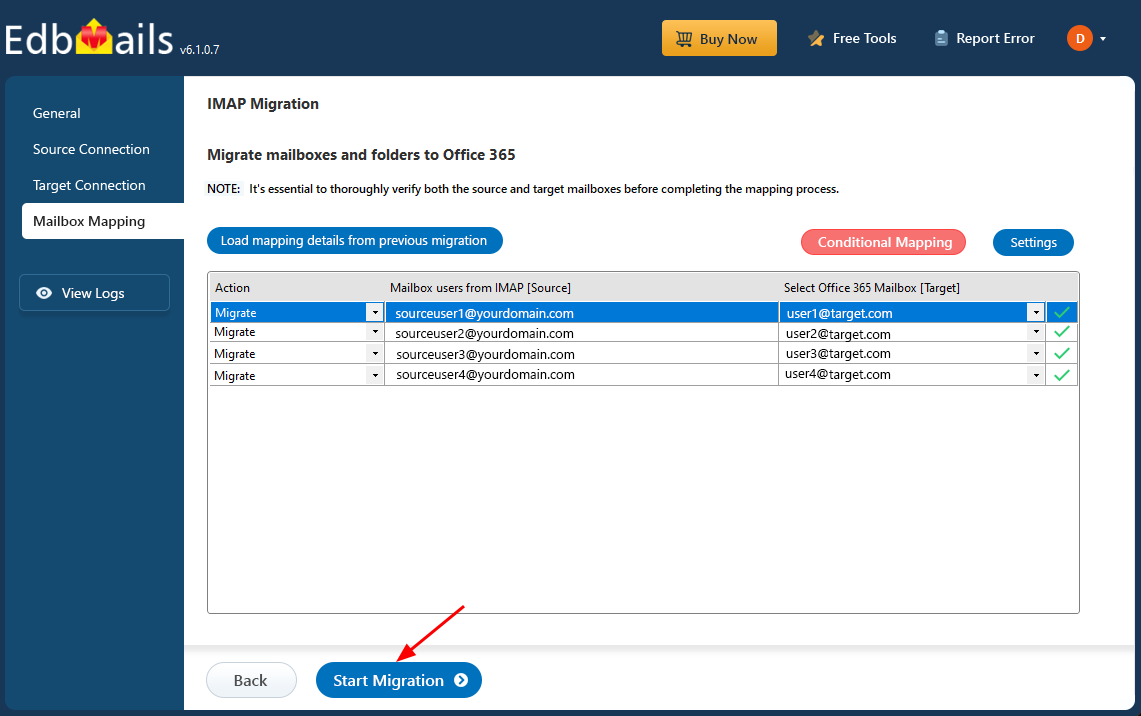
Step 5: Start Office 365 to Office 365 Migration Operation
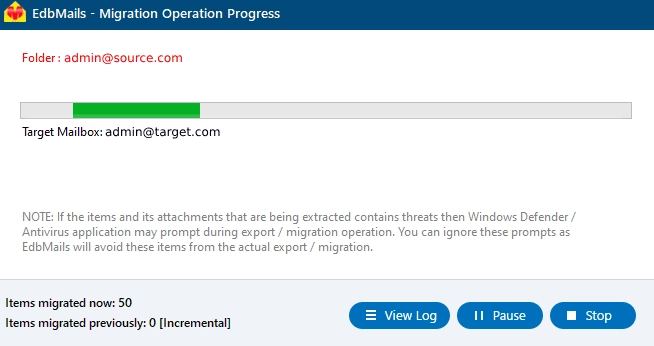
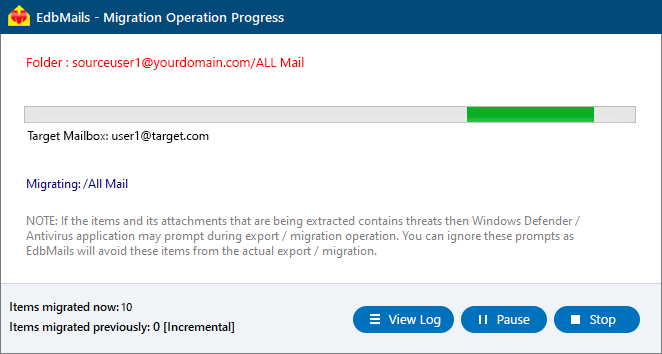
- Click the 'Start Migration’ button to initiate the migration process.
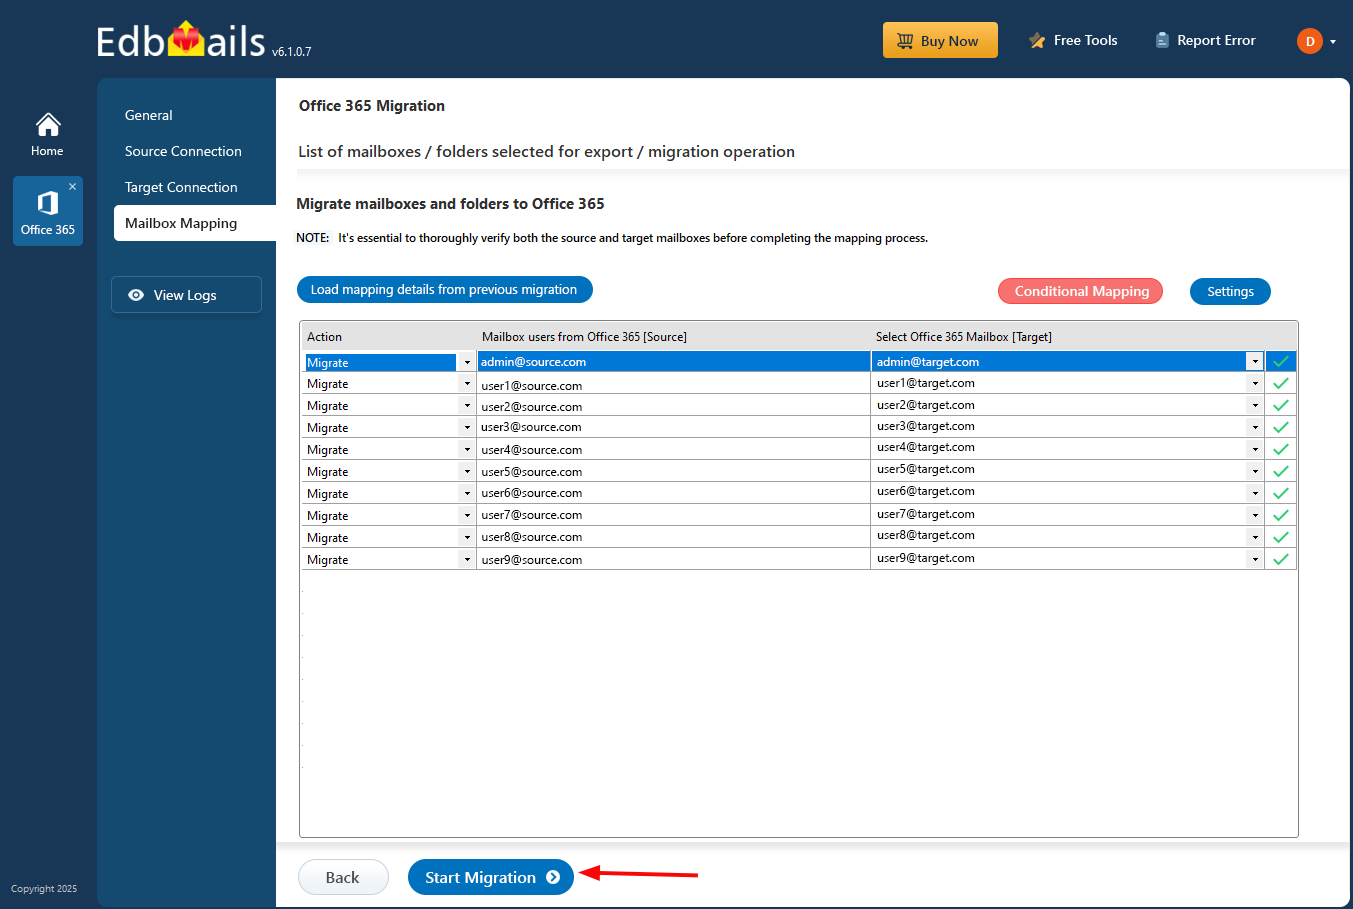
- EdbMails automatically starts the migration process and informs you once it finishes.
- You can click the ‘View Logs’ option to check the detailed migration report.
- The software also allows you to pause and resume the migration whenever required at your convenience.
Method 2:
GoDaddy to Office 365 using IMAP to Office 365 migration feature
If you have your GoDaddy email account on an IMAP server (such as cPanel, Zoho, or Zimbra), you can use EdbMails IMAP migration tool to directly migrate GoDaddy email to Office 365.
Step 1: Download and Install EdbMails IMAP Migration Software
- Download and install EdbMails application on your computer.
- Open EdbMails on your computer.
- Provide your registered email address and password, then click ‘Login’. If you are a first-time user, select ‘Start Your Free Trial’ to access the trial version.Note: The trial version provides all key features and allows exporting up to 30 items per folder. To remove this limit and enable unlimited exports, purchase a valid license from the official EdbMails website.After completing the purchase, close the software and launch it again. Sign in with the same email address and password used during the purchase to activate your license successfully.
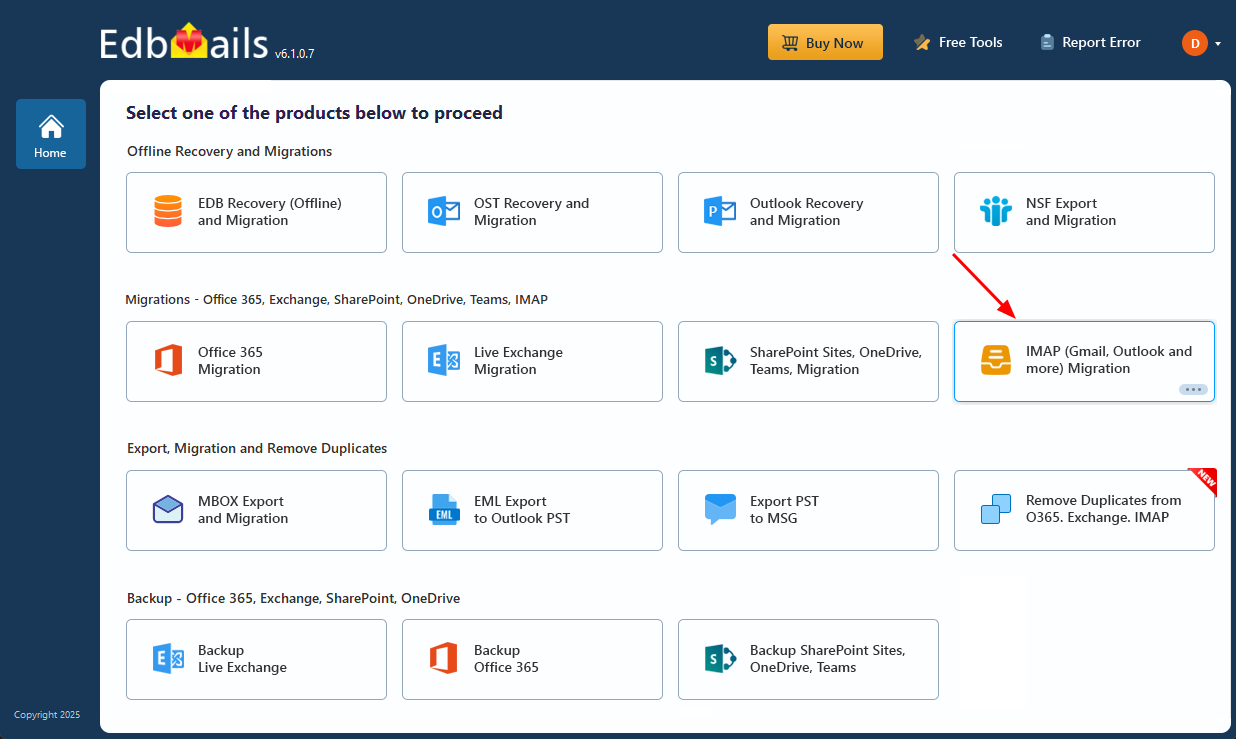
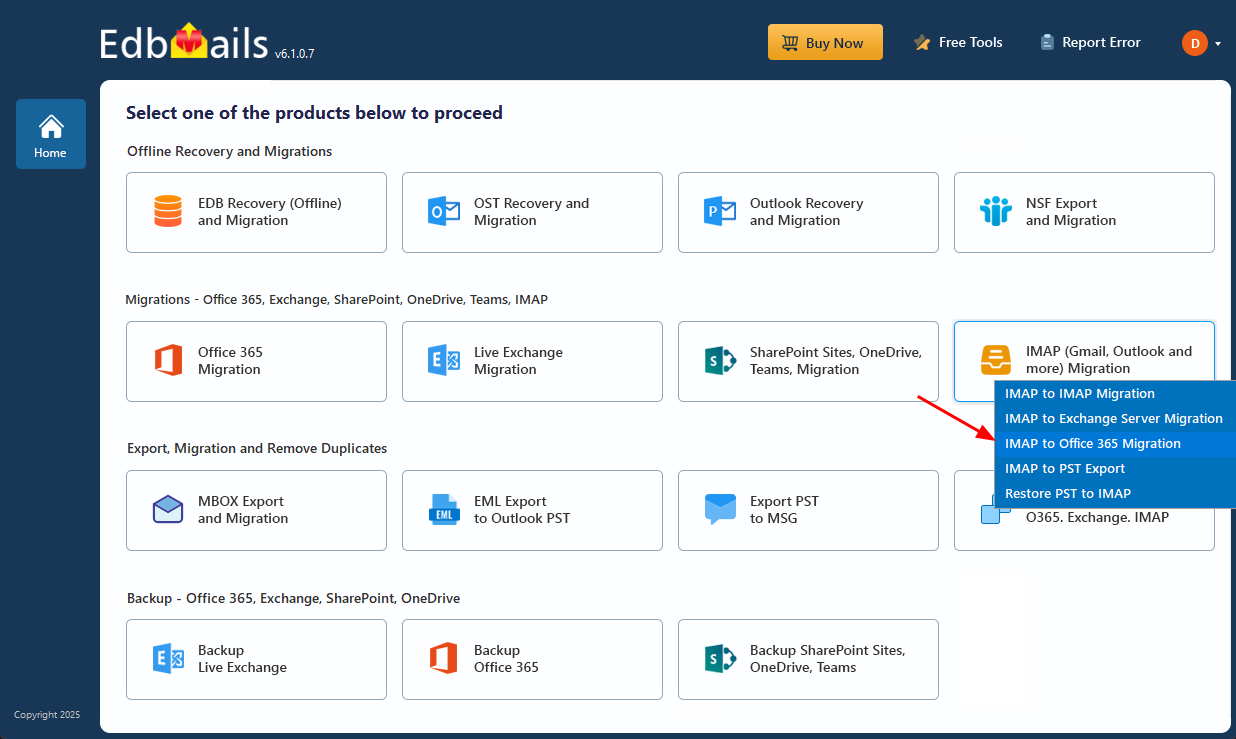
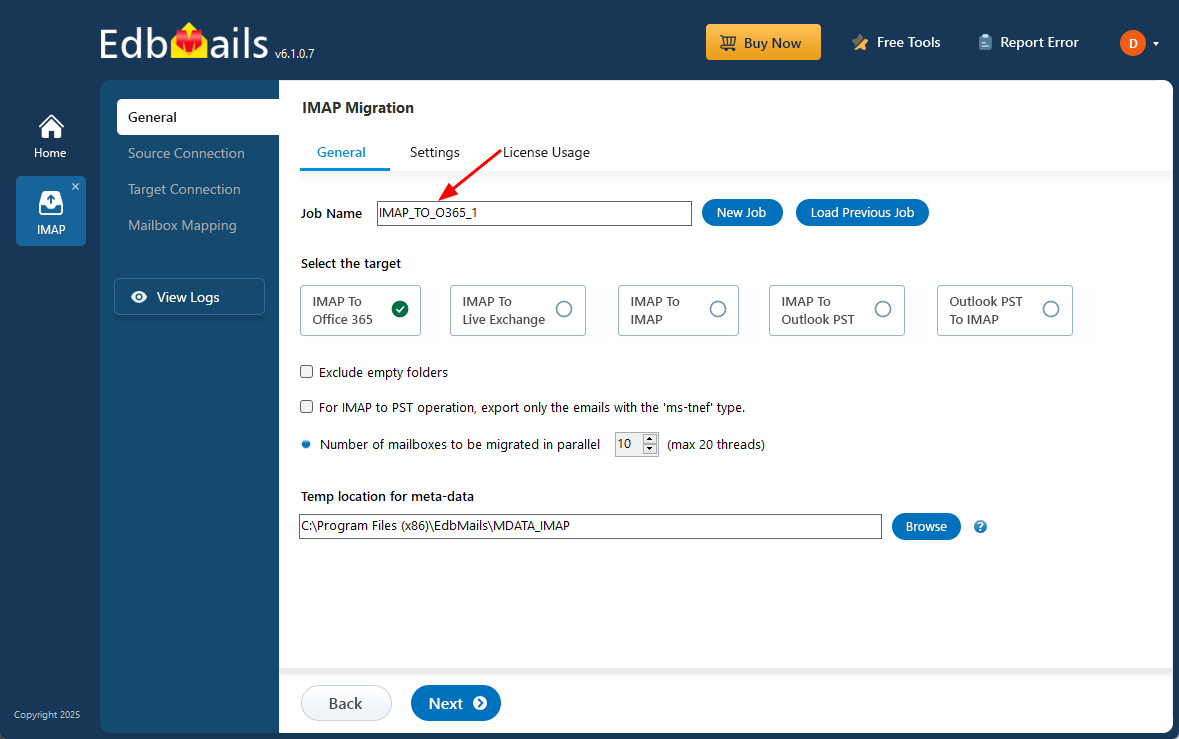
- Select the option ‘IMAP (Gmail, Outlook & more) Migration’.
- Select ‘IMAP to Office 365 Migration’.
- You can continue with the default job name, or choose ‘New Job’ if you would like to rename and customize it before moving ahead.
Step 2: Connect to Source GoDaddy Office 365 Server
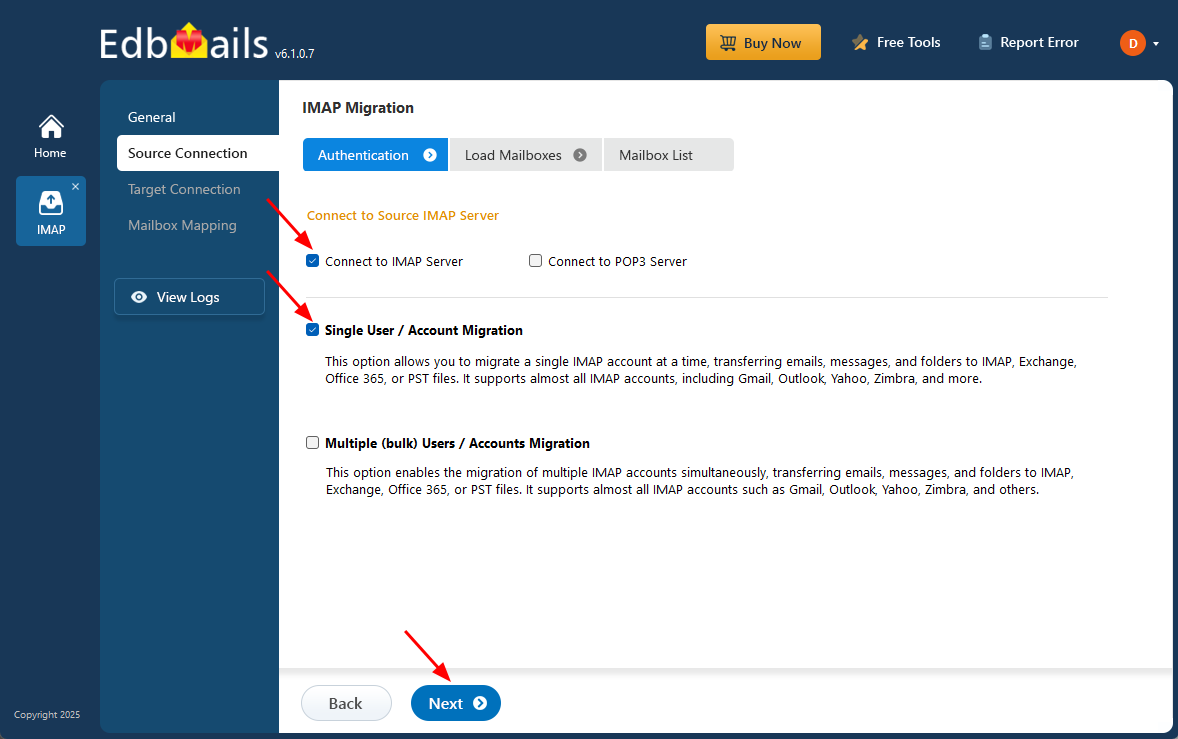
- To connect a single GoDaddy account for migration, click ‘Single User / Account Migration’, choose the suitable connection option such as ‘Connect to IMAP Server’ or ‘Connect to POP3 Server’. Click ‘Next’ to proceed.
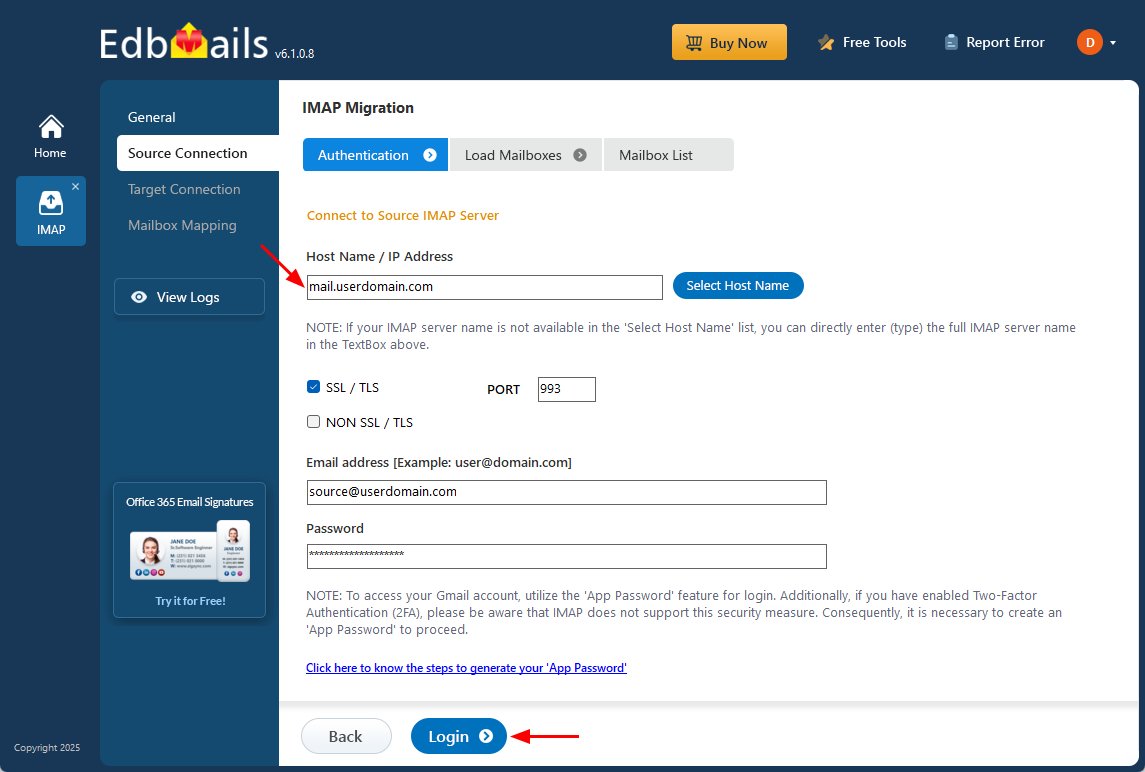
- Choose the appropriate IMAP server from the list, or manually enter the server hostname such as mail.userdomain.com.
- Next, provide the necessary login details including your email address, password, and the SSL port number, which is typically 993 when SSL encryption is enabled.
- Click the ‘Login’ button.
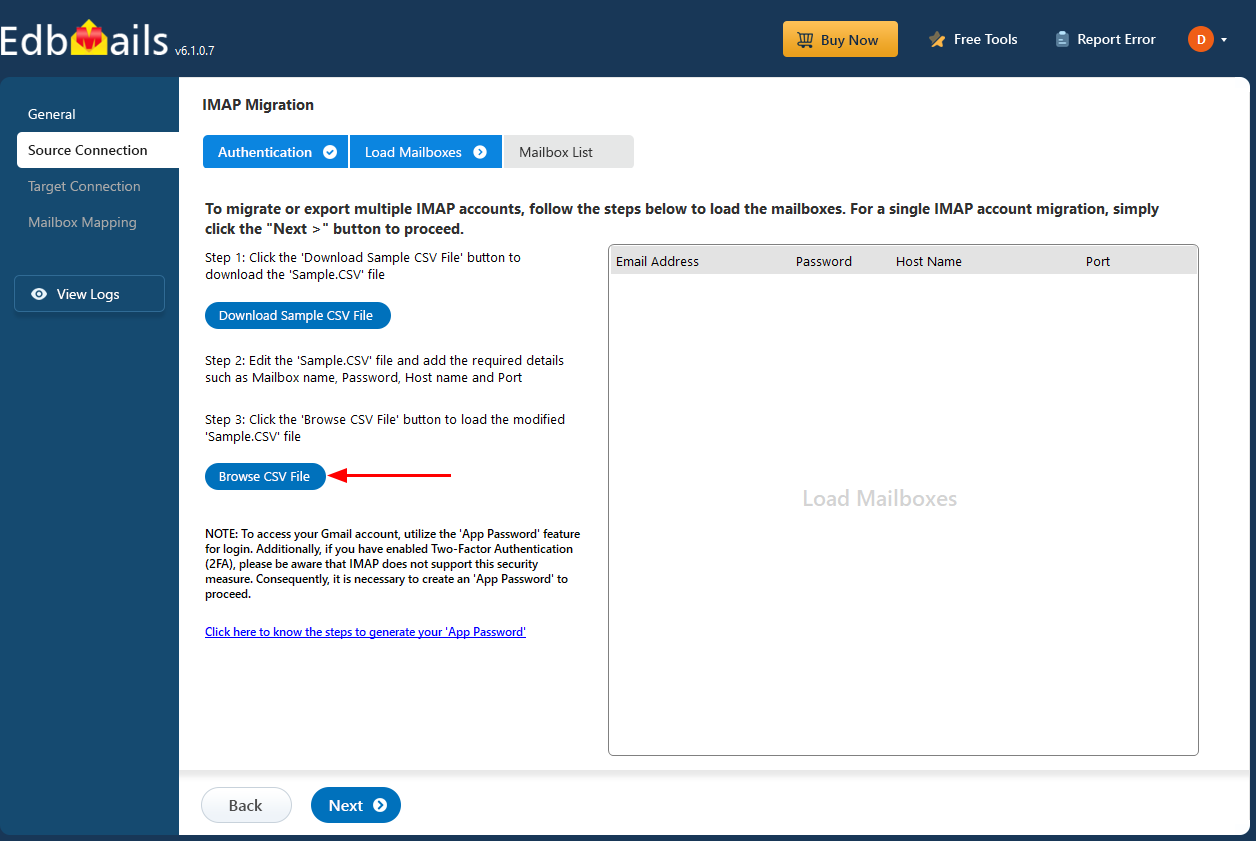
- To migrate multiple GoDaddy mailboxes at once, select ‘Multiple (bulk) Users/Accounts Migration’, choose the suitable connection method such as ‘Connect to IMAP Server’ or ‘Connect to POP3 Server’.
- Then proceed by clicking ‘Next’.

- Select the ‘IMAP Migration CSV File’ option to download the ‘Sample.CSV’ file, which will be saved to your local drive for future reference.

- Open the CSV file and fill in the details like email address, password, server name, and port number. After entering the information, save the file.
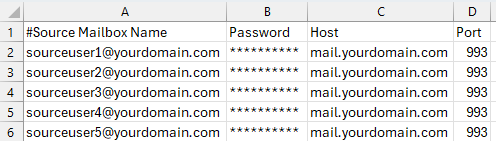
- Once you've made the necessary changes to the CSV file, save and close it.
- Then, click on the 'Load Modified CSV File' button, find your updated file, select it, and open it to continue.
Refer to the EdbMails detailed steps on connecting to single and multiple users during IMAP migration.
- To connect a single GoDaddy account for migration, click ‘Single User / Account Migration’, choose the suitable connection option such as ‘Connect to IMAP Server’ or ‘Connect to POP3 Server’. Click ‘Next’ to proceed.
Step 3: Select Source GoDaddy Office 365 Mailboxes
- Select the mailboxes or specific folders you want to migrate, then click ‘Next’ to proceed with the migration process.
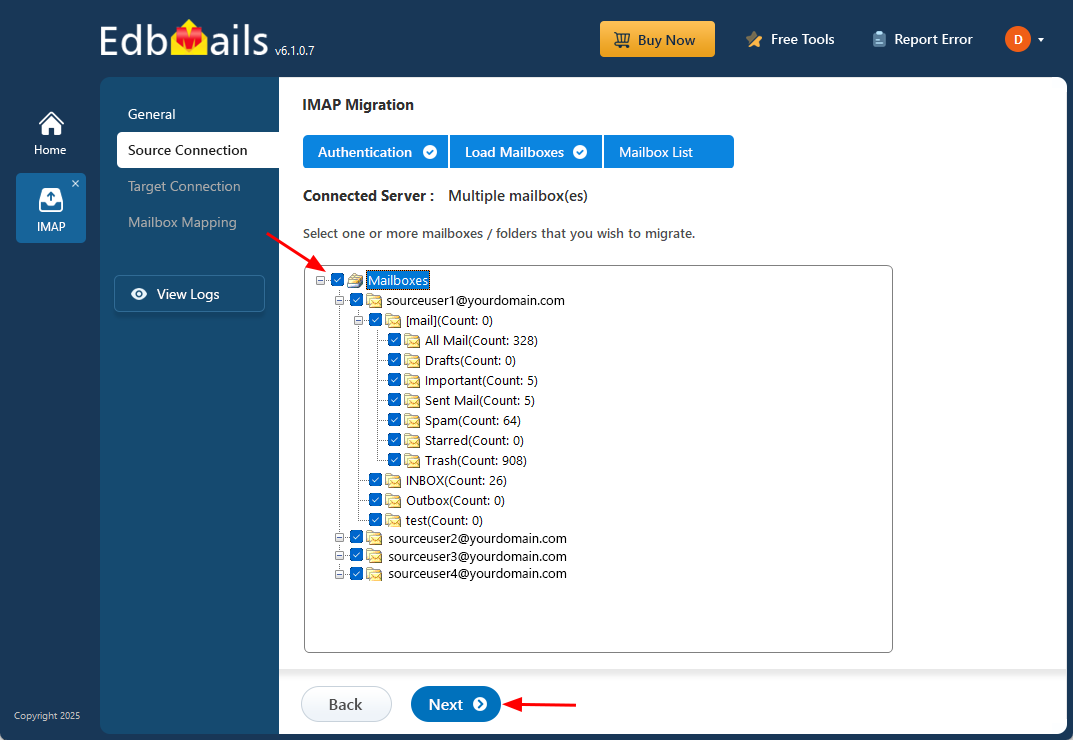
- Select the mailboxes or specific folders you want to migrate, then click ‘Next’ to proceed with the migration process.
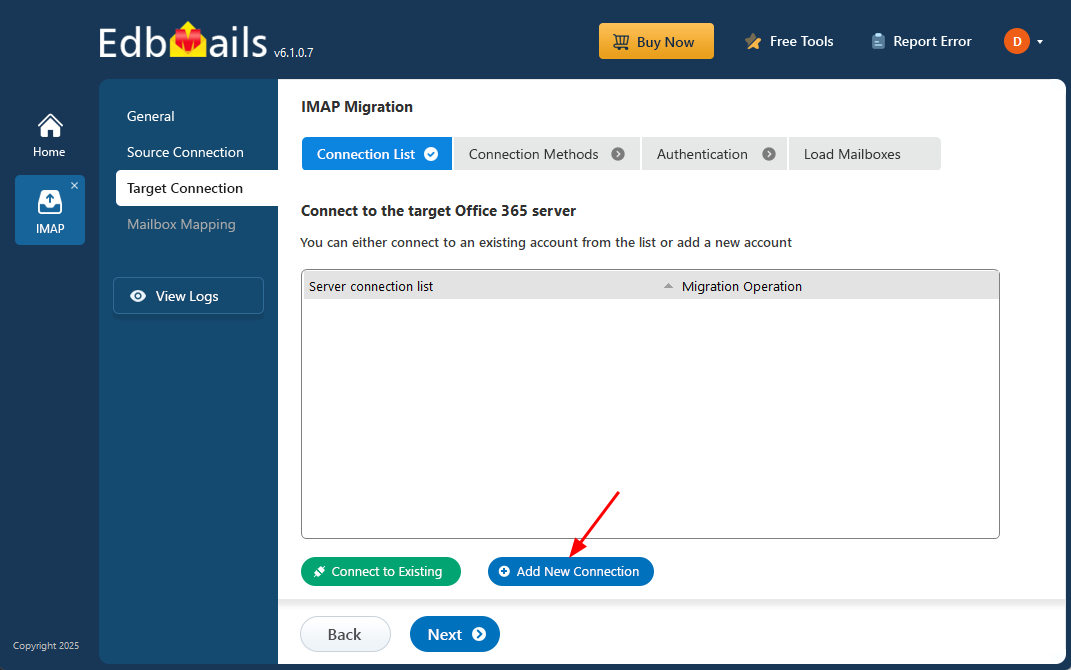
Step 4: Connect to target Office 365 server
- Click the ‘Add New Connection’ button to establish a new connection to the target Office 365. To use the previous connection, select it from the connection list and click the ‘Connect to Existing’ button to proceed.
- Select the required connection options and click the ‘Next’ button.
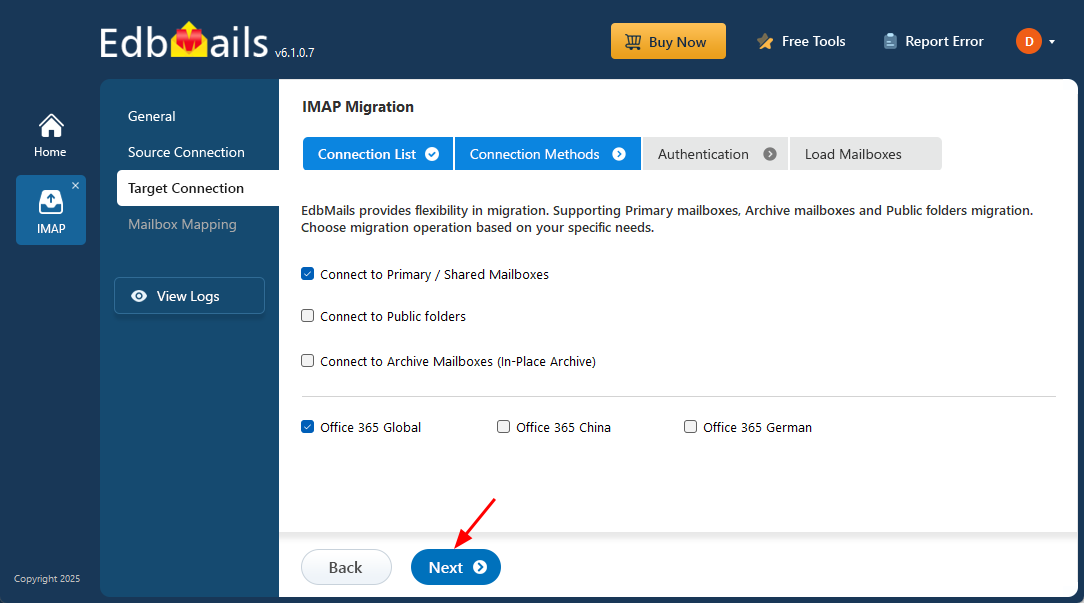
- Select the appropriate target connection method.
- Click the ‘Login’ button to continue.

- Authenticate on Microsoft sign-in page.
- Select one of the methods to load the mailboxes. You can Select ‘Load Mailboxes Automatically’, load the mailboxes using a CSV file or ‘Load Mailboxes from previous list’ and click ‘Next’.
- Click the ‘Add New Connection’ button to establish a new connection to the target Office 365. To use the previous connection, select it from the connection list and click the ‘Connect to Existing’ button to proceed.
Step 5: GoDaddy to Office 365 Mailboxes Mapping
- Select the mapping option that best aligns with your requirements.
- EdbMails provides an automated mailbox creation feature for Office 365, streamlining the setup of target mailboxes and ensuring seamless mailbox and folder mapping from the source IMAP server.
- Select the mapping option that best aligns with your requirements.
Step 6: Start GoDaddy to Office 365 Migration
- After mapping the mailboxes, click the ‘Start Migration’ button to initiate the migration process.
- Click the ‘View Log’ button to see the migration report, which includes mapping details and the total count of migrated emails.
- After mapping the mailboxes, click the ‘Start Migration’ button to initiate the migration process.
- Click the 'Start Migration’ button to initiate the migration process.
GoDaddy to Office 365 Post-migration Tasks
- Step 1: Update MX records to point to Office 365
Update the MX records to enable email to work with the target server and receive messages on Office 365. In addition, configure the Autodiscover record to allow Outlook to connect to the migrated mailboxes.
- Step 2: Defederate the domain from the GoDaddy tenant
After verifying that all data has been successfully migrated, remove the domain from GoDaddy. To complete this process, sign in as a tenant admin in GoDaddy, enable impersonation, and remove the federation. Finally, remove the delegated admin, test the mail flow, and cancel the GoDaddy subscription once everything is confirmed to be working properly.
Note: Before defederating your domain, make sure that you have migrated all of your data and email accounts to a new email provider or platform, as federating a domain prevents users from accessing Office 365 services associated with that domain.
- Step 3: Change the default domain name on Office 365
If the default domain on Office 365 points to the address from Microsoft (companyname.onmicrosoft.com), you can change the settings to set the custom domain from GoDaddy (companyname.com) as default.
- Step 4: Reset the passwords of users from Azure Active Directory
This is an optional step if you have used the CSV file to load and migrate the mailboxes. Reset the user passwords from the Azure AD as described in the guide.
- Step 5: Create a new Outlook profile for users in the new domain
Ensure you have the latest version of Microsoft Office and Outlook installed to avoid compatibility issues with Office 365. Configure the Outlook profile for each user in your domain if Outlook has problems connecting to Office 365 mailboxes.
- Step 1: Update MX records to point to Office 365
Troubleshooting Guide for GoDaddy to Office 365 Migration
Office 365 to Office 365 migration feature:
For troubleshooting, visit Knowledge Base articles.
For more queries, check Frequently Asked Questions or contact support.
IMAP to Office 365 migration feature:
Advantages of EdbMails for GoDaddy to Office 365 Migration
EdbMails allows you to easily perform GoDaddy Office 365 to Microsoft 365 migration, saving you time and reducing your migration workload. Here’s why business and IT administrators all over the world choose EdbMails as their preferred Office 365 migration solution.
- Secure modern authentication for Office 365 login.
- Supports concurrent mailboxes migration
- You can perform staged, cutover to Office 365.
- EdbMails automates most of the operations such as mailbox mapping, mailbox creation on target Office 365, delta migration etc.
- Migrate between Office 365 tenants with the same domain from Godaddy to Office 365
- Migrate with no third party components, no downtime or data loss.
Frequently asked questions (FAQ)
What are the steps for migrating emails from GoDaddy to Office 365?
Migrating GoDaddy Office 365 to Microsoft is relatively straightforward with EdbMails:
- Step 1: Install EdbMails and connect to your GoDaddy account
- Step 2: Select the mailboxes to migrate from GoDaddy to Office 365.
- Step 3: Start and monitor the migration from GoDaddy to Office 365
- Step 4: Verify that all data has been successfully migrated to Office 365.
- Step 5: Update your DNS records to point to your new Office 365 account.
Why migrate from godaddy to microsoft 365?
Microsoft 365 offers a more comprehensive suite of tools, including email, file storage, online meetings, and much more. It also has better security features and is generally more reliable than GoDaddy.
Here are the benefits of transferring email from godaddy to microsoft 365.
- More Comprehensive Suite of Tools - Microsoft 365 offers a wide range of tools, including email, file storage, online meetings, and much more, making it a more comprehensive solution for businesses.
- Better Security Features - Microsoft 365 has advanced security features, such as multi-factor authentication and data encryption, that offer greater protection against cyber threats.
- Increased Reliability - Microsoft 365 has a high uptime rate, ensuring that your data and applications are always available when you need them.
- Scalability - Microsoft 365 is scalable, so it can grow with your business, and you only pay for what you need
- Collaborative Tools - Microsoft 365 includes collaborative tools such as Teams and SharePoint, which allow for seamless collaboration among team members, even if they're in different locations.
- Access from anywhere - With Microsoft 365, you can access your data and applications from anywhere with an internet connection, making it easy to work remotely or on the go.
- Automatic Updates - Microsoft 365 is always up to date with the latest features and security updates, so you don't have to worry about manually updating software.
- Cost-effective - With Microsoft 365, you only pay for what you need, making it a cost-effective solution for businesses of all sizes.
What happens to my existing GoDaddy email during the migration?
EdbMails ensures that your emails from GoDaddy remain intact during the migration process. It transfers all your existing emails and data to Office 365 without any modifications or deletions. The tool guarantees a one-to-one consistency between the source and the target, ensuring that you won't lose any of your existing data.
How long does the migration from Godaddy to Office 365 take?
EdbMails is designed with powerful algorithms to make the migration as fast as possible. However, the length of the migration process can vary depending on the size of your organization, size of the data being migrated, the speed of your internet connection and so on.
What happens to my GoDaddy domain during the migration?
Your domain remains with GoDaddy, but you can still use it with your new Office 365 account. If you want to use your domain at GoDaddy with Microsoft 365, you must add the domain, verify it and finally add MX records to point to the Office 365 server. See how to connect your DNS records at GoDaddy to Microsoft 365
What support resources are available for migration?
EdbMails provides a free trial version that enables you to test all of the software's features as well as free 24x7 technical support with remote assistance for migrating emails from GoDaddy to Office 365. You can also refer to our migration guide and video tutorials to learn how the entire process works.

