Migrate emails from Posteo to Office 365
As digital communication continues to evolve, businesses rely on secure and dependable email platforms to support everyday communication. Posteo is a privacy-centric email service recognized for its strong encryption, reliable data protection, and environmentally friendly infrastructure. Since its introduction in 2009, Posteo has provided encrypted email along with calendar and contact management features, making it a preferred option for users who value both privacy and sustainability.
However, as organizations expand, many are moving to Microsoft 365 (Office 365) for its all-in-one productivity suite, advanced security, and cloud-based flexibility. The migration to Microsoft 365 enables businesses to benefit from enhanced scalability, centralized administration, real-time collaboration, and enterprise-level compliance with industry standards.

Migrating from Posteo to Office 365 can pose challenges such as maintaining data integrity, transferring large mail archives, and preserving encrypted communications during the transition. Without proper tools, these complexities can lead to data loss, extended downtime, or compliance risks.
This is where EdbMails IMAP Migration Tool simplifies the entire process. It allows you to seamlessly transfer emails, folders, and attachments from Posteo to Office 365 with just a few clicks, securely and without the need for scripts or manual configurations. The tool automatically creates target mailboxes in Office 365, supports bulk mailbox migration, and ensures end-to-end security through modern authentication (OAuth 2.0).
User Query
We've been using Posteo for our business email, but we need more storage, better security, and seamless integration with other tools. We're planning to migrate to Office 365. Can you provide a simple and secure way to move our Posteo emails to Office 365?
Why should you migrate emails from Posteo to Office 365?
Here are the key reasons why businesses migrate from HostGator to Office 365:
- Enhanced security: Office 365 offers advanced security features like data loss prevention and encryption, providing an extra layer of protection over Posteo’s end-to-end encryption.
- Cloud flexibility: Office 365 allows access to data from anywhere and on any device, offering more flexibility than Posteo.
- Increased storage: Office 365 provides larger storage capacity, enabling businesses to manage and share bigger files with ease.
- Microsoft tool integration: Office 365 integrates with Microsoft tools like Teams, OneDrive, and SharePoint, enhancing productivity and collaboration.
- Continuous updates: Office 365 ensures regular software updates and new features, keeping businesses on the cutting edge of technology.
- Improved collaboration: Office 365 streamlines communication with shared calendars and address books, making it easier to migrate Posteo data.
For these reasons, many organizations choose to migrate from Posteo to Office 365 with the help of EdbMails, ensuring a smooth and secure transition.
Posteo email to Office 365 Migration Plan
Planning is one of the most important steps before you begin the Posteo email to Office 365 migration. Here is a checklist of points to consider before you migrate.
- Determine the size of the data and the number of mailboxes you want to migrate.
- Make a list of all the data and permissions from Posteo email that you want to transfer.
- Create appropriate user mailboxes on Office 365 and assign licenses to them.
- Ensure you have enough network capacity and bandwidth to migrate.
- Communicate the migration plan and flow to your end users.
Posteo email to Office 365: Pre-migration Activities
- Find the IMAP server name of your Posteo email server. You can find this information from your server’s dashboard settings or by connecting your email system to Outlook.
- Have the users email address, passwords, IMAP hostname and port number.
- Create mailboxes on your target Office 365 server. You can choose the option to automatically create target mailboxes in EdbMails. If you prefer to create them manually, refer to the links below.
- If you have a custom email domain from your hosting provider to which you want to migrate and receive emails, you must add and verify the domain on Office 365.
Steps to add a custom domain to Office 365 and Steps to add DNS records to connect your domain. - Configure Office 365 to send and receive large messages.
Follow the steps to increase the message size on Office 365 to 150MB and see tips to optimize IMAP migration to Exchange online.
Steps to Migrate emails from Posteo to Office 365
Step 1: Download and install EdbMails IMAP migration software
- Begin by downloading EdbMails and installing it on a Windows computer of your choice. The setup is straightforward, and the software is designed to work seamlessly across various Windows environments, allowing you to get started with your email migration in just a few clicks
See a detailed list of EdbMails system requirements for IMAP migration.

- Open the EdbMails application on your computer.
- Enter your registered email address and password, then click ‘Login’. If you are accessing EdbMails for the first time, select ‘Start Your Free Trial’ to continue with the trial version.Note:The trial version includes all essential features and lets you migrate up to 30 items per folder. To enable unlimited migration, purchase an IMAP Migration license from the official EdbMails website.
Click here to view IMAP Migration pricing details.
Once the purchase is complete, close the application and reopen it. Then sign in again using the same email address and password used during the license purchase to activate it successfully.

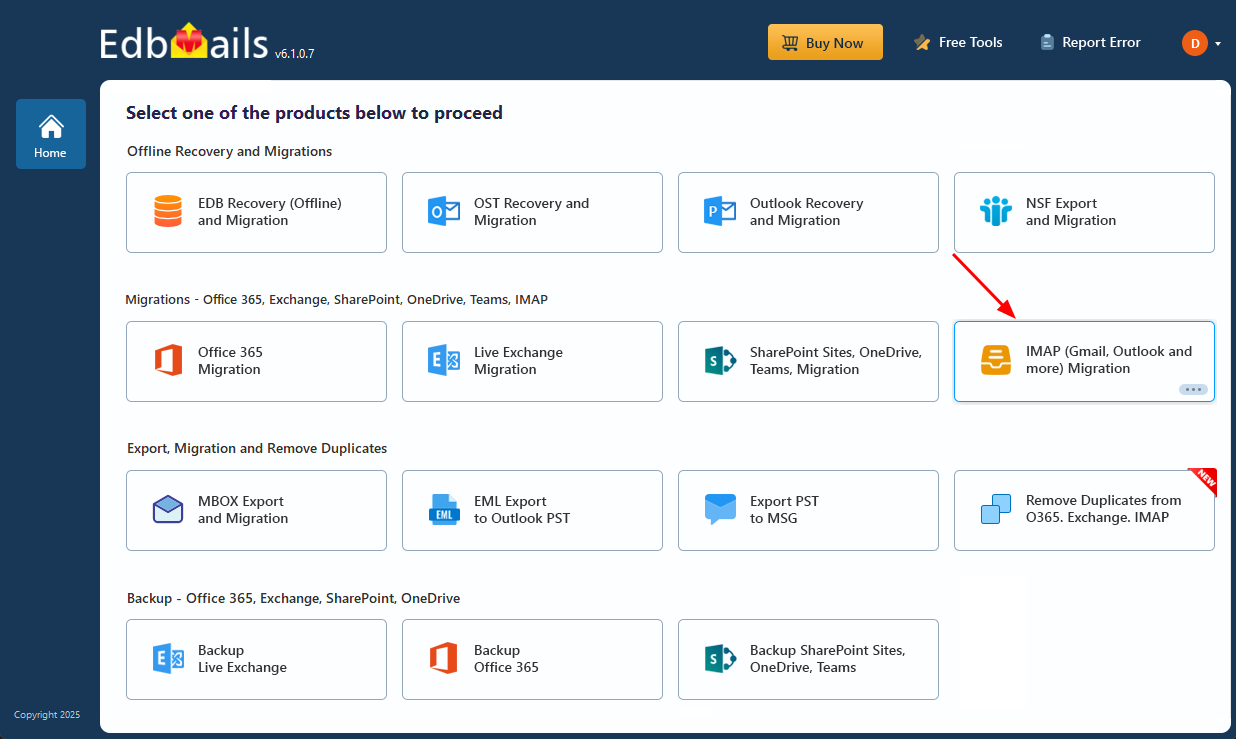
- Select the option ‘IMAP (Gmail, Outlook & more) Migration’.
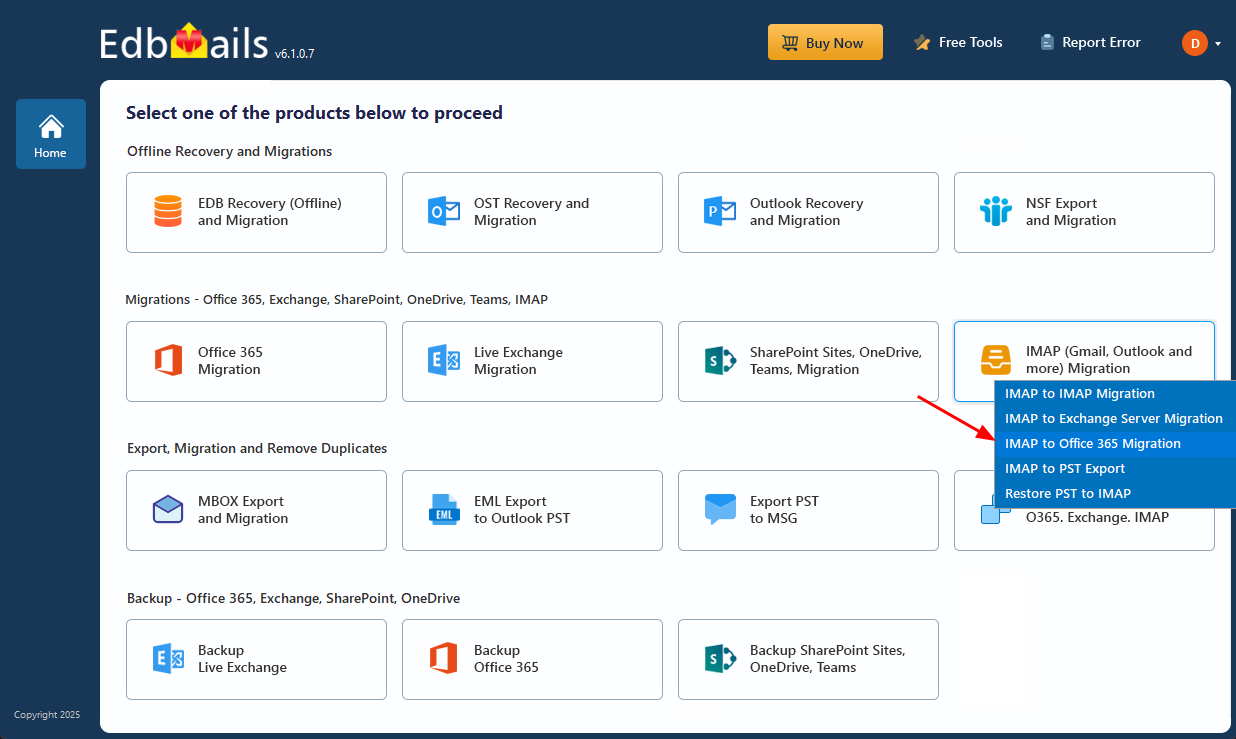
- Select ‘IMAP to Office 365 Migration’ to initiate the direct transfer of your Posteo mailboxes to Microsoft 365.
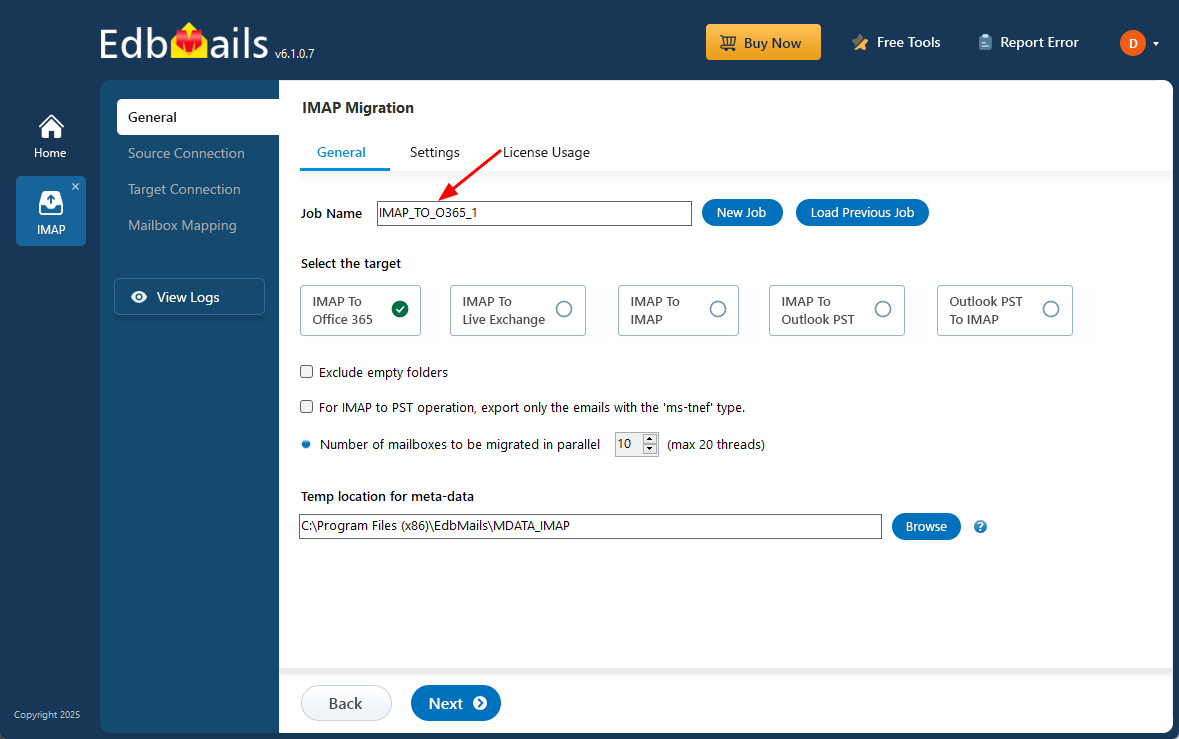
- You can continue with the default job name provided by EdbMails, or select ‘New Job’ to assign a custom name. This approach simplifies the management of multiple migration tasks and helps you easily identify, track, and organize each migration job.
- Begin by downloading EdbMails and installing it on a Windows computer of your choice. The setup is straightforward, and the software is designed to work seamlessly across various Windows environments, allowing you to get started with your email migration in just a few clicks
Step 2: Connect to the source Posteo email server
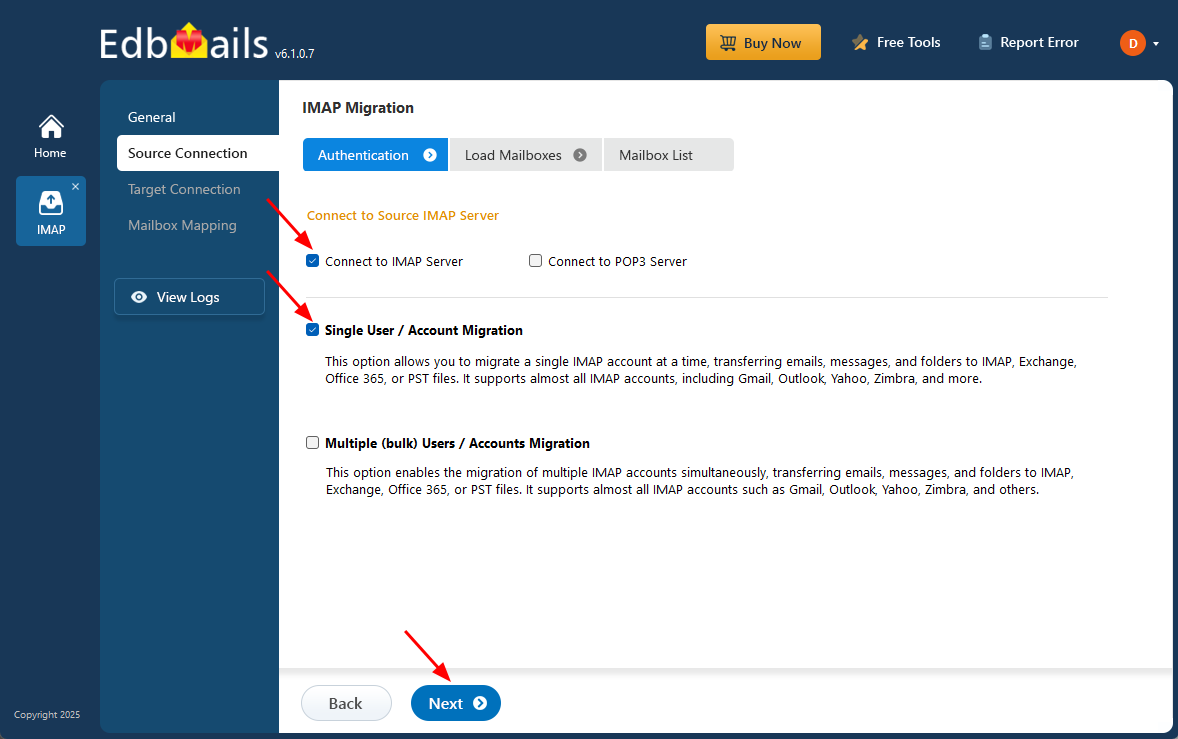
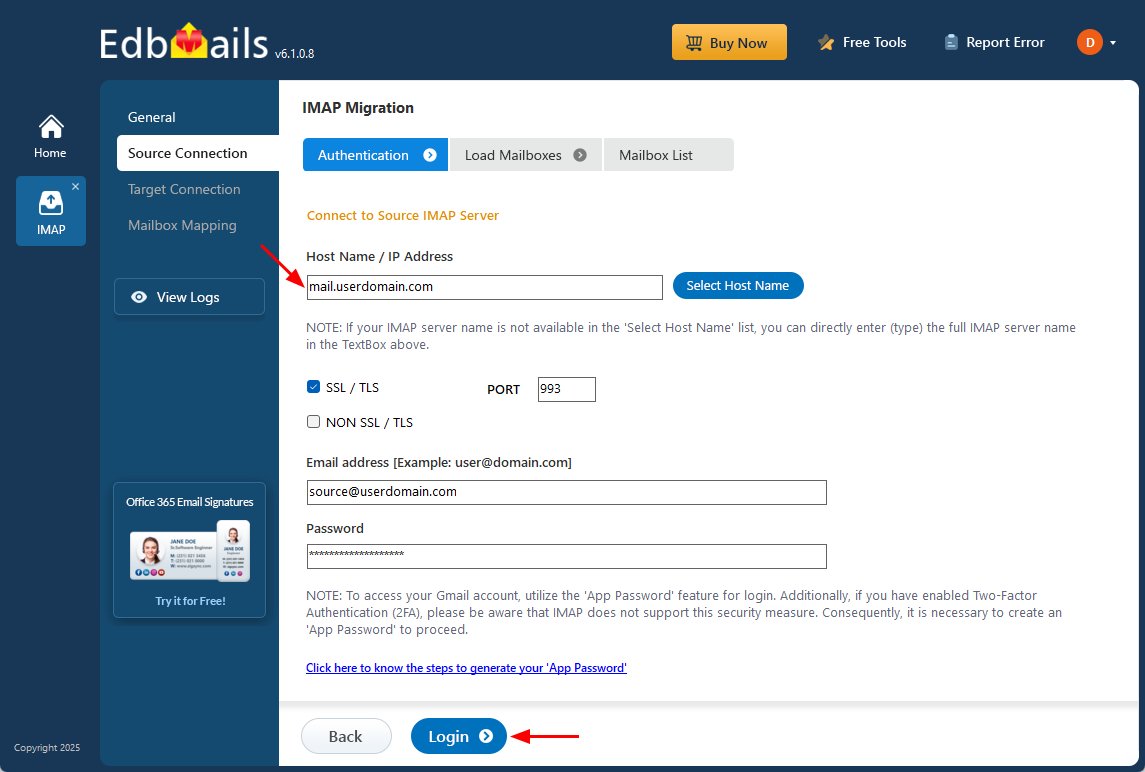
- To migrate a single Posteo account, click ‘Single User / Account Migration’, choose the suitable connection option such as ‘Connect to IMAP Server’ or ‘Connect to POP3 Server’. Click ‘Next’ to proceed.
- To migrate a single user from Posteo, enter the Posteo IMAP server address, or manually enter it (e.g., mail.userdomain.com).
- Then, fill in the Port Number (993 for SSL), email address and password.
- If you are adding a Gmail account, create an app password and use it instead of your standard account password.
- Click the ‘Login’ button.
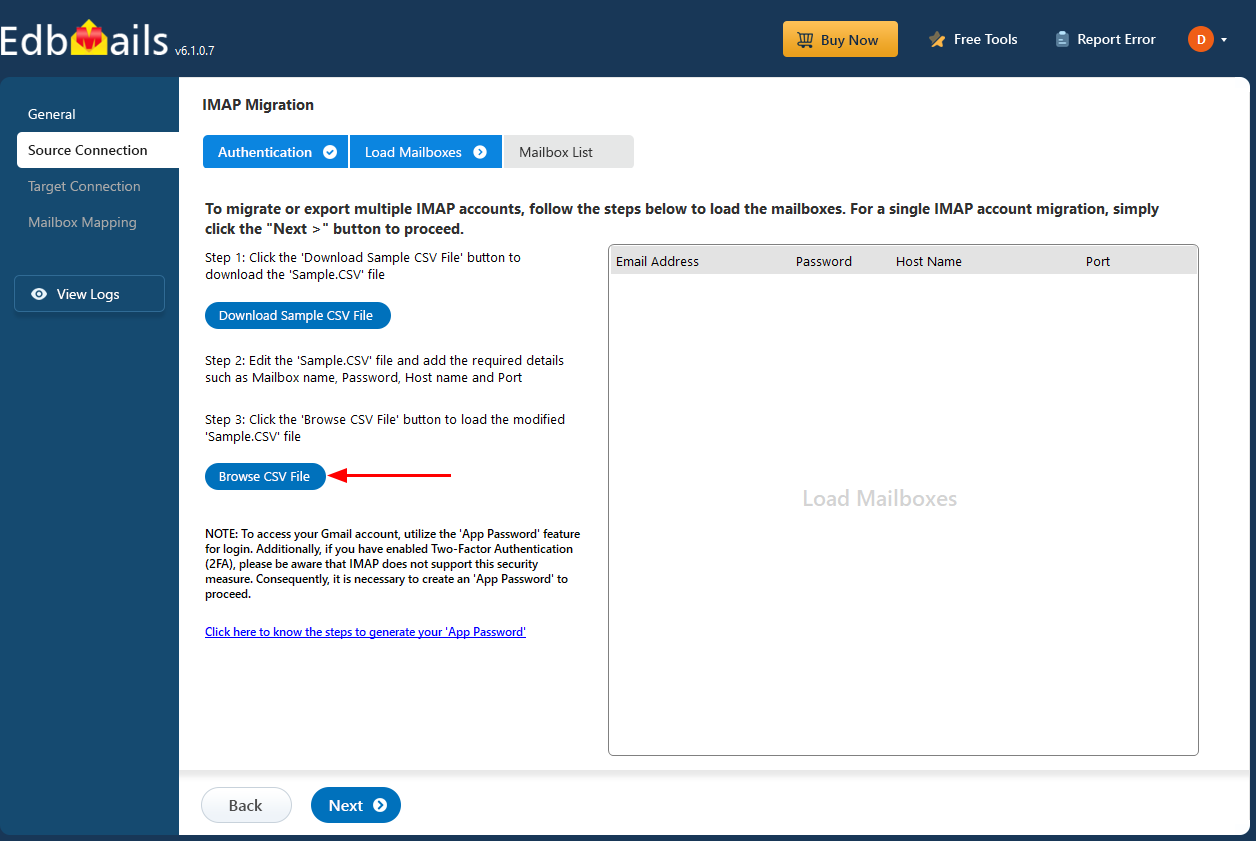
- To migrate multiple Posteo mailboxes at once, select ‘Multiple (bulk) Users/Accounts Migration’, choose the suitable connection method such as ‘Connect to IMAP Server’ or ‘Connect to POP3 Server’.
- Then proceed by clicking ‘Next’.

- Click ‘IMAP Migration CSV File’.

- Update the CSV file by entering the necessary details such as the email address, password, server hostname, and port number. Once updated, save the file to apply the changes.
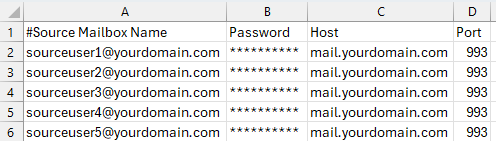
- Once you've made the necessary changes to the CSV file, save and close it.
- Then, click on the 'Load Modified CSV File' button, find your updated file, select it, and open it to continue.
- To migrate a single Posteo account, click ‘Single User / Account Migration’, choose the suitable connection option such as ‘Connect to IMAP Server’ or ‘Connect to POP3 Server’. Click ‘Next’ to proceed.
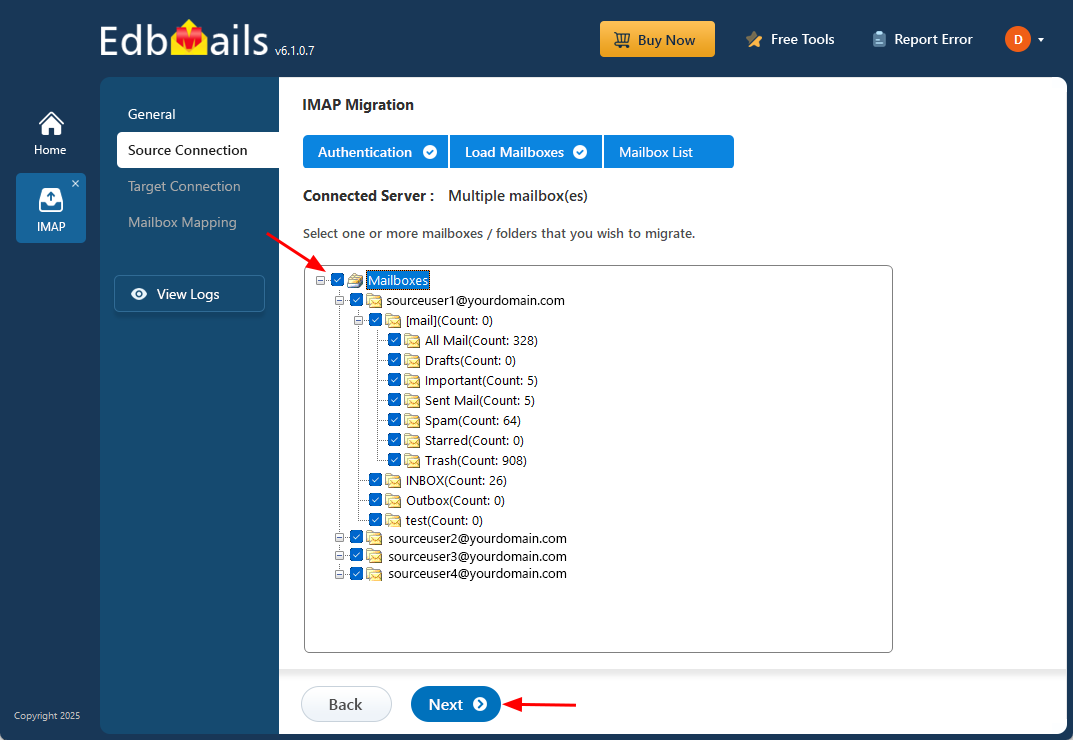
Step 3: Select the source Posteo email server mailboxes
- Select the mailboxes or specific folders you want to migrate.
- Then click ‘Next’ to proceed with the migration process.
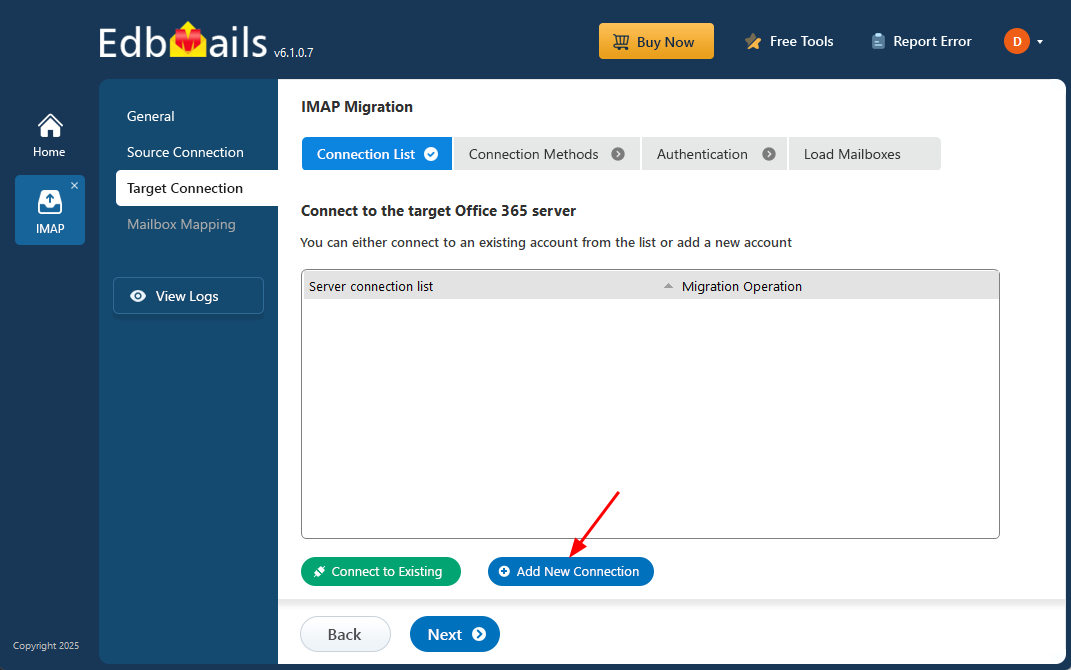
Step 4: Connect to target Office 365 server
- Click the ‘Add New Connection’ option to create a new connection to the target Office 365 account.
- If you have already configured a connection, simply choose it from the list and click ‘Connect to Existing’ to continue.
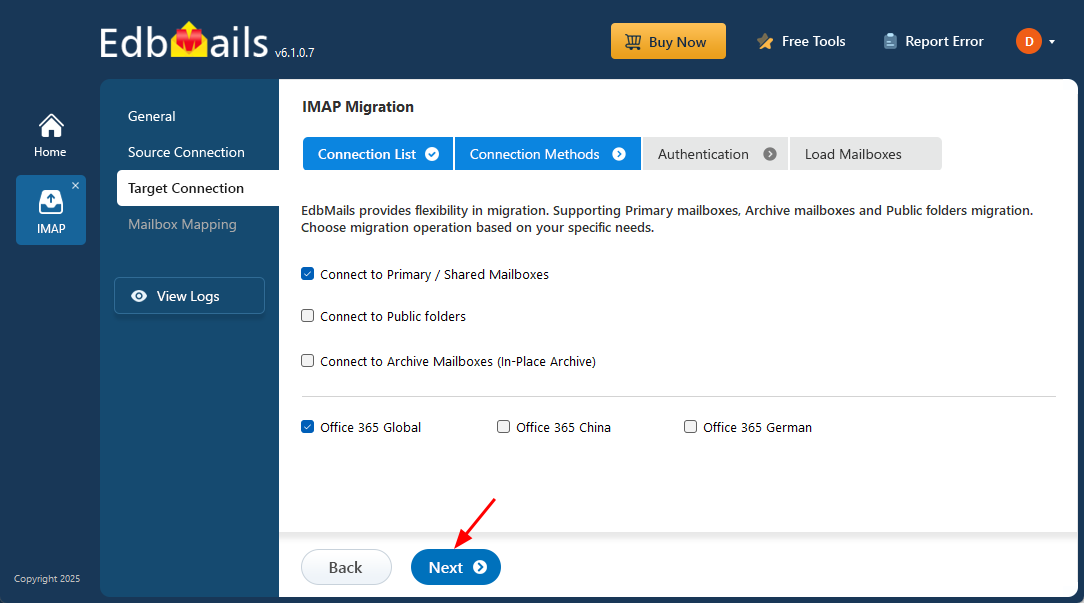
- EdbMails provides flexibility in migration, supporting Primary, archive and public folders migration.
- Select the required connection options and click the ‘Next’ button to proceed with authentication methods.
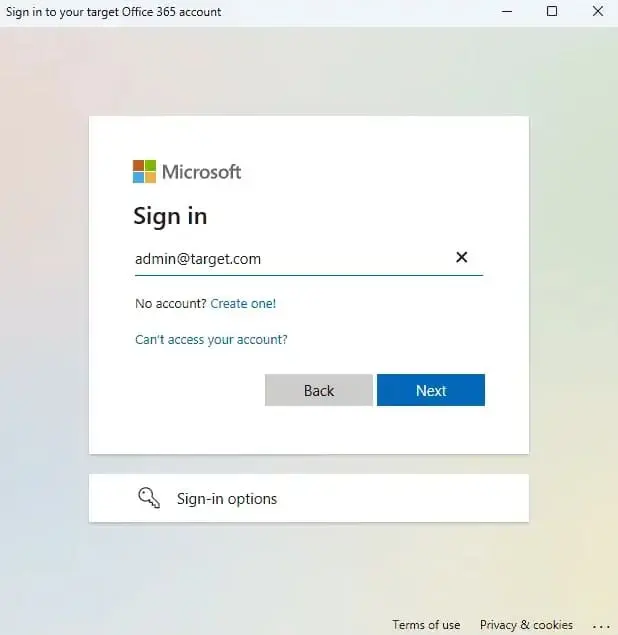
- Select the authentication method that suits your requirement.
- The sign-in process is completed via the official Microsoft sign-in page, where your credentials are securely validated using OAuth 2.0.
- Click ‘Login’ to continue.

- Sign in through the official Microsoft login page to authenticate your account and proceed with the migration.
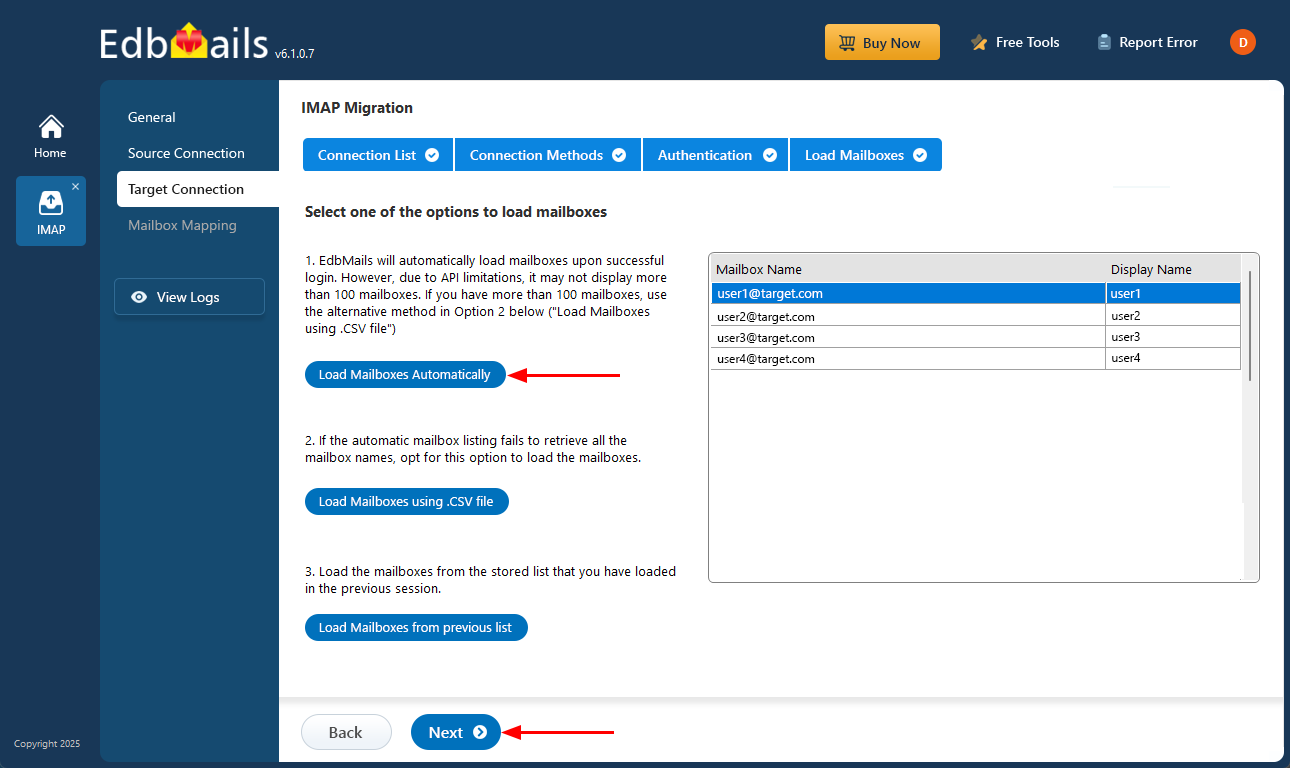
- EdbMails enables automatic mailbox loading, making the process fast and convenient. However, due to Microsoft API limitations, the automatic option can display up to 100 mailboxes at a time.
- In larger environments or when you need to include additional specific mailboxes beyond this limit, you can use the CSV file method to load mailboxes manually, allowing better control over the mailbox selection process.
- Click the ‘Next’ button to continue.
Step 5: Posteo email to Office 365 mailboxes mapping
- Choose the appropriate mailbox and folder mapping option based on your migration preferences.
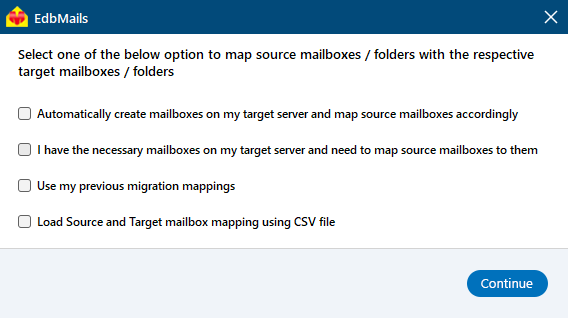
- You can choose to let EdbMails automatically create mailboxes in Office 365 and map them between the source and target servers. This feature is especially useful for large-scale migrations, saving time, reducing manual effort.
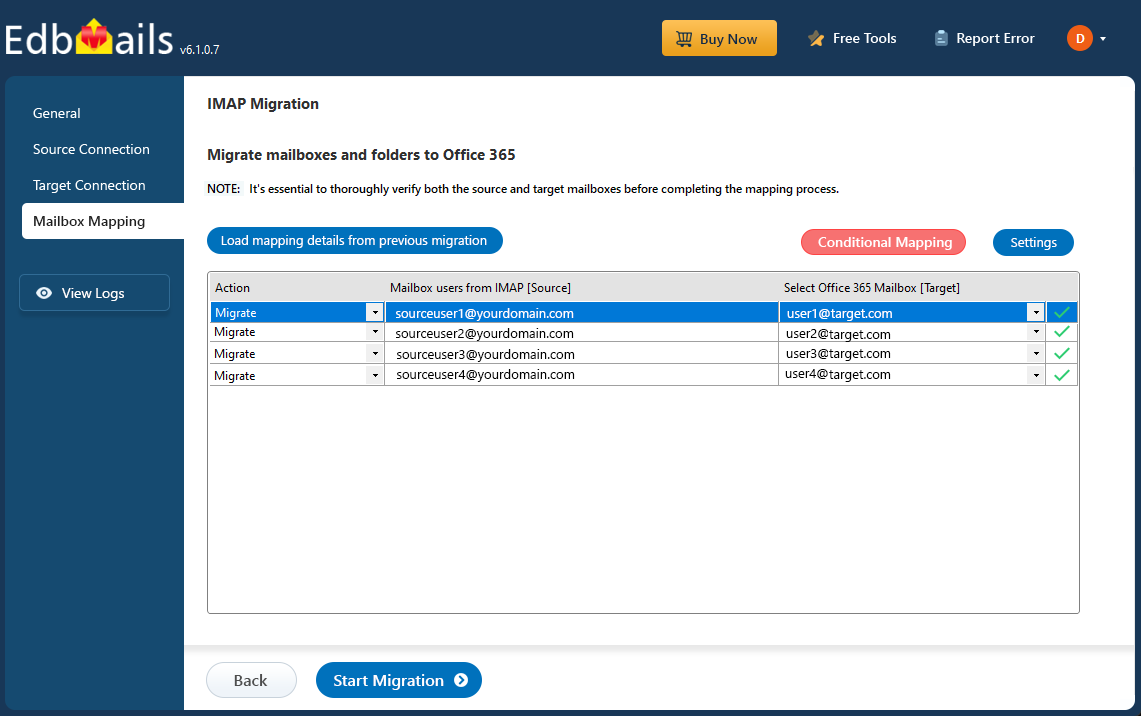
- Choose the appropriate mailbox and folder mapping option based on your migration preferences.
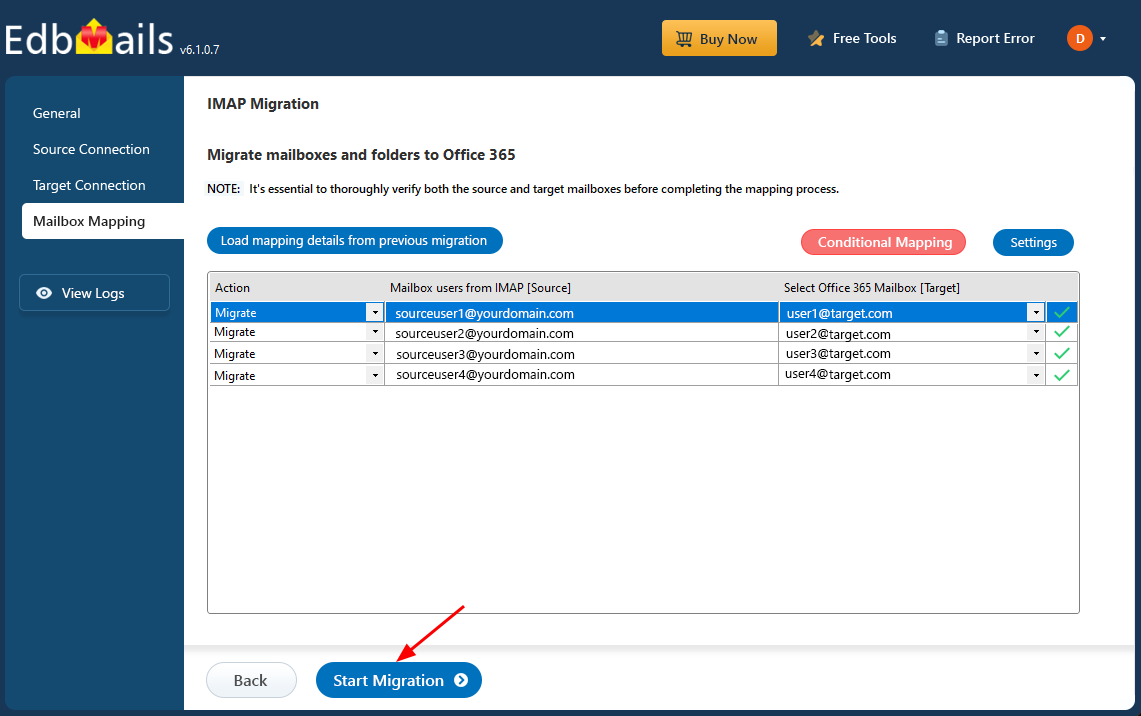
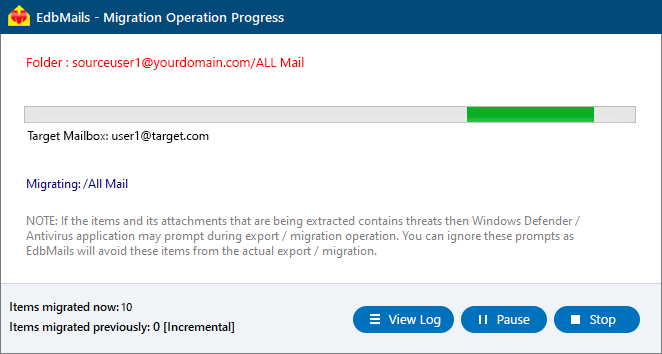
Step 6: Start Posteo email to Office 365 migration
- After mapping the mailboxes, click the ‘Start Migration’ button to initiate the migration process.
- Click the ‘View Log’ button to view the migration report, which includes mapping details and the total count of migrated emails.
- Login to your target server and verify the items.
- After mapping the mailboxes, click the ‘Start Migration’ button to initiate the migration process.
Posteo email to Office 365 Post-migration Tasks
- Step 1: Update the MX records to point to Office 365
If you have not done this step previously, change the DNS records known as MX records to enable email and receive messages on the target Office 365 server. In addition, configure the Autodiscover record to allow Outlook to connect to the migrated mailboxes.
- Step 2: Create a new Outlook profile for users in the new domain
Configure the Outlook profile for each user in your domain if Outlook has problems connecting to Office 365 mailboxes.
- Step 1: Update the MX records to point to Office 365
Troubleshooting Guide for Posteo email to Office 365 Migration
For troubleshooting, check out our knowledge base articles. If you have additional questions, browse the FAQs or engage with our customer care team for personalized assistance.
Advantages of EdbMails to Migrate from Posteo email to Outlook
- Delta Migration
Delta migration ensures that only the data added or changed after the initial migration is transferred during subsequent syncs. This minimizes downtime and optimizes bandwidth usage. With EdbMails, this feature ensures that only the most recent data is moved while preserving existing data integrity.
- Advanced Filtering Option for Precise Migration
EdbMails offers advanced filtering options , allowing users to select specific emails, folders, or date ranges for migration. This feature helps streamline the migration process by transferring only the necessary data, reducing unnecessary clutter and ensuring that only relevant information is moved from Posteo to Office 365.
- Compliance with Data Retention Policies
EdbMails ensures full compliance with data retention policies by preserving the email content, folders, and metadata during the migration. This guarantees that businesses follow industry regulations and legal requirements, avoiding the risk of non-compliance while migrating from Posteo to Office 365.
- Comprehensive Migration Summary
EdbMails provides a detailed migration summary that includes status reports and logs of every step taken during the migration process. This transparency helps users track progress and ensures no data is left behind, giving businesses full visibility over the entire Posteo to Office 365 migration.
- Personalize your Migration Destination Folder Choice
EdbMails allows users to choose specific destination folders on Office 365 for their migrated data. Whether it's emails, folders, or attachments, businesses can ensure that the data is organized and stored according to their preferences, streamlining the process and making it easier to manage post-migration.

