


Virgin Media email to Gmail Migration
This guide explains how to migrate supported Virgin Media email data to Gmail with a clear and structured approach. Users can generally continue accessing the source during the copy phase, but final mail-flow or account changes should still be planned and verified.
Virgin Media, one of the leading telecommunications providers in the UK, includes email services along with its broadband and phone packages. Despite this, many users experience limitations such as restricted storage, outdated functionality, and lack of flexibility. This has led a growing number of users to consider migration to Gmail, a widely used cloud-based email platform recognized for its advanced features, strong security, generous storage, and smooth integration with Google services.
When planning a migration of Virgin Media emails to Gmail, users can use a manual mail-client approach for small requirements or a migration application for a repeatable multi-mailbox workflow. EdbMails provides mailbox selection, mapping, filters, bulk loading, follow-up passes, and migration reports for the supported IMAP email scope.
User Query
"We’ve been relying on Virgin Media for our email services, but as our requirements grow, we’re looking for improved storage options and more sophisticated features. We’re thinking about switching to Gmail due to its strong security and seamless integration with Google’s suite of tools. Could you recommend an efficient and dependable method to transfer our Virgin Media emails to Gmail? - Julia, Netherlands"
Why is Gmail a better choice than Virgin email?
There are several benefits that prompt users to migrate their Virgin email accounts to Gmail. Here, we outline a few key factors that influence this decision.
- Gmail’s user-friendly interface simplifies email management, making it easier for all types of users to navigate their inboxes efficiently.
- Since Gmail is a cloud-based service, users can access their emails from any device, anywhere, as long as they have an internet connection. Virgin Media lacks this flexibility.
- With a Gmail account, users get a generous 15 GB of free storage, which helps manage emails and attachments effectively. This extensive storage capability is one reason users prefer migrating from Virgin.
- Gmail ensures a high level of security with features like two-factor authentication and spam filtering, providing greater peace of mind compared to Virgin’s security options.
- A Gmail account also allows users to access various Google services like Google Drive, Google Docs, and Google Meet. Virgin Media does not offer such an integrated suite of tools.
- Additionally, Gmail’s search functionality is far more advanced, making it easier to locate specific emails and attachments compared to Virgin’s basic search capabilities.
Now that we’ve discussed why Gmail is a better choice, let’s explore solutions to migrate Virgin email to Gmail effectively.
Expert solution to migrate Virgin email to Gmail
The EdbMails IMAP Migration Tool provides a guided Virgin-Media-to-Gmail workflow for single-user and bulk IMAP migration, with mailbox selection, mapping, filters, follow-up passes, and migration reports. For the broader source-to-target process, see the IMAP to IMAP migration guide.
EdbMails uses the secure connection methods supported by the source and target services and provides migration controls for mailbox selection, mapping, filtering, and progress tracking. Review the EdbMails security information, run a pilot mailbox, and verify representative Gmail data before completing the project.
Virgin Media email to Gmail Migration Plan
- Assess your specific needs, including the number of users, data volume, and desired migration timeframe.
- Create a Gmail account or G Suite subscription, depending on your requirements. Configure the necessary settings and ensure that your Gmail account is ready to receive the migrated data.
- Configure IMAP migration settings: If you opt for an IMAP migration tool, configure the necessary settings, such as providing the source Virginmedia email server details, target Gmail server details, authentication credentials, and migration options.
- Before migrating all data, perform a test migration to ensure that the process works smoothly. Verify that emails, attachments, folders, and supported message metadata are successfully transferred from Virgin Media to Gmail.
- Inform all users about the upcoming migration. Provide instructions on how to access their new Gmail accounts and any necessary setup steps.
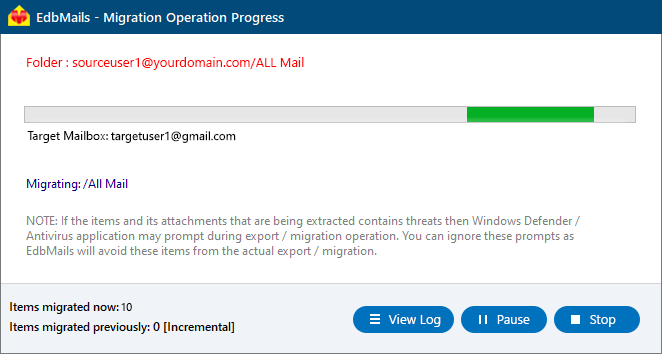
- Once you have completed the necessary preparations and testing, initiate the full migration process. Monitor the progress to ensure that all data is transferred correctly.
- After the migration, carefully review the migrated data in Gmail to ensure that everything is intact and accurately transferred. Cross-check mailbox folders, message counts, attachments, and selected messages to confirm completeness.
- Once you have verified the successful migration and ensure data integrity, you can proceed to decommission your Virginmedia email accounts.
Virgin Media email to Gmail: Pre-migration Activities
- Ensure that IMAP settings are enabled on both the source (Virginmedia) and target (Gmail) servers to facilitate migration.
- Keep a record of the email addresses and passwords for all users you plan to migrate from the Virginmedia server.
- Confirm that the required target Gmail accounts exist for all users. Where Gmail requires app-password authentication for the migration connection, create the required app password for each account.
Click here for steps to create an app password for a Gmail account.
Steps to Migrate emails from Virgin Media to Gmail
Step 1: Download and install EdbMails IMAP migration software
- Download and install EdbMails on your computer.
See EdbMails system requirements for Virgin Media to Gmail migration
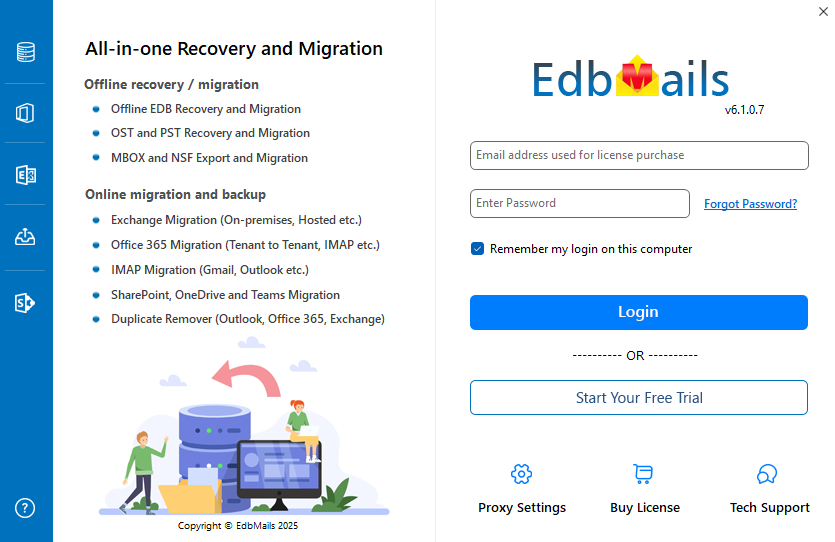
- Launch the EdbMails application on your computer.
- Enter your registered email ID and password, then click ‘Login’. If you are a first-time user, click ‘Start Your Free Trial’ to proceed with the trial version.Note: The trial version provides full functionality and allows migration of up to 30 items per folder. To migrate all eligible items for licensed mailboxes, purchase the required IMAP Migration license from the official EdbMails website.Once the purchase is complete, restart the application and sign in again using the same credentials used during the purchase to activate your license properly.
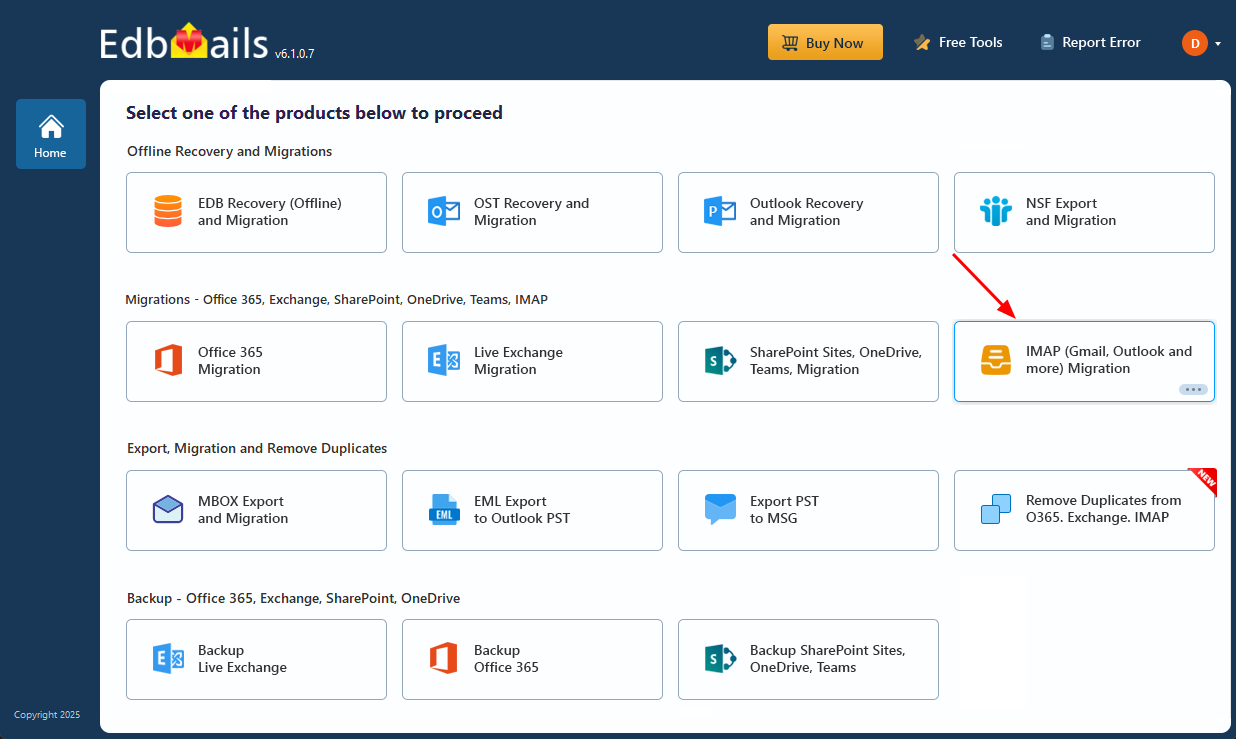
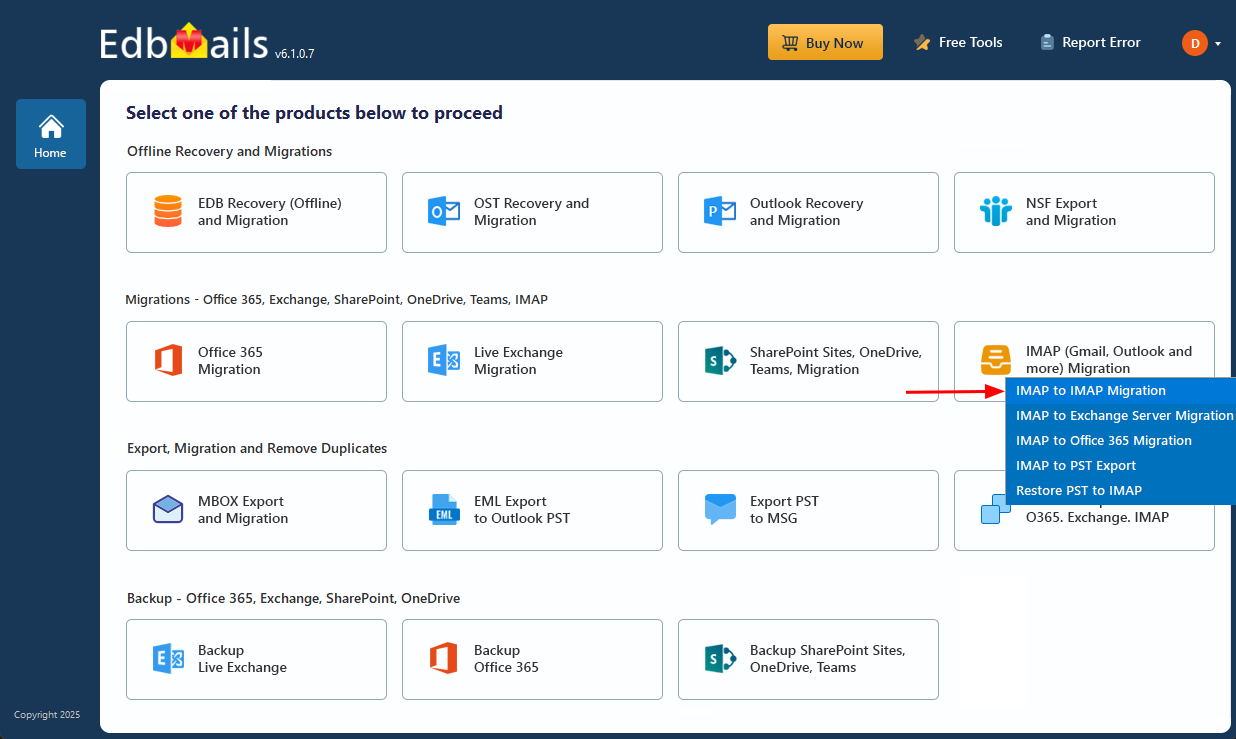
- Select the ‘IMAP (Gmail, Outlook & more) Migration’
- Select ‘IMAP to IMAP Migration’.
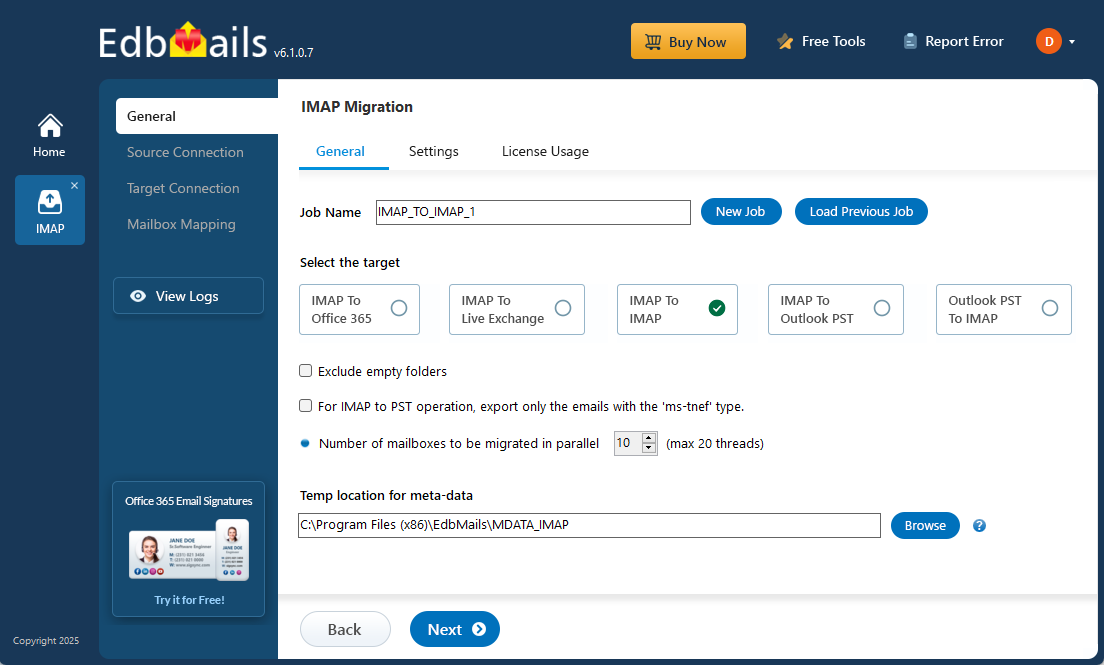
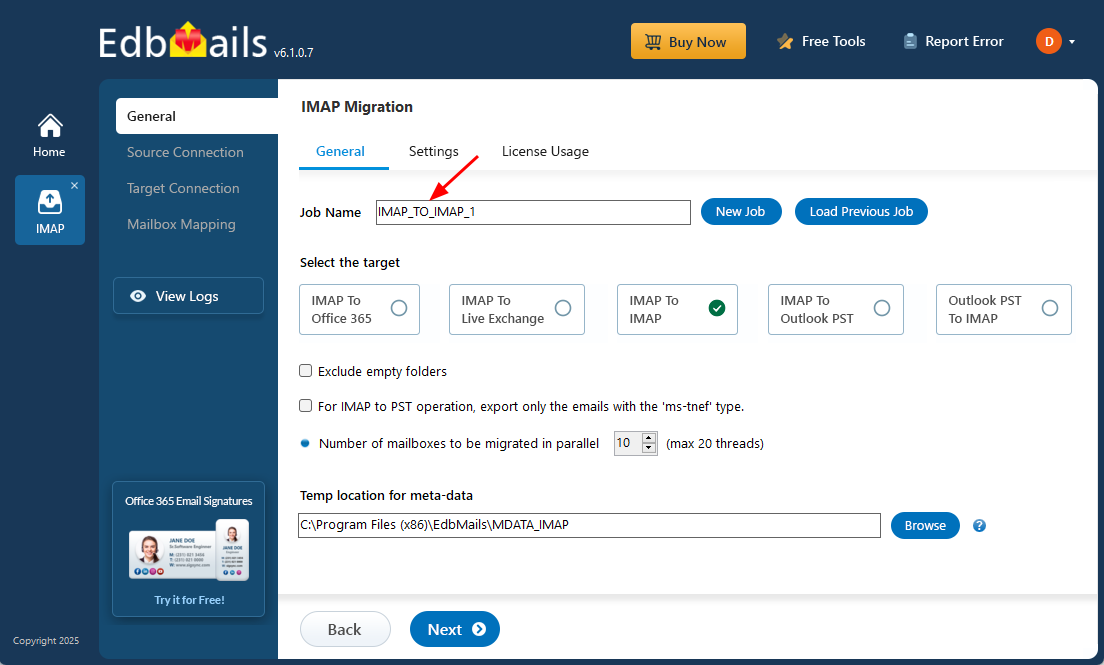
- You can proceed with the default job name or select ‘New Job’ to assign a custom name, making it easier to identify and manage the migration task before continuing.
- Download and install EdbMails on your computer.
Step 2: Connect to the source Virgin Media email server
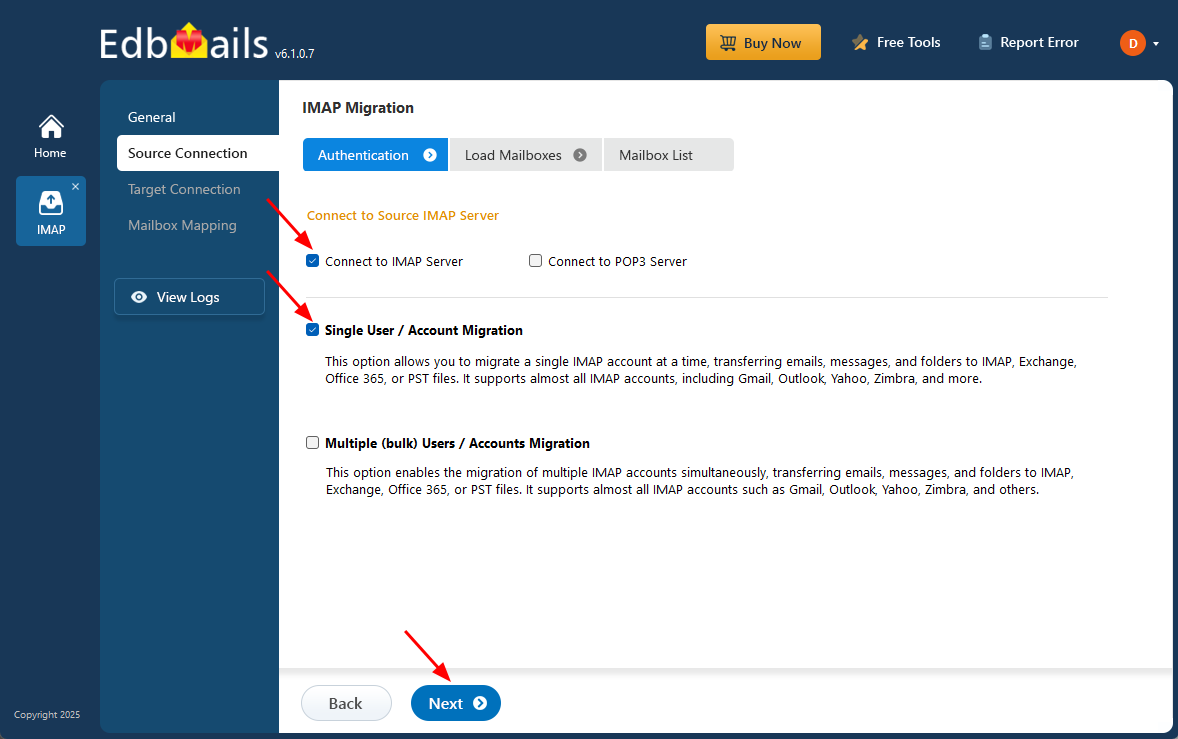
- To connect a single Virgin Media Server for migration, click ‘Single User / Account Migration’, choose the suitable connection option such as ‘Connect to IMAP Server’ or ‘Connect to POP3 Server’.
- Click ‘Next’ to proceed.
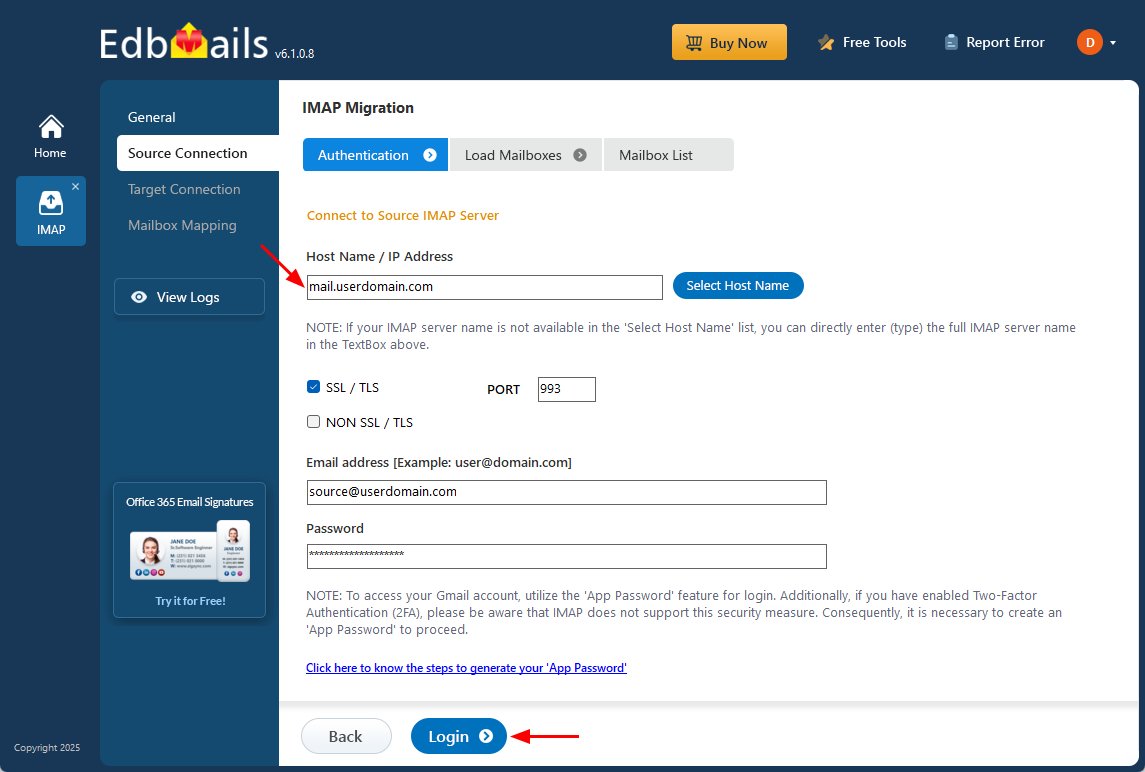
- For Virgin Media Mail, use imap.virginmedia.com with port 993 and SSL enabled.
- Enter the full Virgin Media email address and the separate Virgin Media Mail app password generated in the account settings.
- Click the ‘Login’ button to proceed.
- For migrating multiple Virgin Media user mailboxes at once, choose ‘Multiple (Bulk) Users/Accounts Migration’, then select the appropriate connection option such as ‘Connect to IMAP Server’ or ‘Connect to POP3 Server’.
- Click ‘Next’ to continue.
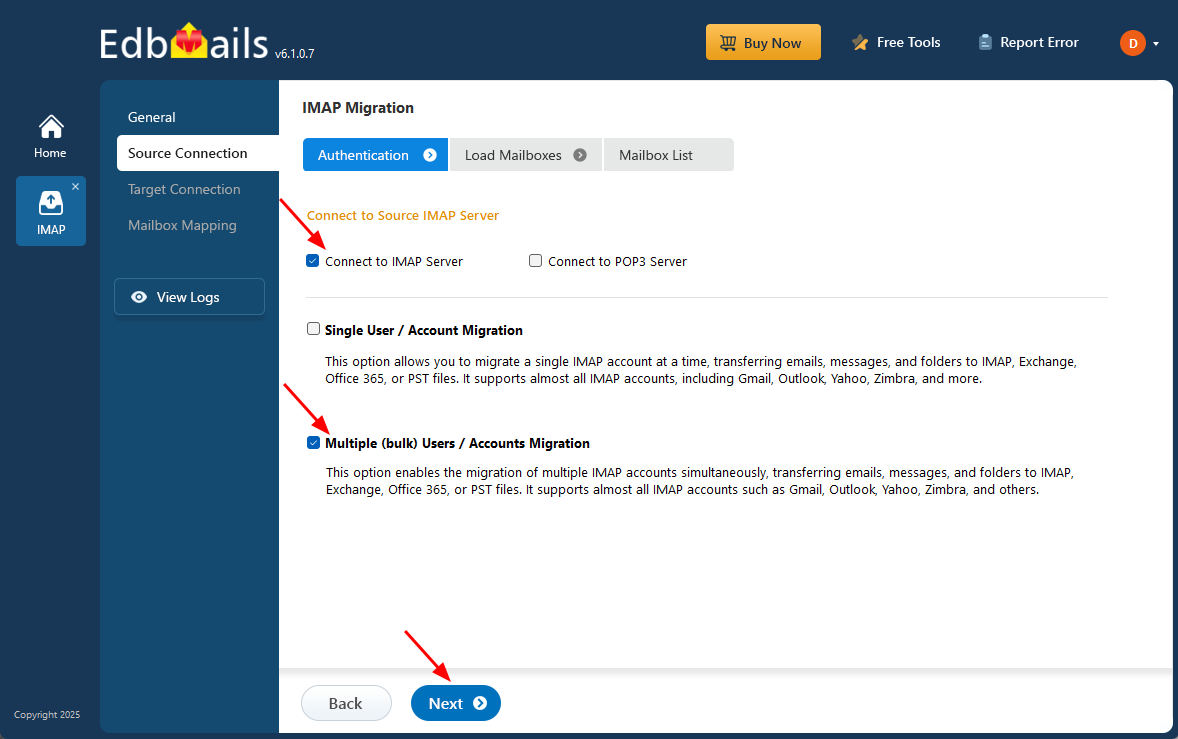
- Click ‘IMAP Migration CSV File’. It will load the sample CSV file to your local drive.
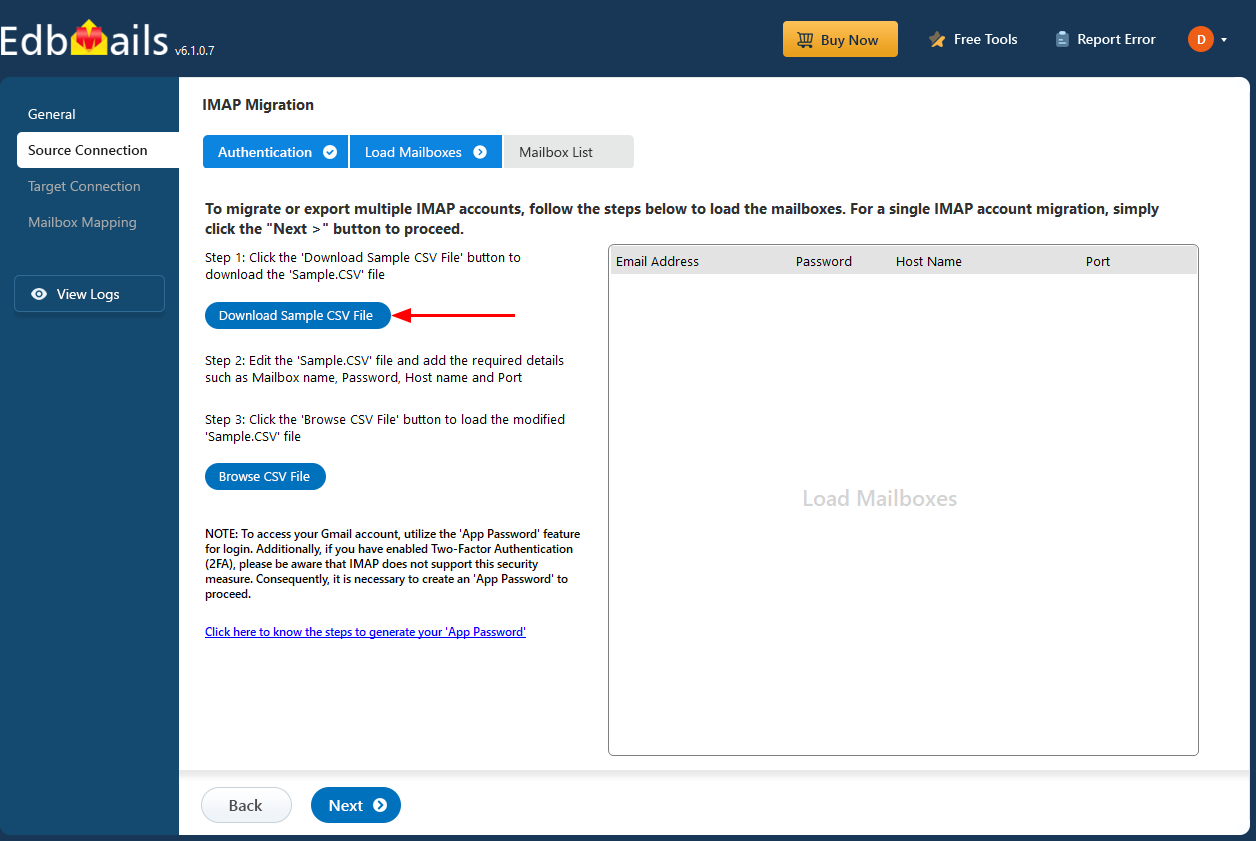
- Open the CSV file and fill in the necessary details, including the email address, password, IMAP server hostname, and port number for each mailbox. After completing the entries, save and close the updated CSV file.
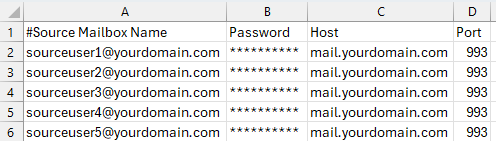
- Once you’ve added all the required information to the CSV file, save the changes and close the file to proceed with the next steps in the migration process.
- Then, click the 'Load Modified CSV File' button, open the updated CSV file and click ‘Next’ to proceed.
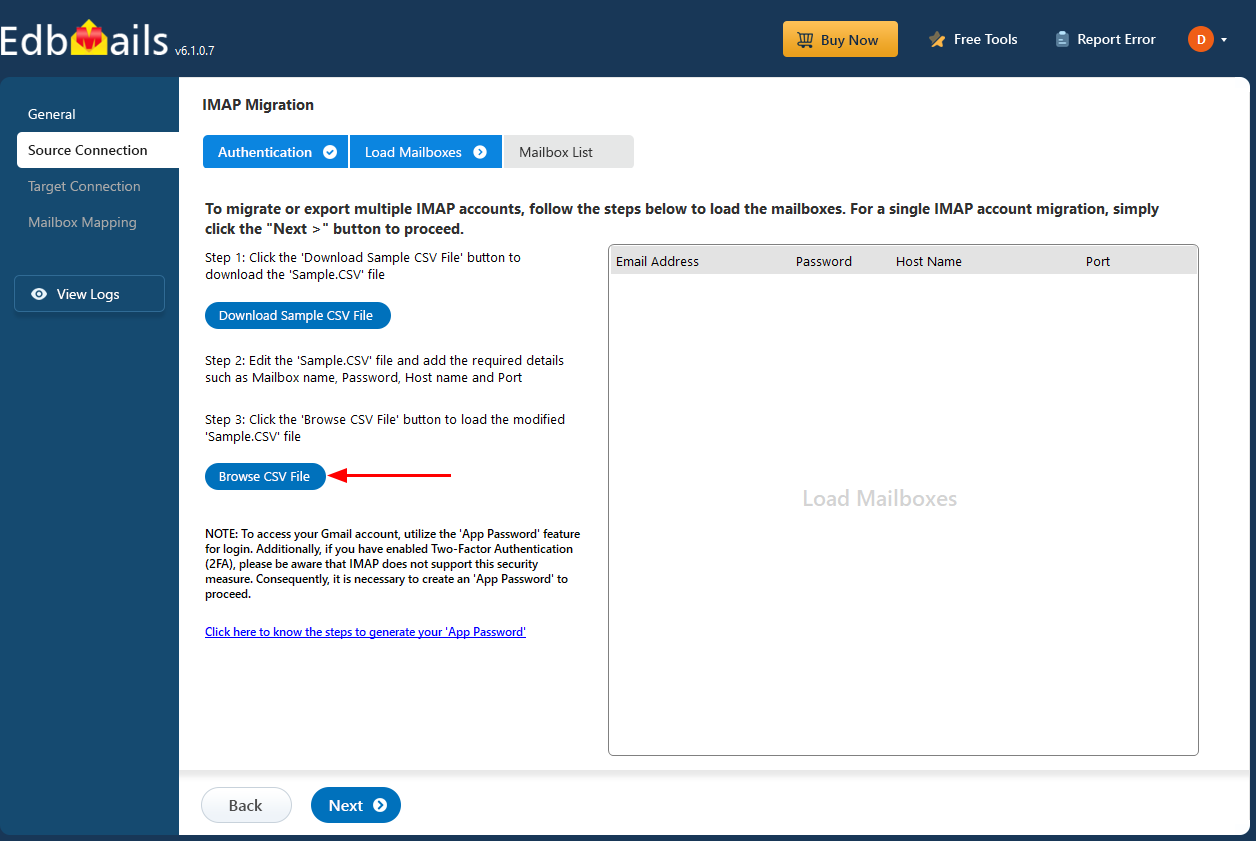
- Choose the specific mailboxes or individual folders you wish to migrate. Once your selection is complete, click ‘Next’ to continue.
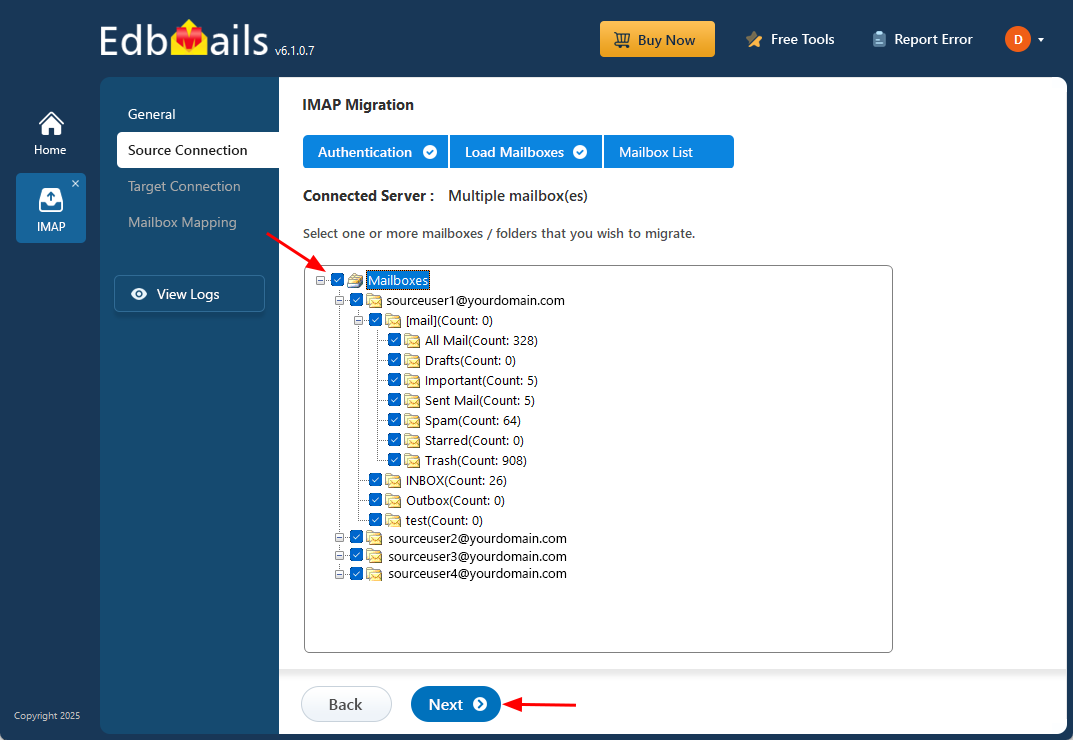
Step 3: Connect to the target Gmail server
- To connect a single user account, select ‘Single User / Account Migration’ Then, choose the required protocol, such as ‘Connect to IMAP Server’ or ‘Connect to POP3 Server’, and click ‘Next’ to proceed.
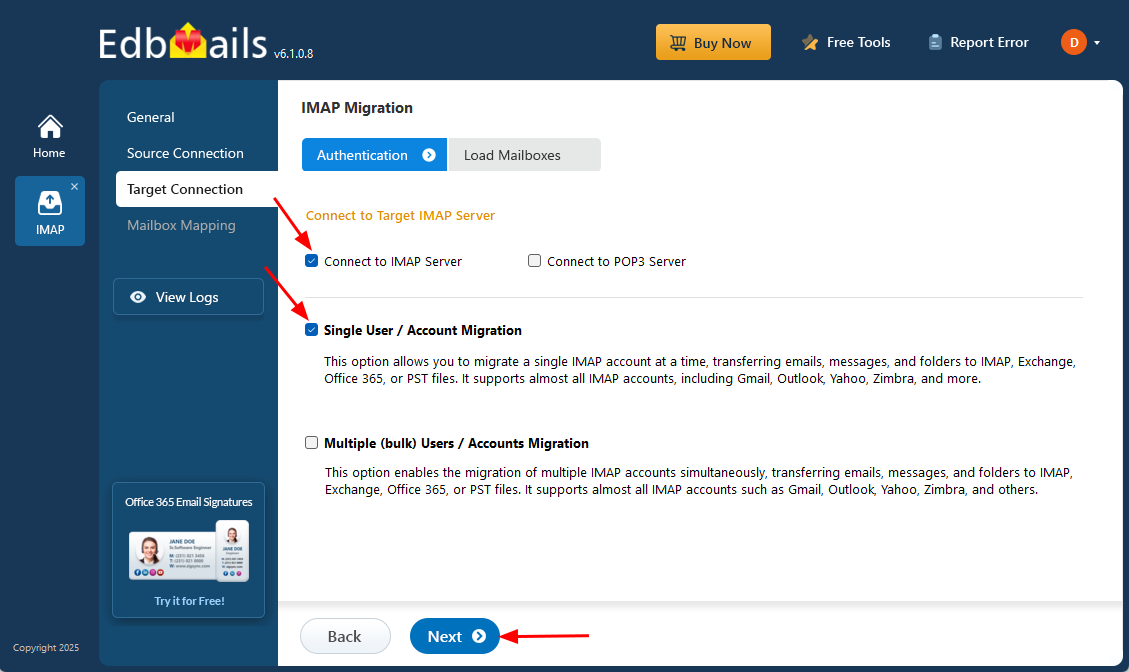
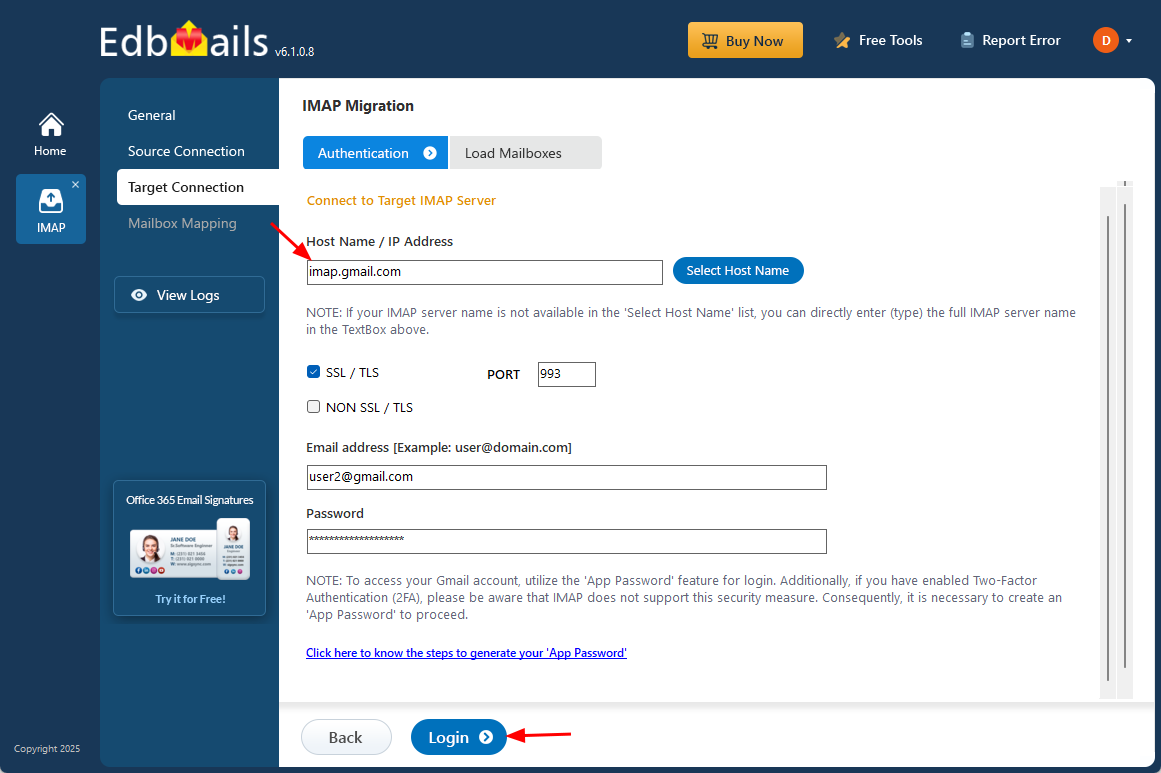
- For the Gmail target, use imap.gmail.com and the authentication method supported by the selected EdbMails connection. Google recommends Sign in with Google where supported; an app password is available only for eligible accounts with 2-Step Verification and should be used only when required.
- Click the ‘Login’ button to establish the connection.
- For migrating multiple mailboxes, select ‘Multiple (Bulk) Users/Accounts Migration and click ‘Next’.
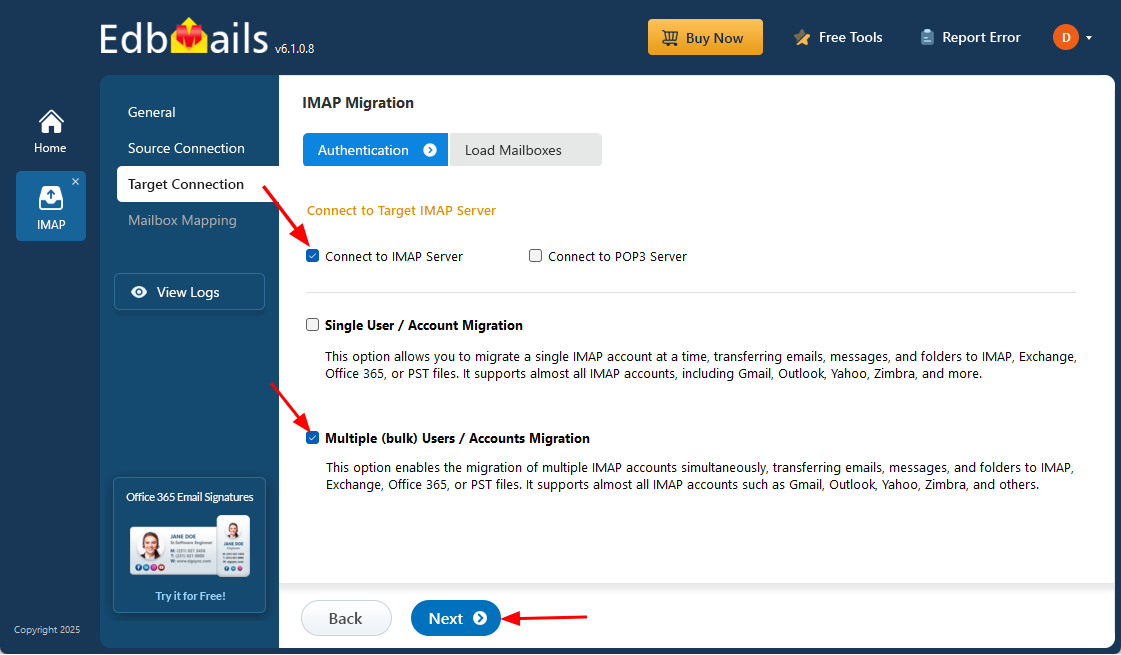
- Click ‘IMAP Migration CSV File’. It will load the sample CSV file to your local drive.
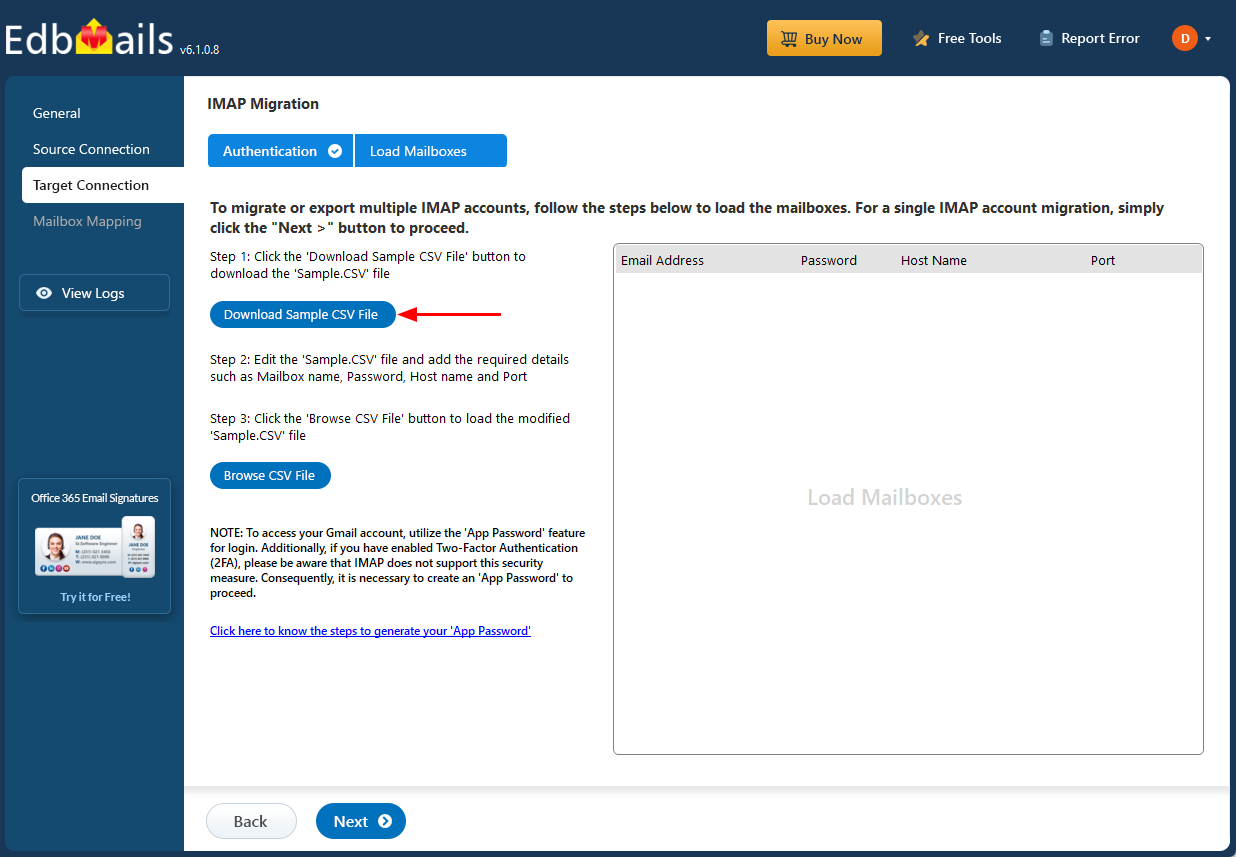
- Open the CSV file and fill in the necessary details, including the email address, password, IMAP server hostname, and port number for each mailbox. After completing the entries, save and close the updated CSV file.
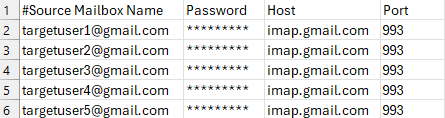
- After updating the CSV file, save it and close it.
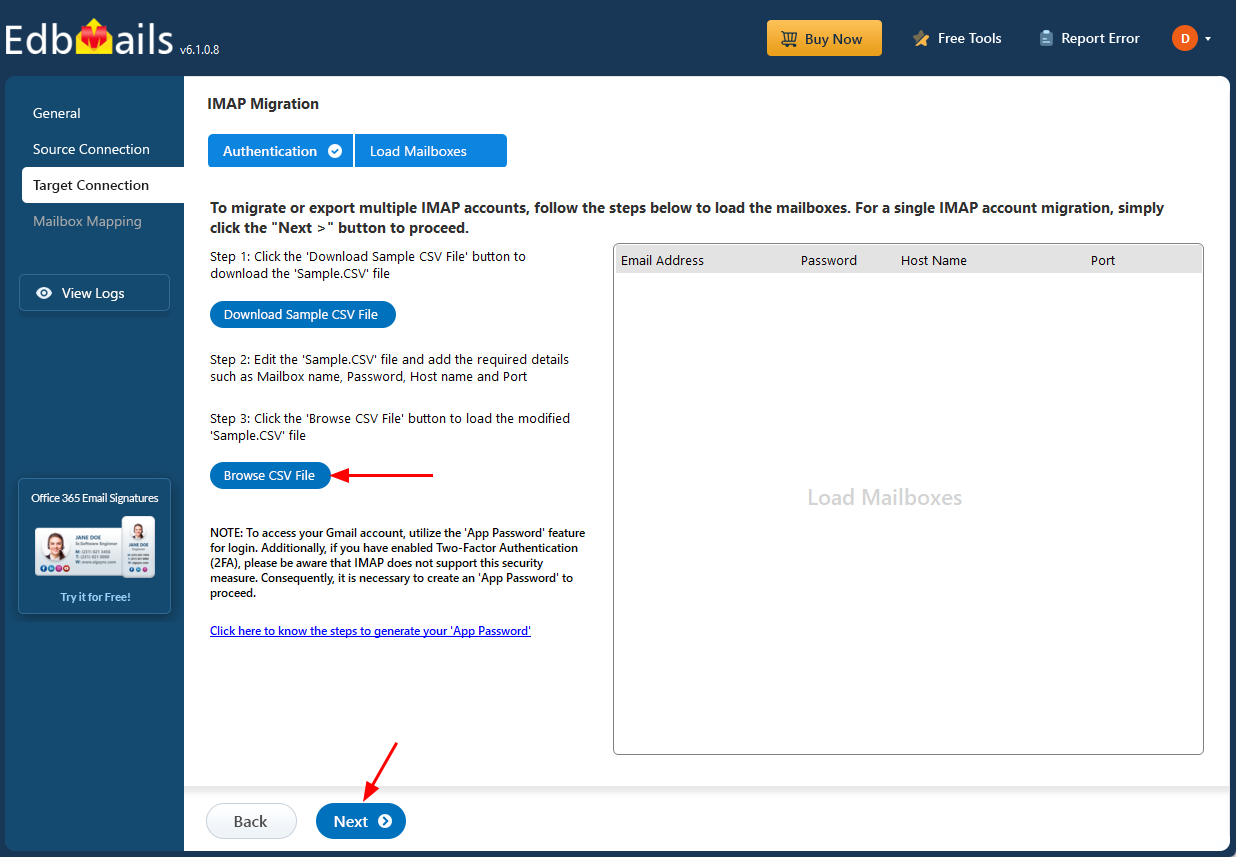
- Then, click the 'Load Modified CSV File' button, open the updated CSV file and click ‘Next’ to proceed.
- To connect a single user account, select ‘Single User / Account Migration’ Then, choose the required protocol, such as ‘Connect to IMAP Server’ or ‘Connect to POP3 Server’, and click ‘Next’ to proceed.
Step 4: Virgin Media email to Gmail mailboxes mapping
- Select the appropriate mailbox mapping option to match source mailboxes with their Gmail counterparts. You can choose automatic or manual mapping based on your needs.
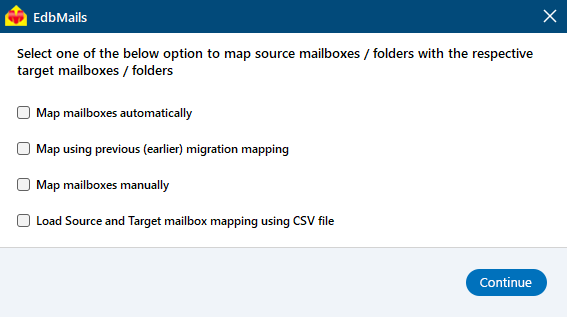
- EdbMails can automatically map source and target mailboxes where identifiers align. Review and adjust the mapping manually where required.
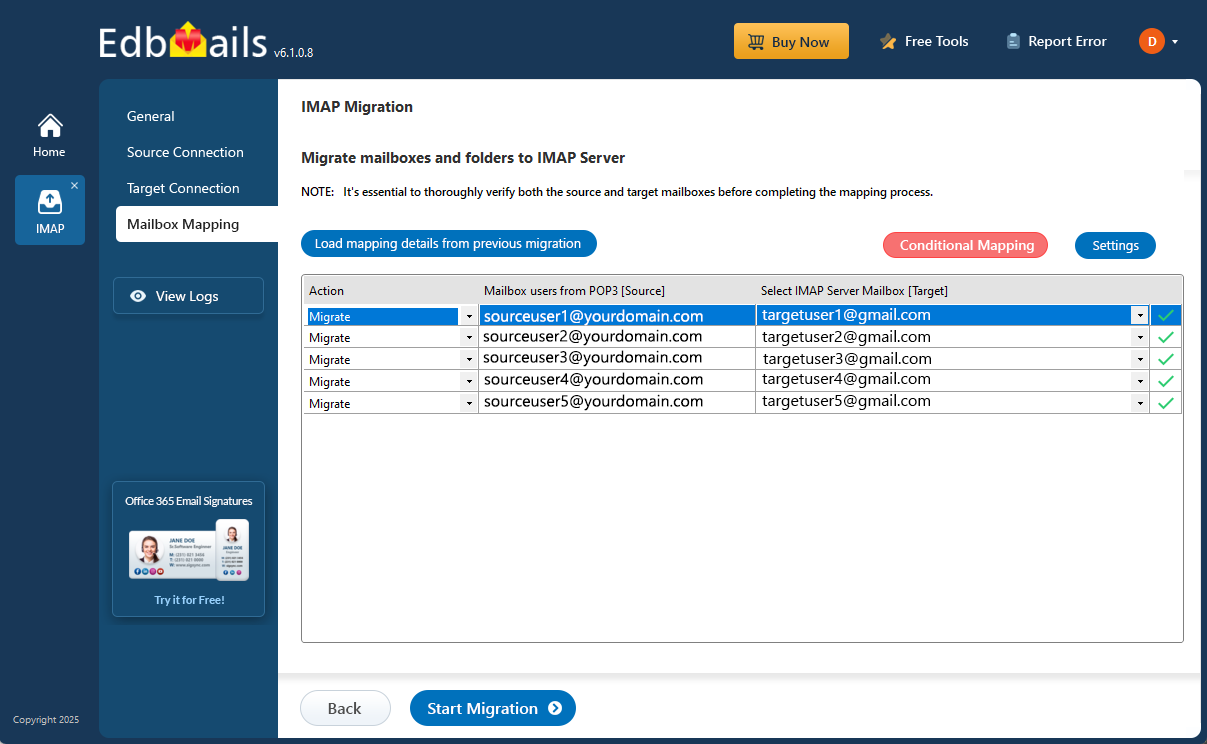
- Select the appropriate mailbox mapping option to match source mailboxes with their Gmail counterparts. You can choose automatic or manual mapping based on your needs.
Step 5: Start Virgin Media email to Gmail migration
- Verify the mailbox mapping.
- Click the ‘Settings’ button to apply the filters. For example, you can set a date filter to migrate only the data within a certain date range.
- Click the ‘Start Migration’ button and initiate the migration process.
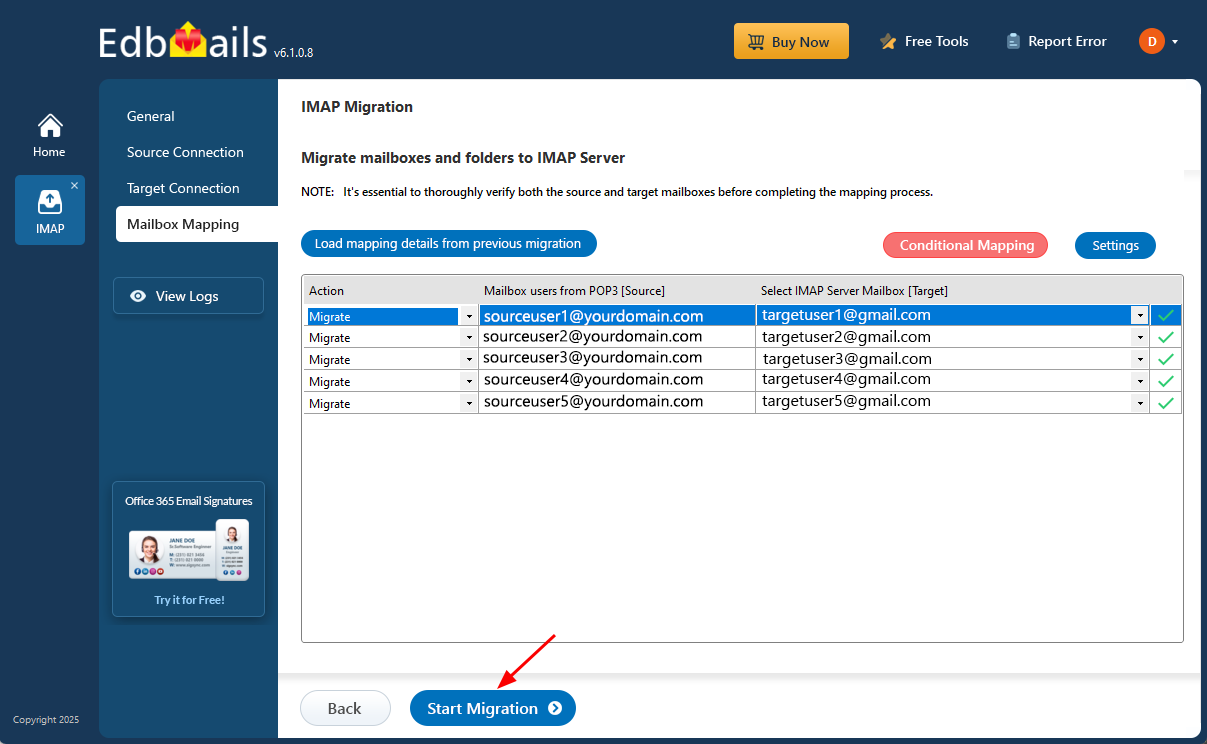
- To view the migration report, click the ‘View Logs’ button. It provides a comprehensive summary showing the number of emails, folders, and mailbox items migrated, along with their respective counts.
Virgin Media email to Gmail Post-migration Tasks
- Step 1: Updating MX Records
In order to redirect incoming email traffic to Gmail instead of Virginmedia, you will need to make adjustments to the MX records in your DNS provider's portal. This crucial step ensures that emails are correctly routed to your Gmail account, ensuring smooth communication.
- Step 2: Verify Gmail / Google Workspace mail flow
After making any required custom-domain DNS changes, verify that new messages are being delivered to Gmail and confirm that users can sign in and access their migrated mailboxes. Personal Gmail migrations that do not use a custom domain do not require MX record changes.
- Step 3: Setting up Virginmedia Mail Forwarding
To avoid any email loss during the migration process, it is vital to set up mail forwarding in your Virginmedia account. This ensures that any incoming messages are forwarded to your Gmail account until the transition is fully completed. By enabling mail forwarding, you can remain connected and receive all your emails without interruption throughout the migration period.
- Step 1: Updating MX Records
Troubleshooting Guide for Virgin Media email to Gmail Migration
For troubleshooting, check out our knowledge base articles. If you have additional questions, browse the FAQs or contact our dedicated support team for personalized assistance.
Benefits of EdbMails for Virginmedia email to Gmail Migration
- Transfer supported attachments and message properties:
EdbMails migrates supported attachments and common message properties exposed through Virgin Media IMAP and accepted by Gmail. Verify representative messages and attachments after migration.
- Preview migration scope:
Review the source mailbox and selected folders before starting the migration so the intended email-data scope can be checked in advance.
- Windows-based Software:
EdbMails runs on supported Windows environments. Review the current IMAP migration system requirements before deployment instead of relying on an older Windows-version list.
- Preserve supported email properties:
EdbMails is designed to preserve supported message content, attachments, folder structure, and common email properties where the source exposes them and Gmail accepts them. Provider-specific limits can affect individual items, so verify the target after migration.
- Detailed Migration Reports:
EdbMails generates detailed migration reports throughout the transfer process. These reports provide insights into the success or failure of each email and attachment, helping users track the migration and resolve any issues that may arise during the Virgin Media to Gmail migration.
FAQs - Virginmedia email to Gmail Migration
- How long does Virginmedia email to Gmail migration take?
The duration depends on mailbox size, internet speed, migration time, number of accounts, and network speed.
- Will all attachments and folders be preserved?
EdbMails is designed to preserve supported emails, attachments, and folder structure where Virgin Media exposes them through IMAP and Gmail accepts the corresponding data. Verify representative folders and messages after migration.
- Is there any downtime during migration?
EdbMails transfers the mailbox data while the source account remains accessible, allowing users to continue using Virgin Media email during the migration. For custom-domain cutover, plan the final DNS change carefully to minimize mail-flow disruption.