IMAP to Exchange Migration
Migrating from IMAP to Exchange Server is a strategic upgrade for organizations aiming to enhance email management, strengthen security, and improve collaboration within their environment. Although IMAP provides basic email access, it does not support key enterprise capabilities like shared mailboxes, centralized administration, integrated calendars, contact synchronization, data loss prevention (DLP), and multi-layered security controls. Microsoft Exchange delivers these advanced features along with complete Active Directory integration, making it a scalable solution for businesses that demand compliance, reliability, and advanced communication features.

Transferring from IMAP to Exchange can involve several challenges, including retaining the original folder hierarchy, preserving message metadata, mapping mailboxes, reducing downtime, and handling large mailbox transfers efficiently. Because of these factors, it is important to rely on a trusted migration solution that maintains data integrity, security, and uninterrupted business operations.
EdbMails IMAP migration software streamlines the migration process through a script-free, fully automated, and easy-to-use interface. It supports migration to all Exchange Server versions from 2007 to 2019 and handles user mailboxes, shared mailboxes, archive mailboxes, and public folders. With incremental migration, advanced filtering options, parallel mailbox processing, and a guided step-by-step wizard, it ensures complete data integrity, consistent results, and minimal operational impact.
Whether migrating a few mailboxes or performing a large-scale migration, EdbMails IMAP to Exchange migration tool provides a secure, efficient, and reliable solution that helps businesses achieve seamless collaboration, enhanced productivity, and business continuity.
IMAP to Exchange Migration Plan
Planning is one of the most important steps before you begin migrating your IMAP data to Exchange. Prepare the target environment to avoid potential risks and data loss. Here is a brief checklist of points to consider before you migrate.
- Remove unused mailboxes, mail items and duplicate files from the source.
- Make an inventory of items before you make the move. These should include but are not limited to the following items.
- User accounts, email addresses and login credentials.
- The source and target details, browser and operating systems used.
- Network settings, DNS configurations, MX records, firewall settings.
- Outlook settings and version you are using in your organization.
- Licensing plans on your current source server.
- Active Directory configuration and other dependencies associated with it.
- List of data and permissions from the source server that you want to transfer.
- Determine the size of the data and number of mailboxes you want to migrate.
- Decide if you want to migrate everything at once (cutover migration) or plan to migrate your data in stages (staged migration).
- Decide if you plan to migrate your source mailboxes to Public folders, In-Place Archive or Shared mailboxes.
- Create user mailboxes on the target Exchange server and assign licenses to them.
- Ensure you have enough network capacity and bandwidth to migrate.
- Consider the throttling and message size limits for the migration.
- Communicate the migration plan and changes to your end users and stakeholders.
- Run a test migration from the source to the target environment before starting the full migration
- Start the actual migration, verify the endpoints and update the MX records.
- Check for correct mail flow and configure Outlook for all the users.
- Decommission unused apps and their settings post migration.
IMAP to Exchange Migration Prerequisites
On source IMAP server:
- Make sure you have the IMAP server hostname, port number, email address, and password ready.
See how to find IMAP server Host name
- To migrate multiple users, download the sample CSV file from the EdbMails application and update it with the IMAP server hostname, port number, email address, and password for each user's mailbox you wish to migrate.
- If you're migrating from Gmail, create an app password and use it in place of your regular password.
On target Exchange server:
- Step 1: Check that your system meets the Exchange server setup requirements.
Note: Exchange 2010 and 2013 reached the end of support . Therefore it is highly recommended that you migrate your mailbox data to Exchange 2016 or 2019.
If you are planning to migrate IMAP to a Hosted Exchange server, skip to ‘Create mailboxes and Public folders on the Exchange server’ in the following section.
The following links help you to set up your target Exchange server. Learn more about the network, hardware, coexistence scenarios, and operating system requirements for installing Exchange.
- Step 2: Prepare your system with the following prerequisites for Exchange
Complete the following prerequisites for Active Directory, Windows Mailbox server, and Windows Edge Transport servers before installing the target Exchange server.
Set up the target Exchange server for migration
Given below is a list of key points for installing and preparing the Exchange server for migration.
- Step 1: Prepare AD and domains
- Before installing the Exchange server you need to prepare your Active Directory forest and its domains for the new version of Exchange.
- If you have a separate team to manage the Active Directory schema, you need to first extend the active directory schema, else proceed to the next step to prepare the Active Directory.
- If you have multiple domains you need to additionally prepare the Active Directory domains.
- Step 2: Install Exchange server on your computer
Ensure that you meet the server system requirements and prerequisites as outlined previously. Next, follow the link to install Exchange 2016 or install Exchange 2019 from the setup wizard based on which server you want to migrate to.
- Step 3: Prepare a clean Exchange target environment
- Create and configure a Send connector to send mail outside the Exchange organization.
- By default, Exchange automatically creates receive connectors for inbound mail flow when the mailbox server is installed. If you must configure receive connectors manually, follow the steps in the link.
- Add accepted domains to allow recipients to send and receive email from another domain.
- Configure the default email address policy to add the accepted domain to every recipient in the organization.
- Configure external URLs (domains) on the virtual directories in the Client Access (frontend) services on the Mailbox server to allow clients to connect to your server from the internet (outside the organization’s network).
- Configure internal URLs on the virtual directories in the Client Access (frontend) services on the Mailbox server to allow clients to connect to your server from the internal network.
- Configure SSL certificates from a third-party certificate authority for services such as Outlook Anywhere and Exchange ActiveSync.
- Verify the Exchange server installation by running the command Get-ExchangeServer on the Exchange Management Shell (EMS).
- Step 4: Create mailboxes on target Exchange server
- Before migrating your mail data, ensure that mailboxes are created on the target server. You can use EdbMails to automatically create mailboxes on the target Exchange server. Alternatively, if you prefer to create mailboxes manually, refer to the link below:
- If you want to migrate to public folders, ensure that mail-enabled public folders are created and that the necessary permissions are assigned to the admin user.
Steps to create Public folder in Exchange server and assign permissions to the admin user.
- Step 5: Assign management roles to the admin account
- If you are using a global admin account to connect to the Exchange server, ensure to set impersonation rights to the global admin user.
- Step 6: Configure the throttling and message-size limits
Create custom throttling policies for EWS and configure message size limits manually on the Exchange server by following the steps in the link.
- Make sure you have the IMAP server hostname, port number, email address, and password ready.
Step-by-Step Guide for IMAP to Exchange Migration
Step 1: Download and install EdbMails IMAP migration tool
- To get started, Download and install EdbMails on your computer.
See EdbMails system requirements for IMAP to Exchange migration

- Open the EdbMails application on your system.
- Enter your registered email address and password, then select ‘Login’. If you have not created an account yet, click ‘Start Your Free Trial’ to continue with the trial version.Note: The Free Trial gives you access to all essential features and allows exporting up to 30 items per folder. To remove this limit and export unlimited items, purchase a valid license from the EdbMails website.
Click here to purchase the license from the EdbMails website.
After completing the purchase, restart the application and log in again using the same email address and password used during the purchase to activate your license.

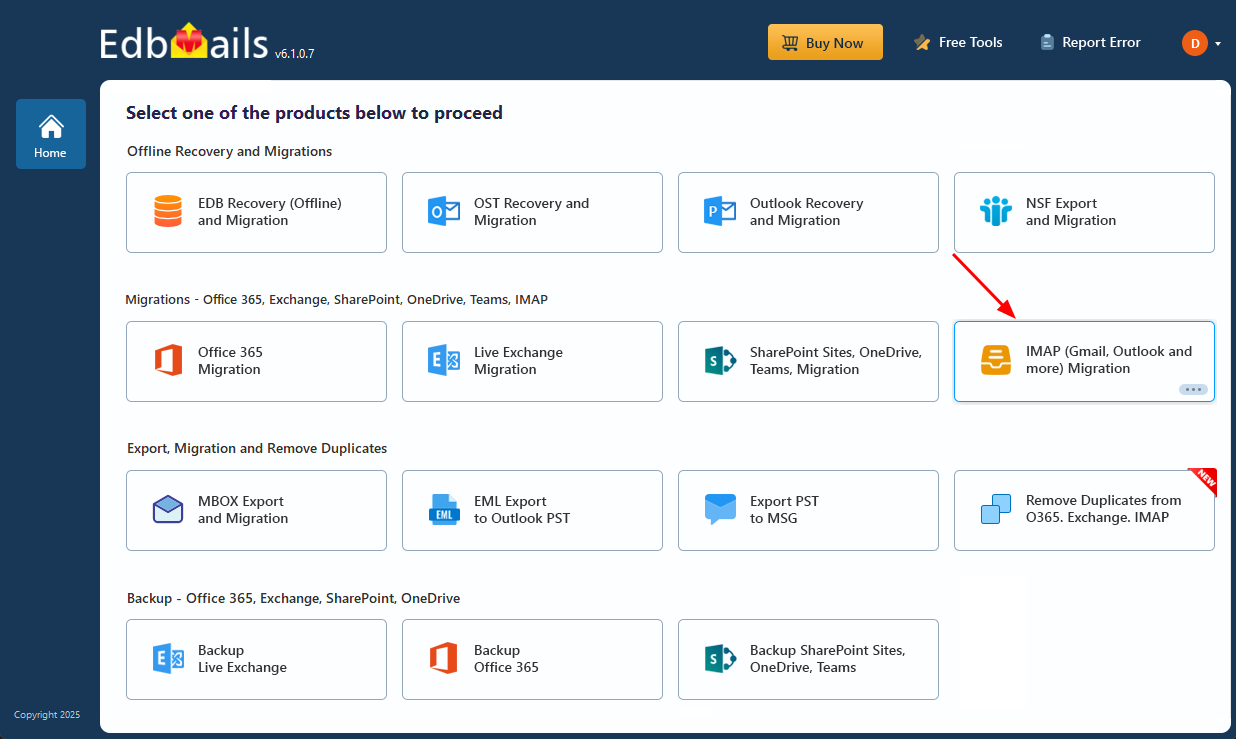
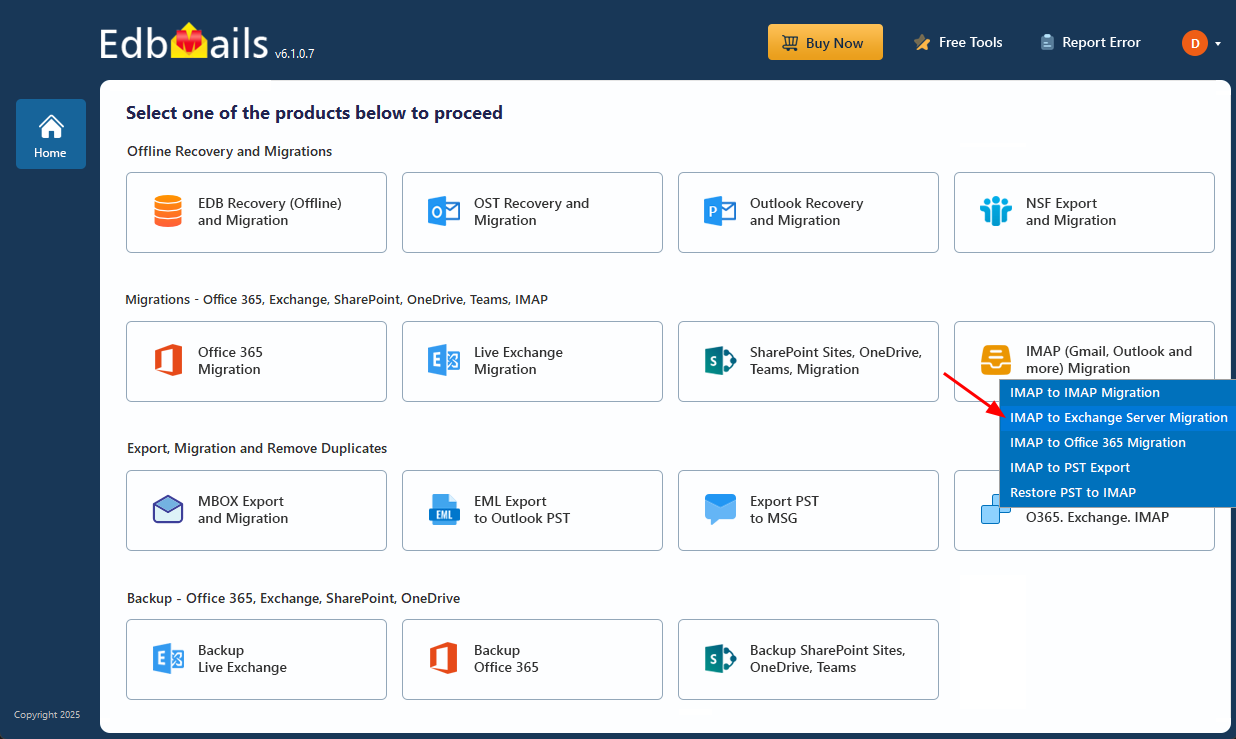
- Select the option ‘IMAP (Gmail, Outlook & more) Migration’
- Select ‘IMAP to Exchange Server Migration’.
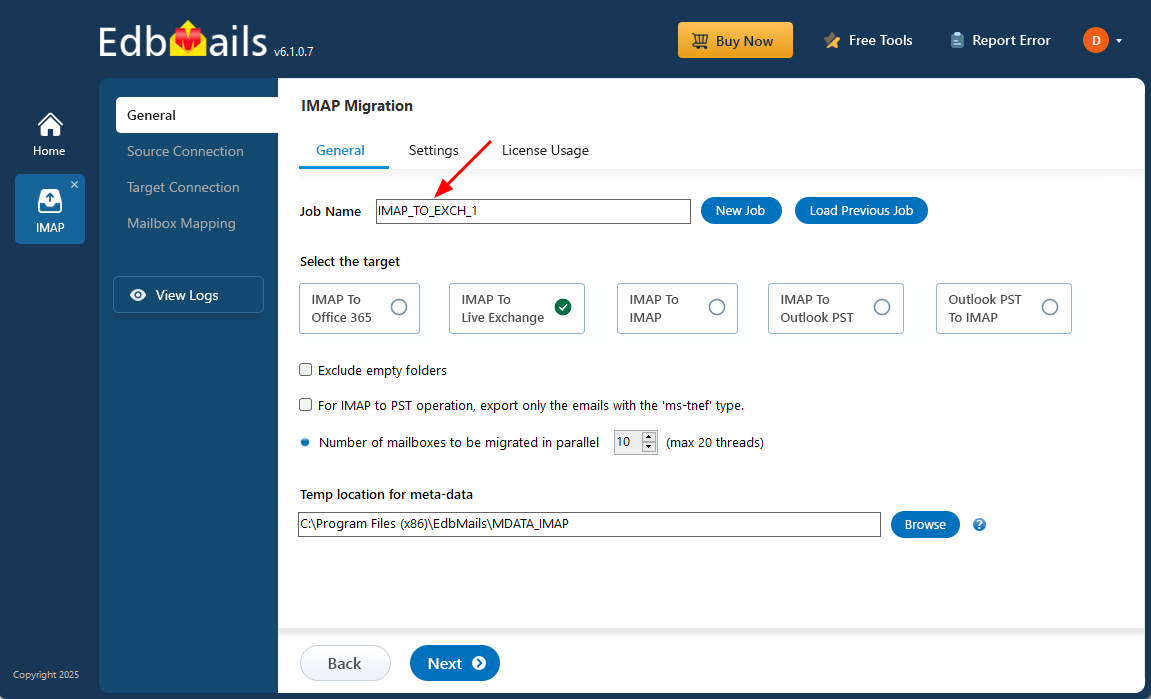
- You may continue with the default job name already assigned or select ‘New Job’ to rename it based on your preference before moving ahead with the process.
- To get started, Download and install EdbMails on your computer.
Step 2: Connect to the Source IMAP Server
- For migrating an individual account, choose ‘Single User / Account Migration’, select the appropriate option such as ‘Connect to IMAP Server’ or ‘Connect to POP3 Server’, and then click ‘Next’ to move further.
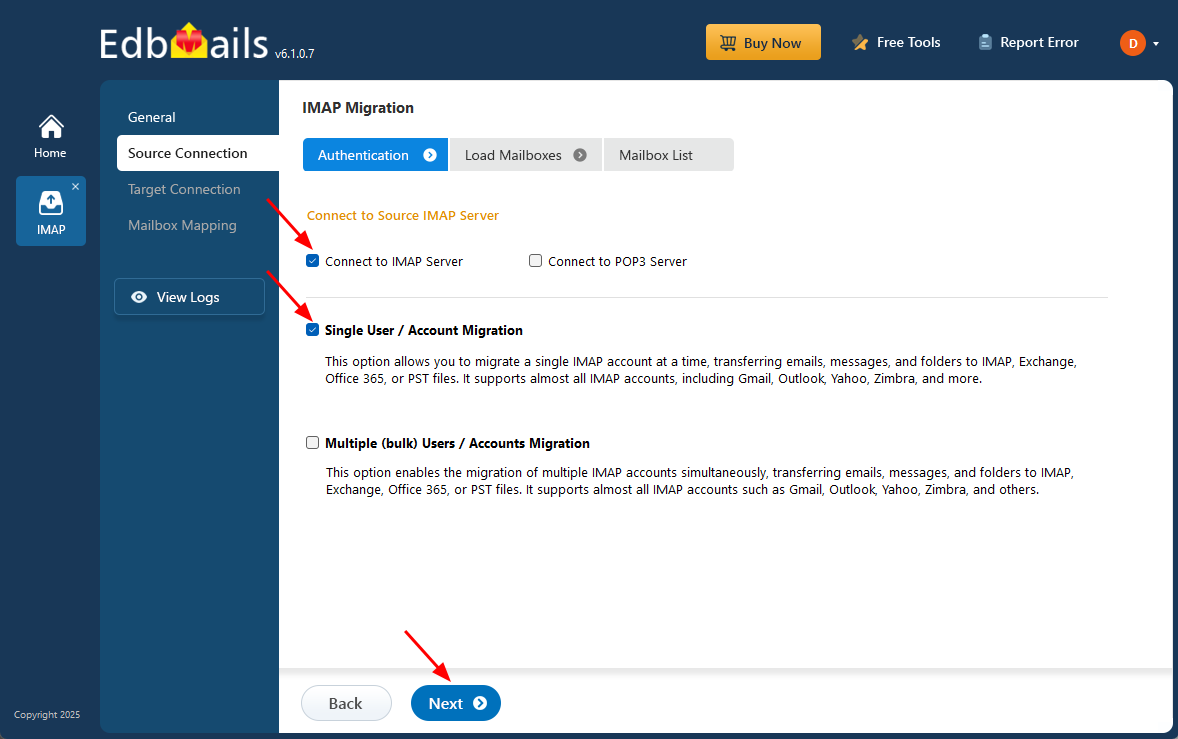
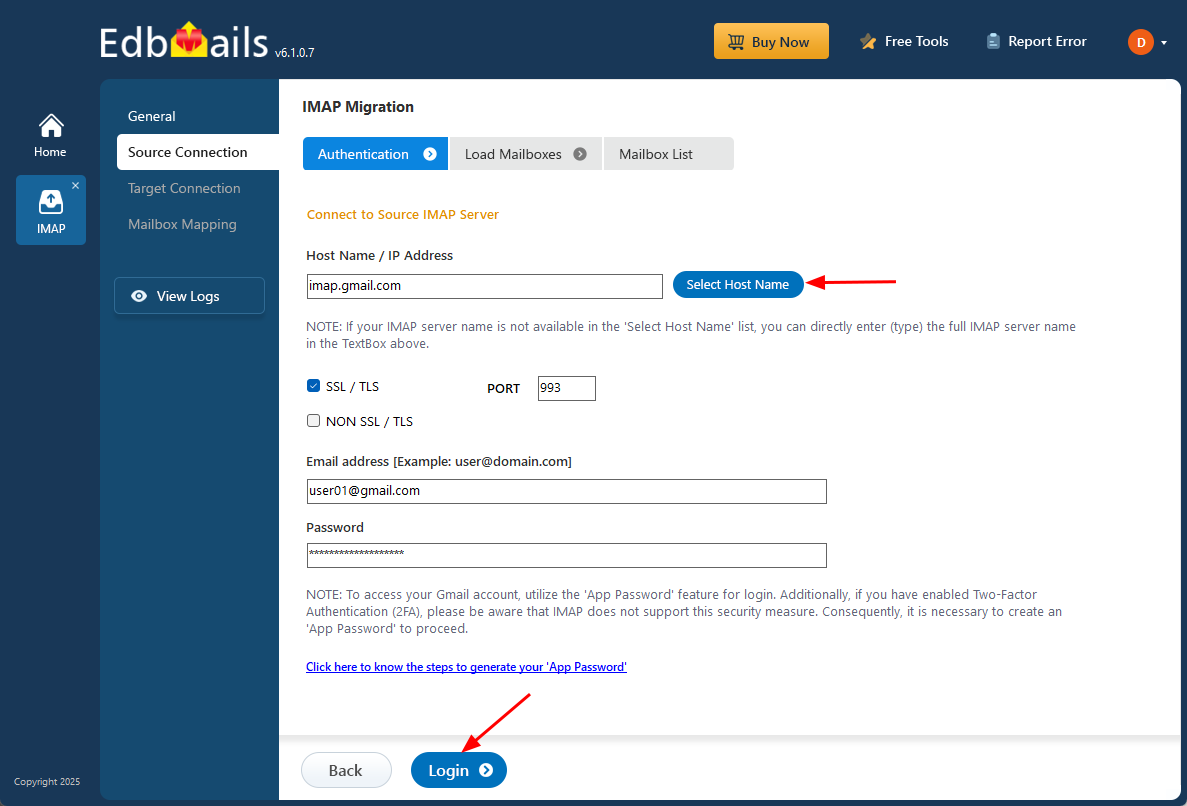
- For a single user login, select the correct IMAP host name from the available list or manually enter the complete IMAP server name. Then provide your email address and password to proceed. If you are connecting a Gmail account, generate an app password and use it in place of your regular account password.
- Then, click the ‘Login’ button.
- For migrating multiple mailboxes, choose ‘Multiple (bulk) Users/Accounts Migration’, then select the appropriate option such as ‘Connect to IMAP Server’ or ‘Connect to POP3 Server’, and then click ‘Next’.

- Click ‘IMAP Migration CSV File’ to download the ‘Sample.CSV’ file.

- Modify the CSV file with the required details such as email address, password, host name and port number in the CSV file and save the changes.
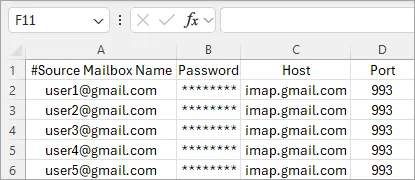
- Close the CSV file, click the ‘Load Modified CSV File’ button, and then choose the updated CSV file to continue.
- Verify the mailboxes, and click 'Next'.
Refer to the EdbMails detailed steps on connecting to single and multiple users during IMAP migration.
- For migrating an individual account, choose ‘Single User / Account Migration’, select the appropriate option such as ‘Connect to IMAP Server’ or ‘Connect to POP3 Server’, and then click ‘Next’ to move further.
Step 3: Select Source Exchange Server Mailboxes
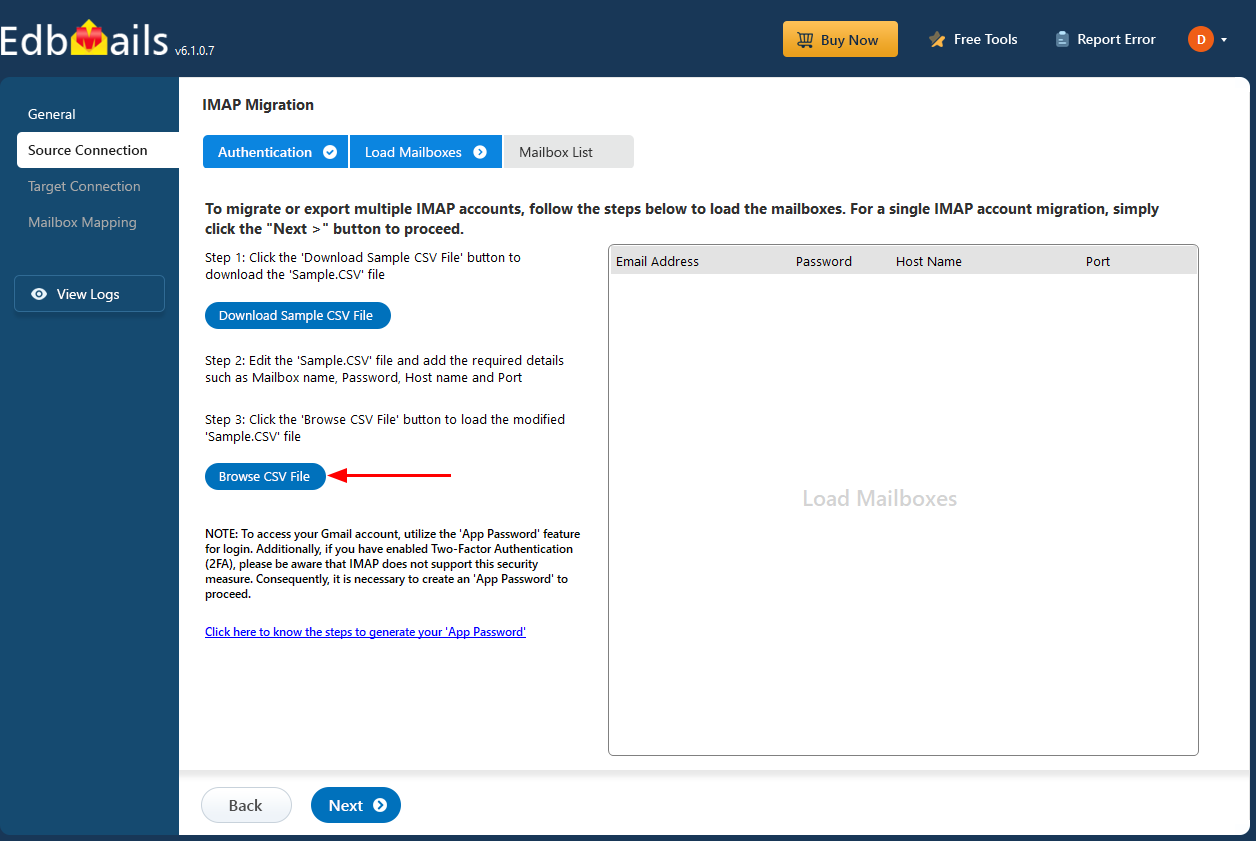
- Select the required mailboxes or specific folders you want to migrate, then click ‘Next’ after completing your selection.
- Select the required mailboxes or specific folders you want to migrate, then click ‘Next’ after completing your selection.
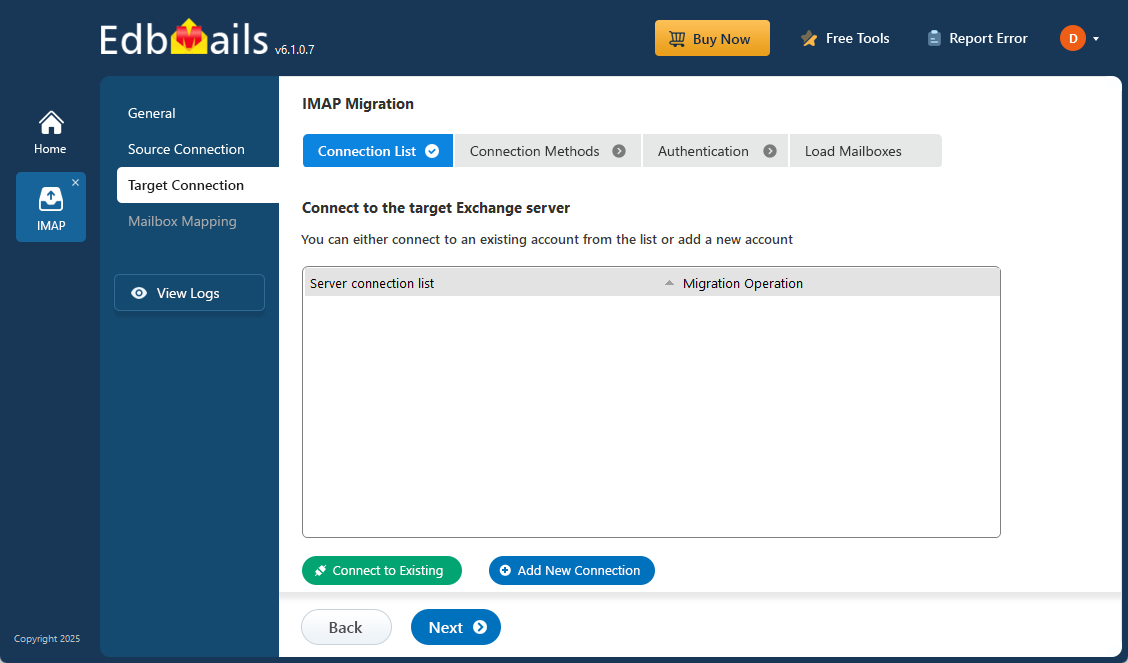
Step 4: Connect to the Target Exchange Server
- Select ‘Add New Connection’ button to create a fresh connection with the target Exchange Server. If you prefer to continue with an earlier setup, choose it from the connection list and click ‘Connect to Existing’ to move forward.
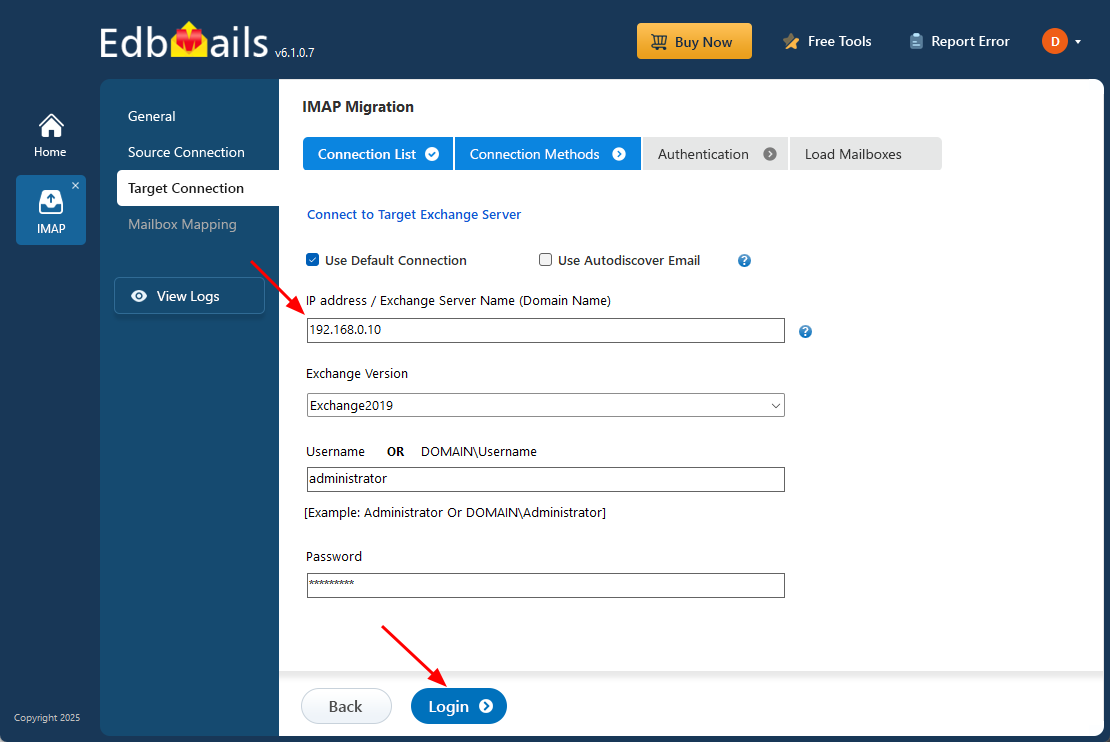
- Select the required connection options and click the ‘Next’ button.

- Enter the target Exchange server details and click the ‘Login’ button
- Choose a preferred method to load the mailboxes. You can opt for ‘Load Mailboxes Automatically’, Load mailboxes using .CSV file or select ‘Load Mailboxes from previous List’, then click ‘Next’ to continue.

- Select ‘Add New Connection’ button to create a fresh connection with the target Exchange Server. If you prefer to continue with an earlier setup, choose it from the connection list and click ‘Connect to Existing’ to move forward.
Step 5: IMAP to Exchange Server Mailbox Mapping
- Select the appropriate mailbox mapping option to map each source mailbox with its corresponding target mailboxes.
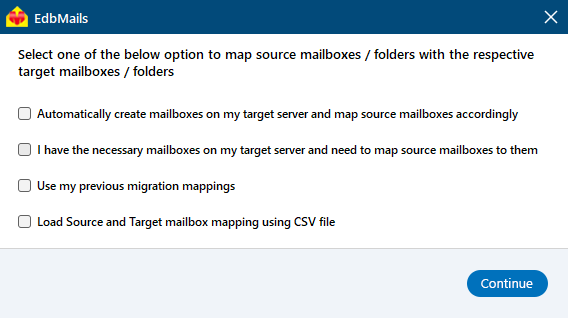
- EdbMails streamlines large-scale migrations by automatically creating mailboxes on the target Exchange Server and maps source IMAP mailboxes and folders, ensuring a smooth and organized transition with minimal manual effort.
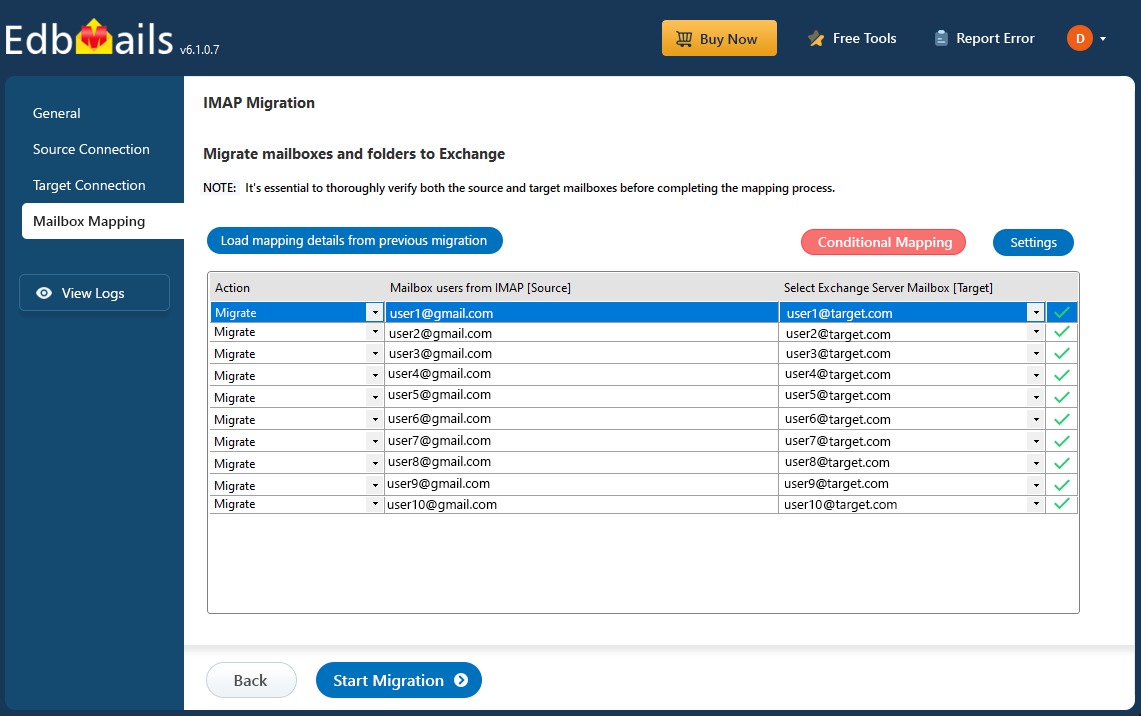
- Select the appropriate mailbox mapping option to map each source mailbox with its corresponding target mailboxes.
Step 6: Start IMAP to Exchange server migration operation
- After mapping the mailboxes, click the ‘Start Migration’ button to initiate the migration process.

- Select the ‘View Log’ option to open the IMAP Export migration report , where you can review the mailbox migration status, check any errors or warnings, and see a detailed summary of the migrated data, including the total items exported, allowing you to easily monitor and assess the entire process.
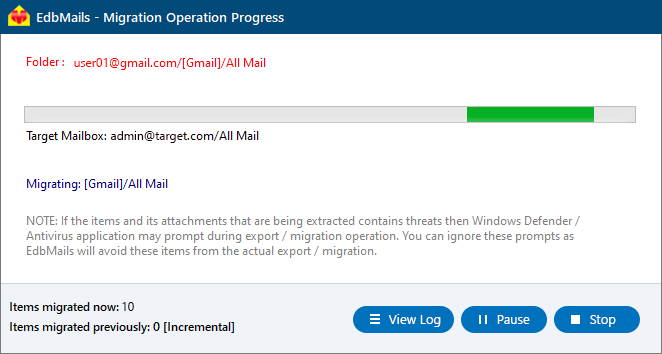
- After mapping the mailboxes, click the ‘Start Migration’ button to initiate the migration process.
IMAP to Exchange Post Migration Tasks
- Step 1: Update DNS records (MX record) to point to the new server
Change the MX records to enable and receive email messages on the target server. In addition to this setup, configure the Autodiscover record to allow Outlook to connect to the migrated mailboxes.
- Step 2: Create a new Outlook profile for users in the new domain
Remove any previous instances of the email account you may have on Outlook to avoid conflicts with Exchange. Configure and recreate the Outlook profile for each user in your domain after you complete the migration.
- Step 1: Update DNS records (MX record) to point to the new server
Troubleshooting Guide for IMAP to Exchange Migration
Refer to the migration troubleshooting guide for solutions to common errors encountered during the process. For additional insights and detailed answers regarding EdbMails IMAP migration, visit the frequently asked questions section.
Benefits of EdbMails for IMAP to Exchange migration
EdbMails streamlines IMAP to Exchange migration with precision and ease. Its robust features save time, reduce costs, and ensure data integrity throughout the process. Experience a hassle-free transition tailored to all needs
- Delta migration
EdbMails' incremental (delta) migration feature ensures only new or modified data is transferred during migration, minimizing bandwidth usage and reducing migration time. This allows for efficient, partial migrations without duplicating existing data, ensuring seamless and optimized transitions.
- Automated mailbox mapping
EdbMails’ automated mailbox mapping feature eliminates the need for manual configuration, ensuring accurate mapping of IMAP to Exchange mailboxes. This reduces human error, enhances efficiency during the migration process while ensuring data consistency and integrity across all mailboxes.
- CSV-based mailbox import
EdbMails supports CSV-based mailbox imports, making it easy to migrate multiple mailboxes in bulk. By specifying mailbox details in a CSV file, users can streamline large-scale migrations, ensuring an efficient, organized, and scalable process, ideal for businesses with numerous email accounts.
- Cost-effective solution
EdbMails offers a cost-effective solution for IMAP to Exchange migration, combining powerful features in one platform. It provides exceptional value by eliminating the need for additional tools or consultants, ensuring businesses achieve a seamless migration at a fraction of the cost.
- Zero downtime
EdbMails guarantees zero downtime during the IMAP to Exchange migration process, ensuring uninterrupted access to email services. This approach allows businesses to continue their operations without experiencing email service disruptions. Users can maintain productivity and communication throughout the migration, ensuring seamless business continuity.

