Hostgator email to Office 365 migration
HostGator has been a reliable email hosting solution for many small and medium-sized businesses, providing domain-based email accounts along with essential communication features. However, as businesses grow, the need for stronger security, improved collaboration tools, and better scalability becomes more important. These advanced requirements can sometimes exceed the capabilities of traditional hosting platforms such as HostGator.
Microsoft 365 (formerly Office 365) offers a complete cloud-based platform designed to support modern business needs. It brings together enterprise-level email through Microsoft Outlook, collaboration with Microsoft Teams, and productivity applications such as Microsoft Word, Microsoft Excel, and Microsoft OneDrive. All these services work within a unified environment, enabling efficient communication, streamlined collaboration, and smoother workflow management across organizations.

For a secure and reliable migration from HostGator to Office 365, the EdbMails IMAP Migration Tool provides a comprehensive and automated solution. It supports direct mailbox migration while ensuring data security with OAuth-based authentication. The tool also includes automatic mailbox mapping, incremental migration to avoid duplicate items, and zero downtime to maintain uninterrupted access throughout the migration process.
This guide explains the benefits of migrating from HostGator to Microsoft 365 and demonstrates how EdbMails can help you complete the transition smoothly, securely, and without data loss.
User Query
We’ve been using HostGator for our business email, but as our company grows, we need better storage and security features. We’re planning to migrate to Office 365. Can you provide a reliable and efficient way to move our HostGator emails to Office 365?
Reasons to Migrate email from HostGator to Office 365
Here are the key reasons why businesses migrate from HostGator to Office 365:
- Limited email sending capacity: HostGator’s shared hosting plans restrict outgoing email to 500 messages per hour, which can create performance bottlenecks for organizations that manage high-volume communications, automated notifications, or large mailing lists.
- Restricted mailing lists: HostGator blocks mailing lists with over 900 email addresses during peak hours, which can disrupt marketing and customer communications.
- POP check limitations: HostGator restricts each IP address to 30 POP email checks per hour, which limits synchronization frequency and reduces flexibility when managing emails across multiple devices or email clients.
- Scalability challenges: HostGator’s email service is ideal for small businesses but may struggle to meet the demands of growing companies. As businesses expand, they require more robust and scalable solutions, such as Office 365, to support their evolving needs.
- Comprehensive productivity suite: Office 365 (Microsoft 365) offers not just email services but also a suite of tools like Word, Excel, PowerPoint, Outlook, and Teams, enhancing collaboration, communication, and business operations.
- Cloud-based access: Microsoft 365 enables users to securely access emails, calendars, contacts, and other business data from any device, including PCs, Macs, tablets, and smartphones. It also provides offline access, ensuring uninterrupted productivity even without an internet connection.
- Regular updates and security: Office 365 is regularly updated with new features, security enhancements, and bug fixes, ensuring businesses always have access to the latest tools and protection.
- Flexible subscription plans: Office 365 offers various subscription plans that allow businesses to choose the most suitable one based on their specific needs, unlike HostGator’s fixed email services.
These reasons highlight why migrating from HostGator to Office 365 using EdbMails is a smart choice for businesses aiming to scale and enhance their productivity.
Challenges in migrating from HostGator to Office 365
Here are the key challenges in migrating from HostGator to Office 365:
- Data migration complexity: Moving email data from HostGator to Office 365 can be challenging due to differences in server architecture, authentication methods, and data storage formats, which may lead to configuration issues or data inconsistencies if not handled properly.
- Email downtime during transition: Minimizing downtime during migration is essential to avoid communication disruptions.
- Ensuring data integrity: Ensuring data consistency and accuracy during migration is crucial to prevent data loss or corruption.
- Configuration issues: Configuring Office 365 to work seamlessly with existing systems can require significant effort.
- Limited knowledge of migration tools: Lack of expertise in migration tools can lead to incomplete data transfer or email delivery issues.
- Domain and DNS settings: Misconfiguring DNS settings during migration can cause email delivery problems or spam issues.
- Security risks during migration: Ensuring secure migration protocols is crucial to protect sensitive business data from unauthorized access, data leaks, or security breaches during the HostGator to Office 365 migration process.
Professional approach for Hostgator email to Office 365 Migration
EdbMails IMAP migration tool simplifies the migration process from HostGator to Office 365, ensuring that all attachments are preserved while maintaining the original folder structure and hierarchy. This user-friendly software allows even non-technical users to effortlessly complete the migration in just a few easy steps, ensuring a smooth transition to Office 365.
EdbMails enhances the migration with powerful features such as delta migration, which transfers only new or modified data, reducing unnecessary transfers and saving time. Concurrent migration enables the simultaneous transfer of multiple mailboxes, streamlining large-scale migrations. Automatic mailbox mapping eliminates manual configuration, minimizing errors. Additionally, EdbMails offers a free trial, allowing users to test the software before committing. With these features, EdbMails provides a secure, efficient, and professional solution for businesses seeking a seamless migration to Office 365.
Hostgator email to Office 365 Migration Plan
Planning is one of the most important steps before you begin a Hostgator email to Office 365 migration. Prepare the environment and have a backup plan in place to avoid potential risks and data loss. Here is a checklist of points to consider before you migrate.
- Determine the size of the data and the number of mailboxes you want to migrate.
- Make a list of all the data and permissions from Hostgator email that you want to transfer.
- Create the necessary user mailboxes in Office 365 and assign the appropriate licenses.
- Ensure sufficient network capacity and bandwidth are available to support the migration process.
- Inform your end users about the migration plan and timeline to ensure smooth communication and minimal disruption.
Pre-migration activities for Hostgator email to Office 365 Migration
- Find the IMAP server name of your Hostgator email server. You can find this information from your server’s dashboard settings or by connecting your email system to Outlook.
- Before you migrate Hostgator email to Office 365, ensure that you create mailboxes for your users in your organization and assign suitable licenses to them.
- If you plan to migrate the source Public folders to Public folders on Office 365, ensure that you create and configure the Public folder mailboxes on the target server.
Create Office 365 Public folder and assign mailbox user. - Ensure that the admin account on the target Office 365 server has the impersonation rights to migrate mailboxes and Public folders.
- If you have a custom email domain from your hosting provider to which you want to migrate and receive emails, you must add and verify the domain on Office 365.
Steps to add a custom domain to Office 365 and Steps to add DNS records to connect your domain. - Configure Office 365 to send and receive large messages.
Follow the steps to increase the message size on Office 365 to 150MB and see tips to optimize IMAP migration to Exchange online.
A step-by-step guide to Migrate HostGator email to Office 365
Step 1: Download and install EdbMails IMAP migration software
- Download EdbMails and install the application on any computer running on Windows OS that is connected to the source and target environment.
See a detailed list of EdbMails system requirements for IMAP migration.

- Start the EdbMails application on your computer.
- Enter your registered email address and password, then click ‘Login’. If you are new to EdbMails, select ‘Start Your Free Trial’ to continue with the trial edition.Note: The trial version includes all essential features and permits migrating up to 30 items per folder. To enable unlimited migration, purchase a valid license from the EdbMails website
Click here to view IMAP Migration pricing details.
Once the purchase is completed, restart the application and sign in again with the same email address and password used during the purchase to activate the license successfully.

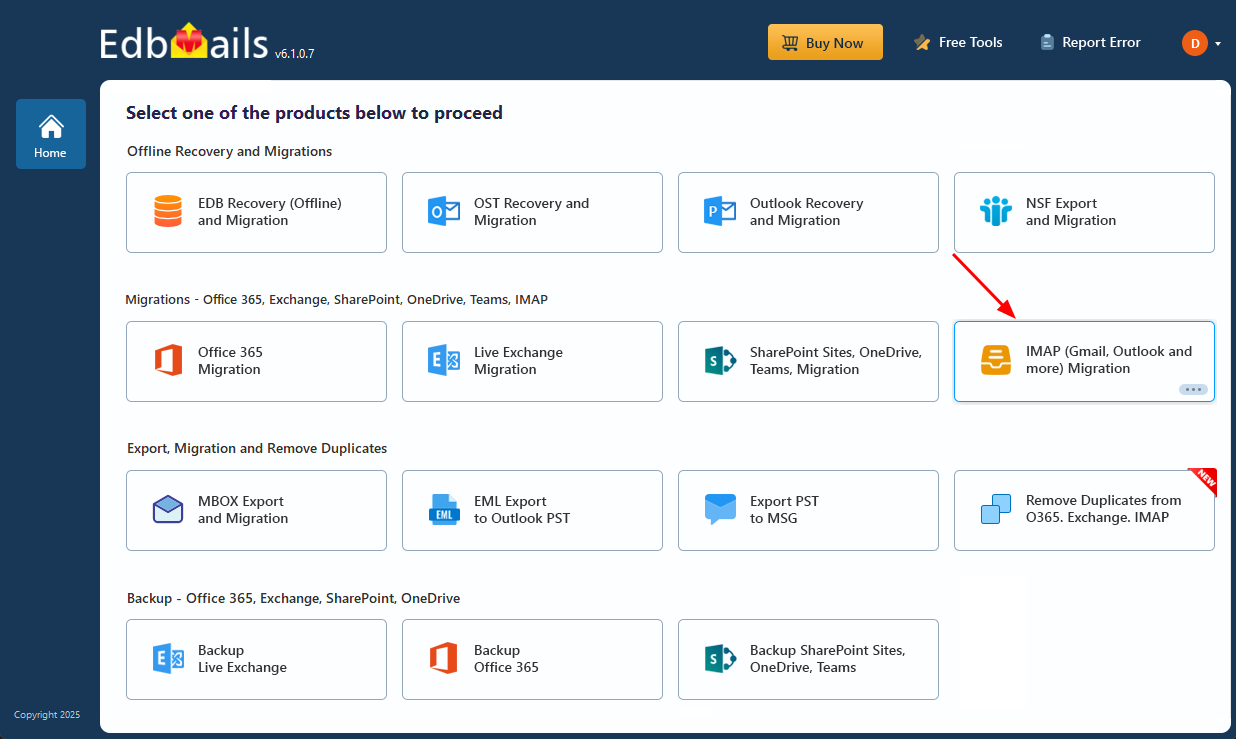
- Select the option ‘IMAP (Gmail, Outlook & more) Migration’.
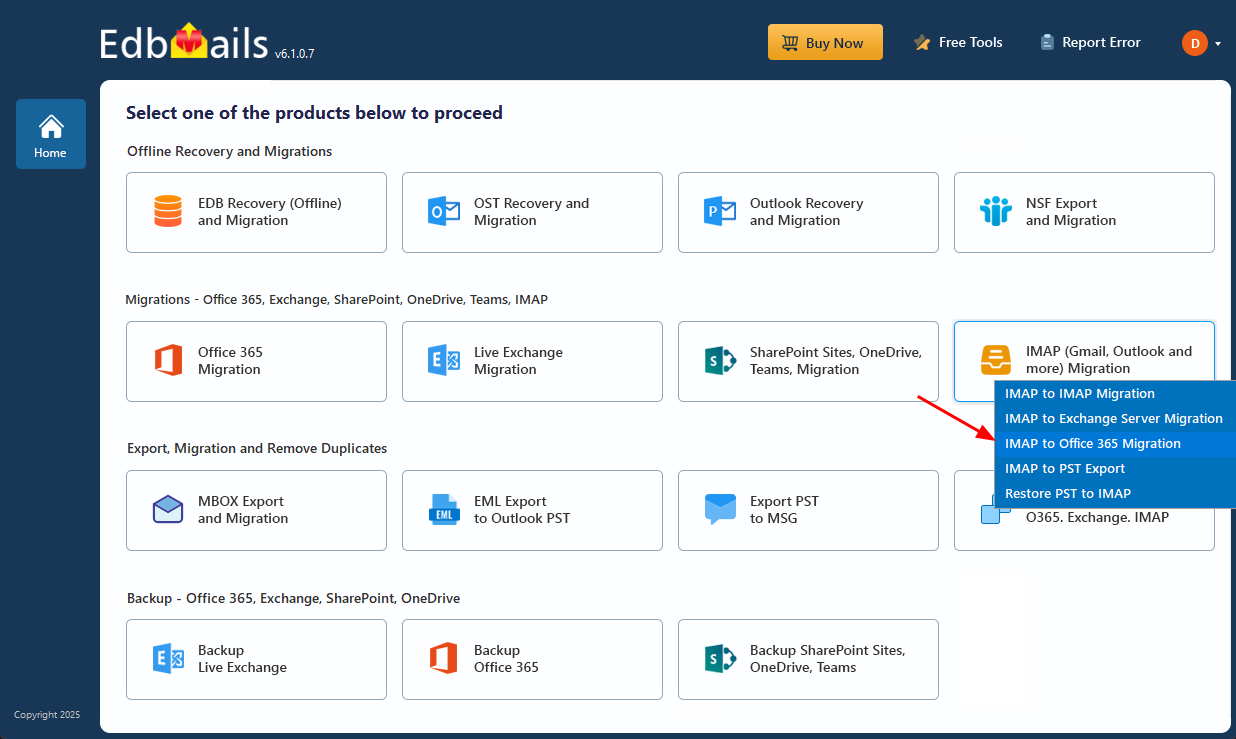
- Select ‘IMAP to Office 365 Migration’.
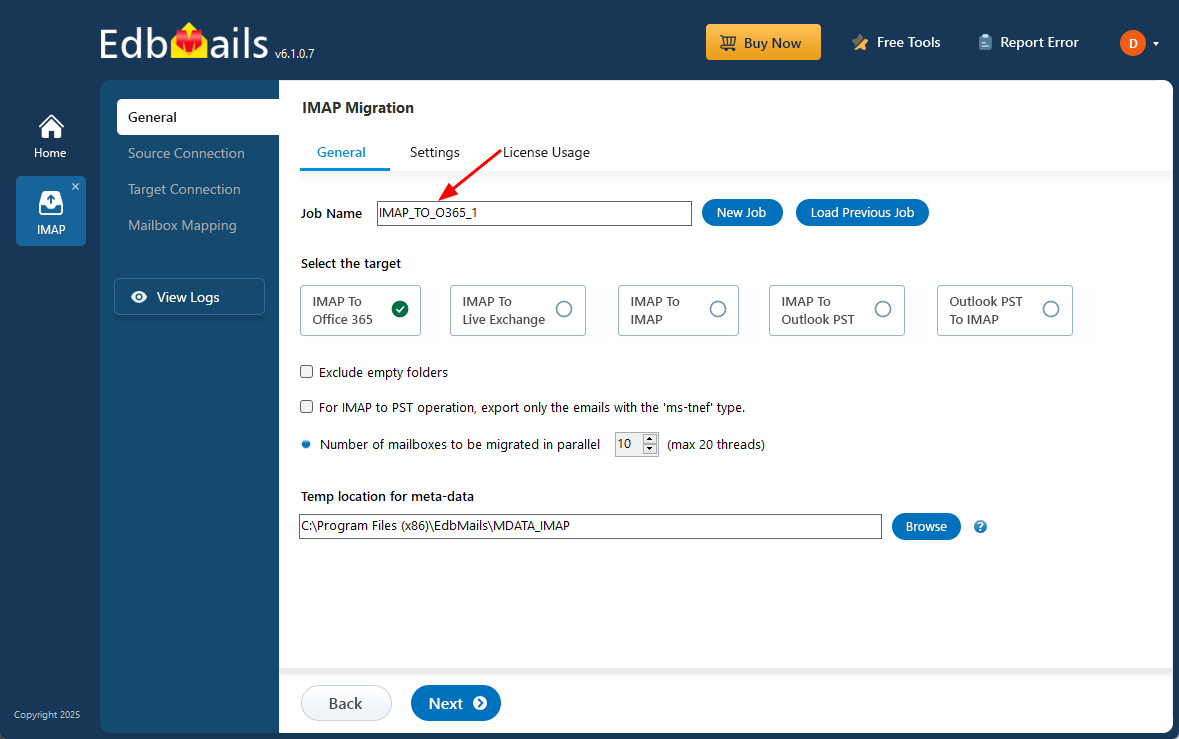
- You can either keep the default job name or select ‘New Job’ to define a custom name.
- Download EdbMails and install the application on any computer running on Windows OS that is connected to the source and target environment.
Step 2: Connect to source Hostgator server
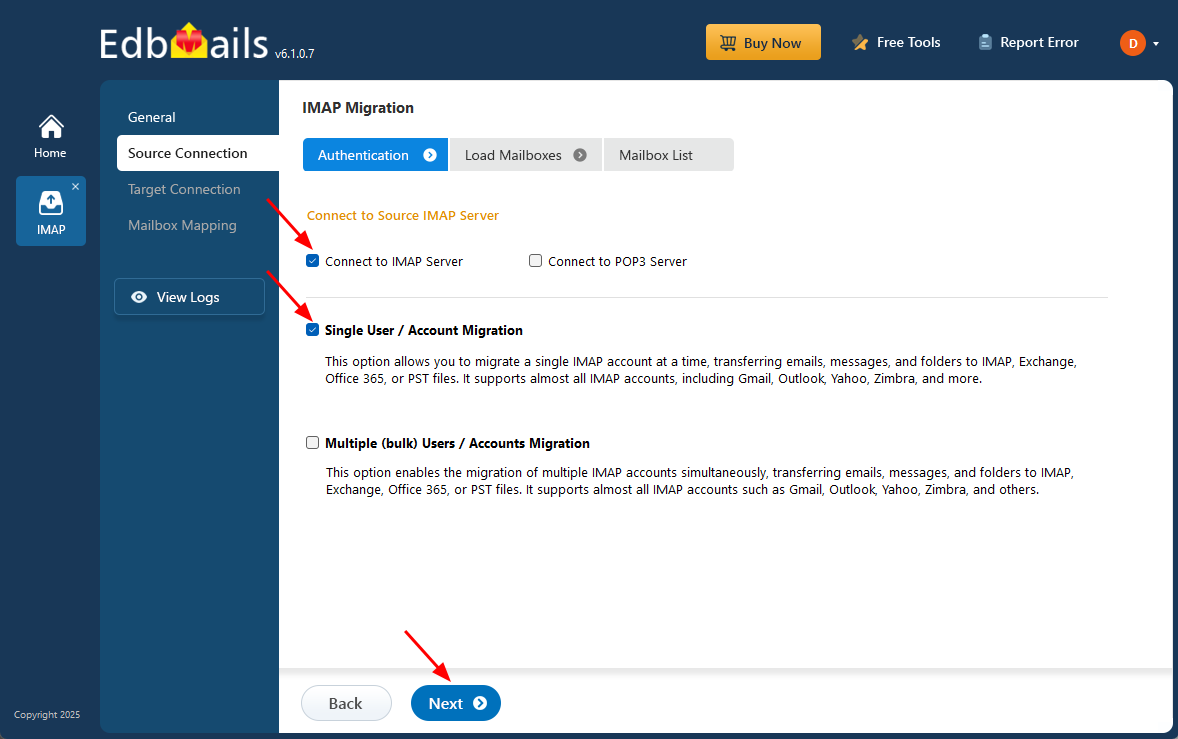
- To migrate a single Hostgator account, choose ‘Single User / Account Migration’.
- Next, select the desired protocol, like ‘Connect to IMAP’ or ‘Connect to POP3,’
- Click ‘Next’ to continue.
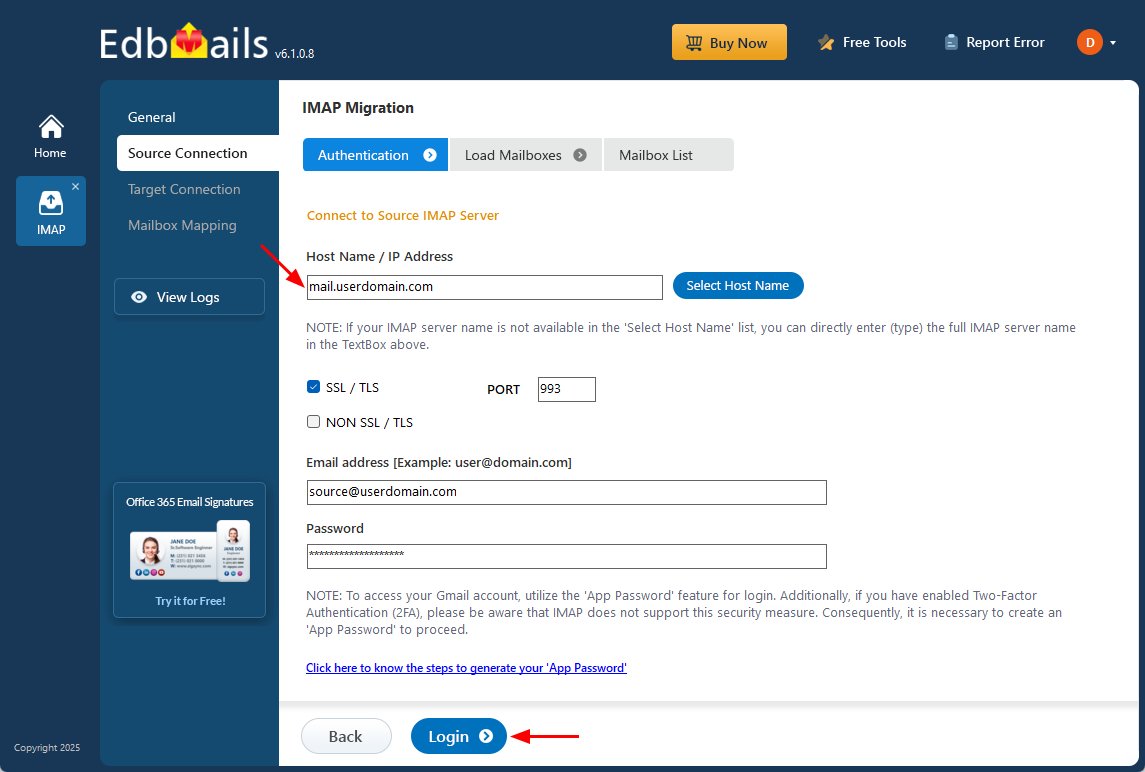
- For migrating a single user, enter the HostGator IMAP hostname (for example, mail.userdomain.com) along with the port number 993 (SSL).
- Provide the user’s email login credentials to establish a secure and authenticated connection for the migration process.
- Click the ‘Login’ button.
- To migrate multiple Hostgator mailboxes at once, select ‘Multiple (bulk) Users/Accounts Migration’.
- Choose the suitable connection method such as ‘Connect to IMAP Server’ or ‘Connect to POP3 Server’.
- Then proceed by clicking ‘Next’.

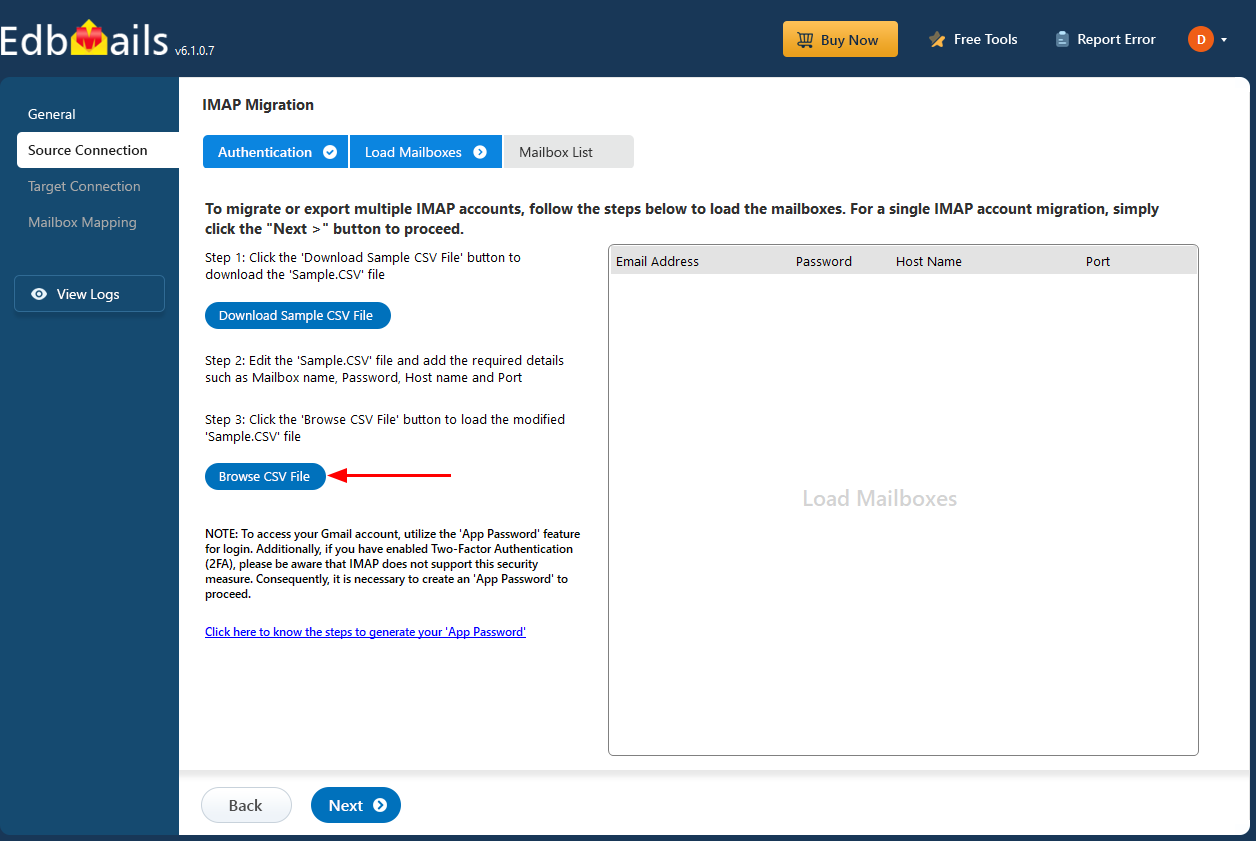
- Click ‘IMAP Migration CSV File’. It downloads a ‘Sample.CSV’ file and saves it to your local drive for reference.

- Edit the CSV file to include the necessary details such as the email address, password, IMAP host name, and port number. Once updated, save the file to apply the changes before proceeding with the migration.
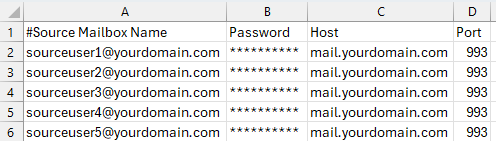
- After updating the CSV file with the necessary details, such as email addresses, passwords, IMAP hostnames, and port numbers, save and close the file to apply the changes.
- Next, click on the 'Load Modified CSV File' button within the application. Navigate to the location of your updated CSV file, select it, and open it to proceed with the migration process.
Step 3: Select source Hostgator server mailboxes
- Select the mailboxes or specific folders you want to migrate, then click ‘Next’ to proceed with the migration process.
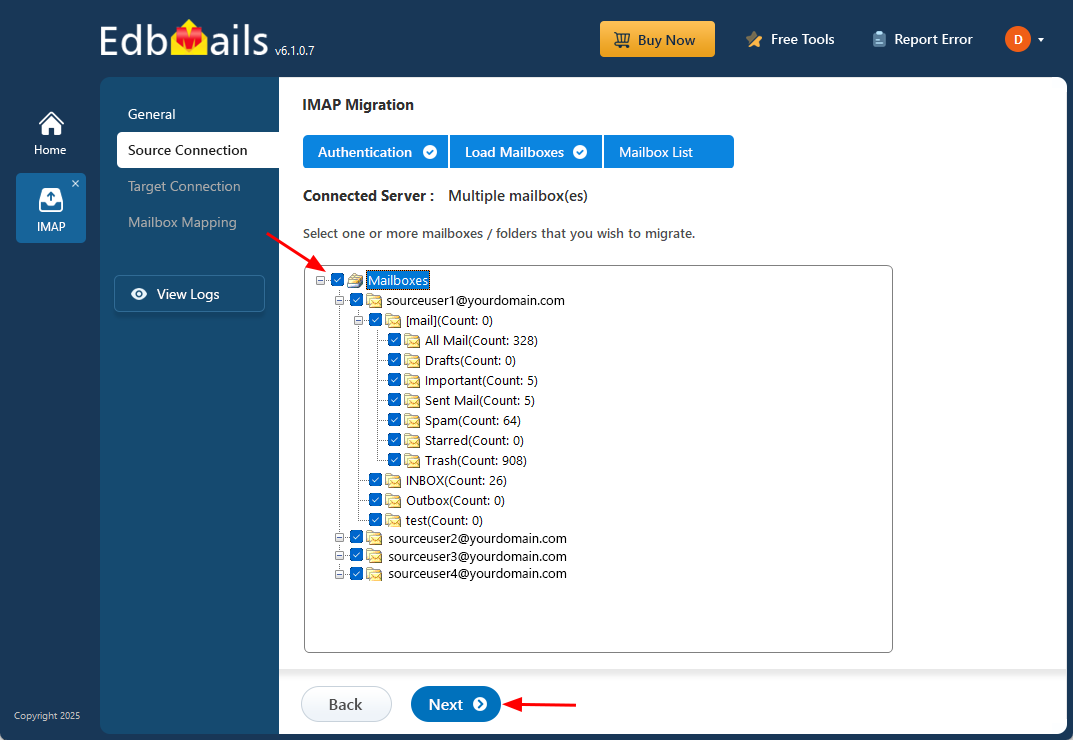
- Select the mailboxes or specific folders you want to migrate, then click ‘Next’ to proceed with the migration process.
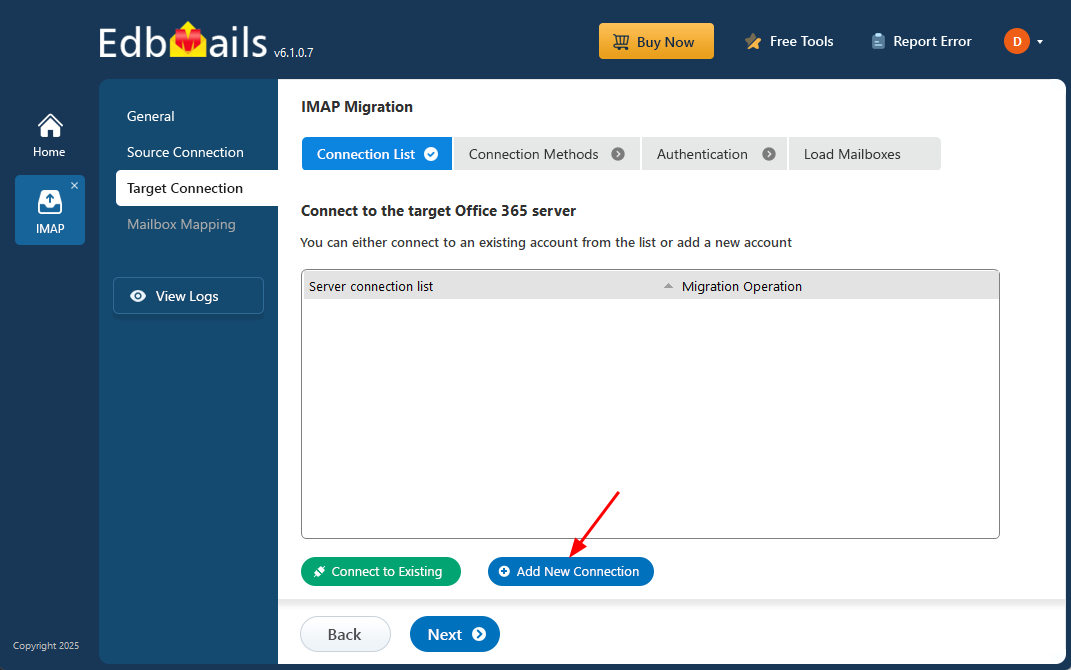
Step 4: Connect to target Office 365
- Click ‘Add New Connection’ to create a new connection with the target Office 365 account. If you prefer to continue with a previously configured connection, select it from the list and click ‘Connect to Existing’ to proceed.
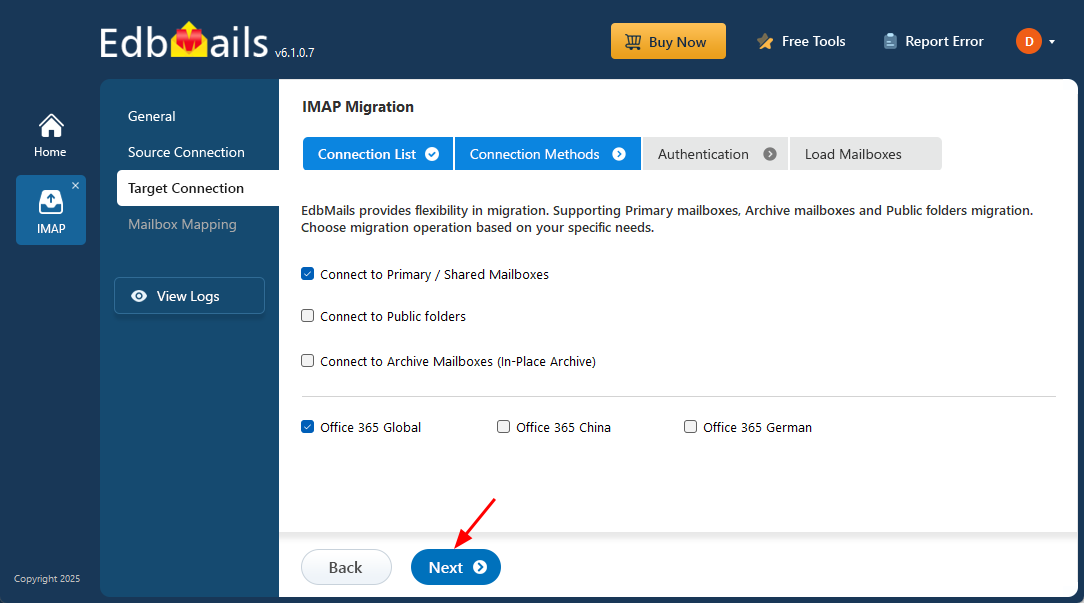
- Select the required migration / connection operation (Primary / Shared, Public folders, Archive mailboxes).
- Click ‘Next’ to proceed with the setup.
- Select any of the available options to establish a secure connection using OAuth 2.0 modern authentication.
- Choose Auto Registration for a quick setup. Sign in with a Global Admin account and grant the required permissions to automatically register the application in Azure AD.
- Alternatively, select Manual Registration if you prefer to enter the Azure AD application details yourself. This method supports both Global Admin accounts and accounts with Full Access permissions.
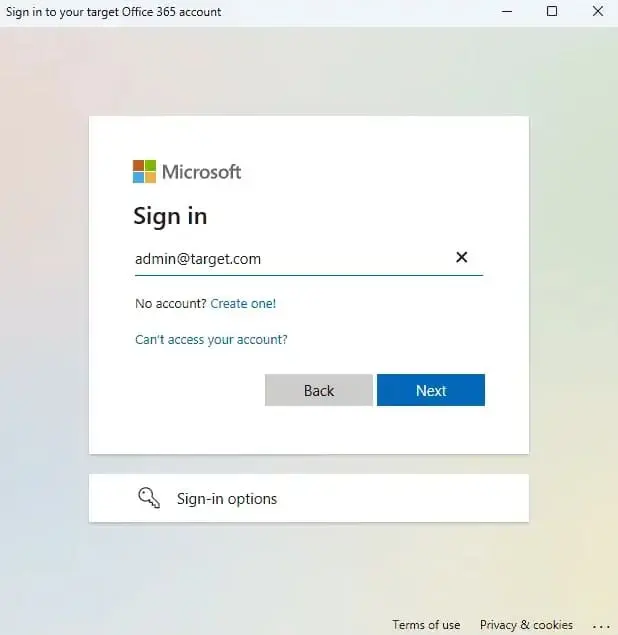
- Click ‘Login’ to proceed.

- Authenticate on Microsoft sign-in page.
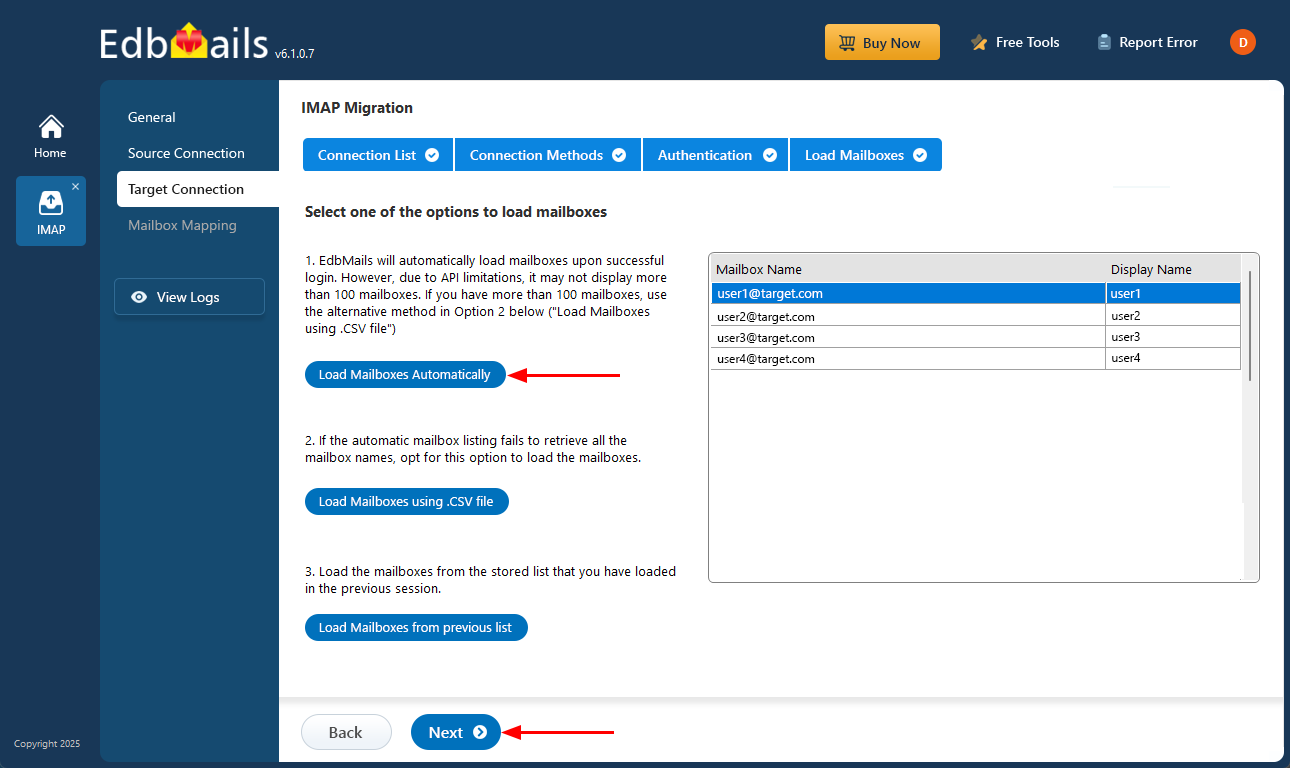
- Select a method to load your mailboxes. EdbMails automatically retrieves mailboxes for Office 365 users, but due to Microsoft API limitations, only the first 100 mailboxes are displayed. If your environment contains more than 100 mailboxes, you can use the CSV file method to load the complete list.
- Click ‘Add New Connection’ to create a new connection with the target Office 365 account. If you prefer to continue with a previously configured connection, select it from the list and click ‘Connect to Existing’ to proceed.
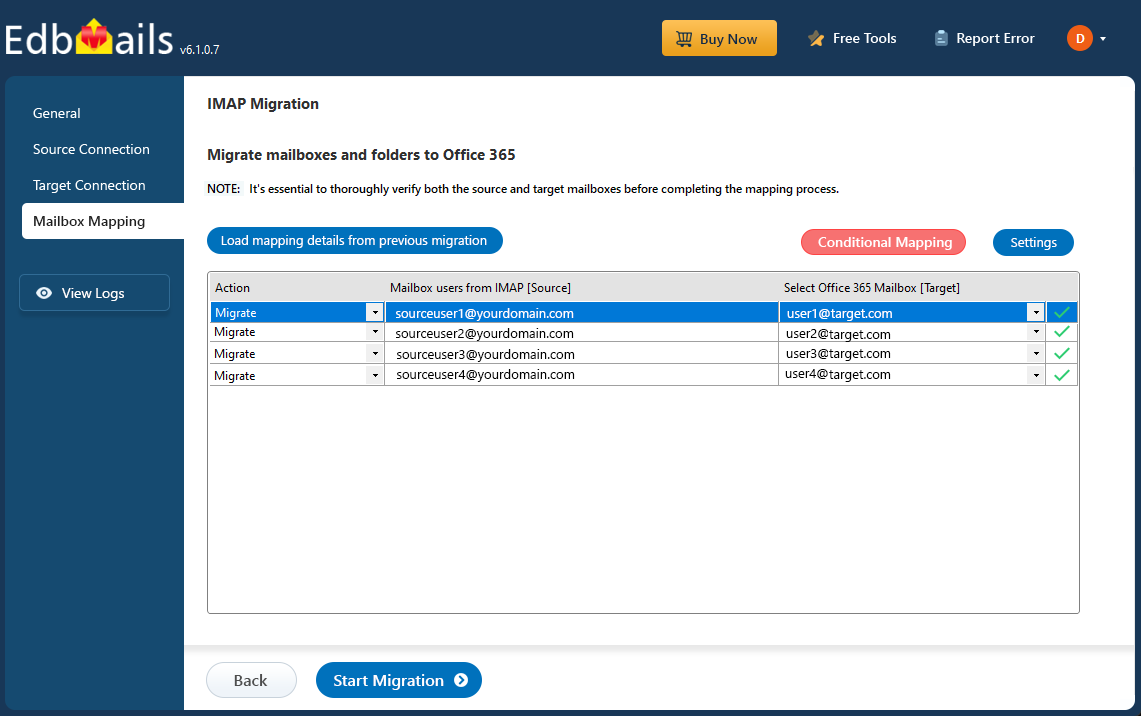
Step 5: Hostgator email to Office 365 mailboxes mapping
- Select the mapping option that best aligns with your requirements.
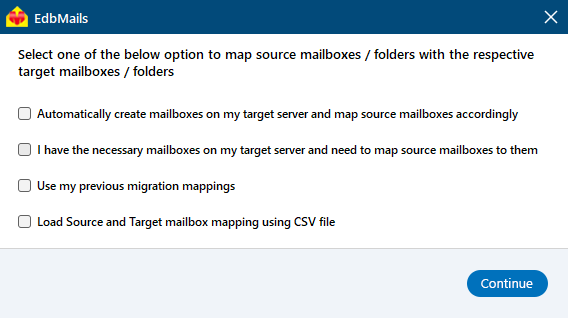
- You can choose to let EdbMails automatically create mailboxes in Office 365 and map them between the source and target servers. This feature is especially useful for large-scale migrations, saving time, reducing manual effort.
- Select the mapping option that best aligns with your requirements.
Step 6: Start Hostgator email to Office 365 migration
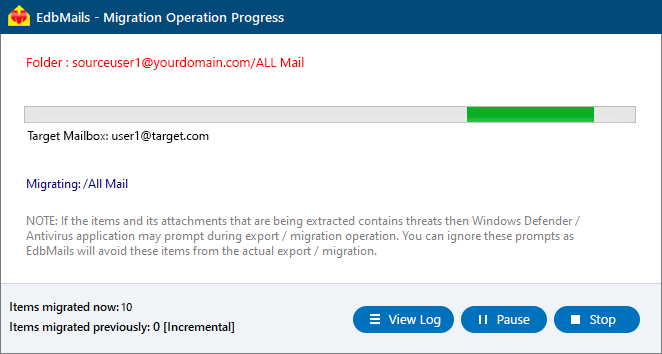
- After mapping the mailboxes, click the ‘Start Migration’ button to initiate the migration process.
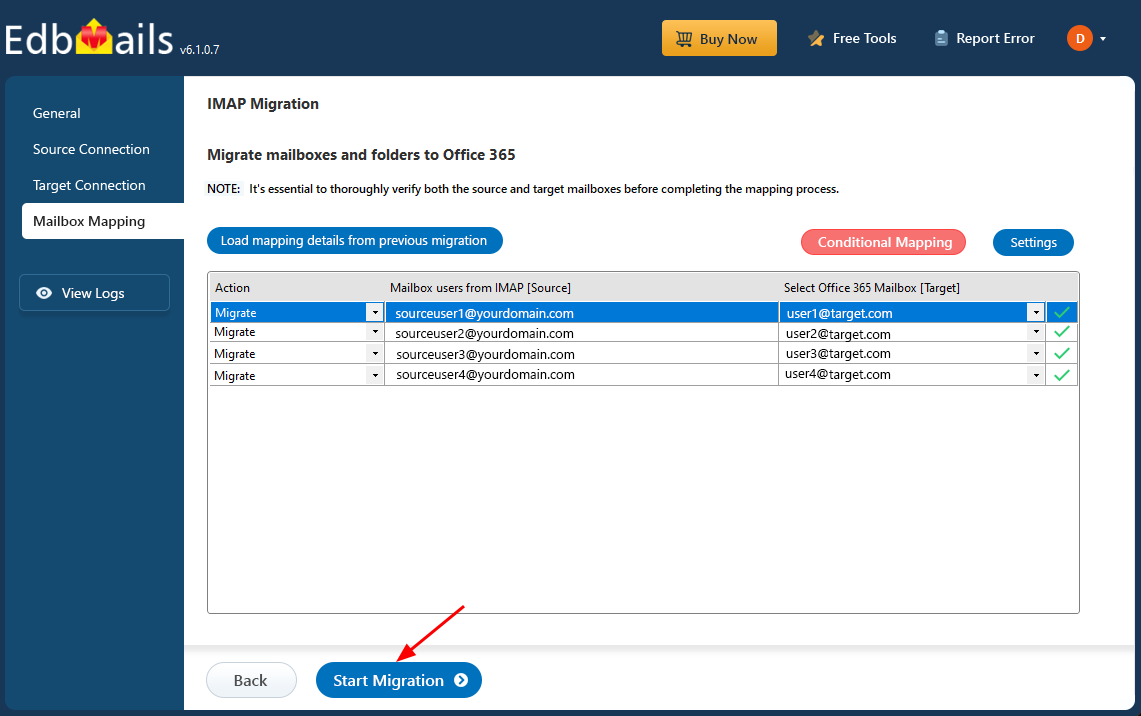
- Click the ‘View Log’ button to view the migration report, which includes mapping details and the total count of migrated emails.
- Login to your target server and verify the migrated items.
- After mapping the mailboxes, click the ‘Start Migration’ button to initiate the migration process.
Hostgator email to Office 365 post-migration tasks
- Step 1: Update the MX records to point to Office 365
If you have not done this step previously, change the DNS records known as MX records to enable email and receive messages on the target Office 365 server. In addition, configure the Autodiscover record to allow Outlook to connect to the migrated mailboxes.
- Step 2: Create a New Outlook Profile for Users in the New Domain
Configure the Outlook profile for each user in your domain if Outlook has problems connecting to Office 365 mailboxes.
- Step 1: Update the MX records to point to Office 365
Troubleshooting Guide for Hostgator email to Office 365 Migration
For troubleshooting, check out our knowledge base articles. If you have additional questions, browse the FAQs or engage with our customer care team for personalized assistance.
Advantages of EdbMails to Migrate Hostgator email to Office 365
- Easy-to-use Utility for seamless Migration
EdbMails simplifies the HostGator email to Office 365 migration with an intuitive interface designed for users of all skill levels. Its user-friendly dashboard ensures that even non-technical users can easily navigate and complete the migration process without complications, ensuring smooth results.
- Selective Migration for better Control
With EdbMails, you can select specific emails, folders, or data items to migrate. This feature allows businesses to transfer only the necessary data, reducing clutter in Office 365 while speeding up the overall migration process.
- Secure and Reliable Data Transfer
EdbMails ensures top-tier security throughout the migration, safeguarding sensitive email data with encryption and preventing unauthorized access. This level of security gives businesses peace of mind, knowing their data remains safe during and after migration.
- Fast and Simple Process
EdbMails simplifies the entire migration workflow from initial configuration to final completion using fast, efficient tools that minimize downtime and ensure uninterrupted business operations. This makes it an ideal solution for time-sensitive email migrations.
- Compatible with all Versions of Windows OS
EdbMails is fully compatible with all major Windows operating systems, including Windows 11, 10, 8, and 7. This broad compatibility ensures users can perform migrations without system-related limitations, delivering a smooth and error-free experience across both older and modern Windows environments.

