SmarterMail to Office 365 Migration
SmarterMail is a dependable on-premises email and collaboration server that provides capabilities comparable to Microsoft Exchange while remaining more cost-effective. It includes features such as shared calendars, group chat, task management, and strong security, making it a preferred choice for small businesses, hosting providers, and enterprises. Seamless integration with Outlook and mobile devices also improves accessibility and everyday usability.
As more organizations move toward cloud-based environments, Microsoft 365 (Office 365) has emerged as a leading platform for modern business operations. It provides greater scalability, simplified centralized administration, and powerful collaboration tools such as Word, Excel, Teams, and OneDrive, along with improved security and compliance capabilities.
Migrating from SmarterMail to Office 365 can be a complex process, often involving challenges such as configuration difficulties, risks of data loss, downtime, and compatibility issues. Without a reliable tool in place, ensuring data security and maintaining smooth business operations can become challenging.

EdbMails IMAP migration software makes the migration process simple by providing a secure, reliable, and efficient solution. The user-friendly interface removes the need for complex configurations, while maintaining metadata integrity to preserve emails along with their attachments, headers, and folder structure. Automated mailbox mapping further reduces manual effort by accurately matching SmarterMail accounts with Office 365 mailboxes. In addition, the zero-downtime migration capability allows users to continue accessing their emails without interruption. With support for multi-factor authentication (MFA) and strong security measures, EdbMails helps businesses to migrate from SmarterMail to Office 365 smoothly and with confidence.
User Query
“My company is planning to migrate from SmarterMail server to Office 365 cloud, but we don't have much information on how to do so yet. It would be extremely helpful if someone could provide us with a step-by-step guide on how to proceed. I've also looked into a few methods for importing a PST file. However, we do not want to use those PST upload methods. Thank you very much.”
Top Reasons for SmarterMail to Office 365 Migration
SmarterMail is undeniably popular due to its low cost and Exchange-like features. In comparison, Office 365, with its full-fledged productivity suite, is suited and tailor-made for enterprises. It's also worth noting that each service has its own set of advantages and disadvantages. But, in the end, it all comes down to the business requirements and making a decision that meets your needs.
- Office 365 integrates in real time with applications such as SharePoint, Teams, OneDrive, Google Drive, Yammer, and many more.
- Collaborating with teams is made easier with an Office 365 suite that allows for the sharing of documents, files, and so on.
- Office 365 includes the Microsoft brand, which ensures complete server uptime and security.
- Office 365 is a fully packaged cloud solution that requires no in-house installation or server maintenance and upgrades.
SmarterMail email to Office 365 Migration Plan
Planning is one of the most important steps before you begin the SmarterMail email to Office 365 migration. Here is a checklist of points to consider before you migrate.
- Determine the size of the data and the number of mailboxes you want to migrate.
- Make a list of all the data and permissions from SmarterMail email that you want to transfer.
- Create appropriate user mailboxes on Office 365 and assign licenses to them.
- Ensure you have enough network capacity and bandwidth to migrate.
- Communicate the migration plan and flow to your end users.
SmarterMail to Office 365 Migration Prerequisites
- Have the users email address, passwords, IMAP hostname and port number.
- Find the IMAP server name of your SmarterMail email server. You can find this information from your server’s dashboard settings or by connecting your email system to Outlook.
- Before you migrate SmarterMail email to Office 365, ensure that you create mailboxes for your users in your organization and assign suitable licenses to them.
- If you have a custom email domain from your hosting provider to which you want to migrate and receive emails, you must add and verify the domain on Office 365.
Steps to add a custom domain to Office 365 and Steps to add DNS records to connect your domain.
- Configure Office 365 to send and receive large messages.
Follow the steps to increase the message size on Office 365 to 150MB and see tips to optimize IMAP migration to Exchange online.
Steps to Migrate SmarterMail to Office 365
Step 1: Download and install EdbMails software
- Download and install the EdbMails application on your computer running on Windows OS.
Know more details on EdbMails system requirements for IMAP migration.

- Open the EdbMails application on your system.
- Enter your registered email address and password, then click ‘Login’. If you’re accessing EdbMails for the first time, select ‘Start Your Free Trial’ to continue with the trial version.Note: The trial version includes all major features and allows migration of up to 30 items per folder. For unlimited migration, purchase an IMAP Migration license from the official EdbMails website.After completing the purchase, close the application and reopen it. Then log in again using the same email address and password used during the purchase to activate your license successfully.

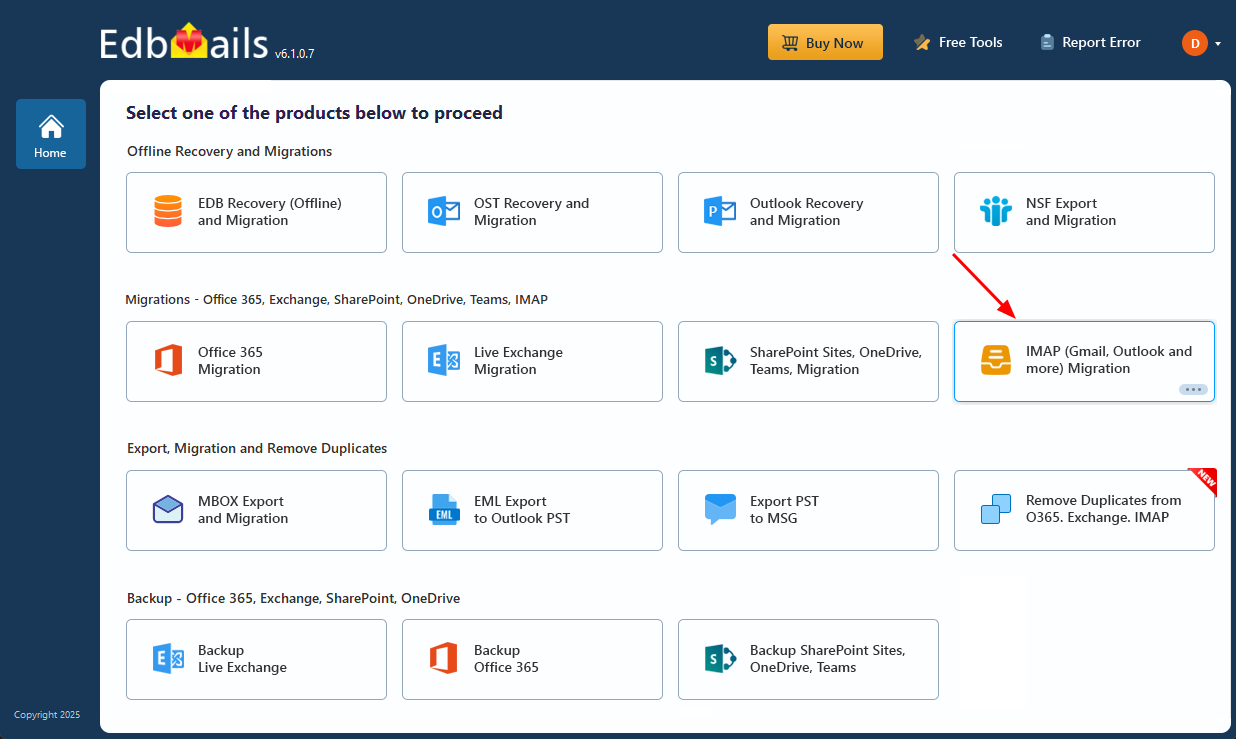
- Select the option ‘IMAP (Gmail, Outlook & more) Migration’.
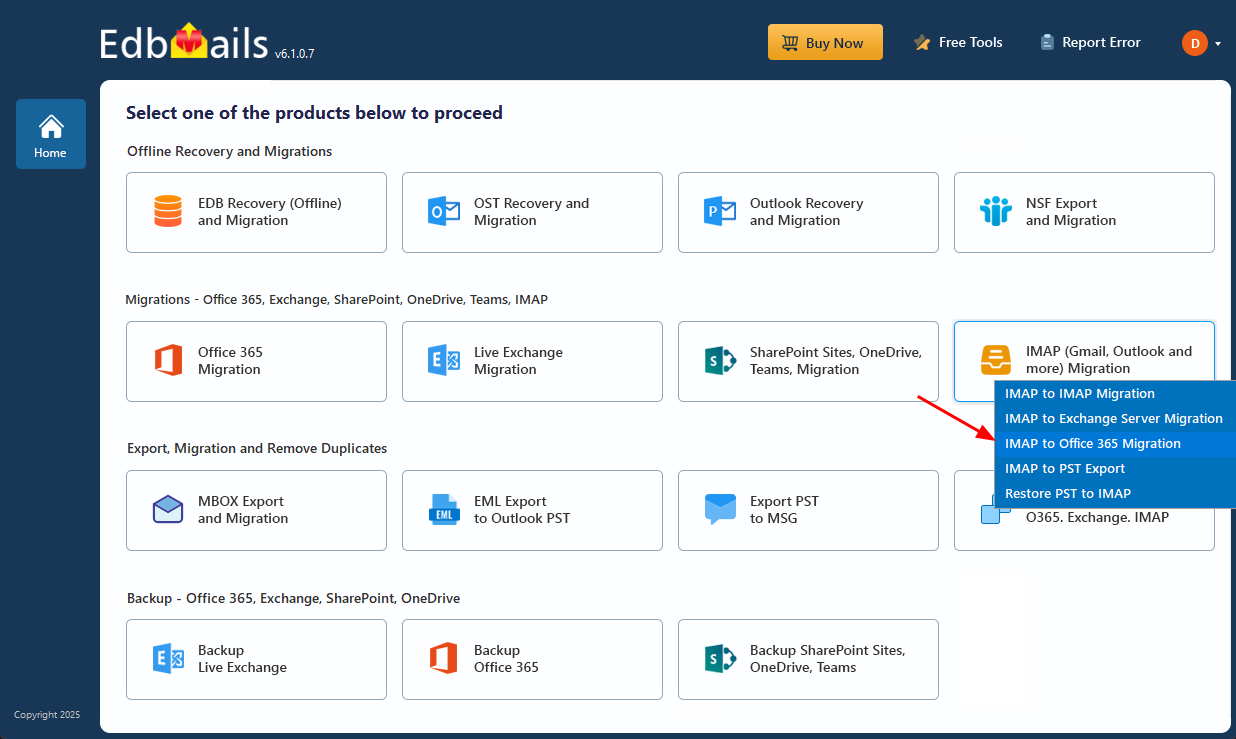
- Select ‘IMAP to Office 365 Migration’.
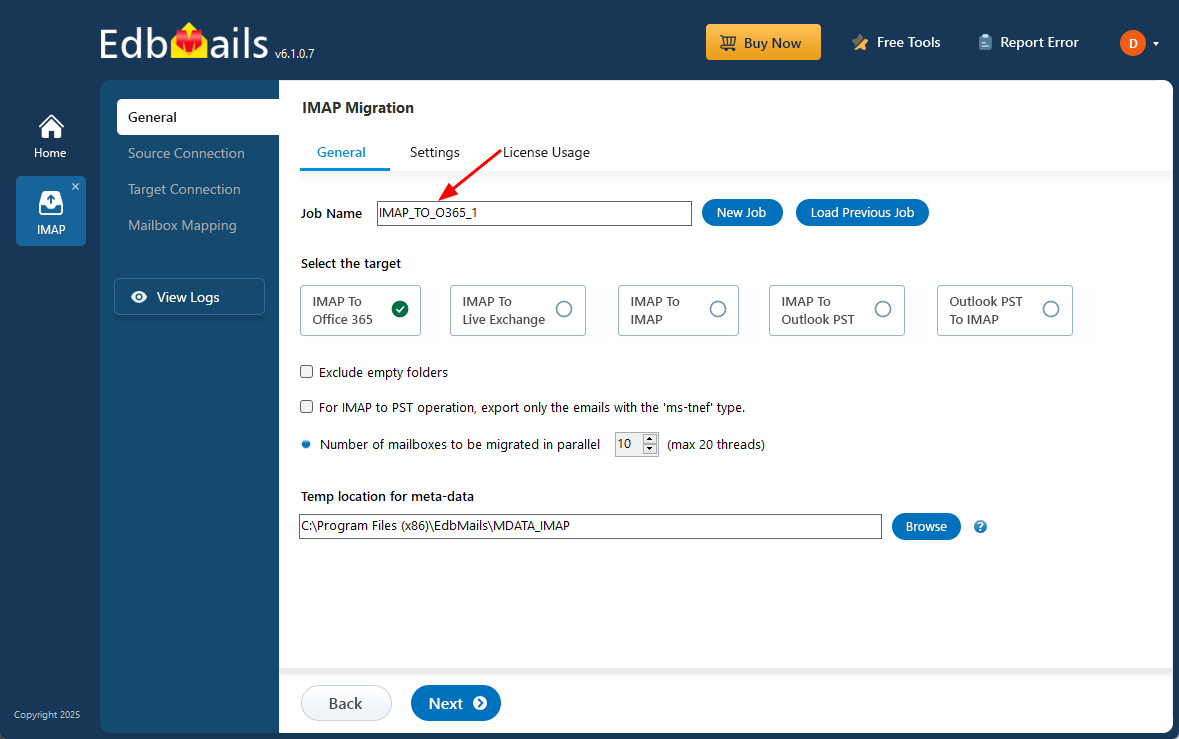
- You can either go with the default job name or click on 'New Job' if you'd like to customize it.
- Download and install the EdbMails application on your computer running on Windows OS.
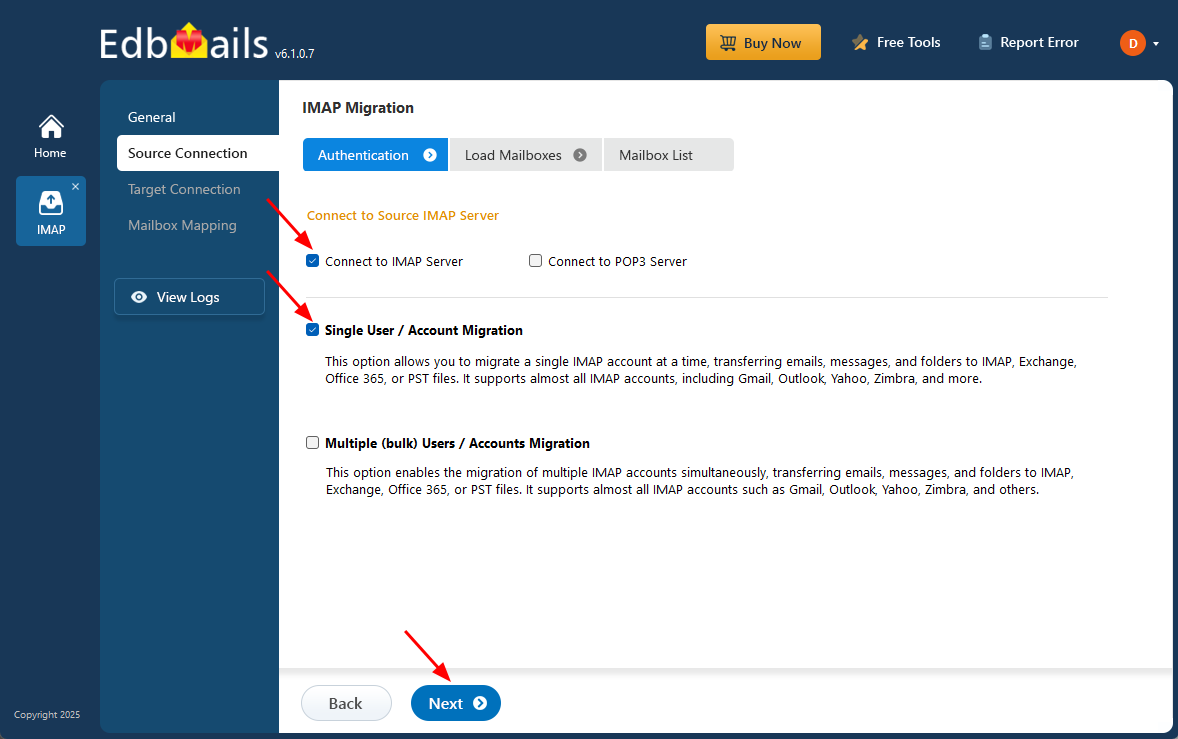
Step 2: Connect to source SmarterMail server
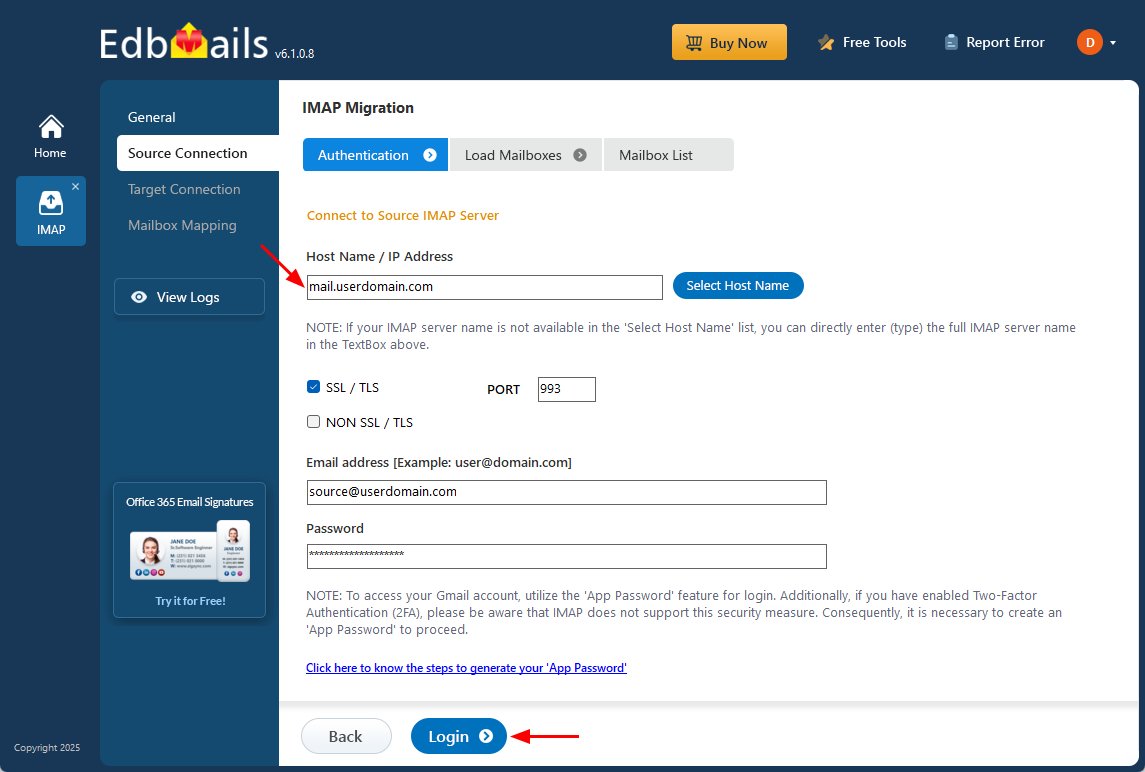
- To connect a single Smartermail account for migration, click ‘Single User / Account Migration’, choose the suitable connection option such as ‘Connect to IMAP Server’ or ‘Connect to POP3 Server’. Click ‘Next’ to proceed.
- Select the appropriate IMAP hostname for Smartermail from the list, or enter it manually. Then, provide your email address and password to proceed.
- Next, click the ‘Login’ button.
- To migrate multiple Smartermail mailboxes at once, select ‘Multiple (bulk) Users/Accounts Migration’, choose the suitable connection method such as ‘Connect to IMAP Server’ or ‘Connect to POP3 Server’.
- Then proceed by clicking ‘Next’.

- Click ‘IMAP Migration CSV File’ and specify the location to save on your local drive.

- Open the CSV file and input the required details, such as email address, password, server name, and port number. Once you've entered all the information, save the file.
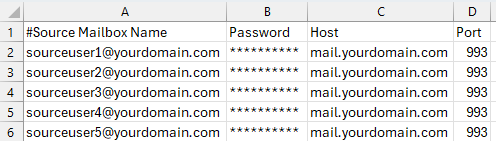
- After updating the CSV file, save it and close it.
- Next, click on the 'Load Modified CSV File' button, locate your updated file, select it, and open it to proceed.
- To connect a single Smartermail account for migration, click ‘Single User / Account Migration’, choose the suitable connection option such as ‘Connect to IMAP Server’ or ‘Connect to POP3 Server’. Click ‘Next’ to proceed.
Step 3: Select source SmarterMail server mailboxes
- Choose the mailboxes or specific folders you wish to migrate, then click ‘Next’ to continue.
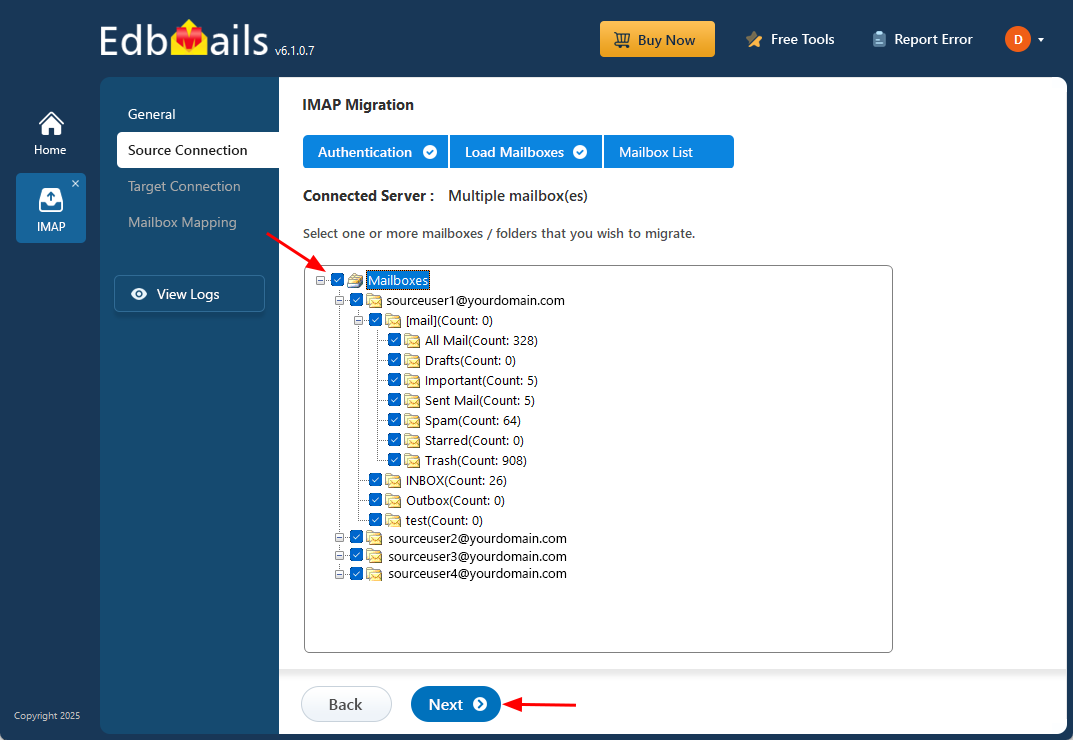
- Choose the mailboxes or specific folders you wish to migrate, then click ‘Next’ to continue.
Step 4: Connect to target Office 365 server
- Select the ‘Add New Connection’ option to establish a connection with your target Office 365 account.
- If you have previously set up a connection, you can choose it from the available list and click ‘Connect to Existing’ to proceed.
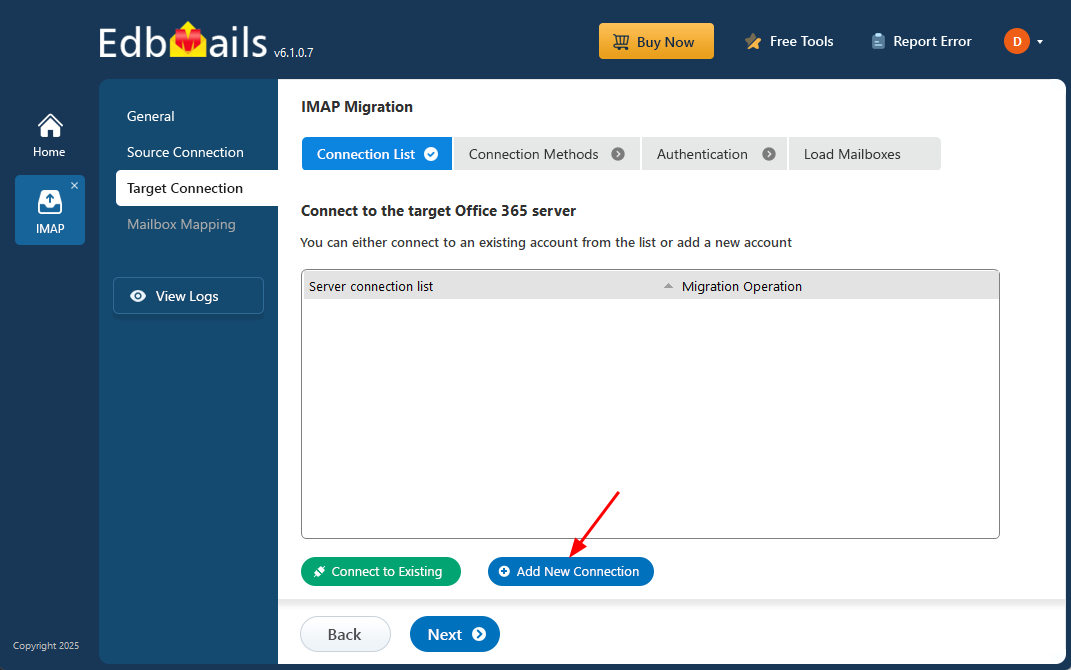
- Choose the necessary connection options and click ‘Next’ to continue
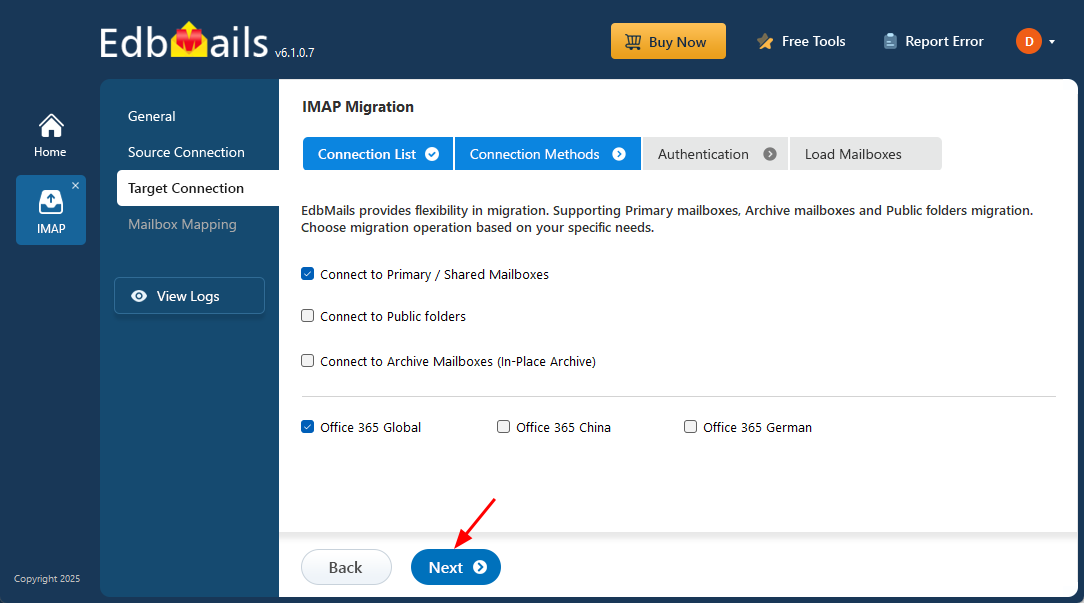
- Choose any of the available options to create a secure connection through OAuth 2.0 modern authentication.
- Select Auto Registration for a quick and hassle-free configuration. Simply log in with a Global Admin account and approve the required permissions to automatically register the application in Azure AD.
- Or select Manual Registration if you want to provide the Azure AD application details manually. This option supports both Global Admin accounts and accounts with Full Access permissions.
- Click the ‘Login’ button to continue.

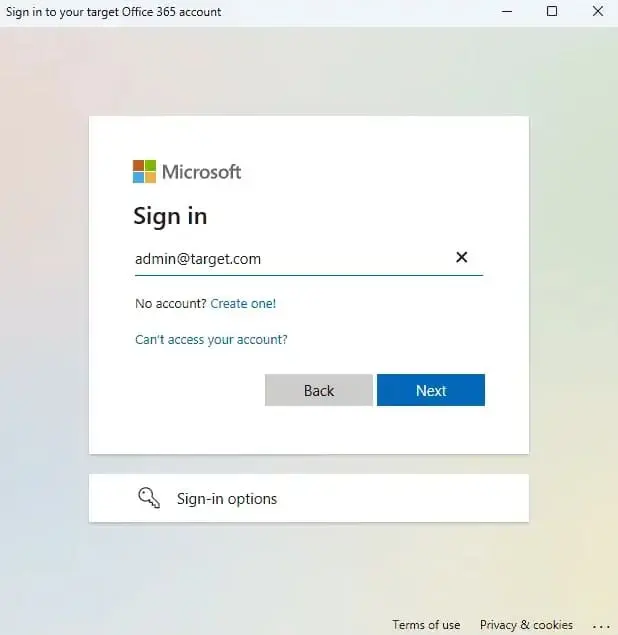
- Proceed to the Microsoft sign-in page and complete the authentication using your Office 365 credentials to securely grant access for the migration.
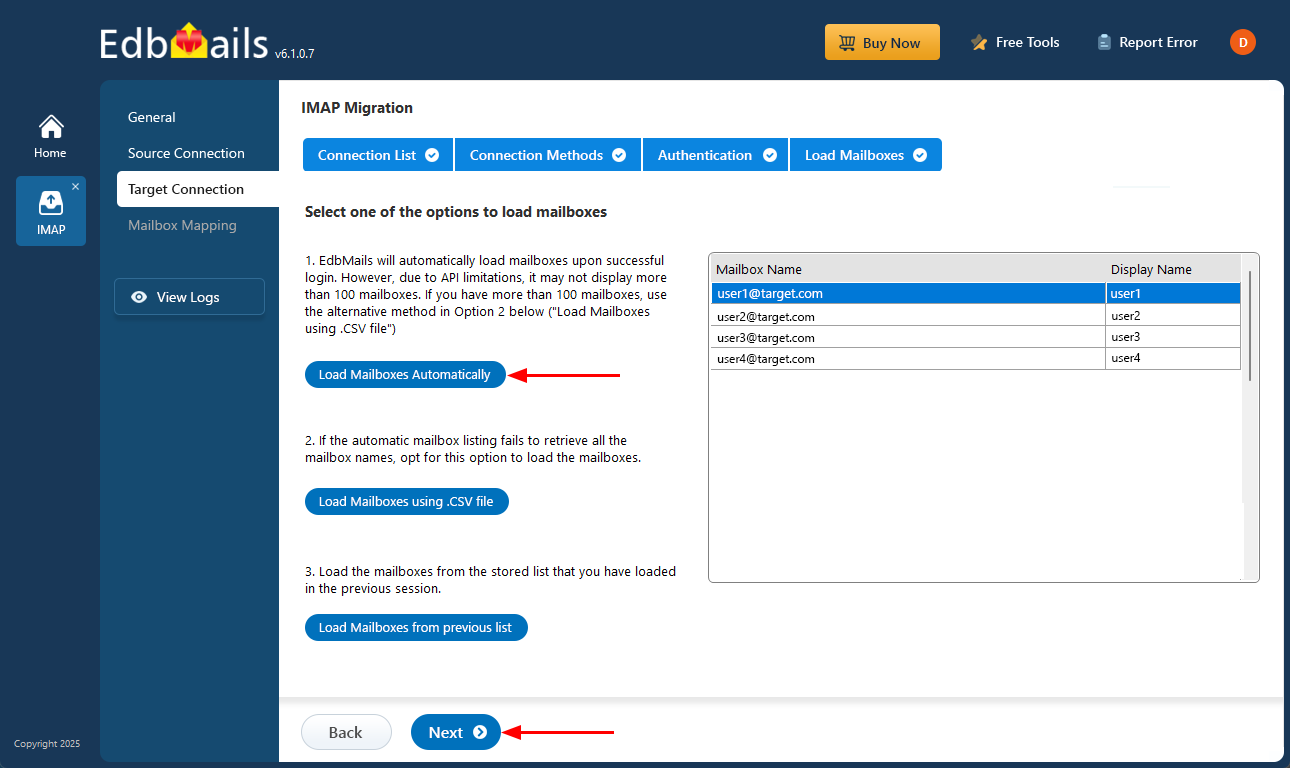
- Once authentication is completed successfully, select any one of the following methods to load the mailboxes:
i) Load Mailboxes Automatically: EdbMails loads the mailboxes automatically after login, making the setup quick and simple. Due to Microsoft API limitations, only up to 100 mailboxes may be displayed. If your organization has more than 100 mailboxes, use the alternative option below.
ii) Load Mailboxes using CSV file: If the automatic method does not retrieve all mailbox names, choose the ‘Load Mailboxes using .CSV file’ option to manually select and load the required mailboxes.
iii) Load Mailboxes from previous list: You can directly access mailboxes from the list that was imported and saved during your previous session.
- Select ‘Load Mailboxes Automatically’ and click ‘Next’ to proceed.
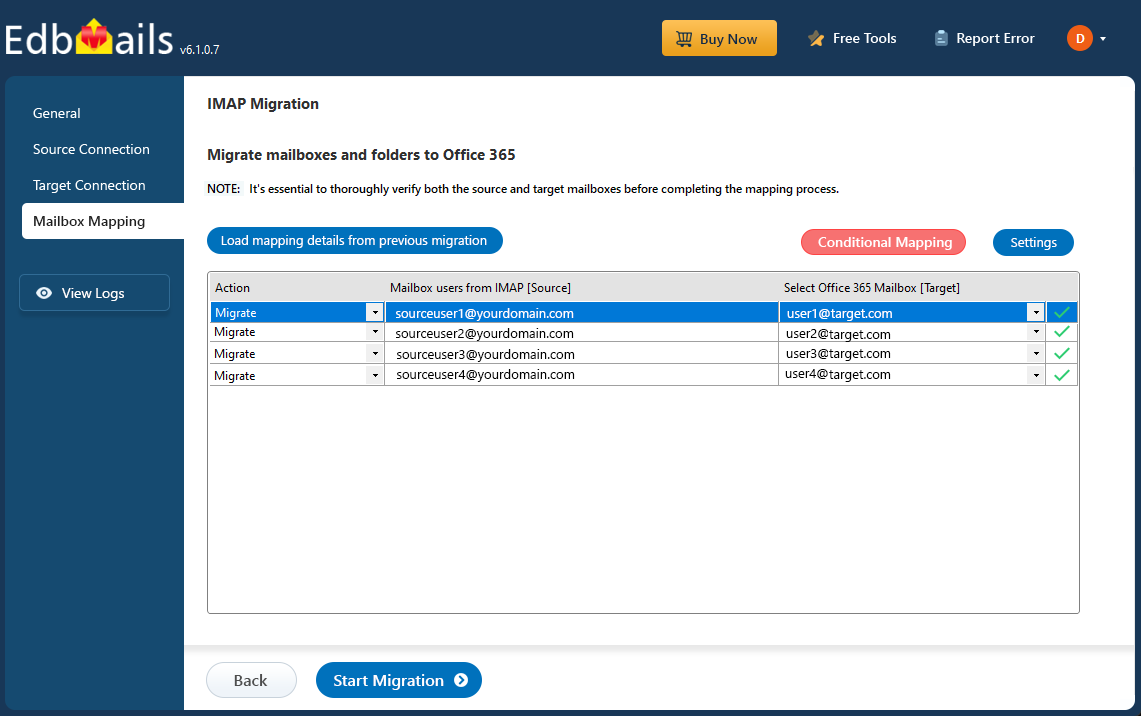
Step 5: SmarterMail to Office 365 mailboxes mapping
- Select a preferred option to map the source mailboxes and folders with their corresponding mailboxes and folders on the target Office 365 account.
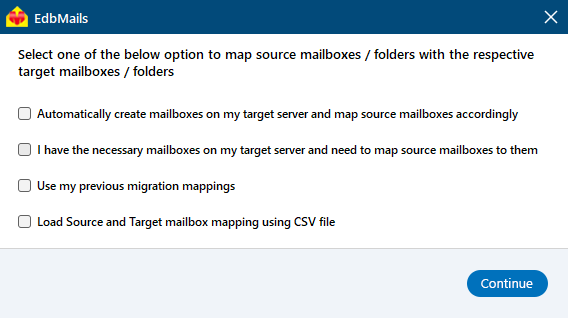
- EdbMails lets you automatically create the required mailboxes in your target Office 365 account.
- It also automatically maps your source Smartermail mailboxes and folders to the matching ones in Office 365, making large migrations easier to manage.
- Select a preferred option to map the source mailboxes and folders with their corresponding mailboxes and folders on the target Office 365 account.
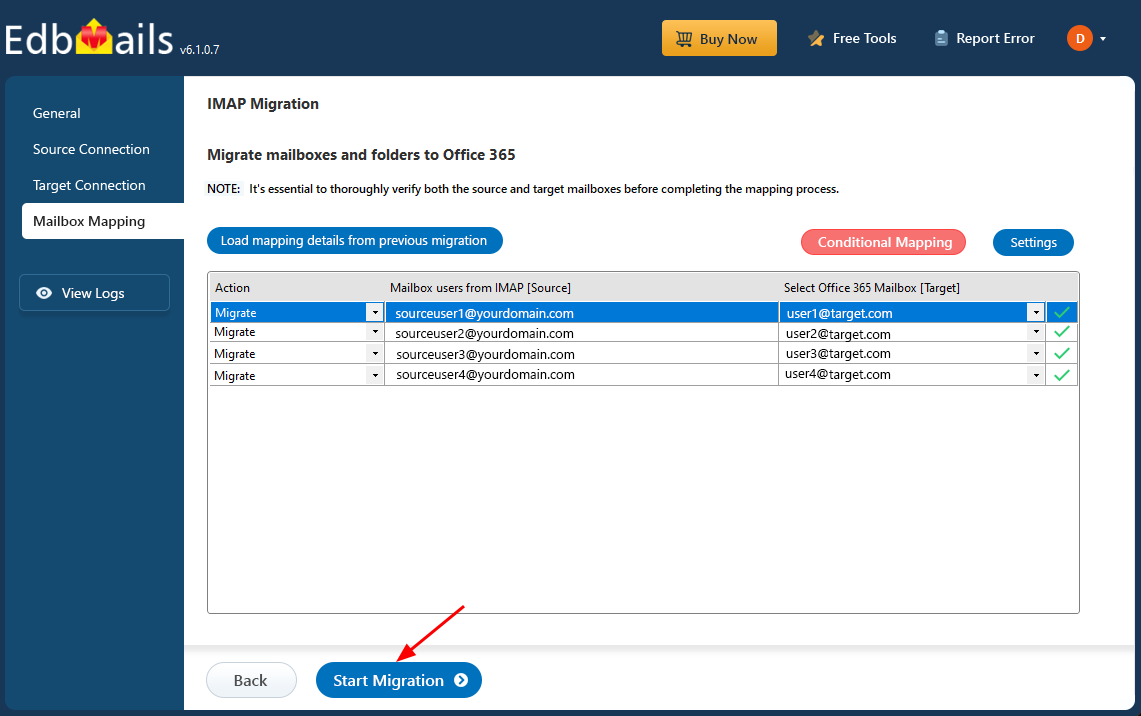
Step 6: Start SmarterMail to Office 365 migration
- Verify the mailbox mapping, then click the ‘Start Migration’ button to begin the migration process.
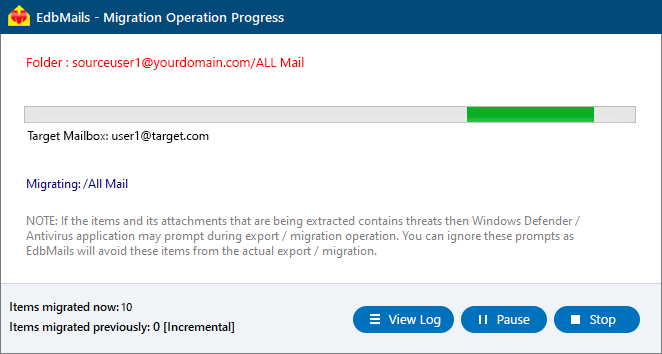
- Click the ‘View Logs’ button to access the full migration report. The report provides detailed information, including the mailbox mapping, an overall summary of the migration, and the item count for each mailbox and folder that was migrated.
- Verify the mailbox mapping, then click the ‘Start Migration’ button to begin the migration process.
SmarterMail to Office 365 Post-migration Tasks
- Step 1: Update the MX records to point to Office 365
Update the MX records for your domain to direct email traffic to the target Office 365 server, ensuring that messages are delivered to the correct domain-based mailboxes. Additionally, configure the Autodiscover DNS record to allow Outlook to automatically locate and connect to the migrated mailboxes for uninterrupted email access.
- Step 2: Create a new Outlook profile for users in the new domain
Configure and recreate the Outlook profile for each user in your domain if Outlook has problems connecting to Office 365 mailboxes.
- Step 1: Update the MX records to point to Office 365
Troubleshooting Guide for SmarterMail to Office 365 migration
For troubleshooting, visit Knowledge Base.
For more queries, check Frequently Asked Questions or contact support.
Benefits of EdbMails to Migrate SmarterMail to Office 365
- Direct email Transfer
EdbMails enables direct mailbox migration from SmarterMail to Office 365 without relying on intermediate formats or external tools. This streamlined approach minimizes complexity, reduces the risk of data loss, and ensures a fast and reliable transition with minimal disruption.
- Fully Compatible with all Windows OS Versions
EdbMails provides full compatibility with all Windows operating system versions, ensuring a seamless experience across environments. Whether you are using Windows 7, 8, 10, or the latest Windows 11, EdbMails delivers consistent performance, enabling easy migration without compatibility issues.
- Universal Language Compatibility
EdbMails provides multilingual support, making it suitable for businesses worldwide. The software automatically adapts to your selected language - be it English, Spanish, German, French, or others - ensuring a user-friendly and accessible migration experience for teams across different regions.
- Free Trial option
EdbMails offers a free trial, enabling users to experience the full functionality of the software before committing to a purchase. This risk-free option allows you to evaluate its efficiency and features for migrating from SmarterMail to Office 365, ensuring it meets your specific migration needs.
- Detailed Migration Reports
EdbMails generates detailed migration reports that provide complete transparency during SmarterMail to Office 365 migration. These reports include essential information like successfully migrated items, skipped items, errors, and other critical data, allowing administrators to track the migration's progress and resolve any issues promptly.

