Plesk to Office 365 Migration using EdbMails
Plesk is a widely used web hosting control panel that includes built-in email management and an easy interface for both Linux and Windows servers. It works well for basic hosting requirements, but as businesses expand, it may not meet growing demands for advanced collaboration and scalability.
On the other hand, Office 365 (formerly Microsoft 365) delivers a complete cloud-based environment that integrates tools such as Word, Excel, PowerPoint, SharePoint, and Teams, enabling better teamwork and streamlined business processes. Migrating from Plesk to Microsoft 365 eliminates ongoing server maintenance and opens access to stronger security, enhanced features, and flexible scalability. For organizations looking for a more robust and adaptable platform, Microsoft 365 stands out as a better long-term solution compared to Plesk.

User Query
"Since we switched web hosts, we've been looking for a suitable method to migrate our mailboxes from Plesk to Office 365. We're not very good at these migrations because we tried a few solutions and ran into problems. Our main requirement is that our data be moved as smoothly as possible. Could you please guide us in the right direction? Thank you very much."
Why do users prefer EdbMails for Plesk to Office 365 migration?
Migrating from Plesk to Office 365 manually can lead to issues like data loss, corruption, or extended downtime. EdbMails IMAP migration tool offers a secure and efficient alternative with an intuitive interface suited for both technical and non-technical users. It ensures a smooth migration of emails and associated data while preserving structure and integrity. Features like incremental migration transfer only new or modified items, avoiding duplication, while automated mailbox mapping ensures accurate mailbox alignment between Plesk and Office 365. With concurrent migration, multiple mailboxes can be migrated at once, saving time and minimizing disruption. EdbMails provides a dependable and seamless migration experience for organizations moving from Plesk to Office 365.
Why Businesses Choose Office 365 Over Plesk
Organizations move from Plesk to Office 365 to benefit from a modern, secure, and collaborative platform. Key reasons include:
- Integrated productivity tools like Word, Excel, Teams, and SharePoint.
- Enhanced security with encryption, MFA, and threat protection.
- Scalable mailbox storage to support growing teams.
- Cloud accessibility from any device, ensuring flexibility and continuity.
- Automatic updates and maintenance, reducing IT overhead.
- Advanced collaboration features for real-time communication and file sharing.
Plesk to Office 365 Migration Planning
Effective planning is essential for a seamless Plesk to Office 365 migration. A structured approach minimizes risks, prevents data loss, and ensures a smooth transition. Follow these key steps to prepare your source and target environments:
- Define Migration Scope: Determine the number of mailboxes and specific data types (e.g., emails, contacts, calendars) to transfer from Plesk to Office 365.
- Document Permissions: Record all Plesk user permissions and folder access settings to ensure accurate mapping in Office 365.
- Prepare Office 365 Environment: Set up user mailboxes, assign licenses, and verify domain settings in Office 365 for uninterrupted email delivery. Learn more at Microsoft’s guide to adding users and licenses.
- Assess Network Capacity: Verify sufficient bandwidth and network stability to support large-scale data transfers without performance issues.
- Conduct a Test Migration: Run a trial migration with a small set of mailboxes to validate the process and address potential challenges. Explore our for solutions to common issues.
Plesk to Office 365 migration prerequisites
Follow the below pre-migration activities while migrating Plesk to Office 365
- Ensure that you have admin access Plesk and Office 365 accounts
The admin account that has all the necessary permissions to migrate mailboxes on behalf of all the users in your organization. Make sure to assign the Organization Management role group and impersonation rights to the admin user on Office 365.
- Create Office 365 mailboxes and assign the licenses
Click here to Add users and assign licenses to Office 365 users
- To migrate Plesk mailboxes to Office 365 Public folders, ensure that you create a public folder and assign users to mailboxes on the Office 365 server.
- If you are in plan to migrate mailboxes to Office 365 archive mailboxes, ensure to enable In-Place archive in Office 365 admin center.
Steps to enable archive mailbox in Microsoft 365.
- If you have a custom email domain from the source which you want to retain and receive emails to, you must add and verify the domain on Office 365.
Steps to add a custom domain to Office 365 and steps to add DNS records to connect your domain.
- Customize the message size limits for large size messages
Follow the steps to increase the message size on Office 365 to 150MB. See message size limits on Office 365 for more information.
- Ensure that you have admin access Plesk and Office 365 accounts
Steps to Migrate Plesk to Office 365
Step 1: Download and install EdbMails IMAP migration application
- Download EdbMails and install the application on any computer operating on Windows OS.

- Open the EdbMails application on your system.
- Enter your registered email address and password, then click ‘Login’. If you are a new user, select ‘Start Your Free Trial’ to continue with the trial version.Note: The trial version includes all major features and lets you export up to 30 items per folder. To unlock unlimited exports and remove this limit, purchase a valid license from the official EdbMails website.
Purchase the license directly from the official website
Once the purchase is complete, close and relaunch the application. Log in again with the same email address and password used for the purchase to activate the license successfully.

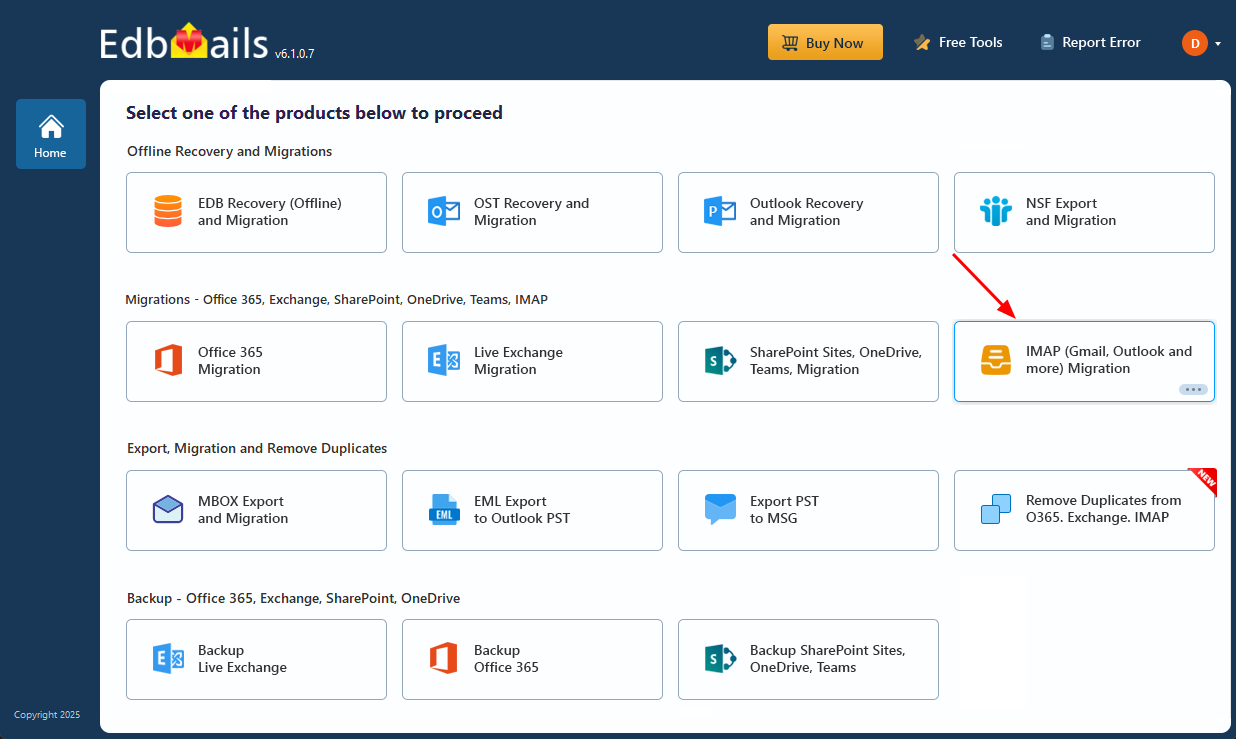
- Select the option ‘IMAP (Gmail, Outlook & more) Migration’.
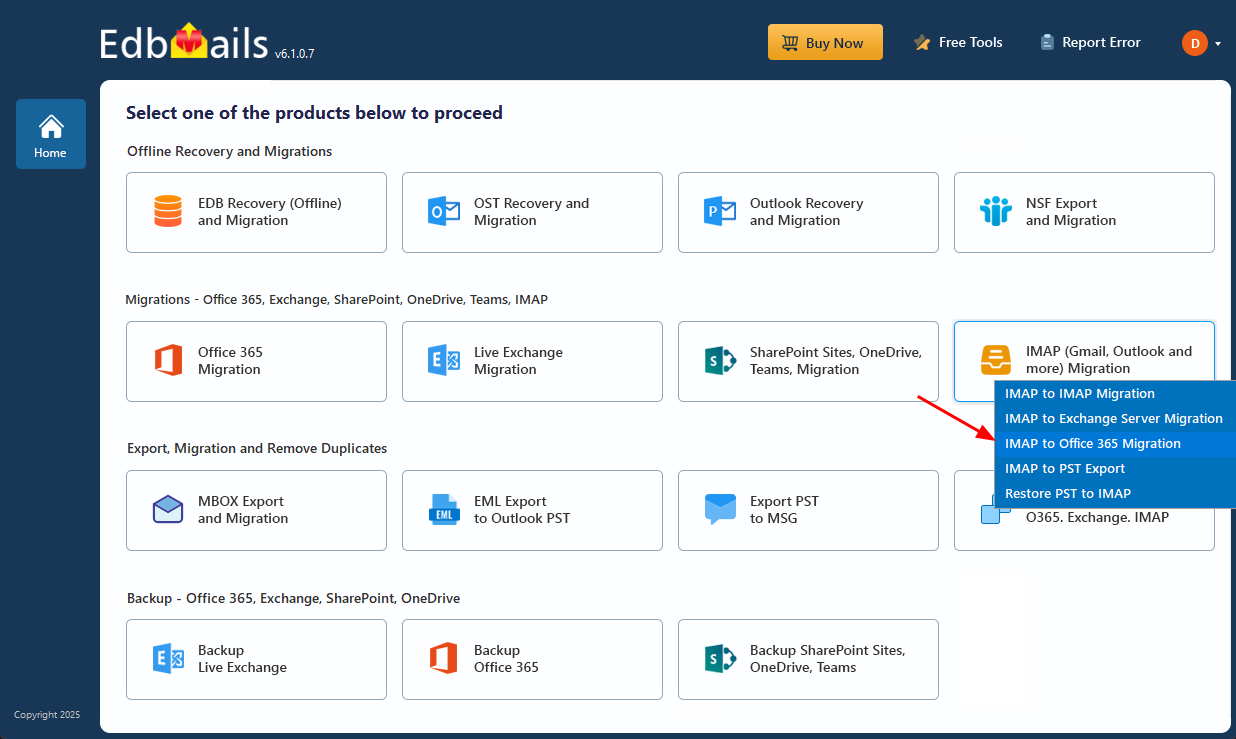
- Select ‘IMAP to Office 365 Migration’.
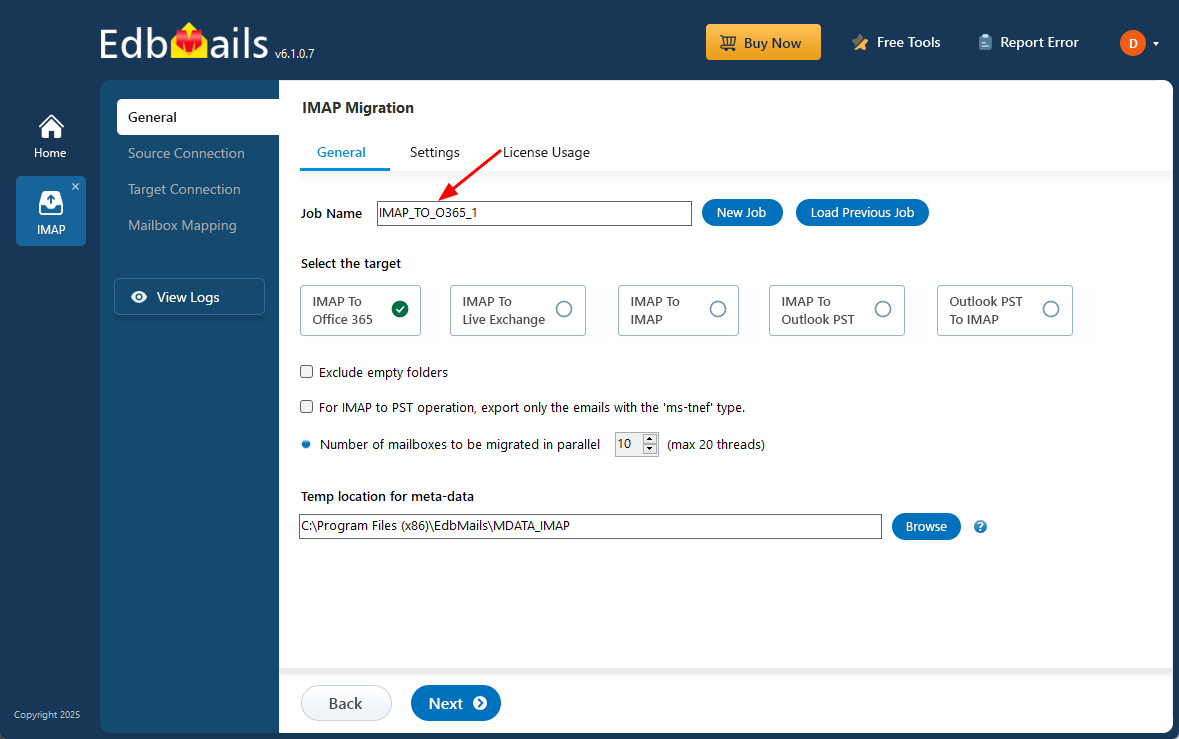
- Use the default job name or select 'New Job' to customize the name.
- Download EdbMails and install the application on any computer operating on Windows OS.
Step 2: Connect to source Plesk server
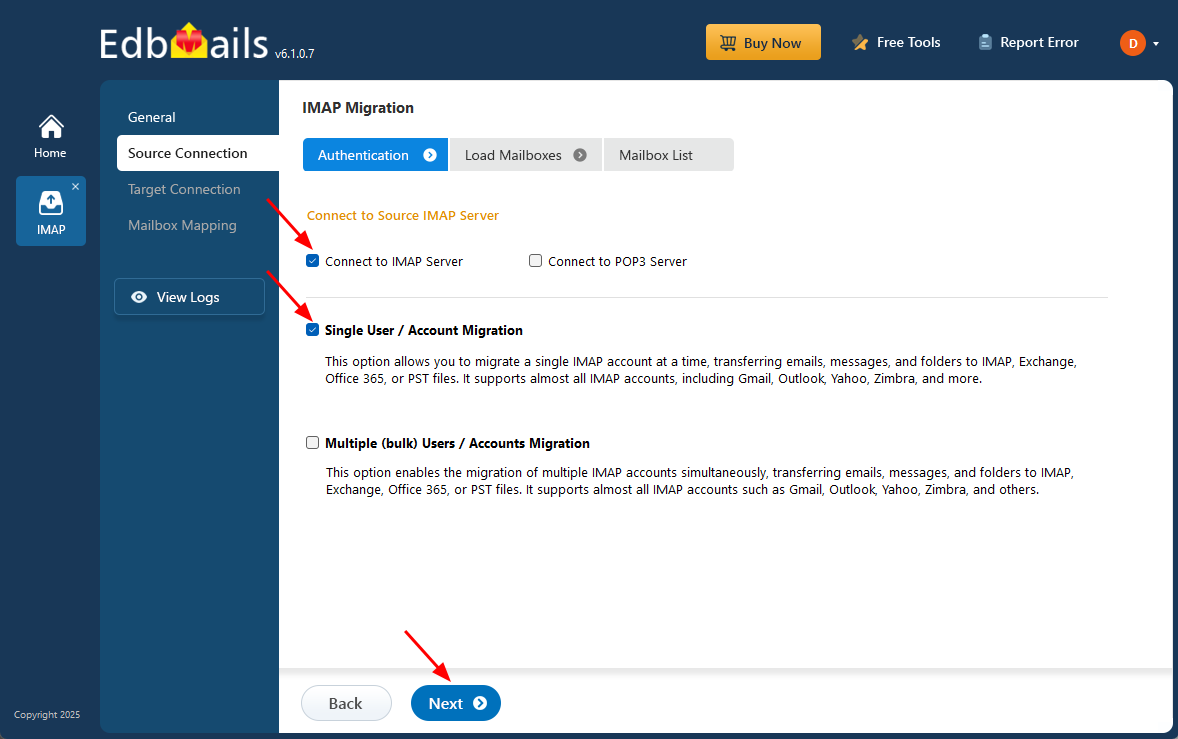
- To connect a single Plesk account for migration, click ‘Single User / Account Migration’, choose the suitable connection option such as ‘Connect to IMAP Server’ or ‘Connect to POP3 Server’. Click ‘Next’ to proceed.
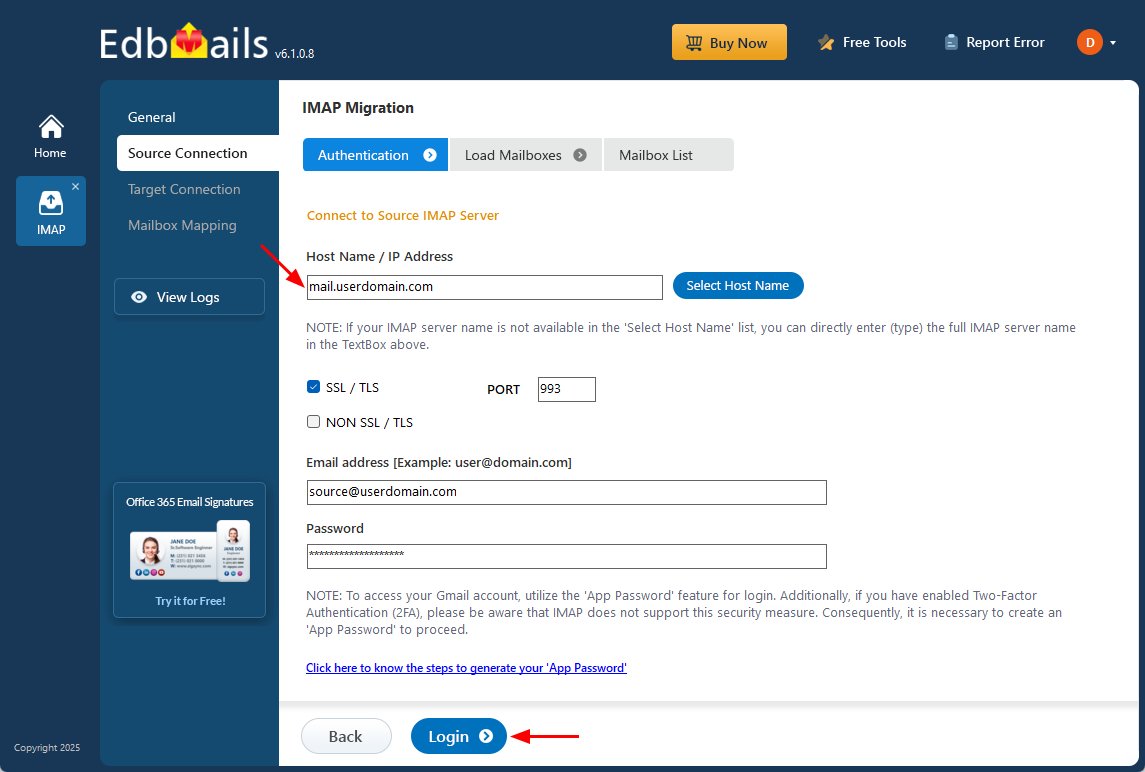
- For a single user login, choose the correct IMAP host name for Plesk from the list or manually enter it (e.g., mail.userdomain.com).
- Then, fill in the email address and password.
- If you are adding a Gmail account, create an app password and use it instead of your standard account password.
- Next, click the ‘Login’ button.
- To migrate multiple Plesk mailboxes at once, select ‘Multiple (bulk) Users/Accounts Migration’, choose the suitable connection method such as ‘Connect to IMAP Server’ or ‘Connect to POP3 Server’.
- Then proceed by clicking ‘Next’.

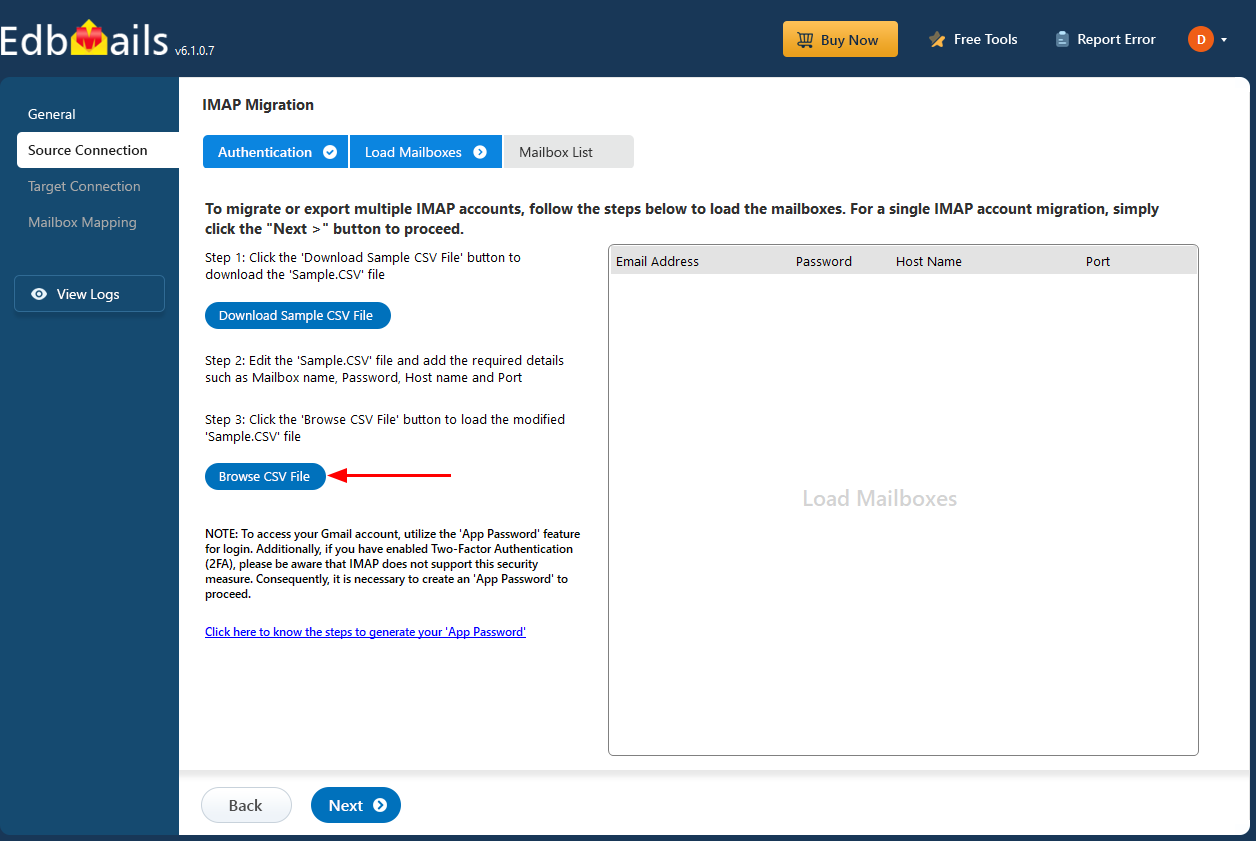
- Select ‘IMAP Migration CSV File’ to download a pre-formatted template. Use this file to fill in the required mailbox information such as email addresses, server details, and login credentials to configure bulk migration.

- Modify the CSV file with the required details such as email address, password, host name and port number in the CSV file and save the changes.
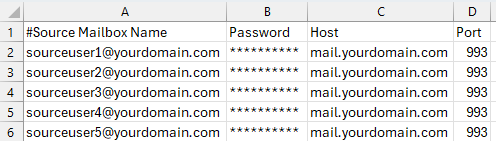
- Once you've made the necessary changes to the CSV file, save and close it.
- Then, click on the 'Load Modified CSV File' button, find your updated file, select it, and open it to continue.
- To connect a single Plesk account for migration, click ‘Single User / Account Migration’, choose the suitable connection option such as ‘Connect to IMAP Server’ or ‘Connect to POP3 Server’. Click ‘Next’ to proceed.
Step 3: Select the mailboxes or folders to migrate
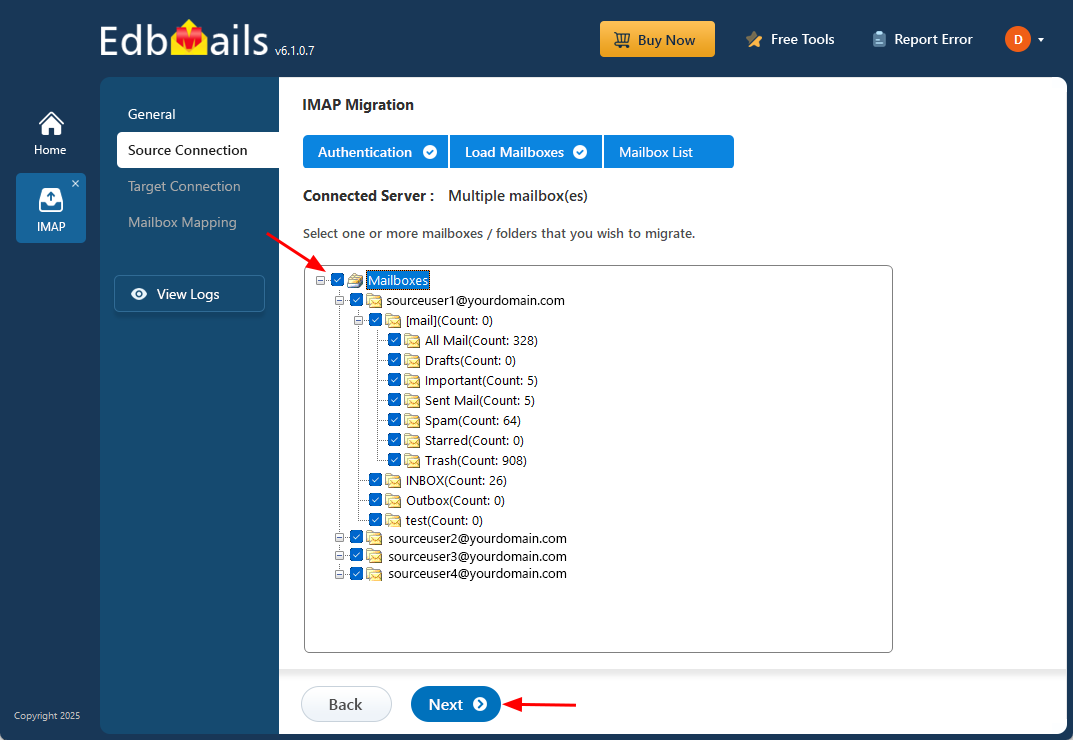
- Choose one or more mailboxes or specific folders you wish to migrate.
- Then click ‘Next’ to continue.
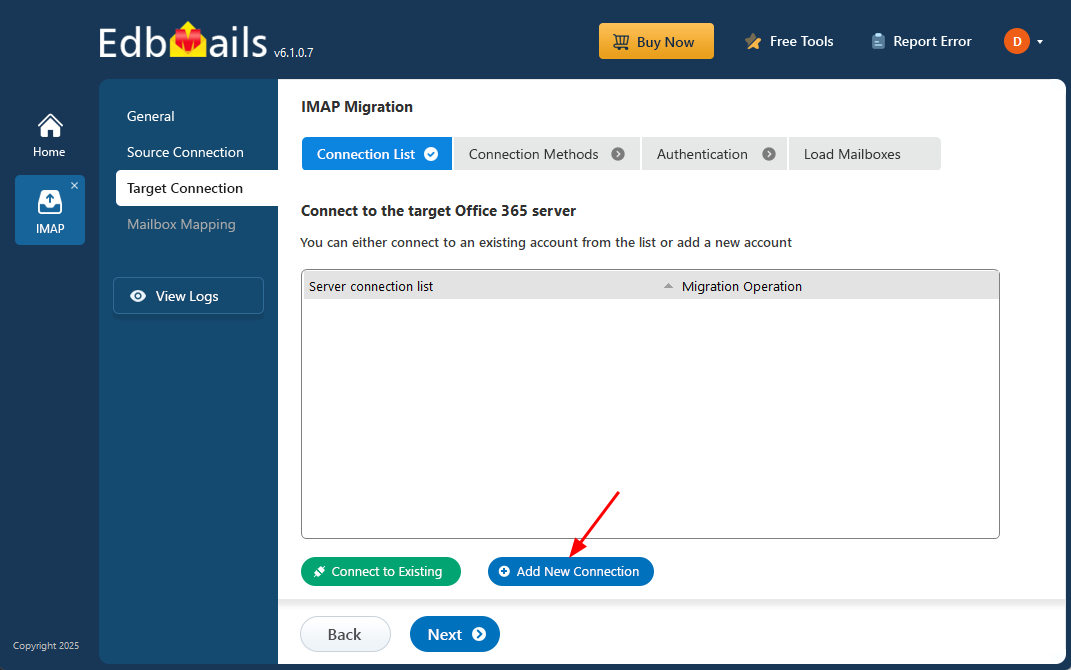
Step 4: Connect to target Office 365 server
- Select the ‘Add New Connection’ option to establish a connection with your target Office 365 account.
- If you have previously set up a connection, you can choose it from the available list and click ‘Connect to Existing’ to proceed.
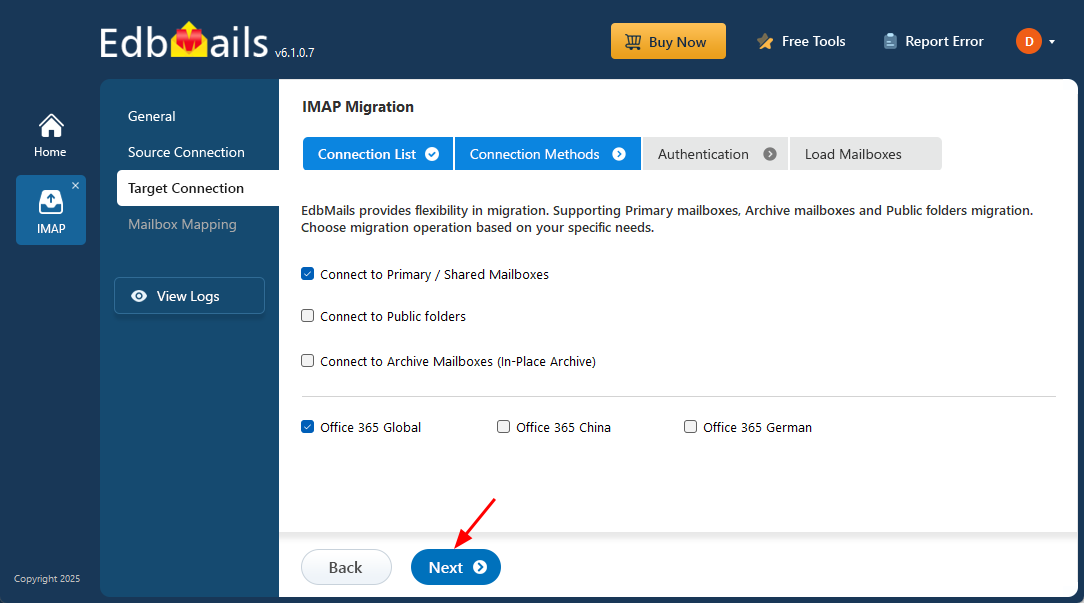
- With EdbMails, you can flexibly migrate primary mailboxes, archive mailboxes, and public folders smoothly using a single, unified solution.
- Select the required connection settings and click ‘Next’ to proceed with the authentication process.
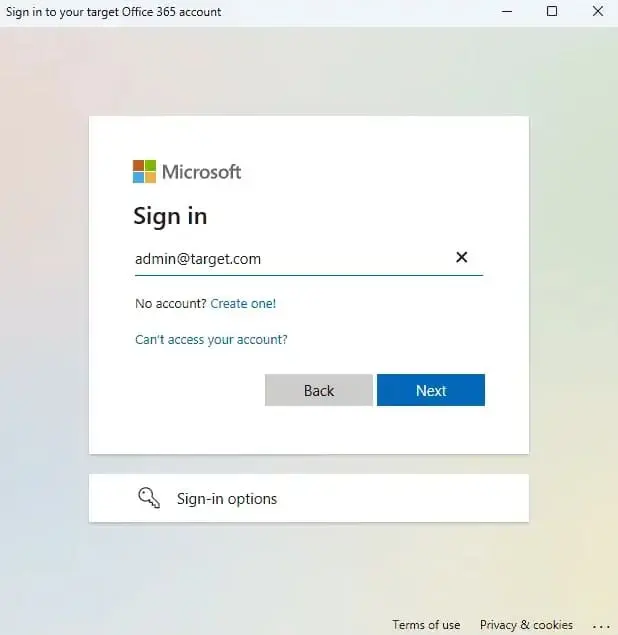
- Choose your preferred secure authentication method for the target Office 365.
- The login process takes place on the official Microsoft sign-in page, where your credentials are securely authenticated through OAuth 2.0, ensuring a safe and protected access experience.
- Click the ‘Login’ button.

- Authenticate on Microsoft sign-in page.
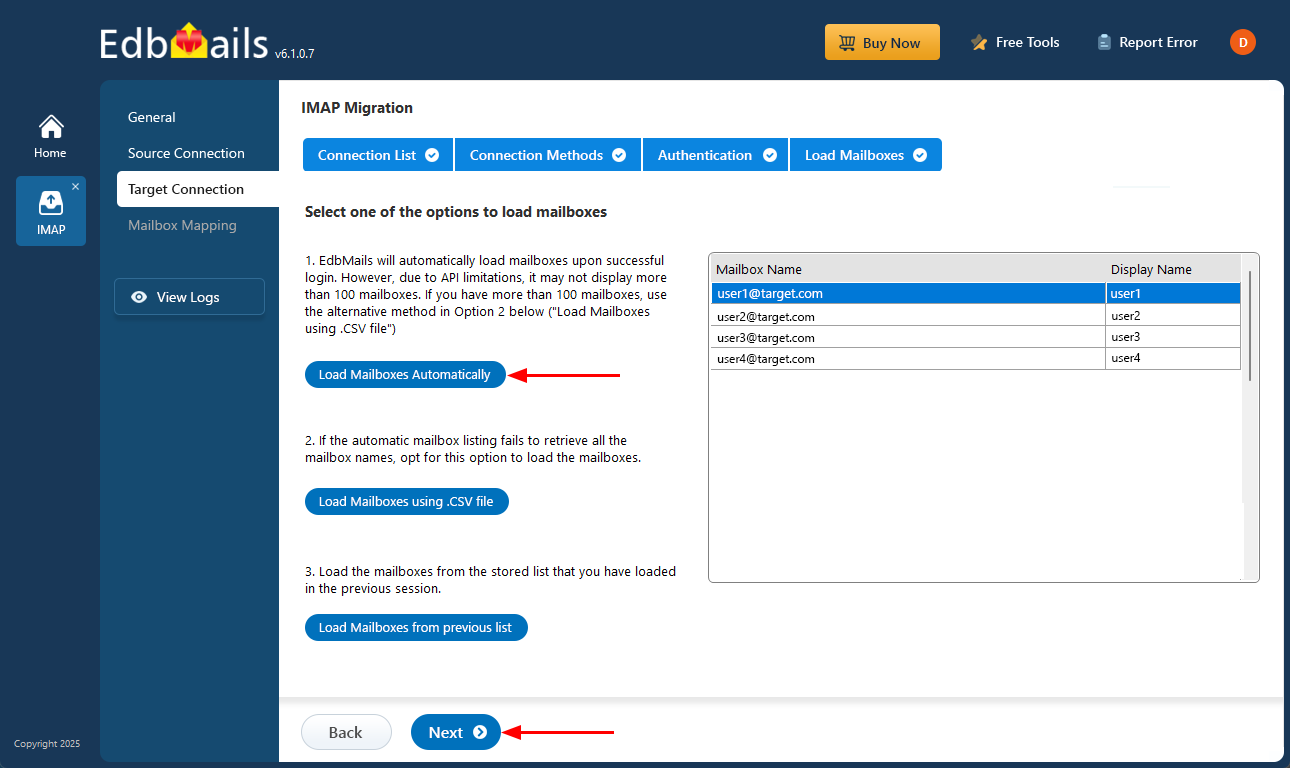
- Once you sign in to your target Office 365 server, choose the preferred method to load the mailboxes
- EdbMails loads mailboxes automatically to simplify the configuration process. Due to Microsoft API limitations, this option displays a maximum of 100 mailboxes at a time
- For larger organizations or when selecting particular mailboxes, use the ‘Load Mailboxes using .CSV file’ option, which enables manual selection and gives you full control over the loading process
- Click ‘Next’ to continue
Step 5: Plesk to Office 365 mailboxes mapping
- Select the mapping option that best aligns with your requirements.
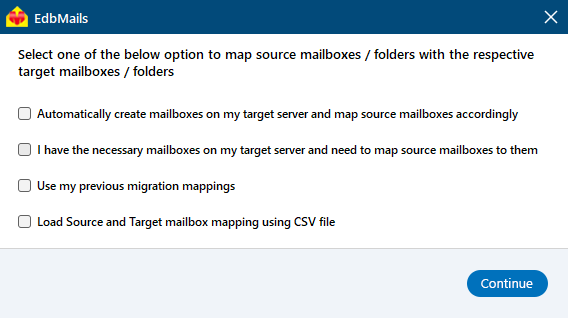
- You can choose to let EdbMails automatically create mailboxes in Office 365 and map them between the source and target servers. This feature is especially useful for large-scale migrations, saving time, reducing manual effort.
- Select the mapping option that best aligns with your requirements.
Step 6: Start Plesk to Office 365 migration
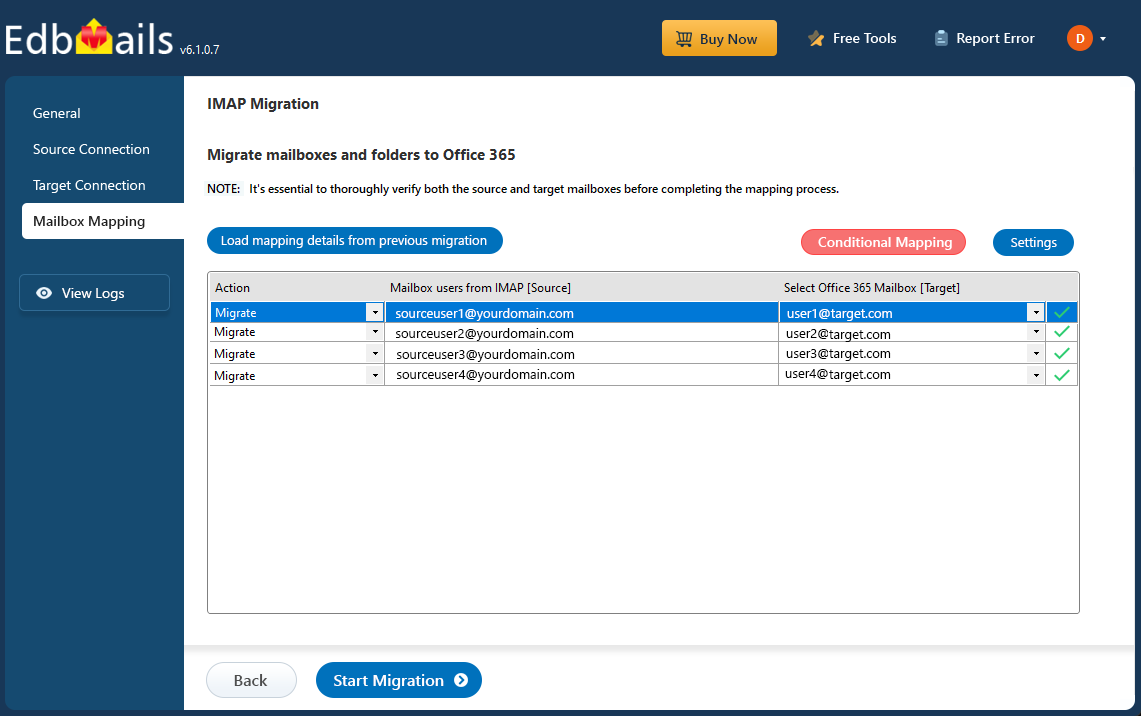
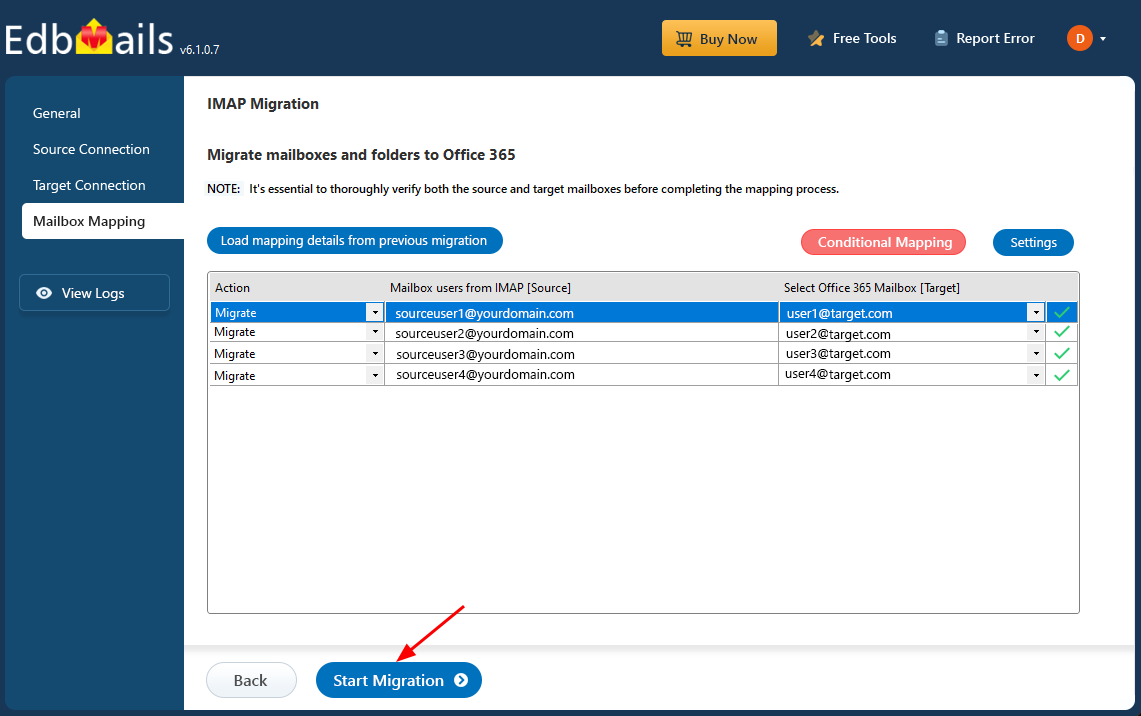
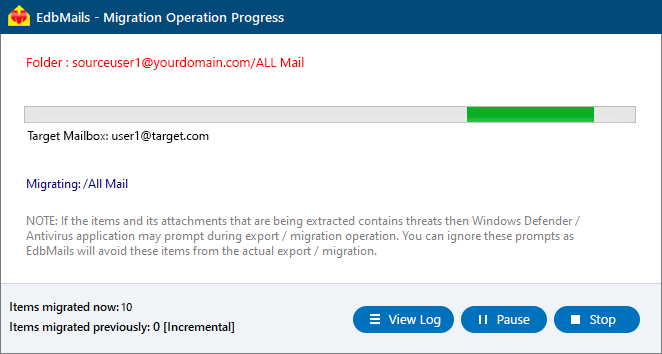
- After mapping the mailboxes, click the ‘Start Migration’ button to initiate the migration process.
- Click the ‘View Log’ button to view the migration report, which includes mapping details and the total count of migrated emails.
- Login to your target server and verify the migrated items.
- After mapping the mailboxes, click the ‘Start Migration’ button to initiate the migration process.
Plesk to Office 365 post migration tasks
- Step 1: Update the MX records to point to Office 365
If you have not done this step previously, change the DNS records known as MX records to enable email and receive messages on the target Office 365 server. In addition, configure the Autodiscover record to allow Outlook to connect to the migrated mailboxes.
- Step 2: Create a new Outlook profile for users in the new domain
Configure the Outlook profile for each user in your domain if Outlook has problems connecting to Office 365 mailboxes.
- Step 1: Update the MX records to point to Office 365
Troubleshooting Guide for Plesk to Office 365 Migration
For assistance with common migration issues, please refer to the troubleshooting guide. For more in-depth details on EdbMails IMAP migration, visit the Frequently Asked Questions(FAQs) section.
Advantages of EdbMails for Plesk to Office 365 Migration
- Efficient email account Migration with Data Integrity
EdbMails offers a reliable solution for migrating email accounts from Plesk to Office 365. It transfers all mailbox data including emails, folders, attachments, and other items while maintaining complete data integrity throughout the process. The software is designed to prevent data loss or corruption, ensuring that all your email content is preserved exactly as it was in the source environment.
- Preserves Mailbox Structure and Hierarchy
One of the standout features of EdbMails is its ability to preserve the original structure and hierarchy of your mailbox data during migration. This ensures that your emails and folders retain their organization, eliminating the need for post-migration reorganization, which can be time-consuming and error-prone.
- Selective Migration for Flexibility
EdbMails offers the flexibility to selectively migrate specific email folders or data within a given date range. This is particularly useful for businesses that want to migrate only relevant data, saving time and reducing migration size while avoiding unnecessary transfers.
- Batch Migration for Multiple Accounts
With the ability to support batch migration, EdbMails allows you to migrate multiple email accounts simultaneously. This feature speeds up the migration process, ensuring that your team experiences minimal disruption while the migration is carried out in parallel, without the need for individual account transfers.
- Automatic Mailbox Mapping
EdbMails automates the mapping of source and target mailboxes, reducing the risk of errors and manual intervention. This streamlined process not only saves time but also ensures that each mailbox is properly aligned, leading to a more accurate and hassle-free migration.
- Preserves Folder Permissions and Metadata
During migration, EdbMails ensures that all folder permissions and email metadata (such as read/unread status, sent/received times) are maintained. This helps avoid disruptions in user access and guarantees that email records are fully intact post-migration.
- Comprehensive Migration Reporting
EdbMails generates detailed migration reports, providing a thorough overview of the migration process. These reports are useful for reference, auditing, and troubleshooting, ensuring transparency and accountability throughout the migration lifecycle.
- Free Trial for Evaluation
To ensure that EdbMails meets your needs, you can download and evaluate the software with the free trial, you can export up to 20 Plesk emails to an Office 365 account, allowing you to assess the software’s capabilities before committing to the full migration.

