Migrate email from Bluehost to Office 365
As businesses expand, their communication needs become more demanding, creating the need for a powerful and scalable email solution. Many companies begin by hosting both their website and email with providers such as Bluehost, GoDaddy, or HostGator because bundled plans are easy to manage and cost effective. Although this arrangement is convenient in the early stages, it can become limiting when it comes to scalability, collaboration capabilities, and advanced enterprise features. For this reason, many organizations prefer to keep their existing website hosting while migrating their email services to Microsoft Office 365. Even so, migrating emails, attachments, and complete mailbox structures from one platform to another can present certain challenges. A well-planned migration, backed by a reliable tool, is essential to ensure data integrity and reduce downtime.

EdbMails IMAP migration tool provides a reliable and hassle-free way for businesses to migrate email from Bluehost to Office 365. As a Microsoft-partnered solution, it enables secure and efficient migration of emails, attachments, and folders with minimal downtime. The software provides granular migration options, allowing organizations to choose specific emails, attachments, or folders instead of migrating everything. It also preserves mailbox metadata, including timestamps, read or unread status, and original folder hierarchy, ensuring data consistency after migration. With a script-free process, users can complete the migration smoothly without technical complexity or coding knowledge. In addition, EdbMails uses AES 256-bit military-grade encryption to protect data throughout the migration process. These capabilities make EdbMails a dependable choice for businesses planning to migrate their email services to Office 365.
User Query
" I'd like to switch my business email from Bluehost to Office 365 and retain the former for the website, but I'm unsure how to do it. Can I use Microsoft 365 to register my Bluehost domain name and still be able to receive emails in Office 365 after migrating and adding my domain name. Thank you for any advice."
Top Reasons to Migrate from Bluehost to Office 365
- Cloud-based Flexibility:
Migrating email from Bluehost to Office 365 provides cloud-based flexibility, enabling seamless access to emails, documents, and applications from any device and location enhancing productivity and ensuring uninterrupted business operations.
- Enhanced Collaboration:
Office 365 enhances collaboration through tools like Microsoft Teams, SharePoint, and OneDrive, enabling real-time teamwork, file sharing, and seamless communication for improved business efficiency.
- Automatic Updates and New Features:
Office 365 ensures your organization stays up-to-date with automatic updates and new features, minimizing downtime and optimizing system performance without the need for manual intervention.
- Scalability:
Office 365 offers exceptional scalability, enabling businesses to easily add users or expand storage as they grow, ensuring seamless transitions and effortless adaptability to evolving business requirements
- Security and Compliance:
Office 365 provides strong security measures such as multi-factor authentication and data encryption while ensuring compliance with industry standards, safeguarding your business data.
- Data Management and Reliability:
Office 365 provides dependable data management through built-in backup features, high availability, and smooth application integration, helping reduce downtime and maintain data accuracy.
- Cost Efficiency:
Office 365 reduces IT costs by eliminating on-premise hardware and offering flexible pricing models, helping businesses optimize expenses while improving operational efficiency.
- Cloud-based Flexibility:
Bluehost to Office 365 Migration Planning
Before you actually start to migrate email from Bluehost to Office 365, you need to have a proper plan and ensure that you are prepared for the operation that helps prevent data loss, minimize downtime, and ensure a smooth transition.
Here is a quick checklist of items for your convenience.
- Decide on Domain Usage : Determine whether you want to continue using your Bluehost domain or switch to another provider. You can keep your existing Bluehost domain and connect it with Microsoft 365 to receive and send emails after migration.
- Plan the Migration Approach : Choose whether to migrate all mailboxes at once or move them in stages based on your business size and email volume.
- Prepare a CSV File : To migrate multiple users' mailboxes download the sample CSV file from EdbMails application and fill in the details such as email address, password, IMAP host name, port etc.
- Verify Credentials and Format : Double-check that the CSV file format is correct and that all user credentials are valid to avoid connection issues during migration.
- Clean Up Unused Mailboxes : Remove inactive or redundant mailboxes on the source server (Bluehost) to streamline the migration and reduce transfer time.
- Inform Users and Stakeholders : Notify your team and other stakeholders about the migration plan, expected timelines, and any temporary access limitations. Proper communication helps reduce confusion.
- Select and Assign Office 365 Licenses : Choose the appropriate Microsoft 365 plan based on your organization’s needs and assign licenses to each user mailbox before the migration.
- Run a Test Migration : Perform a pilot or test migration with a few mailboxes to confirm everything works as expected. This step helps you identify and fix issues before migrating all accounts.
Bluehost to Office 365 Migration Prerequisites
- Create a list of users to migrate from Bluehost in a CSV file.
- Purchase a suitable Office 365 licensing plan. You can also sign up for a 30 day free trial and decide to go with a suitable one later. Compare Office 365 business plans and Compare Office 365 enterprise plans
- Create Office 365 mailboxes and assign licenses to them
- If you plan to migrate your mailboxes to Office 365 Public folders, ensure that you create and configure the Public folder mailboxes on the target server.
- Similarly, if you want to migrate mailboxes to Office 365 In-Place archive, enable them from the admin center.
Steps to enable archive mailbox in Microsoft 365.
- If you have a custom email domain from the source which you want to retain and receive emails to, you must add and verify the domain on Office 365.
Steps to add a custom domain to Office 365 and steps to add DNS records to connect your domain.
- Configure Office 365 to send and receive large messages.
Follow the steps to increase the message size on Office 365 to 150MB. See message size limits on Office 365 for more information.
Steps to Migrate from Bluehost to Office 365
Step 1: Download and install EdbMails IMAP migration software
- Download and install EdbMails application on your computer
See a detailed list of EdbMails system requirements for IMAP migration.

- Launch the EdbMails application on your computer.
- Enter your registered email ID and password, then click ‘Login’. If you are using EdbMails for the first time, select ‘Start Your Free Trial’ to begin with the trial version.Note: The trial edition provides access to all major features and lets you migrate up to 30 items per folder. To enable unlimited migration, purchase IMAP Migration license from the official EdbMails website.After completing the purchase, close the application and reopen it. Log in again with the same email ID and password used for the purchase to activate your license successfully.

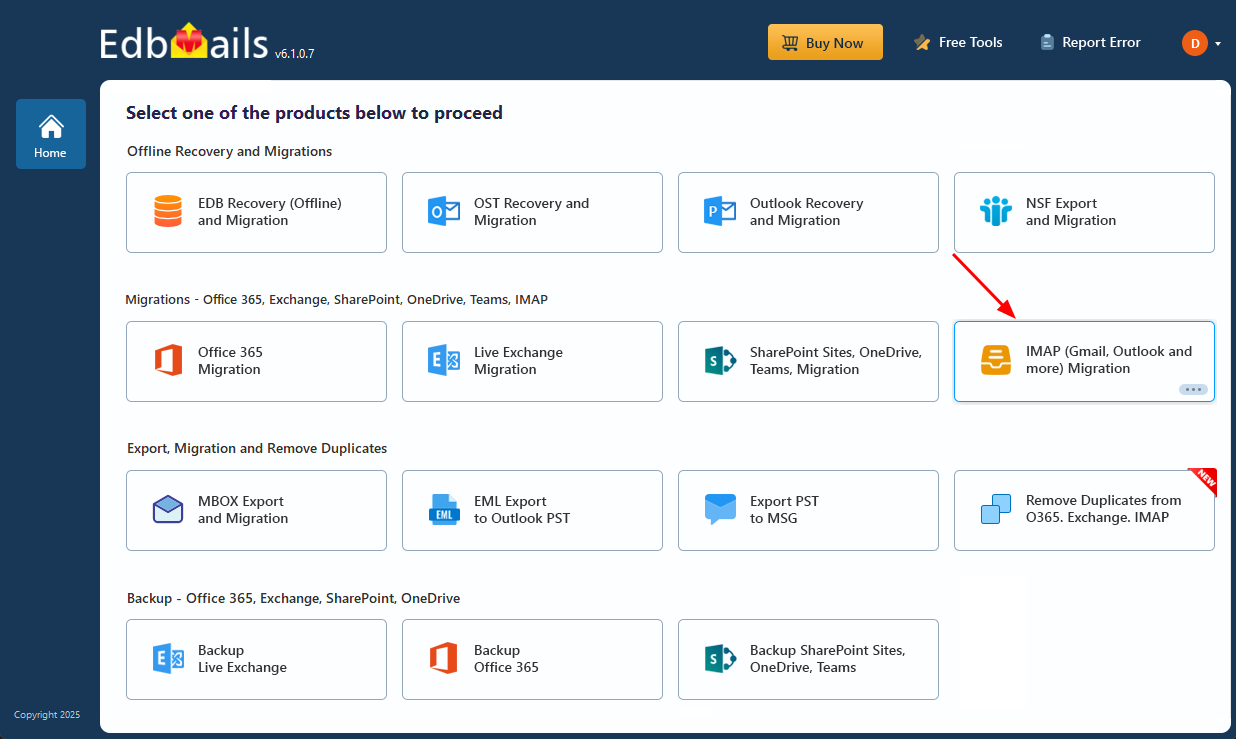
- Select the option ‘IMAP (Gmail, Outlook & more) Migration’.
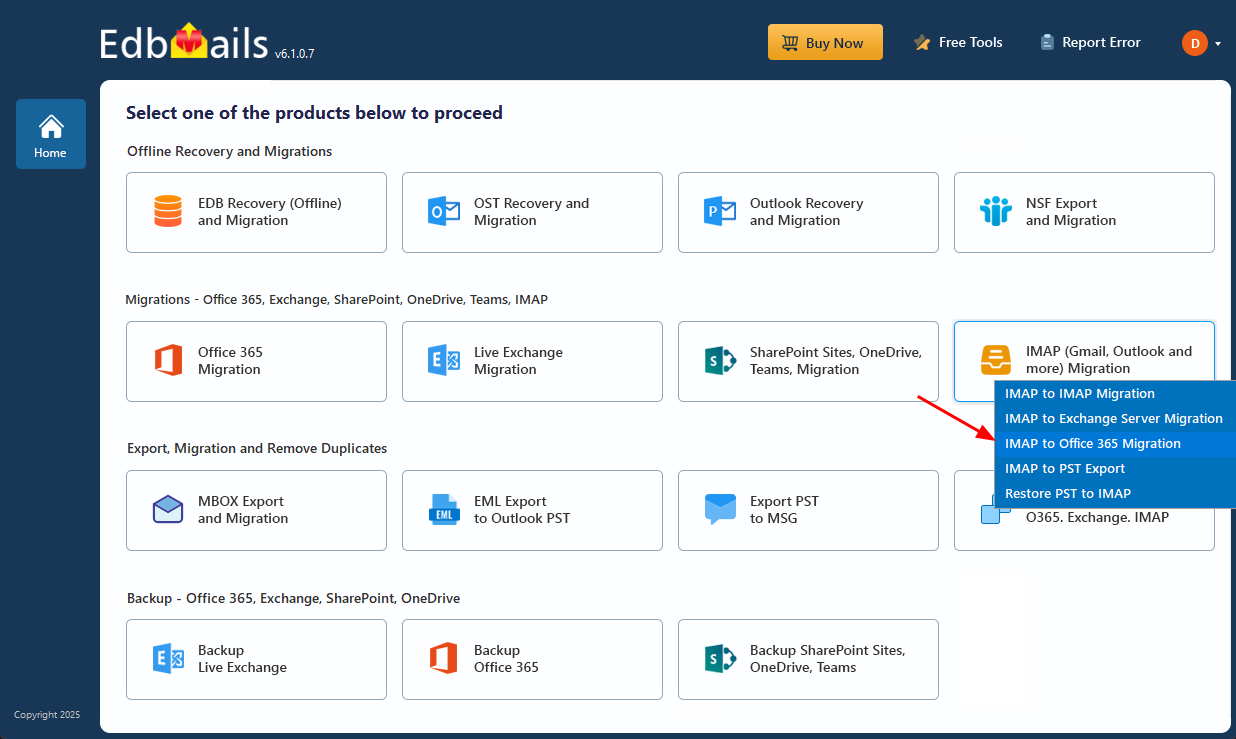
- Select ‘IMAP to Office 365 Migration’.
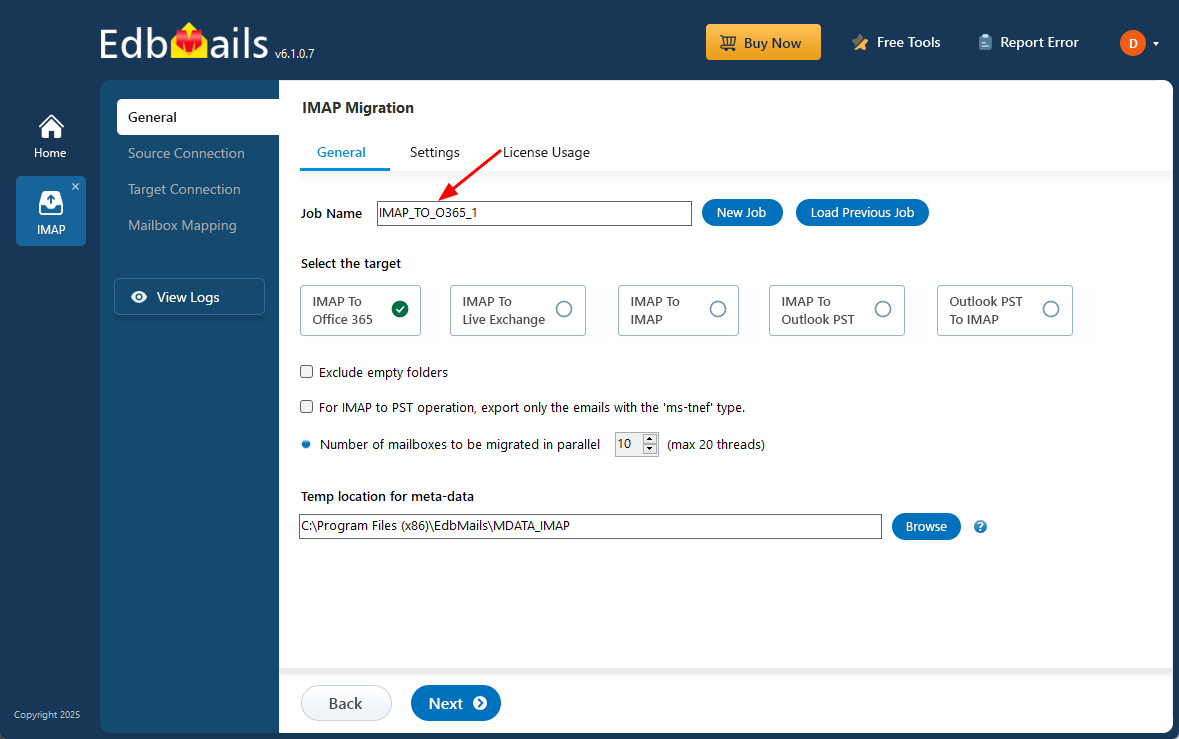
- You can continue with the default job name, or select ‘New Job’ to create a custom name that matches your migration requirements and preferences.
- Download and install EdbMails application on your computer
Step 2: Connect to source Bluehost server
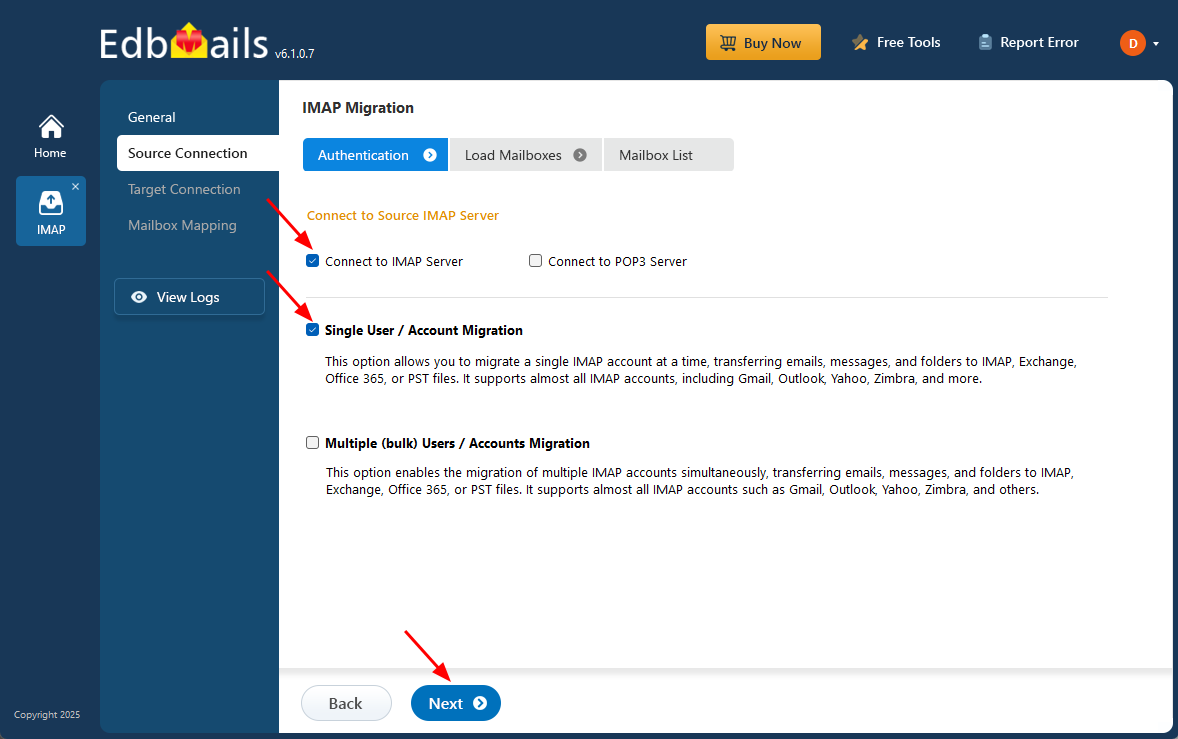
- To connect a single Bluehost account for migration, click ‘Single User / Account Migration’, choose the suitable connection option such as ‘Connect to IMAP Server’ or ‘Connect to POP3 Server’. Click ‘Next’ to proceed.
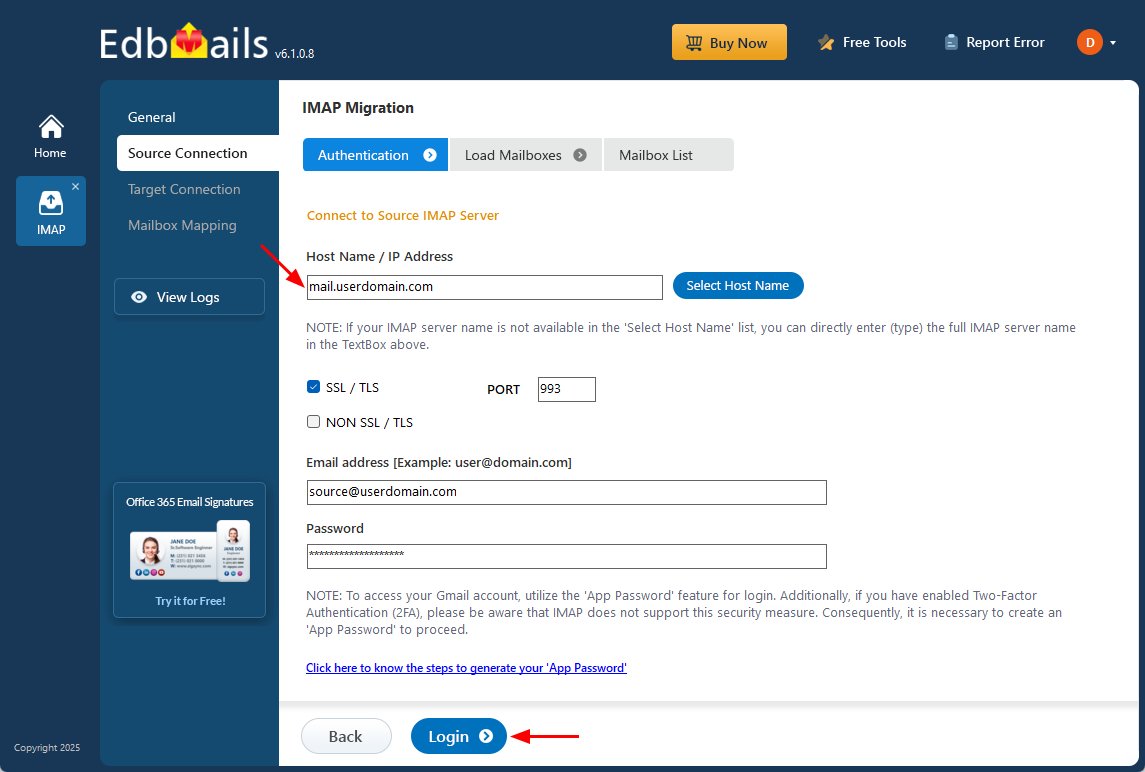
- Provide your Bluehost IMAP server information along with the required login credentials, including your email address and password, on the server login page to connect successfully.
- EdbMails maintains security by not saving your credentials and supports modern OAuth 2.0 authentication for a secure Office 365 sign-in.
- If you are unsure about the IMAP server details such as the hostname or IP address, you can easily locate them in the Bluehost Control Panel under the Email Accounts section.
- Next, click the ‘Login’ button.
- To migrate multiple Bluehost mailboxes at once, select ‘Multiple (bulk) Users/Accounts Migration’, choose the suitable connection method such as ‘Connect to IMAP Server’ or ‘Connect to POP3 Server’.
- Then proceed by clicking ‘Next’.

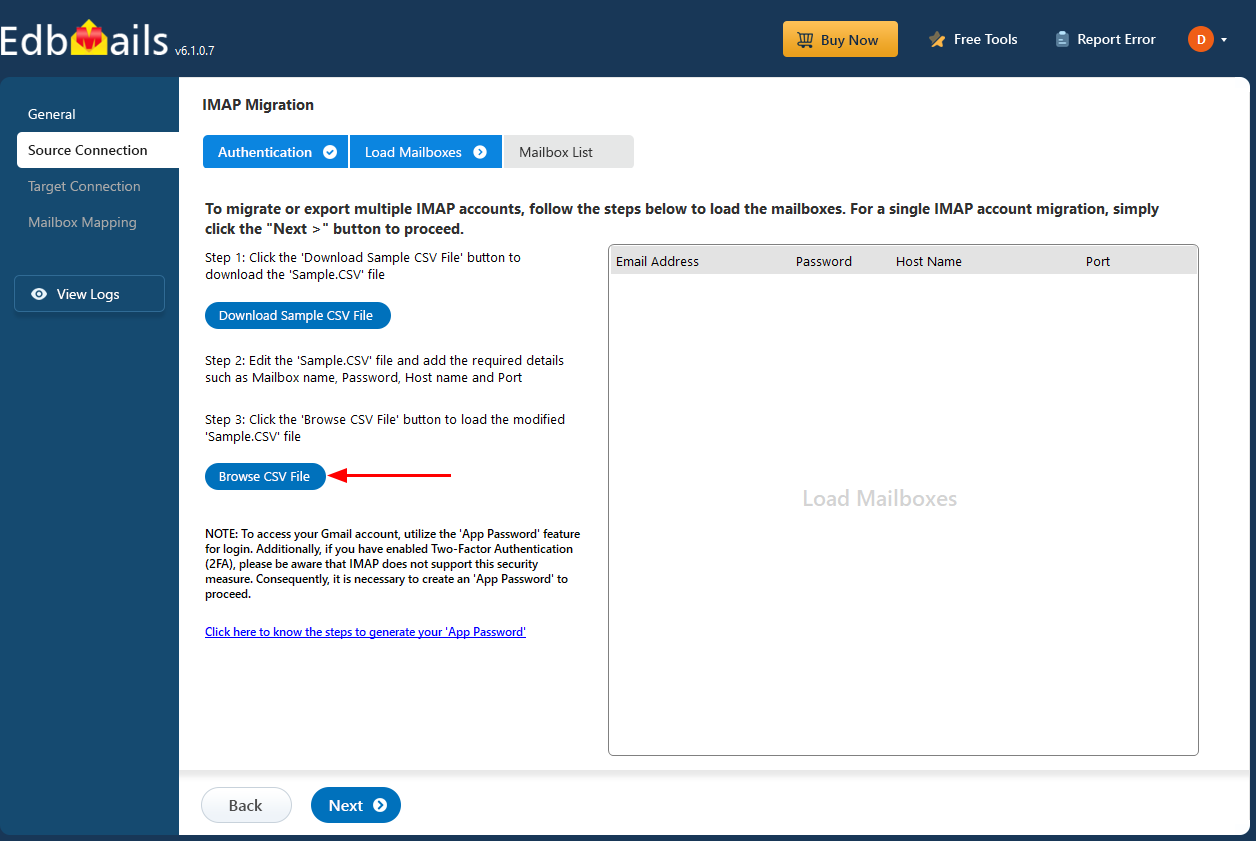
- Click on ‘IMAP Migration CSV File’, navigate to the preferred folder on your drive, and save the CSV file in that location.

- Open the CSV file and enter the required information for each mailbox, such as the email address, password, IMAP server hostname, and port number. Once all the details are correctly filled in, save the file to continue with the migration process.
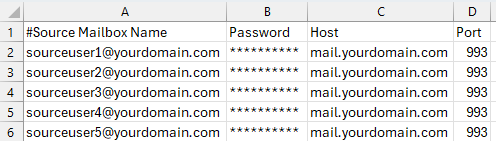
- Once you have updated the CSV file, save your changes and close it. Then select the ‘Load Modified CSV File’ option, browse to open the updated CSV file, and click ‘Next’ to continue.
- To connect a single Bluehost account for migration, click ‘Single User / Account Migration’, choose the suitable connection option such as ‘Connect to IMAP Server’ or ‘Connect to POP3 Server’. Click ‘Next’ to proceed.
Step 3: Choose the source Bluehost mailboxes to migrate.
- Pick the mailboxes or individual folders you wish to migrate, then click ‘Next’ to move forward.
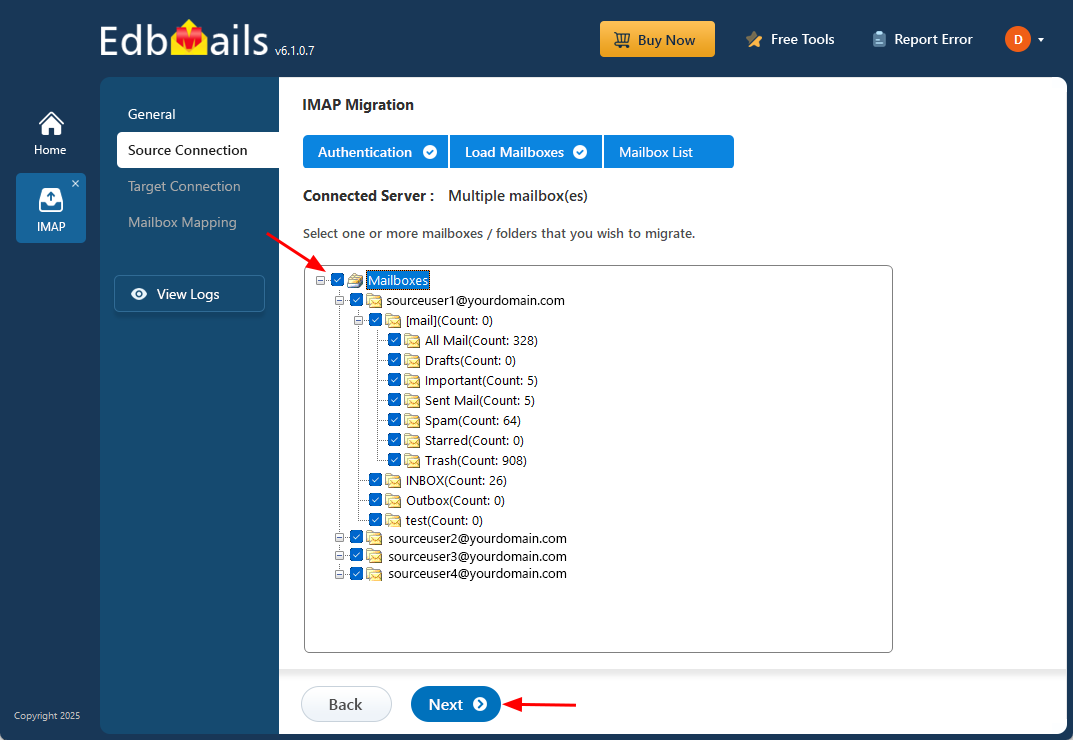
- Pick the mailboxes or individual folders you wish to migrate, then click ‘Next’ to move forward.
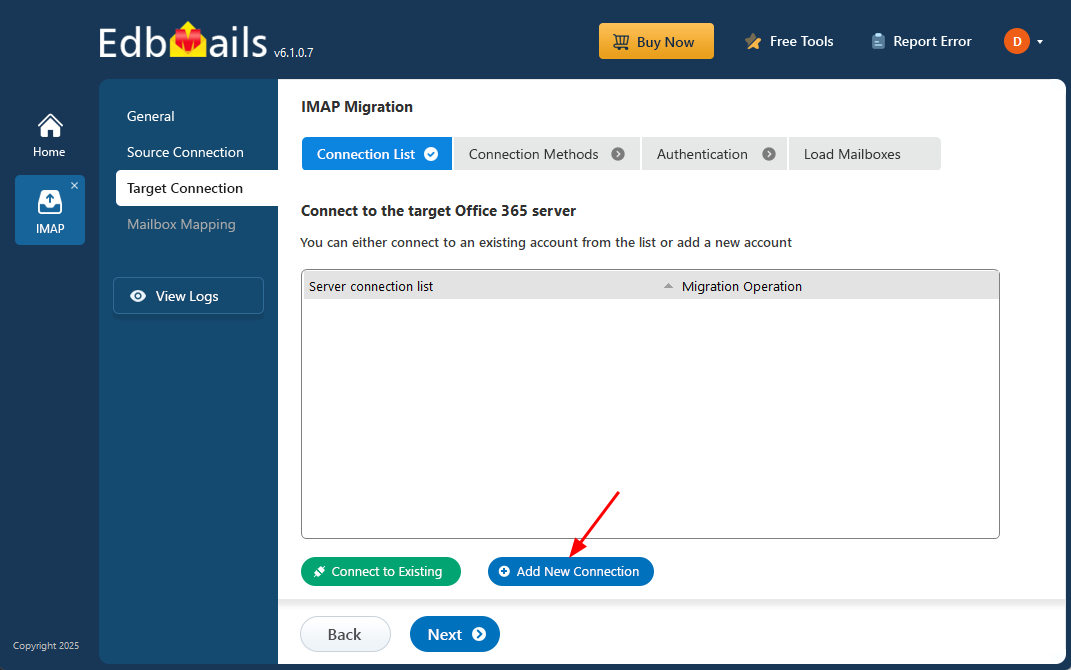
Step 4: Establish a connection to the target Office 365 server.
- Click on ‘Add New Connection’ to set up a connection with your target Office 365 account.
- If a connection has already been configured, simply select it from the list and choose ‘Connect to Existing’ to continue.
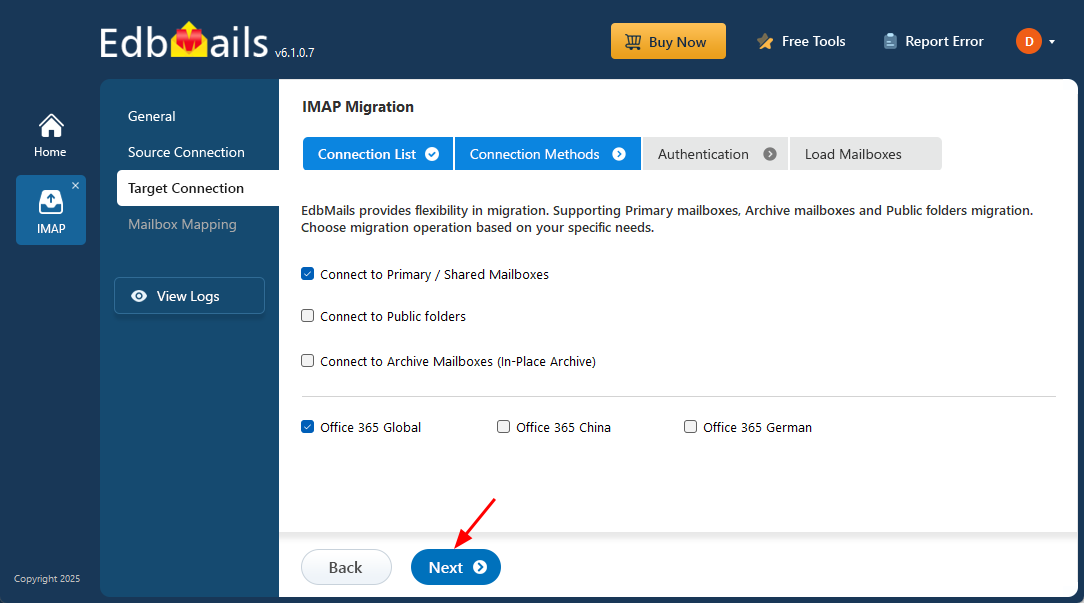
- EdbMails provides flexible migration capabilities, allowing you to transfer primary mailboxes, archive mailboxes, and public folders from a single unified platform.
- Choose the connection method that best fits your migration needs, then click ‘Next’ to proceed with the authentication process.
- Choose any of the available options to create a secure connection using OAuth 2.0 modern authentication:
- Select Auto Registration if you prefer a quick and smooth setup. Sign in with a Global Admin account and provide the required permissions to automatically register the application in Azure AD.
- Or choose Manual Registration if you prefer to enter the Azure AD application details yourself. This method supports both Global Admin accounts and accounts with Full Access permissions.
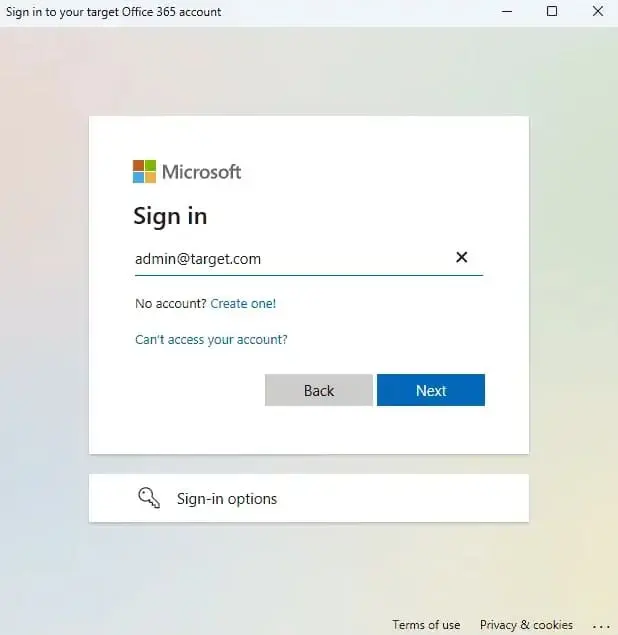
- Click ‘Login’ to proceed.

- Complete the authentication by signing in on the official Microsoft login page.
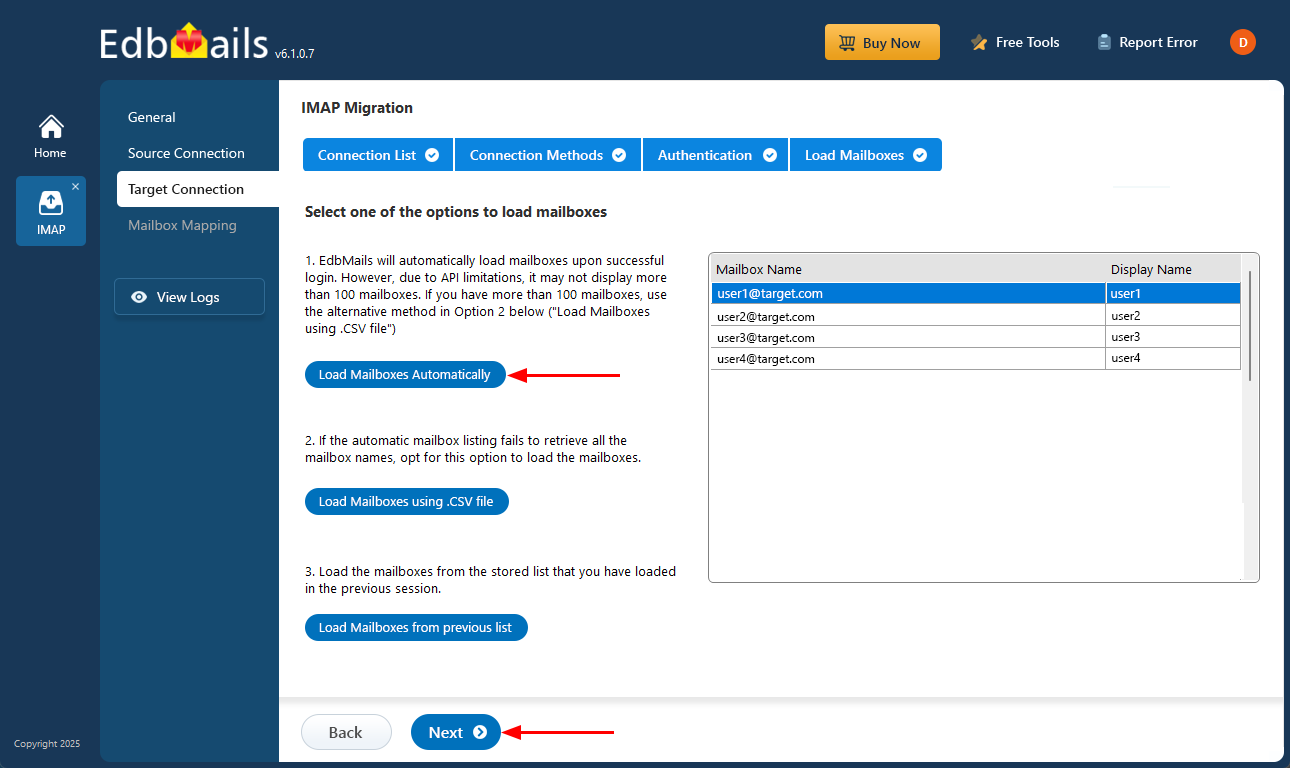
- After successful authentication, select any one of the following options to load the mailboxes:
i) Load Mailboxes Automatically: Once you sign in, EdbMails automatically identifies and displays the available mailboxes, making the process faster and easier. However, due to Microsoft API limitations, only up to 100 mailboxes can be listed. If your organization has more than 100 mailboxes, use the alternative option below.
ii) Load Mailboxes using CSV file: If the automatic option does not display all mailboxes, select ‘Load Mailboxes using .CSV file’ to upload a CSV file for migrating more than 100 mailboxes
iii) Load Mailboxes from previous list: This option lets you load mailboxes from a previously saved list that was imported during an earlier session.
- Select ‘Load Mailboxes Automatically’ and click ‘Next’ to proceed.
Step 5: Bluehost to Office 365 mailboxes mapping
- Choose your preferred method to map the source Bluehost mailboxes and folders to their corresponding mailboxes and folders on the target Office 365 account.
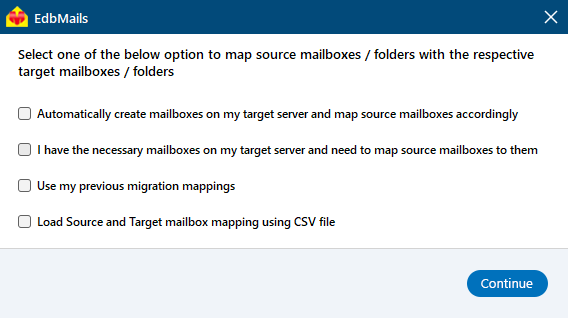
- EdbMails lets you automatically create the required mailboxes in your target Office 365 account.
- It also automatically maps your source Bluehost mailboxes and folders to the matching ones in Office 365, making large migrations easier to manage.
- Choose your preferred method to map the source Bluehost mailboxes and folders to their corresponding mailboxes and folders on the target Office 365 account.
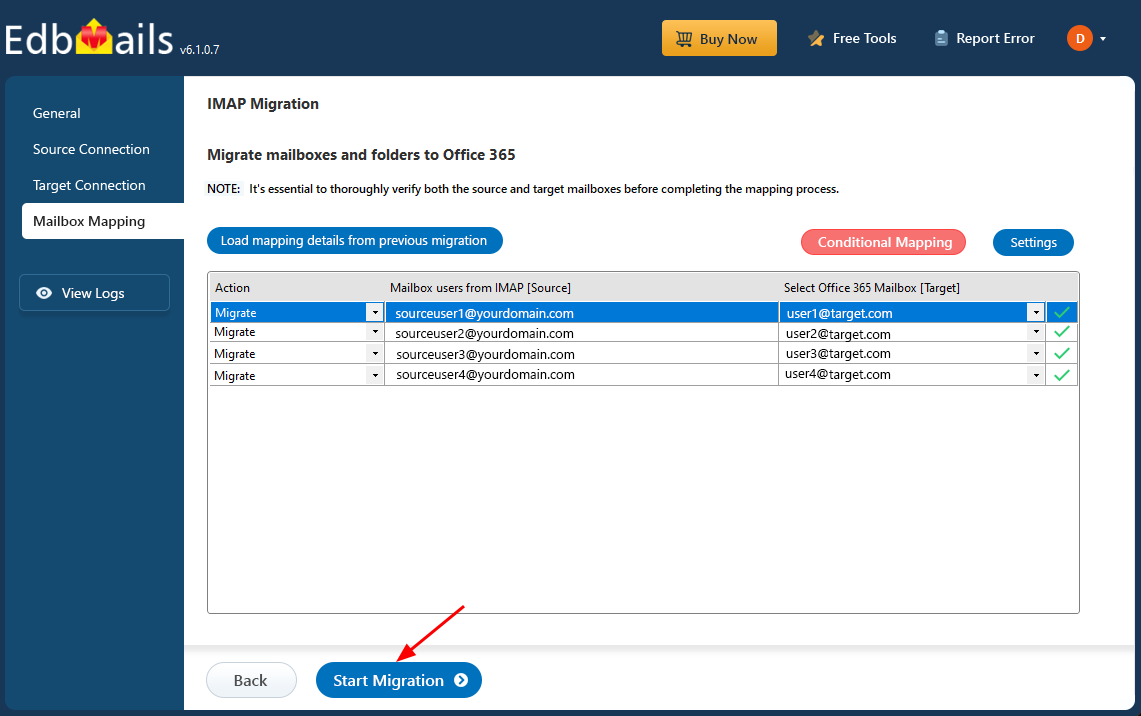
Step 6: Start Bluehost to Office 365 migration
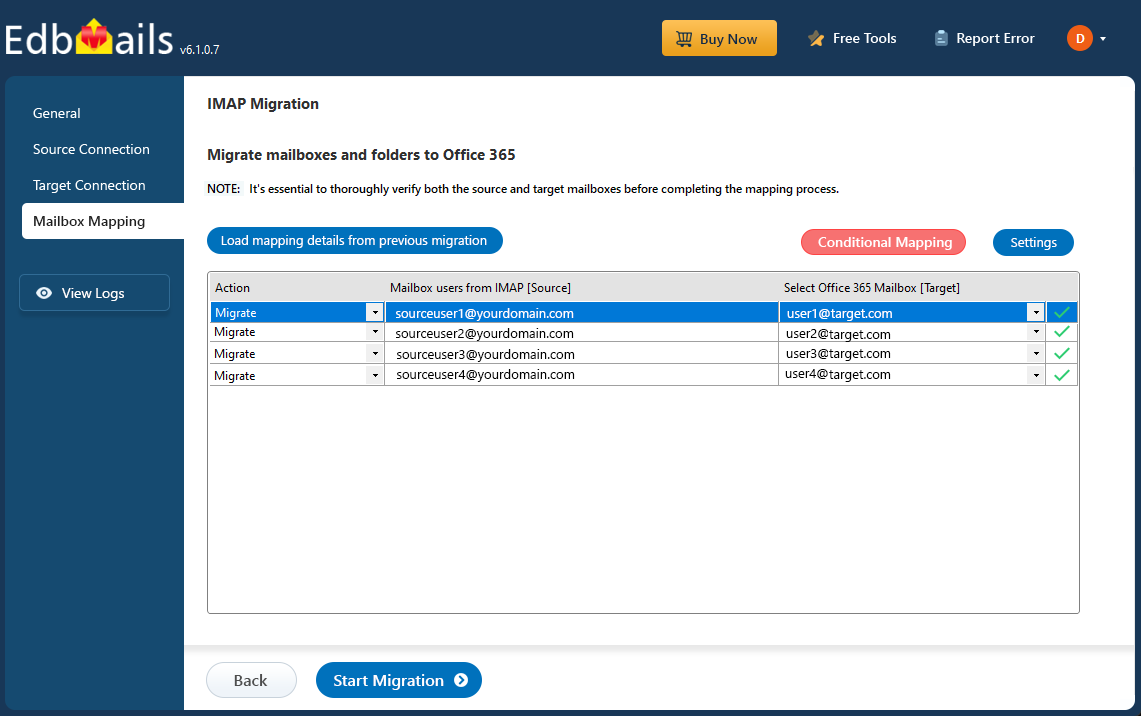
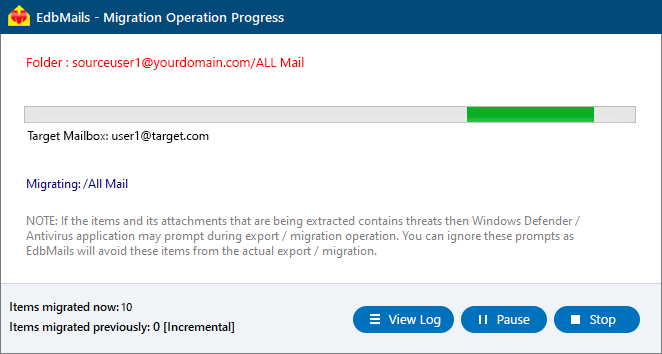
- Verify the mailbox mapping, then click the ‘Start Migration’ button to begin the migration process.
- Select the ‘View Logs’ option to open the detailed migration report. This report outlines how mailboxes were mapped, provides a summary of the migration activity, and shows the number of items migrated
- Verify the mailbox mapping, then click the ‘Start Migration’ button to begin the migration process.
Bluehost to Office 365 Post Migration Tasks
Step 1: Update the MX records to point to Office 365
If you have not done this step previously, change the DNS records known as MX records to enable email and receive messages on the target Office 365 server. In addition, configure the Autodiscover record to allow Outlook to connect to the migrated mailboxes.
Step 2: Create a new Outlook profile for users in the new domain
Configure the Outlook profile for each user in your domain if Outlook has problems connecting to Office 365 mailboxes.
Troubleshooting Guide for Bluehost to Office 365 Migration
Explore the knowledge base articles for troubleshooting common issues. For more information on EdbMails IMAP migration, review the FAQs or contact our dedicated support team for assistance.
Comparison Table: Bluehost Email vs Office 365
| Feature | Bluehost Email | Microsoft 365 |
|---|---|---|
| Storage Limit | 50GB per user | 50GB+ per user |
| Collaboration | Emails, attachments and folder structure | Integrated Teams, SharePoint, OneDrive |
| Security | Advanced Anti-Spam & Anti-Virus, Data Encryption, Two-Factor Authentication. | Anti-phishing, anti-spam, anti-malware capabilities. - Multi-Factor Authentication (MFA). |
| Scalability | Email accounts tied to hosting; storage quota can be manually adjusted via cPanel per account. | Enterprise-grade: scalable user management, global data center system, secure access across Teams / OneDrive / SharePoint. |
Performance Optimization During Migrate email from Bluehost to Office 365
- Limit concurrent connections: Control the number of simultaneous mailbox transfers to prevent throttling and maintain stability.
- Migrate in smaller batches: Migrate mailboxes in smaller, manageable groups instead of all at once. This approach improves processing speed, simplifies troubleshooting, and ensures better migration control.
- Maintain stable bandwidth: Use a reliable, high-speed internet connection to avoid timeouts or interruptions.
Following these steps helps ensure an efficient, faster, smoother and error-free migration to Office 365.
Benefits of EdbMails for Bluehost to Office 365 migration
- Incremental Migration for seamless Data Updates
EdbMails ensures an efficient migration from Bluehost to Office 365 with its incremental migration feature, which transfers only newly added or modified items. This prevents duplication, reduces bandwidth usage, and ensures a clean, streamlined migration without redundant data.
- Concurrent Migration for Faster email Transfers
EdbMails supports concurrent migration, allowing multiple mailboxes to be transferred simultaneously. This reduces the total migration time and helps organizations move to Office 365 more quickly, an ideal solution for larger setups where minimal downtime is essential.
- Pause and Resume for Flexible Migration Control
With EdbMails, you can pause and resume migrations at any point, offering flexibility and control during the migration process. This feature ensures that businesses can manage disruptions and resume from where they left off without losing progress.
- Automated Mailbox Mapping for Error-free Setup
EdbMails simplifies the migration process with its automated mailbox mapping feature, automatically mapping source mailboxes with their corresponding Office 365 targets. This reduces manual effort, streamlines the process, and minimizes errors during complex migrations.
- Multilingual Support for Global Compatibility
EdbMails offers multilingual support, making it accessible to businesses worldwide. This feature enables users to navigate the migration process in their preferred language, ensuring a smooth and user-friendly experience for global customers.
- Free Trial with 24/7 Tech Assistance
EdbMails provides a free trial for businesses to evaluate its functionality before committing. Additionally, its 24/7 free technical support ensures that users have expert assistance throughout the migration process, guaranteeing uninterrupted service and successful migrations.