Cox email to Office 365 Migration
Looking to migrate your Cox emails to Office 365 (Microsoft 365)? You’re in the right place. This guide walks you through the complete process using EdbMails IMAP Migration Tool, an automated and secure solution for transferring your Cox mailboxes to Microsoft 365 with ease.
Cox Webmail is a popular email service offering essential features such as email organization, folder management, and attachments. While it’s suitable for personal use and small businesses, it can become restrictive as your communication and collaboration needs expand.

In contrast, Microsoft 365 delivers a cloud-based, enterprise-grade platform with integrated applications like Outlook, Teams, SharePoint, and OneDrive, designed to enhance productivity and collaboration. With advanced security, spam protection, and centralized management, Office 365 is a robust solution for businesses looking to scale securely in the digital era.
Manual migration from Cox can be time-consuming and prone to data loss, but EdbMails IMAP Migration Tool simplifies the entire process. It enables a direct and secure transfer of emails, folders, and attachments from Cox to Office 365, ensuring data integrity and zero downtime. With its step-by-step interface and built-in automation, EdbMails helps you complete the migration quickly, safely, and without any technical complexity.
User Query
"Hi, I’ve been using Cox Webmail for my personal and business emails, but now I want to move to Office 365 for better features and security. I have several important emails, folders, and attachments stored on my Cox account, and I need help migrating everything to Office 365. Can you guide me on how to transfer my Cox emails to Office 365 without losing any data or folder structure?" - Sarah, USA
Why do we need to Migrate emails from Cox to Office 365?
Here are key reasons why making the switch is beneficial:
- Office 365 offers advanced productivity tools like Microsoft Teams and OneDrive for seamless collaboration.
- Its cloud-based platform allows access to emails and data from anywhere, on any device.
- Office 365 provides enhanced security features, including multi-factor authentication and encryption.
- Generous storage capacity ensures efficient handling of large volumes of emails and attachments.
- Regular updates keep Office 365 equipped with the latest technology, ensuring future-proof functionality.
- Its powerful email management features simplify inbox organization and communication workflows.
- Business-focused features like shared mailboxes and calendar sharing make it ideal for growing companies.
- Automated migration tools ensure smooth data transfer from Cox to Office 365 without data loss.
Switching to Office 365 with EdbMails gives users access to a secure, reliable, and feature-rich email platform designed to meet the demands of today’s fast-paced digital environment.
Professional Method to Migrate Cox emails to Office 365
Migrating your Cox emails to Office 365 is now a simple and efficient task, thanks to the professional migration method offered by EdbMails. EdbMails IMAP migration software provides a secure and reliable way to move your emails, including attachments, metadata, and other mailbox items, to your Office 365 account without any data loss or disruption. One of the key features of EdbMails is its ability to include or exclude specific mail items during the migration process. This gives users full control over the data they wish to transfer, allowing for selective migration based on their needs. EdbMails ensures that all metadata, such as email properties, timestamps, and data format, are preserved, while also retaining the original folder structure for seamless organization after migration. For businesses or users operating in multiple languages, EdbMails offers multi-language migration support, making it versatile for global users. Whether you are migrating from a single mailbox or multiple mailboxes in different languages, EdbMails ensures consistent and accurate data transfer.
Additionally, EdbMails stands out by offering a free personalized demo to help users understand how the tool works, ensuring confidence before proceeding with the full migration. To further enhance the experience, EdbMails provides 24/7 free customer support, ready to assist with any questions or concerns at any stage of the migration process.
With EdbMails, migrating Cox emails to Office 365 becomes a professional, efficient, and worry-free process. Whether you need to migrate all your data or only selected items, EdbMails streamlines the migration with user-friendly features and dedicated support, ensuring a smooth transition to Office 365.
Cox email to Office 365 migration plan
Planning is one of the most important steps before you begin the Cox email to Office 365 migration. Here is a checklist of points to consider before you migrate.
- Determine the size of the data and the number of mailboxes you want to migrate.
- Make a list of all the data and permissions from Cox email that you want to transfer.
- Create appropriate user mailboxes on Office 365 and assign licenses to them.
- Ensure you have enough network capacity and bandwidth to migrate.
- Communicate the migration plan and flow to your end users.
Cox email to Office 365: pre-migration activities
- Find the IMAP server name of your Cox email server. You can find this information from your server’s dashboard settings or by connecting your email system to Outlook.
- Have the users email address, passwords, IMAP hostname and port number.
- Create mailboxes on your target Office 365 server. You can choose the option to automatically create target mailboxes in EdbMails. If you prefer to create them manually, refer to the links below.
- If you have a custom email domain from your hosting provider to which you want to migrate and receive emails, you must add and verify the domain on Office 365.
Steps to add a custom domain to Office 365 and Steps to add DNS records to connect your domain. - Configure Office 365 to send and receive large messages.
Follow the steps to increase the message size on Office 365 to 150MB and see tips to optimize IMAP migration to Exchange online.
Steps to migrate emails from Cox to Office 365 using EdbMails
Step 1: Download and install EdbMails IMAP migration software
- Download EdbMails and install it on a Windows-based computer to get started with the Cox email to Office 365 migration process.

- Open the EdbMails application on your system
- Enter your registered email address and password, then click ‘Login’. If you are accessing EdbMails for the first time, choose ‘Start Your Free Trial’ to proceed with the trial version.
Note: The trial version provides access to all key features and allows you to migrate up to 30 items per folder. To enable unlimited migration, purchase a n IMAP Migration license from the official EdbMails website.
Click here to view IMAP Migration pricing details.
After completing the purchase, close the application and reopen it. Sign in again using the same email address and password used during the purchase to successfully activate your license.

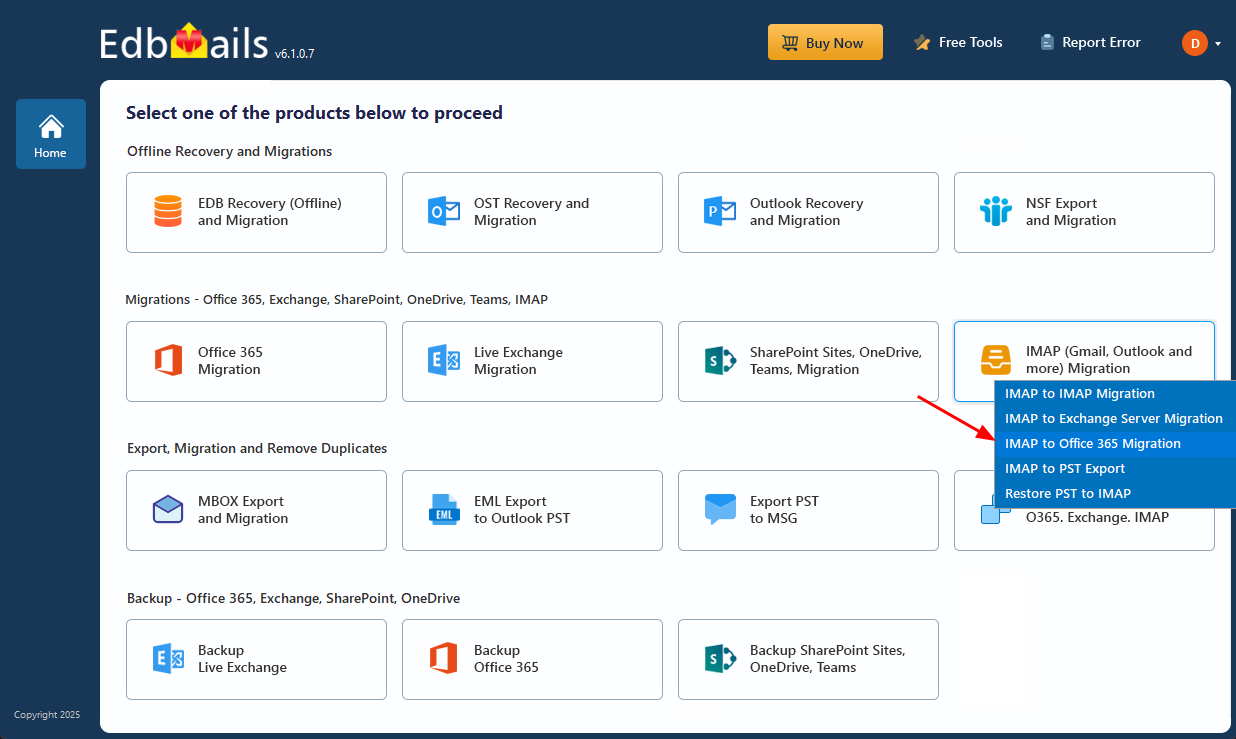
- Select the option ‘IMAP (Gmail, Outlook & more) Migration’.
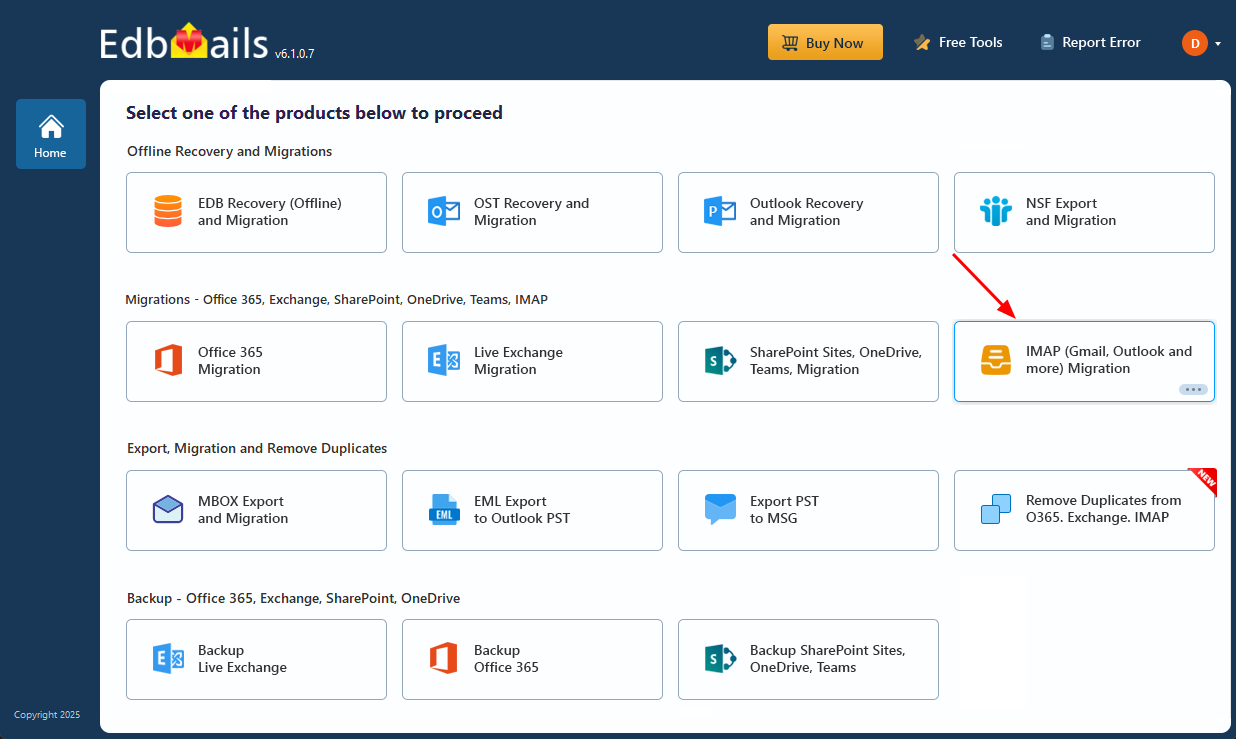
- Select ‘IMAP to Office 365 Migration’.
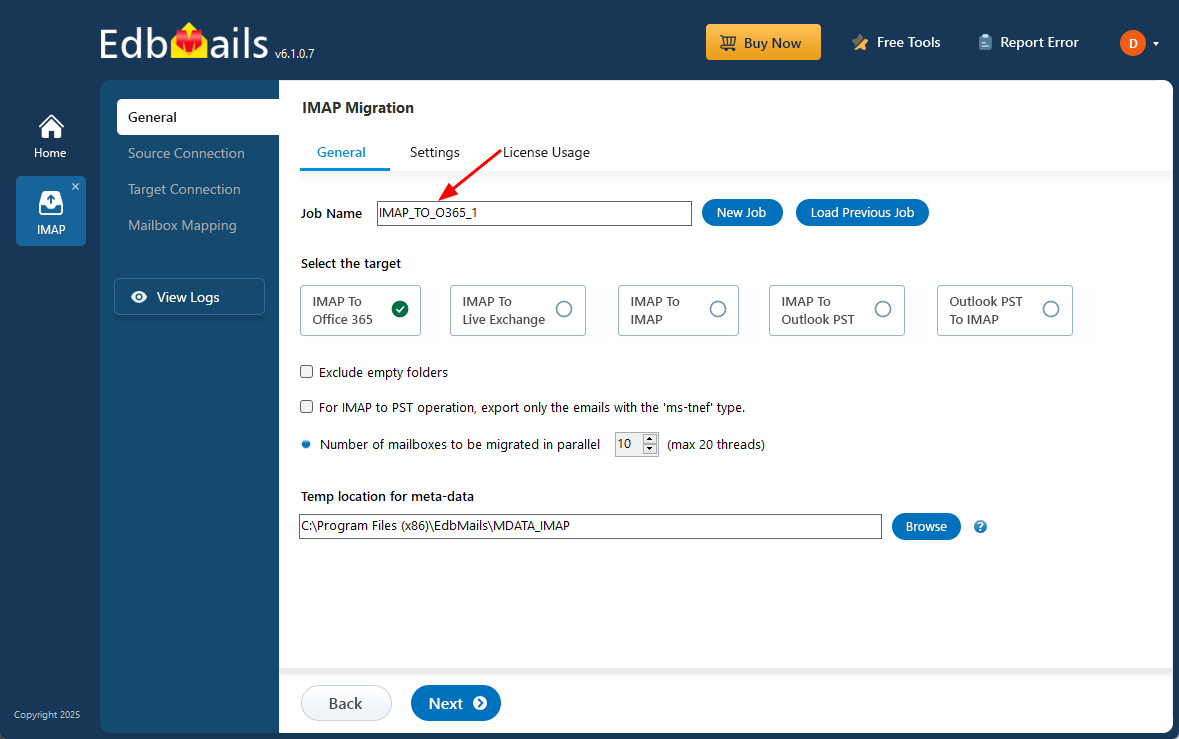
- A default job name is assigned automatically, but you can click ‘New Job’ to set a custom name and easily track your Cox to Office 365 migration task.
- Download EdbMails and install it on a Windows-based computer to get started with the Cox email to Office 365 migration process.
Step 2: Connect to the source Cox email server
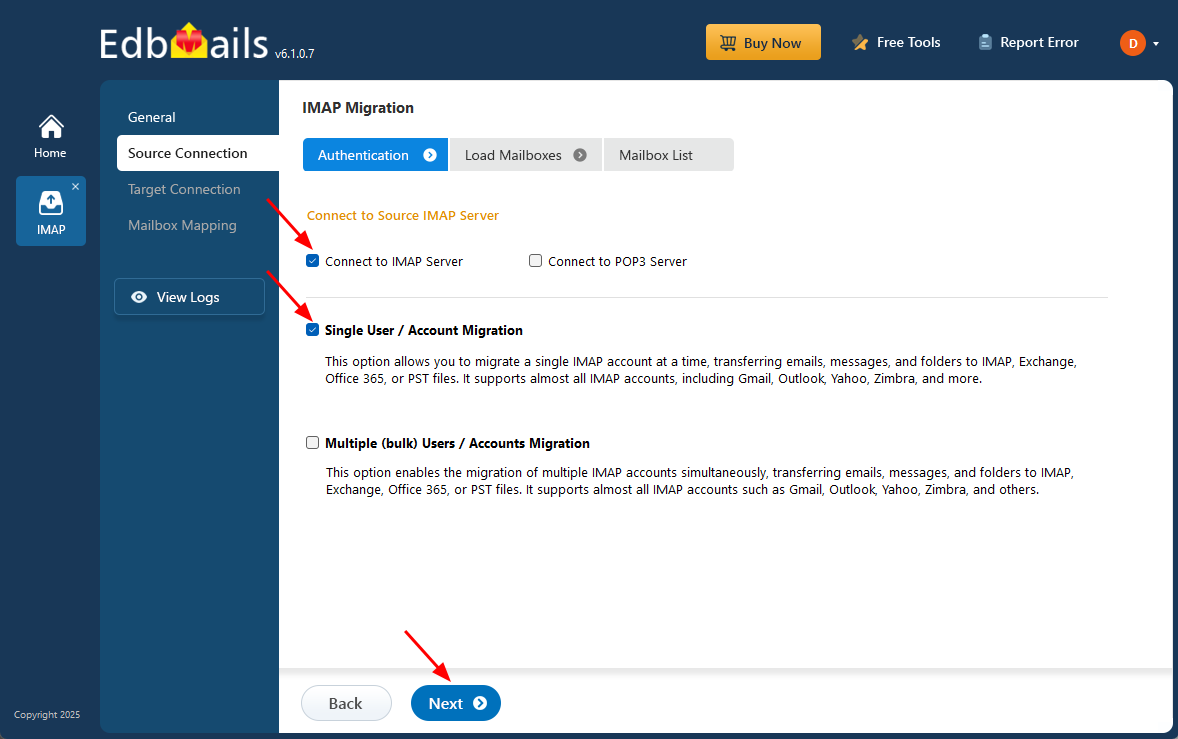
- To connect a single Cox email account for migration, click ‘Single User / Account Migration’, choose the suitable connection option such as ‘Connect to IMAP Server’ or ‘Connect to POP3 Server’. Click ‘Next’ to proceed.
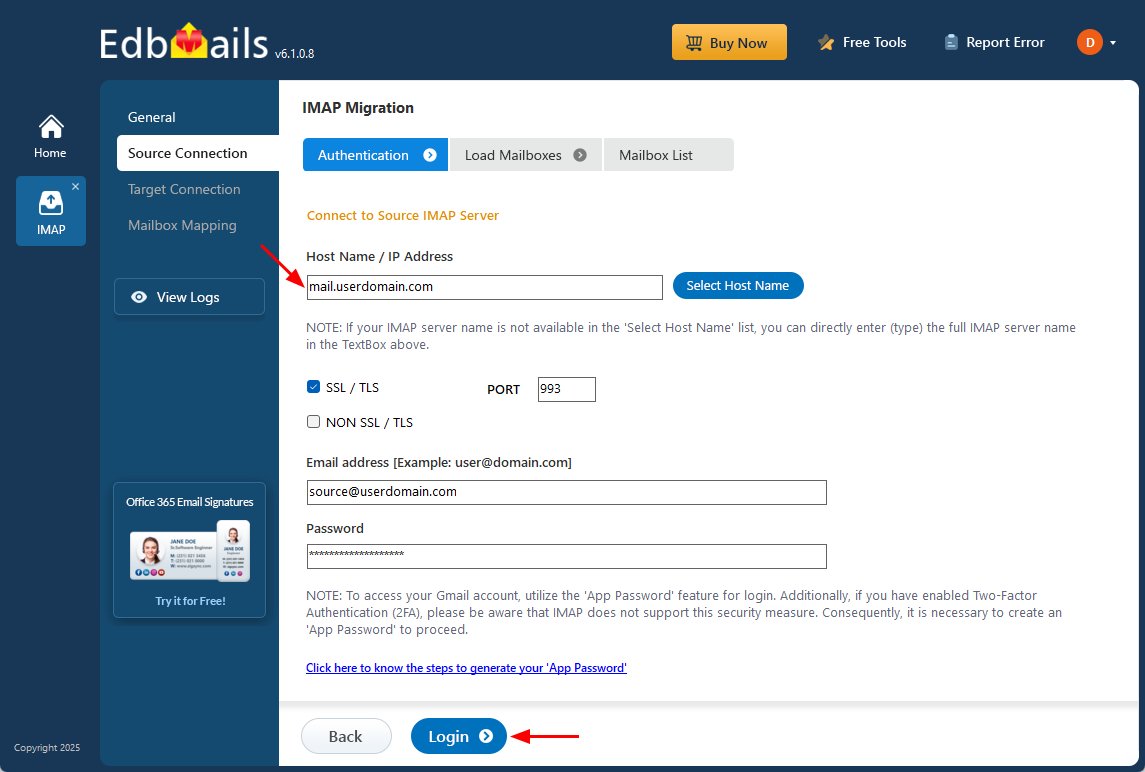
- Choose the correct IMAP host name from the list or manually enter it (e.g., mail.userdomain.com).
- Then, provide Port Number (993 for SSL), and the user’s login details (Email address and password) and proceed.
- Click the ‘Login’ button to proceed.
- To connect and migrate multiple Cox user mailboxes at once, select ‘Multiple (bulk) Users/Accounts Migration’, choose the suitable connection method such as ‘Connect to IMAP Server’ or ‘Connect to POP3 Server’.
- Then proceed by clicking ‘Next’.

- Click ‘IMAP Migration CSV File’.

- Edit the CSV file and fill in the required information, including the email address, password, server hostname, and port number.
- After completing the updates, save the file and close it.
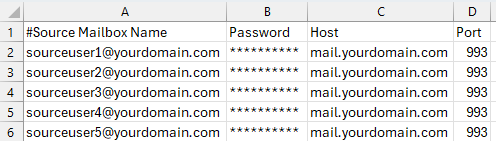
- After entering the required details in the CSV file, save your changes and close the file to continue with the next steps.
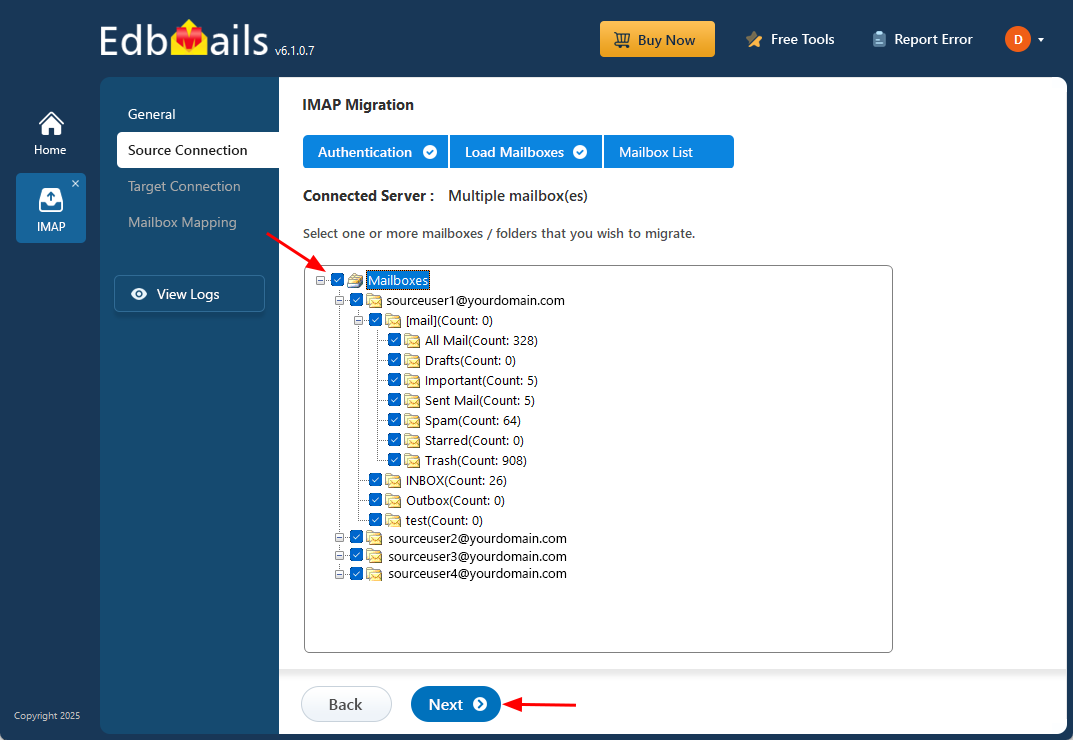
- Next, click the 'Load Modified CSV File' button, locate your updated CSV file, select it, and open it to proceed.
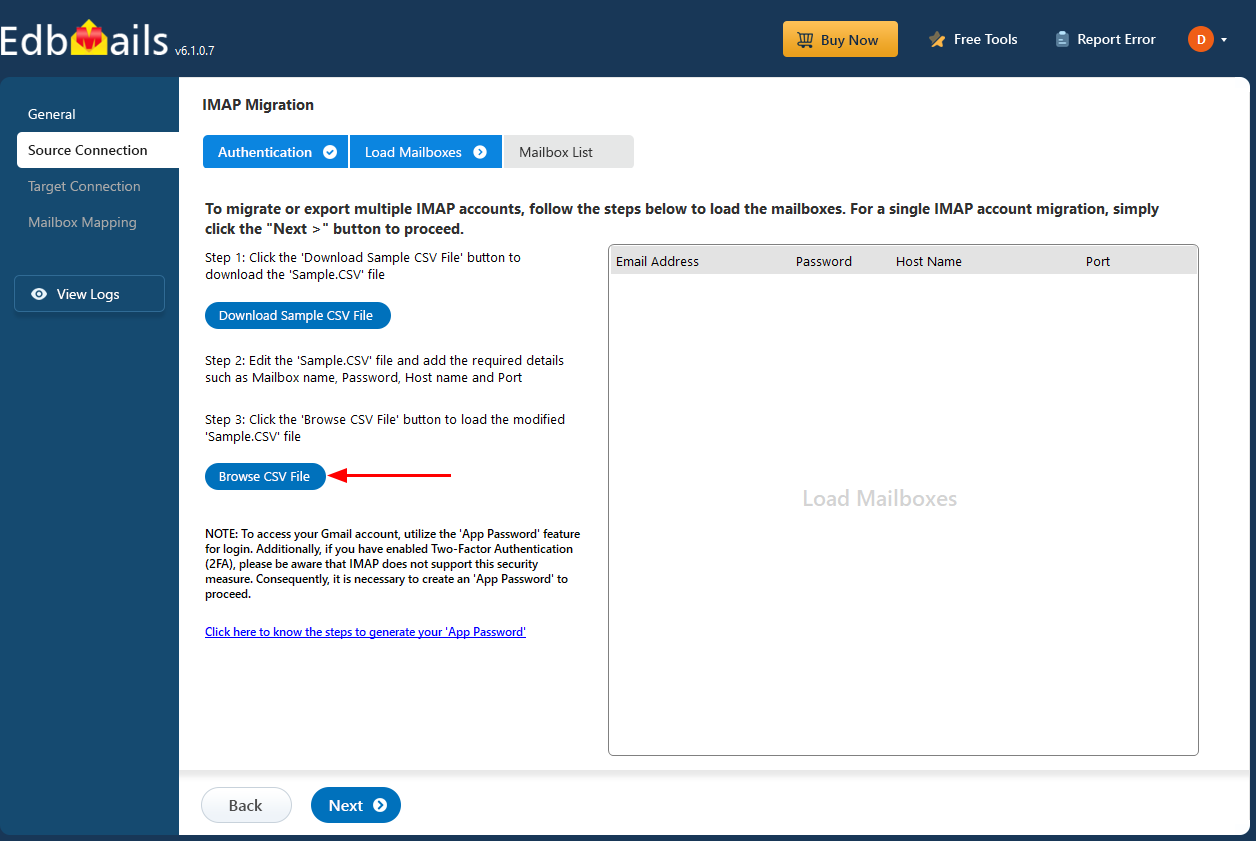
- Choose the specific mailboxes or individual folders you wish to migrate. Once your selection is complete, click ‘Next’ to continue.
- To connect a single Cox email account for migration, click ‘Single User / Account Migration’, choose the suitable connection option such as ‘Connect to IMAP Server’ or ‘Connect to POP3 Server’. Click ‘Next’ to proceed.
Step 3: Connect to the target Office 365 server
- Select the ‘Add New Connection’ option to establish a connection with your target Office 365 account.
- If you have previously set up a connection, you can choose it from the available list and click ‘Connect to Existing’ to proceed.
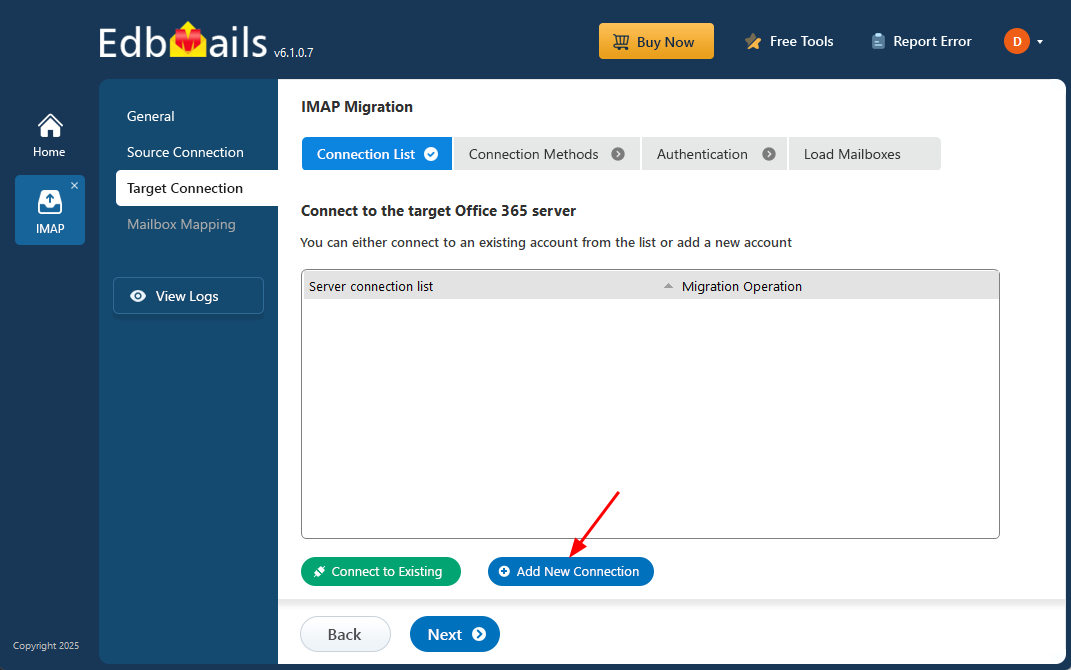
- EdbMails provides flexible migration capabilities, enabling you to migrate primary mailboxes, archive mailboxes, and public folders efficiently from a single platform.
- Choose the appropriate connection preferences and click ‘Next’ to proceed with the authentication process.
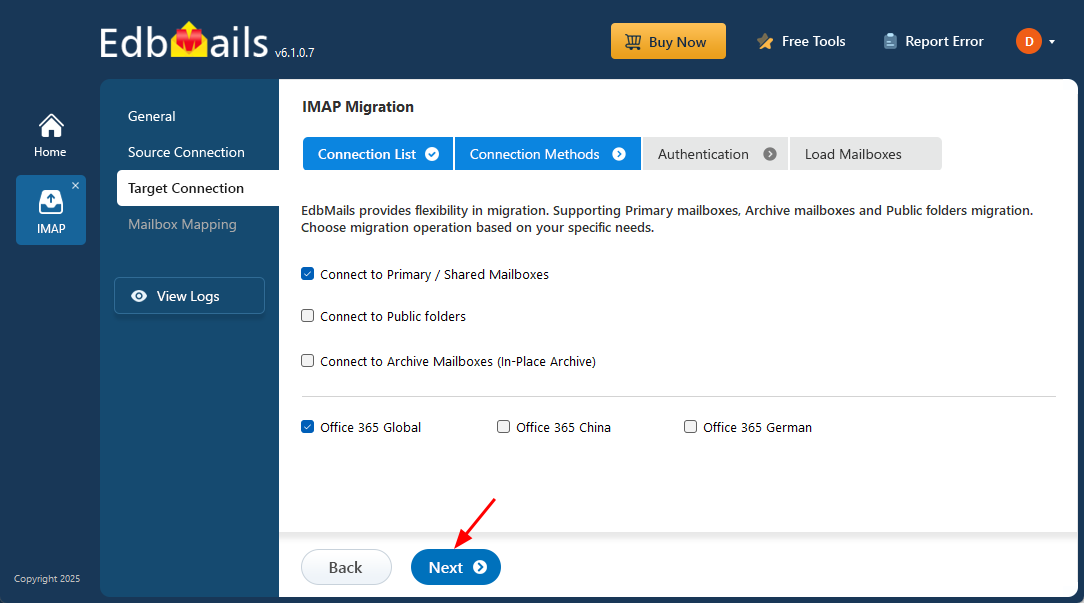
- Choose one of the available options to establish a secure connection using OAuth 2.0 modern authentication.
- Select Auto Registration for a quick and seamless configuration. Simply sign in with a Global Admin account and grant the required permissions to automatically register the application in Azure AD.
- Alternatively, choose Manual Registration if you prefer to enter the Azure AD application details manually. This option supports both Global Admin accounts and accounts that have Full Access permissions.
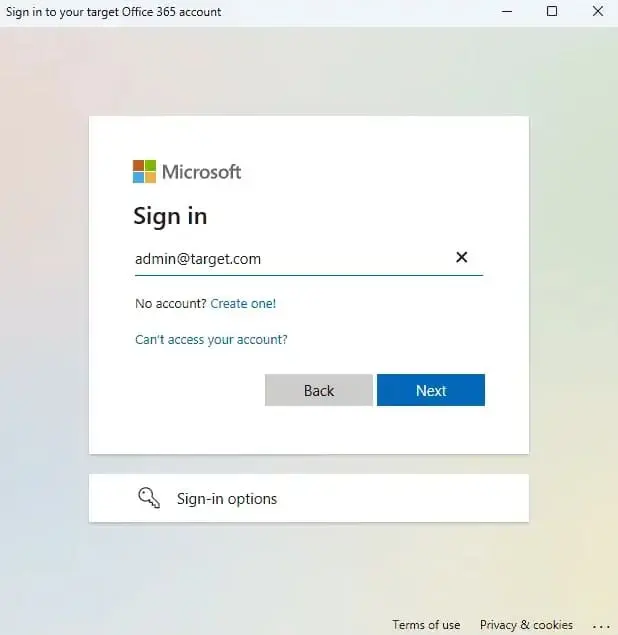
- Click the ‘Login’ button to proceed.

- Authenticate on Microsoft sign-in page.
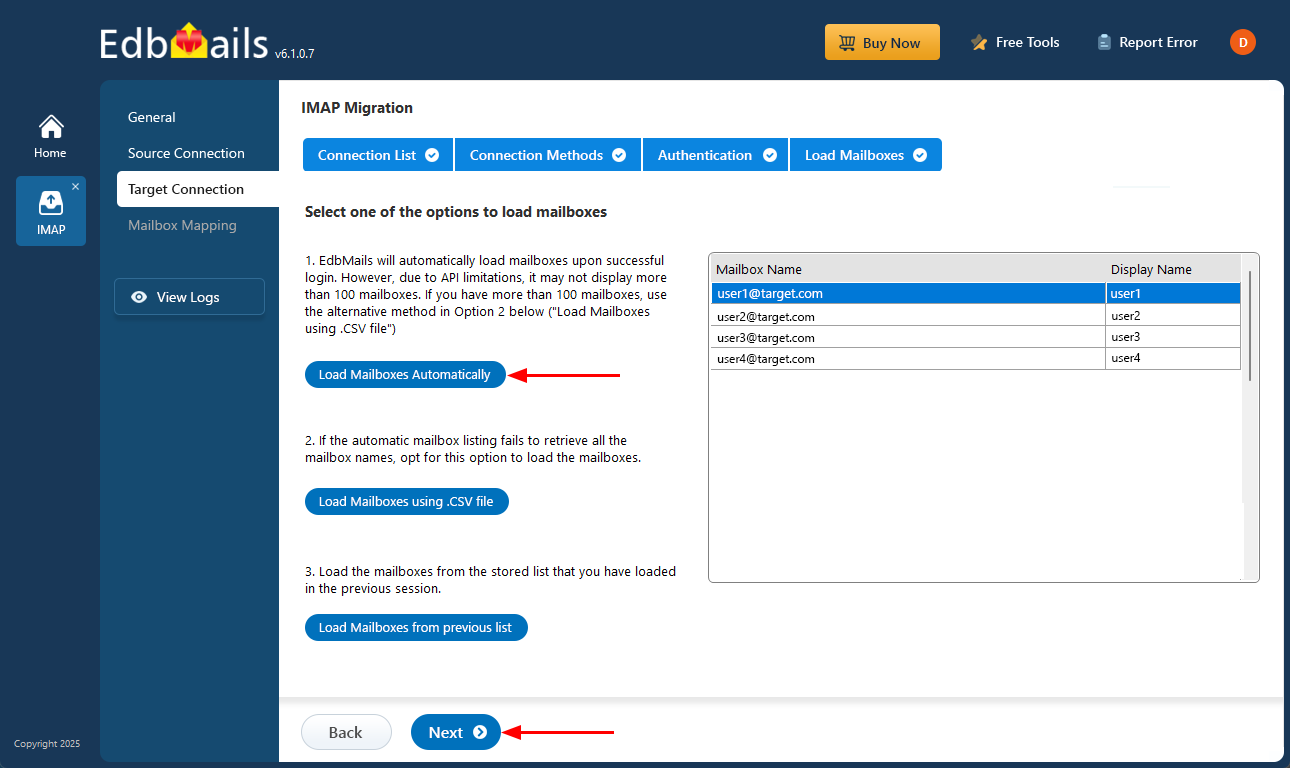
- After the authentication process is successfully completed, choose one of the following methods to load the mailboxes:
i) Load Mailboxes Automatically: EdbMails automatically loads the mailboxes immediately after login, making the configuration quick and straightforward. Due to Microsoft API limitations, only up to 100 mailboxes may appear in the list. If your organization contains more than 100 mailboxes, use the alternative option mentioned below.
ii) Load Mailboxes using CSV file: If the automatic method does not display all mailbox names, select the ‘Load Mailboxes using .CSV file’ option. This allows you to manually choose and load the required mailboxes for migration.
iii) Load Mailboxes from previous list: You can quickly access mailboxes from the list that was previously imported and saved during your earlier session.
- Select ‘Load Mailboxes Automatically’ and click ‘Next’ to continue.
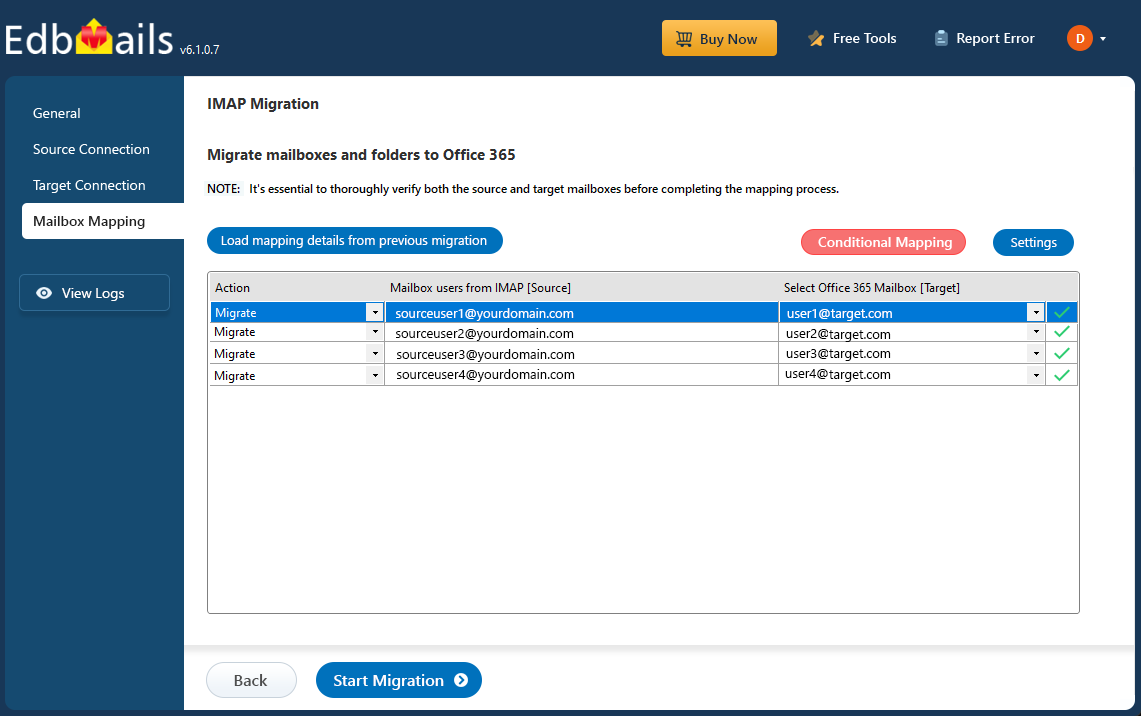
Step 4: Cox email to Office 365 mailboxes mapping
- Choose one of the available options to map the source and target mailboxes
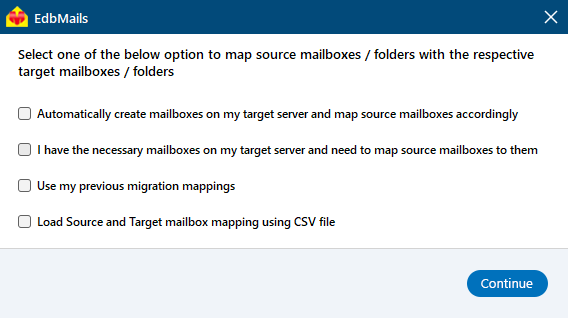
- You can choose the option to let EdbMails automatically create mailboxes on your target Office 365 tenant if they don’t already exist, simplifying the setup process.
- EdbMails automatically maps the source and target mailboxes based on matching display names. You can also manually map mailboxes if needed. With manual mapping, the target mailbox folders are fetched and listed, giving you the option to match the source folders with the corresponding target folders or create custom folder mappings as required.
- Choose one of the available options to map the source and target mailboxes
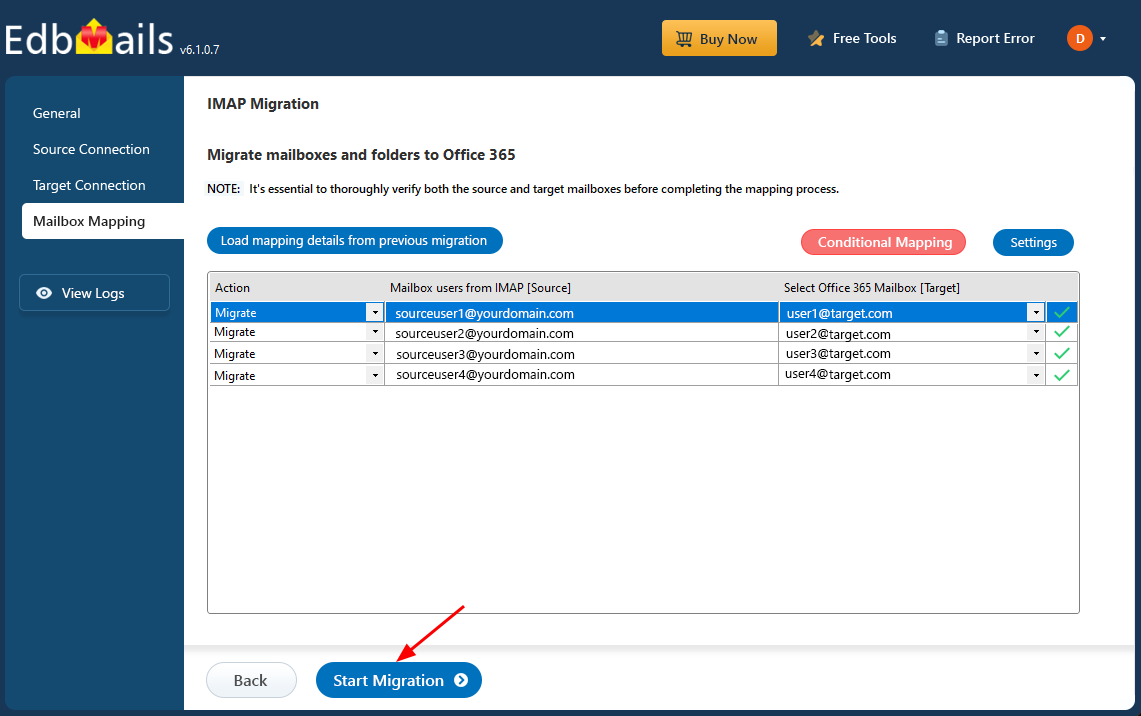
Step 5: Cox email to Office 365 migration
- Once the mailboxes are mapped, click the 'Start Migration' button to begin the migration process.
- Click the 'View Logs' button to access the migration report, which provides detailed information on the items migrated from each folder and mailbox. The report includes mapping details, the number of emails migrated, and any issues encountered during the migration process, helping you track and verify the migration of your data.
- Also log into your target server to verify the migrated items.
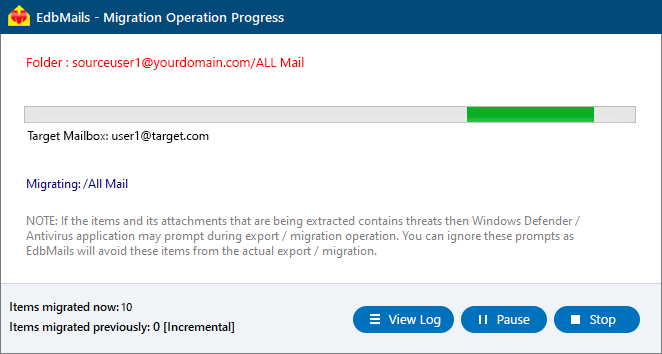
- Login to your target server and verify the items.
- Once the mailboxes are mapped, click the 'Start Migration' button to begin the migration process.
Cox email to Office 365 Post-migration Tasks
- Step 1: Update the MX records to point to Office 365
to route your email traffic to the target Office 365 server, ensuring seamless email delivery. Additionally, configure the Autodiscover record to enable Outlook to connect automatically to the migrated mailboxes, providing users with uninterrupted access to their email.
- Step 2: Create a new Outlook profile for users in the new domain
Configure the Outlook profile for each user in your domain if Outlook has problems connecting to Office 365 mailboxes.
- Step 1: Update the MX records to point to Office 365
Troubleshooting Guide for Cox email to Office 365 Migration
For troubleshooting, check out our knowledge base articles. If you have additional questions, browse the FAQs or engage with our customer care team for personalized assistance.
Advanced features of the automated utility: EdbMails
- Retry Failed Items
EdbMails’ incremental migration ensures that only new or modified email items are migrated, while automatically handling any previously failed items. This guarantees that all your important data is migrated successfully, providing a smooth and complete transition during your Cox email to Office 365 migration.
- Migrate Bulk Mailboxes at once
EdbMails leverages multithreading technology to migrate bulk mailboxes at once with its concurrent mailbox migratio n feature. This boosts performance by allowing multiple mailboxes to be transferred simultaneously, reducing migration time significantly. With efficient handling of large data volumes, you can ensure a fast, secure, and seamless migration while maintaining data integrity.
- Complete Mailbox Migration
EdbMails ensures that all mailbox items, including emails, calendars, contacts, journals, tasks, mailbox rules, attachments, and folders, are migrated accurately. It preserves the original folder structure and metadata, ensuring a smooth and error-free transition to Office 365.
- Automated Process
EdbMails automates key steps in the migration process, including the automatic creation of target mailboxes and mailbox mapping. With this automation, you can eliminate manual configuration and reduce migration time, ensuring a smooth and accurate transfer of data.
- Free trial
EdbMails offers a free trial for users to explore its features and evaluate the software before making a purchase and you can transfer 30 mail items at this stage. This no-cost option allows users to test its functionalities, ensuring it meets their migration needs with zero risks involved.

