Dovecot to Office 365 Migration
Dovecot is a well-known open-source IMAP and POP3 email server commonly deployed on Linux and UNIX platforms. It is valued for its strong security, simple configuration, and dependable performance. Dovecot supports mailbox formats like Maildir and MBOX and works smoothly with widely used email clients such as Outlook and Thunderbird. Even with its proven stability, many organizations are now migrating to Microsoft Office 365 to benefit from its cloud-based environment, centralized management, and enhanced security capabilities.
Migrating from Dovecot to Office 365 involves a range of technical and operational factors that need careful planning. Organizations must focus on protecting data throughout the migration, ensuring existing applications remain compatible, handling bandwidth requirements for large data transfers, supporting users as they adapt to the new platform, and reducing downtime to avoid business interruptions. This guide outlines a clear and organized approach to help businesses manage the migration smoothly and efficiently.

EdbMails IMAP migration software is designed to make the transition from Dovecot to Office 365 with smooth and well-managed. Its delta migration feature migrates only newly added or updated emails, helping reduce bandwidth usage and saving valuable migration time. The software allows multiple mailboxes to be migrated at the same time, which makes it ideal for organizations managing large-scale transitions. With a clear interface and step-by-step guidance, the process remains simple for both IT administrators and non-technical users. EdbMails also uses advanced security standards such as OAuth 2.0 and TLS encryption to protect data during the entire migration. Together, these capabilities ensure a secure, reliable, and disruption-free mailbox migration from Dovecot to Office 365.
Top reasons for Dovecot to Office 365 Migration
While Dovecot serves as a capable and secure mail server, it can become limiting as organizations grow and their communication needs evolve. Its reliance on a Linux-based environment and command-line configuration may pose challenges for users who prefer a more intuitive, graphical interface. For many businesses seeking centralized management, greater scalability, and enhanced collaboration tools, transitioning to a cloud-based platform like Office 365 becomes a practical step for
- Office 365 provides robust security and server uptime. This avoids manual maintenance making it the ideal choice for businesses who are looking to automate their workflow.
- Popularly used office apps such as Word, Excel, PowerPoint are built into Office 365 and come bundled with the license for the same cost.
- Calendars, contacts, emails and many other additional apps such as SharePoint, Teams, Yammer are just a click away with Microsoft’s graphical interface.
- There is no need to use technical commands to access anything on Office 365 and users can easily connect and integrate their Google Drive, Dropbox and cloud services with it.
- Microsoft 365 also supports adding domains from other hosts and allows you to directly receive your emails on Outlook and OWA.
Dovecot to Office 365 Migration Planning
Before you actually start to migrate from Dovecot to Office 365, you need to have a proper plan and ensure that you are prepared for the migration. Here is a quick checklist of items for your convenience.
- Decide if you want to retain the same domain on Dovecot or change to another hosting provider.
- Decide if you want to migrate your data all at once or in stages.
- Create a CSV file with a complete list of mailboxes to be migrated along with the user credentials.
- Verify if the CSV file format and user credentials are correct.
- Remove any unused or unnecessary mailboxes from the source system to streamline the migration process.
- Notify end users and relevant stakeholders about the migration plan, ensuring they are informed of any upcoming changes.
- Select the appropriate Office 365 licensing plan and assign the relevant licenses to user mailboxes.
- Conduct a test migration to verify that the process works as expected and all data is transferred correctly.
Dovecot to Office 365 Migration Prerequisites
- If you want to migrate multiple users from Dovecot, download the sample CSV file from the EdbMails IMAP login window Create a list of users in a CSV file, which you want to migrate from Dovecot.
- Find the name of your source email server from an email client
- Purchase a suitable Office 365 licensing plan. You can also sign up for a 30 day free trial and decide to go with a suitable one later. Compare Office 365 business plans and Compare Office 365 enterprise plans
- Create Office 365 mailboxes and assign licenses to them
Add users and assign licenses to Office 365 users
Assign Microsoft 365 licenses to user accounts - If you plan to migrate your mailboxes to Office 365 Public folders, ensure that you create and configure the Public folder mailboxes on the target server.
Steps to Create Office 365 Public folder and assign mailbox user. - Similarly, if you want to migrate mailboxes to Office 365 In-Place archive, enable them from the admin center.
Steps to enable archive mailbox in Microsoft 365. - If you have a custom email domain from the source which you want to retain and receive emails to, you must add and verify the domain on Office 365.
Steps to add a custom domain to Office 365 and steps to add DNS records to connect your domain. - Configure Office 365 to send and receive large messages.
Follow the steps to increase the message size on Office 365 to 150MB. See message size limits on Office 365 for more information.
Steps to Migrate from Dovecot to Office 365 using EdbMails
Step 1: Download and Install EdbMails migration software
- To initiate the migration process, download and install the EdbMails application on your Windows system.

- Launch the EdbMails application on your system.
- Enter your registered email ID and password, then click ‘Login’. If you are using EdbMails for the first time, choose ‘Start Your Free Trial’ to proceed with the trial version.Note: The trial edition provides access to all key features and allows migrating up to 30 items per folder. To enable unlimited migration, purchase IMAP migration license from the official EdbMails website.After completing the purchase, close the application and open it again. Sign in using the same email ID and password used during the license purchase to activate the license successfully.

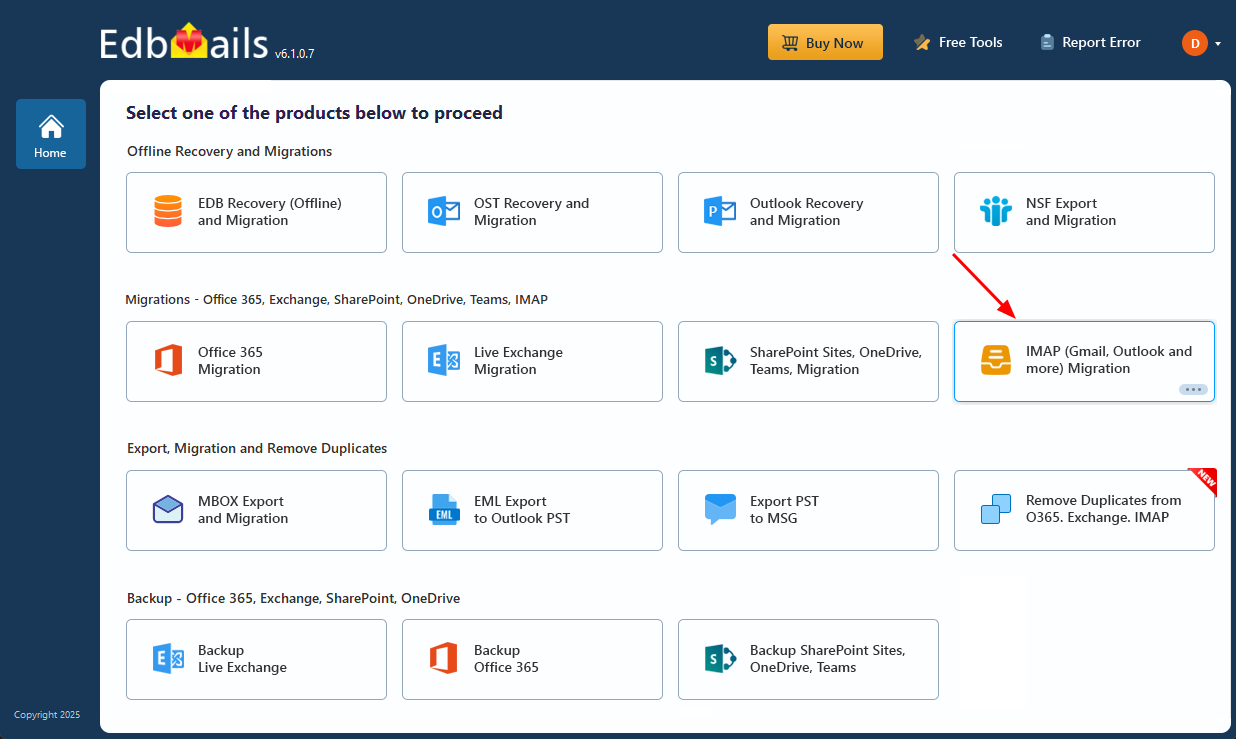
- Select the option ‘IMAP (Gmail, Outlook & more) Migration’.
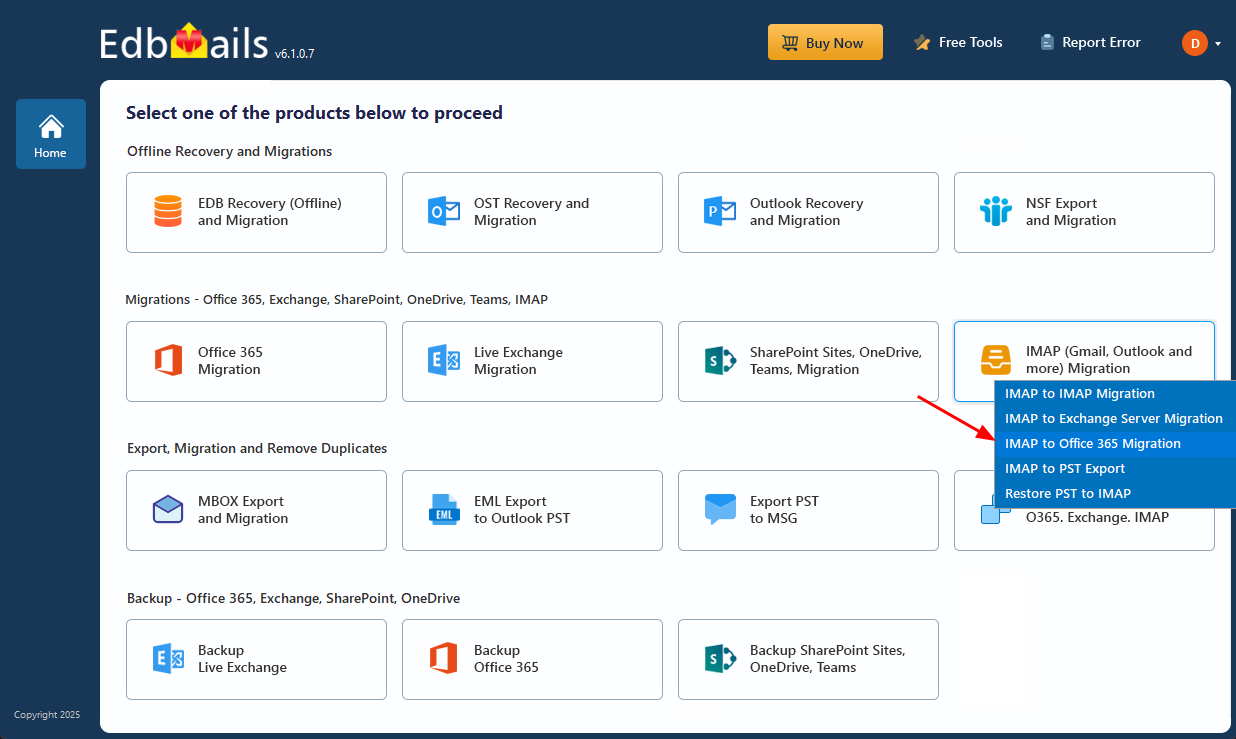
- Select ‘IMAP to Office 365 Migration’.
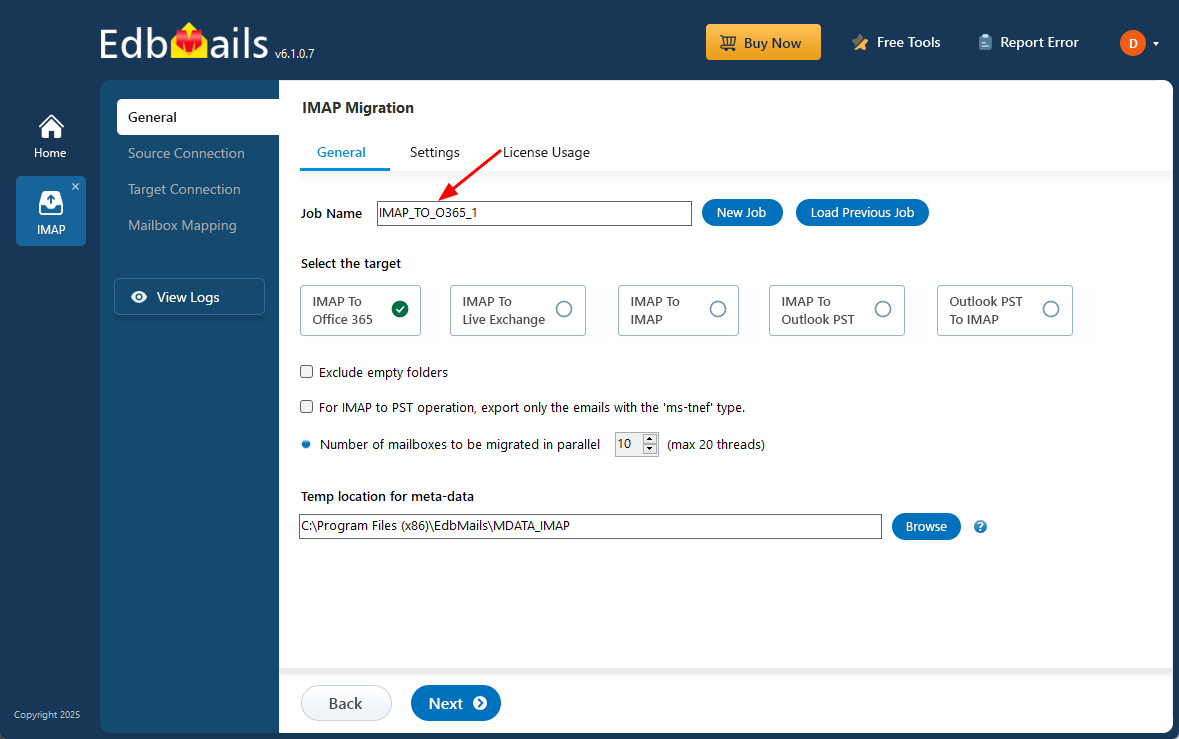
- A default job name is automatically assigned to the task. If needed, click ‘New Job’ to change it and assign a custom name for easier identification and better management.
- To initiate the migration process, download and install the EdbMails application on your Windows system.
Step 2: Connect to source Dovecot server
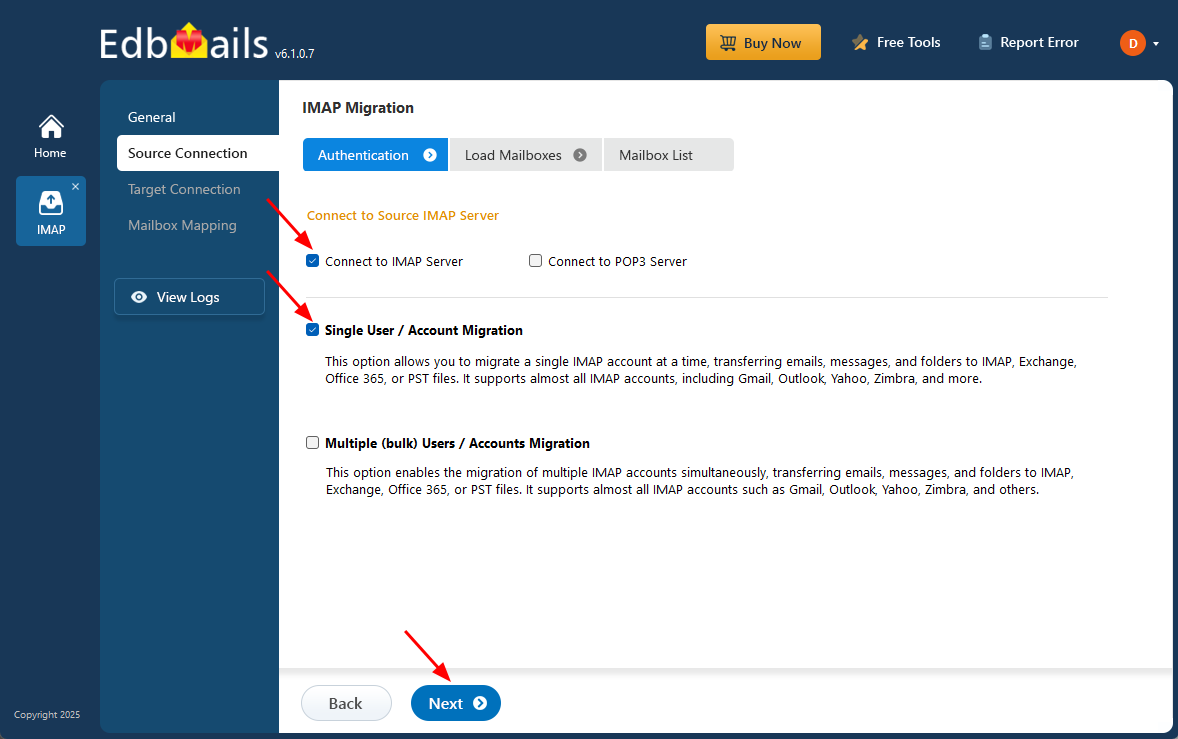
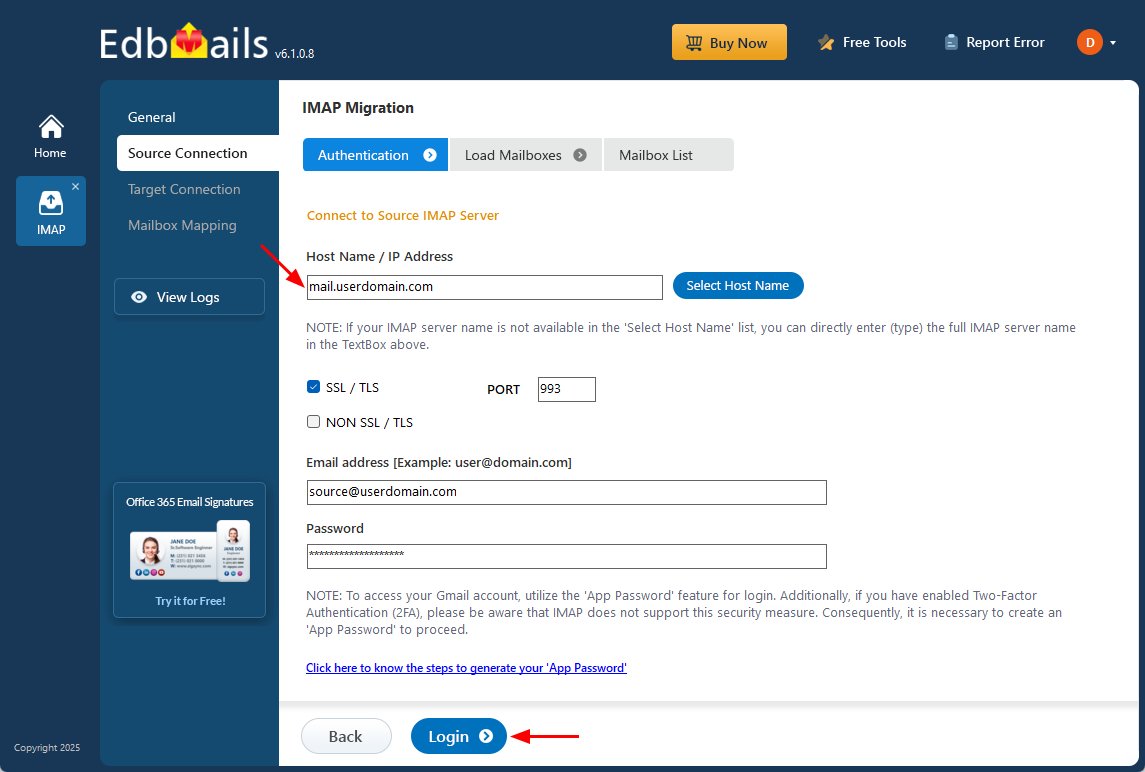
- To migrate one Dovecot account, select ‘Single User / Account Migration’, then choose the appropriate connection method such as ‘Connect to IMAP Server’ or ‘Connect to POP3 Server’ based on your setup. Click ‘Next’ to continue with the process.
- You can obtain your Dovecot server connection details from the Outlook mail client if the account is already configured, or directly from your server control panel. In most cases, the hostname will be in the format mail.yourdomainname.com, and if needed, you may also use the server’s IP address.
- For IMAP connections, select port 993 and make sure SSL/TLS encryption is enabled to ensure a secure connection. Then enter the email address and password of your source account to connect successfully.
- EdbMails does not save or store your credentials and relies on secure OAuth 2.0 authentication when logging in to Office 365.
- Click the ‘Login’ button to proceed.
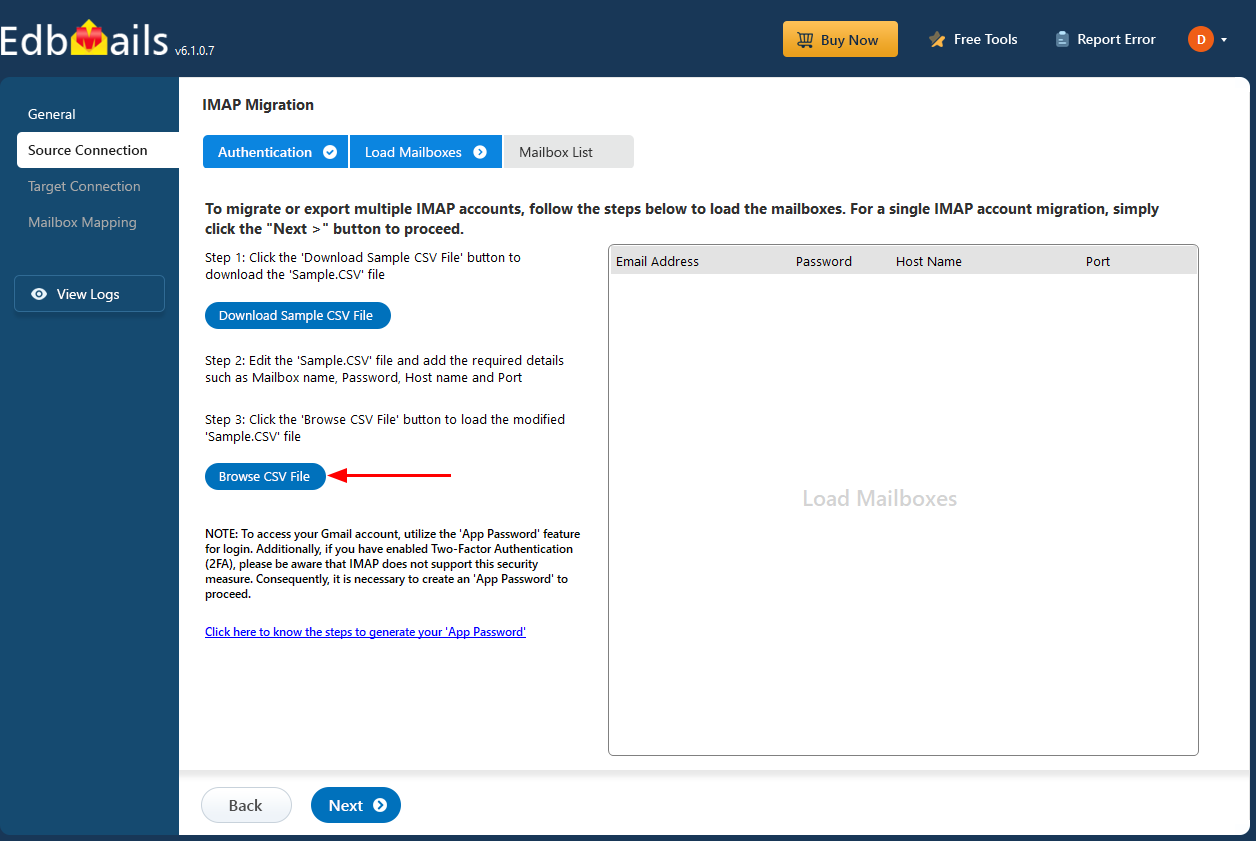
- To migrate multiple Dovecot mailboxes in a single process, choose ‘Multiple (Bulk) Users/Accounts Migration’, then select the appropriate option for connecting to source IMAP Server such as ‘Connect to IMAP Server’ or ‘Connect to POP3 Server’.
- After selecting the method, click ‘Next’ to continue.

- Click ‘IMAP Migration CSV File’. It will load the sample CSV file to your local drive.

- Open the CSV file and enter the required details for each mailbox, such as the email address, password, IMAP server hostname, and port number.
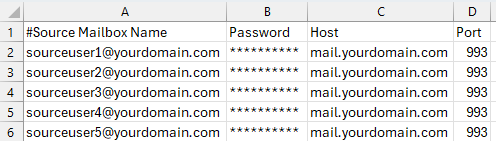
- Once you’ve entered and saved all the required details in the CSV file, close it to finalize the changes.
- Then, click the 'Load Modified CSV File' button, open the CSV file and click ‘Next’ to proceed.
- To migrate one Dovecot account, select ‘Single User / Account Migration’, then choose the appropriate connection method such as ‘Connect to IMAP Server’ or ‘Connect to POP3 Server’ based on your setup. Click ‘Next’ to continue with the process.
Step 3: Select source Dovecot server mailboxes
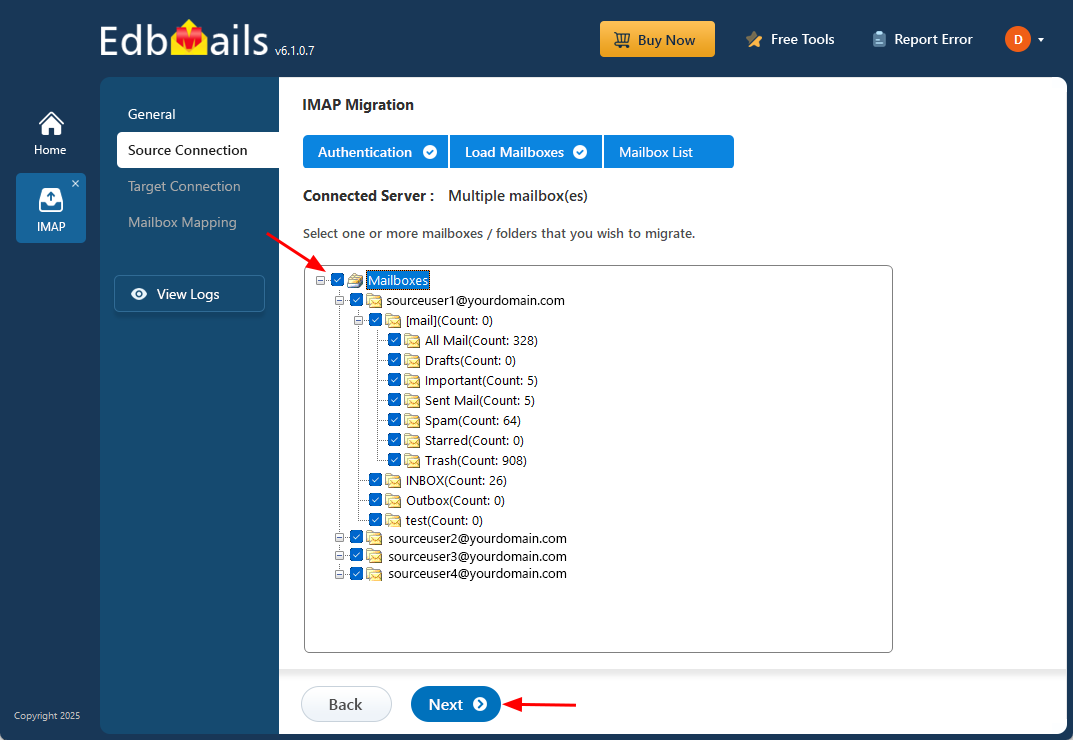
- Choose the mailboxes or specific folders you want to migrate according to your requirement.
- After selecting the items, click ‘Next’ to continue with the migration process.
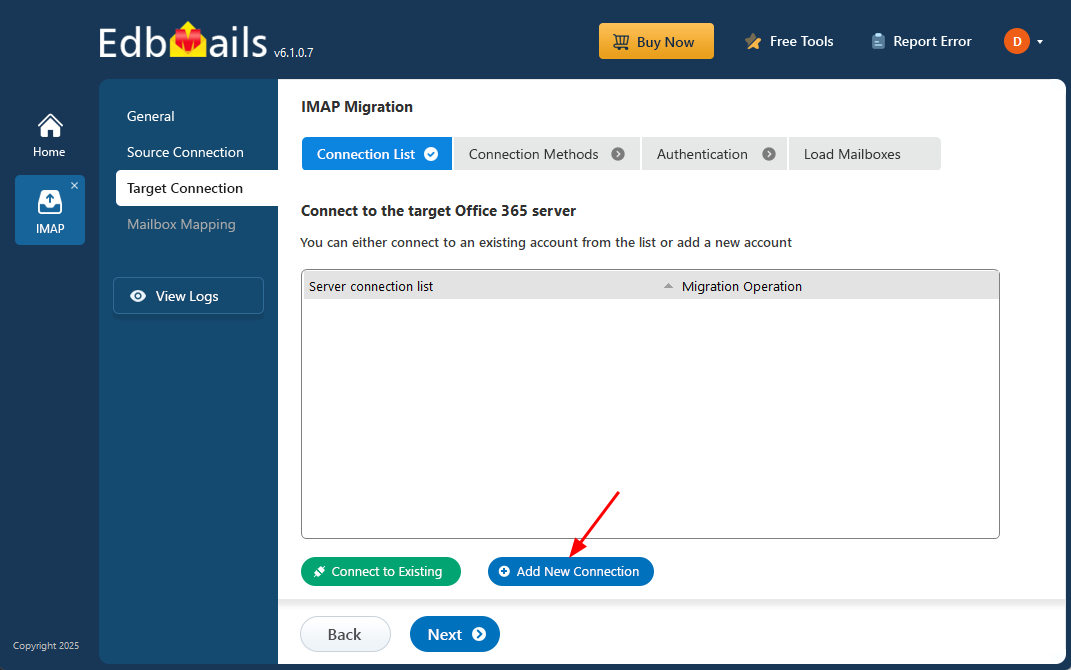
Step 4: Connect to target Office 365 server
- Select the ‘Add New Connection’ option to set up a new connection to the target Office 365 account.
- If a connection has already been configured, just select it from the list and click ‘Connect to Existing’ to proceed.
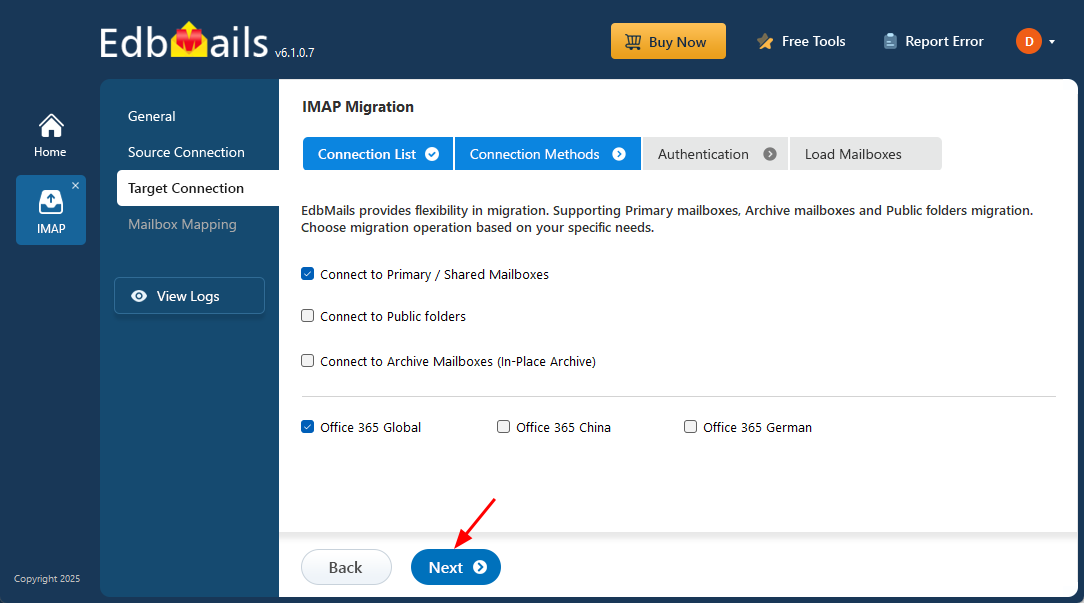
- EdbMails provides flexible migration options, allowing you to migrate primary mailboxes, archive mailboxes, and public folders as needed.
- Choose the appropriate connection settings and click ‘Next’ to continue with the authentication process.
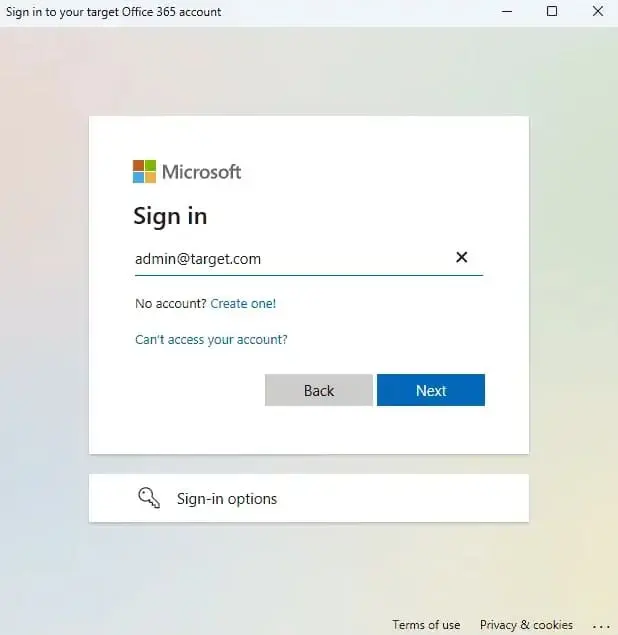
- Choose the authentication method based on your requirement.
- Complete the sign-in through the official Microsoft login page, where your credentials are securely verified using OAuth 2.0.
- Click ‘Login’ to proceed.

- Authenticate by signing in on the Microsoft sign-in page to continue.
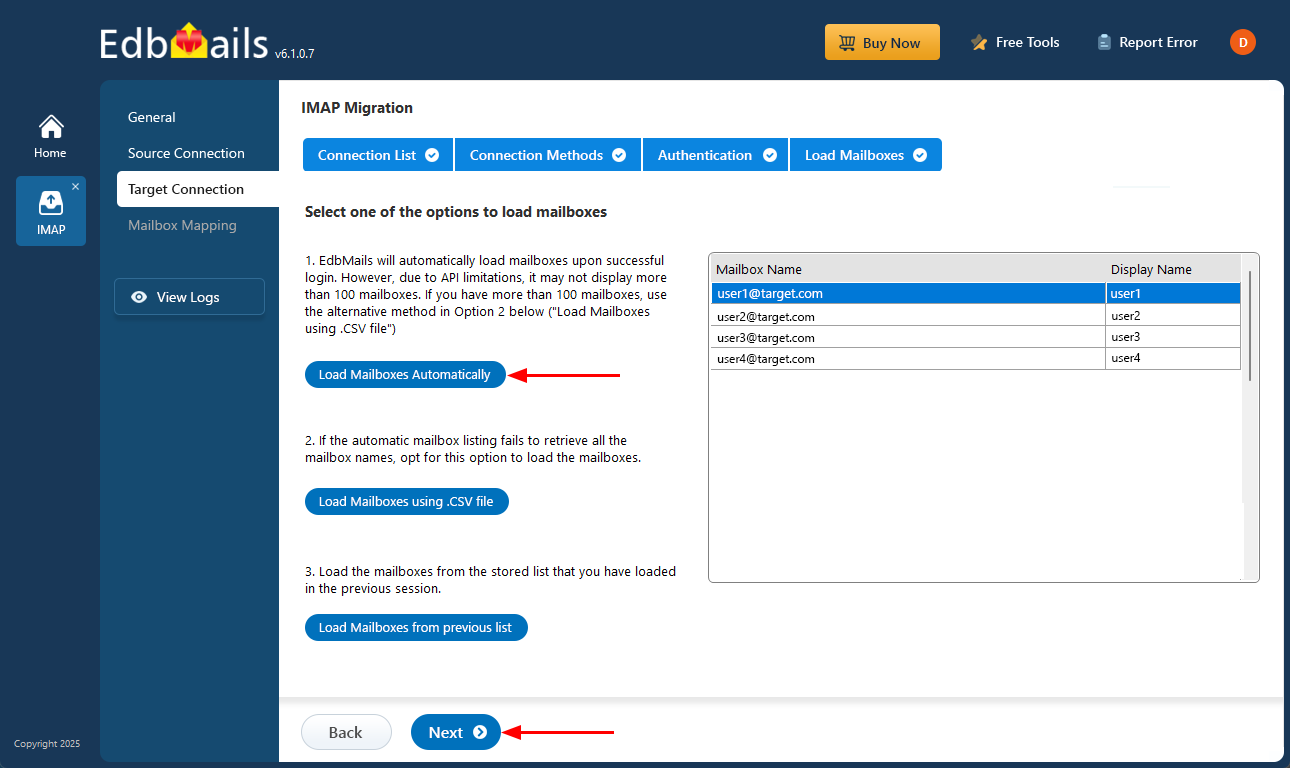
- EdbMails automatically loads mailboxes, making the setup process fast and convenient.
- Because of Microsoft API limitations, the automatic option can display only up to 100 mailboxes at a time.
- In larger environments or when you need to add specific additional mailboxes, you can choose the CSV file method.
- Loading mailboxes through a CSV file allows manual selection and provides complete control over the process.
- Click ‘Next’ to proceed.
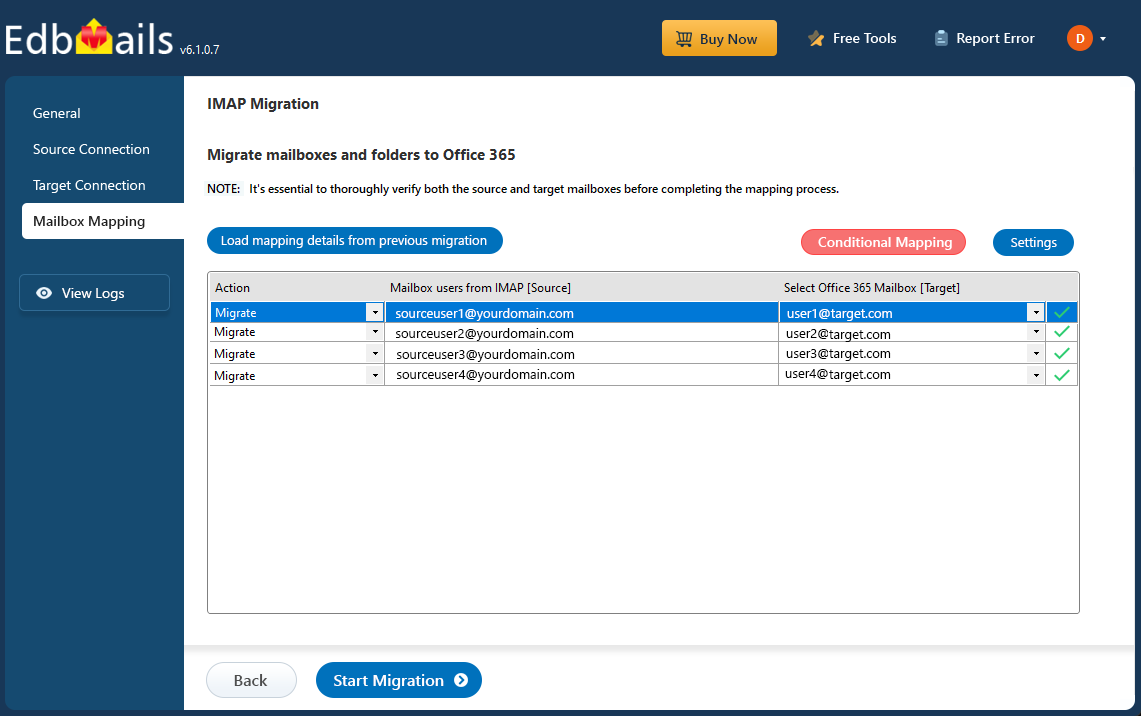
Step 5: Dovecot to Office 365 mailboxes mapping
- Choose an option to map the source mailboxes and folders to their corresponding mailboxes and folders in the target Office 365 account.
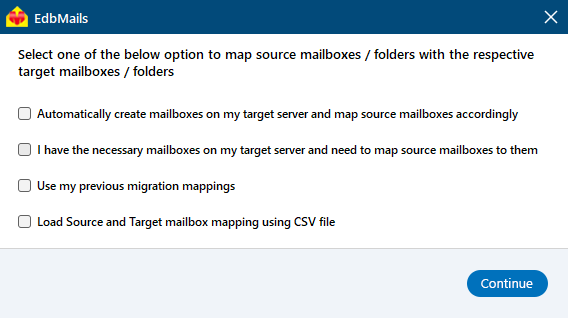
- EdbMails streamlines migration by automatically creating mailboxes in Office 365, effortlessly setting up target mailboxes and mapping source IMAP server mailboxes and folders. This functionality is crucial for ensuring precise management of large-scale mailbox migrations.
- Choose an option to map the source mailboxes and folders to their corresponding mailboxes and folders in the target Office 365 account.
Step 6: Start Dovecot to Office 365 migration
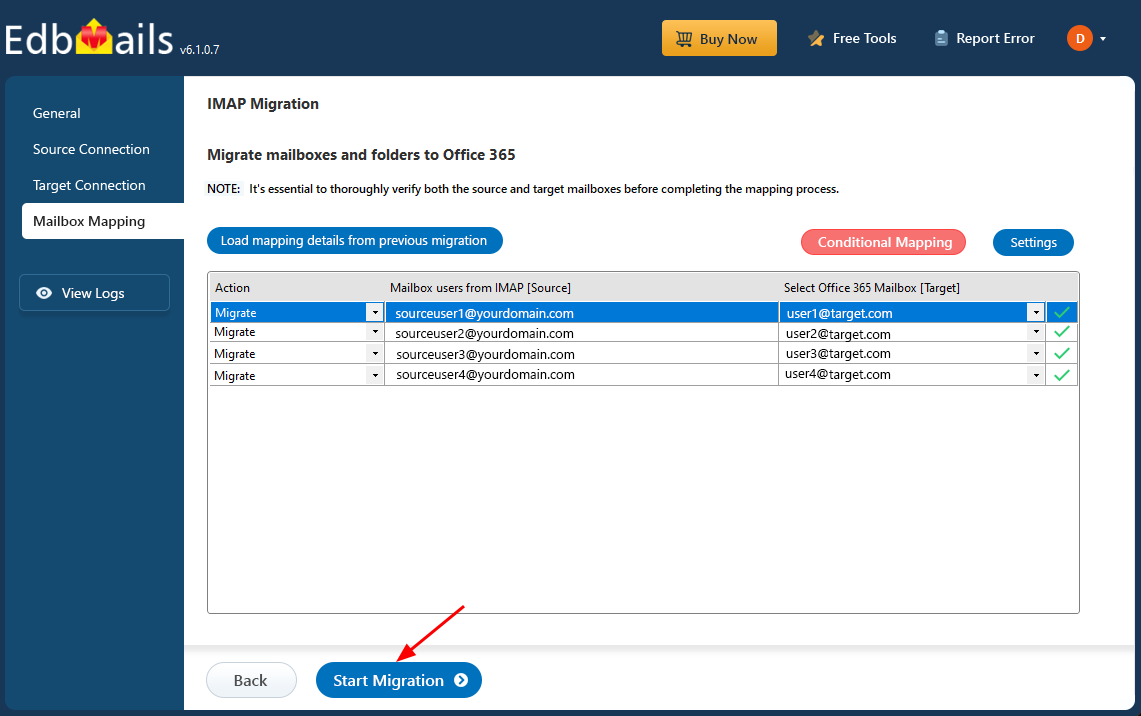
- Review the mailbox mapping and click the ‘Start Migration’ button to initiate the migration process.
- Click the ‘View Logs’ button to access the detailed migration report, which includes mailbox mapping, migration summary, and item count for each migrated mailbox and folder.
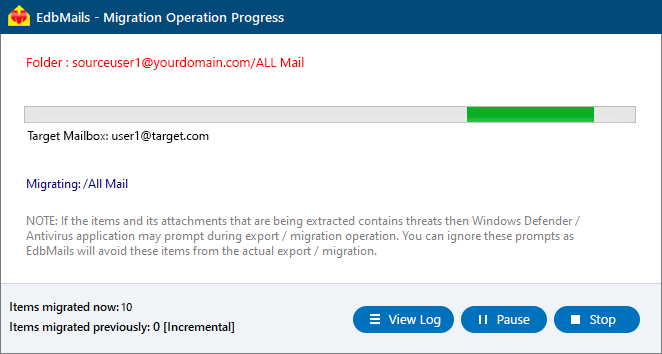
- Review the mailbox mapping and click the ‘Start Migration’ button to initiate the migration process.
Dovecot to Office 365 Post Migration Tasks
- Step 1: Update the MX records to point to Office 365
If you have not done this step previously, change the DNS records known as MX records to enable and receive email messages on the target Office 365 server. In addition to this setup, configure the Autodiscover record to allow Outlook to connect to the migrated mailboxes.
- Step 2: Create a new Outlook profile for users in the new domain
Configure the Outlook profile for each user in your domain if Outlook has problems connecting to Office 365 mailboxes.
- Step 1: Update the MX records to point to Office 365
Troubleshooting Guide for Dovecot to Office 365 Migration
Explore the knowledge base articles for troubleshooting common issues. For more information on EdbMails IMAP migration, review the FAQs or contact our dedicated support team for assistance.
Benefits of EdbMails for Dovecot to Office 365 Migration
- Selective Transfer
EdbMails provides selective migration options, enabling users to choose specific mailboxes, folders, or individual emails for transfer. This feature helps reduce migration time, optimize bandwidth, and ensure only essential data is transferred.
- Maintains Original Folder Hierarchy
During the Dovecot to Office 365 migration, EdbMails retains the original folder structure of your Dovecot mailbox, ensuring that emails remain organized as they were in the source system. This preserves consistency and eliminates confusion in the Office 365 environment.
- Compatible with all Windows Versions
EdbMails is fully compatible with all recent versions of Microsoft Windows, including Windows 10, 11, and earlier editions. It ensures easy installation and a smooth migration experience across your Windows environment.
- Bulk Data Conversion with Attachments
EdbMails facilitates bulk data conversion, allowing for the efficient migration of large volumes of emails and attachments. This ensures that all your mailbox content, including critical attachments, is seamlessly transferred to Office 365 without any data loss or interruptions.
- Save Data at desired Location
EdbMails offers flexibility in choosing the destination for your migrated data, allowing you to save it either on a local drive or directly to Office 365. This ensures that your data is stored in a manner that aligns with your organization's needs and compliance standards.
- 24/7 Free Tech Support
EdbMails provides 24/7 technical support to assist with any migration-related queries. Their dedicated team is available 24/7 to offer free, expert guidance, ensuring a smooth and hassle-free migration experience without delays or disruptions.

