Fastmail to Office 365 Migration
Fastmail is an Australian-based email hosting service recognized for its strong emphasis on privacy, focusing on protecting user data rather than relying on advertising or tracking. It allows users to create custom domain email addresses and supports up to 600 aliases across plans such as Basic, Standard, and Professional. Although Fastmail shares certain similarities with Microsoft 365 (Office 365), particularly in areas like privacy, licensing, and email archiving, it does not include several advanced capabilities that many growing businesses require.
For example, Fastmail’s Basic plan provides just 2 GB of storage per user, which may not be enough for businesses that manage large mailbox data. Fastmail mainly focuses on core services such as email, calendars, and contacts, but it does not include built-in productivity tools like cloud storage or collaboration applications. On the other hand, Office 365 provides a complete productivity ecosystem with services such as Microsoft Teams, OneDrive, and the Microsoft Office suite, along with advanced security capabilities including Exchange Online Protection, Advanced Threat Protection, and Microsoft Defender for Business. Microsoft 365 offers stronger security capabilities such as Exchange Online Protection, Advanced Threat Protection, and Microsoft Defender for Business, features that are not available with Fastmail. In addition, its wide range of integrated applications and collaboration tools makes Microsoft 365 a more robust choice for businesses aiming to improve productivity and support future growth.

Migrating from Fastmail to Office 365 can be complex because both platforms differ in storage capacity, features, and integrations. Fastmail offers limited storage and does not include applications such as OneDrive or Teams, which makes proper planning important during the migration process. Businesses may also encounter challenges like data mapping inconsistencies and possible downtime, so addressing these factors in advance is essential for a smooth transition to Office 365.
EdbMails IMAP migration software makes the migration process simple with a secure, reliable, and efficient solution. It performs complete mailbox migration, including emails, attachments, folders, and multilingual content, while advanced filters help migrate only the required data. AES 256-bit military-grade encryption protects data during the transfer, automated mailbox mapping reduces the chances of errors, and incremental migration transfers only newly added or modified items. With 24/7 free technical support, EdbMails helps businesses migrate from Fastmail to Office 365 smoothly while maintaining data integrity and ensuring zero downtime.
User Query
“We currently use Fastmail's standard email plan and would like to switch to Microsoft's Office 365. We would like to continue receiving emails on our previous domain after the migration without disrupting the current setup. Could someone please point us in the right direction? Thank you very much.”
Fastmail email to Office 365 Migration Plan
Proper planning is crucial for a smooth Fastmail to Office 365 migration. Consider the following checklist before you start:
- Evaluate Mailbox Size: Determine the volume of data and number of mailboxes to migrate.
- Review Data and Permissions: List all emails, folders, and permissions in Fastmail that need migration.
- Prepare Office 365 Environment: Create user mailboxes and assign the required licenses.
- Check Network Stability: Ensure sufficient bandwidth and network capacity for uninterrupted migration.
- Plan User Communication: Inform end users about the migration plan and workflow to avoid disruptions.
Fastmail email to Microsoft 365: Pre-Migration Activities
- Have the users email address, passwords, IMAP hostname and port number.
- Find the IMAP server name of your Fastmail email server. You can find this information from your server’s dashboard settings or by connecting your email system to Outlook.
- Before you migrate Fastmail email to Office 365, ensure that you create mailboxes for your users in your organization and assign suitable licenses to them.
- If you have a custom email domain from your hosting provider to which you want to migrate and receive emails, you must add and verify the domain on Office 365.
Steps to add a custom domain to Office 365 and Steps to add DNS records to connect your domain.
- Configure Office 365 to send and receive large messages.
Follow the steps to increase the message size on Office 365 to 150MB and see tips to optimize IMAP migration to Exchange online.
Steps to Migrate from Fastmail to Office 365
Step 1: Download and Install EdbMails software
- Download and install the EdbMails application on your computer running on Windows OS.
Know more details on EdbMails system requirements for IMAP migration.

- Open the EdbMails application on your computer.
- Enter your registered email address and password, then click ‘Login’. If you are new to EdbMails, select ‘Start Your Free Trial’ to begin with the trial version.Note: The trial version allows access to all essential features and lets you migrate up to 30 items per folder. To enable unlimited migration, purchase a valid license from the official EdbMails website.Once the purchase is complete, close the application and open it again. Then log in using the same email address and password used during the purchase to activate your license successfully.

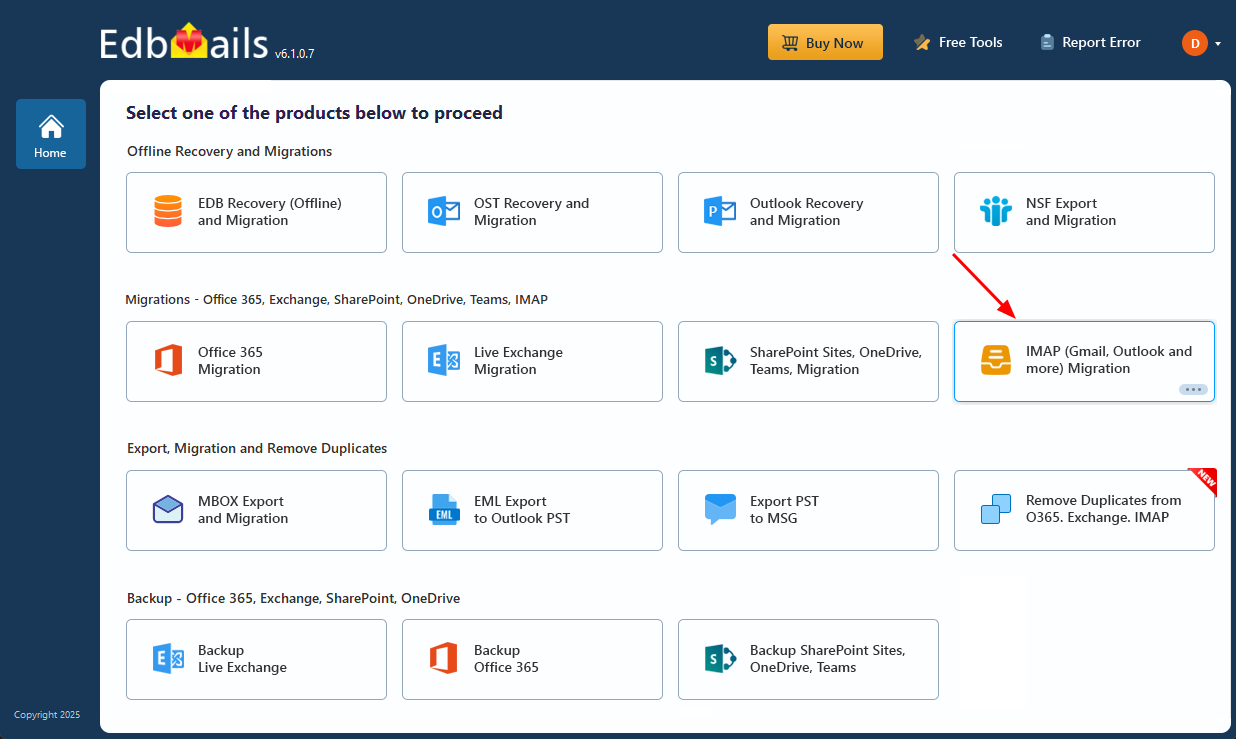
- Select the option ‘IMAP (Gmail, Outlook & more) Migration’.
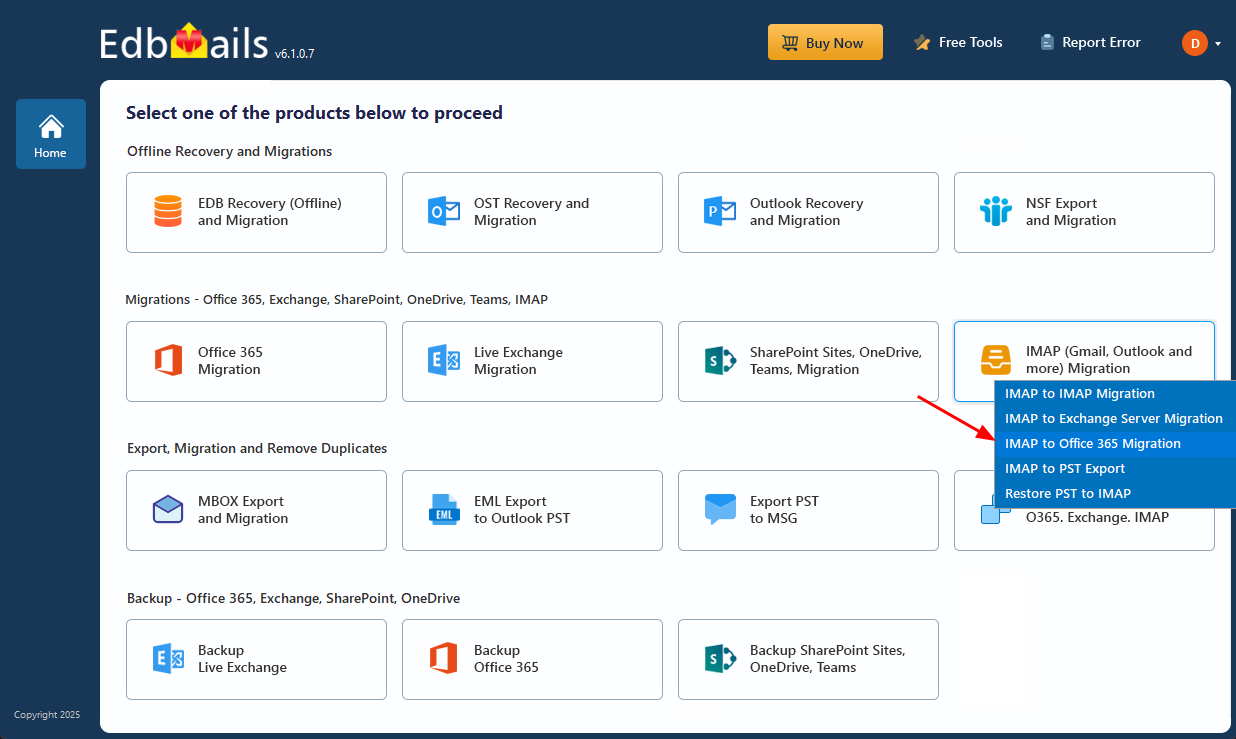
- Select ‘IMAP to Office 365 Migration’.
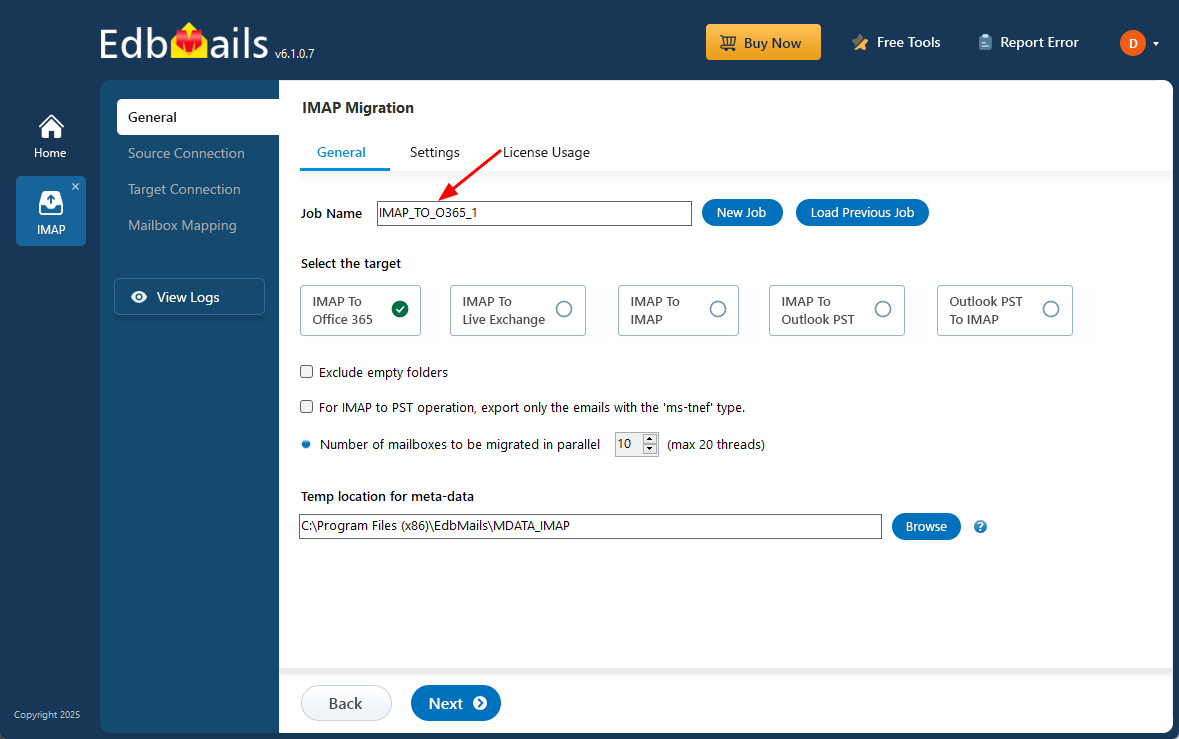
- Use the default job name assigned by EdbMails, or select ‘New Job’ to create a custom name. This helps you easily identify and manage multiple migration tasks.
- Download and install the EdbMails application on your computer running on Windows OS.
Step 2: Connect to source Fastmail server
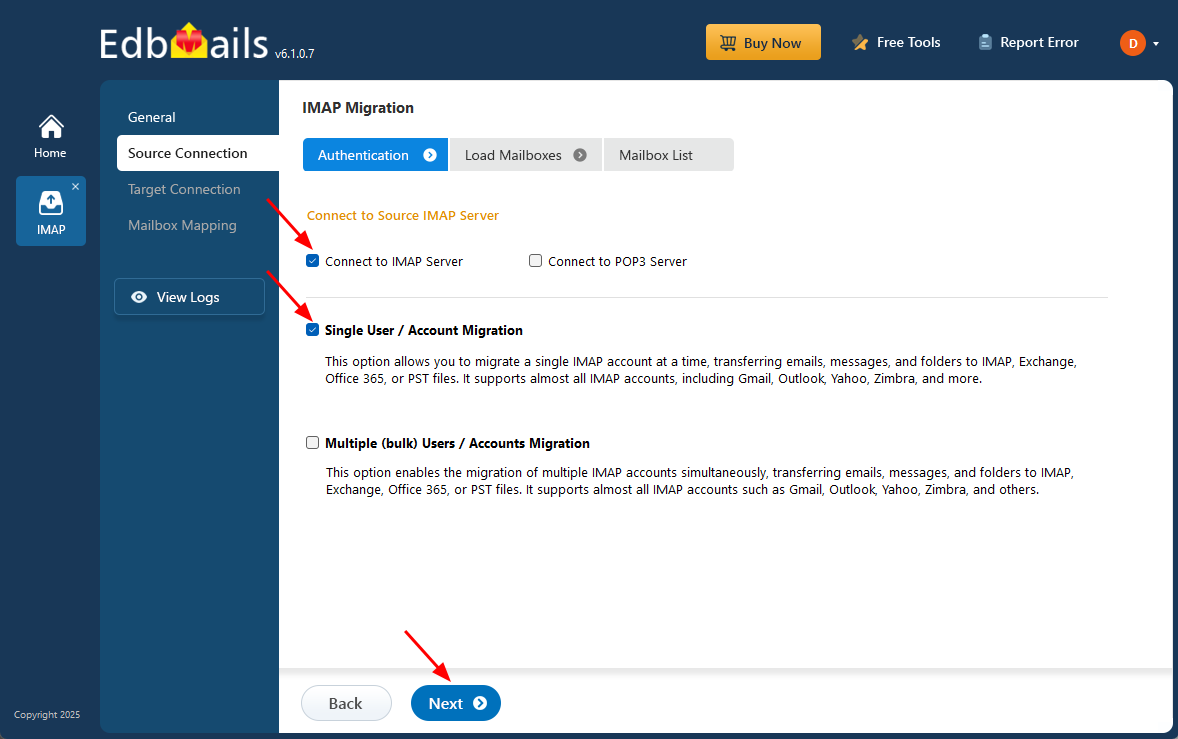
- To connect a single Fastmail account for migration, click ‘Single User / Account Migration’, choose the suitable connection option such as ‘Connect to IMAP Server’ or ‘Connect to POP3 Server’. Click ‘Next’ to proceed.
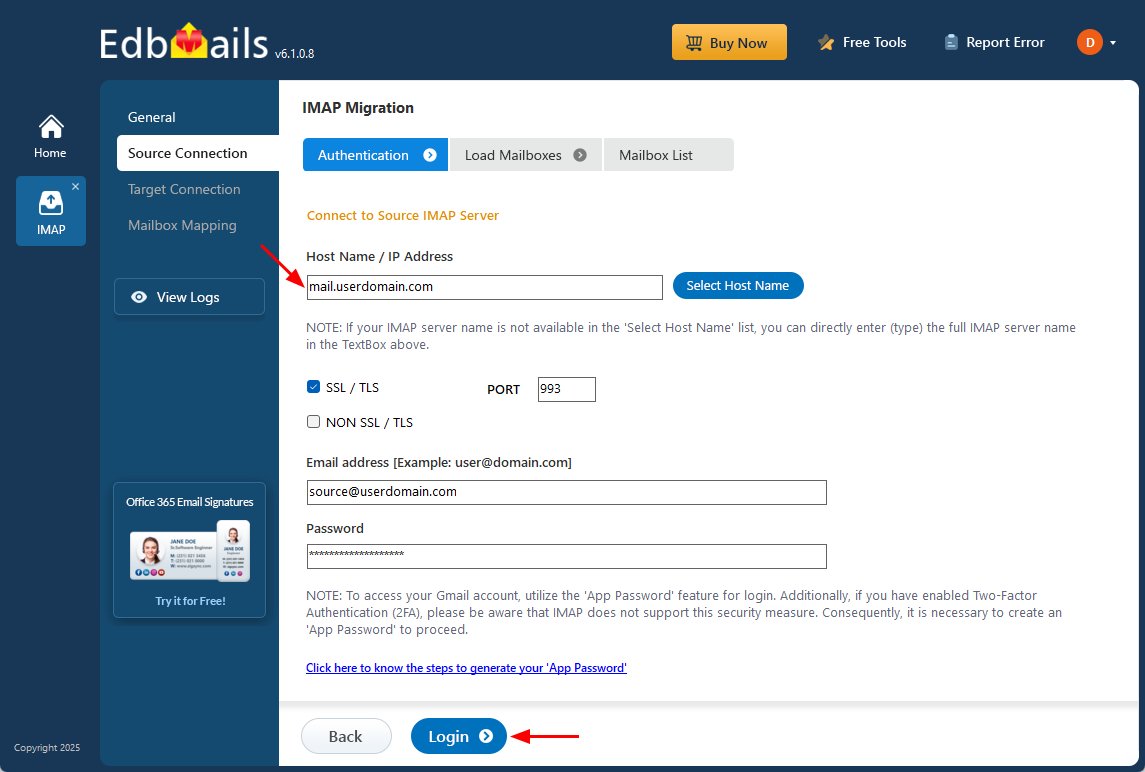
- For a single-user login, select the appropriate Fastmail IMAP host name from the list or enter it manually (for example, mail.userdomain.com).
- Enter the email address and password in the required fields.
- If you are adding a Gmail account, generate an app password and use it in place of your regular account password.
- Click the ‘Login’ button.
- To migrate multiple Fastmail mailboxes at once, select ‘Multiple (bulk) Users/Accounts Migration’, choose the suitable connection method such as ‘Connect to IMAP Server’ or ‘Connect to POP3 Server’.
- Then proceed by clicking ‘Next’.

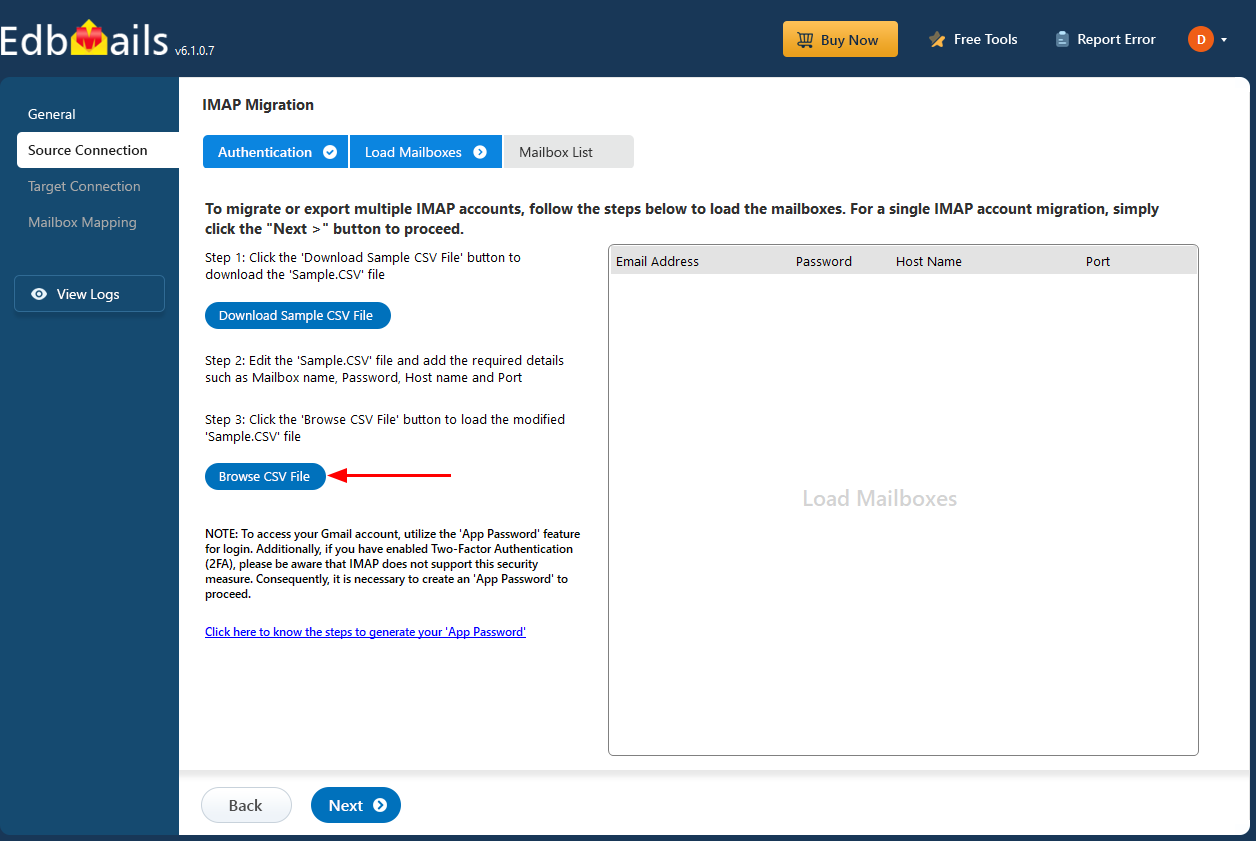
- Click ‘IMAP Migration CSV File’ to download the ‘Sample.CSV’ file.

- Edit the CSV file and fill in the required information, including the email address, password, server hostname, and port number.
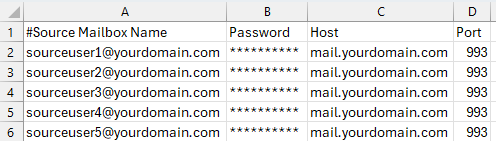
- Once you've made the necessary changes to the CSV file, save and close it.
- Then, click on the 'Load Modified CSV File' button, find your updated file, select it, and open it to continue.
- To connect a single Fastmail account for migration, click ‘Single User / Account Migration’, choose the suitable connection option such as ‘Connect to IMAP Server’ or ‘Connect to POP3 Server’. Click ‘Next’ to proceed.
Step 3: Select source Fastmail server mailboxes
- Select the mailboxes or specific folders you want to migrate, then click ‘Next’ to proceed with the migration process.
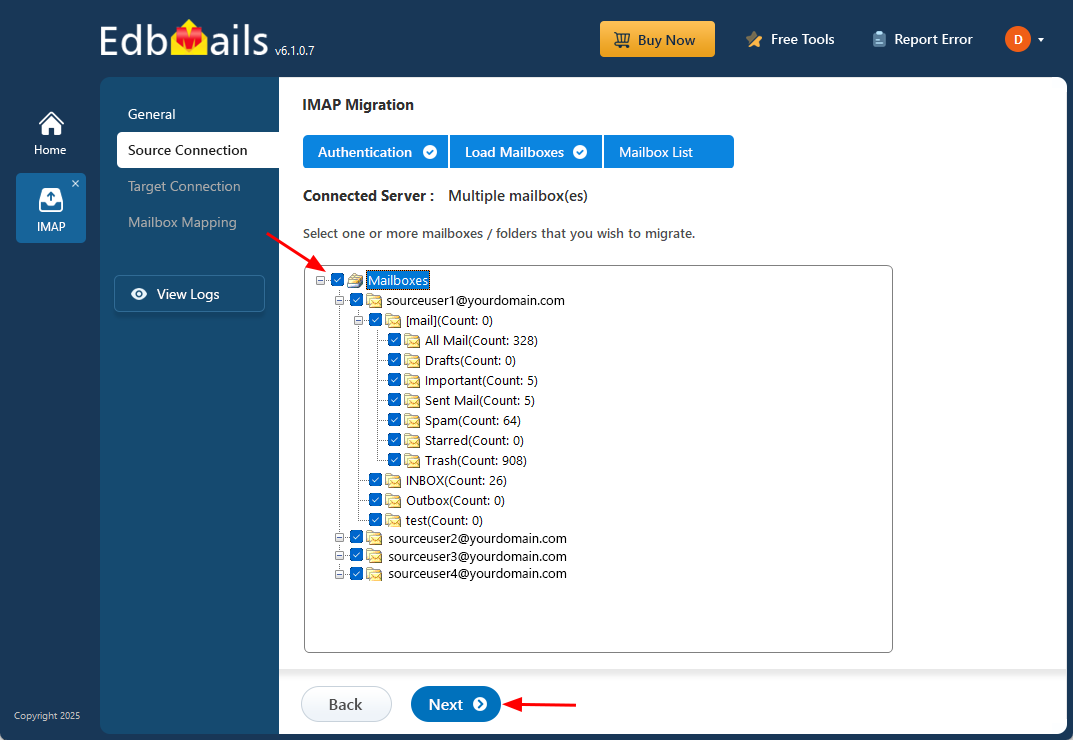
- Select the mailboxes or specific folders you want to migrate, then click ‘Next’ to proceed with the migration process.
Step 4: Connect to target Office 365 server
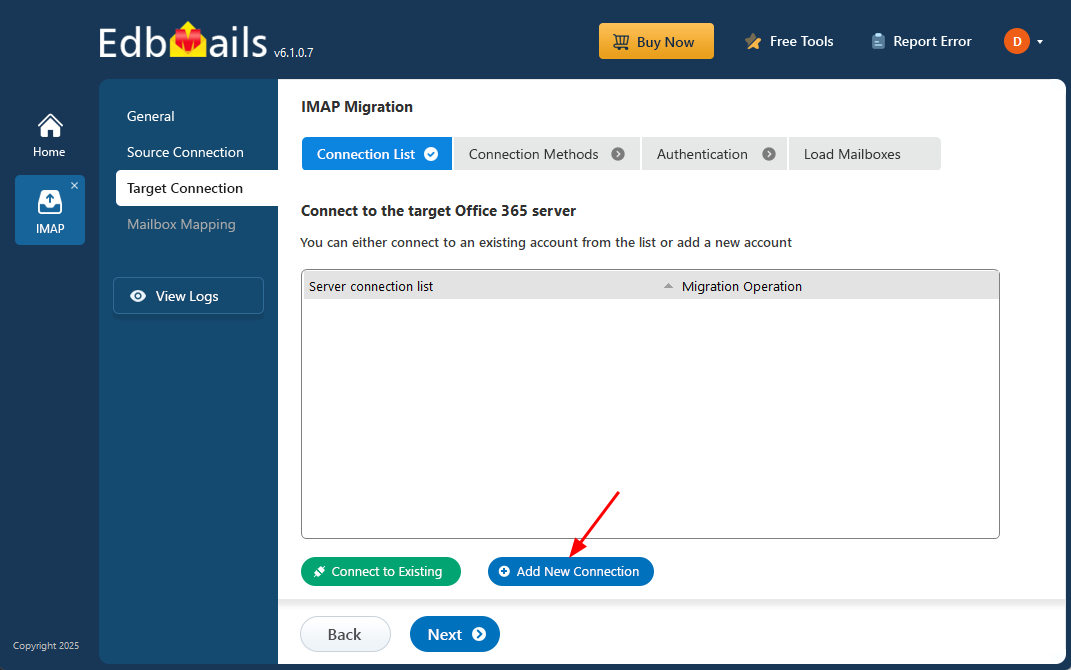
- Select the ‘Add New Connection’ option to establish a connection with your target Office 365 account.
- If you have previously set up a connection, you can choose it from the available list and click ‘Connect to Existing’ to proceed.
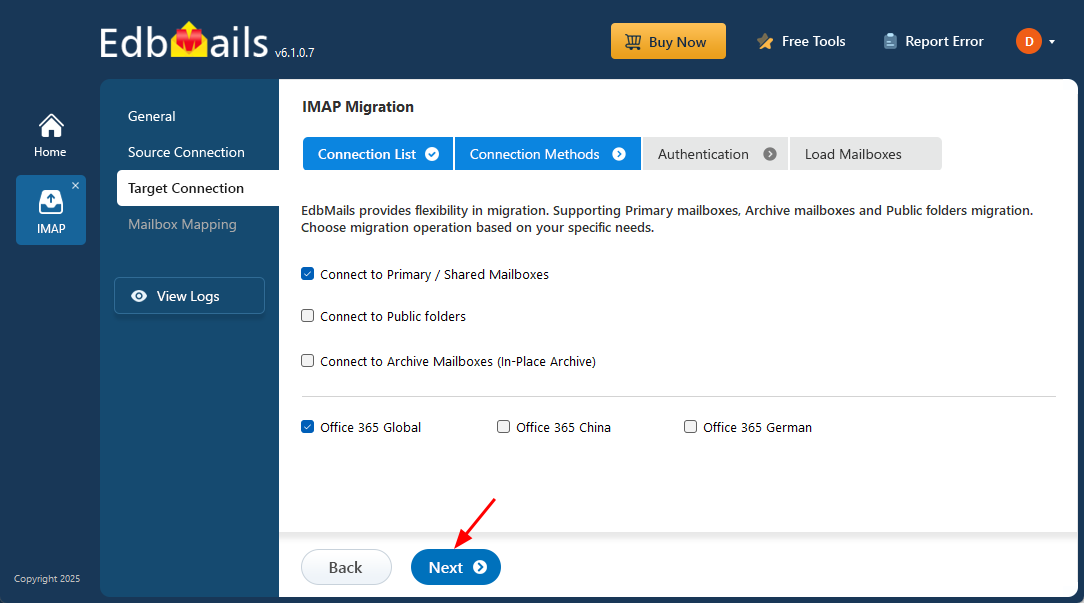
- EdbMails provides flexible migration options, allowing you to migrate primary mailboxes, archive mailboxes, and public folders seamlessly in a single solution.
- Choose the necessary connection options and click ‘Next’ to continue with authentication methods.
- Choose any of the available options to create a secure connection through OAuth 2.0 modern authentication.
- Select Auto Registration for a quick and hassle-free configuration. Simply log in with a Global Admin account and approve the required permissions to automatically register the application in Azure AD.
- Or select Manual Registration if you want to provide the Azure AD application details manually. This option supports both Global Admin accounts and accounts with Full Access permissions.
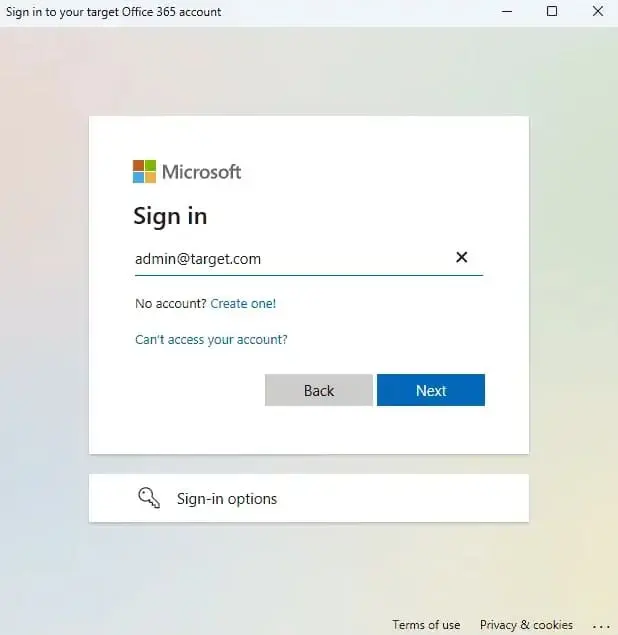
- Click the ‘Login’ button to continue.

- Sign in through the official Microsoft login page to authenticate your account and proceed with the migration.
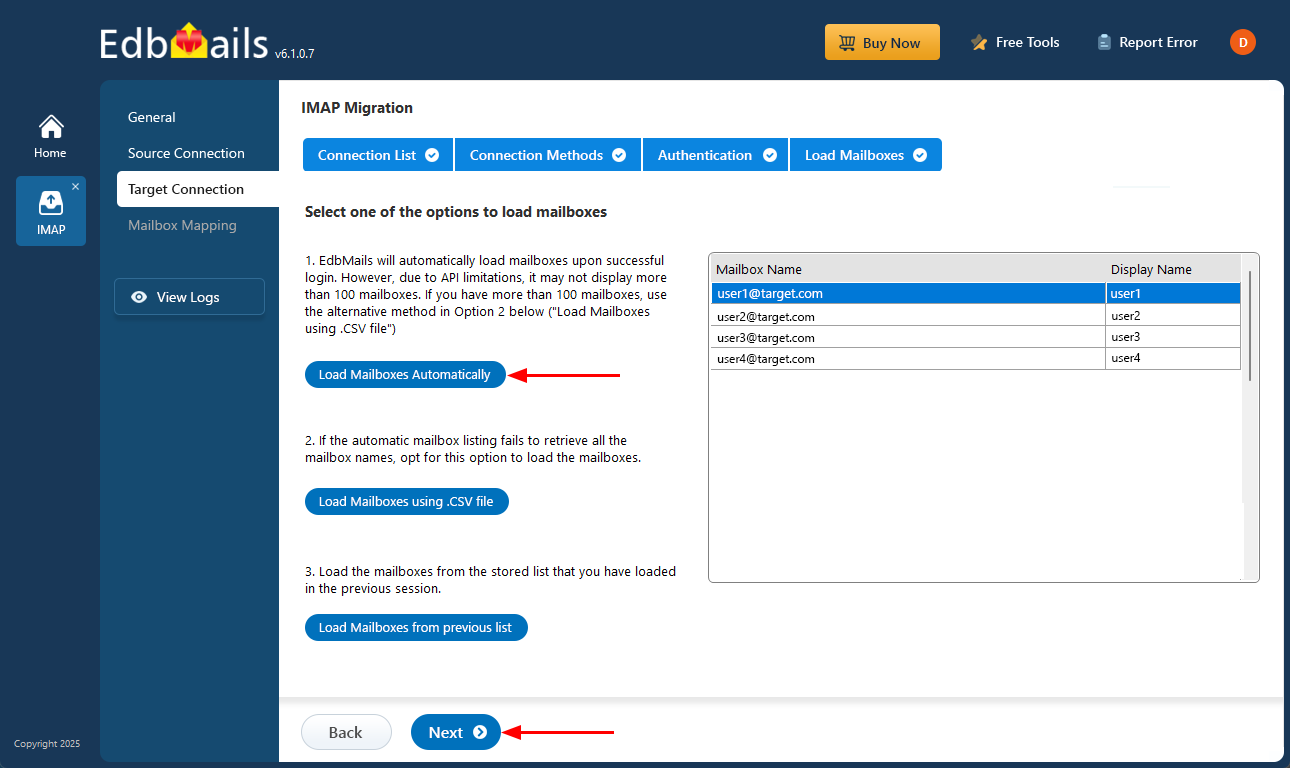
- After the authentication process is completed successfully, choose any one of the following methods to load the mailboxes:
i) Load Mailboxes Automatically: EdbMails automatically retrieves the mailboxes after login, allowing a quick and simple setup. However, due to Microsoft API limitations, only up to 100 mailboxes may be displayed. If your organization contains more than 100 mailboxes, use the alternative option mentioned below.
ii) Load Mailboxes using CSV file: If the automatic method does not load all mailbox names, select the ‘Load Mailboxes using .CSV file’ option to manually import and load the required mailboxes.
iii) Load Mailboxes from previous list: This option allows you to directly access the mailbox list that was previously imported and saved in an earlier session.
- Choose ‘Load Mailboxes Automatically’ and click ‘Next’ to continue.
Step 5: Fastmail to Office 365 mailboxes mapping
- Choose the appropriate mailbox and folder mapping option based on your migration preferences.
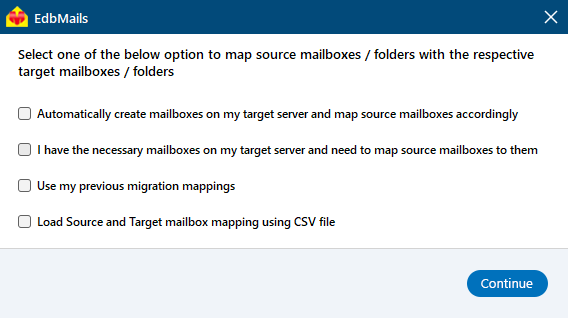
- You can choose to let EdbMails automatically create mailboxes in Office 365 and map them between the source and target servers. This feature is especially useful for large-scale migrations, saving time, reducing manual effort.
- Choose the appropriate mailbox and folder mapping option based on your migration preferences.
Step 6: Start Fastmail to Office 365 migration
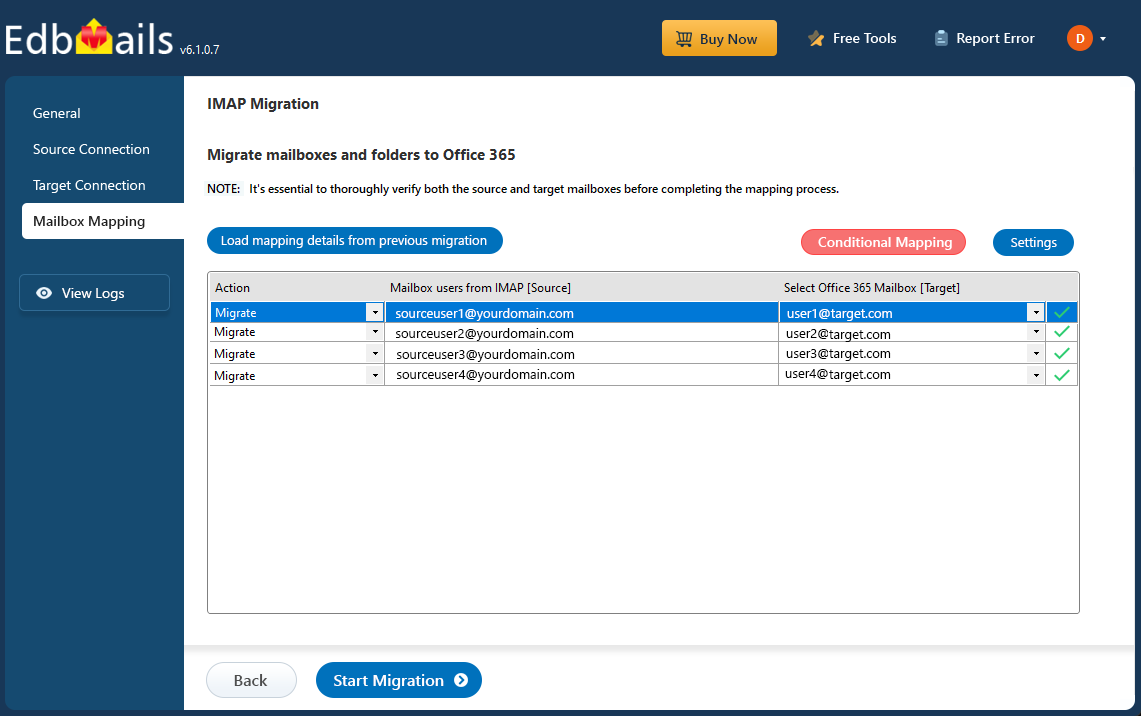
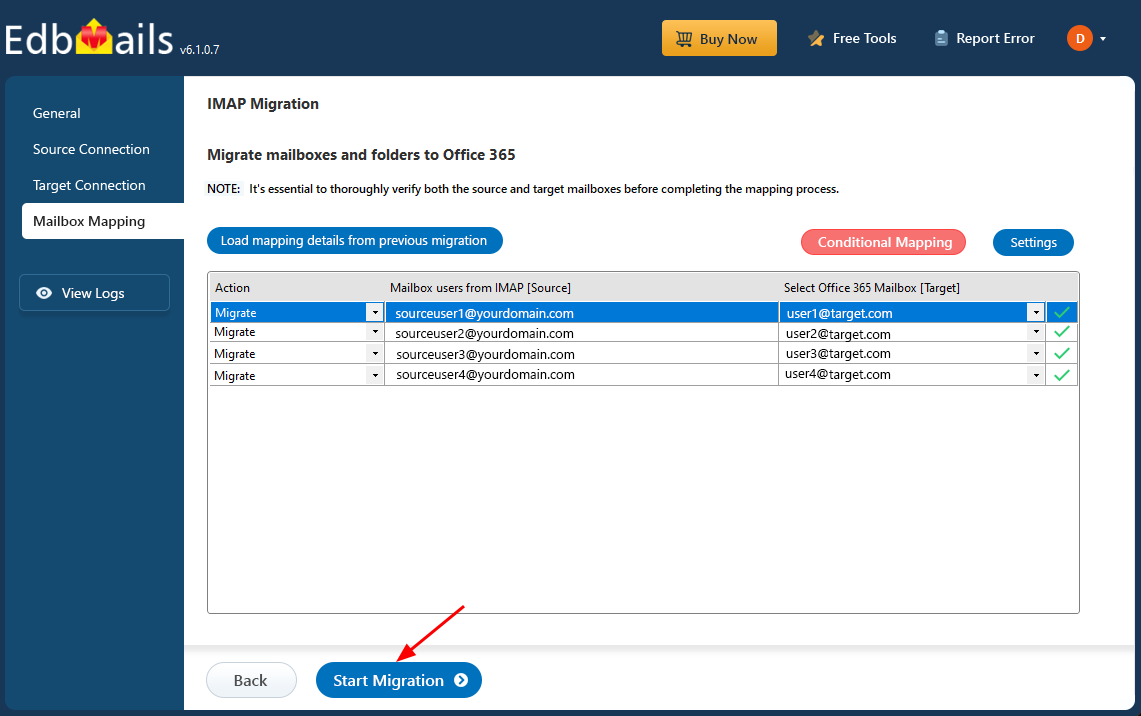
- After mapping the mailboxes, click the ‘Start Migration’ button to initiate the migration process.
- Click the ‘View Log’ button to view the migration report, which includes mapping details and the total count of migrated emails.
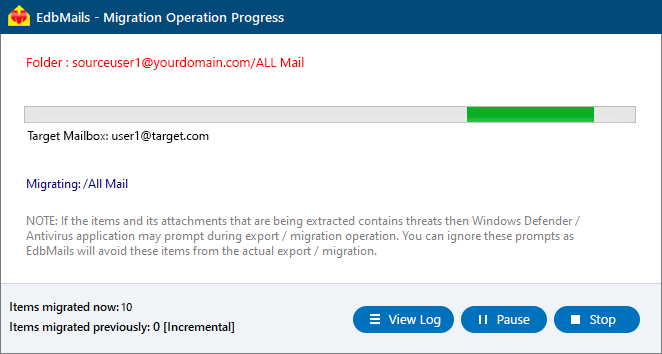
- Login to your target server and verify the items.
- After mapping the mailboxes, click the ‘Start Migration’ button to initiate the migration process.
Fastmail to Office 365 Post-migration Tasks
- Step 1: Update the MX records to point to Office 365
Update MX records to enable email and receive messages on the target Office 365 server. In addition, configure the Autodiscover record to allow Outlook to connect to the migrated mailboxes.
- Step 2: Create a new Outlook profile for users in the new domain
Configure and recreate the Outlook profile for each user in your domain if Outlook has problems connecting to Office 365 mailboxes.
- Step 1: Update the MX records to point to Office 365
Troubleshooting Guide for Fastmail to Office 365 Migration
For troubleshooting, visit Knowledge Base.
For more queries, check Frequently Asked Questions or contact support.
Benefits of EdbMails to Migrate from Fastmail to Office 365
- Selective email Migration with Date Filters
EdbMails provides a flexible migration solution that allows users to selectively migrate emails within a specific date range. This ensures that only relevant emails are migrated, streamlining the process, preserving data integrity, and avoiding unnecessary data transfers.
- Bulk Migration with Data Integrity
EdbMails streamlines the migration from Fastmail to Office 365, supporting bulk migration of mailboxes with concurrent migration capabilities. This feature allows multiple mailboxes to be migrated simultaneously, speeding up the process. The tool ensures that all your data remains intact throughout the entire migration, eliminating the risks of data corruption or loss, even when migrating large volumes of information.
- Mailbox Preview and Folder Selection
EdbMails provides a detailed preview of your Fastmail mailboxes, including all folders and subfolders, giving you full visibility before migrating to Office 365. You can selectively migrate specific folders, ensuring only the necessary data is moved and improving the overall efficiency of the migration process.
- Compatibility with all Windows OS versions
EdbMails operates seamlessly across all Windows operating systems, offering broad compatibility and flexibility. Whether you are using Windows 10, 8, or older versions, the tool delivers consistent and reliable performance, making it an ideal choice for businesses of all sizes.
- Delta (incremental) migration
EdbMails’ delta migration feature ensures that only new or modified items that weren’t migrated previously are synced to Office 365. This incremental approach saves time and bandwidth, enabling a seamless migration with no disruption to ongoing mail operations.

