


cPanel to cPanel Email Migration using IMAP
This guide focuses specifically on migrating email mailboxes from one cPanel-hosted mail server to another using IMAP. Website files, databases, DNS zones, SSL certificates, and other hosting-account data are outside the scope of EdbMails IMAP migration and should be moved with the appropriate cPanel or hosting-provider tools.
The EdbMails IMAP Migration Tool provides a guided workflow for transferring supported email data between two cPanel-hosted IMAP environments. It is designed to preserve supported messages, attachments, folder hierarchy, and common message properties where the source exposes them and the target accepts them. For the broader server-to-server workflow, use the main IMAP to IMAP migration guide.
With incremental follow-up migration, EdbMails can process eligible new or changed email items after the initial pass, which supports staged cutover and reduces repeated processing.
EdbMails supports concurrent mailbox processing for larger projects, subject to source and target connection limits, bandwidth, and migration-computer resources. Automatic mailbox mapping can reduce repetitive setup where source and target identifiers align, but administrators should review every mapping before migration.
EdbMails supports secure IMAP connections over SSL/TLS where the source and target servers provide them. Review the EdbMails security information and the current IMAP migration requirements before deployment.
Use a pilot mailbox, review mapping, check migration reports, and verify representative target data before changing production mail flow or retiring the source cPanel environment.
cPanel to cPanel Migration Plan
Before starting your cPanel email migration, it’s essential to plan ahead. Setting up and verifying the target environment in advance helps prevent issues like data loss or migration errors. Use the following checklist to ensure everything is ready before you begin the process.
- Remove unused mailboxes and duplicate emails files from the source.
Make an inventory of items before you make the move. These should include but are not limited to the following items.
- User accounts, email addresses and login credentials.
- The source and target details, browser and operating systems used.
- Network settings, DNS configurations, MX records, firewall settings.
- Outlook settings and version you are using in your organization.
- Licensing plans on your current source IMAP server.
- List of data and permissions from the source server that you want to transfer.
- Identify the number of mailboxes and estimate the total data size for migration.
- Create appropriate user mailboxes on the target server
- Ensure the migration computer and network have sufficient capacity for the planned mailbox volume and concurrency.
- Communicate the migration plan and changes to your end users and stakeholders.
- Perform a test migration before you start the actual one.
- Start the actual migration, verify the endpoints and update the MX records.
- Check for correct mail flow and configure Outlook for all the users
cPanel to cPanel email Migration Prerequisites
Before you begin migrating mailboxes between two cPanel servers using EdbMails IMAP Migration, ensure that the following prerequisites are met for a smooth and error-free transition:
1. Collect Source and Target Server Details
Have the required IMAP connection details ready for both the source and destination cPanel servers. This includes:
- IMAP hostname or server address.
- Port number (typically 993 for SSL/TLS).
- Email address and corresponding password for each mailbox.
2. Prepare for Multiple Mailbox Migrations
If you plan to migrate multiple cPanel mailboxes, you can save time by using EdbMails CSV import feature. Download the sample CSV template directly from the application, fill in the connection details for each user account, and upload it to automate the mailbox mapping process.
3. Confirm secure IMAP connectivity
Use SSL/TLS-enabled IMAP on both cPanel servers whenever available. Confirm that the source and target hostnames, ports, credentials, and firewall rules allow the migration computer to connect.
4. Ensure mailbox access
Confirm that every source and target mailbox can be accessed with the credentials supplied for the migration. For bulk migration, prepare the per-mailbox connection information required by the EdbMails CSV workflow.
5. Test Connection Before Migration
Use EdbMails’ built-in connection test to validate IMAP settings and ensure both servers are ready. This precheck helps identify any configuration issues early on.
Step-by-Step Guide for cPanel to cPanel Migration
Step 1: Download and install EdbMails IMAP migration Software
- Download and install the EdbMails application on your computer to get started with the cPanel to cPanel migration process.
See EdbMails system requirements for cPanel to cPanel email migration.
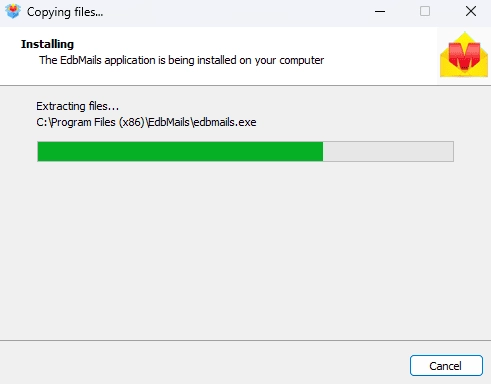
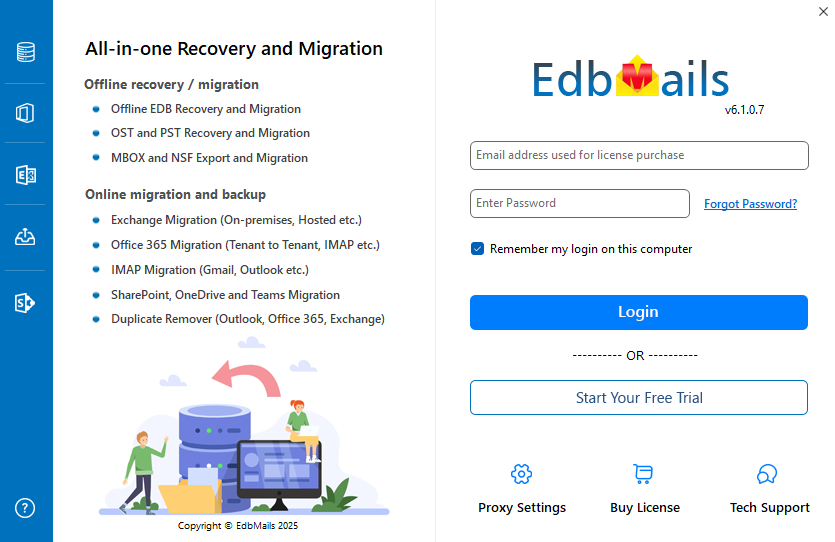
- Launch the EdbMails application on your system.
- Enter your registered email address and password, then click ‘Login’. If you don’t have an account, select ‘Start Your Free Trial’ to proceed with the trial version.Note: The Free Trial version includes the key migration features and lets you migrate up to 30 items per folder. To remove the trial item limit, purchase a valid IMAP Migration license from the EdbMails website.
Click here to purchase the license from the EdbMails website.
Once the purchase is complete, restart the application and sign in again with the same email address and password used during the purchase to activate your license.
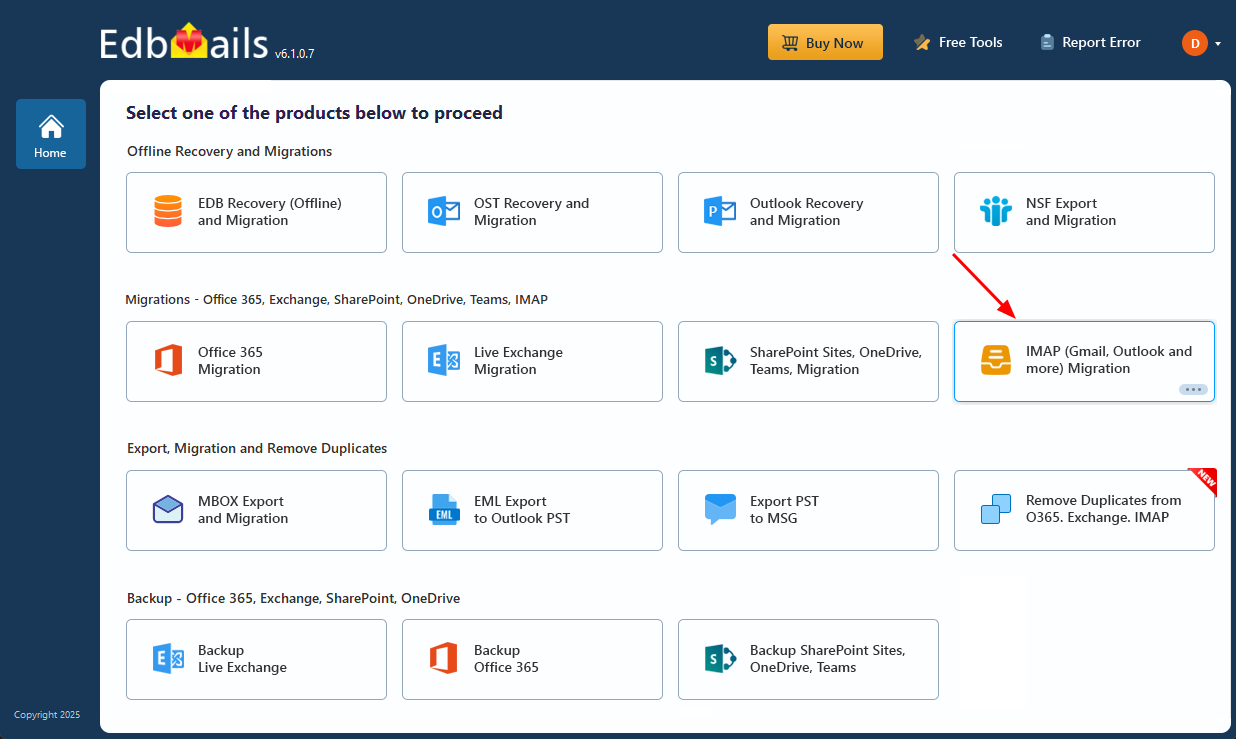
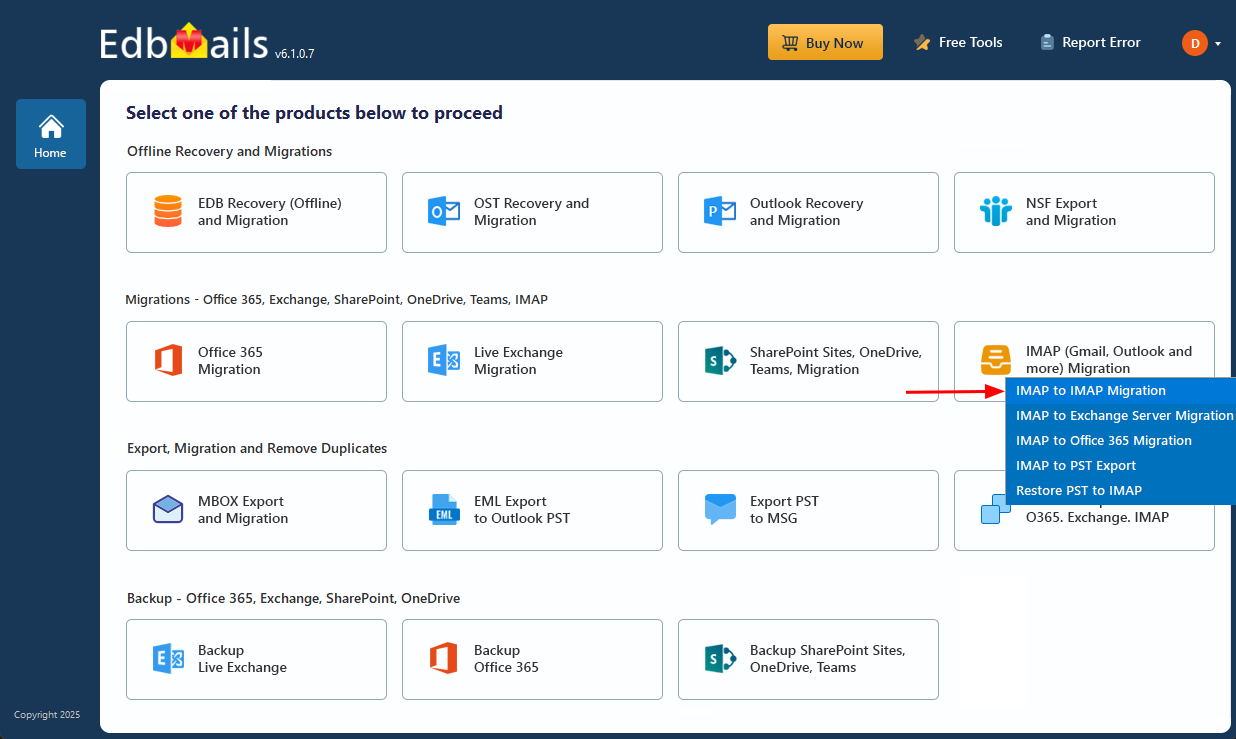
- Select the ‘IMAP (Gmail, Outlook & more) Migration’
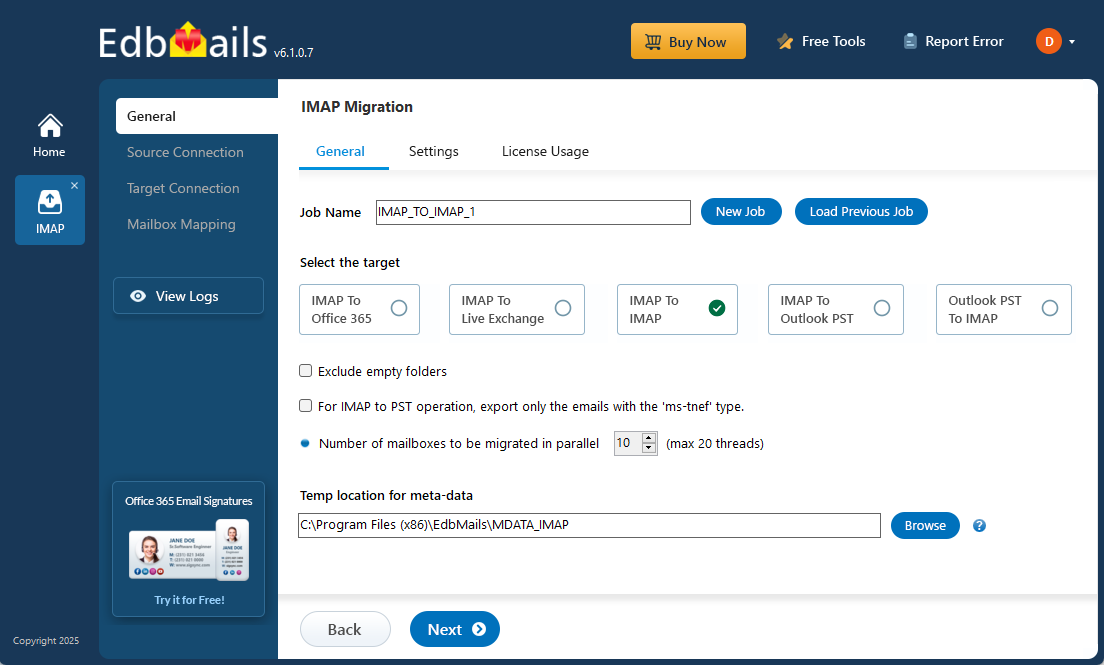
- Select ‘IMAP to IMAP Migration’.
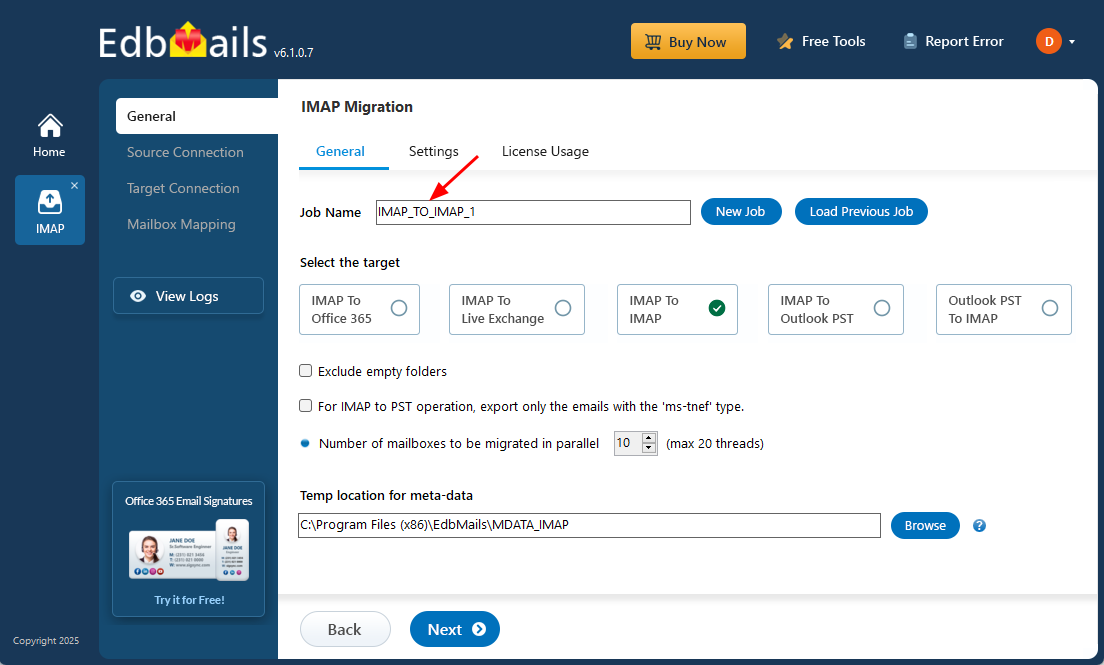
- You can proceed with the default job name that has been assigned or choose ‘New Job’ to rename it as per your preference before continuing with the process.
- Download and install the EdbMails application on your computer to get started with the cPanel to cPanel migration process.
Step 2: Connect to source cPanel server
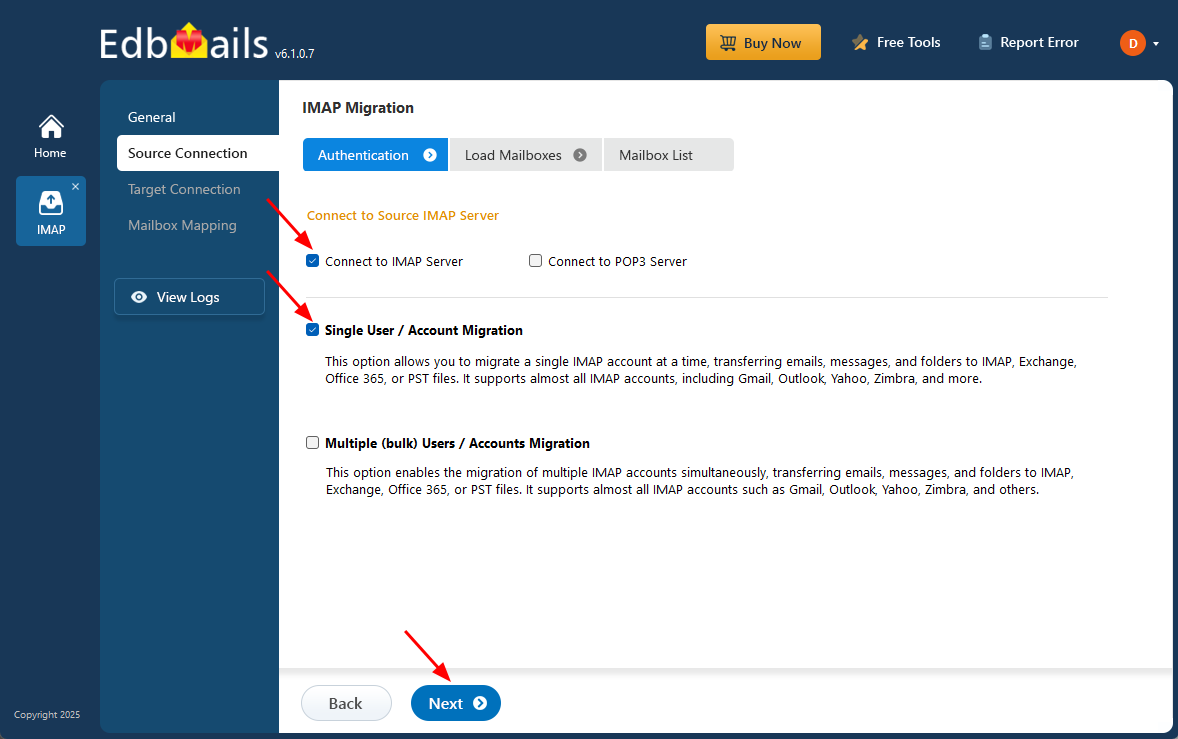
- To migrate a single account, select ‘Single User / Account Migration’, choose the relevant option such as ‘Connect to IMAP Server’ or ‘Connect to POP3 Server’, and click ‘Next’ to proceed to the next step.
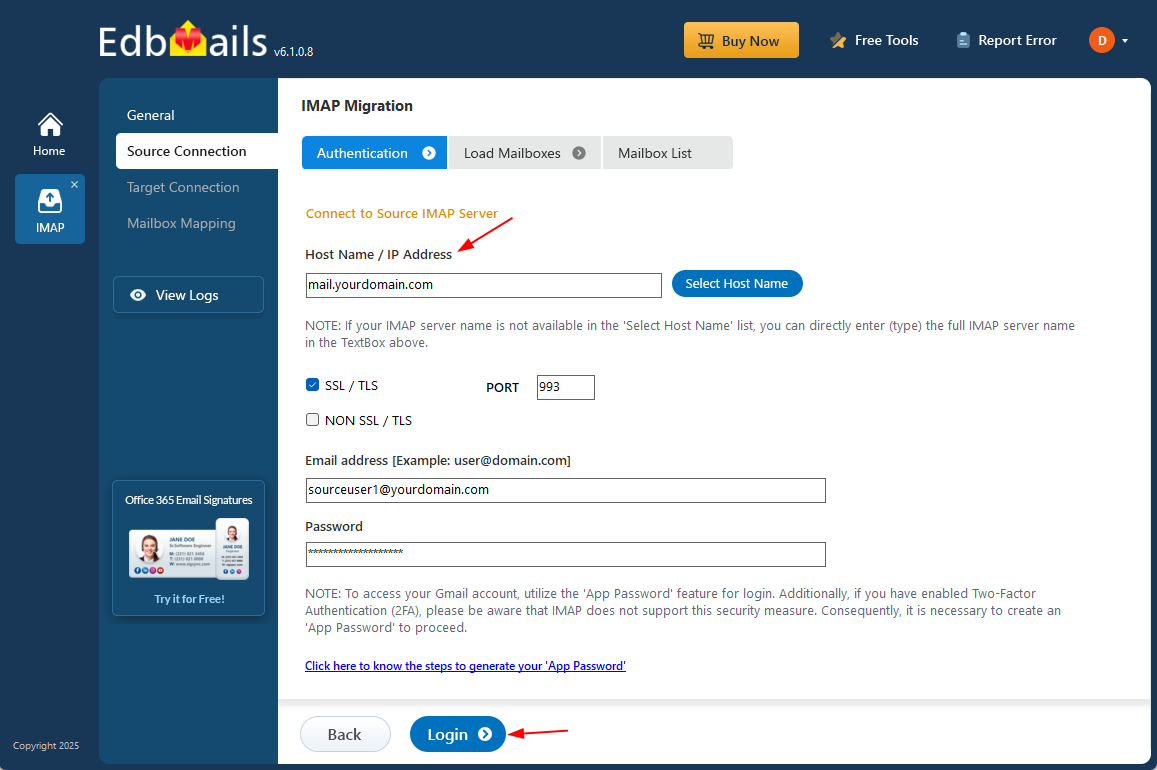
- Select the correct cPanel IMAP server hostname from the available list or enter it manually. Next, enter your cPanel email address along with the corresponding password to proceed.
- Click the ‘Login’ button.
- To migrate multiple cPanel mailboxes, select ‘Multiple (Bulk) Users/Accounts Migration’, choose ‘Connect to IMAP Server’, and click ‘Next’ to proceed.
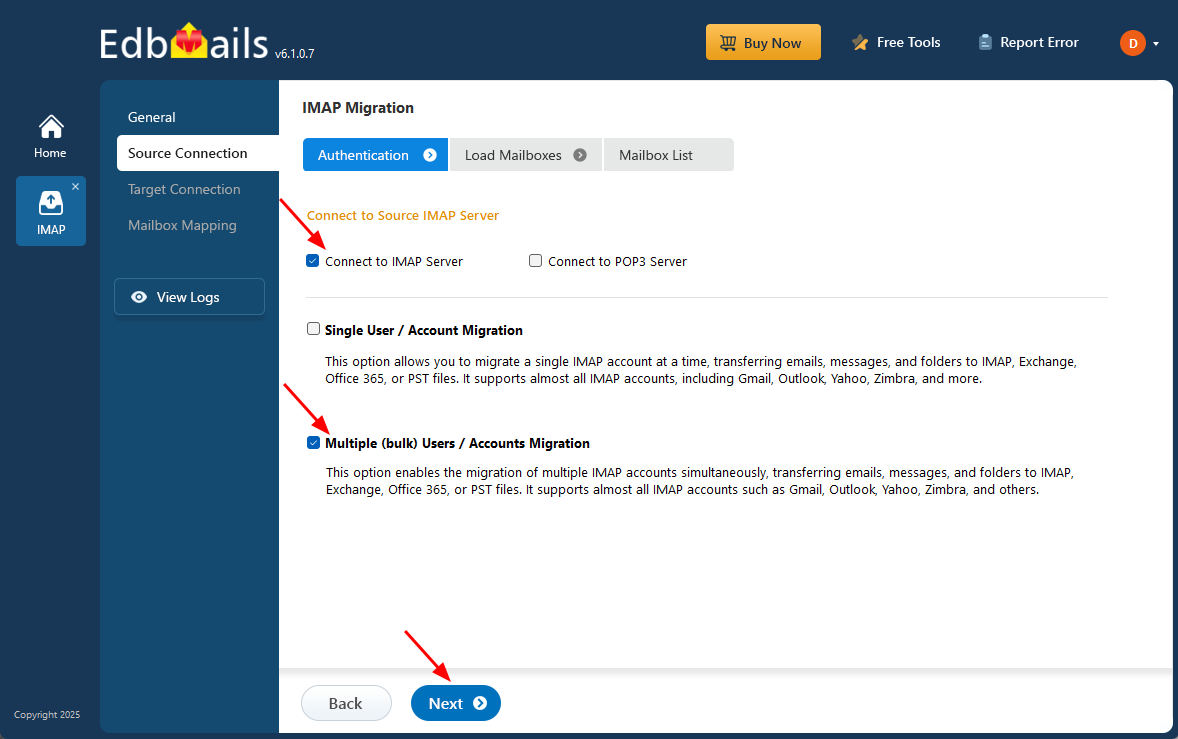
- Select ‘IMAP Migration CSV File’ to download the sample CSV file directly to your local system.
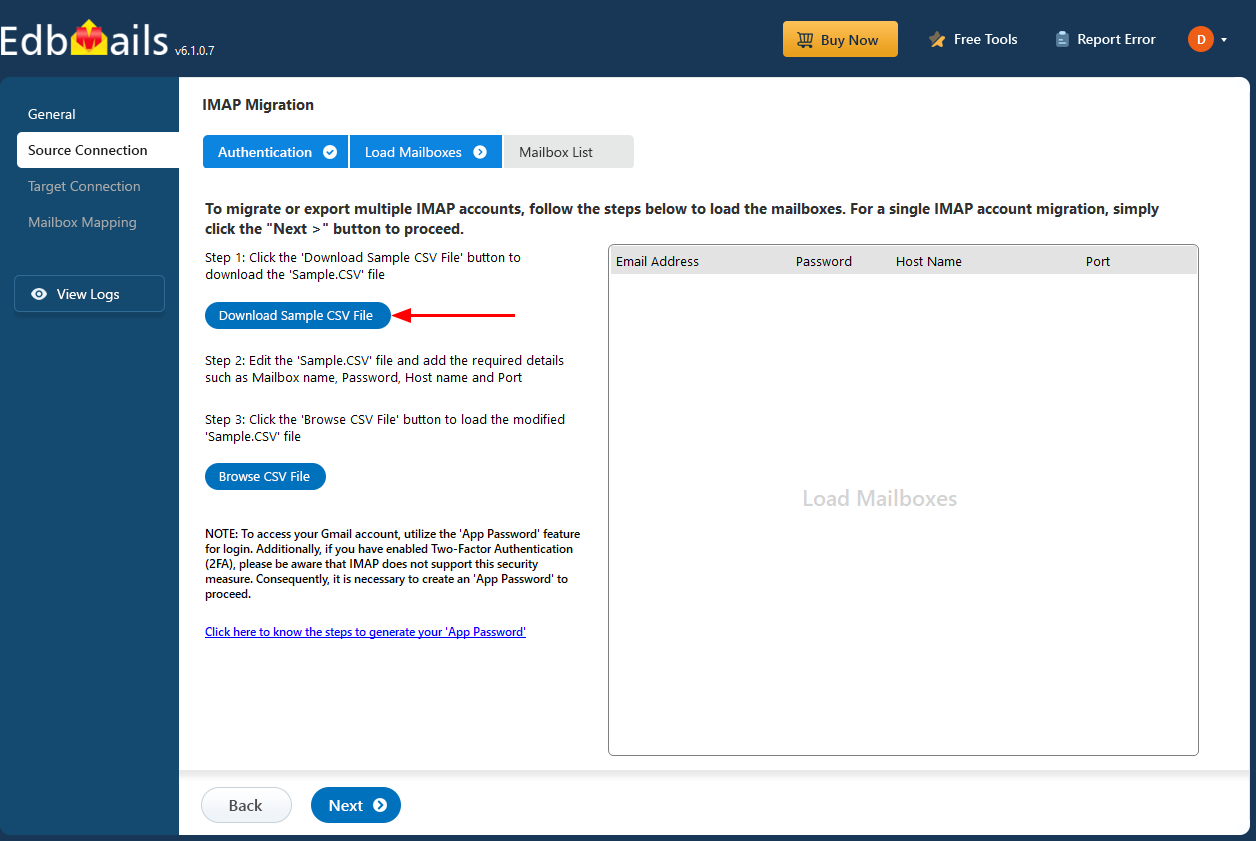
- Open the CSV file and enter the required information for each mailbox such as the email address, password, IMAP server hostname, and port number then save the file once all details are updated to continue with the migration process
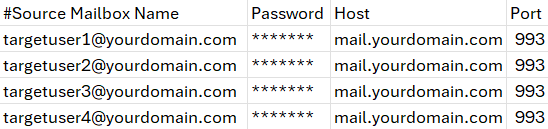
- Save the changes and close the CSV file when you're done.
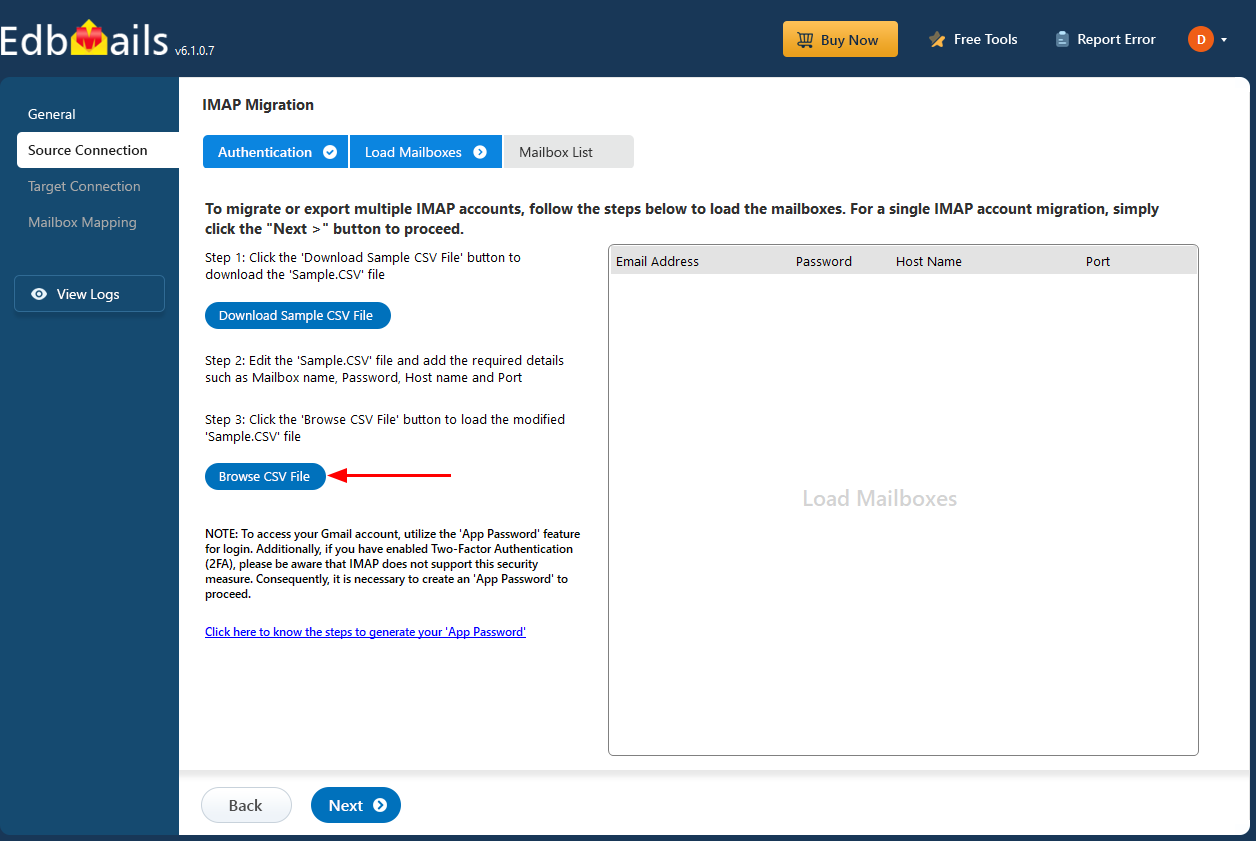
- Then, click the 'Load Modified CSV File' button to load the modified ‘Sample.CSV’ file.
- Click ‘Next’ to proceed.
- To migrate a single account, select ‘Single User / Account Migration’, choose the relevant option such as ‘Connect to IMAP Server’ or ‘Connect to POP3 Server’, and click ‘Next’ to proceed to the next step.
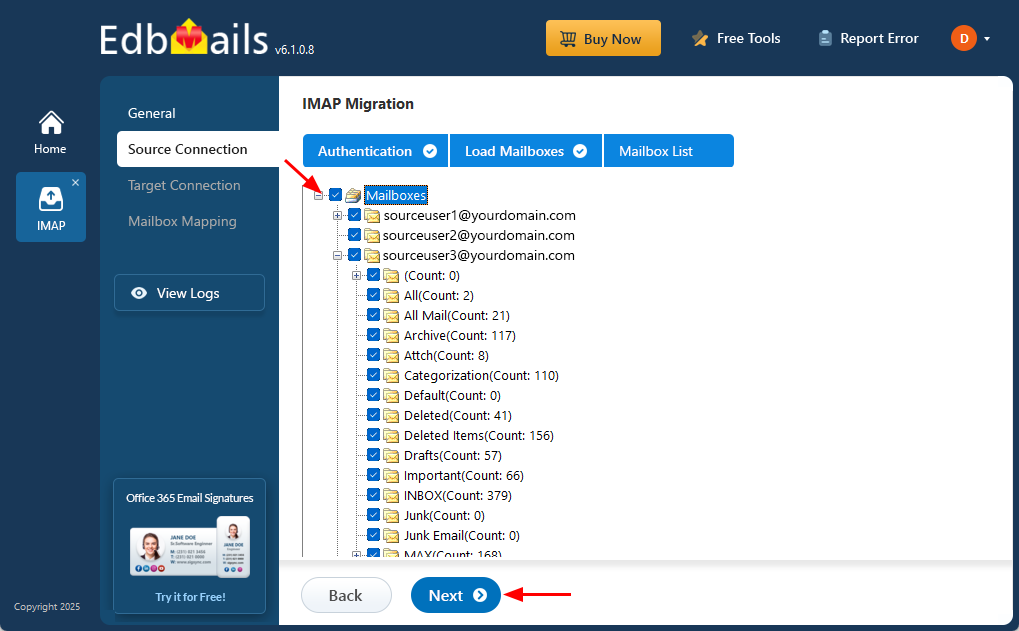
Step 3: Select the mailboxes or folders to migrate
- Choose the mailboxes or specific folders you want to migrate from the mailbox list.
- Then click on the ‘Next’ button to continue.
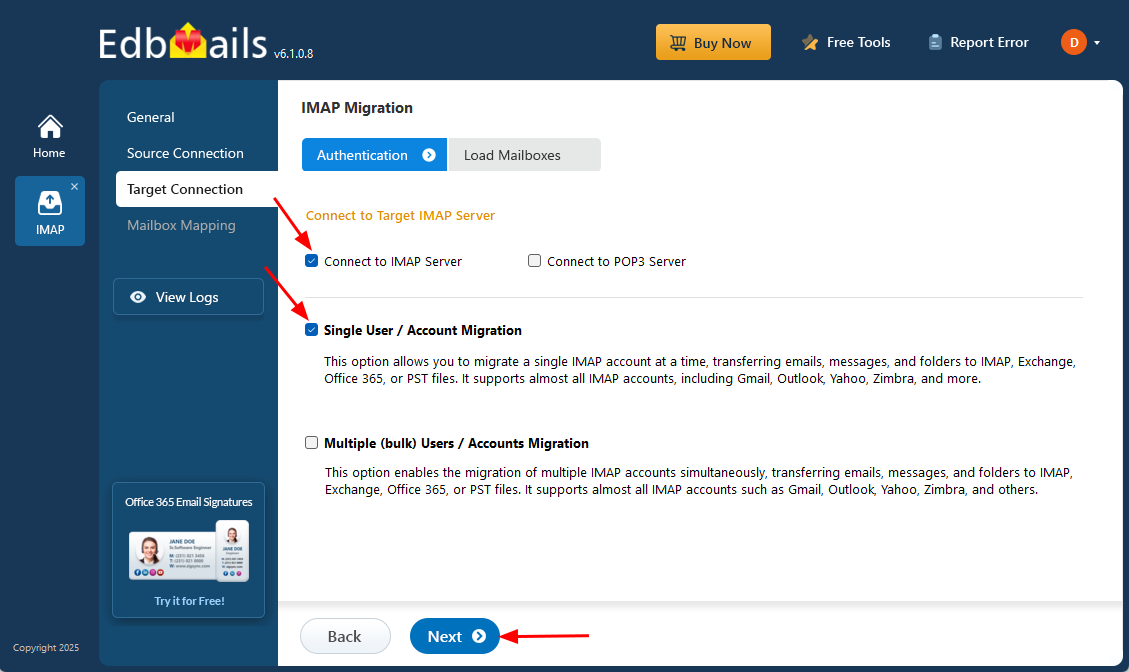
Step 4: Connect to target cPanel server
- For a single mailbox migration, select ‘Single User / Account Migration’, choose the required option like ‘Connect to IMAP Server’ or ‘Connect to POP3 Server’, and then click ‘Next’ to continue with the process.
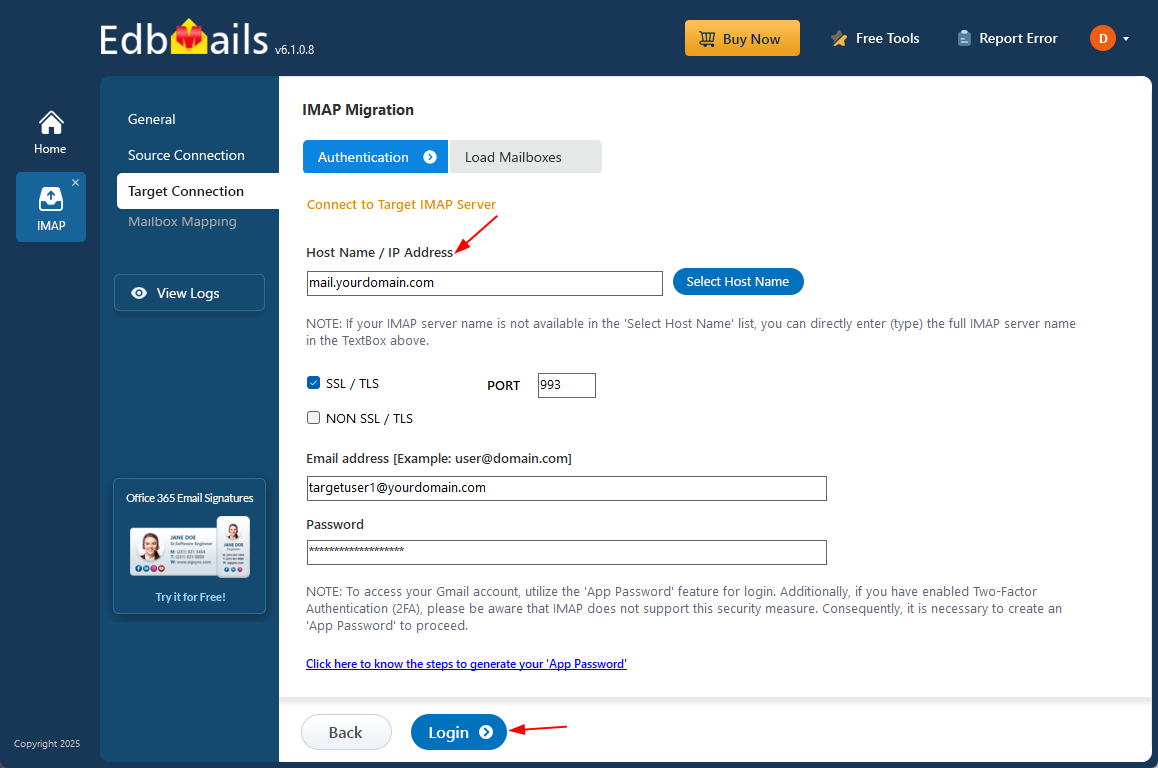
- For a single user login, choose the appropriate IMAP host name from the list or enter the full IMAP server address manually. Next, enter your email address and password to continue. Use the authentication credential required by the target cPanel-hosted mailbox.
- Click the ‘Login’ button.
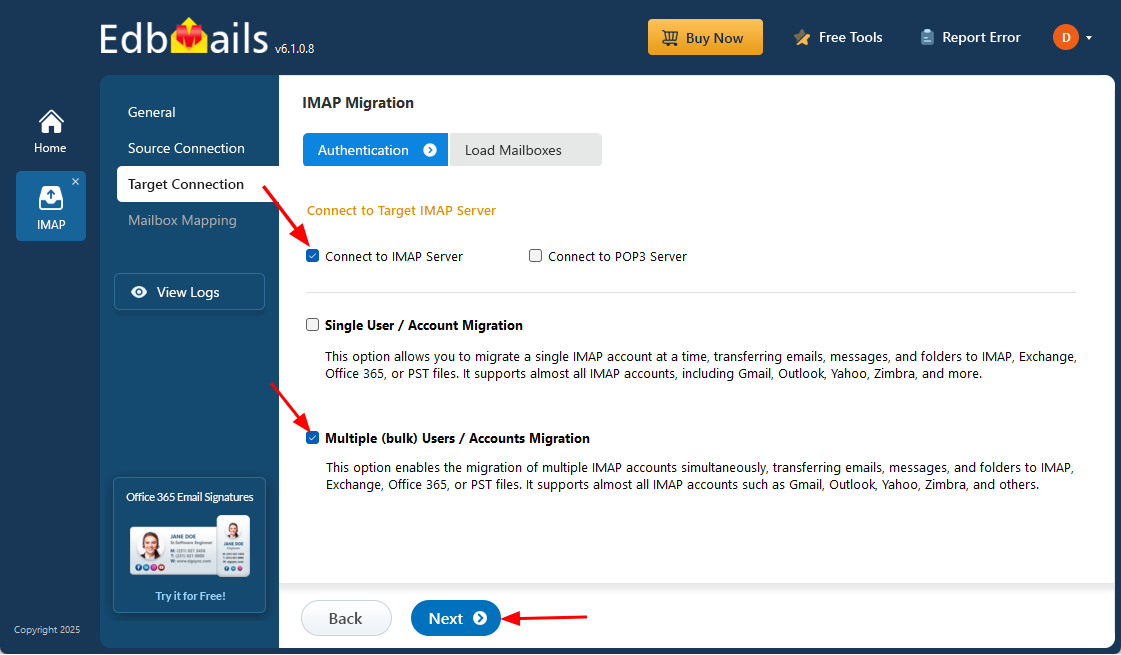
- For migrating multiple mailboxes, choose ‘Multiple (bulk) Users/Accounts Migration’, then select the appropriate option such as ‘Connect to IMAP Server’ or ‘Connect to POP3 Server’, and then click ‘Next’.
- Click ‘IMAP Migration CSV File’. It will load the ‘Sample.CSV’ file to your local drive.
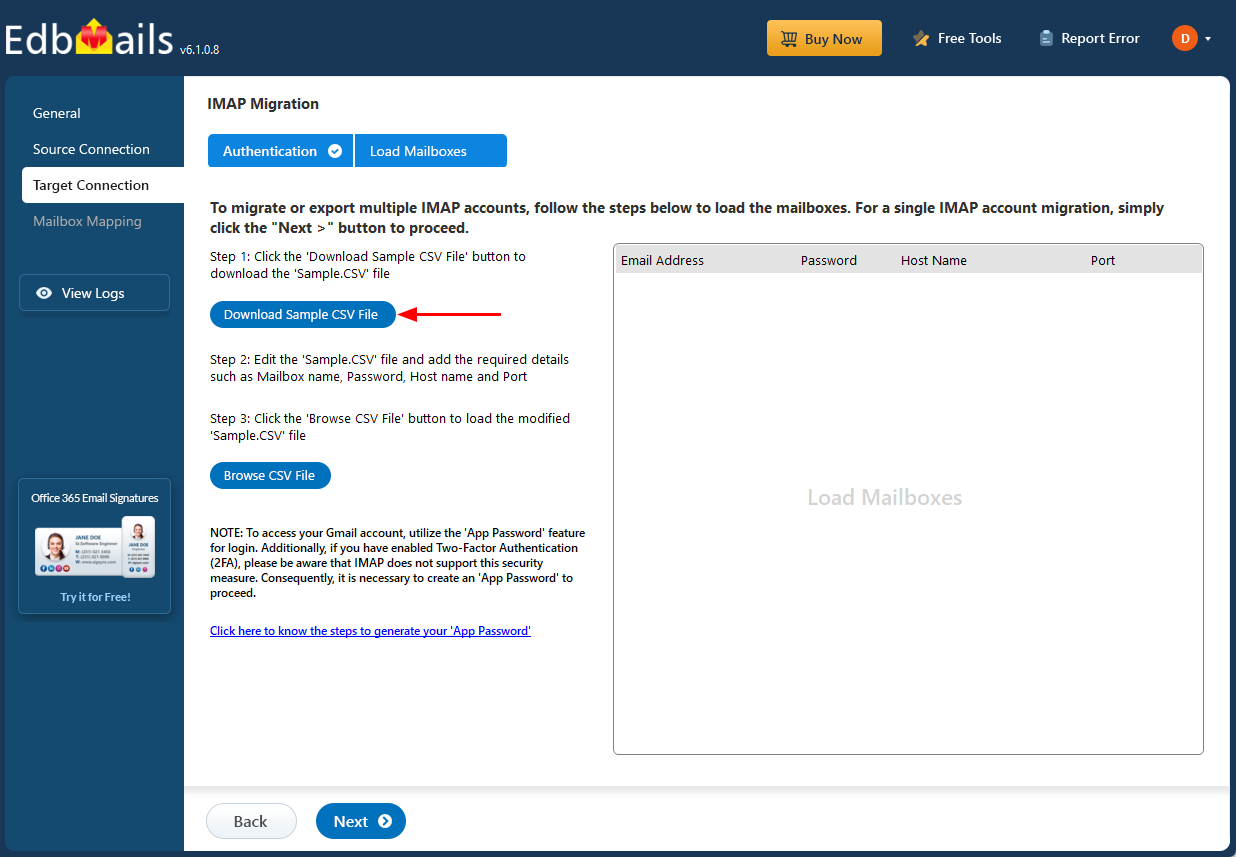
- Open the CSV file and enter the required information for each mailbox, such as the email address, password, IMAP server hostname, and port number.

- Once completed, save the CSV file to apply the changes.
- Then, click the 'Load Modified CSV File' button, open the CSV file and click ‘Next’ to proceed.
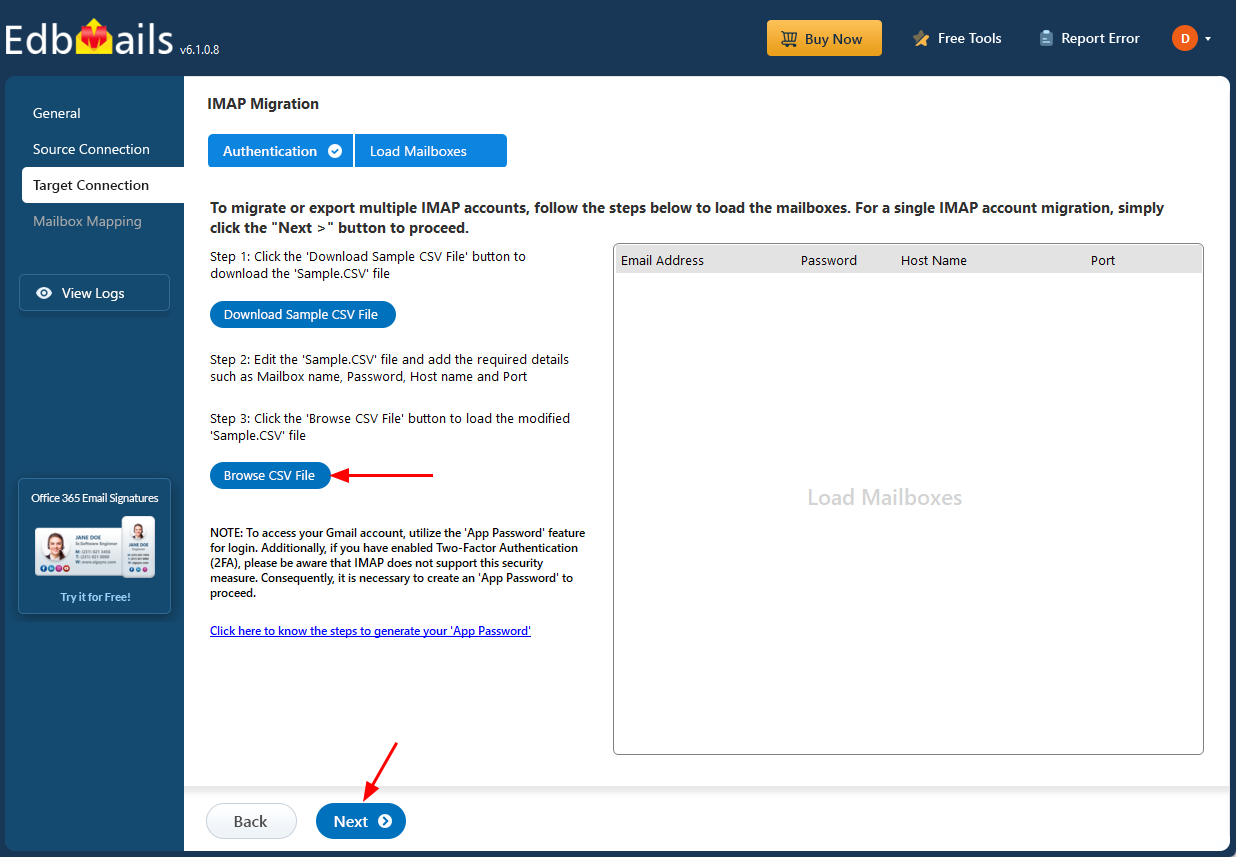
- For a single mailbox migration, select ‘Single User / Account Migration’, choose the required option like ‘Connect to IMAP Server’ or ‘Connect to POP3 Server’, and then click ‘Next’ to continue with the process.
Step 5: Map source and target mailboxes
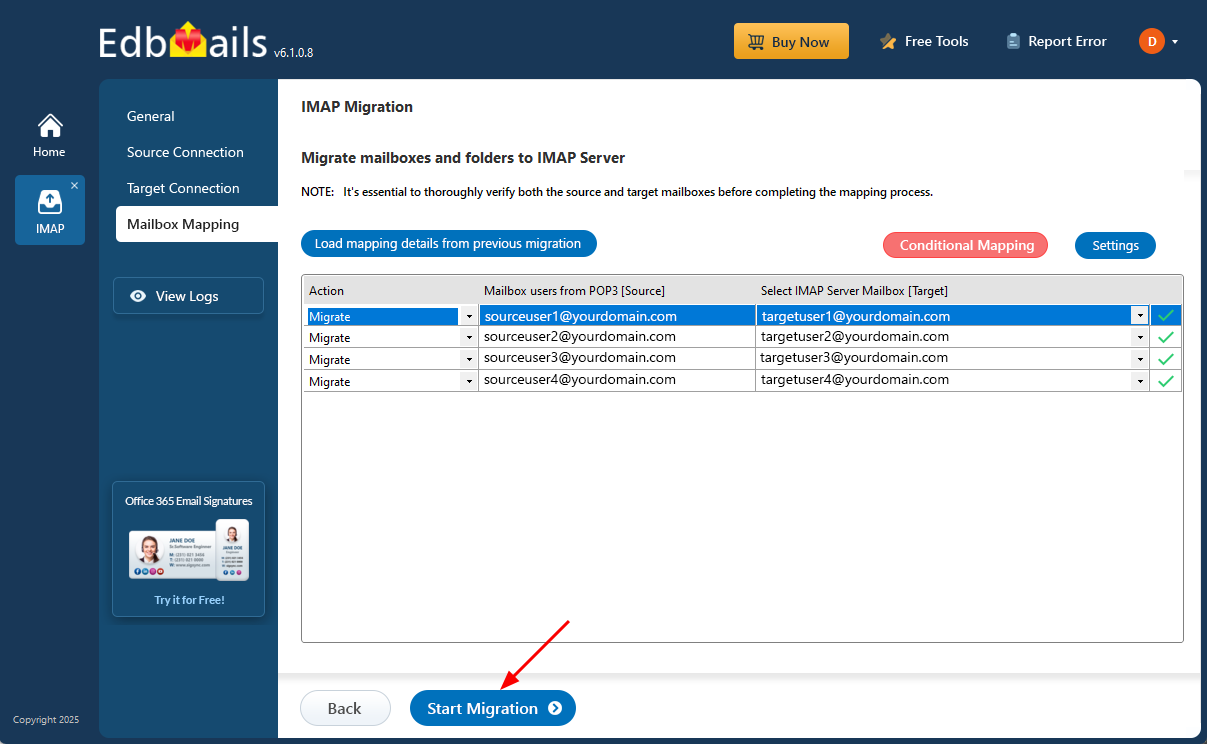
- Select one of the mailbox mapping options.
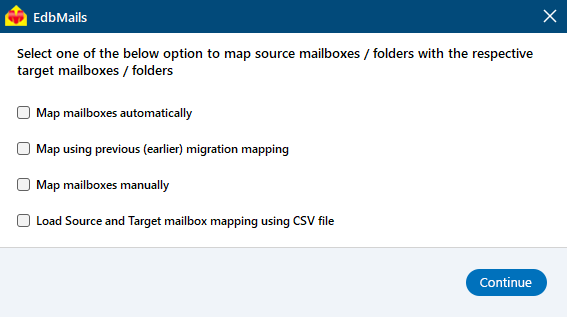
- EdbMails can automatically map source and target cPanel mailboxes where available identifiers align.
- Review every automatic mapping and adjust source-to-target mailbox assignments manually where required.
- Carefully verify both the source and target mailboxes before completing the mapping process.
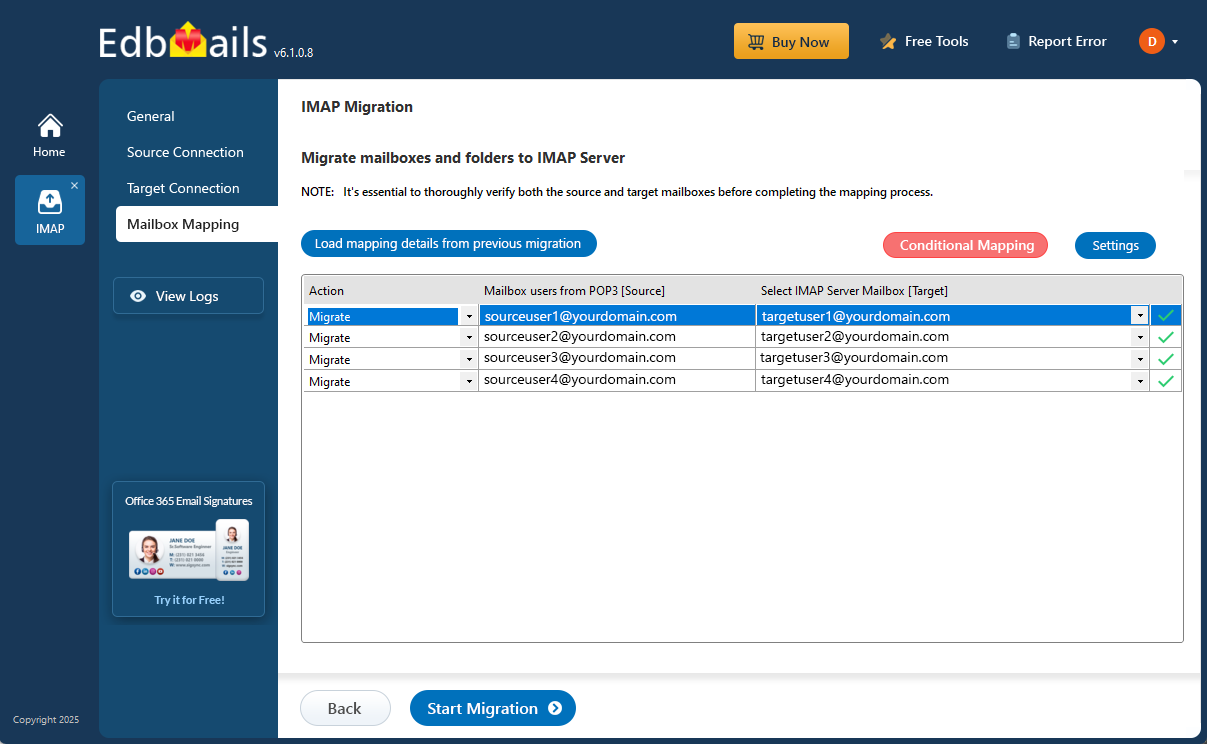
- Select one of the mailbox mapping options.
Step 6: Start Cpanel to Cpanel migration operation
- After mapping the mailboxes, click the ‘Start Migration’ button and initiate the migration process.
- Click on ‘View Log’ to access the migration report, where you can track the mailbox migration status, review any errors or warnings, and view a comprehensive summary of the migrated data, including the total number of exported items, making it simple to monitor and evaluate the overall process.
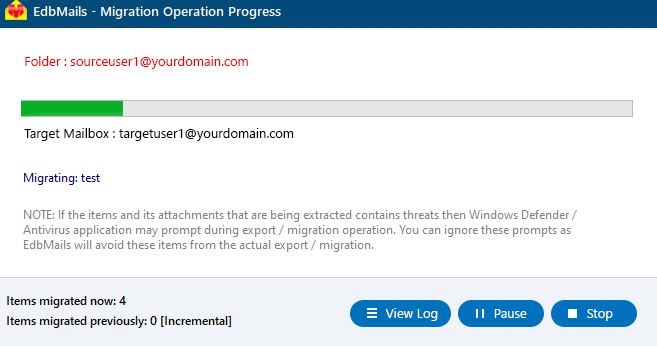
- Also, log in to your target server and verify the migrated items.
- After mapping the mailboxes, click the ‘Start Migration’ button and initiate the migration process.
cPanel to cPanel Post-migration Activities
- If the target cPanel server will become the production mail host for the domain, update MX and related DNS records only after validating the target. If mail routing is not changing, an MX update may not be required.
Troubleshooting Guide for cPanel to cPanel IMAP Migration
For troubleshooting, visit Knowledge Base.
For more queries, check Frequently Asked Questions or contact support.
Advantages of EdbMails for cPanel to cPanel migration
- Secure connections and verification
Use SSL/TLS-enabled IMAP on both cPanel servers where available, protect source and target credentials, review migration reports, and verify representative folders and messages after migration. Provider/server limits and individual item conditions can affect migration results.
- Selective folder option
With EdbMails, you can select specific folders for migration, enabling a more targeted and efficient transfer. Whether migrating inboxes, sent items, or custom folders, the tool provides full control over the data you move, simplifying the entire process.
- Include and exclude mail items
EdbMails offers flexibility with its include and exclude mail item feature, enabling you to filter data such as junk emails or large attachments. This customization optimizes the migration process, minimizing unnecessary data transfer and ensuring efficiency.
- Step-by-step wizard instructions and tutorials
EdbMails provides easy-to-follow step-by-step instructions and detailed tutorials, guiding users through the entire migration process. These user-friendly resources ensure that even complex migrations are simplified, reducing the learning curve for all experience levels.
- Source mailbox access during migration
Users can continue accessing the source cPanel mailboxes while email data is being transferred. Plan the final MX/DNS cutover separately and verify new mail flow before retiring the old server.
- Customized target mailbox folder listing
EdbMails supports source-to-target folder mapping for the cPanel-to-cPanel workflow and allows administrators to adjust mappings where required. Review the resulting folder structure on representative target mailboxes before completing cutover.