DreamHost to Office 365 Migration
DreamHost is a well-known provider of web and WordPress hosting services, offering features such as VPS hosting, dedicated servers, domain management, cloud hosting, and email solutions. Its email hosting includes 25 GB of mailbox storage and built-in spam protection, which is suitable for basic business needs. However, as organizations expand, they often require more advanced features, better collaboration tools, and stronger security measures that go beyond what traditional hosting platforms can offer.
Microsoft 365 provides a powerful and secure cloud-based email platform with a 50 GB mailbox, 1 TB of OneDrive storage, and seamless integration with tools such as Microsoft Teams, SharePoint, and the Office productivity suite. This integrated ecosystem enables teams to work more efficiently, improve communication, and enhance data security while maintaining full control over their business email and collaboration environment.

To migrate emails from DreamHost to Microsoft 365 without losing access to your domain, EdbMails provides a simple and reliable solution. As a Microsoft-partnered IMAP migration tool, it ensures a smooth and error-free transfer of emails, folders, and mailboxes. Its selective migration feature allows you to move only the required folders or emails, while preserving the entire structure and metadata. The tool offers personalized folder mapping, enabling precise control over where your DreamHost data lands in Microsoft 365.
By providing a secure, automated, and downtime-free migration experience, EdbMails helps businesses modernize their email infrastructure with minimal effort. Its flexibility, reliability, and advanced migration capabilities make it an ideal choice for organizations planning to move from DreamHost to Microsoft 365.
User Query
" I'm new to email migration and need some pointers and instructions to help me transfer my data. I've had my website hosted by DreamHost for about 7 years and have stuck with their email service, which I believe has become slow. Because our team has grown and there are more users, we intend to migrate to the Office 365 Business suite. Our requirement is that we keep our hosting with DreamHost but move our email platform to Microsoft 365. What steps do I need to take and how do I add DNS records? Thank you for any suggestions"
Common Migration Challenges & Solutions:
- Authentication Failures
Challenge: Login errors or denied access during connection to DreamHost or Office 365.
Solution: EdbMails OAuth 2.0 supports secure, hassle-free sign-in without manual credential issues.
- Folder Sync Issues
Challenge: Missing or incomplete email folders after migration.
Solution: EdbMails delta migration and auto-retry to sync any skipped or unsent items.
- Large Mailboxes
Challenge: Transferring big mailboxes can slow down or fail midway.
Solution: EdbMails incremental migration and can handle large files without timeouts.
- DNS Delays
Challenge: Mail flow disruption after changing MX records to Office 365.
Solution: Verify DNS and MX record updates using DNS lookup tools to ensure emails are routed correctly post-migration.
Comparison Table
Feature DreamHost Microsoft 365 Mailbox Size 25 GB 50 GB + Archive Collaboration Basic Webmail Teams, SharePoint, OneDrive Security Spam, Virus MFA, ATP, DLP Integration Limited Deep Office App Integration - Authentication Failures
Reasons for DreamHost to Office 365 Migration
Microsoft designed the corporate suite Office 365 with administrators in mind. Customers have had access to their records thanks to its cloud-based component.
Effective communication requires a trustworthy and strong digital platform. Office 365 is popular because of its updated and user-friendly functionality. There are countless causes for this movement.
- Straightforward, user-friendly communication and teamwork with partners and coworkers.
- It also effortlessly connects with Microsoft Office and other Microsoft software.
- Predictable and flexible price options that apply to everyone or a portion of an organization.
- The most recent software version is additionally upgraded without additional charge.
- It's a file hosting service that enables users to share and access work files from mobile phones, tablets, and desktop PCs.
- Office 365 includes built-in security features to help protect business data, such as Advanced Threat Analytics, email message encryption, and multi-layered access controls.
- Additionally, Office 365 features a drag and drop feature and a simplified UI. The user will find it easier.
DreamHost to Office 365 Migration Planning
You must have a solid plan in place and make sure you are ready for Dreamhost to Office 365 migration before you begin the process. For your convenience, we have provided a short list of things.
- Choose if you want to keep the same domain on DreamHost or switch to a different hosting company.
- Choose whether you want to move your data in stages or all at once.
- Make a CSV file that contains the user credentials and a complete list of the mailboxes that need to be migrated.
- Check to see if the user credentials and CSV file format are accurate.
- Ensure that every mailbox is fully backed up, and export any large attachments or files to your local disc.
- Share information about the migration plan and impending modifications with the end users.
- Choose a suitable Office 365 licensing plan and assign the licenses.
- Perform a test migration to check that everything functions as planned.
Pre Migration Activities for DreamHost to Office 365 Migration
- Create a list of users in a CSV file, which you want to migrate from DreamHost.
- Find the host name of your source email server from an email client
- Subscribe to a suitable Office 365 licensing plan. You can also sign up for a 30 day free trial and decide to go with a suitable one later. Compare Office 365 business plans and Compare Office 365 enterprise plans
- Create Office 365 mailboxes and assign licenses to them
- If you plan to migrate your mailboxes to Office 365 Public folders, ensure that you create and configure the Public folder mailboxes on the target server.
- Similarly, if you want to migrate mailboxes to Office 365 In-Place archive, enable them from the admin center.
Steps to enable archive mailbox in Microsoft 365.
- If you have a custom email domain from the source which you want to retain and receive emails to, you must add and verify the domain on Office 365.
Steps to add a custom domain to Office 365 and steps to add DNS records to connect your domain.
- Configure Office 365 to send and receive large messages.
Follow the steps to increase the message size on Office 365 to 150MB. See message size limits on Office 365 for more information.
Steps to Migrate from DreamHost to Office 365
Step 1: Download and Install EdbMails software
- Download and install EdbMails on your computer.

- Open the EdbMails application on your system.
- Enter your registered email address and password, then click ‘Login’. If you are accessing EdbMails for the first time, choose ‘Start Your Free Trial’ to proceed with the trial version.Note: The trial version provides access to all key features and allows you to migrate up to 30 items per folder. To enable unlimited migration, purchase an IMAP Migration license from the official EdbMails website.
Click here to know IMAP Migration Pricing Details.
After completing the purchase, close the application and reopen it. Sign in again using the same email address and password used during the purchase to successfully activate your license.

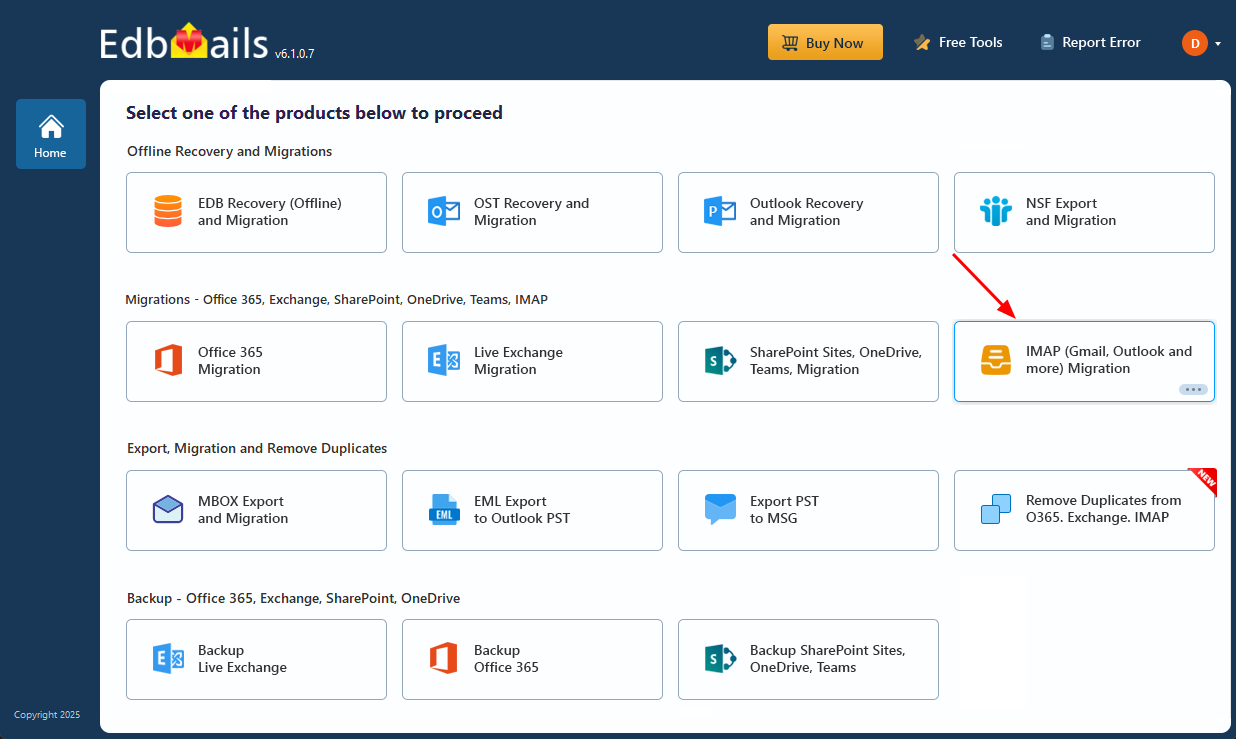
- Select the option ‘IMAP (Gmail, Outlook & more) Migration’.
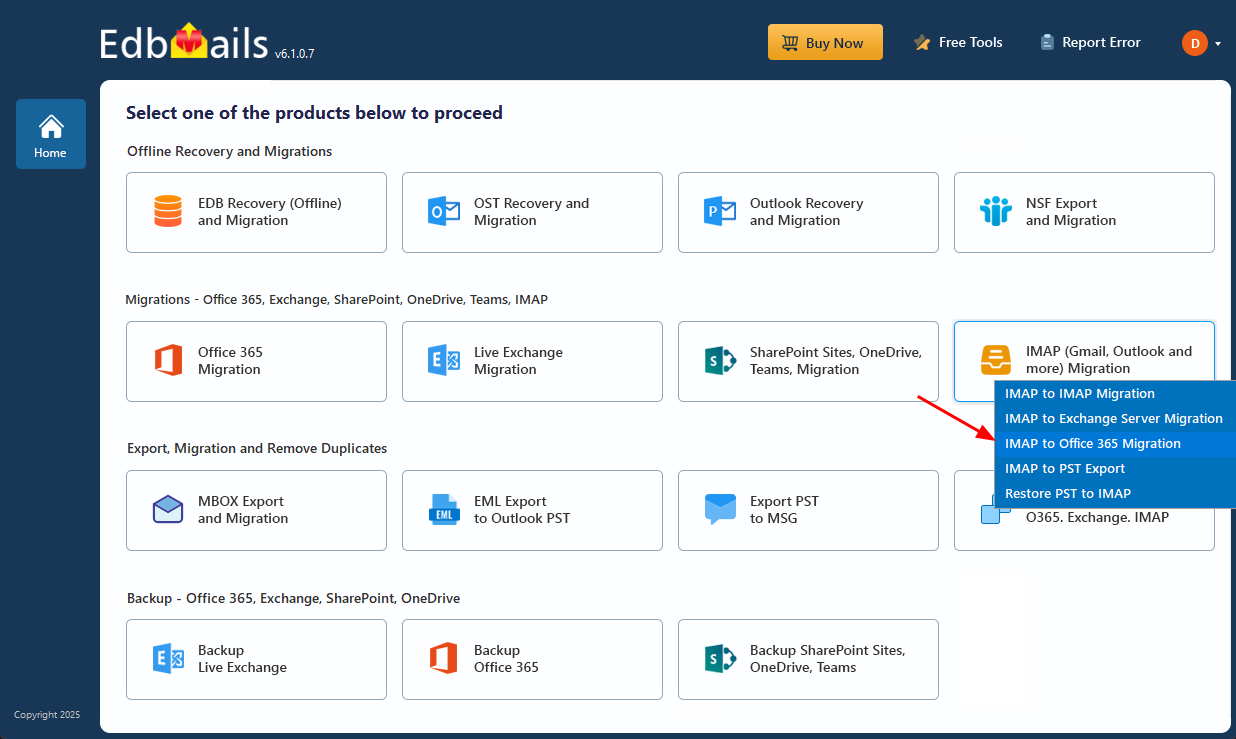
- Select ‘IMAP to Office 365 Migration’.
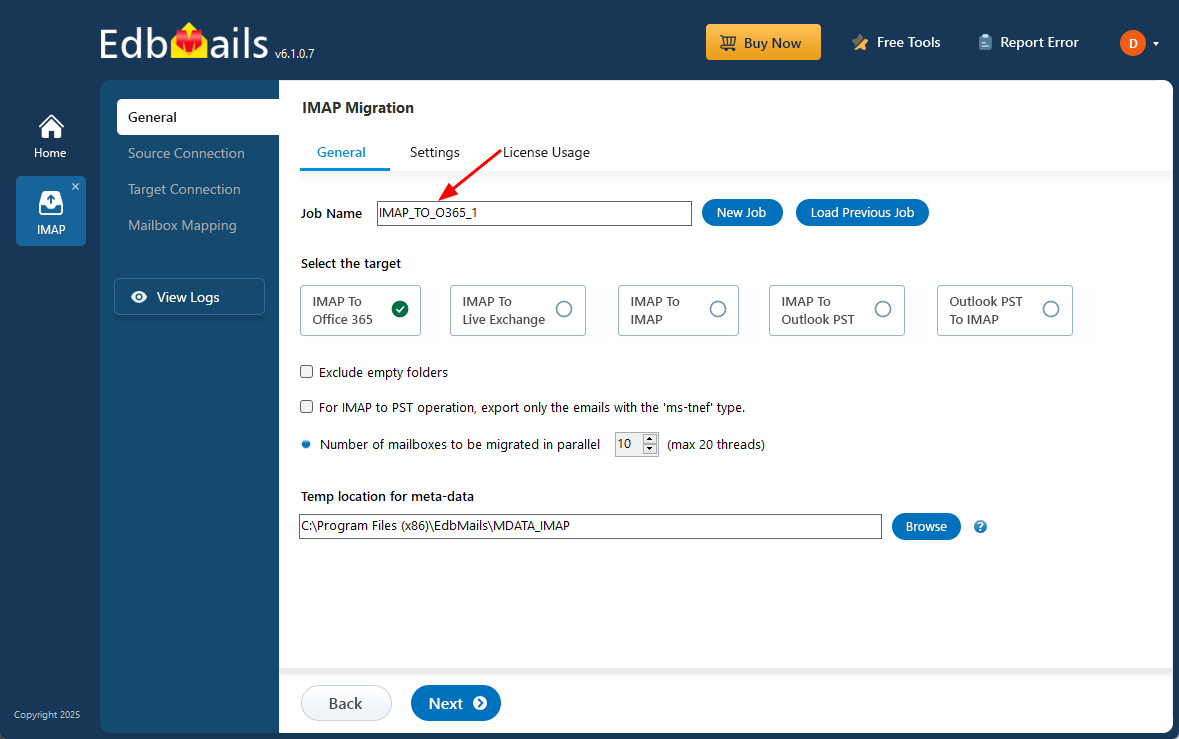
- You can either go with the default job name or click on 'New Job' if you'd like to customize it.
- Download and install EdbMails on your computer.
Step 2: Connect to source DreamHost server
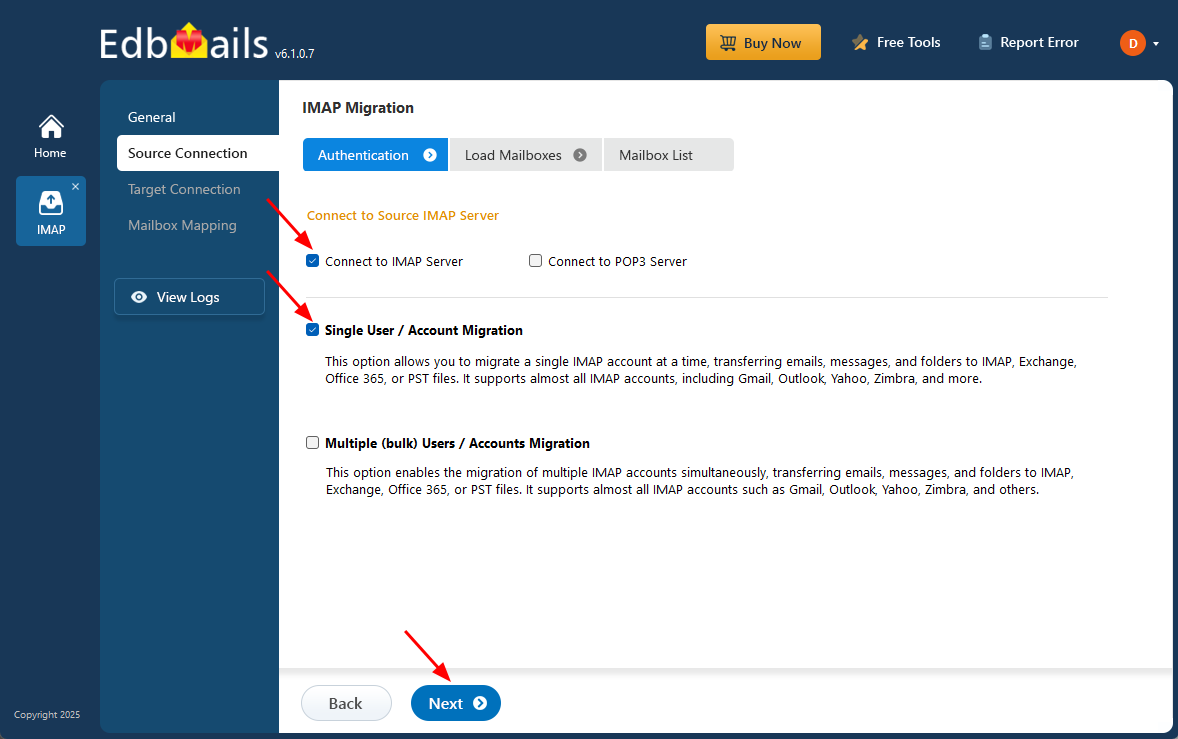
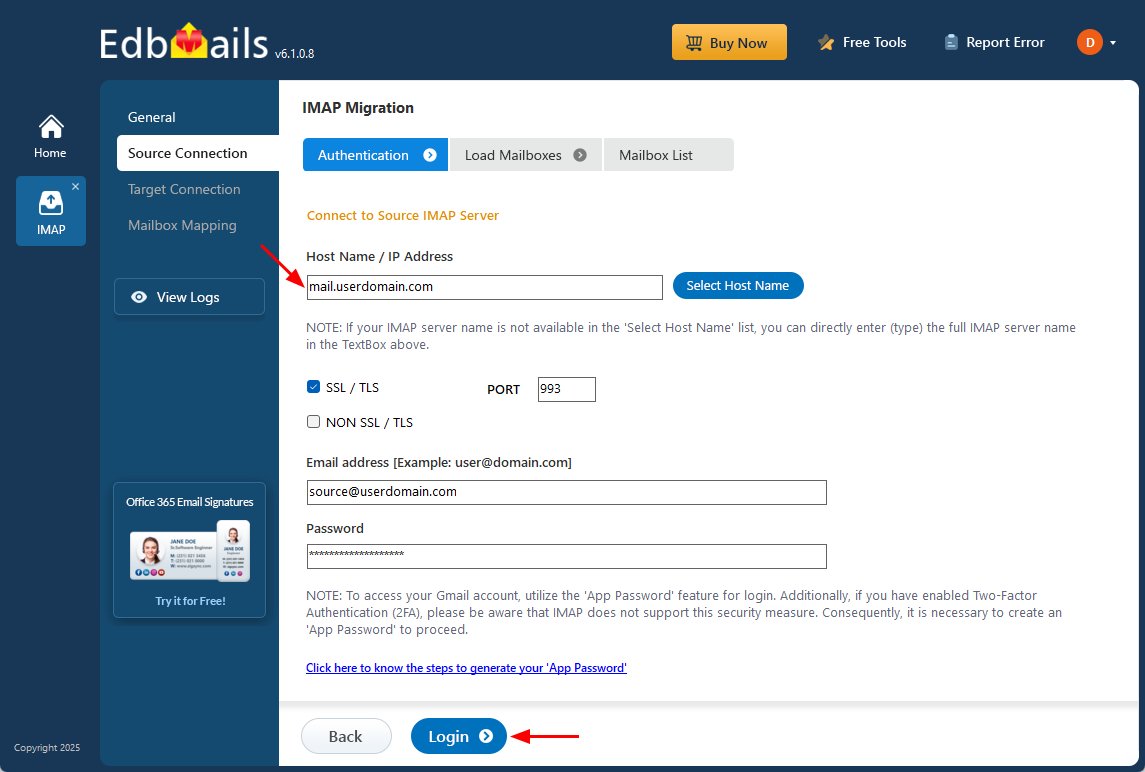
- To connect a single DreamHost account for migration, click ‘Single User / Account Migration’, choose the suitable connection option such as ‘Connect to IMAP Server’ or ‘Connect to POP3 Server’. Click ‘Next’ to proceed.
- Select the appropriate IMAP hostname for DreamHost from the list, or enter it manually. Then, provide your email address and password to proceed.
- Next, click the ‘Login’ button.
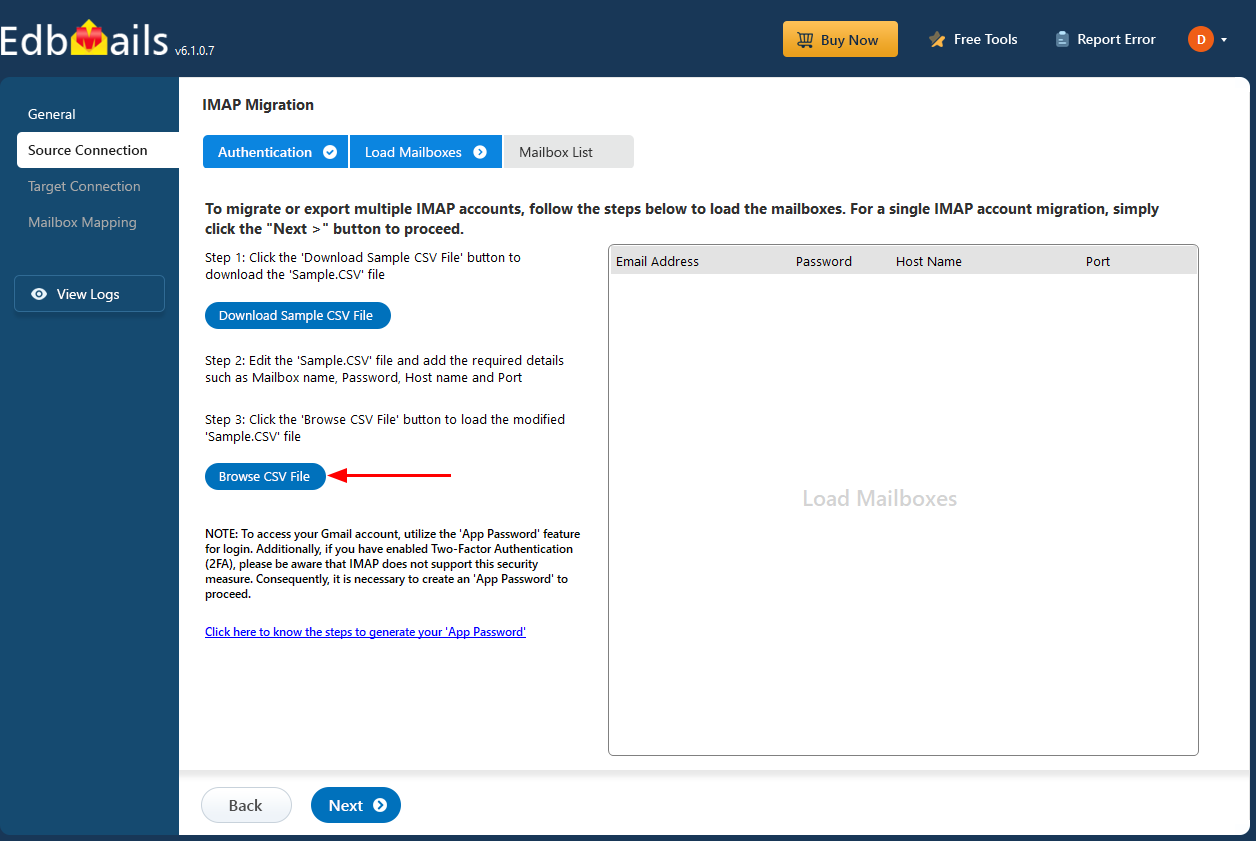
- To migrate multiple DreamHost mailboxes at once, select ‘Multiple (bulk) Users/Accounts Migration’, choose the suitable connection method such as ‘Connect to IMAP Server’ or ‘Connect to POP3 Server’.
- Then proceed by clicking ‘Next’.

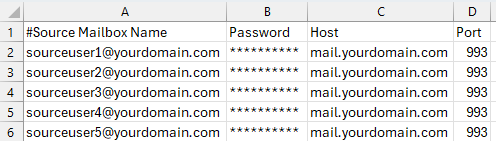
- Click ‘IMAP Migration CSV File’ and specify the location to save on your local drive.

- Open the CSV file and fill in the necessary details, including the email address, password, IMAP server hostname, and port number for each mailbox. After completing the entries, save the CSV file and close.
- Now, click the 'Load Modified CSV File' button, open the CSV file and click ‘Next’ to proceed.
- To connect a single DreamHost account for migration, click ‘Single User / Account Migration’, choose the suitable connection option such as ‘Connect to IMAP Server’ or ‘Connect to POP3 Server’. Click ‘Next’ to proceed.
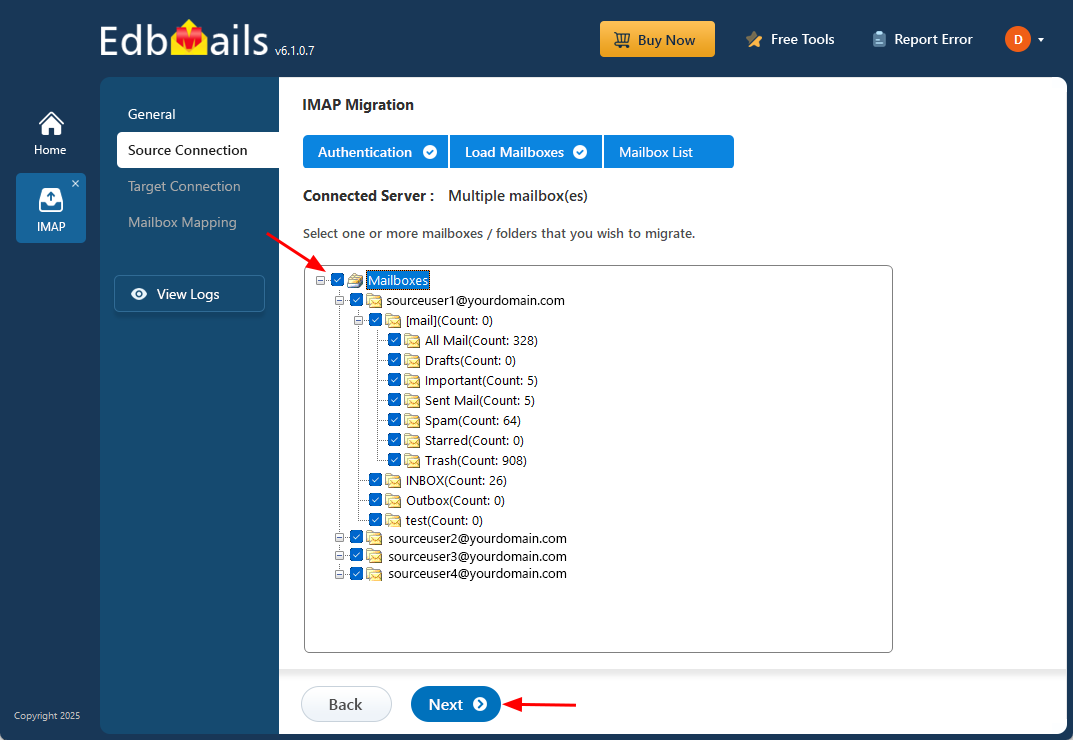
Step 3: Select the mailboxes or folders to migrate
- Choose the mailboxes or specific folders you wish to migrate, then click ‘Next’ to continue.
- Choose the mailboxes or specific folders you wish to migrate, then click ‘Next’ to continue.
Step 4: Connect to target Office 365 server
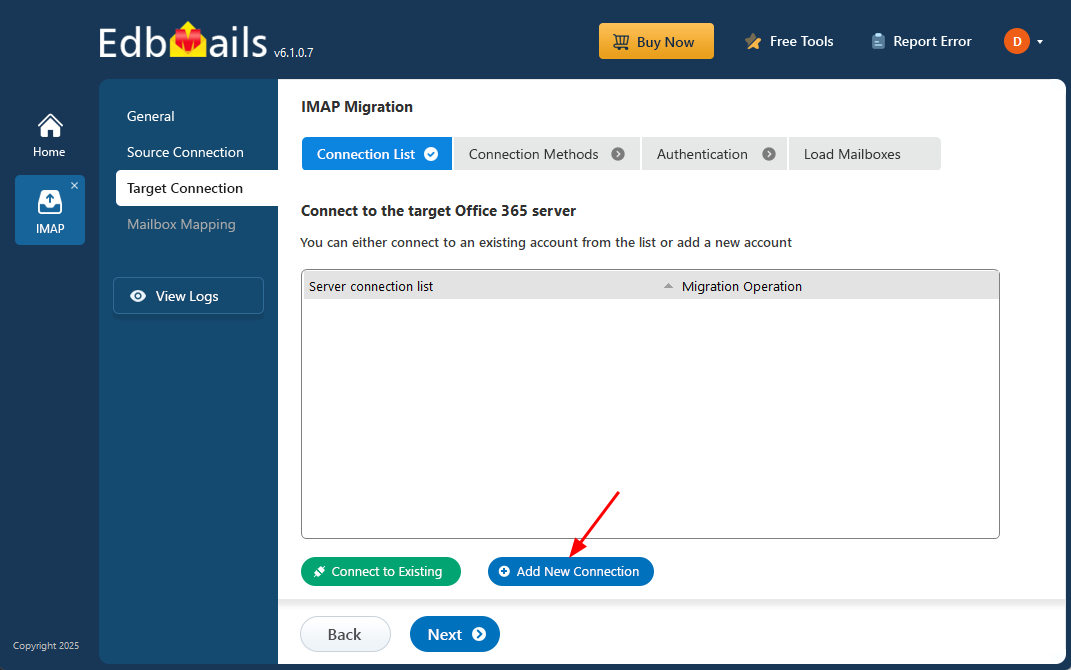
- Select the ‘Add New Connection’ option to establish a connection with your target Office 365 account.
- If you have previously set up a connection, you can choose it from the available list and click ‘Connect to Existing’ to proceed.
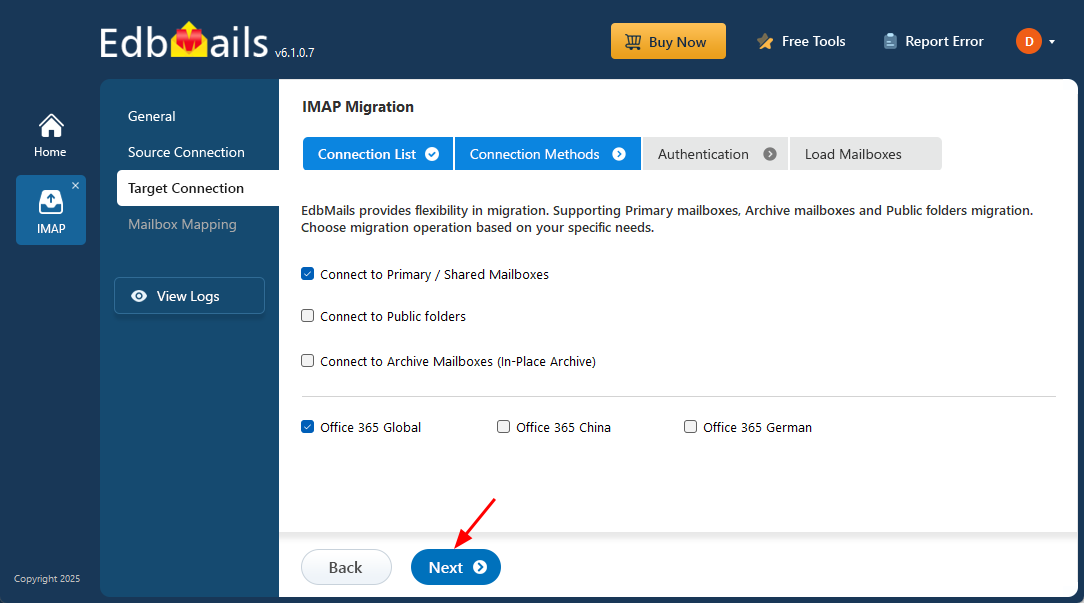
- Choose the necessary connection options and click ‘Next’ to continue.
- Choose any of the available options to create a secure connection through OAuth 2.0 modern authentication.
- Select Auto Registration for a quick and hassle-free configuration. Simply log in with a Global Admin account and approve the required permissions to automatically register the application in Azure AD.
- Or select Manual Registration if you want to provide the Azure AD application details manually. This option supports both Global Admin accounts and accounts with Full Access permissions.
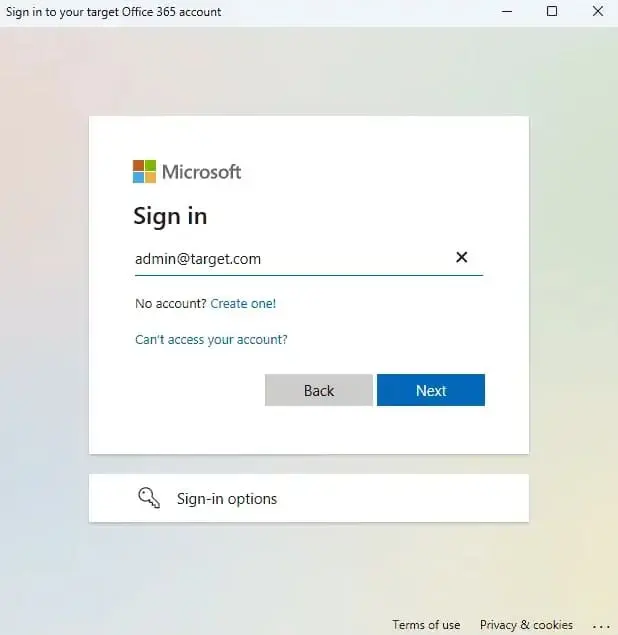
- Click the ‘Login’ button to continue.

- Authenticate on Microsoft sign-in page.
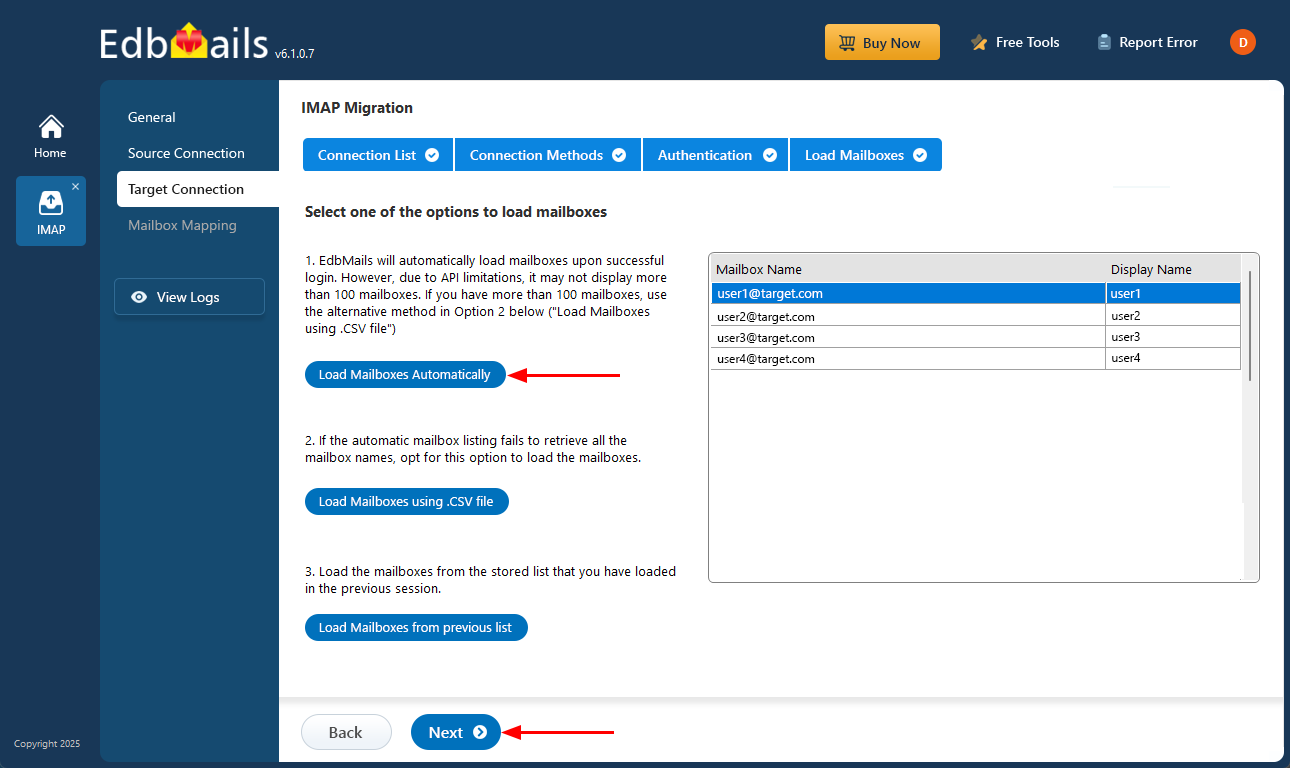
- Once authentication is completed successfully, select any one of the following methods to load the mailboxes:
- Load Mailboxes Automatically: EdbMails loads the mailboxes automatically after login, making the setup quick and simple. Due to Microsoft API limitations, only up to 100 mailboxes may be displayed. If your organization has more than 100 mailboxes, use the alternative option below.
- Load Mailboxes using CSV file: If the automatic method does not retrieve all mailbox names, choose the ‘Load Mailboxes using .CSV file’ option to manually select and load the required mailboxes.
- Load Mailboxes from previous list: You can directly access mailboxes from the list that was imported and saved during your previous session.
- Select ‘Load Mailboxes Automatically’ and click ‘Next’ to proceed.
Step 5: DreamHost to Office 365 mailboxes mapping
- Select a preferred option to map the source mailboxes and folders with their corresponding mailboxes and folders on the target Office 365 account.
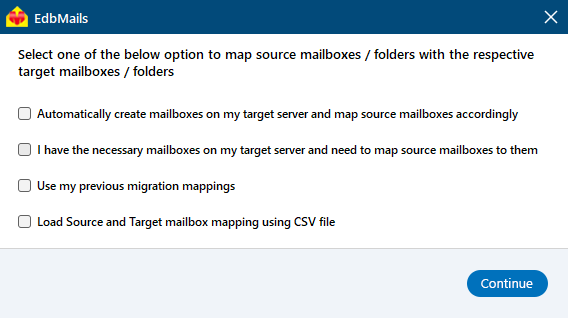
- EdbMails lets you automatically create the required mailboxes in your target Office 365 account.
- It also automatically maps your source Dreamhost mailboxes and folders to the matching ones in Office 365, making large migrations easier to manage.
- Select a preferred option to map the source mailboxes and folders with their corresponding mailboxes and folders on the target Office 365 account.
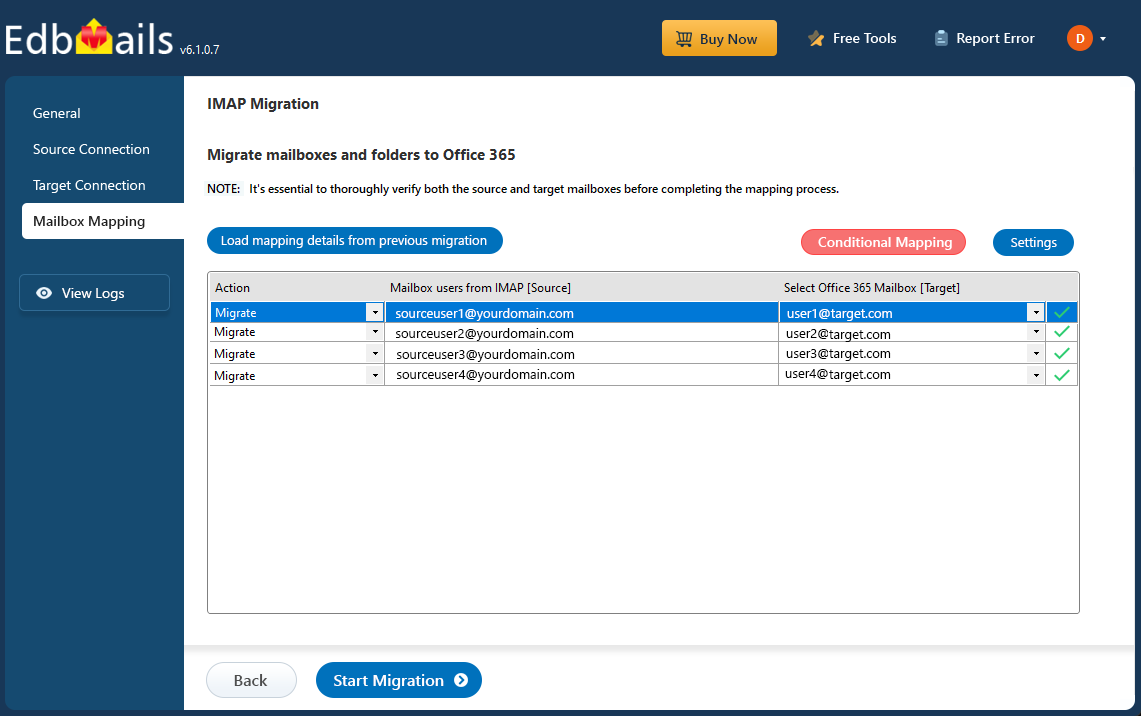
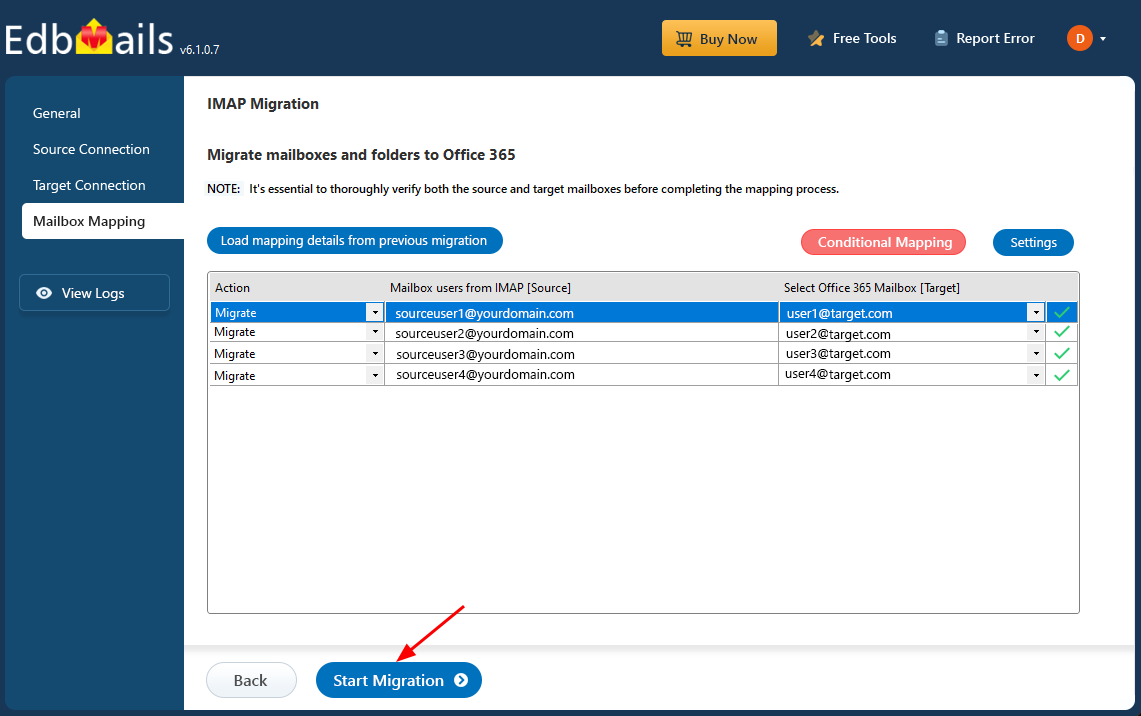
Step 6: Start DreamHost to Office 365 migration
- Verify the mailbox mapping, then click the ‘Start Migration’ button to begin the migration process.
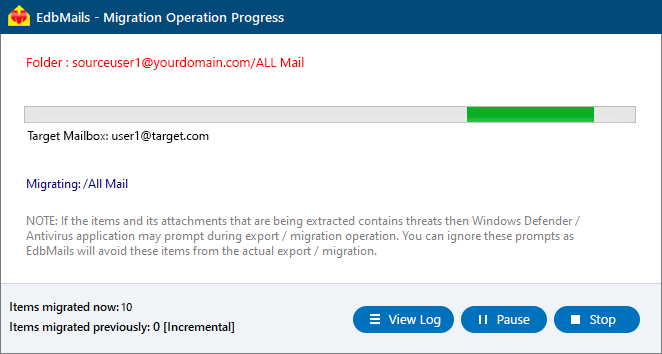
- Click the ‘View Logs’ button to access the full migration report. The report includes comprehensive details such as mailbox mapping, a summary of the overall migration, and the item count for each migrated mailbox and folder.
- Verify the mailbox mapping, then click the ‘Start Migration’ button to begin the migration process.
DreamHost to Office 365 Post-migration Tasks
Step 1: Update the MX records to point to Office 365
If you have not done this step previously, change the DNS records known as MX records to enable and receive email messages on the target Office 365 server. After you complete this step, you will be able to receive emails from your customers and partners in your Office 365 account. In addition to this setup, configure the Autodiscover record to allow Outlook to connect to the migrated mailboxes.
Step 2: Create a new Outlook profile for users in the new domain
Configure and recreate the Outlook profile for each user in your domain if Outlook has problems connecting to Office 365 mailboxes.
Troubleshooting Guide for DreamHost to Office 365 Migration
For troubleshooting, explore our knowledge base articles. If you need further help, browse the FAQs or reach out to our support team for tailored assistance.
Benefits of EdbMails to migrate from DreamHost to Office 365
The DreamHost to Office 365 migration process is streamlined and efficient, thanks to the powerful features of the EdbMails IMAP migration tool. Here are some key highlights:
- Incremental Migration: EdbMails offers a reliable solution for transferring all data from DreamHost emails to Office 365, utilizing its incremental migration feature for improved efficiency.
- Selective Migration with Filters: The software includes advanced filters, such as date range, same email address, and same subject email filters, enabling users to migrate only the necessary emails.
- Maintains Original Formatting: It ensures complete preservation of email formatting, maintaining the original structure of emails sent from DreamHost. Moreover, the folder hierarchy remains intact, ensuring that emails are organized into their original folders and subfolders.
- Bulk Mailbox Migration: EdbMails offers a simple and quick solution for bulk migration of DreamHost email accounts to Office 365.
- Free Trial Access: Users can also download the free trial version to test the tool's functionality before committing to the full licensed version, providing an opportunity to evaluate its features and performance.

