BigRock to Office 365 Migration
BigRock is a leading provider of domain registration and web hosting services, offering solutions such as Linux and Windows hosting, WordPress hosting, website builders, SiteLock security, cloud and VPS hosting, and bundled email services. Popular among small businesses and professionals, BigRock’s advanced and business hosting plans include unlimited email accounts with storage options of 5GB and 30GB. However, BigRock email is only available as part of its hosting packages and is not offered as a standalone service. Many users prefer to retain their domain and hosting with BigRock while migrating email to Office 365 for enhanced features, security, and collaboration tools. In some cases, Office 365 tenants hosted on BigRock also choose to shift mail services directly to Microsoft servers to benefit from improved reliability and centralized management. Migrating large volumes of email data manually can be complex, time-consuming, and prone to errors without the right migration tool.

EdbMails IMAP Migration Tool, a Microsoft-partnered solution, offers a flawless and automated way to migrate emails from BigRock to Office 365. Key features include delta migration, which transfers only new or modified emails after the initial migration to prevent duplicates and save time, and concurrent migration, enabling multiple mailboxes to be migrated simultaneously for faster results. With multi-factor authentication (MFA) and TLS encryption, EdbMails ensures secure access and protects sensitive data during the migration. It also preserves complete data integrity, maintaining folder structures, attachments, metadata, and formatting, ensuring no information is lost or altered. These capabilities make EdbMails a reliable, secure, and efficient solution for businesses looking to move their email services from BigRock to Office 365.
User Query
" We have a BigRock website domain and are stuck with the email account that comes with it. We are now planning to migrate to Office 365, and after researching the migration techniques, we are unsure where to begin. We have come across frequent terms of adding MX records and proving the identity of our domain names. Could anyone please advise us on how to migrate, even if using a suitable tool? Thanks "
Common Migration Challenges & Solutions
- Missing Folders or Incomplete Sync
Challenge: Some folders or emails may not appear after migration due to interrupted transfers.
Solution: EdbMails’ delta sync and automatic retry feature ensures all missing or unsynced items are migrated without duplication.
- Throttling or Timeout
Challenge: Servers may slow down or disconnect large migrations because of bandwidth throttling.
Solution: EdbMails automatically resumes migration from the last synced point, maintaining speed and continuity without data loss.
- MX Record Update Delays
Challenge: Emails may not route correctly after switching to Office 365 due to DNS propagation delays.
Solution: Verify and monitor MX and Autodiscover records post-migration to ensure smooth mail flow and zero downtime.
- Missing Folders or Incomplete Sync
Reasons for BigRock to Office 365 Migration
While BigRock provides useful features like Global Address Book, IMAP sync, distribution lists, and SSL certificate support, it still falls short of Office 365’s dedicated and fully integrated email environment for below key reasons.
- Although BigRock offers features like Global Address Book, IMAP sync, distribution lists, and SSL support, it lacks the fully integrated, collaborative, and feature-rich email environment provided by Office 365.
- Office 365 has a much collaborative and dedicated email service with Public folder, Archive and Shared Mailbox facility making it ideal for teams and organizations.
- It also includes access to SharePoint, OneDrive, Yammer, and other productivity apps all integrated under a single Microsoft 365 license.
- Office 365 comes with 50GB mailbox storage as opposed to BigRock’s Advanced and Business plans.
- Office 365 also includes desktop versions of Word, Excel, and Outlook, allowing users to work seamlessly across devices and access their tools from virtually anywhere.
BigRock to Office 365 Migration Planning
Before you actually start BigRock to Office 365 migration, you need to have a proper plan and ensure that you are prepared for the migration. Here is a quick checklist of items for your convenience.
- Decide whether you want to keep your existing domain hosted with BigRock or move it to a different hosting provider, depending on your long-term email and website management needs.
- Decide if you want to migrate your data all at once or in stages.
- Create a CSV file with a complete list of mailboxes to be migrated along with the user credentials.
- Verify if the CSV file format and user credentials are correct.
- Make a complete backup of all the mailboxes and export large attachments or files to your local drive.
- Remove unused and unnecessary mailboxes on the source.
- Inform the end users and stakeholders about the migration plan and the upcoming changes.
- Choose a suitable Office 365 licensing plan and assign the necessary licenses to each user mailbox to enable access and services.
- Perform a test migration to ensure everything works as expected.
Pre-migration Activities for BigRock to Office 365 Migration
- Create a list of users in a CSV file, which you want to migrate from BigRock.
- Find the name of your source email server from an email client
- Purchase a suitable Office 365 licensing plan. You can also sign up for a 30 day free trial and decide to go with a suitable one later. Compare Office 365 business plans and Compare Office 365 enterprise plans
- Create Office 365 mailboxes and assign licenses to them
- If you plan to migrate your mailboxes to Office 365 Public folders, ensure that you create and configure the Public folder mailboxes on the target server.
- Similarly, if you want to migrate mailboxes to Office 365 In-Place archive, enable them from the admin center.
Steps to enable archive mailbox in Microsoft 365.
- If you have a custom email domain from the source which you want to retain and receive emails to, you must add and verify the domain on Office 365.
Steps to add a custom domain to Office 365 and steps to add DNS records to connect your domain.
- Configure Office 365 to send and receive large messages.
Follow the steps to increase the message size on Office 365 to 150MB. See message size limits on Office 365 for more information.
Steps to Migrate from BigRock to Office 365
Step 1: Download and Install EdbMails software
- Start the migration process by downloading and installing the EdbMails application on your Windows computer.

- Open the EdbMails application on your system.
- Enter your registered email address and password, then click ‘Login’. If you are accessing EdbMails for the first time, choose ‘Start Your Free Trial’ to proceed with the trial version.Note: The trial version provides access to all key features and allows you to migrate up to 30 items per folder. To enable unlimited migration, purchase a n IMAP Migration license from the official EdbMails website.After completing the purchase, close the application and reopen it. Sign in again using the same email address and password used during the purchase to successfully activate your license.

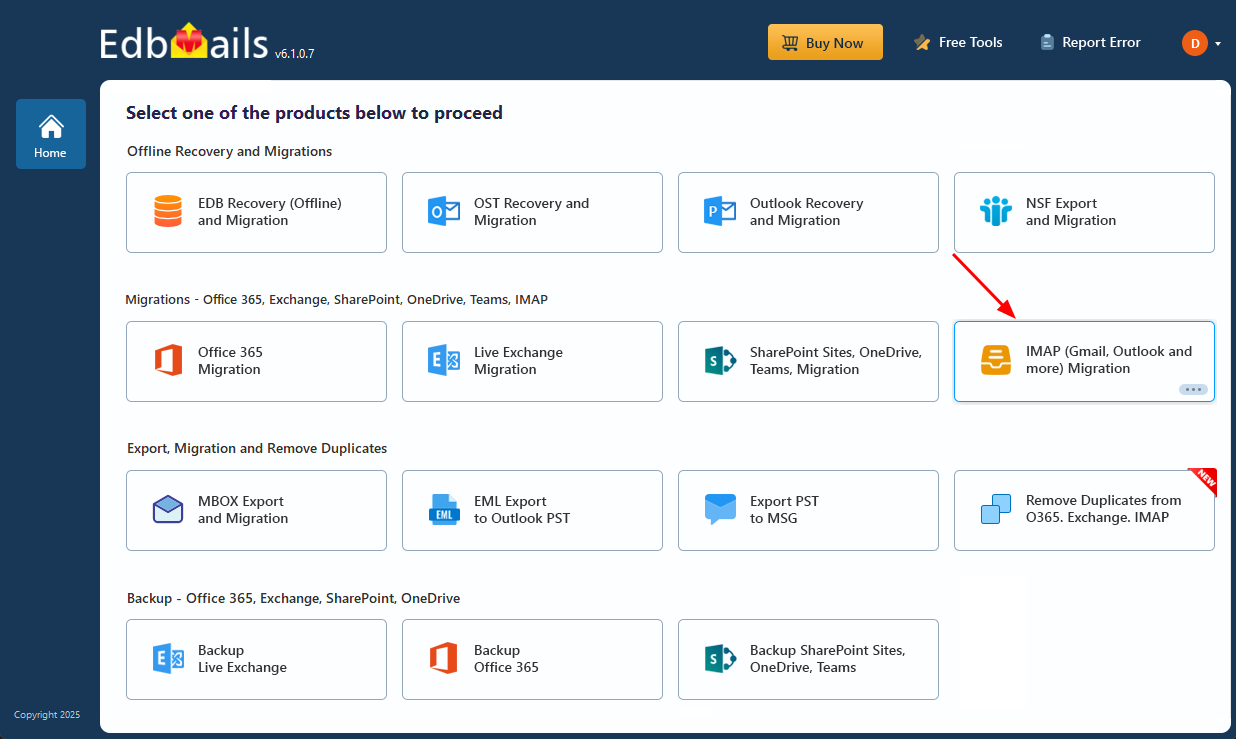
- Select the option ‘IMAP (Gmail, Outlook & more) Migration’.
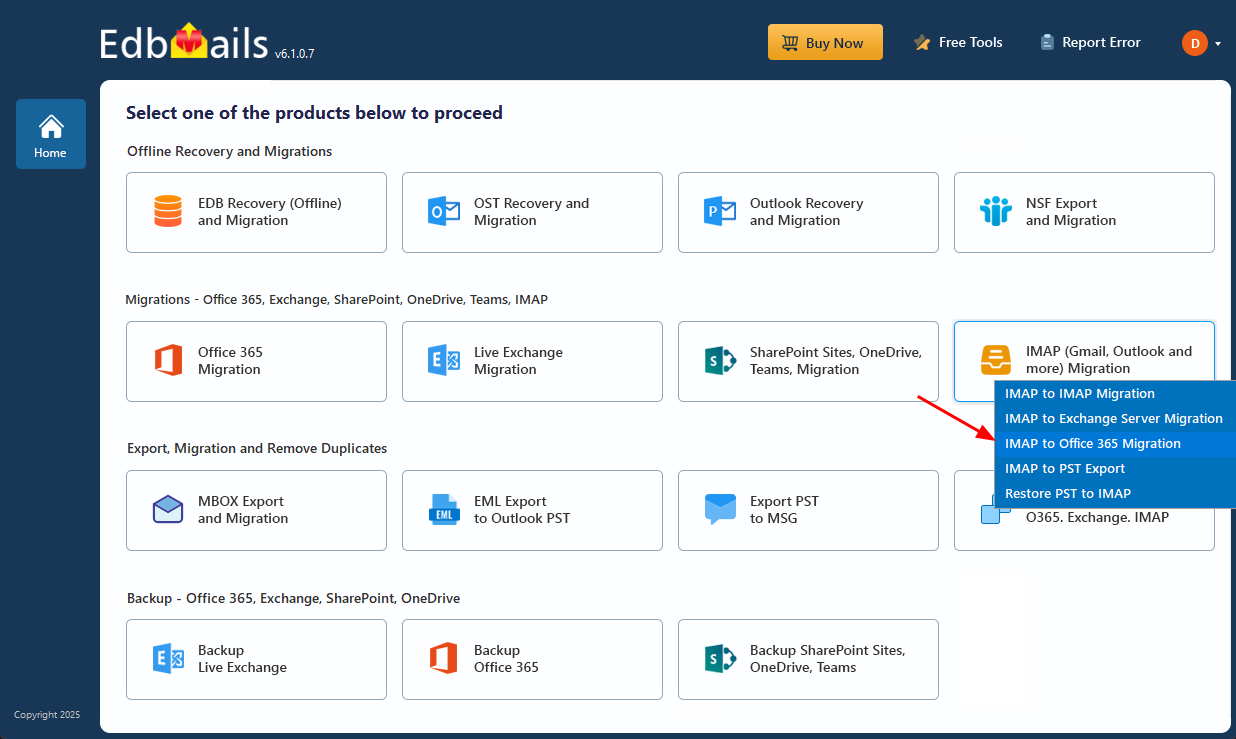
- Select ‘IMAP to Office 365 Migration’.
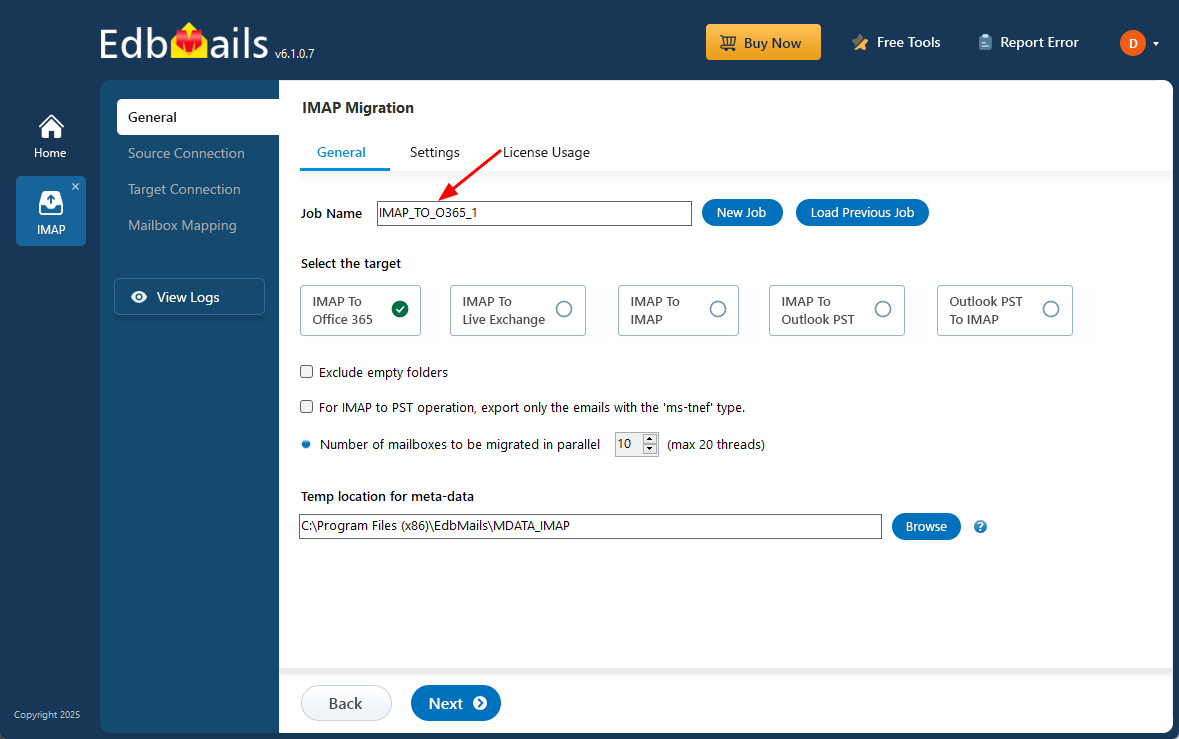
- By default, a job name is assigned automatically. If you'd like to make it easier to identify, click ‘New Job’ and choose a custom name.
- Start the migration process by downloading and installing the EdbMails application on your Windows computer.
Step 2: Connect to the source BigRock server
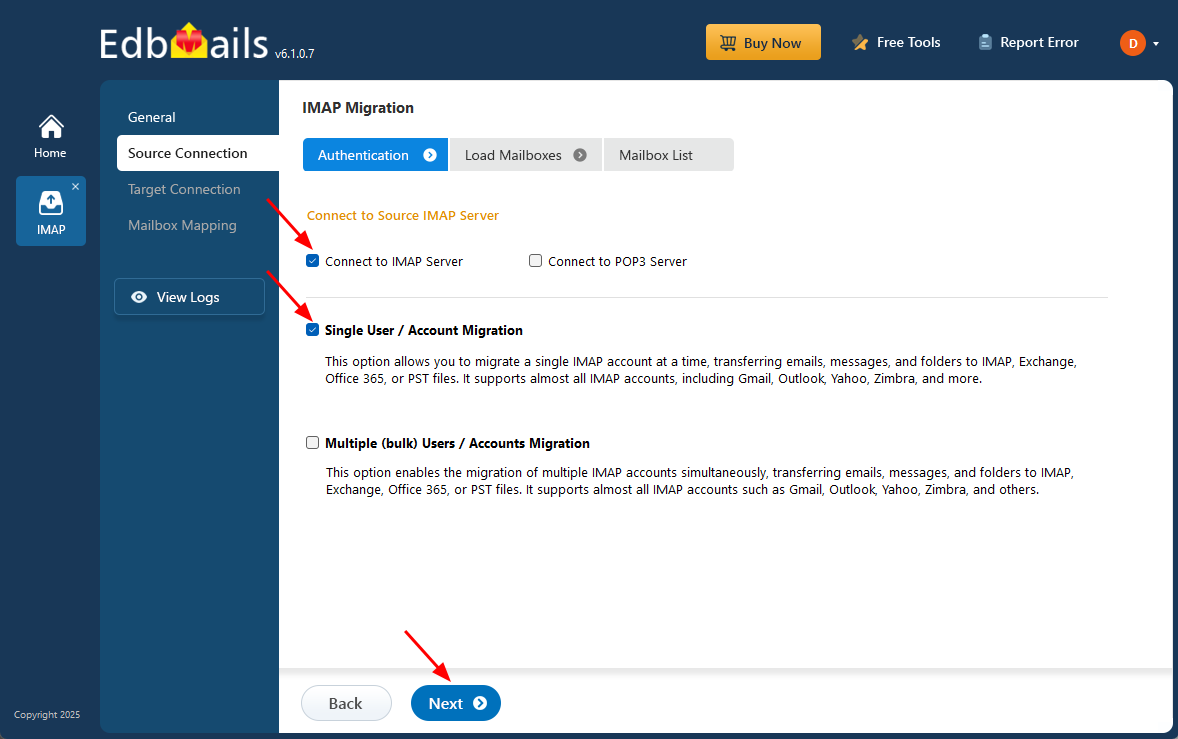
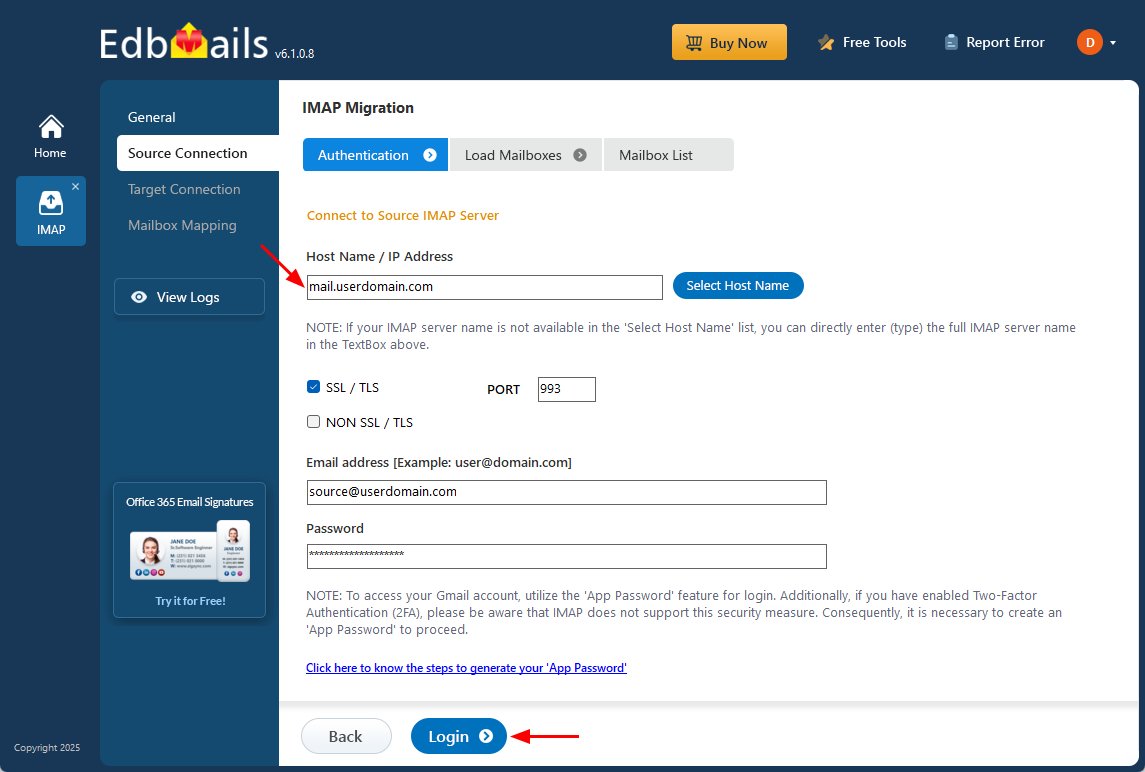
- To connect a single Bigrock account for migration, click ‘Single User / Account Migration’, choose the suitable connection option such as ‘Connect to IMAP Server’ or ‘Connect to POP3 Server’. Click ‘Next’ to proceed.
- Before starting the migration, gather the IMAP connection details for your BigRock account, which can be found in the BigRock Control Panel under DNS settings. Once you have this information, enter the following details:
- HostName/IP Address: mail.userdomainname.com (Example: abc.bigrock.in).
- Port: 993 with SSL/TLS enabled (If you have SSL for your IMAP connection).
- Email address and password associated with your account.
- Click the ‘Login’ button.
- To migrate multiple Bigrock mailboxes at once, select ‘Multiple (bulk) Users/Accounts Migration’, choose the suitable connection method such as ‘Connect to IMAP Server’ or ‘Connect to POP3 Server’.
- Then proceed by clicking ‘Next’.

- Click ‘IMAP Migration CSV File’ and specify the location to save on your local drive.

- Open the CSV file and fill in the necessary details, including the email address, password, IMAP server hostname, and port number for each mailbox. After completing the entries, save the CSV file and close.
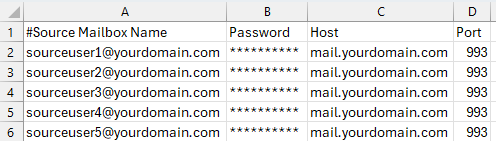
- Now, click the 'Load Modified CSV File' button, open the CSV file and click ‘Next’ to proceed.
- To connect a single Bigrock account for migration, click ‘Single User / Account Migration’, choose the suitable connection option such as ‘Connect to IMAP Server’ or ‘Connect to POP3 Server’. Click ‘Next’ to proceed.
Step 3: Select source BigRock server mailboxes
- Choose the specific mailboxes or individual folders you wish to migrate. Once your selection is complete, click ‘Next’ to continue.
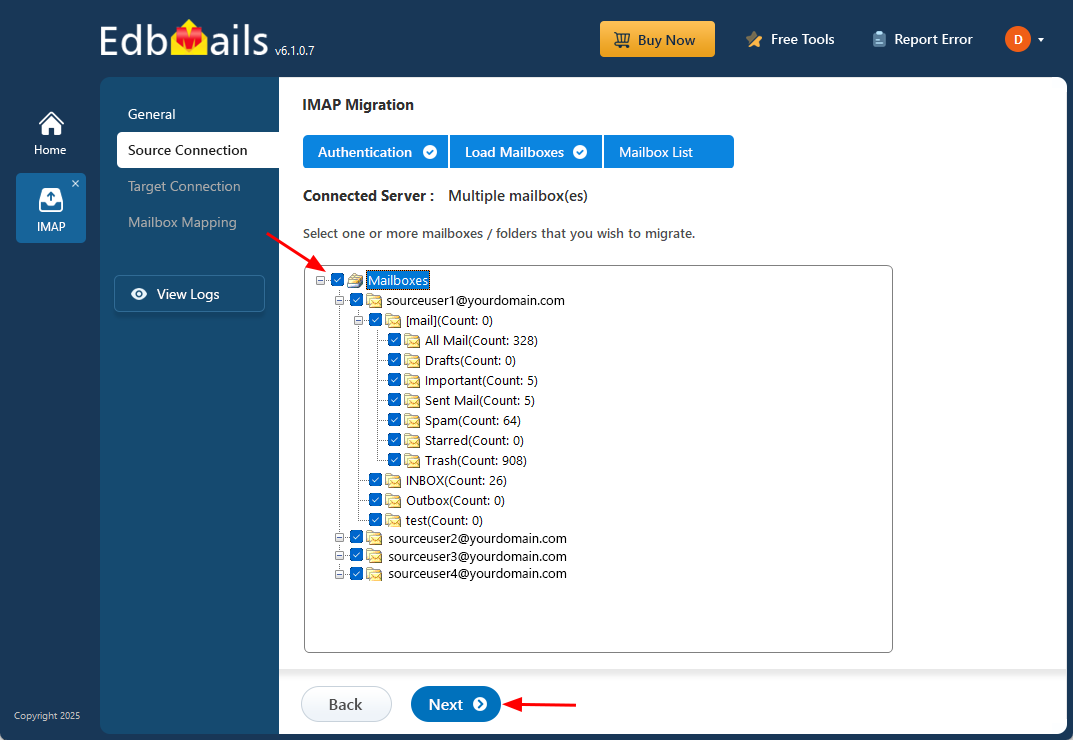
- Choose the specific mailboxes or individual folders you wish to migrate. Once your selection is complete, click ‘Next’ to continue.
Step 4: Connect to the target Office 365 server
- Select the ‘Add New Connection’ option to establish a connection with your target Office 365 account.
- If you have previously set up a connection, you can choose it from the available list and click ‘Connect to Existing’ to proceed.
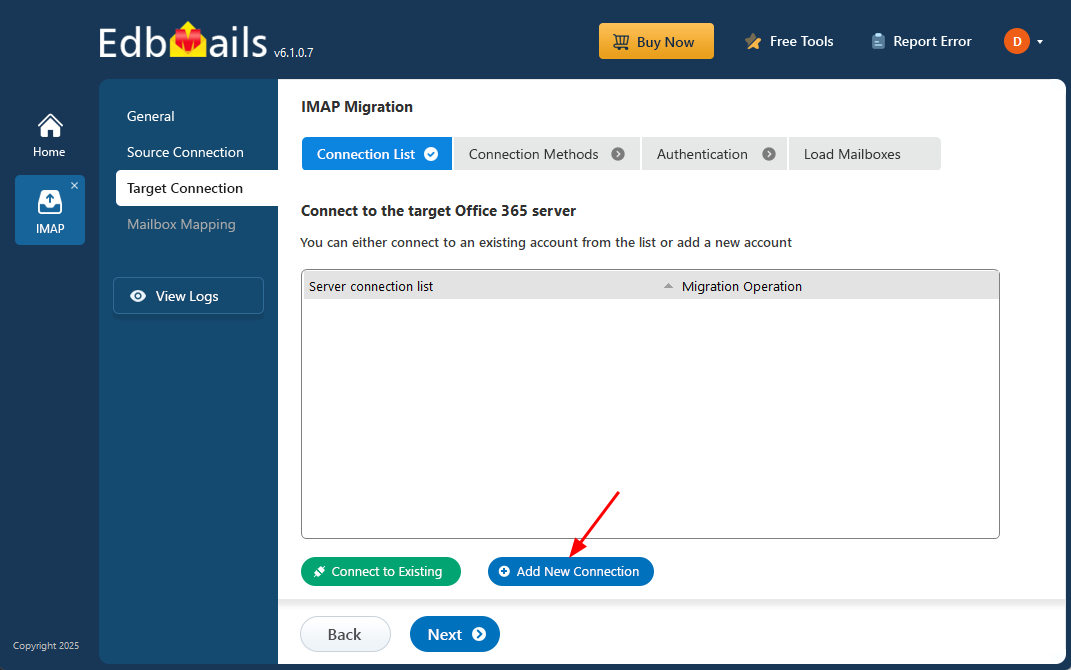
- Select the preferred connection settings and click ‘Next’ to continue with the migration process.
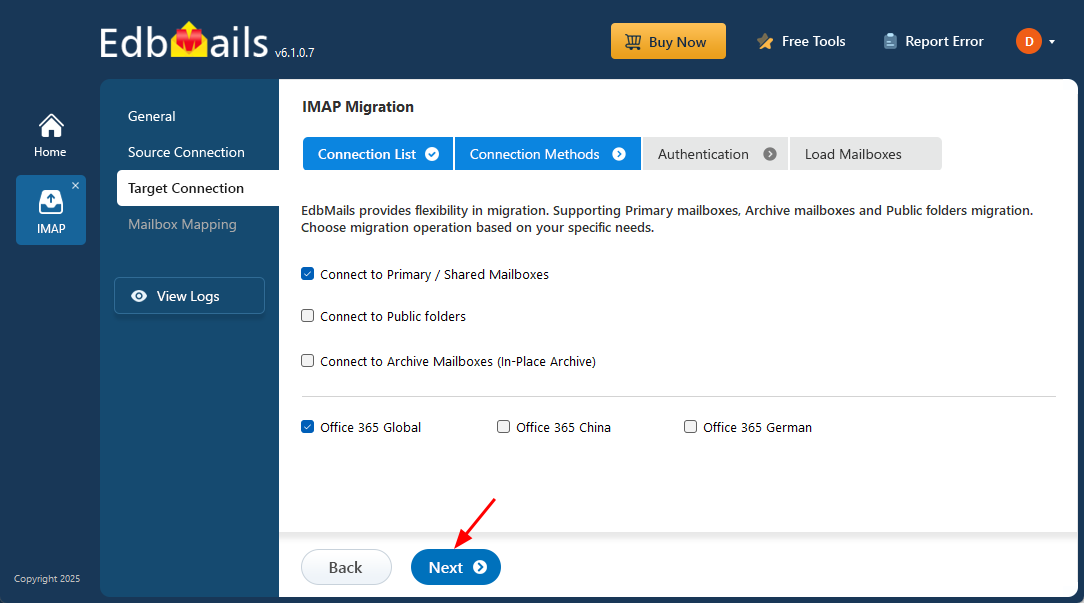
- Choose any of the available options to create a secure connection through OAuth 2.0 modern authentication.
- Select Auto Registration for a quick and hassle-free configuration. Simply log in with a Global Admin account and approve the required permissions to automatically register the application in Azure AD.
- Or select Manual Registration if you want to provide the Azure AD application details manually. This option supports both Global Admin accounts and accounts with Full Access permissions.
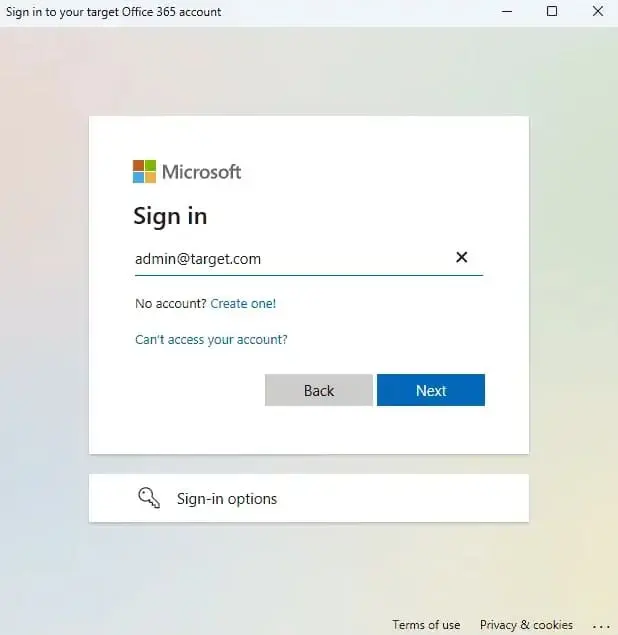
- Click the ‘Login’ button to continue.

- Authenticate on Microsoft sign-in page.
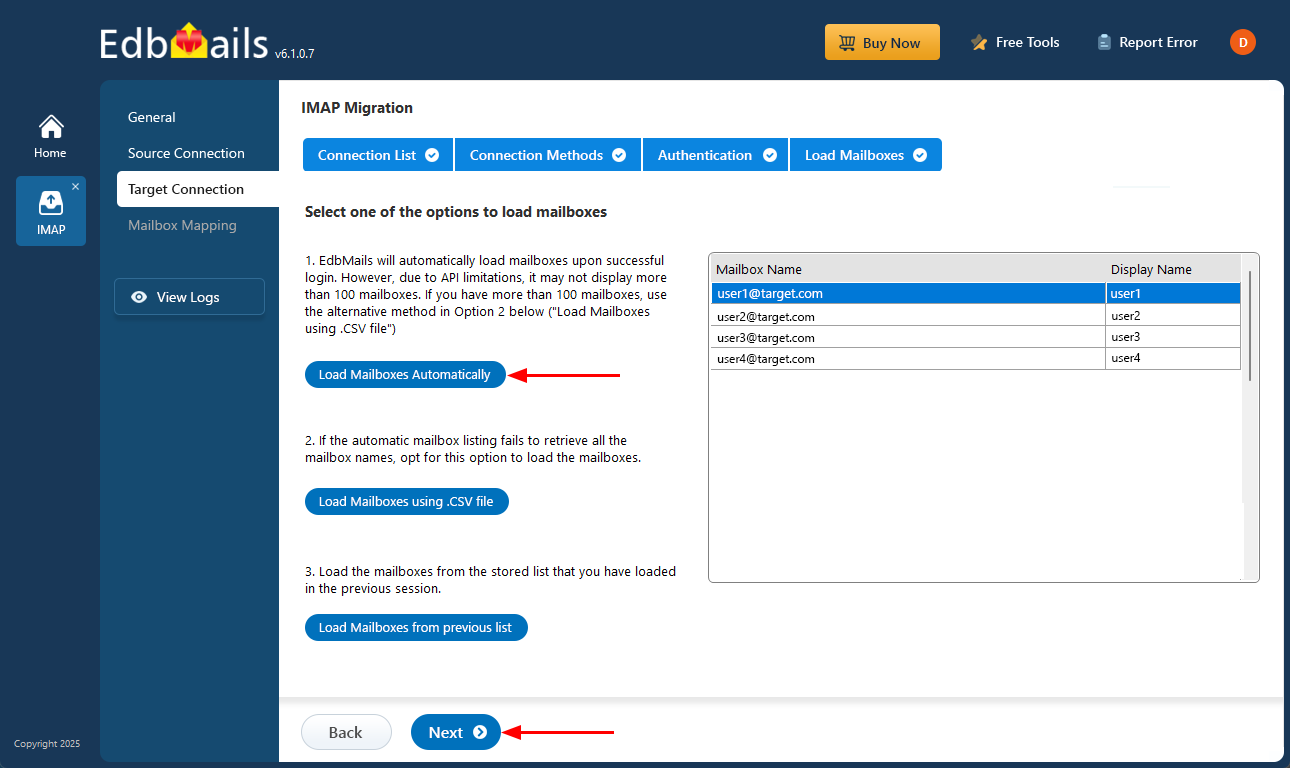
- Once authentication is completed successfully, select any one of the following methods to load the mailboxes:
i) Load Mailboxes Automatically: EdbMails loads the mailboxes automatically after login, making the setup quick and simple. Due to Microsoft API limitations, only up to 100 mailboxes may be displayed. If your organization has more than 100 mailboxes, use the alternative option below.
ii) Load Mailboxes using CSV file: If the automatic method does not retrieve all mailbox names, choose the ‘Load Mailboxes using .CSV file’ option to manually select and load the required mailboxes.
iii) Load Mailboxes from previous list: You can directly access mailboxes from the list that was imported and saved during your previous session.
- Select ‘Load Mailboxes Automatically’ and click ‘Next’ to proceed.
Step 5: BigRock to Office 365 mailboxes mapping
- Choose one of the available options to map the source and target mailboxes
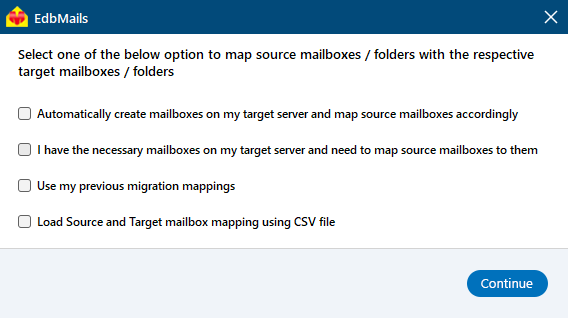
- EdbMails lets you automatically create the required mailboxes in your target Office 365 account.
- It also automatically maps your source hMailserver mailboxes and folders to the matching ones in Office 365, making large migrations easier to manage.
- Choose one of the available options to map the source and target mailboxes
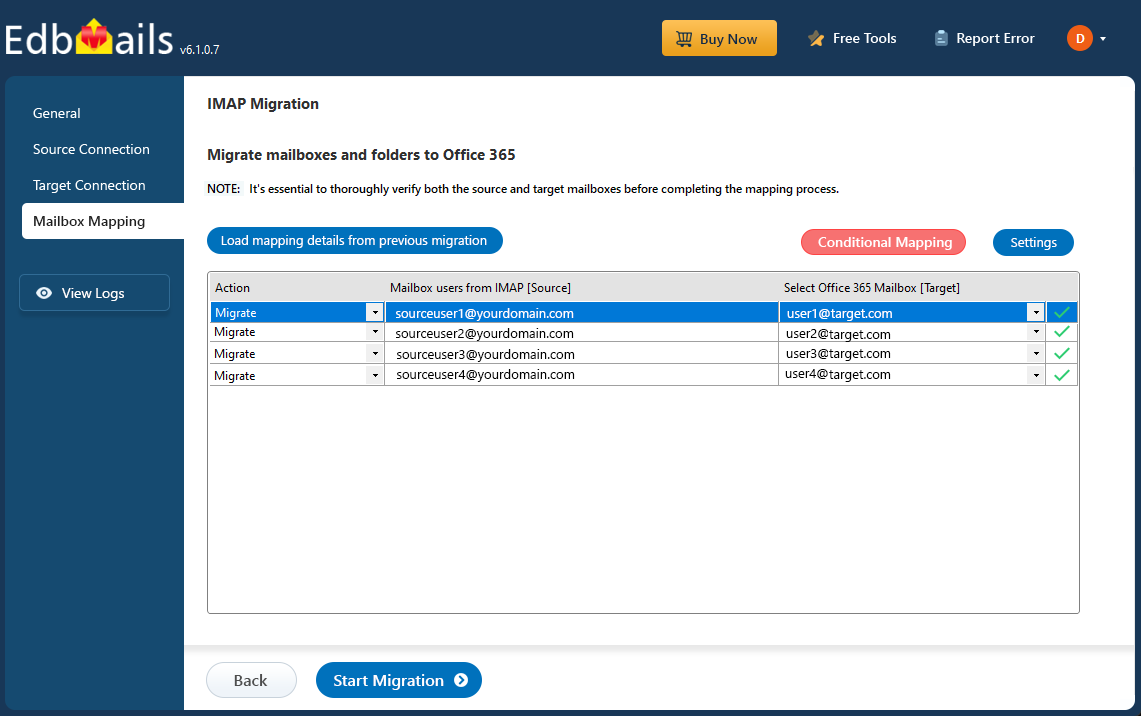
Step 6: Start Bigrock to Office 365 migration
- Verify the mailbox mapping, then click the ‘Start Migration’ button to begin the migration process.
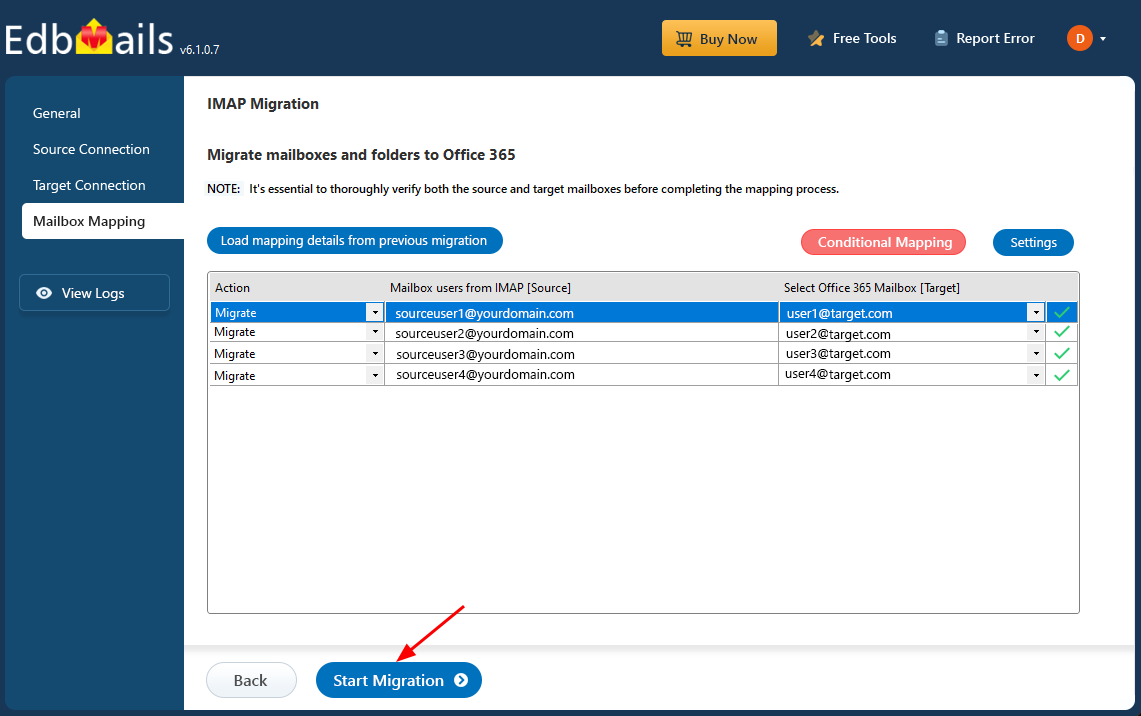
- Click the ‘View Logs’ button to access the full migration report. The report provides detailed information, including the mailbox mapping, an overall summary of the migration, and the item count for each mailbox and folder that was migrated.
- Verify the mailbox mapping, then click the ‘Start Migration’ button to begin the migration process.
BigRock to Office 365 Post-migration Tasks
Step 1: Update the MX records to point to Office 365
If you have not done this step previously, change the DNS records known as MX records to enable and receive email messages on the target Office 365 server. In addition to this setup, configure the Autodiscover record to allow Outlook to connect to the migrated mailboxes.
Step 2: Create a new Outlook profile for users in the new domain
Configure and recreate the Outlook profile for each user in your domain if Outlook has problems connecting to Office 365 mailboxes.
Troubleshooting Guide for BigRock to Office 365 Migration
For common migration issues, check the knowledge base articles. For more information on EdbMails IMAP migration, visit the frequently asked questions (FAQs) section or contact our technical support team.
Advantages of using EdbMails to Migrate from BigRock to Office 365
EdbMails simplifies the migration process with a reliable and secure solution, making it a strong choice for businesses and professionals aiming to upgrade their email systems. Below are some of the notable features that set EdbMails apart in handling BigRock to Office 365 migrations.
- Versatile Tool for seamless Migration
EdbMails provides a flexible solution for moving mailboxes from BigRock to Office 365. It handles emails, folders, attachments, and other mailbox components in one streamlined process removing the need for additional tools. Whether you're transferring a handful of accounts or performing a full-scale migration, EdbMails scales to match your requirements smoothly.
- Safe and Reliable solution for Secure Data Transfer
Security is a top priority during BigRock to Office 365 migration, and EdbMails ensures your data remains safe throughout the process. With end-to-end encryption, your sensitive data is protected from unauthorized access. The tool’s robust error-handling mechanism ensures that the migration process remains smooth, minimizing risks and data loss.
- Compatible with all Windows OS Versions
EdbMails offers full compatibility with all versions of Windows OS such as Windows 11, 10, 8, and so on, ensuring that no matter the operating system you're working with, you can rely on it for your migration tasks. This flexibility ensures a smooth user experience without compatibility issues.
- Preserves Metadata Integrity
A major concern during email migration is preserving metadata like timestamps, read or unread status, attachments, and the original folder structure. EdbMails ensures complete metadata integrity, so every email retains its original attributes without the risk of corruption or loss throughout the migration.
- Detailed Migration Reports for Transparency
EdbMails provides detailed migration reports that give you full visibility into the migration process. These reports track the progress of each mailbox migration, providing insights into any issues encountered and ensuring that no data is overlooked. This transparency helps you manage and monitor the migration with confidence, ensuring a smooth transition from BigRock to Office 365.

