hMailServer to Office 365 Migration
hMailServer is a free, open-source email server designed for Windows and is often used as a lightweight alternative to Microsoft Exchange for small and medium-sized businesses. It supports standard email protocols like IMAP, POP3, and SMTP, allowing organizations to efficiently manage their on-premises email environment. With built-in anti-spam features, support for virus scanning, and centralized control through the hMailServer Administrator console, IT administrators can easily set up domains, manage user accounts, and oversee server-wide configurations from a single interface.

As businesses grow, they often begin to experience the limitations of hMailServer, especially in areas like storage capacity, collaboration features, and security. This naturally leads many organizations to consider migrating to a modern cloud-based platform such as Microsoft 365 (formerly Office 365). However, migrating from hMailServer to Office 365 is not always straightforward, as the process involves carefully preserving email data integrity, reducing downtime, and ensuring that daily business activities continue without disruption.
EdbMails IMAP Migration Tool makes the transition smooth by providing a secure, direct, and fully automated migration from hMailServer to Office 365. It enables administrators to run incremental migrations and apply advanced filters to migrate only selected mailboxes, folders, or specific date ranges, helping save time and bandwidth. With its built-in pause and resume option, administrators can manage the migration process with complete control while ensuring uninterrupted access to users’ emails.
EdbMails improves the migration process by automatically mapping source and target mailboxes, reducing the risk of manual mistakes in multi-user setups. With OAuth 2.0 modern authentication, TLS encryption, and complete end-to-end data security, it delivers a secure and compliant migration environment. Businesses can confidently migrate from hMailServer to Office 365 without data loss or downtime, ensuring a smooth and worry-free experience.
User Query
“We are currently running hMailServer on Windows and would like to migrate our business emails to Office 365 now that our team has grown. We are looking for a suitable method or approach to safely migrate our data without leaving any loose ends. Could anyone please assist us step-by-step? Thanks for the guidance”
hMailServer email to Office 365 Migration Plan
Proper planning is crucial before initiating the migration from hMailServer to Office 365. Below is a checklist of key considerations to review before starting the migration process.
- Determine the total mailbox size and the number of accounts to be migrated for better planning and resource allocation.
- Prepare an inventory of all email data in hMailServer that you plan to migrate. This includes user mailboxes, complete folder hierarchies (such as Inbox, Sent, Drafts, Trash), and any additional custom folders created by users.
- Create the required user mailboxes in Office 365 and assign the appropriate licenses to ensure each account is ready for migration.
- Make sure your network has enough bandwidth and capacity to handle the migration.
- Inform end users about the migration plan, schedule, and expected changes to ensure a smooth transition and minimal disruption.
Pre Migration Activities for hMailServer to Office 365 Migration
- Find the IMAP server name of your hMailServer email server. You can find this information from your server’s dashboard settings or by connecting your email system to Outlook.
- Gather each user’s email address, password, IMAP server hostname, and port number needed to establish a successful connection for the migration.
- Create mailboxes on your target Office 365 server. You can choose the option to automatically create target mailboxes in EdbMails. If you prefer to create them manually, refer to the links below.
- If you have a custom email domain from your hosting provider to which you want to migrate and receive emails, you must add and verify the domain on Office 365.
Steps to add a custom domain to Office 365 and Steps to add DNS records to connect your domain. - Configure Office 365 to send and receive large messages.
Follow the steps to increase the message size on Office 365 to 150MB and see tips to optimize IMAP migration to Exchange online.
Steps to Migrate from hMailServer to Office 365
Step 1: Download and Install EdbMails migration software
- Download and install EdbMails on your computer.

- Launch the EdbMails application on your system.
- Enter your registered email address and password, then click ‘Login’. If you’re using EdbMails for the first time, choose ‘Start Your Free Trial’ to proceed with the trial version.Note: The trial edition provides all major features and allows you to migrate up to 30 items per folder. For unlimited migration and purchase an IMAP Migration license from the official EdbMails website.After completing the purchase, close and reopen the application, then log in again using the same email address and password you used to buy the license to ensure successful activation.

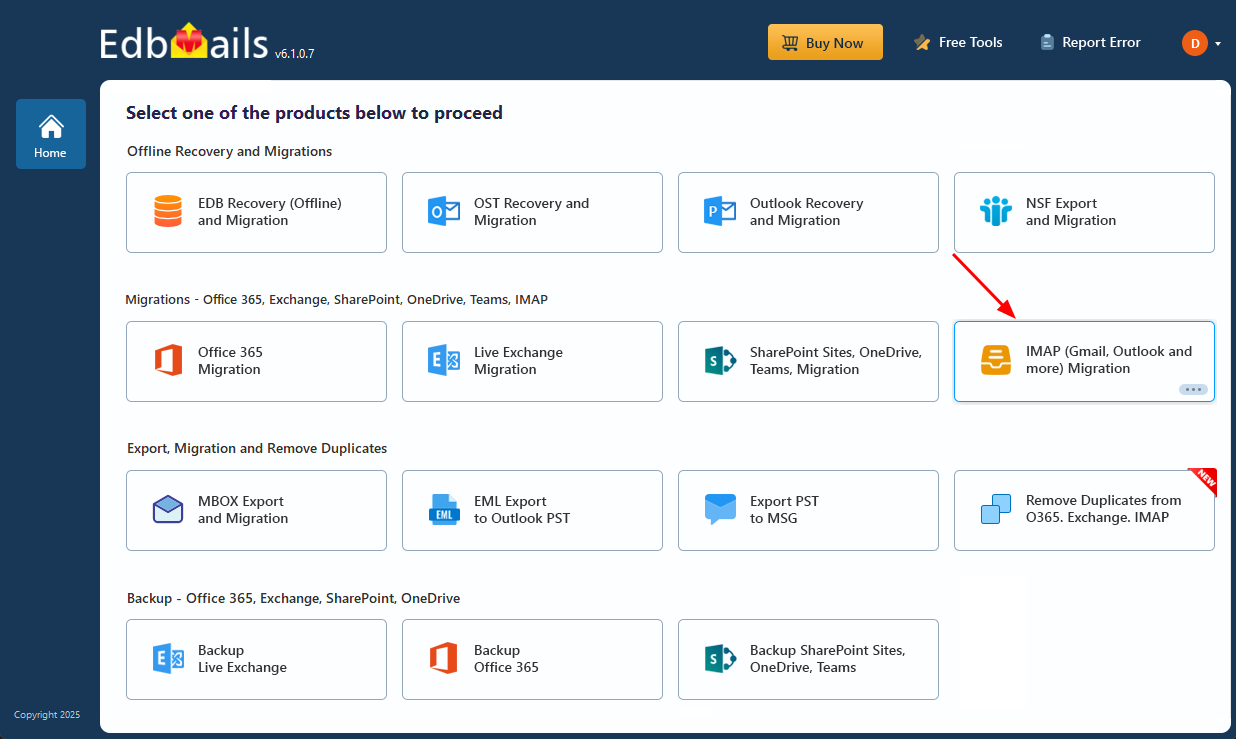
- Select the ‘IMAP (Gmail, Outlook & more) Migration’ option from the available choices.
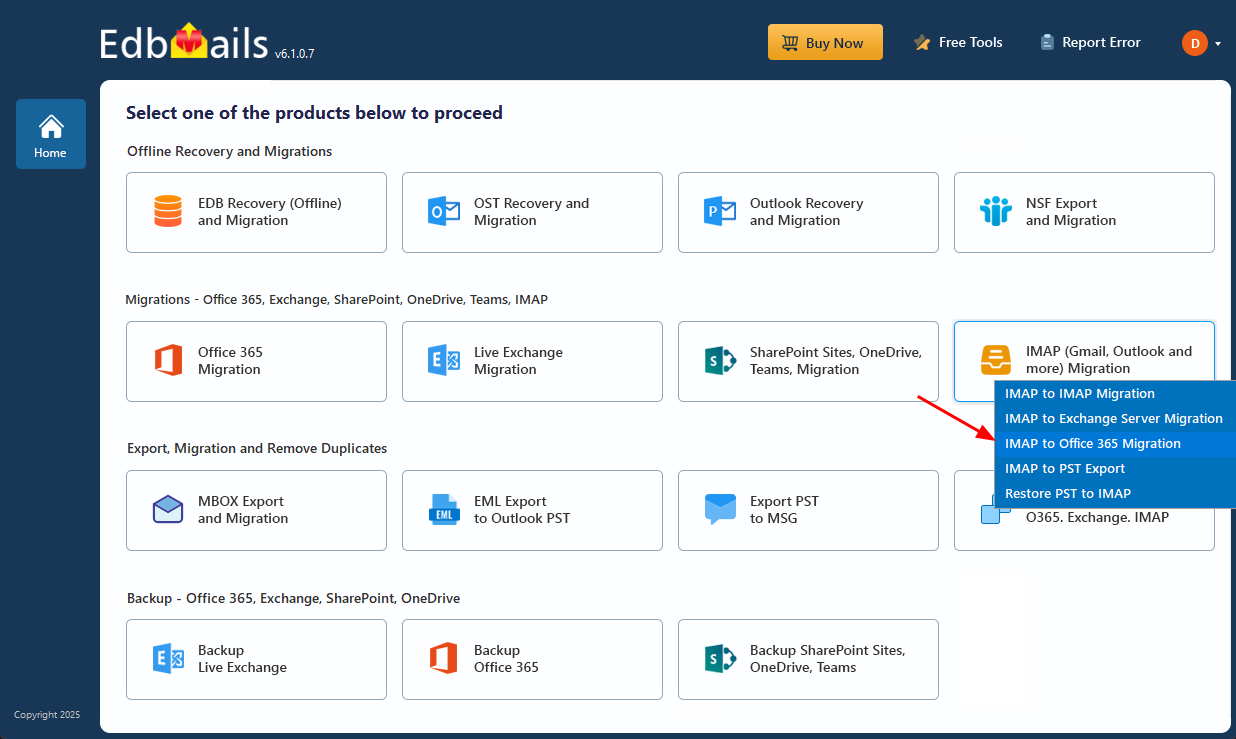
- Select ‘IMAP to Office 365 Migration’.
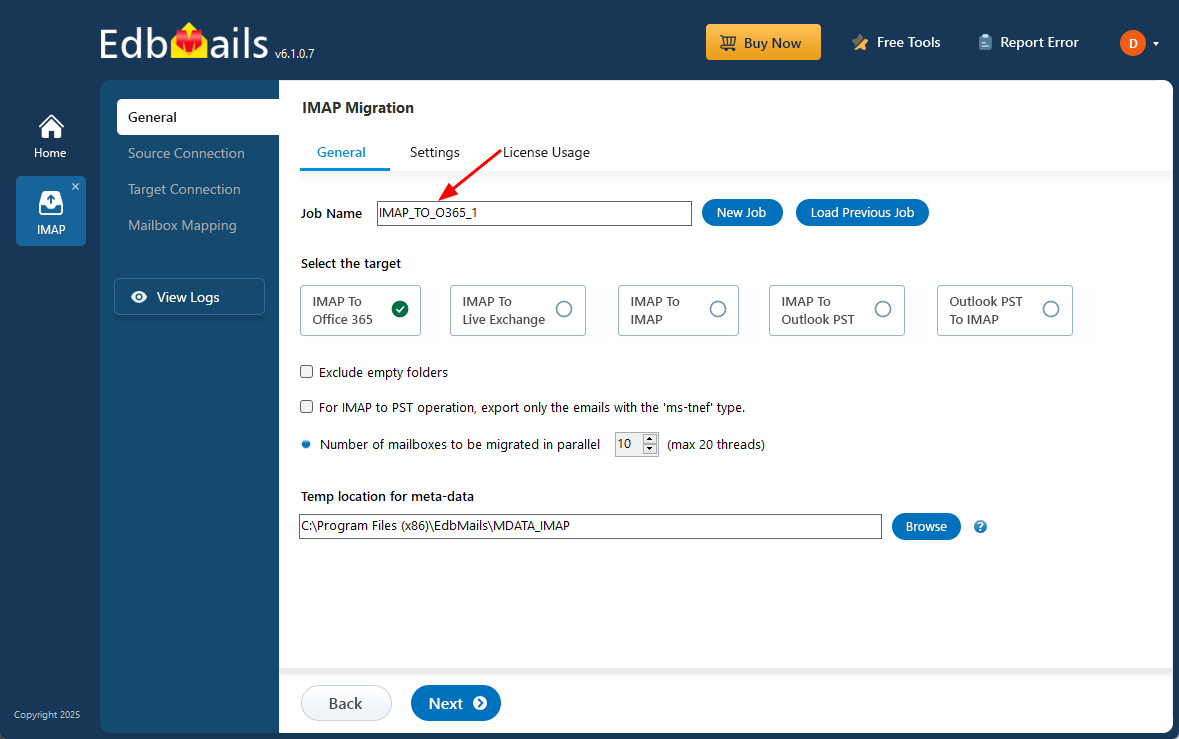
- You may continue using the default job name, or choose ‘New Job’ if you would like to create and personalize a job name according to your preference.
- Download and install EdbMails on your computer.
Step 2: Connect to source hMailServer server
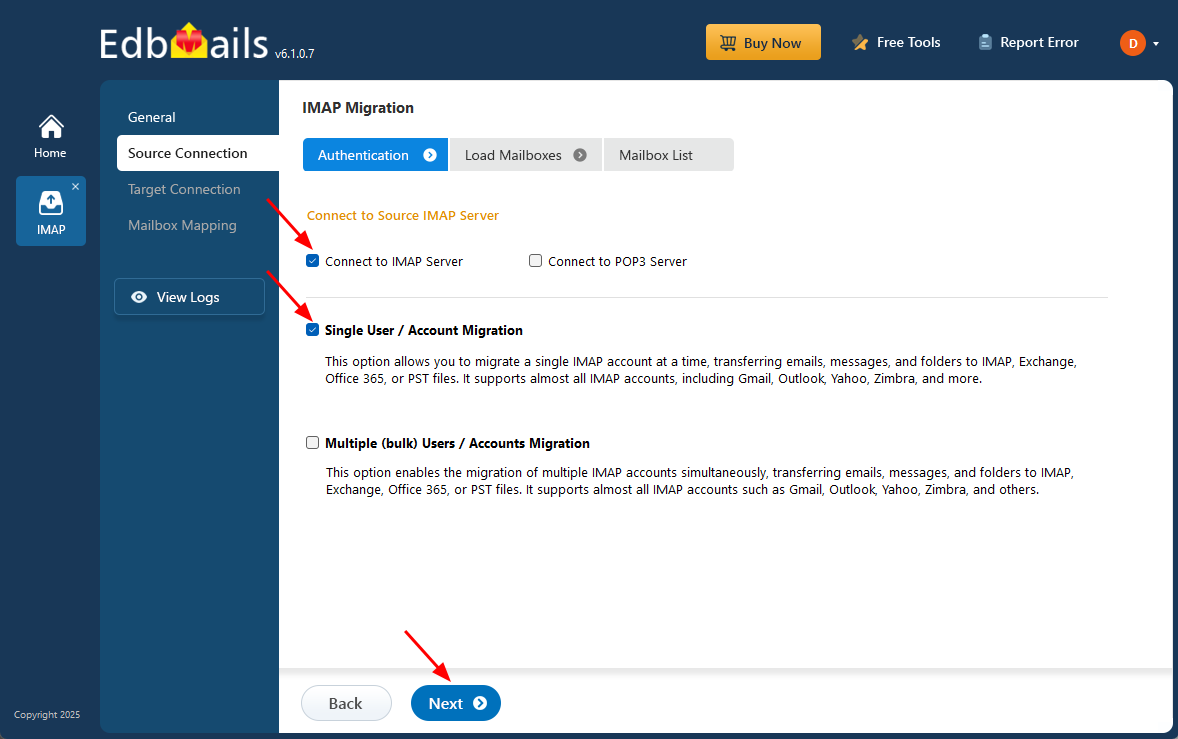
- To connect a single hMailServer account for migration, click ‘Single User / Account Migration’, choose the suitable connection option such as ‘Connect to IMAP Server’ or ‘Connect to POP3 Server’.
- Click ‘Next’ to proceed.
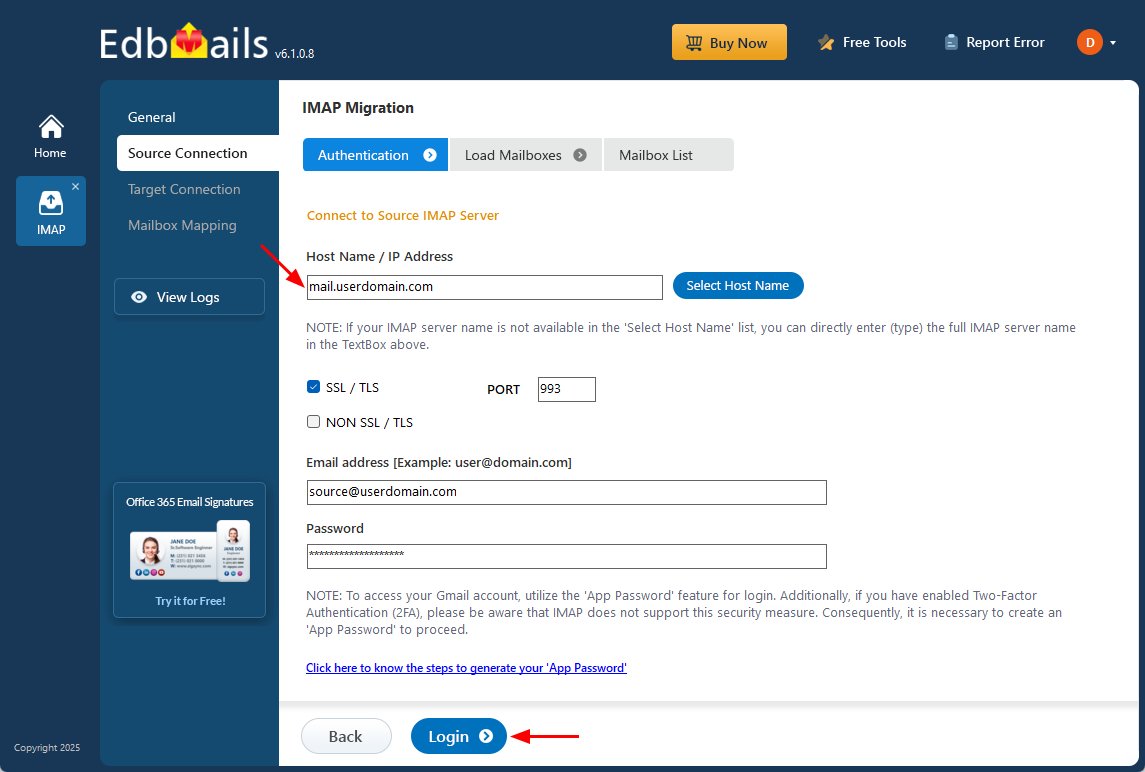
- For a single-user login, select the appropriate IMAP host name for hMailServer from the list or enter it manually (for example, mail.userdomain.com).
- Enter the email address and password in the required fields.
- When adding a Gmail account, generate an app password and use it in place of your regular account password.
Follow the steps to create an app password for your Gmail account.
- Click the ‘Login’ button to proceed.
- For migrating multiple hMailServer mailboxes simultaneously, choose ‘Multiple (Bulk) Users/Accounts Migration’, then select the appropriate connection option such as ‘Connect to IMAP Server’ or ‘Connect to POP3 Server’.
- Click ‘Next’ to continue.

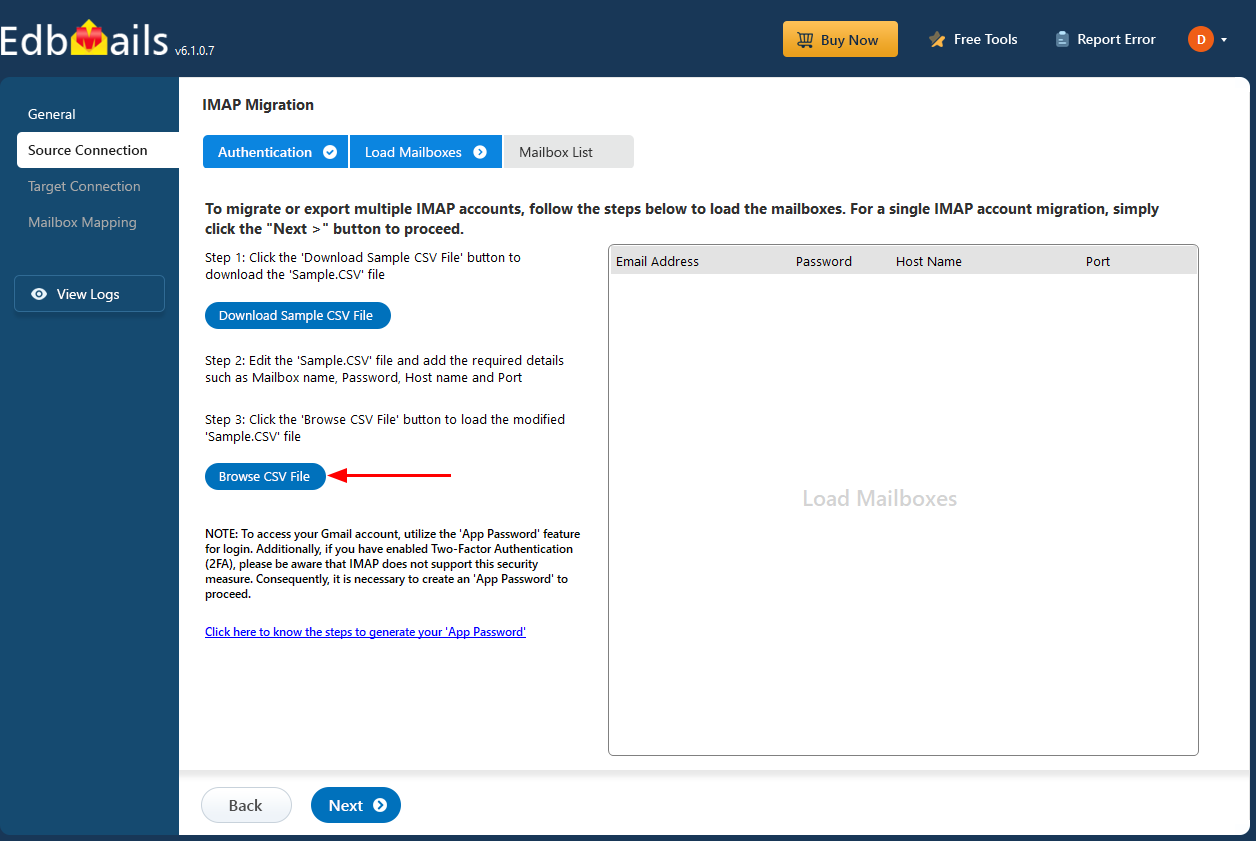
- Choose the ‘IMAP Migration CSV File’ option to download the ‘Sample.CSV’ file, which will be automatically saved to your local drive for future use and reference.

- Open the CSV file and fill in the necessary fields, including the email address, password, server name, and port number. After entering all the required details, save the file to proceed.
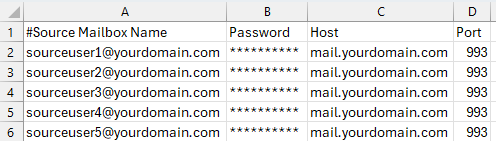
- Once you've updated the CSV file, save and close it. Then, click the ‘Load Modified CSV File’ button, find your updated file, select it, and open it to move forward.
Step 3: Select the source hMailServer server mailboxes
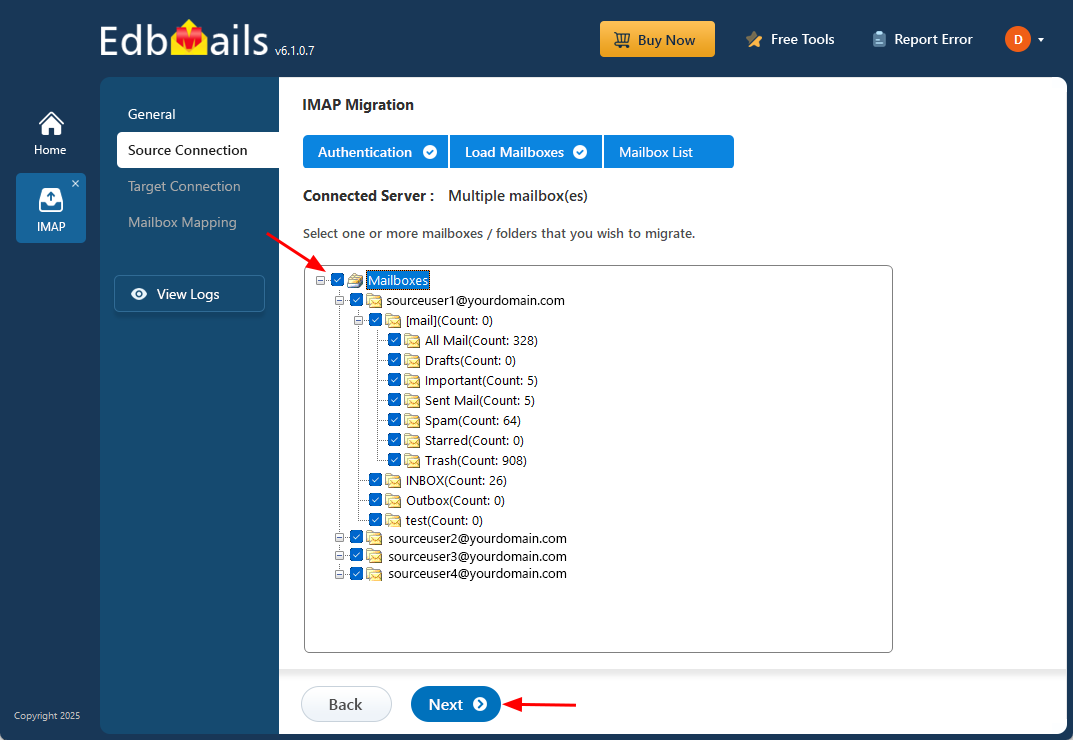
- Choose one or more mailboxes or specific folders you wish to migrate.
- Then click ‘Next’ to continue with migration.
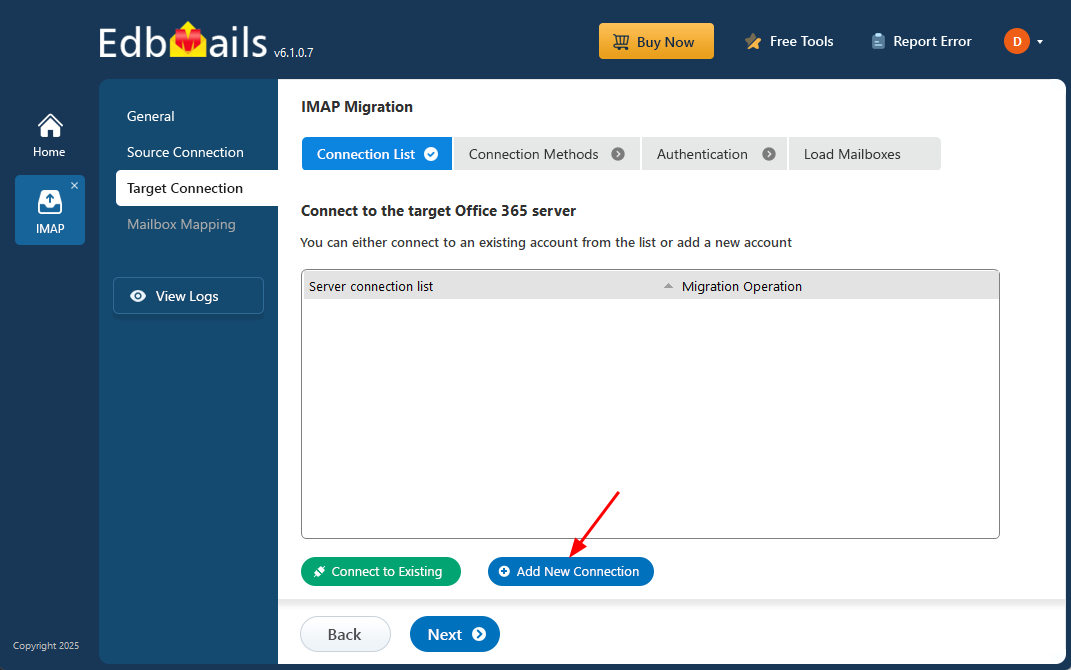
Step 4: Connect to target Office 365 server
- Click on ‘Add New Connection’ to create a new connection with your target Office 365 account.
- If a connection has already been configured, simply select it from the list and choose ‘Connect to Existing’ to continue.
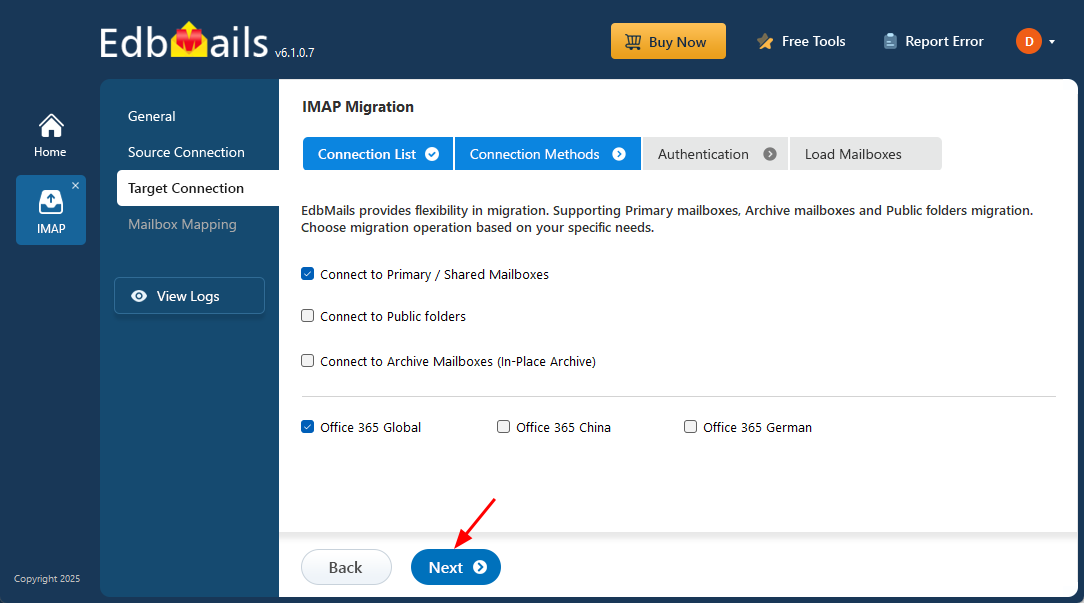
- EdbMails provides flexible migration options, allowing you to migrate primary mailboxes, archive mailboxes, and public folders seamlessly in a single solution.
- Choose the necessary connection options and click ‘Next’ to continue with authentication methods.
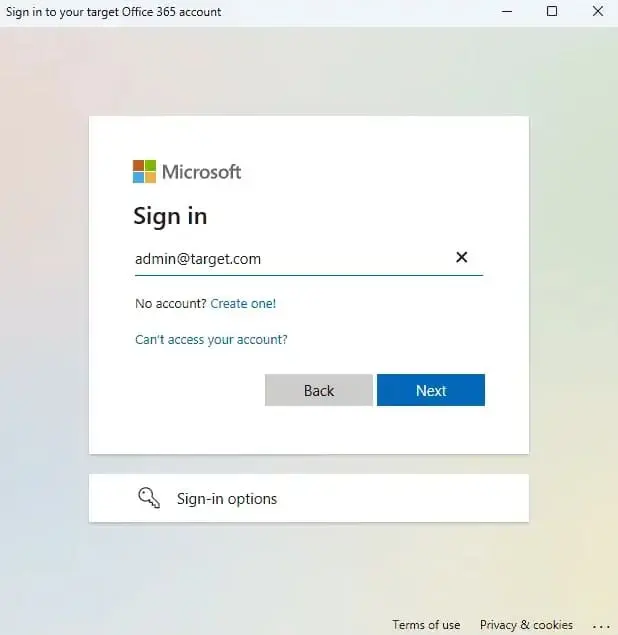
- Choose your preferred secure authentication method for the target Office 365.
- The login process takes place on the official Microsoft sign-in page, where your credentials are securely authenticated through OAuth 2.0, ensuring a safe and protected access experience.
- Click the ‘Login’ button.

- Authenticate on Microsoft sign-in page.
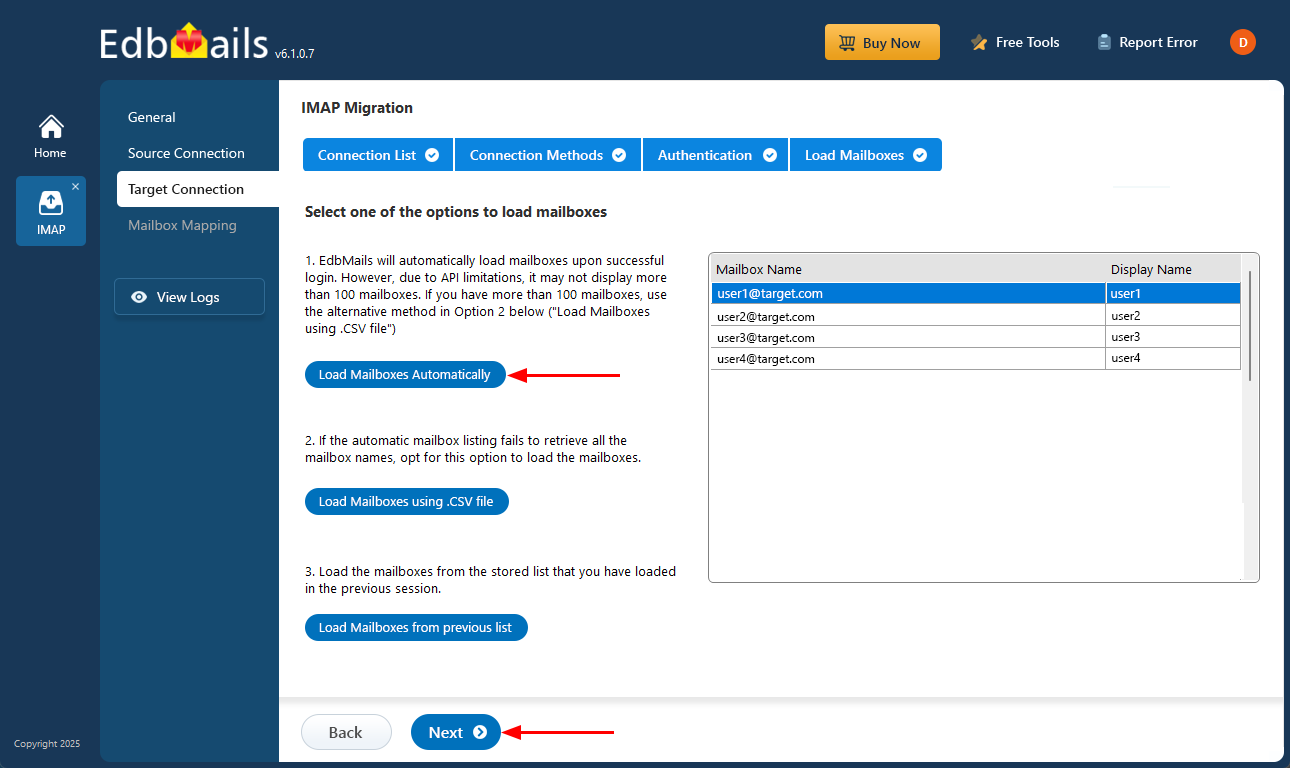
- Once you sign in to your target Microsoft 365 server, choose the preferred method to load the mailboxes.
- EdbMails can automatically detect and load mailboxes, making the configuration quick and straightforward. However, due to Microsoft API limitations, the automatic option displays a maximum of 100 mailboxes at a time.
- For larger setups or when you want to include selected mailboxes only, use the ‘Load Mailboxes using .CSV file’ option. This method enables manual selection and gives you full control over which mailboxes are added.
- Click ‘Next’ to continue.
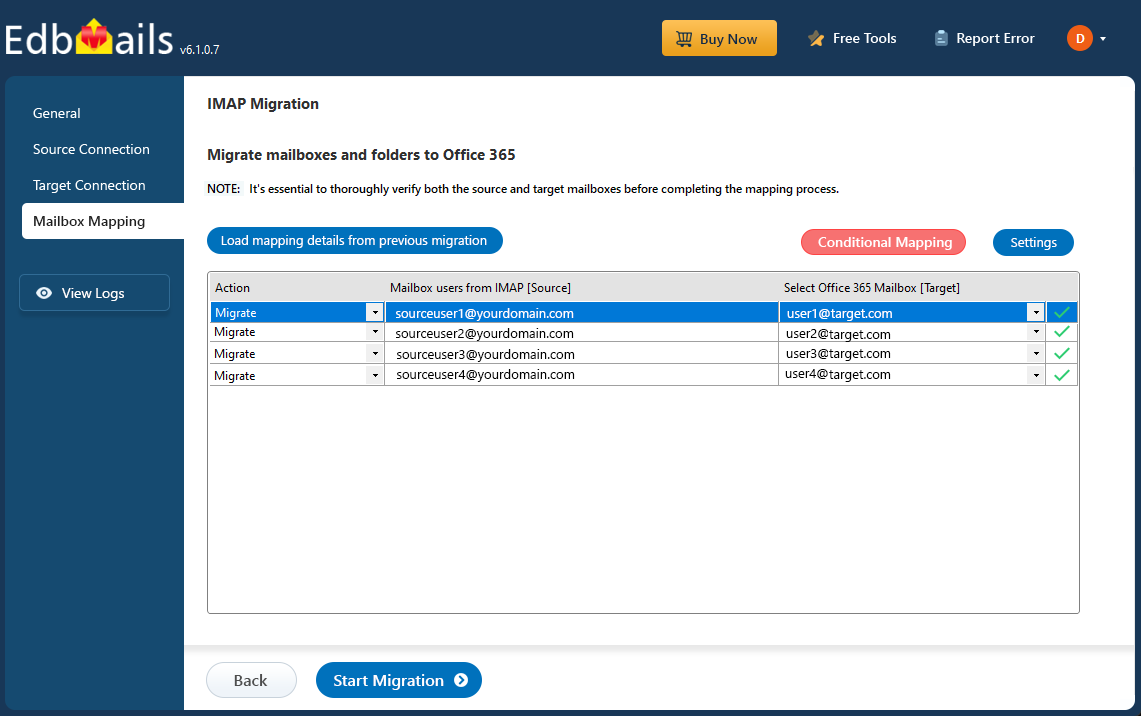
Step 5: hMailServer to Office 365 mailboxes mapping
- Select a preferred option to map the source hMailServer mailboxes and folders with their corresponding mailboxes and folders on the target Office 365 account.
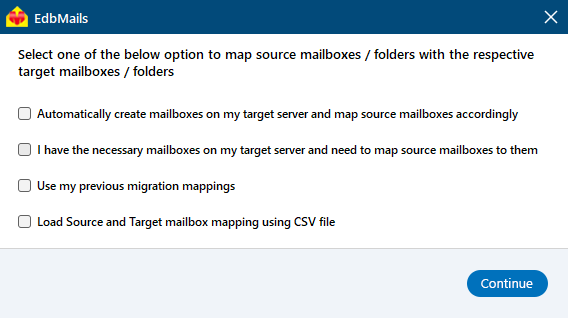
- EdbMails lets you automatically create the required mailboxes in your target Office 365 account.
- It also automatically maps your source hMailserver mailboxes and folders to the matching ones in Office 365, making large migrations easier to manage.
- Select a preferred option to map the source hMailServer mailboxes and folders with their corresponding mailboxes and folders on the target Office 365 account.
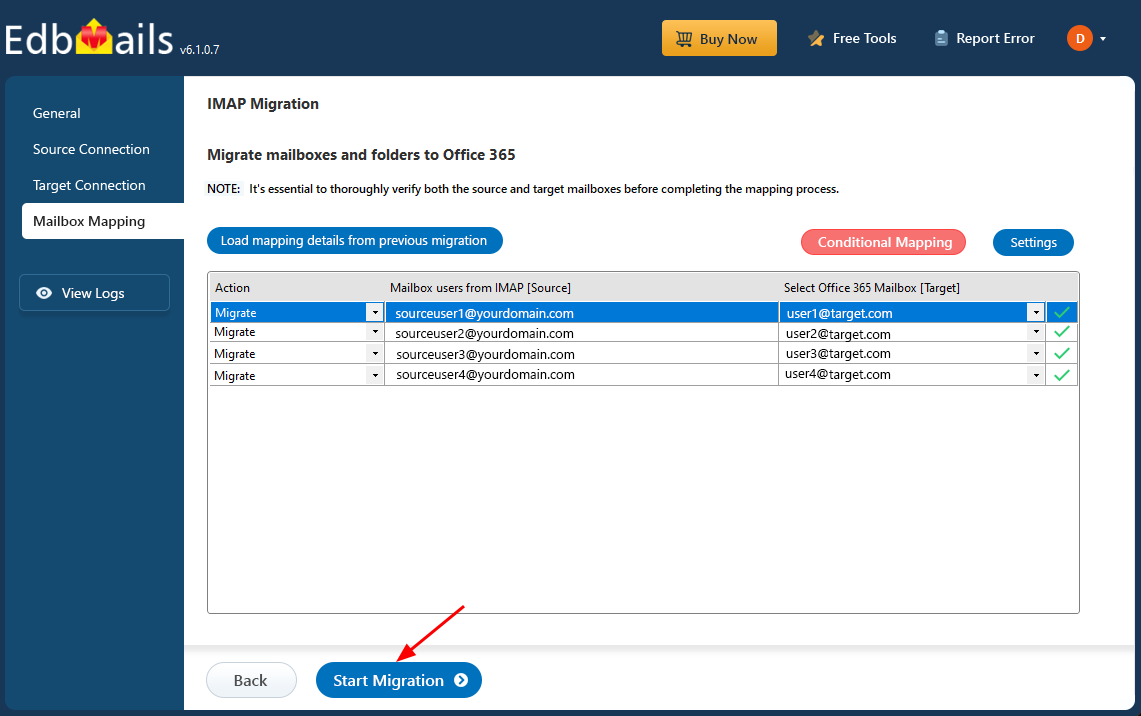
Step 6: Start hMailServer to Office 365 migration
- Verify both the source and target mailbox before completing the mapping process.
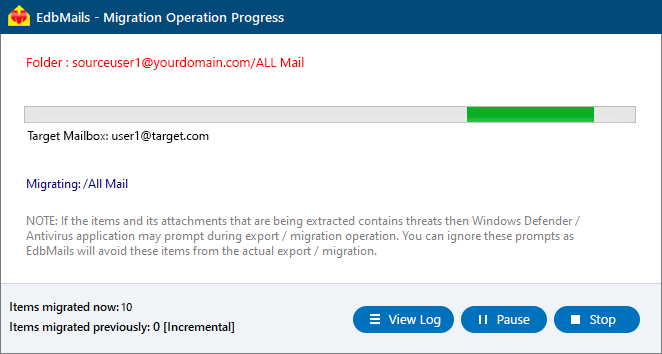
- Then click the ‘Start Migration’ button to begin the migration process.
- Click the ‘View Logs’ button to access the full migration report. The report provides detailed information, including the mailbox mapping, an overall summary of the migration, and the item count for each mailbox and folder that was migrated.
hMailServer to Office 365 Post Migration Tasks
Step 1: Update the MX records to point to Office 365
If you have not done this step previously, change the DNS records known as MX records to enable email and receive messages on the target Office 365 server. In addition, configure the Autodiscover record to allow Outlook to connect to the migrated mailboxes.
Step 2: Create a new Outlook profile for users in the new domain
Configure the Outlook profile for each user in your domain if Outlook has problems connecting to Office 365 mailboxes.
Troubleshooting Guide for hMailServer to Office 365 Migration
Explore the knowledge base articles for troubleshooting common issues. For more information on EdbMails IMAP migration, review the FAQs or contact our dedicated support team for assistance.
Advantages of using EdbMails for hMailServer to Office 365 migration
- Simple and Reliable Solution
With EdbMails, you can carry out a secure hMailServer to Office 365 migration without risking data integrity. The software is built on advanced encryption standards, making the entire process straightforward and protected from potential threats. Additionally, EdbMails does not store any user information within the application interface, ensuring complete privacy throughout the migration.
- Migrate Multiple hMailServer Data to Office 365
EdbMails makes it simple to migrate multiple hMailServer mailboxes to Office 365 in one go. To begin a bulk migration, prepare a CSV file containing the credentials of all hMailServer user accounts. Once configured, the data can be directly mapped and transferred to the target Office 365 administrator account with ease.
- Selectively Migrate emails
You can migrate certain mailboxes from hMailServer to Office 365 using EdbMails Filter Settings. Users can use it to sort emails by subject, email address, date range, etc. You can also exclude standard and custom folders from migration.
- Maintains exact Source Folder Structure on the Target
It maintains the original folder structure from hMailServer during the migration to Office 365, ensuring a one-to-one transfer between the source and target servers without any data loss.

