Icewarp to Office 365 Migration: Step-by-Step Guide
As organizations shift toward cloud-based platforms, many IceWarp users are transitioning to Microsoft 365 (formerly Office 365) to benefit from advanced collaboration tools, strong security, and seamless access from anywhere. Migrating from IceWarp to Office 365 provides better alignment with Microsoft’s ecosystem, improved performance, and a flexible, scalable communication setup. For a smooth transition, careful planning is essential to safeguard data, ensure uninterrupted operations, and reduce any potential downtime.
The EdbMails IMAP Migration tool simplifies this entire process with a direct and secure migration from IceWarp to Office 365. It includes incremental sync, concurrent mailbox migration, flexible folder mapping, and complete support for large mailboxes. Designed with a user-friendly interface and guided steps, EdbMails suits both small business setups and large enterprise migration projects.

This comprehensive walkthrough explains how to migrate from IceWarp to Office 365 using EdbMails. Whether you are moving a few mailboxes or managing a full organizational transition, the outlined steps help ensure a precise and dependable email migration process.
What Makes Microsoft 365 a Better Choice than IceWarp Server?
- App Integration: Microsoft 365 integrates seamlessly with Office apps like Word, Excel, PowerPoint, Teams, OneDrive, and SharePoint. For a smooth transition of data and collaboration tools when migrating from IceWarp, EdbMails offers a secure and efficient solution to transfer emails, and folders to Microsoft 365 without data loss.
- Instant Collaboration: Microsoft 365 also supports real-time collaboration through Microsoft Teams and cloud-based document editing, allowing users to co-author and share files instantly. EdbMails preserves all essential data during migration, ensuring uninterrupted teamwork and business continuity.
- Built-in Security: With enterprise-grade security, Microsoft 365 includes encryption, multi-factor authentication (MFA), and compliance with international standards like GDPR, HIPAA, and ISO, protecting sensitive business information.
- Business Scalability: The platform easily scales for businesses of any size, offering flexible resource management and high performance that grows with your organization.
- Data Safeguarding: Microsoft 365 includes tools like OneDrive for Business and Exchange Online Archiving for data backup and recovery.
- Service Reliability: Leverages a vast global data center network to provide consistent, reliable service with 99.9% uptime SLAs.
- Modern Productivity Tools: Regular feature updates, AI-powered tools, and continuous integration of new productivity applications keep businesses competitive and adaptable.
Real Challenges during IceWarp to Office 365 Migration
- Data Loss Risk – Emails, attachments, or calendar entries can be lost if the migration isn’t handled properly.
- User Mapping Errors – Manually matching IceWarp users to Office 365 accounts can lead to errors, especially in large organizations.
- Folder Mismatches – Differences in folder hierarchies may result in disorganized mailboxes post-migration.
- Large Mailbox Issues – Migrating emails with large attachments or very large mailboxes can slow down or fail.
- Rules and Filters Issues – Replicating IceWarp mailbox rules, filters, or categories in Office 365 is often difficult.
- Network Bottlenecks – Large-scale migrations can strain network resources, affecting server performance.
- User Downtime – MX record updates or Outlook configuration may cause temporary email access disruption.
- Post-Migration Verification – Extensive testing is needed to ensure all emails, folders, and attachments migrated correctly.
- Security and Compliance Concerns – Sensitive data must be handled carefully to meet GDPR, HIPAA, and internal compliance standards.
- Coexistence Issues – Running IceWarp and Office 365 simultaneously can create synchronization issues and duplicates.
How EdbMails Tackles these Challenges
EdbMails IMAP migration software addresses all these challenges by offering incremental migration, automatic mailbox mapping, preservation of folder hierarchy and data integrity, support for large mailboxes and attachments, and secure, hassle-free transfer. Its intuitive interface and step-by-step migration process reduce downtime, eliminate errors, and ensure a smooth, reliable migration from IceWarp to Office 365.
Best way to Migrate emails from IceWarp to Office 365
EdbMails IMAP migration tool, a Microsoft-partnered solution, simplifies the migration from IceWarp to Office 365 by eliminating the complexities of manual migration. Its easy-to-use interface lets you connect to the source server, select mailboxes, and migrate emails, folders, and attachments in just a few steps.
The tool tackles common migration challenges with incremental migration, automatic mailbox mapping and creation, preservation of folder hierarchy and data integrity, and support for large mailboxes and attachments. Advanced filters allow selective migration, while incremental sync ensures only new or updated items are transferred, avoiding duplicates.
With OAuth 2.0 authentication and TLS encryption, EdbMails keeps your data secure throughout the migration process. By combining automation, flexibility, and security, it delivers a fast, accurate, and stress-free IceWarp to Office 365 migration with minimal downtime.
IceWarp to Office 365 Migration Planning
Planning is an important step before starting your IceWarp to Office 365 migration. Setting up the environment properly in advance helps reduce risks and prevent data loss. Below is a checklist of key points to consider before beginning the migration.
- Determine the size of the data and number of mailboxes you want to migrate.
- Make a list of all the data and permissions from IceWarp that you want to transfer.
- Create appropriate user mailboxes on Office 365 and assign licenses to them.
- Ensure you have enough network capacity and bandwidth to migrate.
- Communicate the migration plan and flow to your end users.
IceWarp to Office 365 migration prerequisites
- Locate the IMAP server hostname for your IceWarp server. You can find this information in the server settings or by configuring your IceWarp email account in Outlook and checking the incoming mail server details.
- Before migrating IceWarp to Office 365, make sure all user mailboxes are created on the target server. You can use EdbMails to automatically create Office 365 mailboxes and assign licenses during the migration. If you prefer to handle this manually, follow the official Microsoft guides to create mailboxes and assign the appropriate licenses:
- If you plan to migrate the source Public folders to Public folders on Office 365, ensure that you create and configure the Public folder mailboxes on the target server.
- Ensure that the admin account on the target Office 365 server has the impersonation rights to migrate mailboxes and Public folders.
- If you have a custom email domain from your hosting provider to which you want to migrate and receive emails, you must add and verify the domain on Office 365.
Steps to add a custom domain to Office 365 and Steps to add DNS records to connect your domain.
- Configure Office 365 to send and receive large messages.
Follow the steps to increase the message size on Office 365 to 150MB and see tips to optimize IMAP migration to Exchange online.
Steps to Migrate IceWarp to Office 365
Step 1: Download and install EdbMails IMAP migration software setup
- Download EdbMails and install the EdbMails software on your computer.

- Start the EdbMails application on your computer.
- Provide your registered email address and password, then click ‘Login’. If you are new to EdbMails, select ‘Start Your Free Trial’ to continue with the trial edition.Note: The trial version includes all essential features and permits exporting up to 30 items per folder. To remove this limit and enable unlimited export, purchase a valid license from the EdbMails websiteOnce the purchase is completed, restart the application and sign in again with the same email address and password used during the purchase to activate the license successfully.
See a detailed list of EdbMails system requirements for IMAP migration.

- Select the option‘IMAP (Gmail, Outlook & more) Migration’
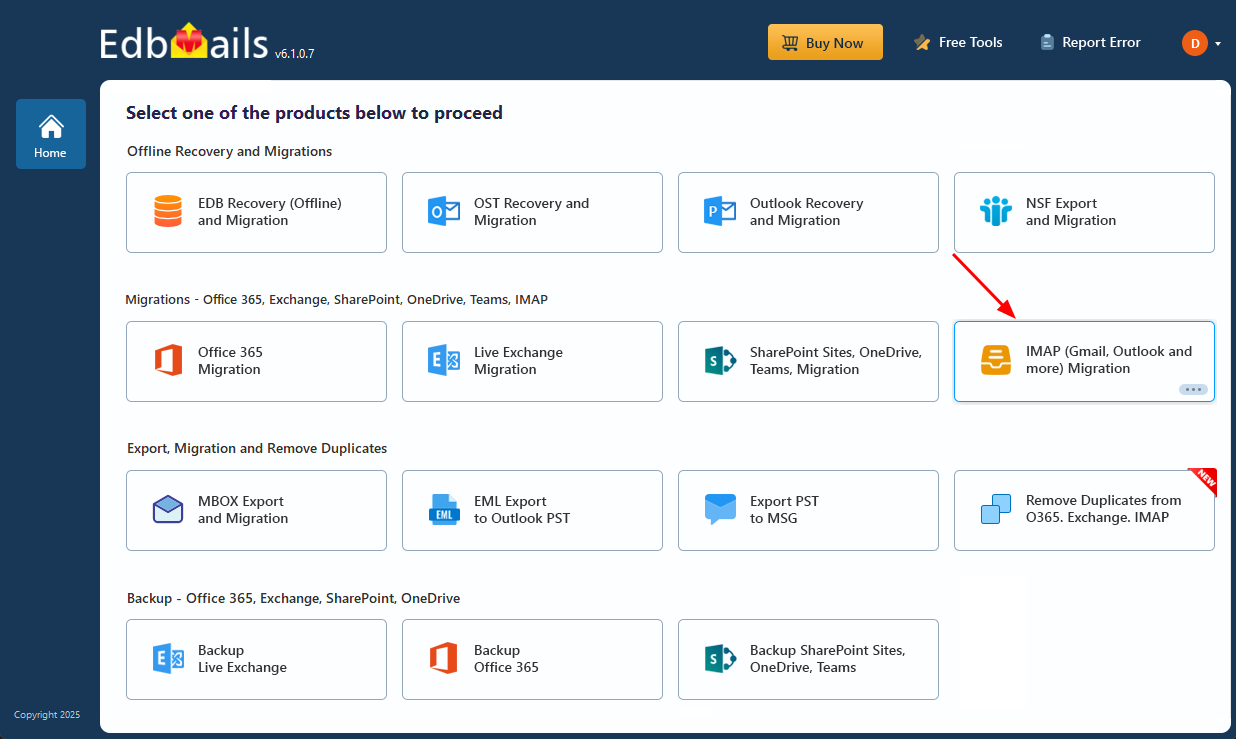
- Select ‘IMAP to Office 365 Migration’
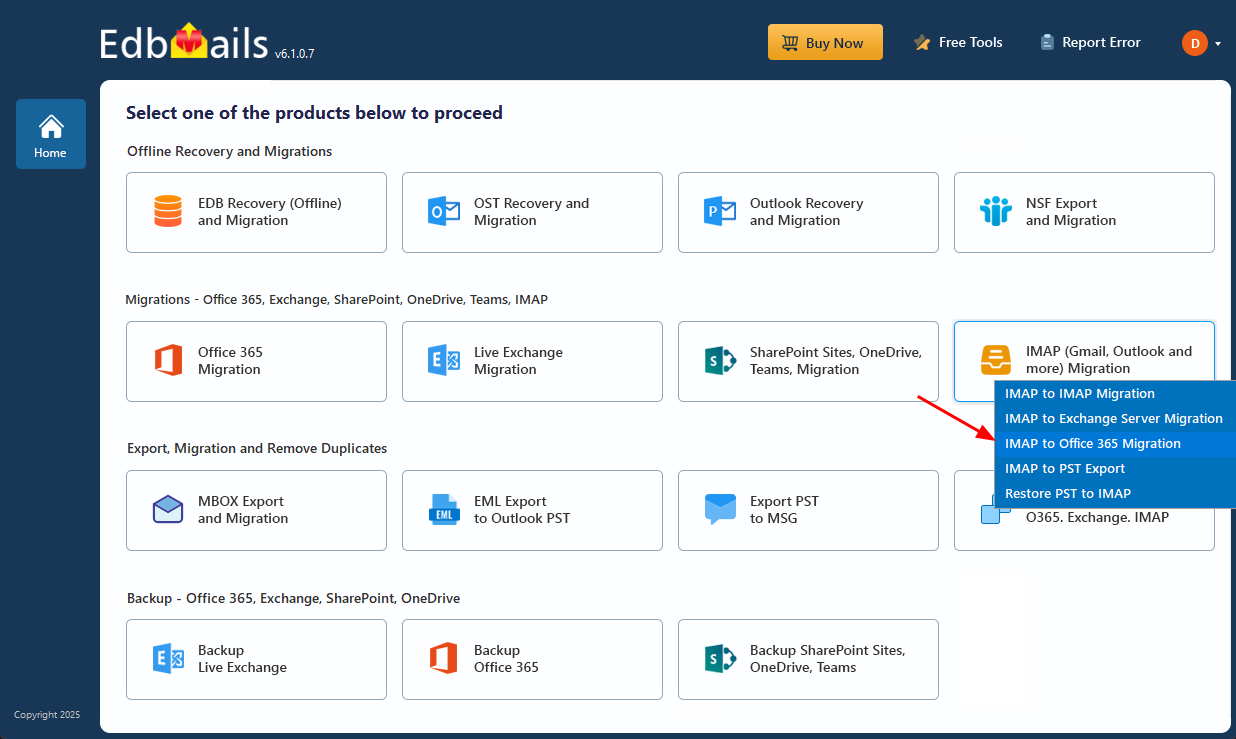
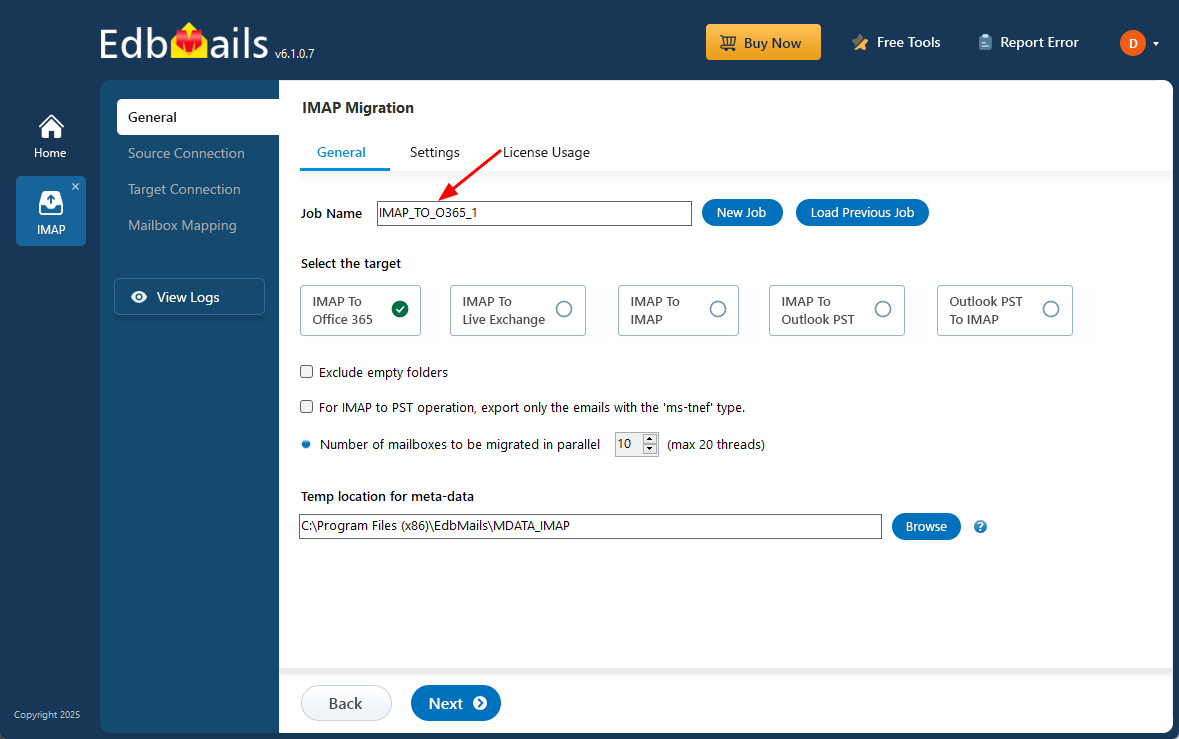
- By default, the software creates a job name automatically. If required, you can select ‘New Job’ to provide your own custom name that is meaningful, distinct, and easy to recognize according to your requirements.
- Click ‘Next’ to continue.
- Download EdbMails and install the EdbMails software on your computer.
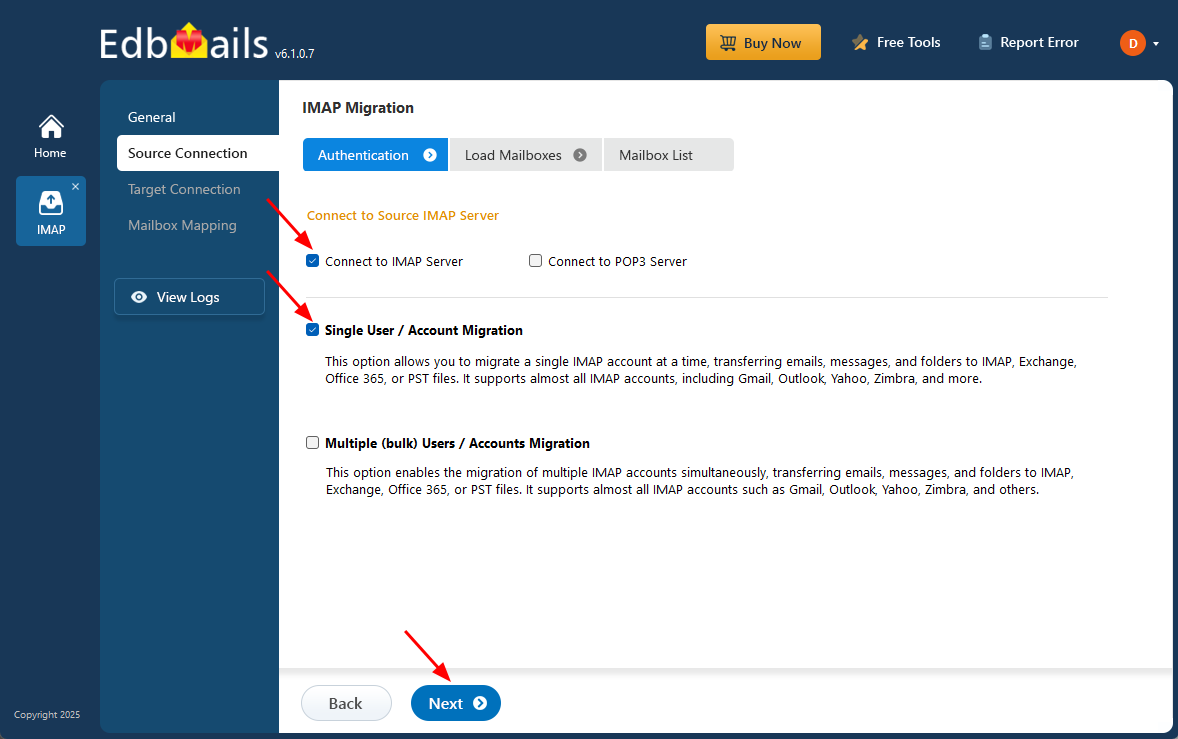
Step 2: Connect to Source IceWarp Server
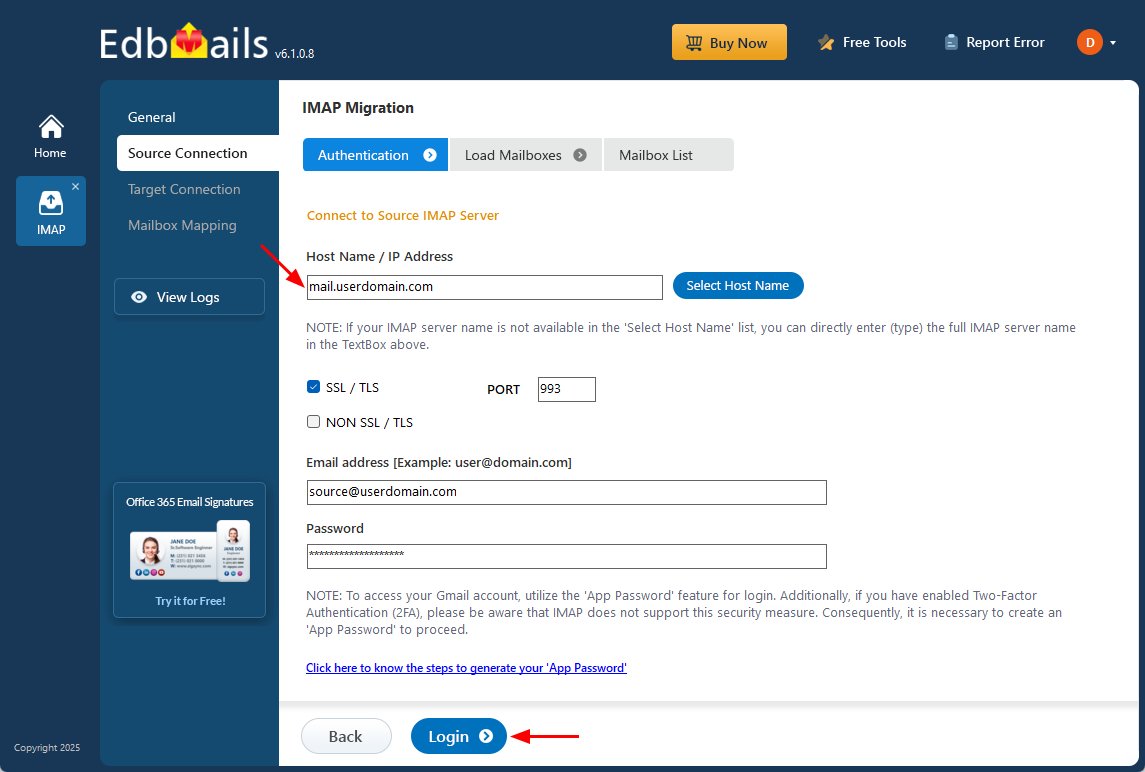
- To migrate a single account, select ‘Single User / Account Migration’, choose the suitable connection option such as ‘Connect to IMAP Server’ or ‘Connect to POP3 Server’, and click ‘Next’ to proceed.
- For a single user login, select the suitable IMAP host name from the list or enter it manually.
- Then, provide your email address and password to continue.
- If you are adding a Gmail account, create an app password and use it instead of your standard account password.
- Click the ‘Login’ button.
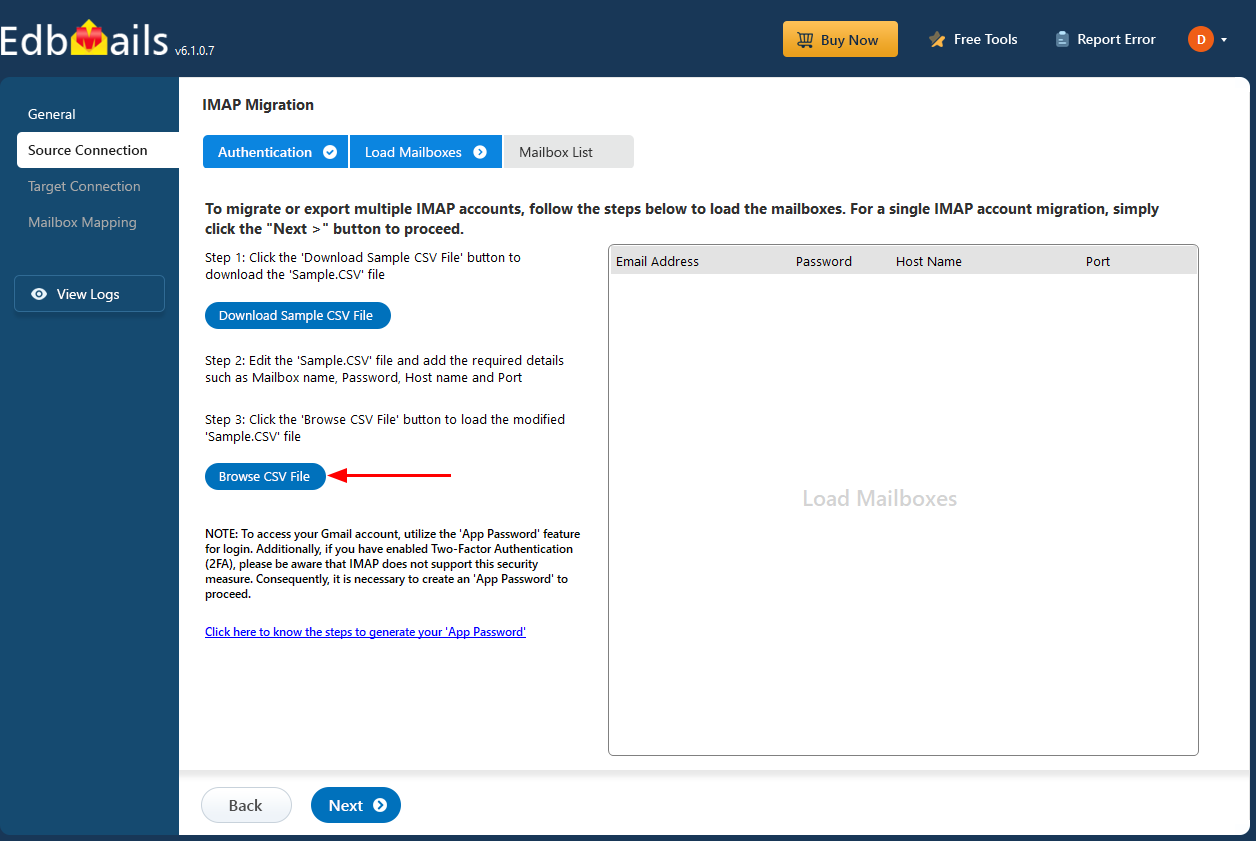
- To migrate multiple mailboxes at once, select ‘Multiple (bulk) Users/Accounts Migration’, choose the suitable connection method such as ‘Connect to IMAP Server’ or ‘Connect to POP3 Server’, and then proceed by clicking ‘Next’.

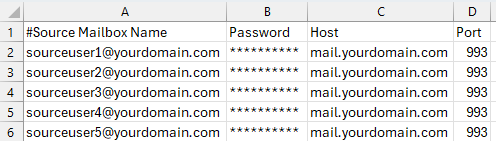
- Click ‘IMAP Migration CSV File’. It downloads a ‘Sample.CSV’ file and saves it to your local drive for reference.

- Open the CSV file and update it by adding the necessary details like email address, password, IMAP server host name, and port number for each mailbox.
- Once done, save the file to continue with the process.
- Close the CSV file, click the 'Load Modified CSV File' button, and select the updated file.
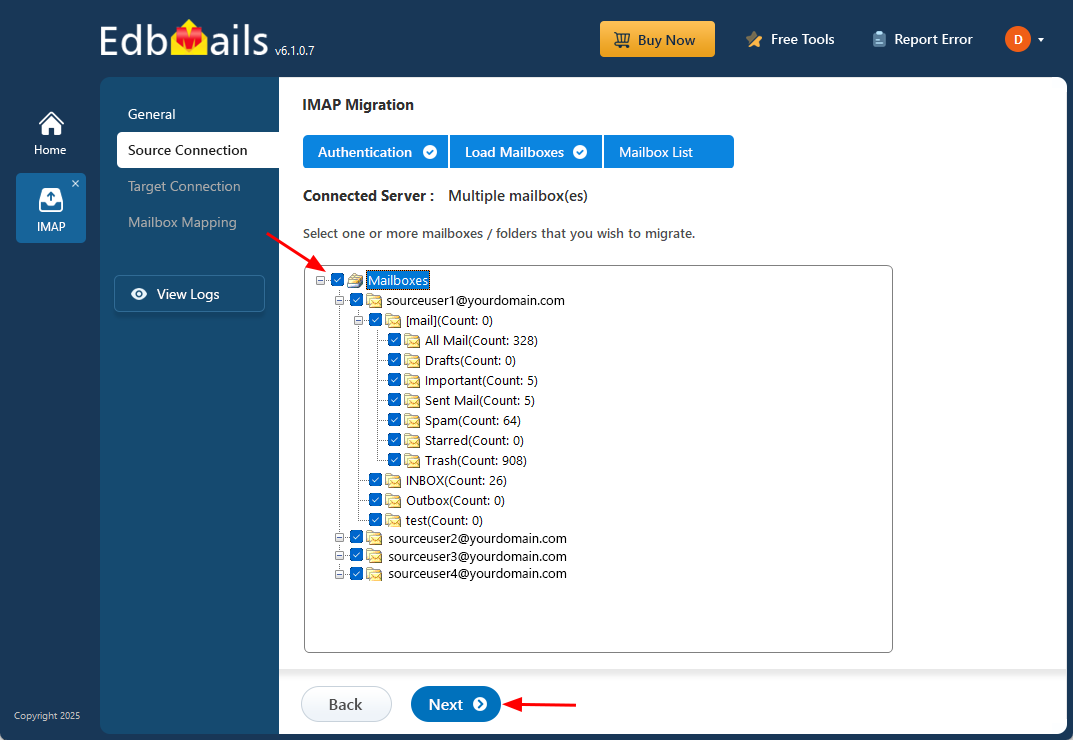
- Verify the mailboxes, and click 'Next'.
- Select the mailboxes or folders to migrate, then click ‘Next’.
- To migrate a single account, select ‘Single User / Account Migration’, choose the suitable connection option such as ‘Connect to IMAP Server’ or ‘Connect to POP3 Server’, and click ‘Next’ to proceed.
Step 3: Connect to Target Office 365
- Click the ‘Add New Connection’ button to create a new connection to your target Office 365 server. To use an existing connection, simply select it from the list and click ‘Connect to Existing’ to continue.
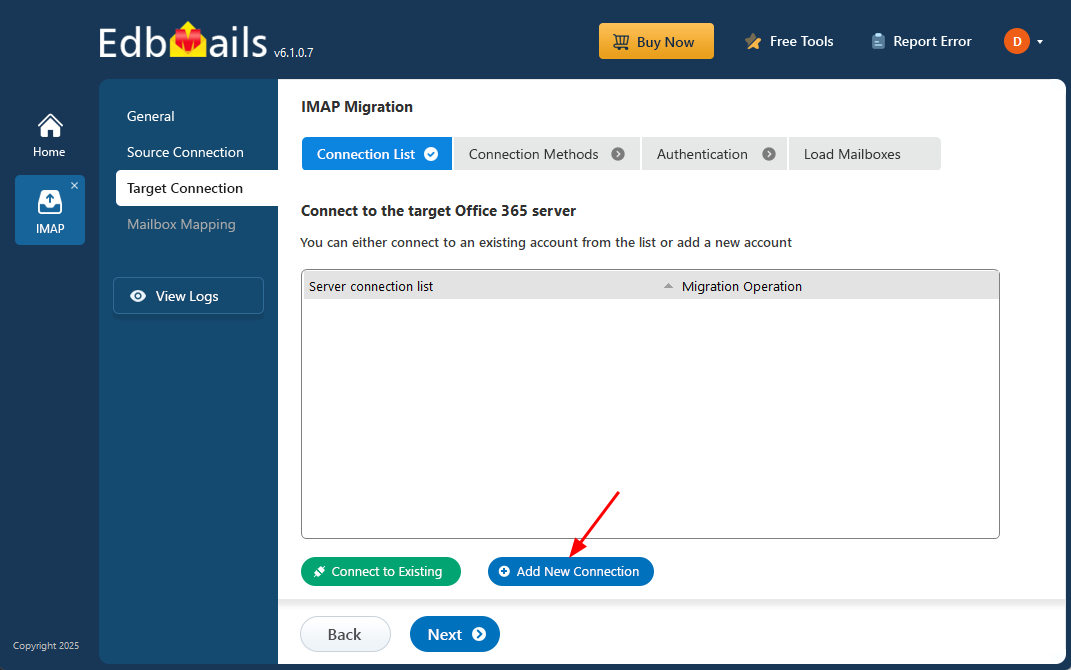
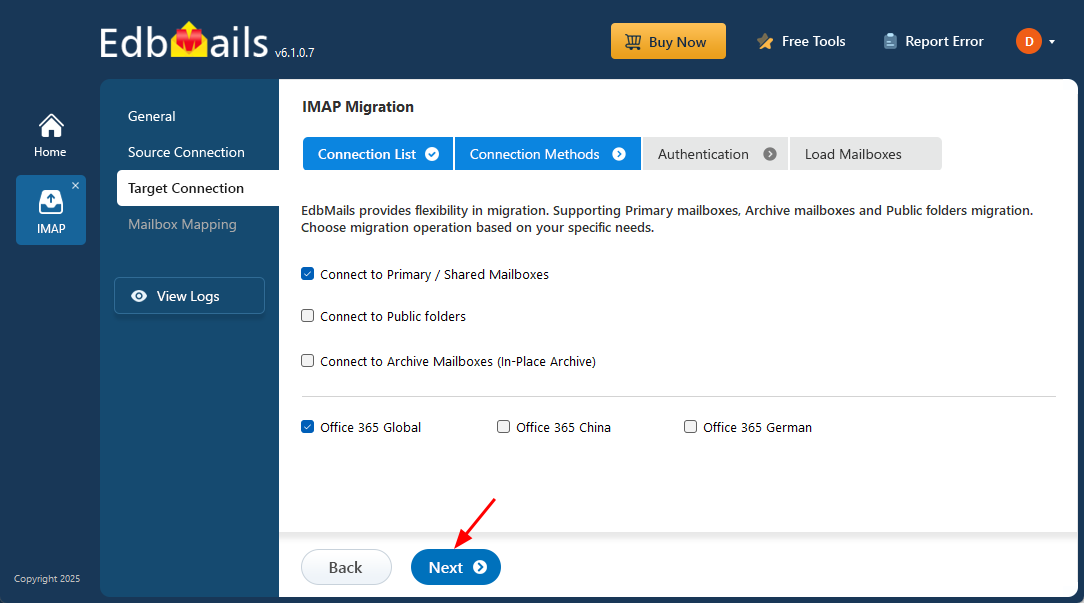
- Select the required migration / connection operation (Primary / Shared, Public folders, Archive mailboxes).
- Click ‘Next’ to proceed with the setup.
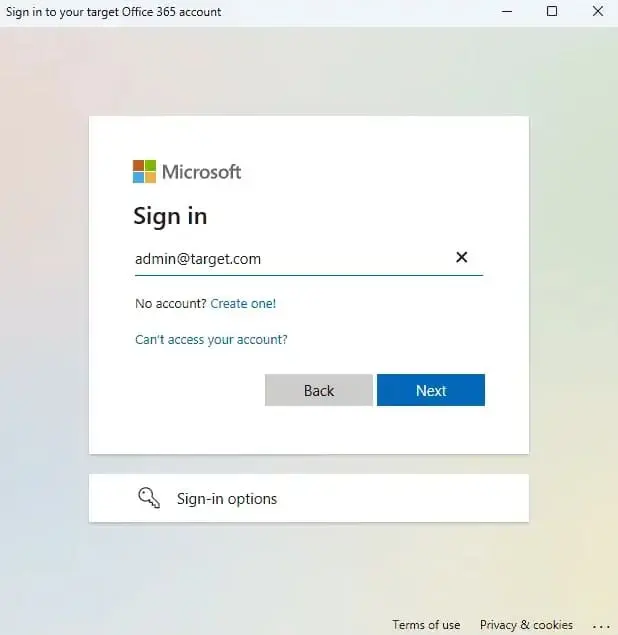
- Select one of the methods for secure OAuth 2.0 based modern authentication.
- Click the ‘Login’ button to continue.

- Authenticate on Microsoft sign-in page.
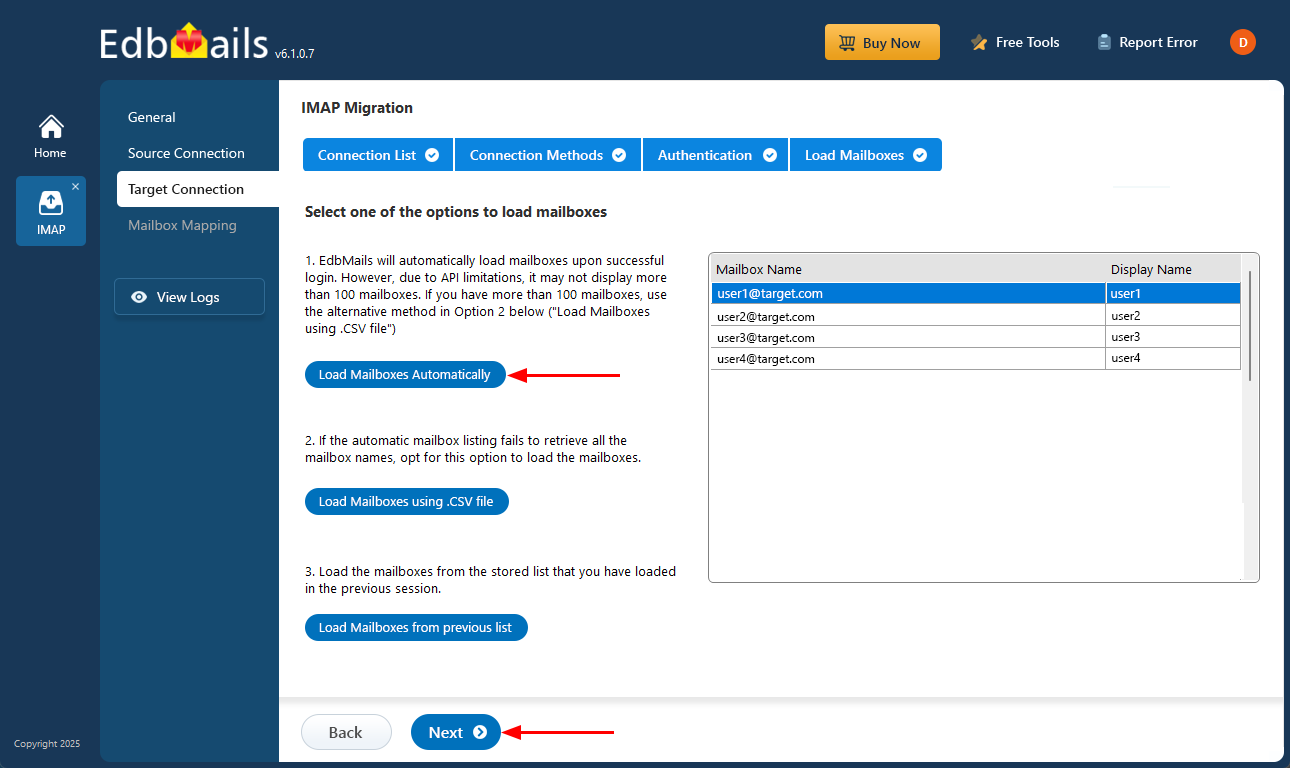
- Select a method to load your mailboxes. EdbMails automatically retrieves mailboxes for Office 365 users, but due to Microsoft API limitations, only the first 100 mailboxes are displayed. If your environment contains more than 100 mailboxes, you can use the CSV file method to load the complete list.
- Click the ‘Next’ button to continue
- Click the ‘Add New Connection’ button to create a new connection to your target Office 365 server. To use an existing connection, simply select it from the list and click ‘Connect to Existing’ to continue.
Step 4: IceWarp to Office 365 mailboxes mapping
- Select the required mapping option
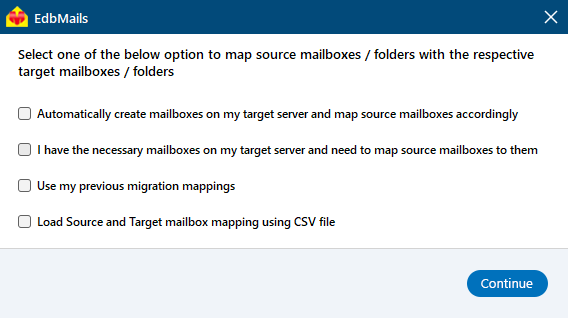
- With EdbMails, you can choose to have the software automatically create mailboxes on the target server, or if the mailboxes are already created, simply select the appropriate option.
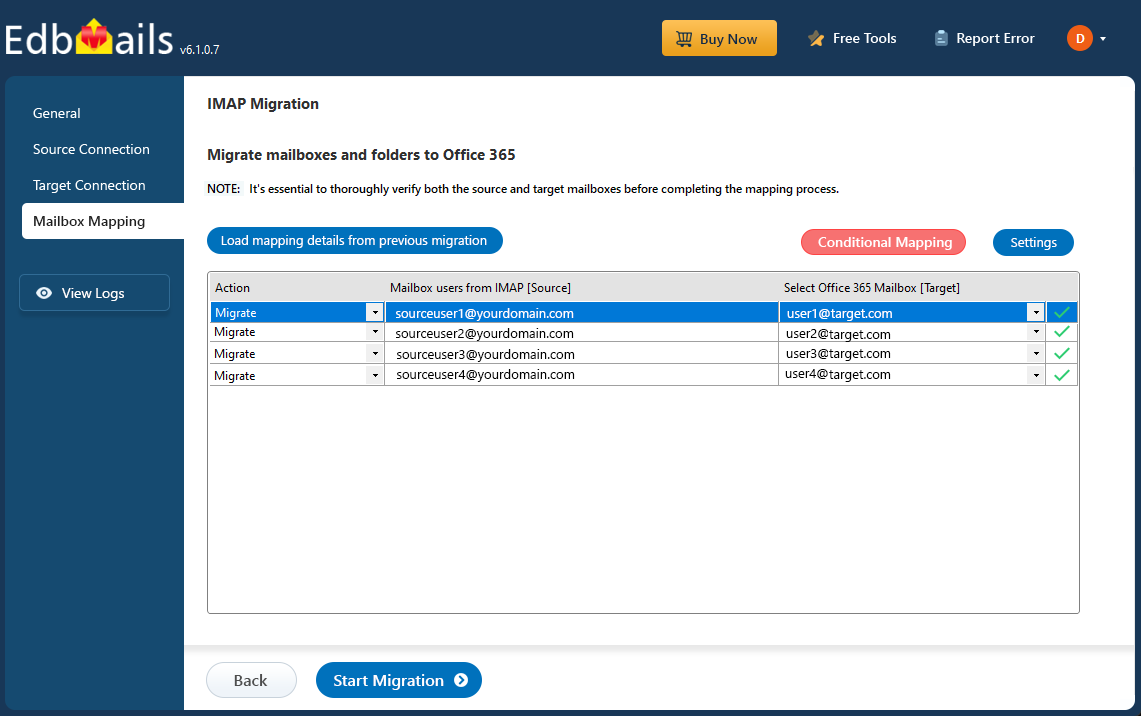
- EdbMails automatically maps mailboxes between the source and target servers, but you also have the option to manually map mailboxes.
- Select the required mapping option
Step 5: Start IceWarp to office 365 migration
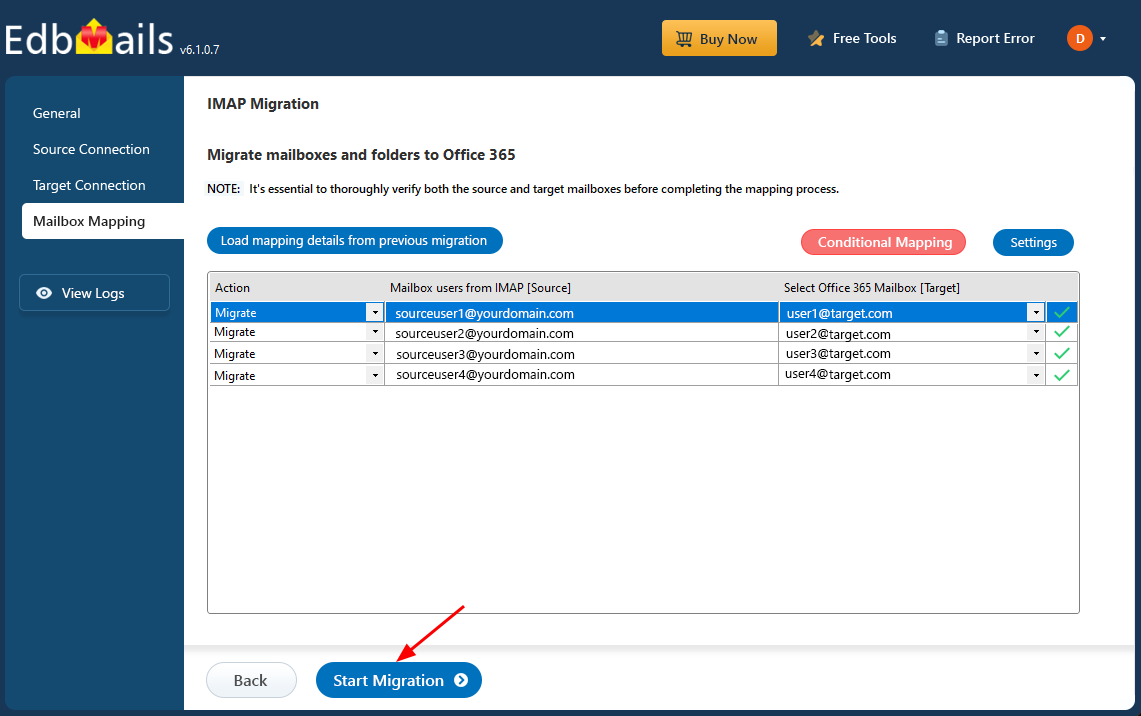
- After mapping the mailboxes, click the ‘Start Migration’ button to initiate the migration process
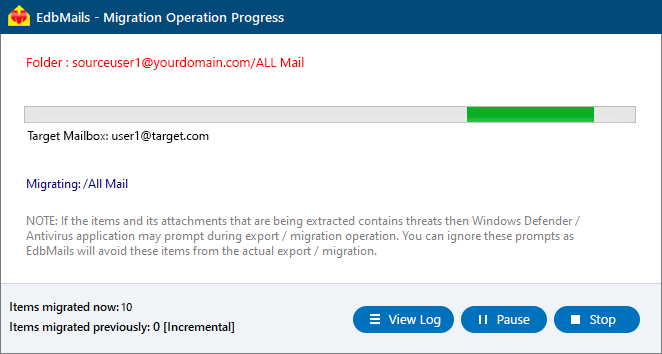
- You can now track the migration progress using the progress bar. When the migration is complete, EdbMails will display a confirmation message
- Click the ‘View Log’ button to open the migration report, which provides a detailed summary of the entire process, including the total number of items migrated from each folder.
- After mapping the mailboxes, click the ‘Start Migration’ button to initiate the migration process
Icewarp to Office 365 post migration tasks
- Step 1: Update the MX records to point to Office 365
Update the MX records to route incoming emails to your target Office 365 server. Also, set up the Autodiscover record to allow Outlook to connect to the migrated mailboxes easily.
- Step 2: Create a new Outlook profile for users in the new domain
Configure the Outlook profile for each user in your domain if Outlook has problems connecting to Office 365 mailboxes.
- Step 1: Update the MX records to point to Office 365
IceWarp to Office 365 migration troubleshooting
For troubleshooting, visit Knowledge Base.
For more queries, check , Frequently Asked Questions or contact support.
EdbMails for IceWarp to Office 365 migration - Advantages
- Incremental and no-duplicate migration
EdbMails supports incremental migration. This feature ensures that only new or modified email items are transferred during each migration session, preventing the re-migration of already transferred data. It helps save time, reduces server load, and ensures that only the latest changes are moved to the target Office 365 account.
- Advanced include and exclude filters
Customize your migration with EdbMails using powerful filters and folder settings. You can select emails based on Date, Sender Address, Subject, or Attachments, and exclude specific folders such as Junk, Drafts, or Conversation History to suit your migration requirements.
- Easy and direct migration operation
Unlike complex manual methods, EdbMails performs a direct one-to-one migration from IceWarp to Office 365. There are no intermediate steps, making the process faster and more reliable.
- Exact folder hierarchy and data formatting
EdbMails ensures that your source mailboxes, folder structure, and data formatting remain intact during migration, with no changes made to either the source or the target. After the migration, all your emails and folders will appear on the target exactly as they were on the source, maintaining their original structure and format.
- Free trial with 24x7 customer support
If you'd like to try the IceWarp migration process yourself, simply download the free trial version of EdbMails. Our 24/7 customer support is also available to guide you through the entire process and assist you step by step, ensuring a smooth experience.
Learn more about EdbMails IMAP migration features