Multiple ways to migrate mailbox to Office 365
Migrating your email infrastructure to Office 365 can unlock benefits like enhanced accessibility, improved scalability, and potential cost savings. However, the migration process can be complex due to the variety of methods available and the unique needs of each organization. Understanding the different migration approaches empowers you to choose the most suitable one for a smooth migration.
Common migration methods for Office 365
Cutover migration
This method involves a clean switch from your existing email system to Office 365 on a specific date
Staged migration
This approach involves migrating mailboxes to Office 365 in phases, allowing for a more controlled migration.
IMAP migration
If you're migrating from an email system that supports IMAP (like Gmail, Zoho, Zimbra etc.), this method allows for the direct migration of emails. However, it doesn't migrate calendars, contacts, or other mailbox data.
PST File Import
This approach involves importing outlook PST files into Office 365.
EdbMails as Your Migration Partner
While the methods above provide a framework, choosing the right tool can significantly impact the migration's success. EdbMails stands out as a comprehensive solution that caters to various migration scenarios. Here's why EdbMails simplifies your Office 365 migration:
Supports Diverse Source Environments
Whether you're migrating from Exchange, Hosted Exchange, or using IMAP, EdbMails offers compatibility.
User-Friendly Software Interface
The intuitive design streamlines the migration process, even for users with less technical expertise.
Robust Features
Features like incremental migration, automatic mailbox mapping, and filtering ensure a smooth and efficient migration.
By understanding the different migration methods, you can ensure a successful migration to Office 365.
Migrate mailbox to Office 365 from Exchange online
Office 365 to Office 365 migration involves moving mailboxes, Emails, Calendars, Contact, Tasks, Public folder, Shared Mailboxes, folder permissions, SharePoint sites, OneDrive for Business content, and other data from one tenant to another. This type of migration is necessary when a company merges with another organization or acquires a new business unit. It can also be required when an organization decides to restructure its Office 365 environment.
Steps to migrate Office 365 mailbox to another tenant
Step 1: Download EdbMails Office 365 migration tool
- Download and install EdbMails software on your computer
- Follow the installation prompts to complete setup.
- Launch the application and click Login or Start Your Free Trial.
Step 2: Choose Office 365 Migration option
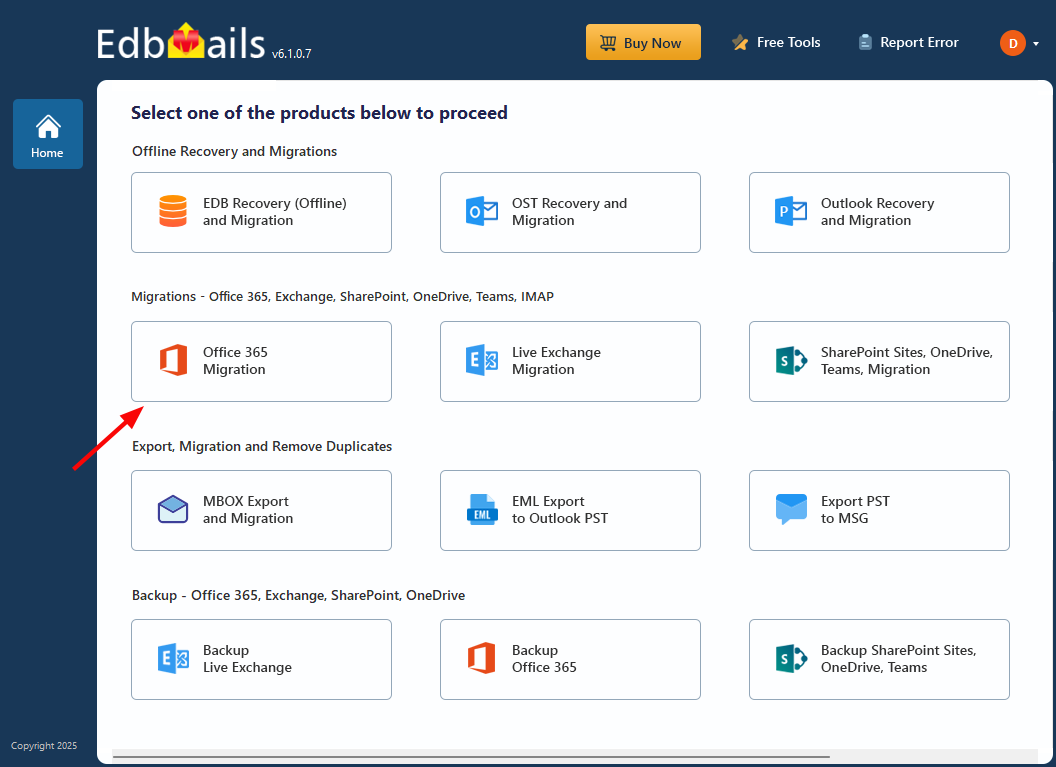
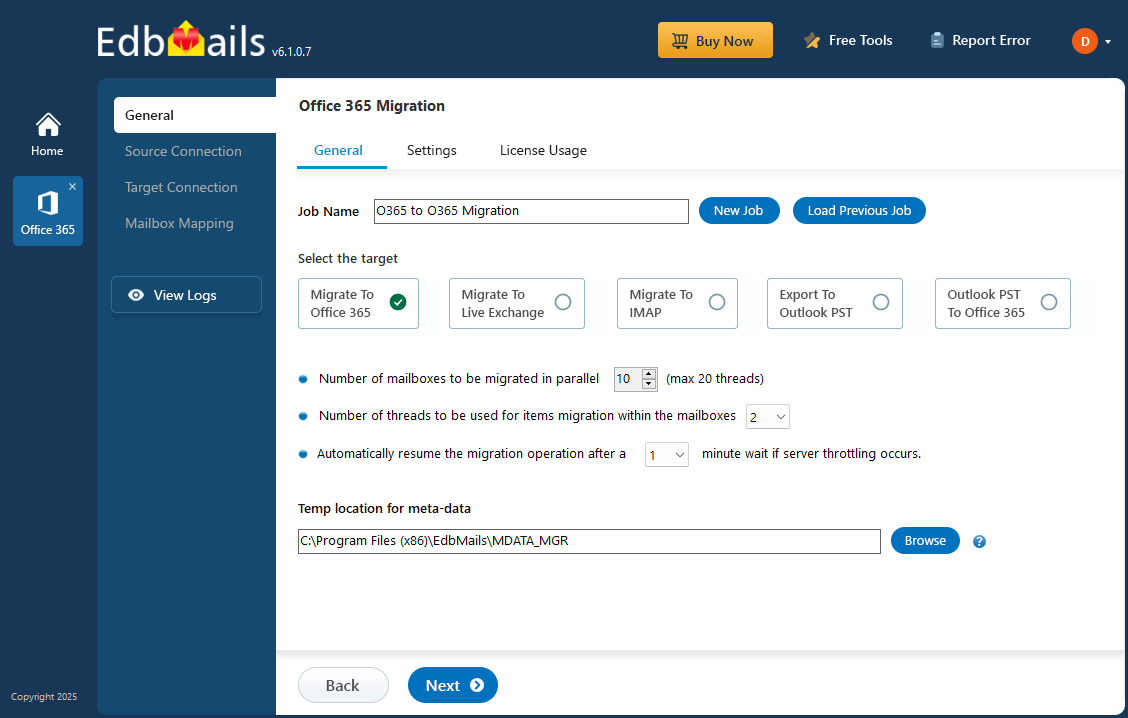
- Select Office 365 Migration from the main screen.
- Choose Office 365 to Office 365 Migration.
- Use the default job name or create a new one if needed.
Step 3: Connect to the source Office 365 tenant
- Click ‘Add New Connection’ to configure a new source connection. To use an existing connection, select it from the list and click ‘Connect to Existing’.
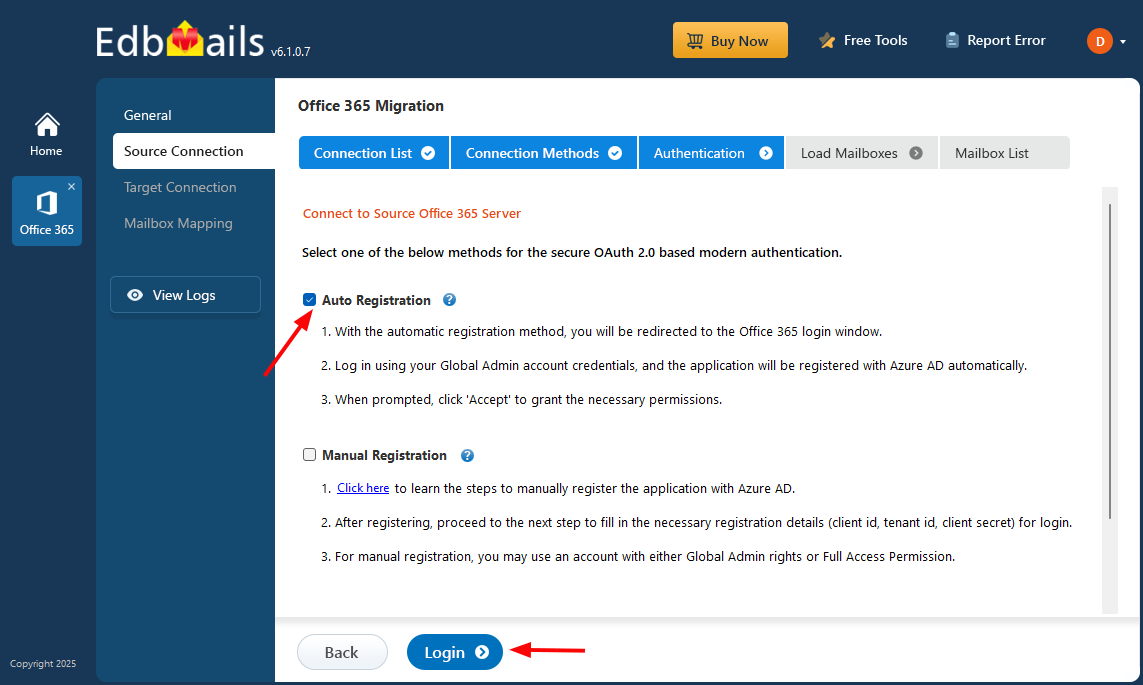
- Select a secure OAuth 2.0 authentication method and click ‘Login’.
- Sign in on the Microsoft login page.
- Choose one of the methods to load mailboxes.
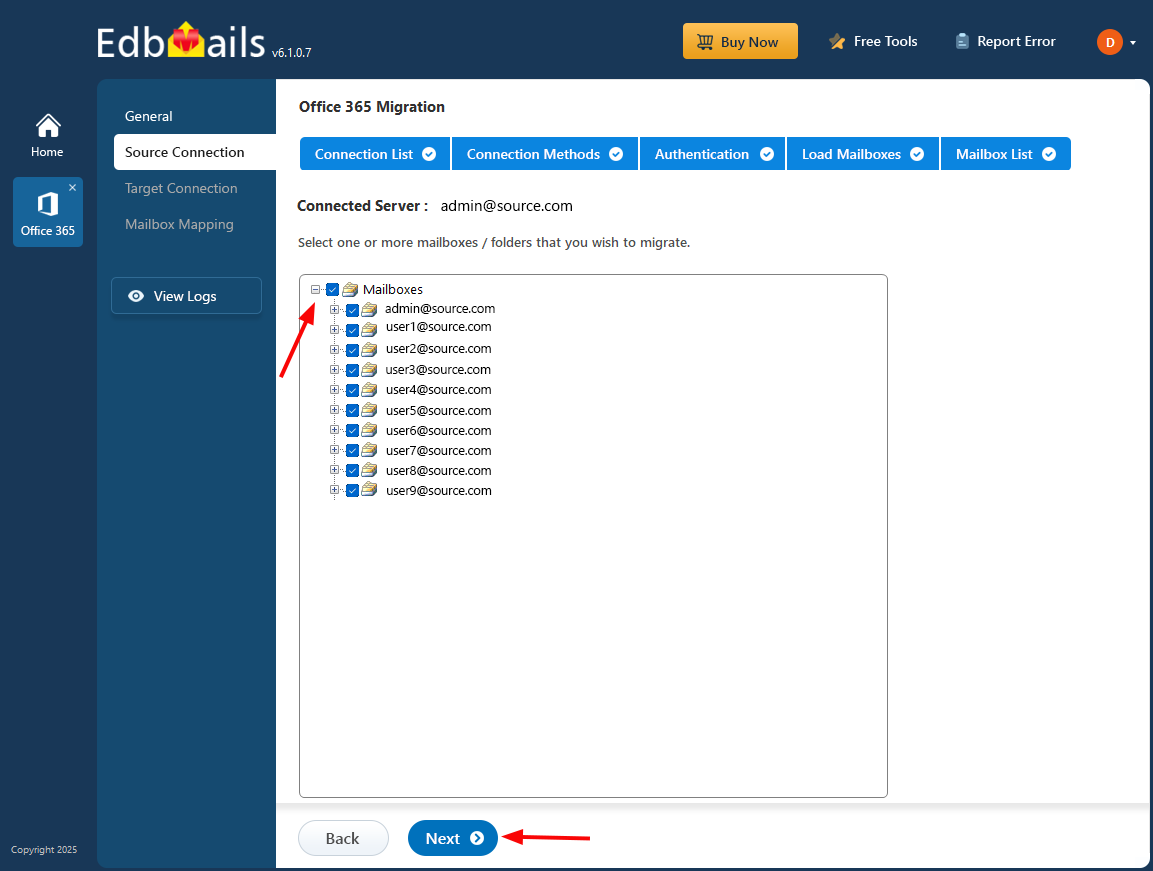
- Select mailboxes to migrate and click ‘Next’.
Step 4: Connect to target Office 365
- Click ‘Add New Connection’ for the target tenant. To use a previous connection, select it from the list and click ‘Connect to Existing’.
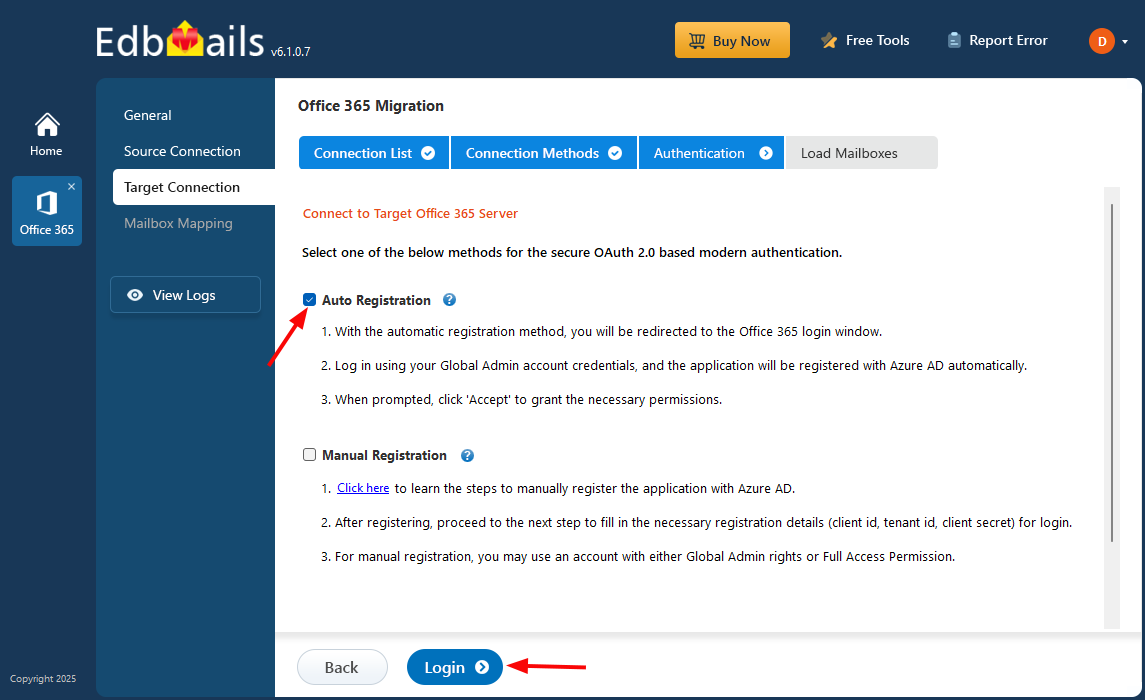
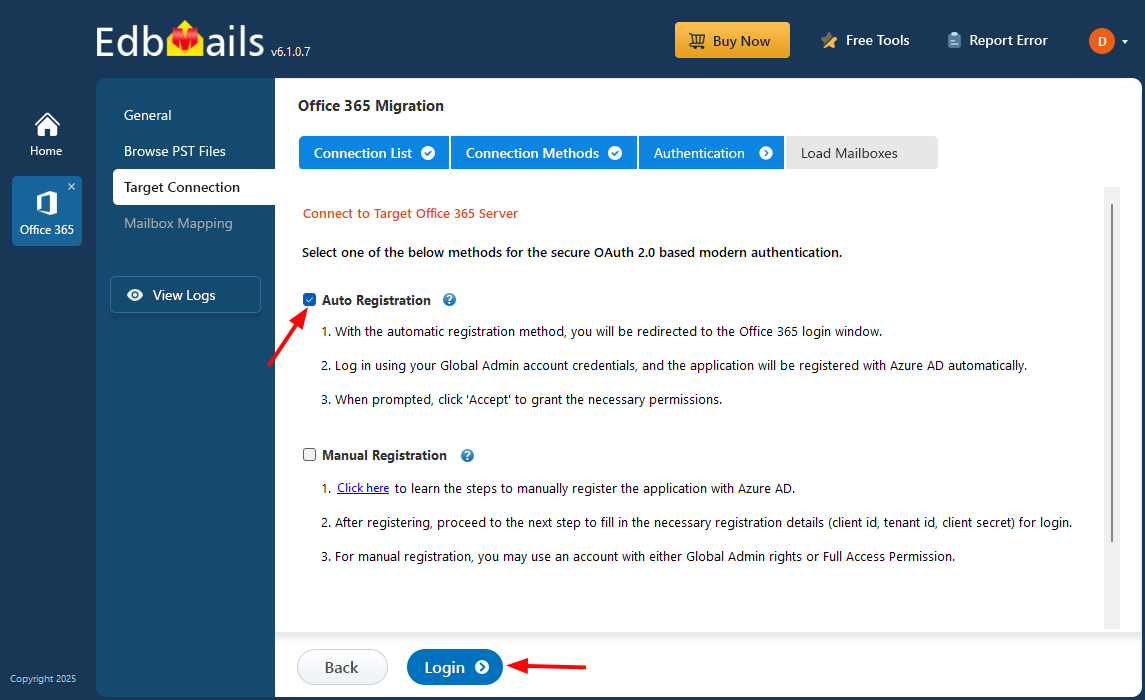
- Choose the connection method and click ‘Login’.
- Authenticate via Microsoft sign-in.
- Load mailboxes using your preferred method.
Step 5: Map source and target mailboxes
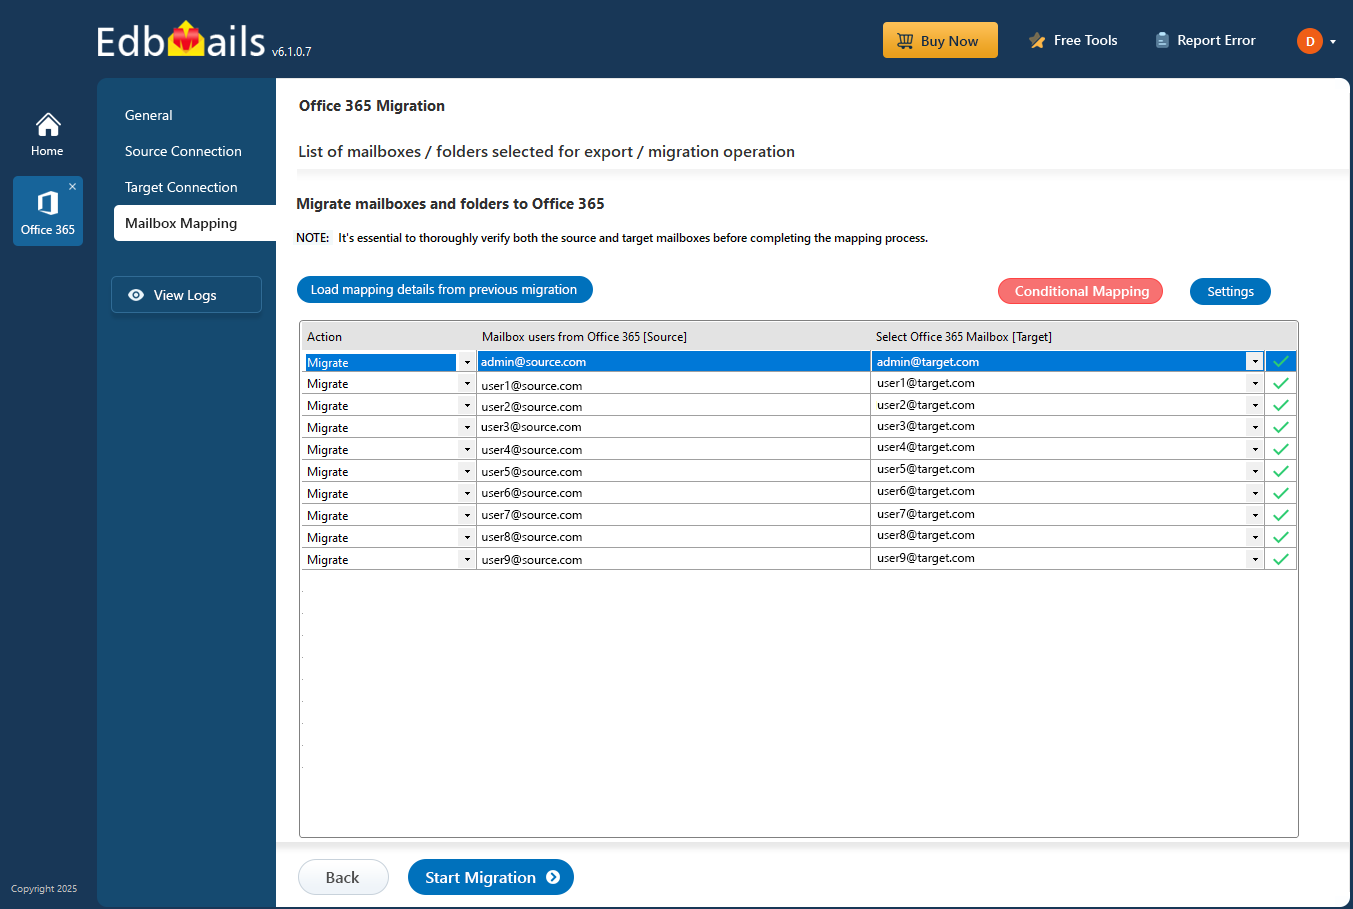
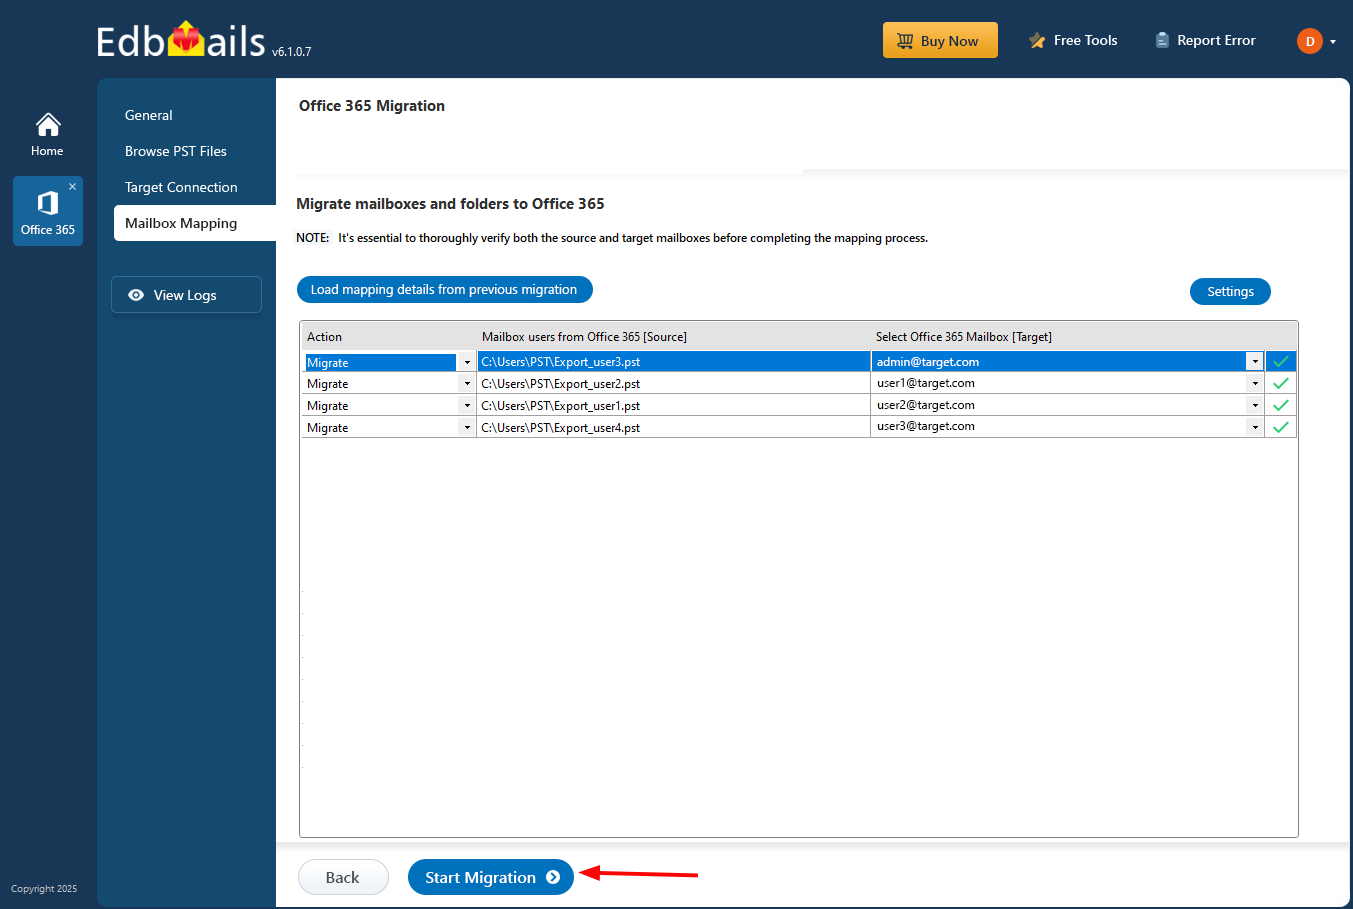
- EdbMails automatically maps mailboxes and folders between source and target.
- You can also manually map specific folders if required.
Step 6: Start the Microsoft 365 to Microsoft 365 tenant migration
- Click 'Start Migration' to begin the process.
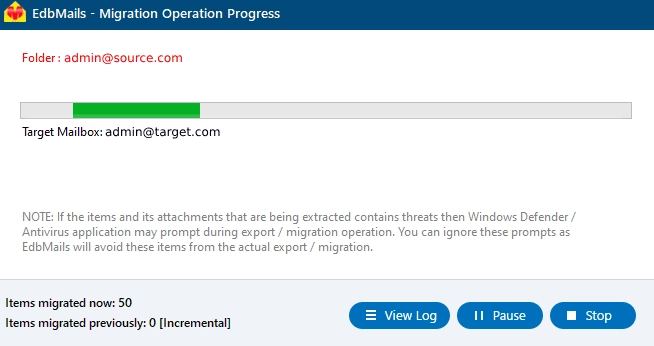
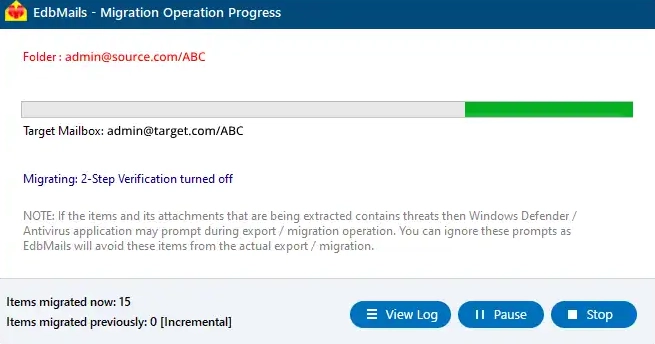
- Monitor progress, pause/resume if needed, and view detailed logs after completion.
Migrate to Office 365 from Exchange server
If you are currently using Exchange server as your email platform, you may want to migrate mailboxes to Office 365 to take advantage of the cloud-based service, EdbMails can help you with Exchange to Office 365 migration while preserving all of your data, including email messages, contacts, calendars, and tasks.
Steps to migrate mailbox to Office 365 from On-Premises Exchange server
Step 1: Install and Launch EdbMails
- Download and install EdbMails Exchange to Office 365 migration tool.
- Launch the application and click ‘Login’ or ‘Start Your Free Trial.’
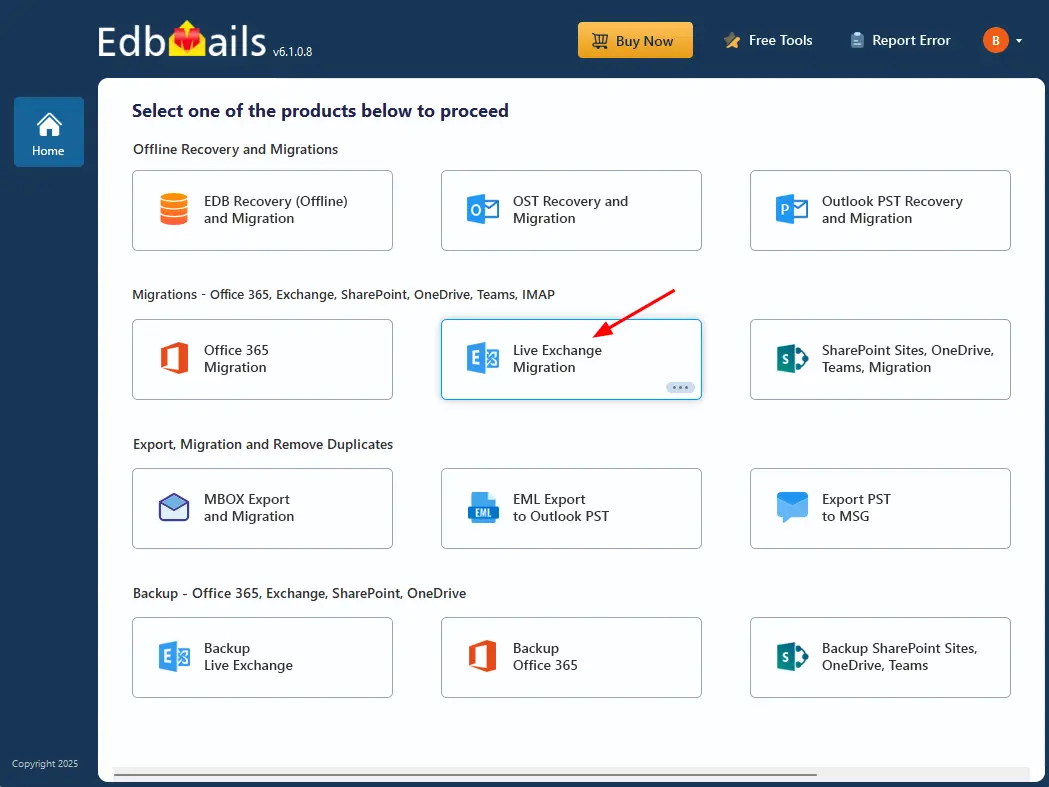
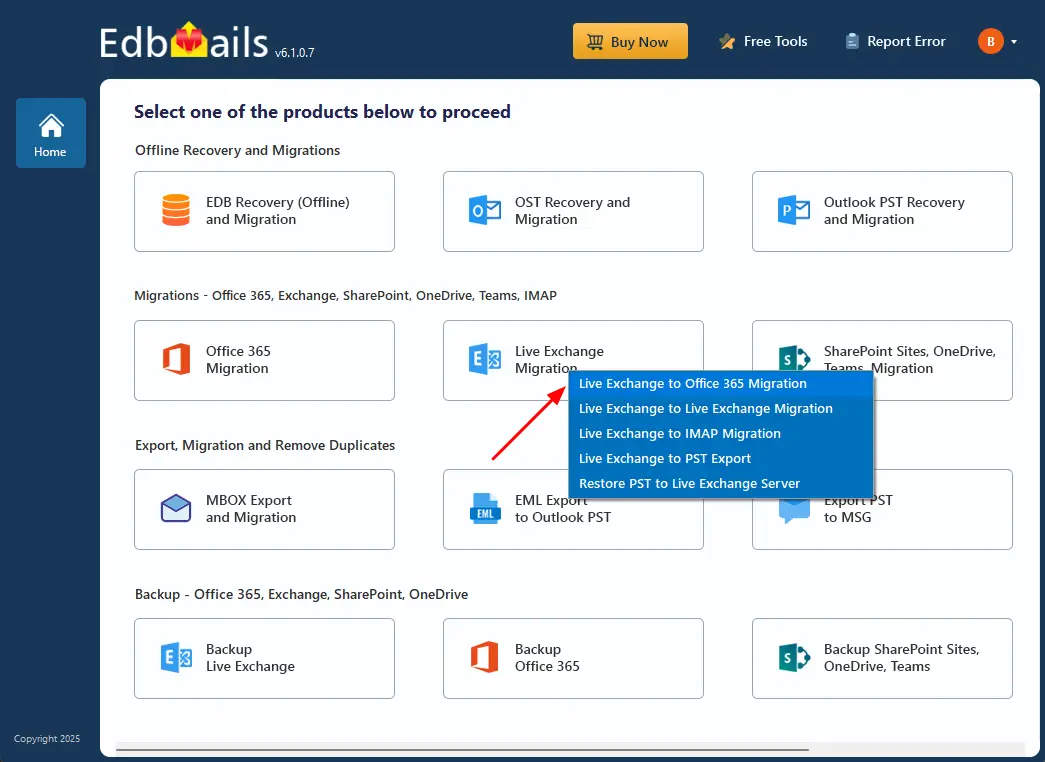
- Select ‘Live Exchange Migration’ > ‘Live Exchange to Office 365 Migration.’
- Keep the default job name or click ‘New Job’ to set a custom name.
Step 2: Connect to the source Exchange server
- Click ‘Add New Connection’ to set up a new source Exchange connection. To reuse an existing one, select it from the list and click ‘Connect to Existing’.
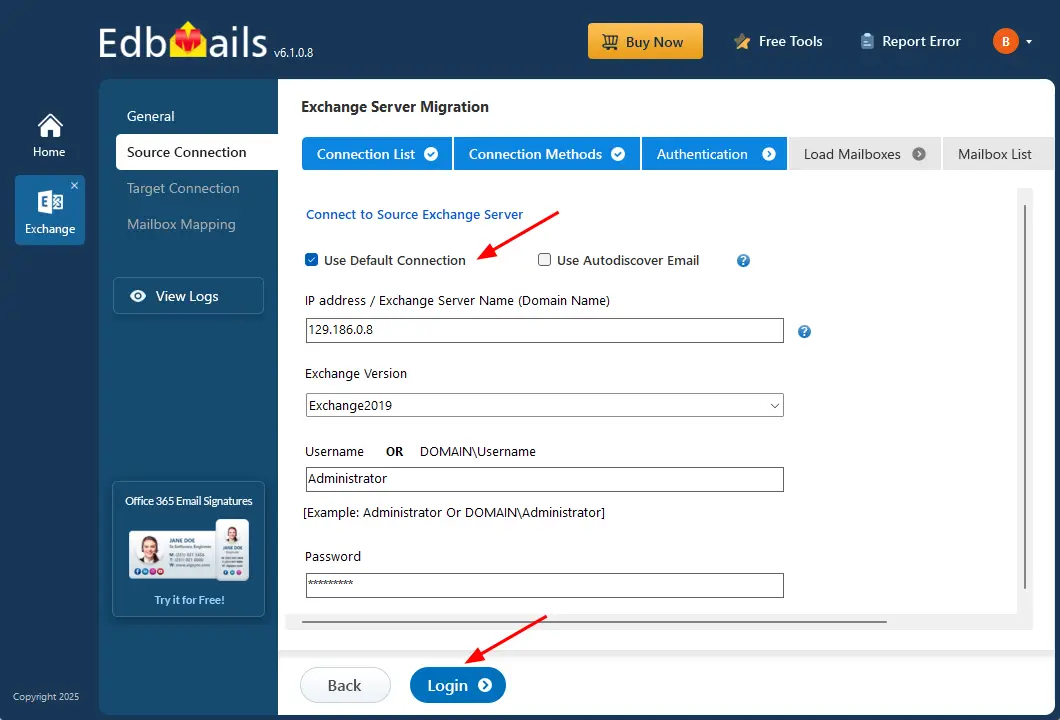
- Enter the connection details and log in to the Exchange server.
- Choose the option to load mailboxes (automatic or CSV).
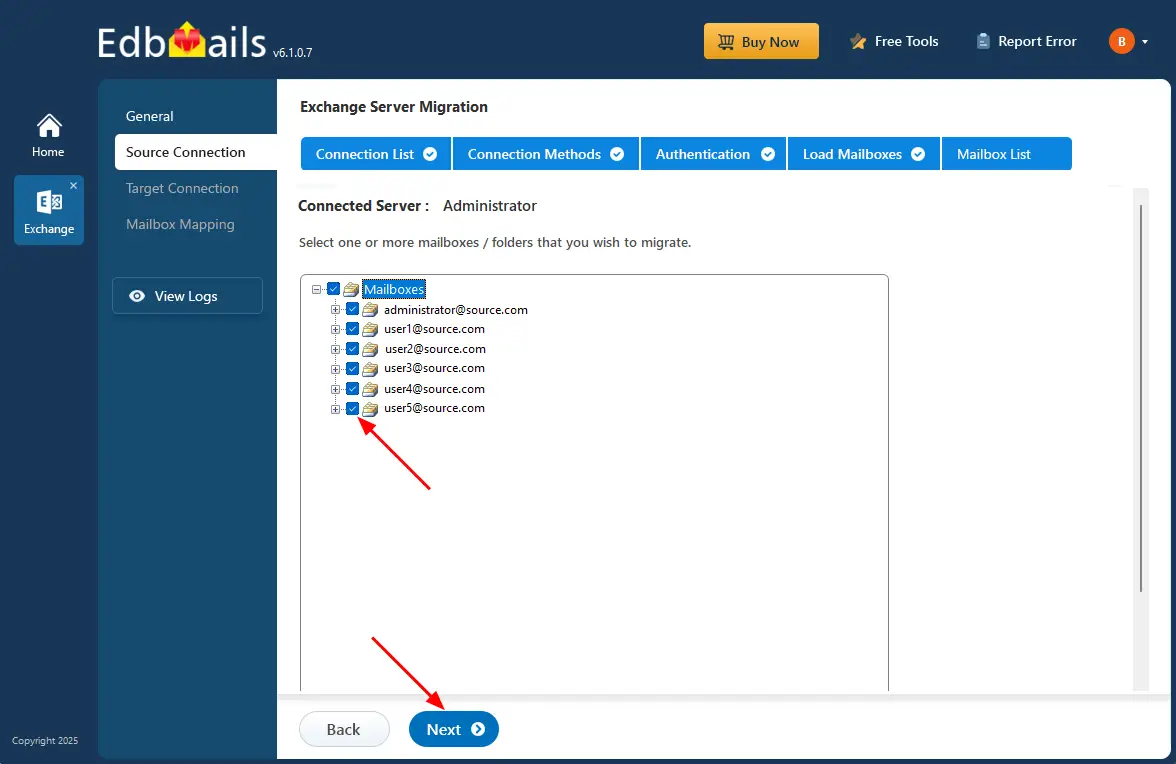
- Select the mailboxes to migrate and click ‘Next’.
Step 3: Connect to target Office 365
- Click ‘Add New Connection’ to create a target Office 365 connection. To use a previous connection, select it and click ‘Connect to Existing’.
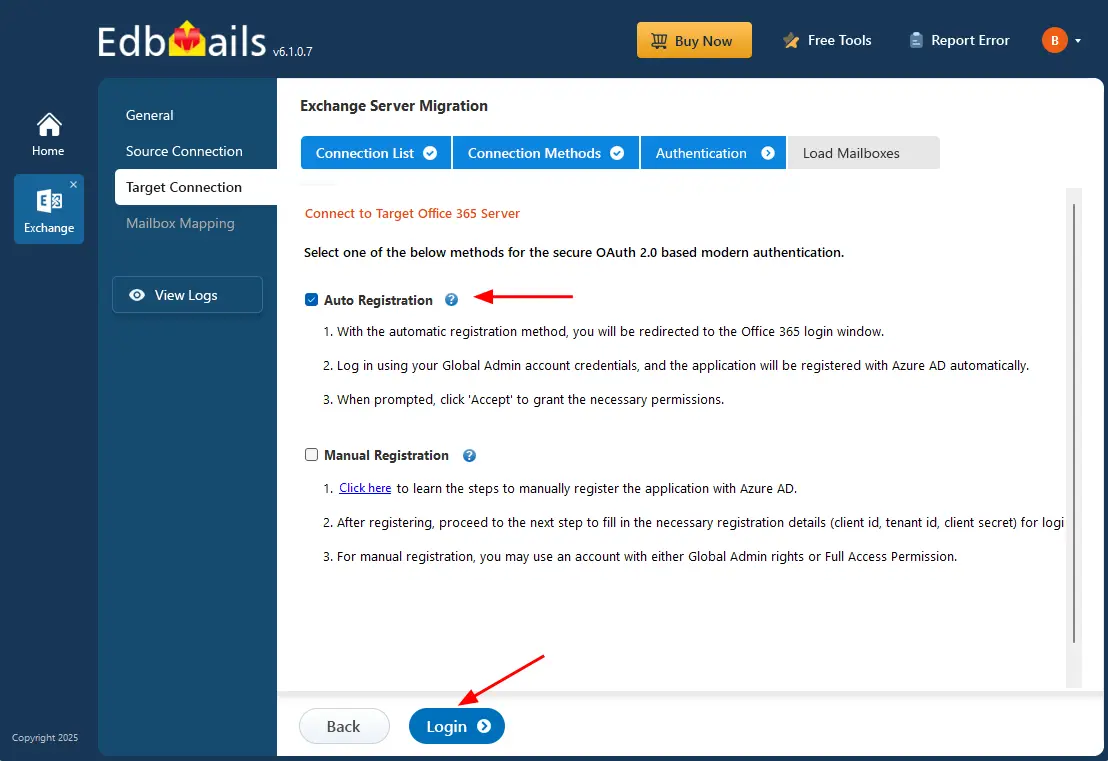
- Choose the authentication method and click ‘Login’.
- Sign in on the Microsoft login page.
- Load mailboxes automatically or with a CSV file and click ‘Next.’
Step 4: Map Exchange to Microsoft 365 mailboxes
- EdbMails automatically creates target mailboxes and assigns licenses.
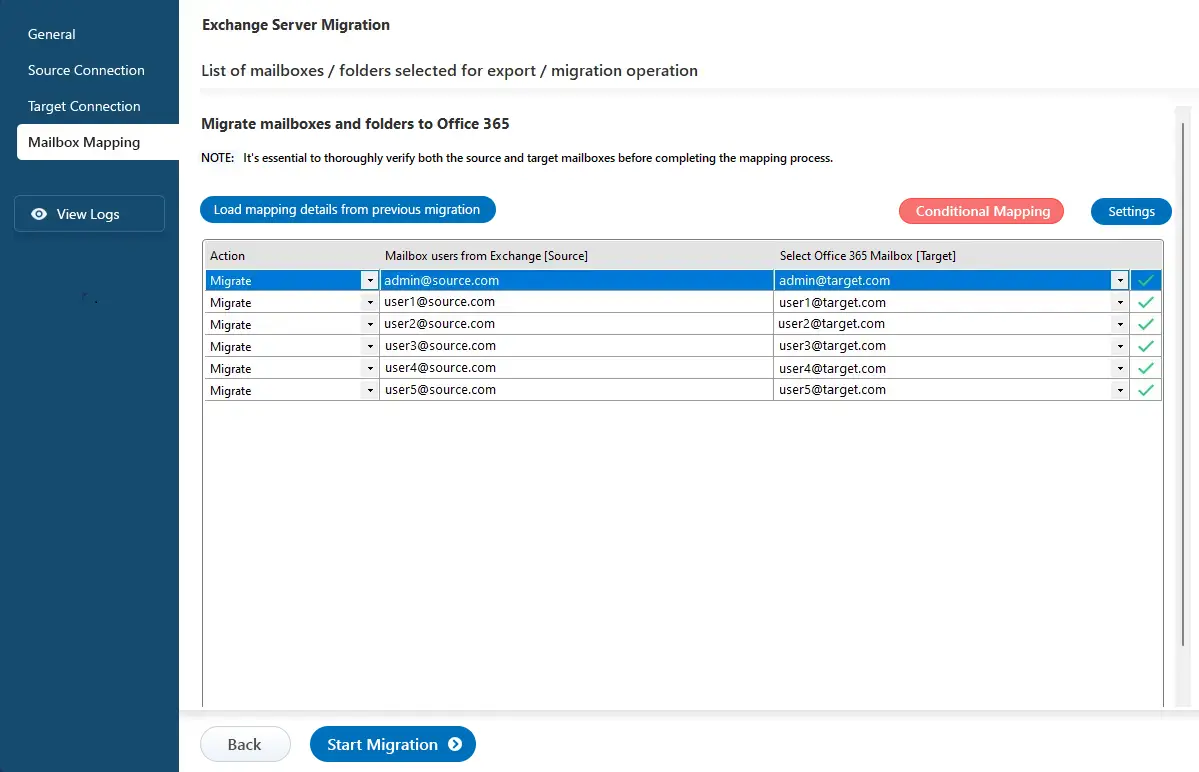
- Mailboxes and folders are mapped automatically, or you can choose manual mapping as needed.
Step 5: Start the Exchange to Office 365 migration
- Click ‘Start Migration’ to begin.
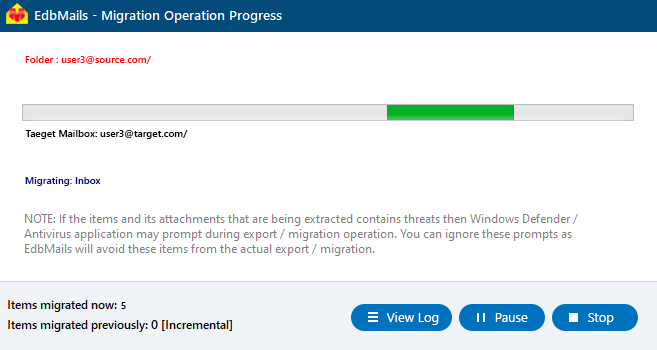
- Track progress in real time and view detailed migration report after completion.
- Log in to the target Office 365 server to verify the migrated data.
Migrate mailbox to Office 365 from Hosted Exchange Server
If you are currently using a Hosted Exchange service, you may want to migrate to Office 365 to take advantage of its features and benefits. Hosted Exchange to Office 365 migration involves moving your hosted Exchange mailboxes to Office 365 while preserving all of your data, including email messages, contacts, calendars, and tasks.
Steps to move Hosted Exchange to Office 365
Step 1: Install and Launch EdbMails
- Download and install the EdbMails migration tool on your system.
- Launch the software and click ‘Login’ or 'Start Your Free Trial’‘ to access the dashboard.
- From the main screen, select ‘Live Exchange Migration’.
- Choose ‘Hosted Exchange to Office 365 Migration’ option.
- Use the default job name or click ‘New Job’ to rename it if needed.
Step 2: Connect to the source Hosted Exchange server
- Click ‘Add New Connection’ to create a new connection to the source Hosted Exchange server. To reuse a previously saved connection, select it from the list and click ‘Connect to Existing’.
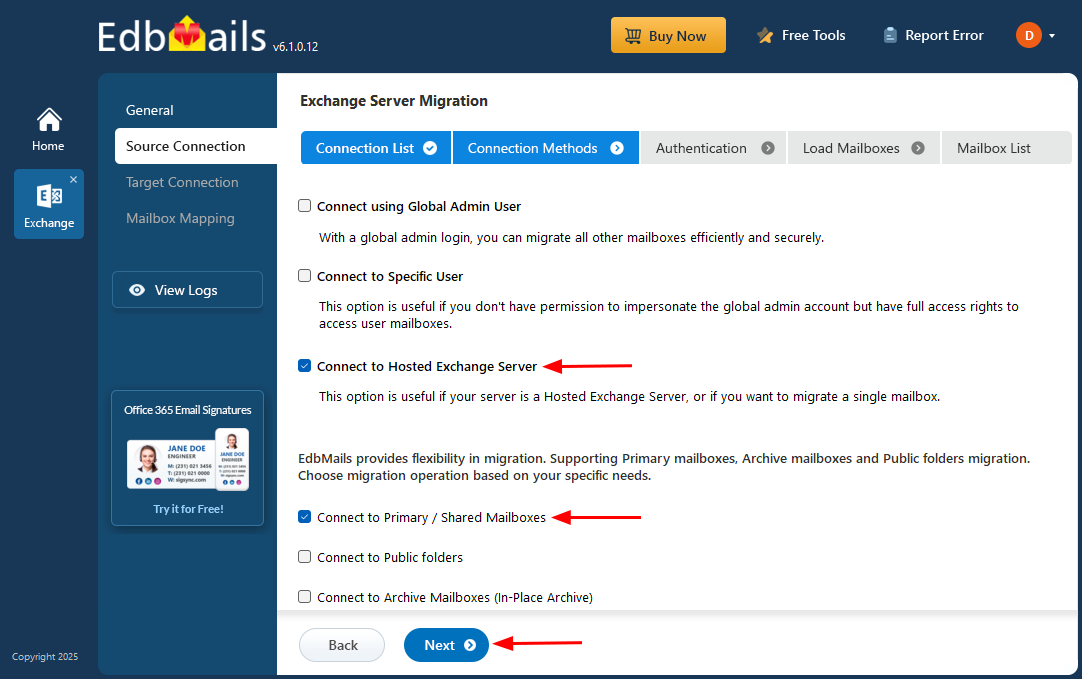
- Select ‘Connect to Hosted Exchange server’ and click ‘Next.’
- Choose the required connection option based on your setup:
- Autodiscover Email – connect using an email address and password with Autodiscover enabled.
- Default Connection – connect using domain name or IP address of the Exchange server.
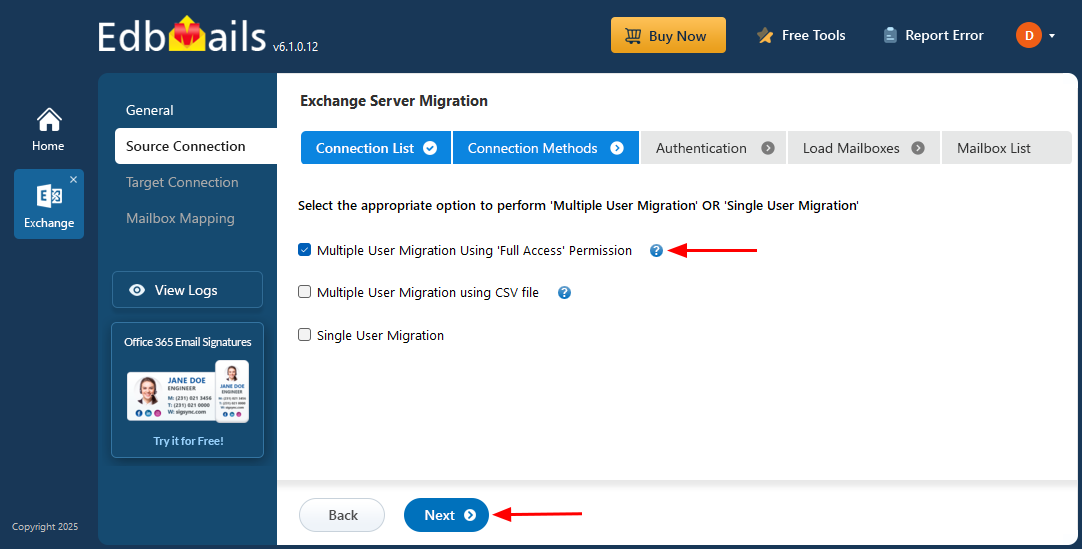
- For migrating multiple mailboxes, select Full Access permission-based option and click ‘Next’.
- Enter the login credentials for the source Hosted Exchange server and click 'Login'.
- Choose your preferred method to load mailboxes:
- Load mailboxes automatically
- Load mailboxes using a CSV file
- Select the mailboxes you wish to migrate and click 'Next'.
Step 3: Connect to target Office 365
- Click ‘Add New Connection’ to configure a connection to your target Office 365 tenant.
- If you have an existing connection, select it from the list and click ‘Connect to Existing’.
- Choose a secure OAuth-based authentication method and click ‘Login’.
- Authenticate through Microsoft’s sign-in page.
- Select your preferred method to load the target mailboxes (automatic or CSV-based) and click ‘Next’.
Step 4: Map Hosted Exchange to Office 365 mailboxes
- EdbMails automatically maps mailboxes and folders between the source and target servers.
- You can also manually map specific mailboxes and folders if required.
Step 5: Start Hosted Exchange to Office 365 migration
- Click ‘Start Migration’ to begin the mailbox transfer from Hosted Exchange to Office 365.
- Monitor real-time progress of the migration.
- After the operation completes, click View Logs to review the detailed migration report.
- Log in to your Office 365 account and verify the migrated mailboxes and folders.
Migrate to Office 365 from IMAP server
If you are using an email platform that supports IMAP, you can easily migrate your email messages to Office 365. Office 365 migration with IMAP involves using IMAP protocol to migrate your email messages from your existing email platform to Office 365. For instance, with EdbMails, you can perform Gmail to Office 365 migration, migration from IceWarp, Zoho, Zimbra and cPanel and a host of other IMAP servers to Office 365.
EdbMails simplifies the IMAP to Office 365 migration by providing a user-friendly interface and powerful migration features.
Steps to migrate mailbox to Office 365 from IMAP enabled servers
Step 1: Download and Install EdbMails IMAP Migration Software
- Download the EdbMails IMAP to Office 365 migration tool on a Windows computer.
- Refer to the system requirements for optimal migration performance.
- Launch the application and log in using your email and password, or select ‘Start Your Free Trial’ to use the trial version.
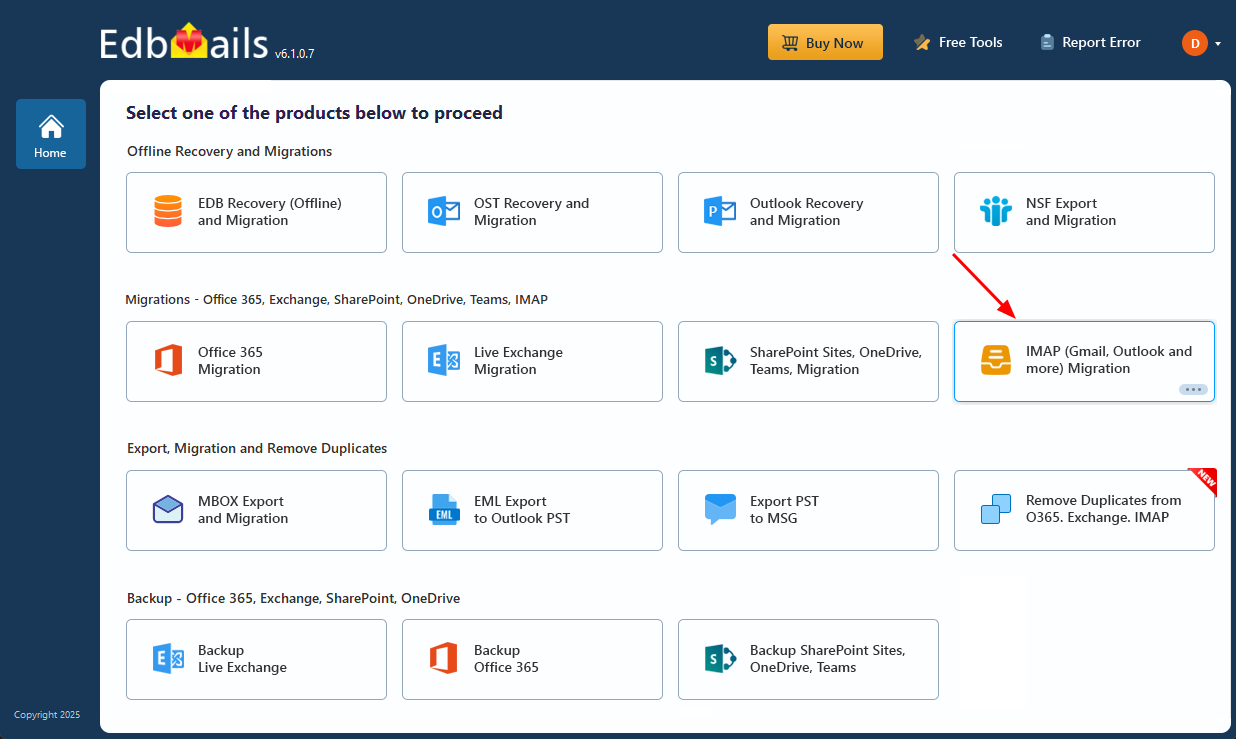
- Select IMAP (Gmail, Outlook & more) Migration.
- Choose ‘IMAP to Office 365 Migration’ from the list.
- Use the default job name or click ‘New Job’ to rename it as needed.
Step 2: Connect to the source IMAP server
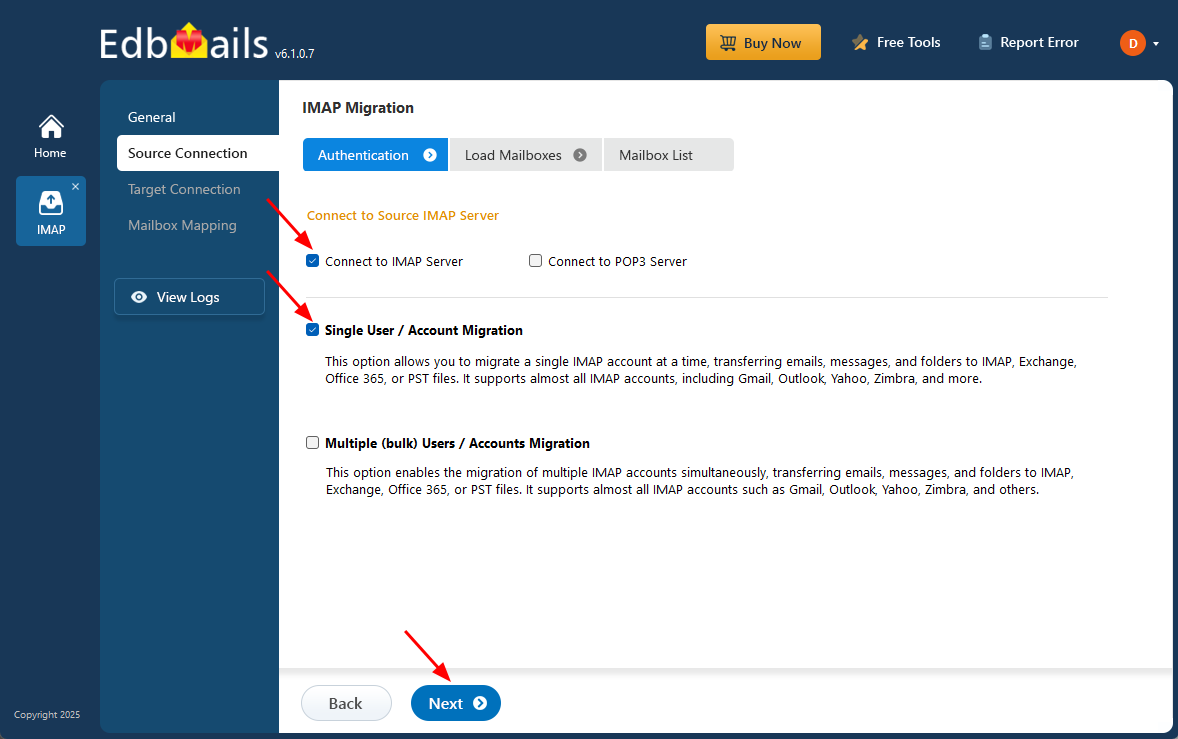
For migrating a single mailbox, select ‘Single User / Account Migration.’
- Choose ‘Connect to IMAP Server’ or ‘Connect to POP3 Server’ based on your source.
- Enter the server details, email address, and password. If connecting to Gmail, create an App Password and use it for authentication.
- Click Login to proceed.
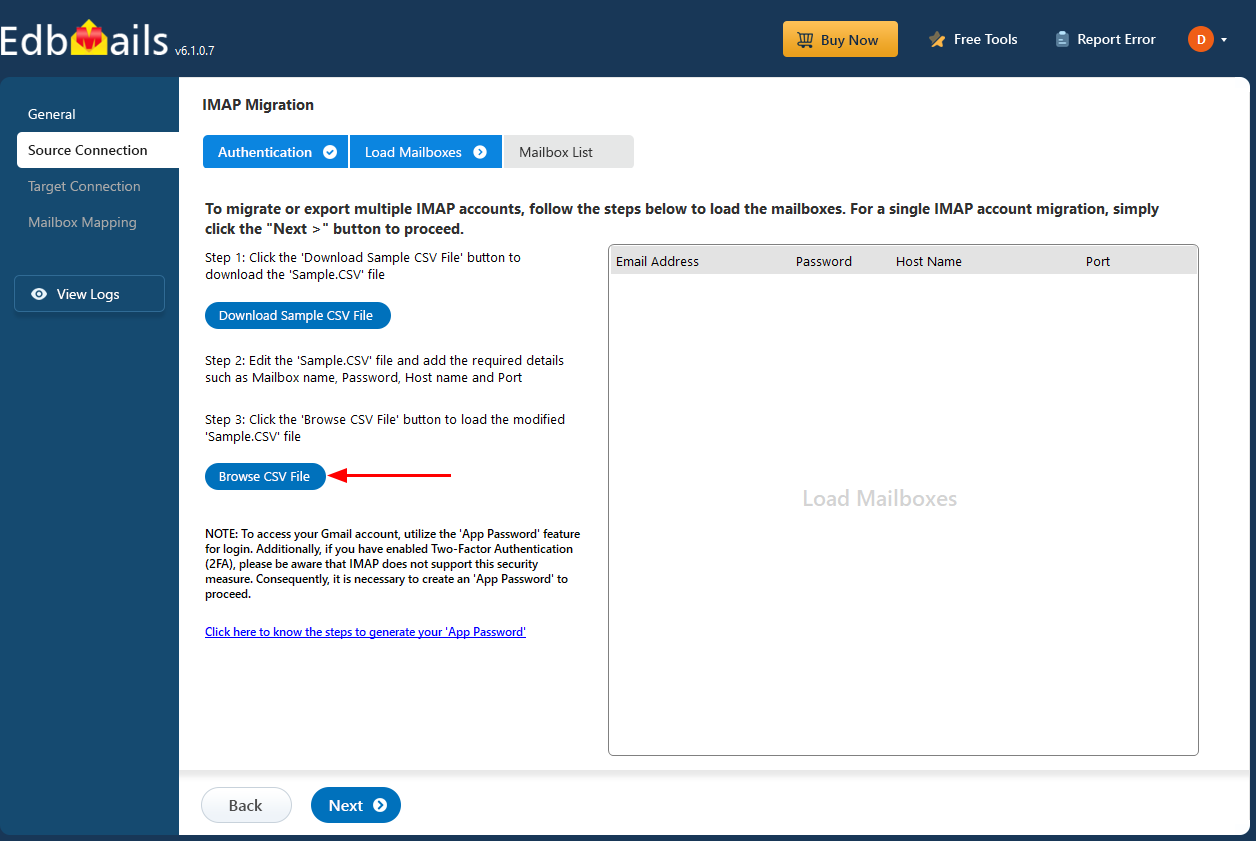
For bulk migration, select ‘Multiple (Bulk) Users/Accounts Migration.’
- Click ‘Download Sample CSV File.’
- Fill in the required details: email, password, host name, and port number.
- Save and close the file.
- Click ‘Browse CSV File’, select your modified CSV, verify mailboxes, and click ‘Next’.
Refer to EdbMails documentation for details on connecting single and multiple IMAP accounts.
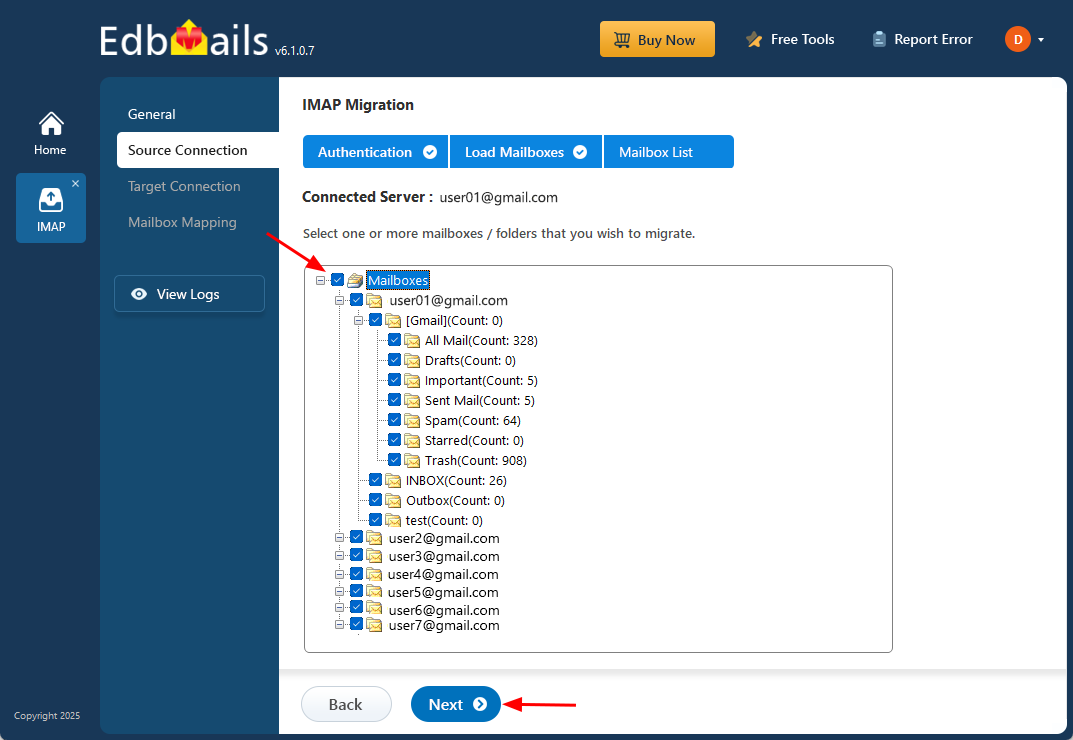
Step 3: Select source IMAP server mailboxes
- Select the mailboxes or folders you wish to migrate and click Next.
Step 4: Connect to the target Office 365 server
- Click ‘Add New Connection’ to configure a new connection to target Office 365. To reuse a saved connection, select it from the list and click Connect to Existing.
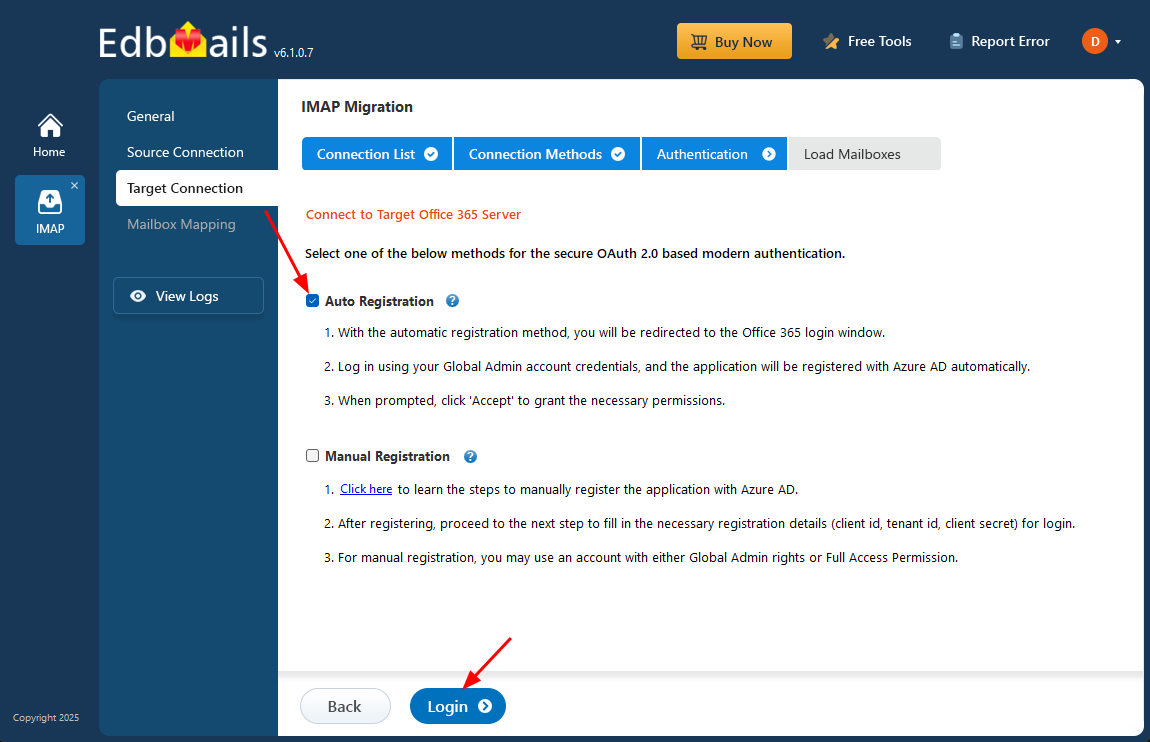
- Select the desired connection options and click ‘Next.’
- Use secure OAuth 2.0 authentication and click ‘Login.’
- Authenticate the sign-in on Microsoft’s login page.
- Select one of the methods to load mailboxes
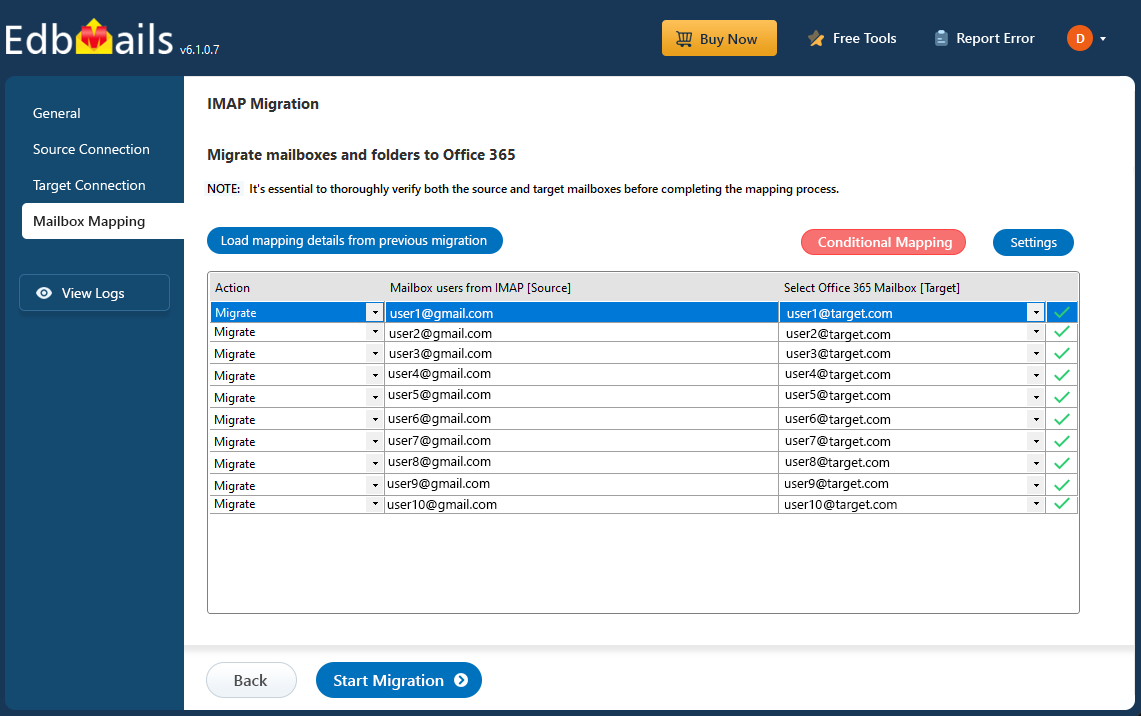
Step 5: Map source and target mailboxes
- Choose the mailbox mapping option that fits your needs.
- EdbMails automatically maps mailboxes and folders and creates target mailboxes in Office 365.
Step 6: Start IMAP to Office 365 Migration
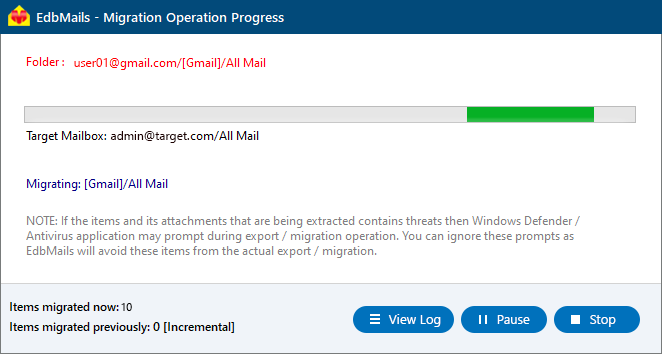
- Click ‘Start Migration’ to begin the migration.
- Monitor the real-time progress of the operation.
- Upon completion, click ‘View Log’ to open the migration report showing mailbox-wise status and folder-level item counts.
Migrate to Office 365 from Outlook PST file
Migrating to Office 365 from Outlook PST files can be straightforward with EdbMails. You can transfer emails, contacts, calendars, tasks, and other mailbox items to Office 365 from the Outlook PST files, maintaining your data integrity and accessibility in the cloud.
Steps to migrate to Microsoft 365 from PST
Step 1: Install EdbMails software
- Download and install the EdbMails application on your computer.
Refer to the system requirements for importing multiple PST files to Office 365.
- Download and install the EdbMails application on your computer.
Step 2: Launch EdbMails and choose migration option
- Open the EdbMails application and enter your email and password, then click ‘Login’ or ‘Start Your Free Trial.’
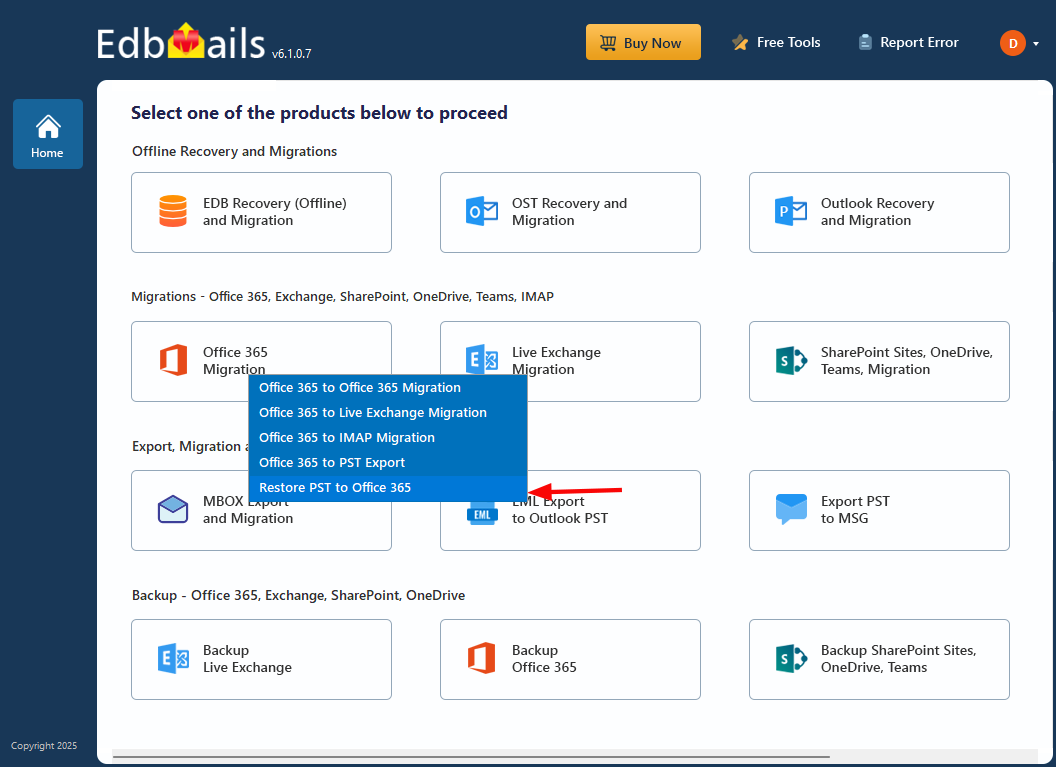
- Select ‘Office 365 Migration’ from the dashboard.
- Choose ‘Restore PST to Office 365’ as your migration option.
- You may keep the default job name or create a new one using the ‘New Job’ button.
Step 3: Add multiple PST files
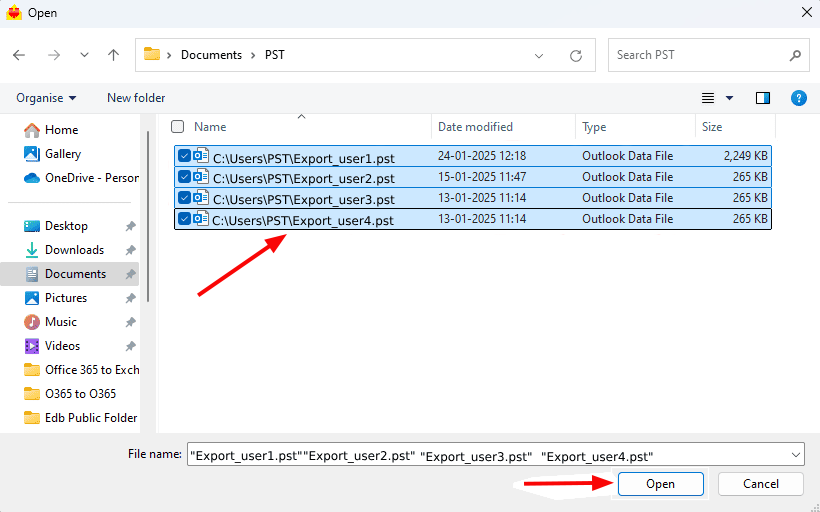
- Click ‘Add File(s)’ to browse and select the PST files from your system.
- Choose and verify all required PST files.
- Enable the option to create a target folder that matches the source PST file name (optional).
- Click ‘Next’ to proceed.
Step 4: Connect to target Office 365 server
- Click ‘Add New Connection’ to configure a new target connection. To use a saved connection, select it from the list and click ‘Connect to Existing.’.
- Choose your connection method and click ‘Next.’
- Authenticate using Microsoft’s secure sign-in page.
- After login, select the option to load the mailboxes (manually or via CSV).
Step 5: Map PST to Office 365 mailboxes
- Choose the desired mapping option.
- EdbMails automatically maps mailboxes and folders between source PST files and the target Office 365 mailboxes.
- You can also manually map specific folders as needed.
Step 6: Start Outlook PST to Office 365 migration
- Click ‘Start Restore’ to begin the migration.
- After completion, a message will confirm success.
- Click ‘View Log'to see the migration report and detailed summary.
Why use EdbMails for Office 365 Migration?
- Incremental migration
EdbMails Office 365 mailbox migration tool can perform incremental migration of your Office 365 mailboxes. Incremental migration (also known as a delta migration or incremental copy) enables you to run migration without creating duplicates on your target server by only migrating new items that are not migrated during consecutive Office 365 migrations. This improves the performance and saves bandwidth for your Office 365 migration.
- Safe and secure migration
EdbMails enables direct server-to-server migration, ensuring your data is transferred securely without any interim storage or third-party involvement. There is no data loss at the source or destination, and your credentials are never stored at any point. The entire process runs within your environment, giving you complete control and peace of mind.
- Scalable and High-performance migration
EdbMails Office 365 mailbox migration tool can migrate individual folders, entire tenants of any size and scale. Its multithreading capability with Office 365 throttling management can make your migration performance faster when compared to any other competitors. It displays complete migration details in the log for your verification.
- Multilingual support
One of the standout features of EdbMails is its exceptional multilingual support. It ensures that language barriers are no obstacle during migration, supporting all Unicode characters, including non-English languages. This capability guarantees accurate data replication regardless of the language, preserving mailbox integrity across diverse regions.
- Cost-effective solution
EdbMails offers a cost-effective solution that helps organizations save significantly on their Office 365 migration. With pricing that is up to 50% lower than other competitors, it provides excellent value without compromising on features. Flexible licensing options, including lifetime licenses, make it an affordable choice for businesses of all sizes.
- Migrate with zero downtime
EdbMails ensures smooth, uninterrupted migration with zero downtime. This means that your organization can continue to function without any service disruption during the migration process. By minimizing business impact, EdbMails delivers a seamless transition, allowing users to access their emails and data throughout the migration.
Frequently Asked Questions (FAQ)
What are the steps to migrate Office 365 mailboxes?
Step 1 : Download and Install EdbMails application
Step 2 : Login with the details or click ‘Start Your Free Trial’
Step 3 : Select ‘Office 365 migration’ option
Step 4 : Connect to the source server
Step 5 : Select the mailboxes & click ‘Migrate to Office 365’
Step 6 : Connect to target Office 365 server
Step 7 : Select mailbox mapping option and start migration
Why choose EdbMails for Office 365 mailbox migration?
EdbMails offers an intuitive interface that simplifies data transfer, including emails, contacts, calendars, and more, from various sources like Exchange servers, Office 365 itself, PST files, and IMAP servers. Security is paramount as EdbMails utilizes secure Modern authentication and data encryption to keep your information protected. Furthermore, migrations occur without server downtime, ensuring uninterrupted business continuity. With advanced features such as delta migration (Incremental migration), concurrent migration of mailboxes, automatic mailbox mapping etc., EdbMails is the perfect choice for a smooth migration to Office 365, all without impacting your day-to-day operations.
What are the migration prerequisites for Office 365 mailboxes in EdbMails?
The migration prerequisites typically include:
- EdbMails Application Installation: Ensure that the EdbMails application is downloaded and installed on your computer
- Source and Target Environment Access: You should have administrative access to both the source (Office 365 ) and target environments (Office 365).
- Valid Credentials: Prepare valid credentials for accessing both the source and target environments. For Office 365 mailboxes, use a global admin account that has a mailbox.
- Network Connectivity: Ensure stable internet connectivity between the migration tool and both source and target environments to facilitate data transfer.
- System Requirements: Verify that your system meets the minimum requirements specified by EdbMails for running the migration tool effectively.
Can I migrate from an on-premises Exchange server to Office 365?
Yes, EdbMails supports direct migration from on-premises Exchange servers (2007, 2010, 2013, 2016, or 2019) to Office 365.
Does EdbMails support cross-tenant mailbox migrations?
Yes, EdbMails allows for migrating mailbox data between different Office 365 tenants. For more information on Office 365 cross-tenant mailbox migration, please refer to this link
Can I trial Office 365 migration features before making a purchase?
Yes, EdbMails offers a ‘Free Trial’ version of the software for testing all the features. The trial allows you to migrate all mailboxes with up to 30 items from each folder, enabling you to evaluate the migration process before deciding to purchase.
How is data security ensured during the migration process?
During the migration process, EdbMails ensures data security through robust measures such as:
- Encryption: Data is encrypted using secure protocols (TLS) during transmission to prevent unauthorized access.
- Authentication: Secure user authentication methods, such as OAuth 2.0, verify user identities to prevent unauthorized access to the migration environment.
- No Data Retention: EdbMails does not retain or store any data beyond the migration process, ensuring data privacy and compliance.
To learn more about data security, refer to the following link.
Can I perform a staged migration with EdbMails?
Yes, EdbMails supports staged migration, allowing users to migrate mailboxes in batches. This approach helps manage large-scale migrations effectively.
What types of data can be migrated to Office 365?
EdbMails migrates emails, contacts, calendars, tasks, journals, and notes from Office 365 mailboxes, shared mailboxes, public folders, and archive mailboxes. It ensures all mailbox items and their properties are accurately transferred to the destination.
Does EdbMails support delta migration?
Yes, EdbMails offers delta (incremental) migration functionality. This feature optimizes the migration process by identifying and migrating only new or modified data since the last migration, saving time and bandwidth, especially for subsequent migrations or scenarios with ongoing data updates.
Does EdbMails handle large mailboxes during migration?
Yes, EdbMails manages large mailboxes during migration without imposing any limits on mailbox size or the number of mailboxes that can be migrated.
Can I migrate Office 365 shared mailboxes and public folders?
Yes, EdbMails supports the migration of Office 365 shared mailboxes and public folders to the destination of your choice. Additionally, you can migrate Office 365 public folders directly to shared mailboxes using EdbMails.
I want to migrate only the data from last year. Is it possible?
Yes, you can set the message received start and end dates to specify the specific date range for migration. Additionally, EdbMails allows you to include or exclude data based on message sender address, recipient address, attachment names, and the read or unread status of the messages, providing flexibility in the migration process.
What is the licensing model for EdbMails Office 365 migration tool?
The licensing is based on the number of source mailboxes you intend to migrate. Each unique source email address consumes a license. For more details on Office 365 migration pricing, click the link
Can I migrate from other email servers like Gmail or Zimbra to Office 365?
Yes, EdbMails supports migration from all IMAP enabled email servers, including Gmail, Zimbra, Yahoo, and others, to Office 365. Learn more
What support is available during the migration process?
EdbMails offers 24/7 technical support via live chat, email, and phone, along with remote access assistance, to help users during the migration process.
How can I verify the migration is successful?
EdbMails provides detailed log reports that include mapping details and folders with item counts to verify the success and completeness of the migration, ensuring accurate data transfer.
Does EdbMails migrate calendar items and contacts?
Yes, EdbMails migrates all mailbox components, including emails, calendar items, contacts, tasks, notes, and more, ensuring a complete migration.
Can I pause and resume the migration process?
EdbMails allows users to pause and resume the migration process at any point, providing flexibility and control over the migration operation.
What if there's intermittent internet during migration?
EdbMails automatically pauses the migration process during intermittent internet connection. Once the connection is restored, it resumes the migration without any data loss or duplication.
Are there any post-migration steps I need to follow?
After migration, follow these steps:
- Redirect Emails and Check Outlook Profiles: Ensure user email accounts are redirected to the new Office 365 environment. Verify in Outlook that each folder shows ‘This Folder Is Up To Date.’
- Assign Licenses: Make sure licenses are assigned to migrated mailboxes promptly to prevent them from being disabled within 30 days.
- Configure Autodiscover DNS Records: Set up Autodiscover DNS records in the target Office 365 environment. This enables users to easily connect their mailboxes to Outlook and mobile clients.
- Decommission the Source Environment: Once migration is confirmed successful, all mailboxes are licensed, and everything is functioning properly in the target Office 365, consider decommissioning the old Office 365 environment. Ensure no future synchronization is needed from the source and the migration is permanent.
Does EdbMails migrate mailbox and folder permissions during migration?
Yes, EdbMails maintains existing mailbox and folder permissions during the migration process. Administrators can manage and configure permissions as needed to ensure continuity and security after migration.


