Exchange 2019 to Office 365 Migration
Exchange Server 2019 is widely used by organizations, and as businesses look ahead, Microsoft’s cloud-based suite Office 365 emerges as a powerful alternative, offering advanced productivity tools, greater flexibility, and enhanced security. Office 365 simplifies IT resource management and supports regulatory compliance for sensitive data. With integrated apps like Teams, OneDrive, and SharePoint, it fosters seamless collaboration and boosts organizational efficiency, while robust security features safeguard data against evolving cyber threats.
EdbMails Exchange Migration Software provides a complete solution to migrate Exchange 2019 to Office 365 efficiently. It supports concurrent mailbox migration, allowing multiple mailboxes to be transferred at the same time for faster results. The software automatically creates target mailboxes and automatically maps them to the corresponding source mailboxes, making the Exchange 2019 to Office 365 migration simple and hassle-free. With incremental migration, only new or updated data is moved, saving bandwidth and avoiding unnecessary transfers. Additionally, automatic throttling management ensures stable performance, keeping the migration process smooth and consistent.
Best Software to Migrate Exchange 2019 to Office 365
When planning to migrate Exchange 2019 to Office 365, choosing the right migration tool is essential to ensure data security, zero downtime, and efficient execution. One of the leading solutions for this purpose is EdbMails Exchange migration software, designed specifically for seamless migration from on-premises Exchange servers to Office 365.
EdbMails delivers high performance when moving Exchange 2019 mailboxes to Office 365, handling emails, contacts, calendars, tasks, journals, and notes while preserving folder structures and metadata. Advanced filtering options let users select specific data for migration, such as emails by date, cc/bcc addresses, or attachments. This combination of speed, accuracy, and flexibility makes EdbMails one of the best software options for Exchange migration.
The software ensures zero-downtime migration, allowing users to continue accessing their mailboxes during the process—critical for business continuity. Its intuitive interface and step-by-step migration wizards make it easy, even for beginners to perform a smooth migration. Additionally, EdbMails uses modern encryption protocols to keep sensitive data secure throughout the migration.
With its robust features, reliability, and cost-effectiveness, EdbMails is an excellent choice for businesses of all sizes and individual users looking to migrate Exchange 2019 to Office 365 confidently and efficiently.
Exchange 2019 to Office 365 migration checklist
Migrating Exchange 2019 to Office 365 can be a complex process, but with proper planning and execution, it can be completed smoothly. Here is a comprehensive checklist that can help you plan and execute your migration
- Preparing your Exchange 2019 environment
- Assess your current Exchange environment: This step includes gathering information about your current Exchange infrastructure, such as the number of mailboxes, their sizes, the number of public folders, and the number of Distribution Groups and others.
- Plan your migration: Based on the information gathered, plan the migration process, including the number of mailboxes to be migrated, the migration schedule, and the migration method to be used.
- Consider mailbox requirements: Take into account specific requirements for certain mailboxes or groups of users, or any permissions that need to be migrated.
- Plan what you want to migrate: Identify the type of your current migration environment and determine whether you want to move everything at once or in stages.
- Performing the pre migration tasks
- Create an Office 365 tenant: If you haven't already done so, sign up for Office 365 and create a tenant. This will be the destination for your Exchange migration.
- Set up Azure AD Connect: Azure AD Connect is used to synchronize your on-premises Active Directory with Azure AD. This step is necessary to enable single sign-on (SSO) for your users.
- Prepare your on-premises Exchange environment: Make sure that your on-premises Exchange environment is properly configured and updated. This preparation ensures that your Exchange servers meet the necessary system requirements and that they are running the latest updates and service packs.
- Create a test environment: It's a good idea to set up a test environment to test the migration process before attempting it on your production environment. This will help you identify and resolve any issues that may arise during the migration.
- Migration with EdbMails Exchange migration
- Perform a test Exchange 2019 migration to 365: You can choose among cutover, staged or hybrid migration. This approach allows you to test the migration process before migrating the rest of the mailboxes.
- Migrate Public Folders: Public folder migration is simplified with EdbMails because you do not require any PowerShell scripts.
- Synchronize your on-premises Active Directory with Azure AD: This step ensures that any changes made to your on-premises Active Directory since the last synchronization are propagated to Azure AD.
- Post-migration Tasks
- Test the migration: Test the migration by logging in as a test user and accessing their mailbox, calendar, and other data. Make sure that everything is migrated and you are able to access the data.
- Perform any necessary cleanup: Once the migration is complete, perform a cleanup such as removing the on-premises Exchange servers and decommissioning any other hardware that's no longer needed.
- Update your documentation: Update your documentation to reflect the changes made during the migration. This includes updating your inventory of hardware and software and your network diagrams.
- Update user training: Inform and give training if necessary to the users, how to use the new Office 365 features and functionalities.
- Preparing your Exchange 2019 environment
Exchange 2019 to Office 365 migration prerequisites
- Step 1: Decide on the Exchange 2019 to Office 365 migration path
The initial step is to determine the most suitable approach for migrating Exchange 2019 to Office 365, tailored to your organization’s needs. Conducting a comprehensive assessment of the current Exchange environment will facilitate informed decision-making. It's essential that the selected migration path aligns with the specific requirements of both the source and target environments to ensure a smooth transition.
Current environment and migration requirement Ideal migration approach Migration flow You are looking to migrate your email, calendar, contacts and all mail data from Exchange Server 2019 to Exchange Online in a single operation Exchange cutover migration to Office 365 All mailbox data is migrated at once to Office 365. Best suited for small to medium-sized environments with fewer mailboxes. You prefer to move mailboxes from Exchange Server 2019 in smaller batches or during scheduled windows (e.g., weekends). Staged Exchange migration Mailboxes are migrated in phases, typically starting with recent data. Suitable for larger environments. You want to migrate to Office 365 gradually while maintaining certain services on-premises. Hybrid migration Enables coexistence between on-premises Exchange 2019 and Office 365. Ideal for long-term staged transitions or complex environments. Use the Microsoft 365 mail migration advisor to determine which migration method is best for you.
- Step 2: Evaluate the bandwidth and network requirements
When you migrate Exchange 2019 to Office 365, it's important to take into account the bandwidth and network requirements of the migration operation. The amount of bandwidth and network resources required depends on the number of mailboxes being migrated, the size of the mailboxes, and the migration method being used.
- Internet bandwidth: The migration requires a reliable and fast internet connection to transfer the data from the on-premises Exchange environment to Office 365. See bandwidth requirements for Office 365 migration.
- Connectivity: It's also important to ensure that you have a stable connection between the Exchange environment and Office 365. See networking roadmap for Office 365.
- Network latency: The network latency between the on-premises Exchange environment and Office 365 should be as low as possible. A latency of less than 150 ms is recommended. See how Microsoft 365 networking is different.
- Firewall configuration: Make sure that your firewall is configured to allow traffic to and from Office 365 which includes ports that are used for Exchange and Azure AD Connect. See the list of worldwide endpoints for Office 365.
- Testing your network connection: With tools like Microsoft Remote Connectivity Analyzer and Microsoft 365 network connectivity test tool, you can test your existing network.
See best practices for network planning and improving migration performance.
Note: If you have already configured your Office 365 tenant, you can directly skip to Step 6 in this section.
- Step 3: Choose a Microsoft 365 license option that suits your requirements
Microsoft 365 is available as a cloud-based subscription service or as a one-time purchase of a perpetual license. Office 365 has different licensing plans each suited to different user requirements.
It is recommended to thoroughly evaluate the Office 365 business plans and Office 365 enterprise plans to determine which one aligns with your organization's requirements. Alternatively, you can also sign up for a 30-day free trial of Office 365 and test the various plans before making a final decision.
- Step 4: Set up and prepare the target Office 365 tenant
Setting up the target Office 365 for the migration involves creating the tenant and configuring it to receive the migrated data from Exchange 2019.
- Create an Office 365 tenant: Plan for the tenant creation and deployment. See the tenant roadmap for Office 365.
- Sign in to the Microsoft 365 admin center: Go to the Microsoft 365 admin center (https://admin.microsoft.com/) and sign in with your global administrator credentials.
- Customize the tenant settings: After the tenant is set up, you can configure and customize the settings such as email domains, language, and time zone to suit your organization's needs.
- Configure Azure AD Connect: Azure AD Connect is used to synchronize your on-premises Active Directory with Azure AD. This step is necessary if you want to retain your on-premises in a Hybrid environment and to enable single sign-on (SSO) for your users.
- Configure email clients and apps: If you want to install Office 365 apps and Outlook, see system requirements for Microsoft 365 and Office configuration support matrix. Because Office 365 is a cloud based solution, it is also important to learn where your Microsoft 365 customer data is stored.
- Set up Office 365 services: Besides email, you may want to set up additional services such as SharePoint, OneDrive and Teams.
- Establish data retention policies: With Office 365, you have the ability to retain data in accordance with compliance and legal requirements. Set up data retention policies to meet your organization's compliance needs, and if necessary configure retention policies for specific mailboxes or groups of users
- Step 5: Add and verify the custom domain on Office 365
If you have a custom email domain from your hosting provider to which you want to migrate and receive emails, you must add and verify the domain on Office 365. This will enable you to use your own domain name (such as example.com) for your email addresses and other Office 365 services.
To set up your custom domain, follow these steps:
- Verify that you own the domain by adding a TXT record to your DNS configuration.
- Add a new domain to your Office 365 tenant. You can use an existing domain that you own or purchase a new one. The domain is used to access your Office 365 services.
- Update your DNS records to point to Office 365. This step is required to ensure that your email is delivered to the correct mailbox.
- Step 6: Create mailboxes and mail-enabled Public folders
Before you migrate Exchange 2019 to Office 365, ensure that you create mailboxes for users in your organization and assign suitable licenses to them. EdbMails automatically creates mailboxes on your target Office 365 server. However, if you want to create manually, refer to the links below.
Add users and assign licenses to Office 365 users.
Add several users at the same time to Office 365.
Assign Microsoft 365 licenses to user accounts.
If you want to migrate Public folders from Exchange 2019, ensure that you create and configure Public folders and make them mail enabled on Office 365.
Steps to create Office 365 Public folder and assign required permissions to admin user.
If you want to migrate to Office 365 archive mailboxes, make sure that In-Place Archive is enabled in Office 365.
- Step 7: Set the impersonation rights on the source server to the admin user
If you are using the global admin account to connect your source Exchange server, ensure to set the impersonation rights.
- Step 8: Verify the mailbox of the admin account
Check to see if the admin account that has been assigned management roles has a valid and non-hidden mailbox on the Exchange 2016 server. See how to configure user mailbox properties for the users from the Exchange admin center (EAC).
- Step 9: Configure Office 365 to send and receive large messages
Follow the steps to increase the message size on Office 365.
- Step 1: Decide on the Exchange 2019 to Office 365 migration path
Exchange 2019 to Office 365 migration using EdbMails
Step 1: Download and install EdbMails Exchange migration software
- Download and install the EdbMails application on a Windows computer that can connect to your Exchange Server 2019.
See system requirements for Exchange 2019 to Office 365 migration.
- After installing the application, launch it and either log in with your registered email and password, or select ‘Start Your Free Trial’ if you haven’t registered yet.
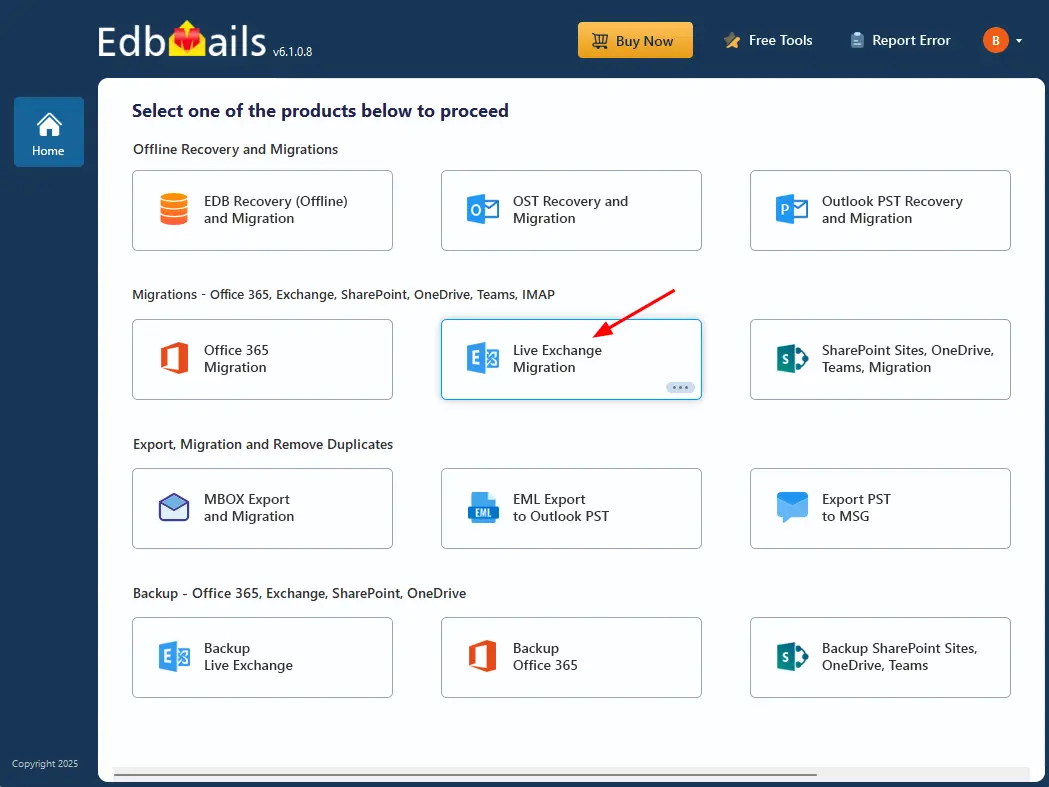
- Select ‘Live Exchange Migration’ option.
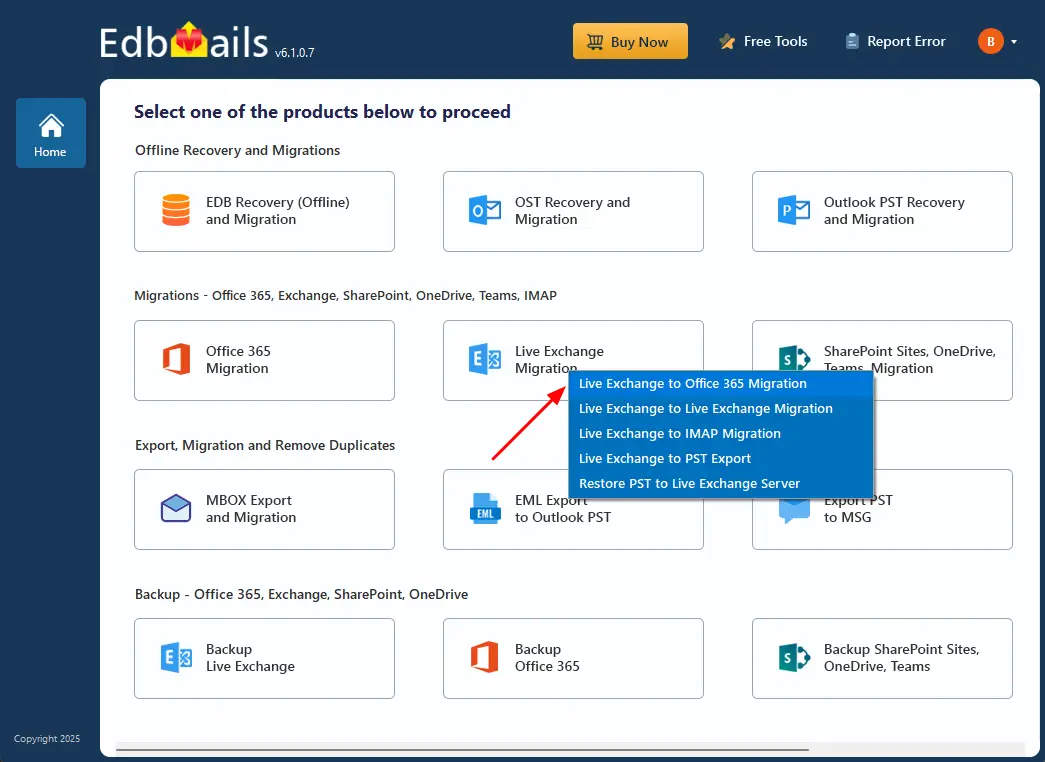
- Select 'Live Exchange to Office 365 Migration' option.
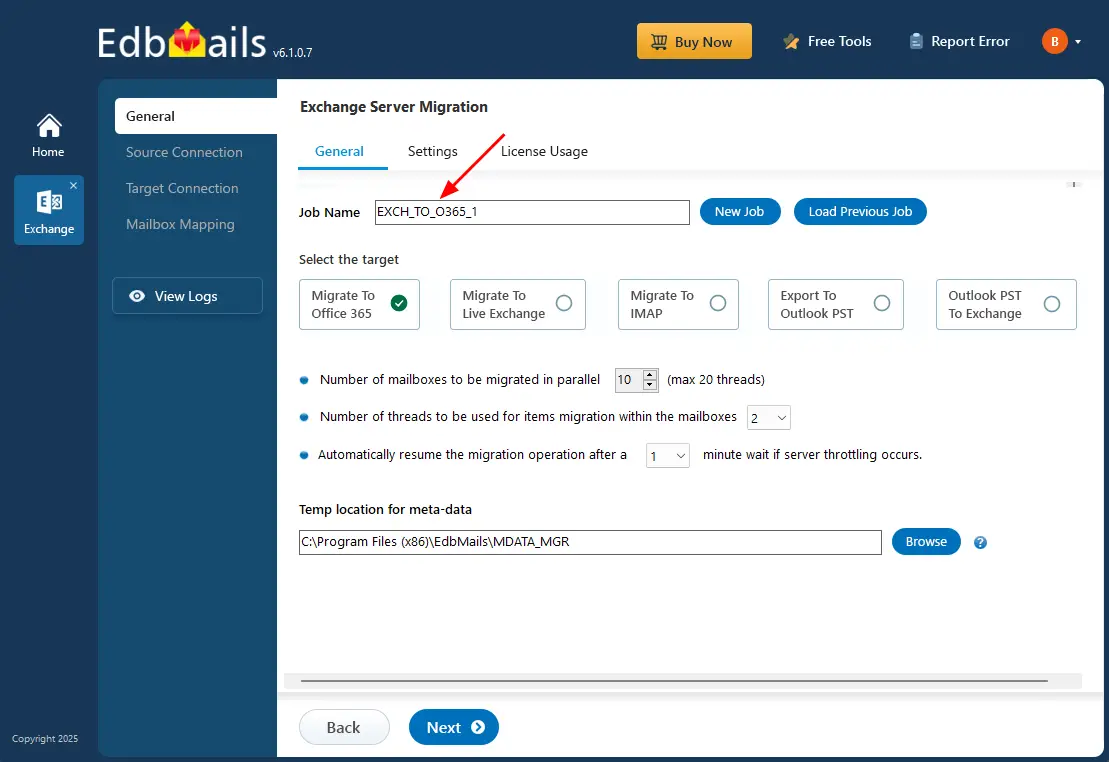
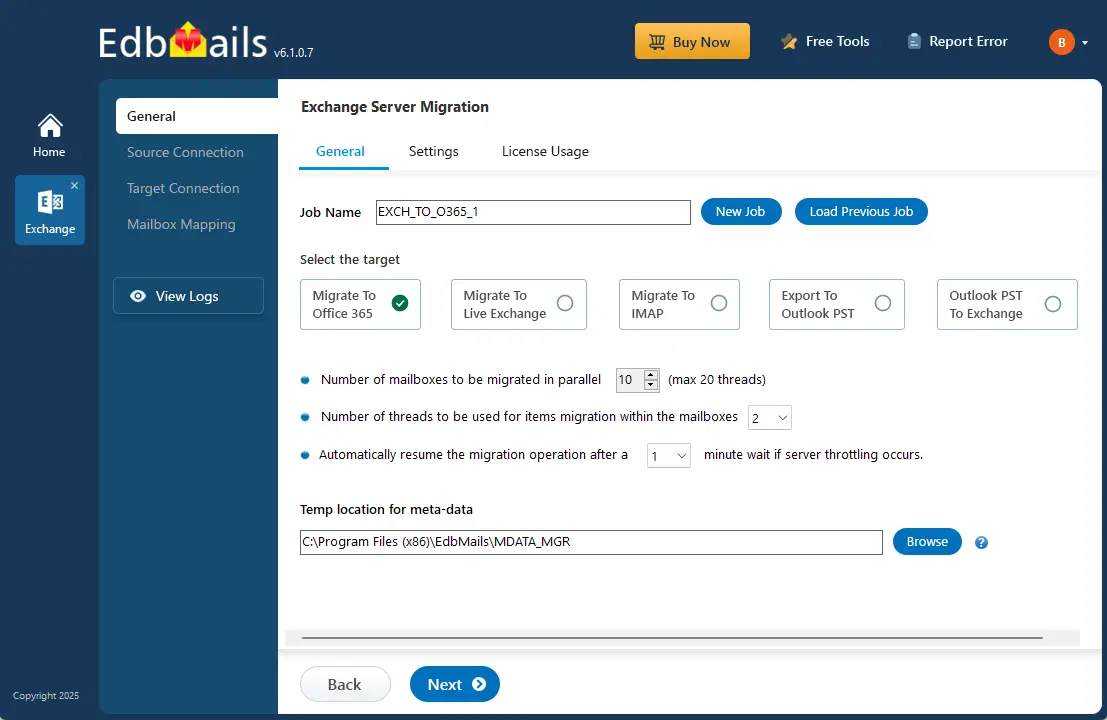
- Either continue with the default job name or click ‘New Job’ to customize it.
Step 2: Connect to source Exchange 2019 server
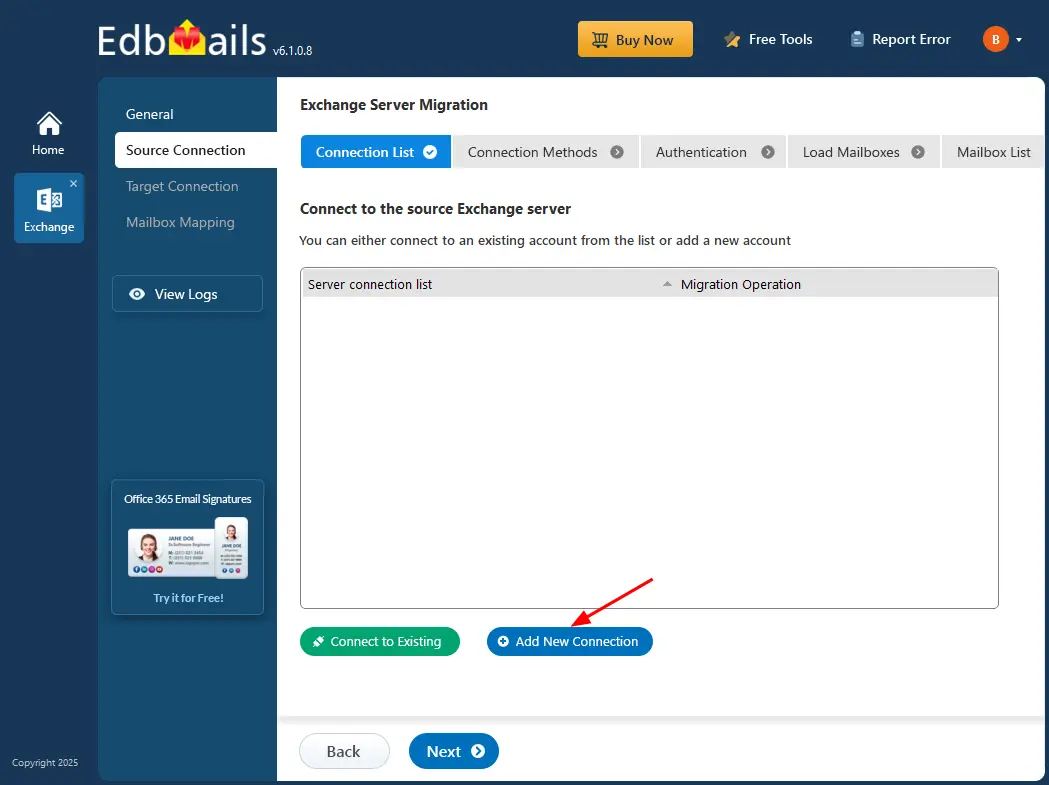
- Click ‘Add New Connection’ to connect to your source Exchange 2019 server. If you’ve already set up a connection, just select it from the list and click ‘Connect to Existing’.
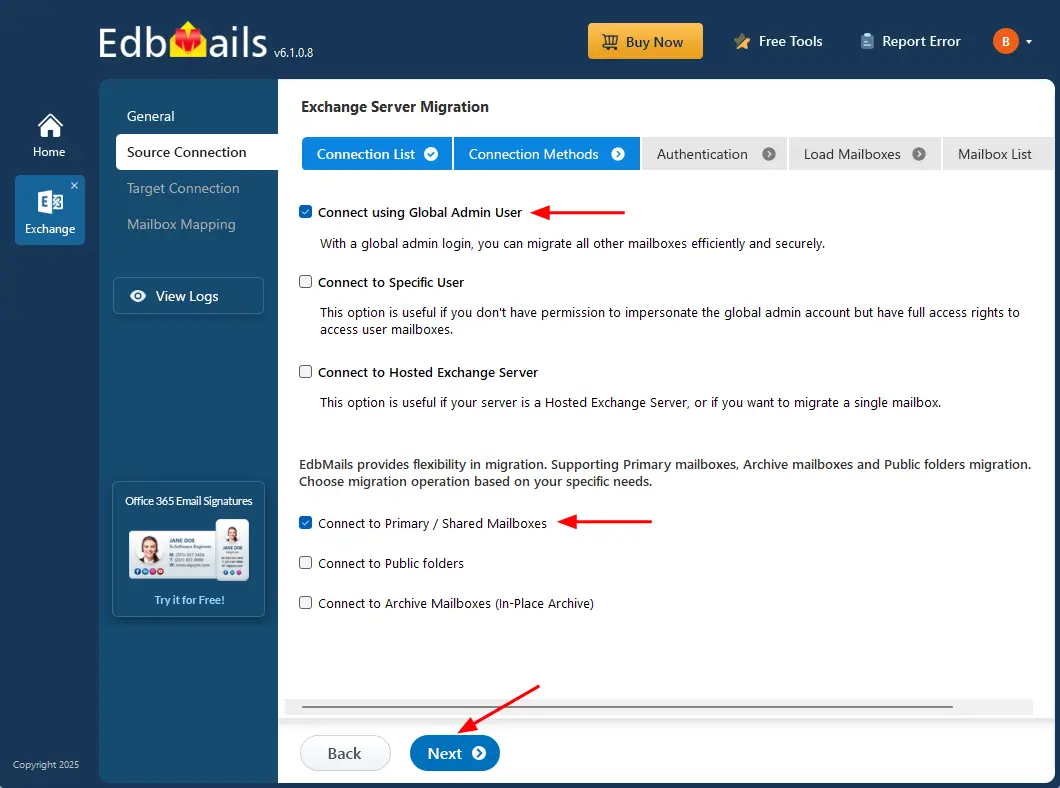
- Select the required connection options and click the ‘Next’ button.
Know more details on Exchange server connection options supported by EdbMails.
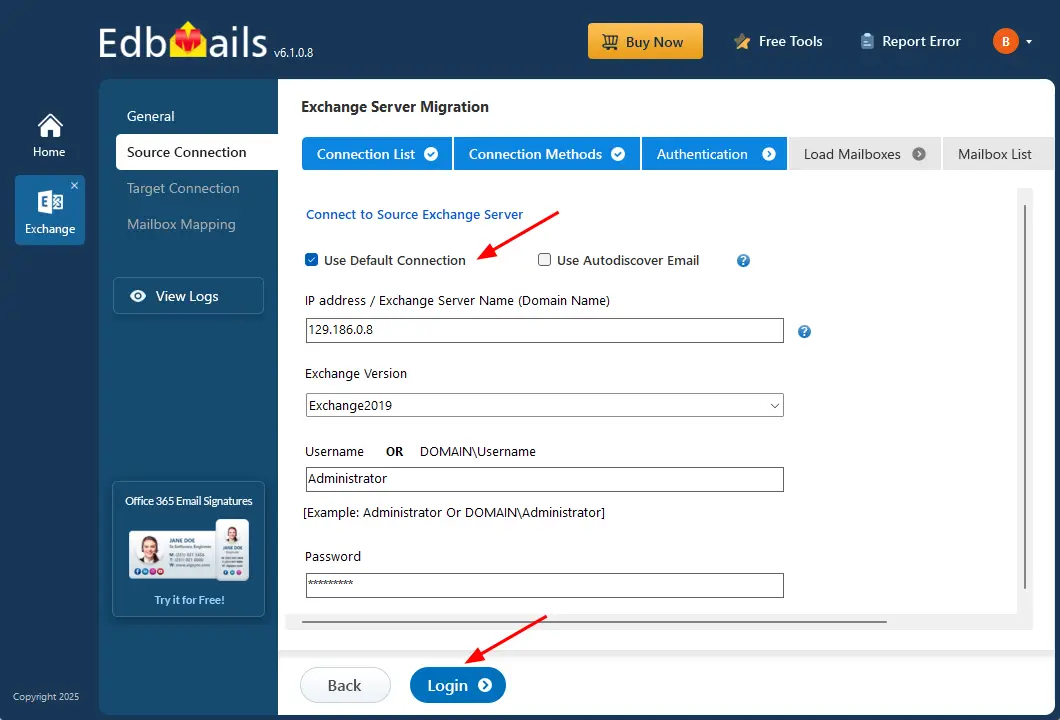
- Enter the details of your source Exchange 2019 server, then click the ‘Login’ button to proceed.
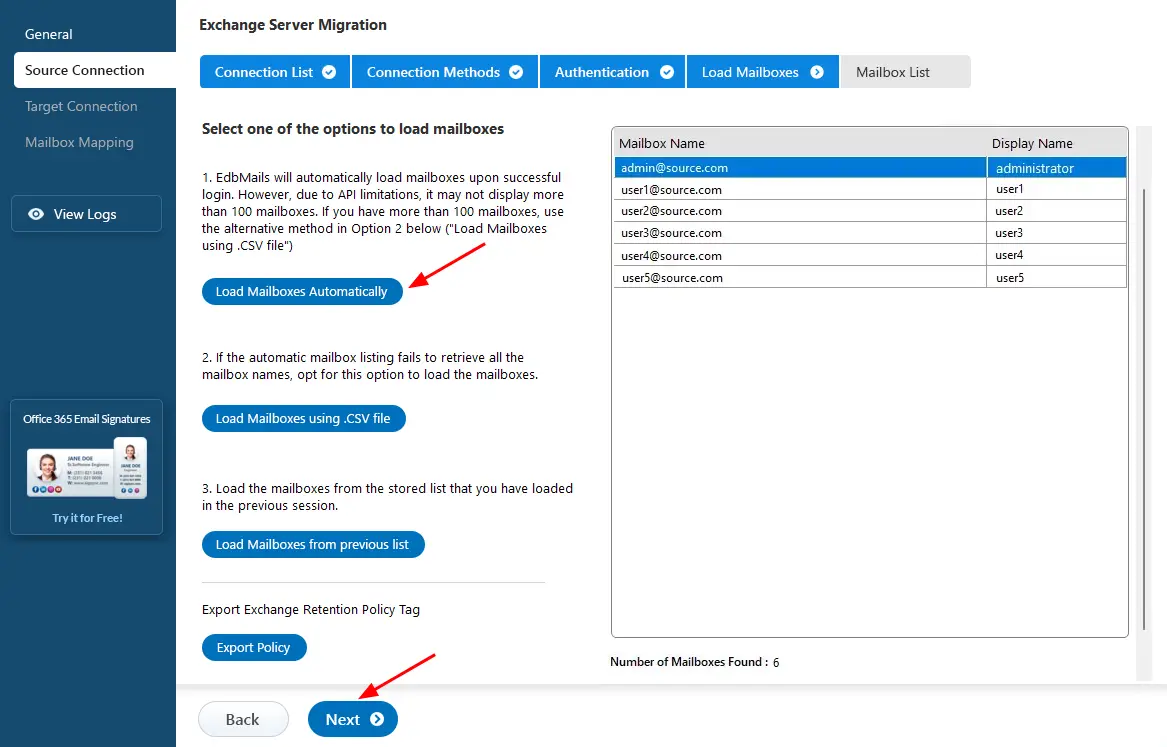
- EdbMails automatically loads mailboxes from your Exchange 2019 server. Due to Microsoft limitations, it may display only up to 100 mailboxes. For more than 100 mailboxes, you can use the CSV file import method.
Step 3: Select Exchange 2019 mailboxes
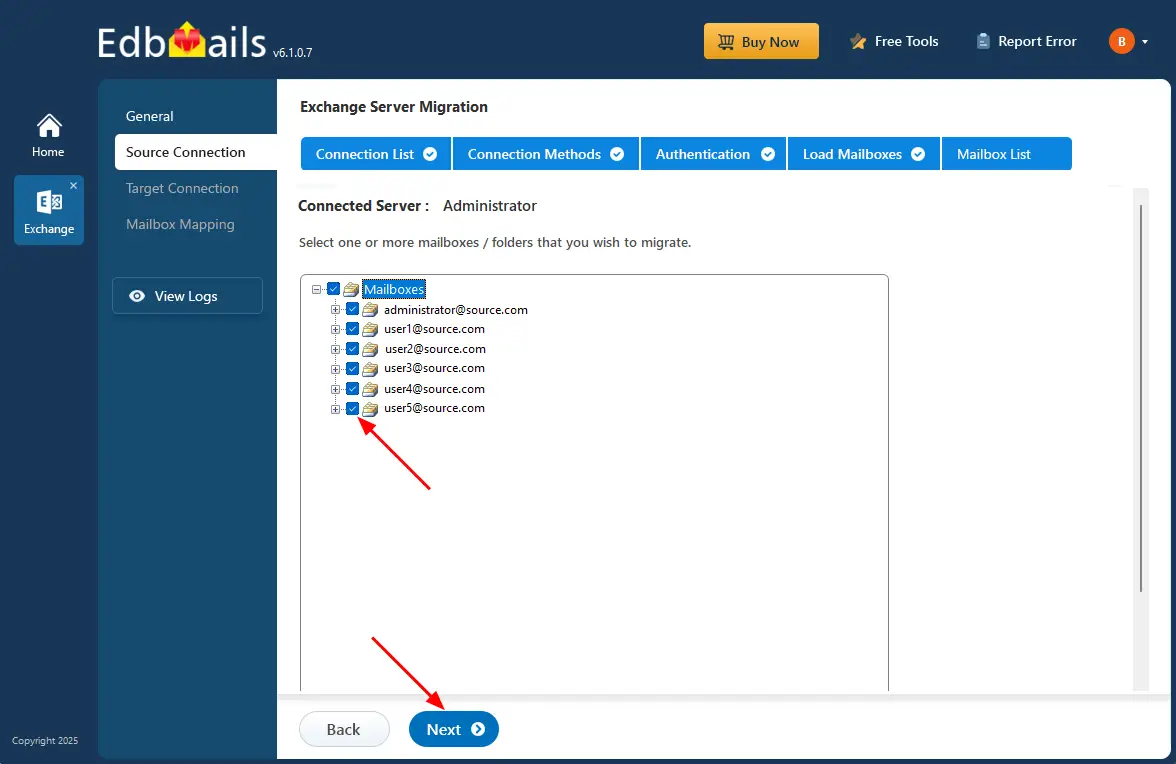
- Select the required mailboxes and folders from your Exchange 2019 server that you plan to migrate to Office 365.
Step 4: Connect to target Office 365 server
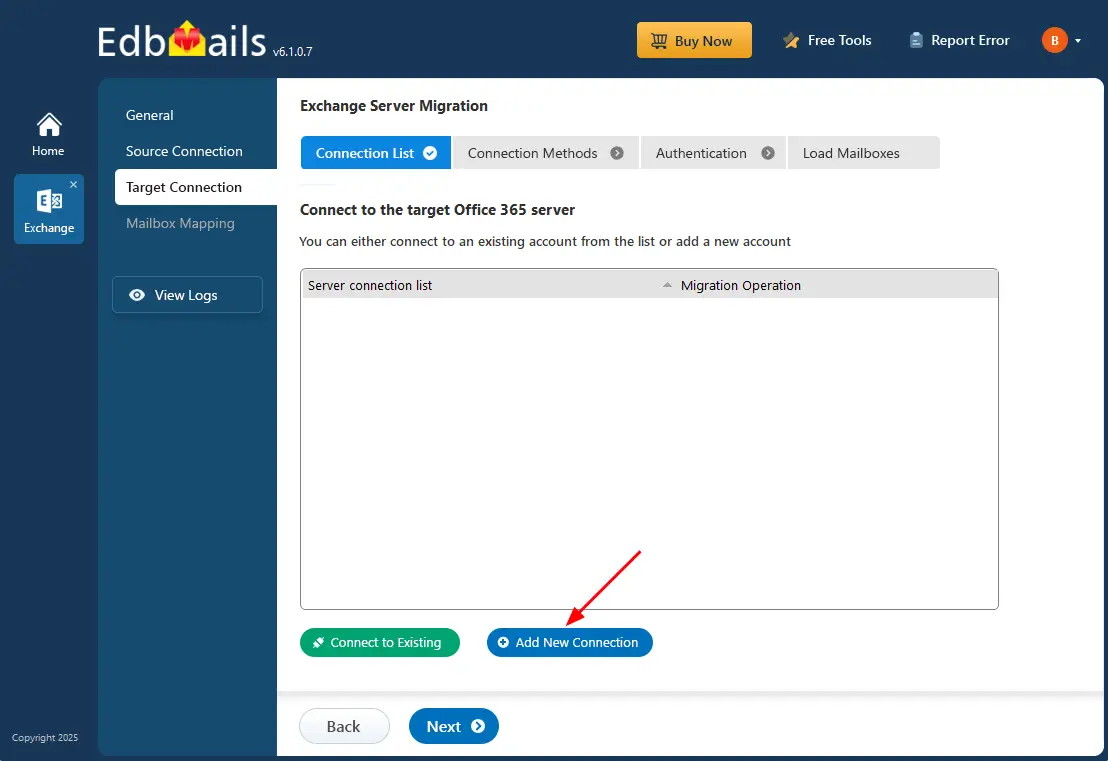
- Click ‘Add New Connection’ to connect to your target Office 365 account. If you have a saved connection, simply select it from the list and click ‘Connect to Existing’ to continue.
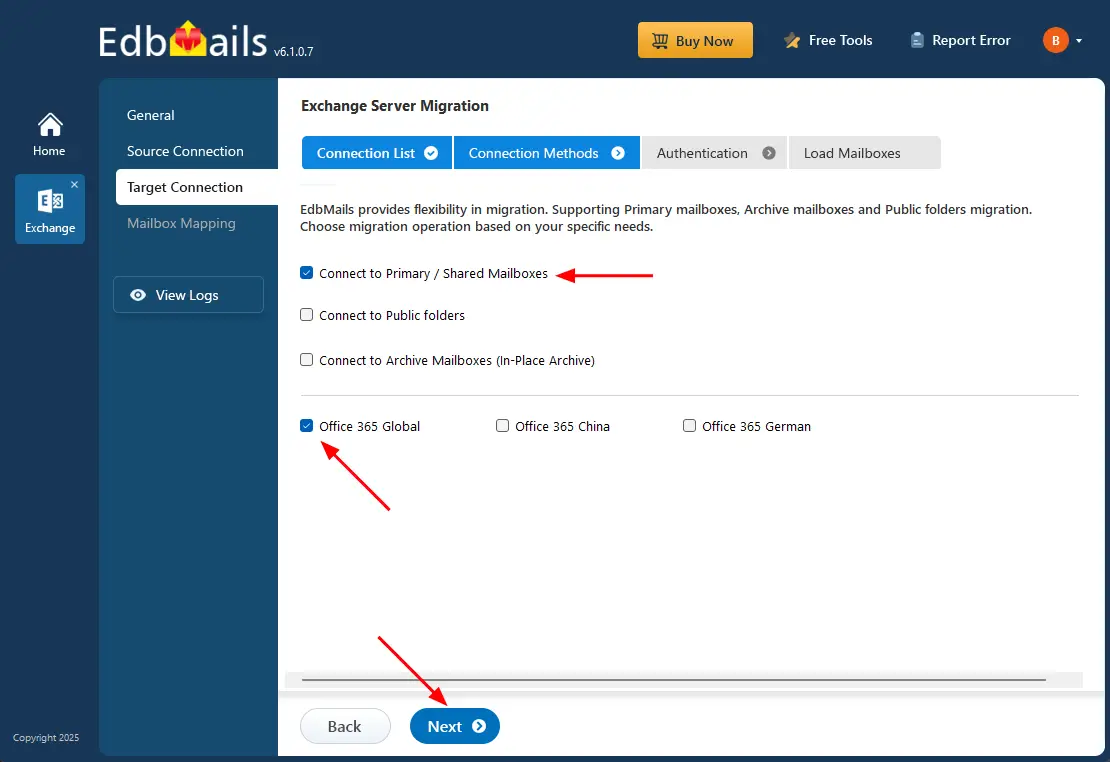
- Choose the necessary connection options, then proceed by clicking ‘Next’.
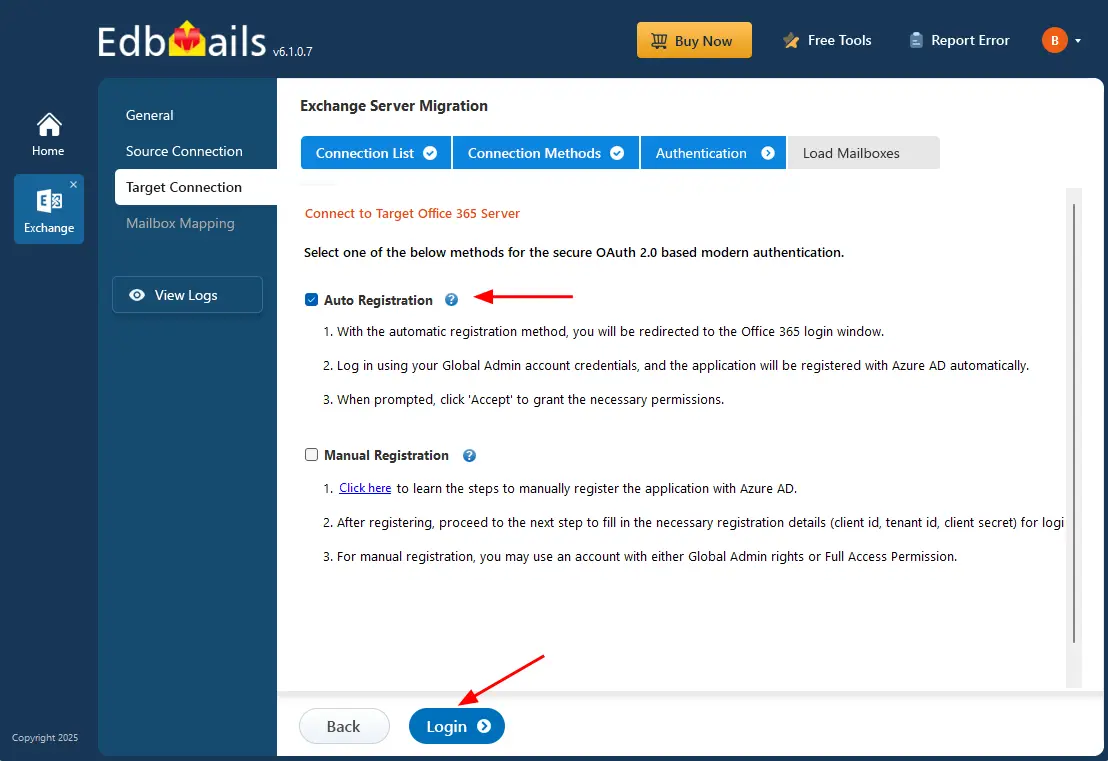
- Select an authentication method to connect to your target Office 365, then click ‘Login’ to continue.
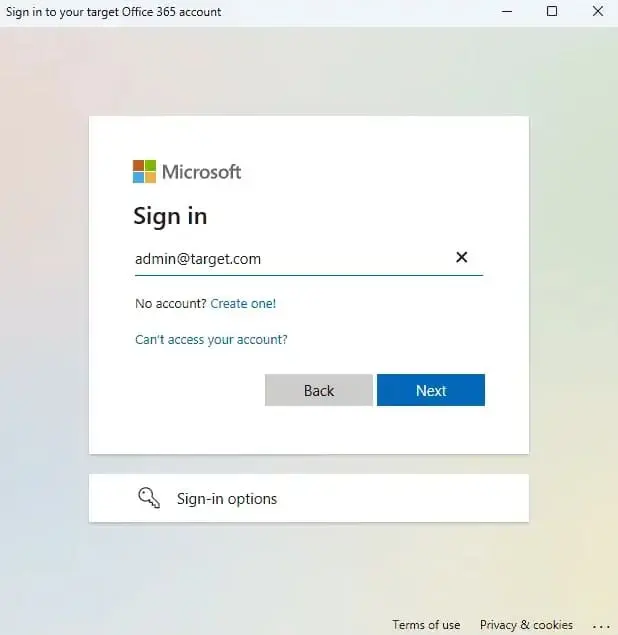
- Authenticate on the Microsoft sign-in screen.
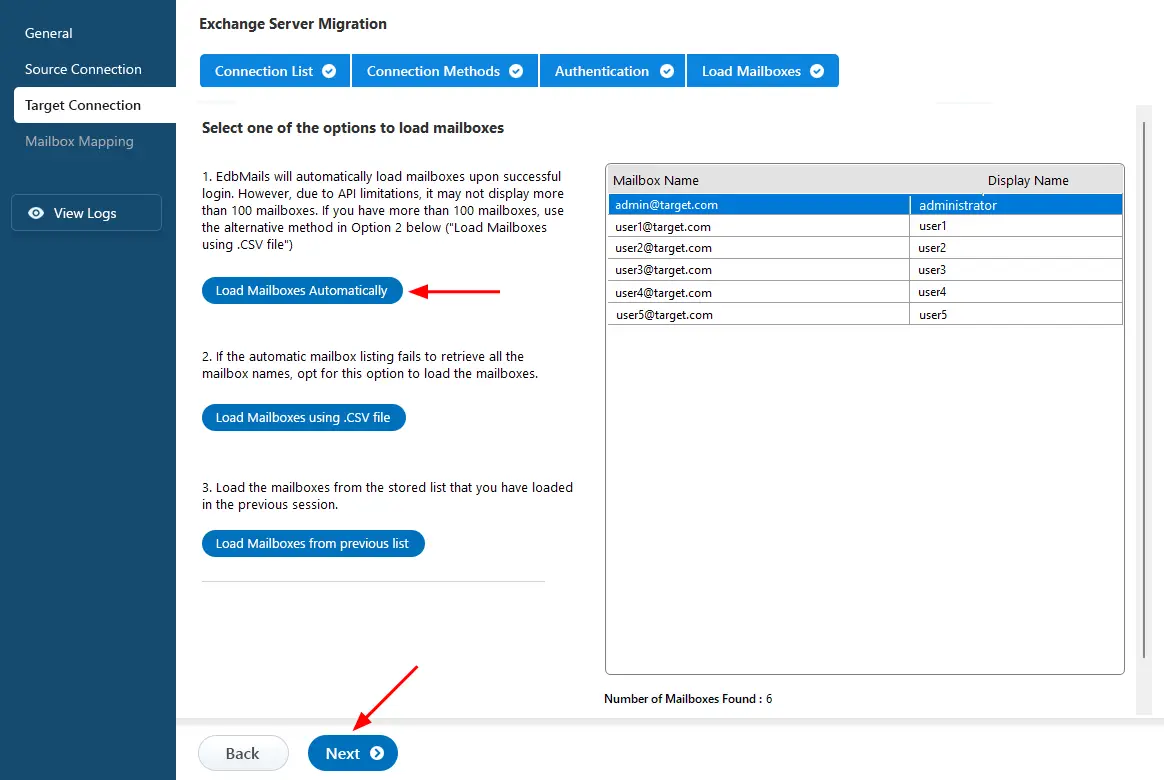
- Select a method to load the Office 365 mailboxes, then click ‘Next’. To load mailboxes using a CSV file, refer to the link below.
Step 5: Map Exchange 2019 and Office 365 mailboxes
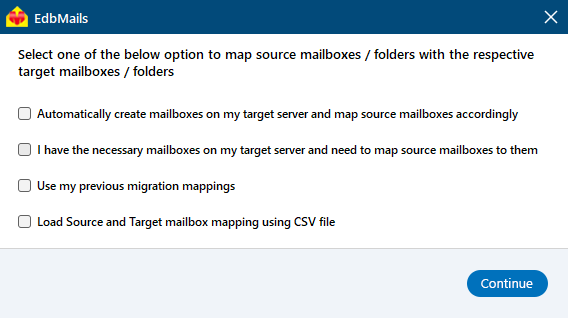
- Select one of the mapping options.
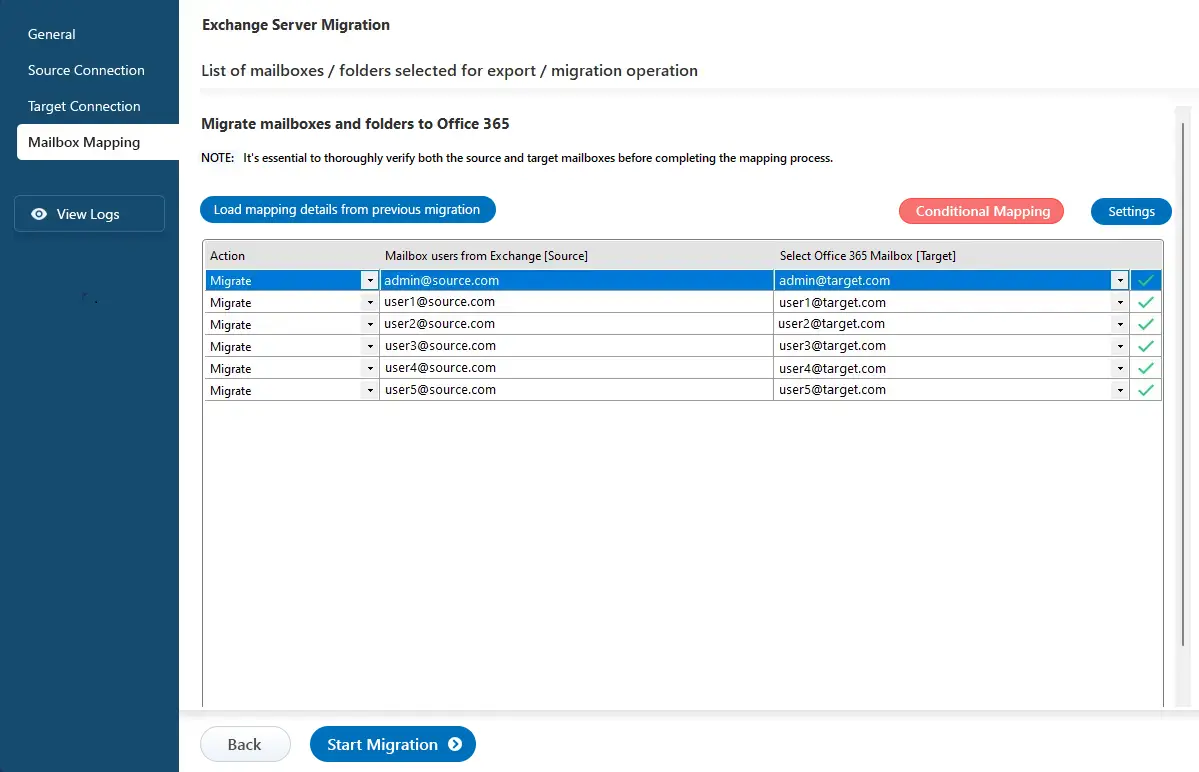
- EdbMails offers a feature to automatically create mailboxes on the target Office 365 server and automatically map mailboxes and folders between Exchange 2019 and Office 365. You also have the option to manually map mailboxes or use the CSV file method for mapping.
Step 6: Start Exchange 2019 to Office 365 migration
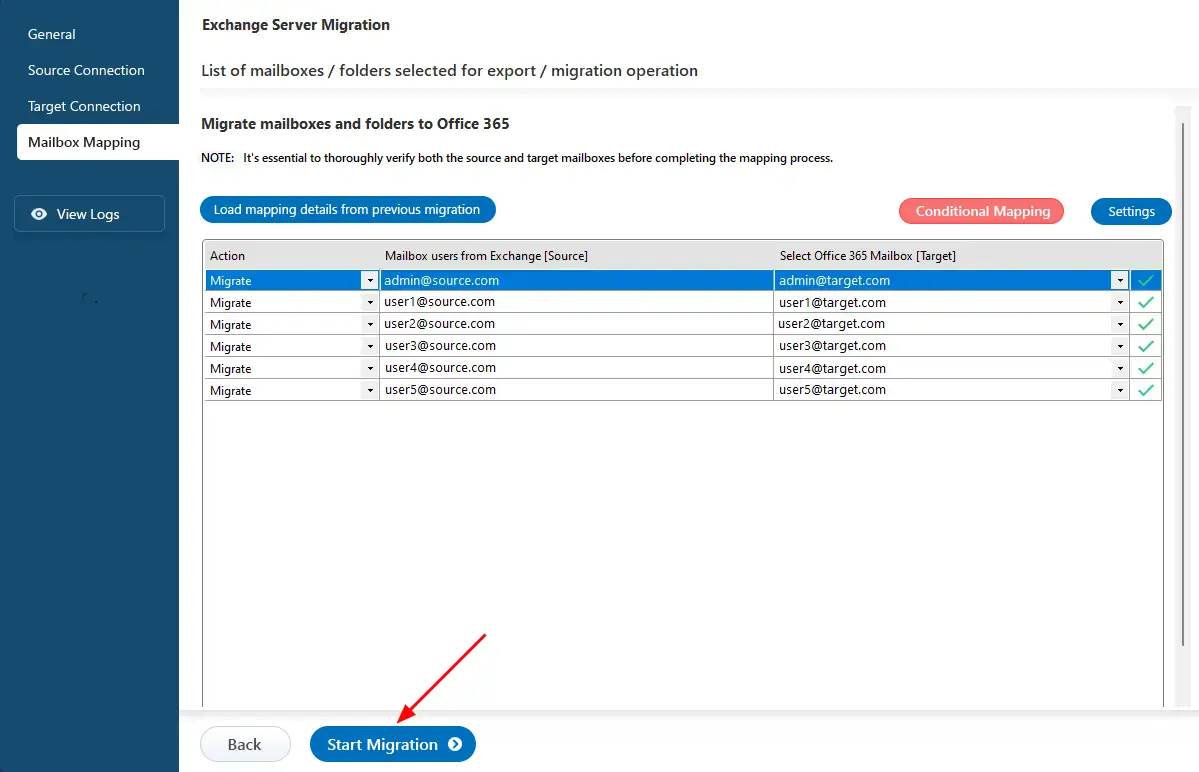
- After completing the mailbox mapping, click the ‘Start Migration’ button.
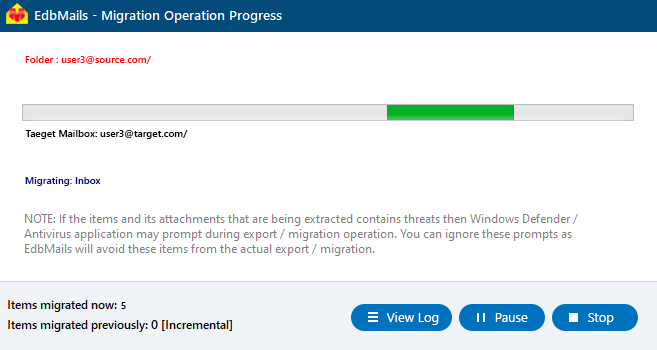
- Track the migration progress using the progress bar. Once the migration is complete, EdbMails will prompt you to view the migration status. Click ‘View Logs’ to access the detailed migration report.
- Download and install the EdbMails application on a Windows computer that can connect to your Exchange Server 2019.
Exchange 2019 to Office 365 post-migration tasks
- Step 1: Verify that all mailboxes have been successfully migrated
Ensure that all data has been successfully migrated to Office 365. You can utilize the auto-generated migration report in the EdbMails application or log in to your Office 365 account to verify the mailbox items.
- Step 2: Test the functionality of email, calendar, and other features
After the migration is complete, test all the features of the email, calendar and other features. For example, send and receive emails, create and manage calendar appointments and check if all the entries are successfully migrated.
- Step 3: Update the MX records to point to Office 365
To ensure you receive messages on Office 365, update the MX records to enable email functionality with the new server you’ve migrated to. Additionally, configure the Autodiscover record to allow Outlook to connect to the migrated mailboxes.
- Step 4: Test email connectivity and perform a backup
It is important to test the email connectivity after the migration to ensure that you are able to send and receive emails correctly. Take a complete Office 365 mailbox backup to ensure that you have a copy in case of any unexpected issues.
- Step 5: Create a new Outlook profile for users in the new domain
Ensure you have the latest version of Outlook installed to avoid compatibility issues. Configure the Outlook profile for each user in your domain if Outlook has problems connecting to Office 365 mailboxes.
- Step 6: Decommission and uninstall Exchange server 2019
If you are not using a Hybrid Exchange deployment, you can uninstall and decommission the Exchange 2019 server after you finish the migration. The following steps provide an overview on how you can decommission the Exchange server.
- Update all DNS records to point to Office 365 and remove any MX records for the on-premises Exchange server.
- Verify that no mailboxes are hosted on the on-premises Exchange server by running the Get-Mailbox command in the Exchange Management Shell.
- Remove all connectors from the on-premises Exchange server to Office 365. This can be done by running the Remove-OutlookAnywhere, Remove-WebServicesVirtualDirectory, and Remove-EcpVirtualDirectory commands in the Exchange Management Shell.
- Disable all email addresses and email domains from the on-premises Exchange server by running the Set-AcceptedDomain and Set-EmailAddressPolicy commands in the Exchange Management Shell.
- Remove any remaining public folders that are hosted on the on-premises Exchange server. Run the cmdlets Remove-PublicFolder and Remove-PublicFolderDatabase in the Exchange Management Shell.
- Backup all the necessary configuration data, such as Outlook and ActiveSync device partnership, from the on-premises Exchange Server by running the Export-AutoDiscoverConfig and Export-ActiveSync commands in the Exchange Management Shell.
- Uninstall the Exchange server components from the Add/Remove programs in the Control Panel.
Here are the steps to uninstall Exchange server from your computer.
- Click Start > search for Exchange Management Shell
- Run the following command to stop all Exchange services:Command: Copy & Paste
Stop-Service MSExchange*
- Run the following command to prepare your organization for Exchange removal:Command: Copy & Paste
setup.exe /mode:uninstall /role:all
- Wait for the command to finish running and then follow the prompts in the Exchange Setup wizard to remove the Exchange server from your computer.
- After the uninstall process is completed, restart the computer and verify that the Exchange server and all related services have been removed from your computer by opening services.msc and checking the services list.
- Finally, remove any other Exchange related products from the Control Panel.
See the list of post migration tasks to complete after you finish the Office 365 migration.
- Step 1: Verify that all mailboxes have been successfully migrated
Exchange 2019 to Office 365 migration troubleshooting
Refer to the Exchange migration troubleshooting guide for solutions to frequent migration errors. For further details about EdbMails Exchange migration, visit the frequently asked questions (FAQ) section.
Advantages of EdbMails for Exchange 2019 to Office 365 migration
- An easy solution for migrating your Exchange 2019 server to Office 365.
If you’re planning to migrate directly from Exchange 2019 to Office 365 manually, you may encounter various challenges and technical obstacles, such as data loss, downtime, and configuration issues. Manual methods often require complex PowerShell scripts and PST imports, adding to the complexity of the process. EdbMails Exchange migration software directly migrates from Exchange 2019 to Office 365, eliminating these requirements and allowing you to perform migration with just a few easy clicks.
- Single-hop Exchange 2019 to Office 365 migration
EdbMails facilitates direct migration from all Exchange servers including Exchange 2019, 2016, 2013, 2010, and 2007 to Office 365 without any intermediate migration steps. It also migrates mailbox data from Hosted Exchange server to Office 365.
- Incremental migration options from Exchange 2019 to Office 365
EdbMails facilitates incremental (delta) migration, allowing for the transfer of only new and modified items while preventing duplicates during subsequent migrations. This feature is applicable across all types of Office 365 mailboxes, including Public folders, shared mailboxes, and archive mailboxes.
- Transfer of Exchange Public folders to Office 365
EdbMails is capable of migrating not only user mailboxes but also Public folders to Office 365. Also the software supports migration of shared mailboxes and in-place archives to Office 365.
- Ability to selectively include or exclude specific email items and folders
When migrating from Exchange 2019 to Office 365, EdbMails offers filter settings that allow you to precisely control which mail items are included or excluded based on parameters such as received/sent date, subject, sender address, and recipient address. You can also set size thresholds to automatically skip emails and attachments that exceed a specified limit.
- Option for migrating mailboxes individually or in batches
EdbMails offers the flexibility to migrate individual Exchange mailboxes or execute batch migrations for multiple mailboxes simultaneously. You can efficiently transfer folders, selected attachments, contacts, and calendars from both on-premises and hosted Exchange environments to Office 365.
- Automatic management of Office 365 throttling
EdbMails Exchange migration is an automated software designed to effectively manage Office 365 throttling and connection disruptions during the migration process. It offers the convenience of pausing and resuming migration operation at any time, ensuring that no data is lost in the process.


