Migrate public folders from Exchange 2010 to 2016
Public folders play a vital role in Microsoft Exchange, serving as a central hub for sharing emails, calendars, contacts, and documents across teams. With Exchange 2010 reaching its end of support, migrating public folders to Exchange 2016 is no longer optional—it’s a necessity. The move ensures continued compliance, security, and access to modern features such as improved scalability, simplified management, and stronger protection measures.
However, the migration process can be daunting. Manual methods often involve complex scripts, extended downtime, and risks of broken folder structures or lost permissions, which can hinder day-to-day operations and reduce business productivity.
EdbMails Exchange server migration tool addresses these challenges with a streamlined, automated approach. It ensures a secure transfer of public folder data while preserving hierarchies, permissions, and metadata. Features like incremental migration, advanced filtering, and real-time monitoring help organizations move from Exchange 2010 to 2016 without disruption.
In this guide, you’ll find a clear roadmap to plan, prepare, and execute your Exchange public folder migration successfully. By the end, you’ll know how to avoid common pitfalls and carry out a smooth transition with confidence.
Exchange 2010 to 2016 Public Folder Migration Planning
Before migrating Public folders from Exchange 2010 to 2016, it’s important to carefully evaluate the prerequisites and prepare the target environment. Proper planning helps reduce risks, avoid downtime, and ensure that the migration completes smoothly.
Here’s a checklist to guide your preparation:
- Set up Exchange 2016 and configure the target environment properly.
- Analyze folder size and count to estimate migration time and resources.
- Create and enable Public folders in Exchange 2016 for mail.
- Choose whether to migrate all public folders at once or in phases.
- Ensure your internet speed and network setup can support the migration workload.
- Decide if the public folders should be migrated to new Public folders, Primary mailboxes, or Shared mailboxes in Exchange 2016.
Review these requirements carefully before starting your migration from legacy Exchange servers to ensure a seamless and reliable transition.
Exchange 2010 to 2016 public folder pre-migration activities
- Check that your system meets the Exchange 2016 setup requirements
The following links will help you to know about the network, hardware and operating system requirements for installing Exchange server 2016.
- Network and directory requirement for Exchange 2016
- Hardware Requirements for Exchange 2016
- Supported operating systems for Exchange 2016
Exchange server version Coexistence scenario Requirement Migration Exchange 2016 Can coexist with Exchange 2010 Install the latest Rollup update for Exchange 2010 Service Pack (SP3) You can migrate to any Exchange server version with EdbMails Exchange migration software regardless of the coexistence issue - Step 2: Prepare your system with the following prerequisites for Exchange 2016
Ensure that you meet the following prerequisites for Active Directory, Windows 2016 Mailbox server and Windows 2016 Edge Transport servers.
- Step 3: Setup the target Exchange Server 2016 for migration
Given below is a list of key points for installing and preparing the Exchange 2016 server for migration.
- Prepare AD and domains
- Before installing Exchange Server 2016, you need to prepare your Active Directory forest and its domains for the new version of Exchange.
- If you have a separate team to manage the Active Directory schema, you need to first extend the active directory schema, else proceed to the next step to prepare the Active Directory.
- If you have multiple domains you need to additionally prepare the Active Directory domains.
- Install Exchange server 2016
Before installing the Exchange server 2016, ensure that you meet the server system requirements and prerequisites as outlined above. Next, follow the link to install Exchange 2016 using the setup wizard.
- Prepare a clean Exchange 2016 target environment
- Create and configure a Send connector to send mail outside the Exchange organization.
- By default, Exchange automatically creates receive connectors for inbound mail flow when the mailbox server is installed. If you need to configure receive connectors, follow the steps in the link.
- Add accepted domains to allow recipients to send and receive email from another domain.
- Configure the default email address policy to add the accepted domain to every recipient in the organization.
- Configure external URLs (domains) on the virtual directories in the Client Access (frontend) services on the Mailbox server to allow clients to connect to your server from the internet (outside the organization’s network).
- Configure internal URLs on the virtual directories in the Client Access (frontend) services on the Mailbox server to allow clients to connect to your server from the internal network.
- Configure SSL certificates from a third-party certificate authority for services such as Outlook Anywhere and Exchange ActiveSync.
- Verify the Exchange server installation by running the command Get-ExchangeServer on the Exchange Management Shell (EMS).
- Install cumulative updates (CU) on Exchange server 2010
For migrating Exchange server 2010 to Exchange 2016, it is required that you have the latest cumulative updates (CU) installed on the source server (2010). A minimum of Exchange 2010 SP3 RU8 or later is required to migrate Public folders.
- Create trust relationship between forests (Optional)
A forest trust is an authentication between two domains within the same Active Directory forest which creates a trust between two root domains for exchanging information. By creating a trust in advance, it is possible to address the trust issues during or after the migration.
- Assign management roles to the admin account
Ensure that you have set the following permissions to the admin account on the source (2010) and target server (2016)
- On the source server
- ApplicationImpersonation
- View-Only Configuration - Run the cmdlet New-ManagementRoleAssignment using the Exchange Management Shell to assign the View-Only Configuration role to the admin.
- On the target server
- ApplicationImpersonation
- View-Only Recipients
- View-Only Configuration
- On the source server
- Verify the mailbox of the admin account
Check to see if the admin account that has been assigned management roles has a valid and non-hidden mailbox on the Exchange 2010 server.
- Create a Public folder on Exchange 2016
Ensure that you create a Public folder on the target server and make it mail-enabled before you migrate.
- Configure the throttling and message-size limits
You can manually change the EWS throttling and message size limits on the target Exchange 2016 server by following the steps outlined in the links below.
Note: To migrate Public folders to Exchange 2016 with EdbMails, you do not require PowerShell scripts. The following steps describe the public migration method by using EdbMails graphical user interface (GUI).
- Prepare AD and domains
- Check that your system meets the Exchange 2016 setup requirements
Steps to migrate public folders from Exchange 2010 to 2016
Step 1: Download and install EdbMails software
- Download EdbMails application and install it on a Windows OS computer that has connectivity to both the source and target Exchange servers.
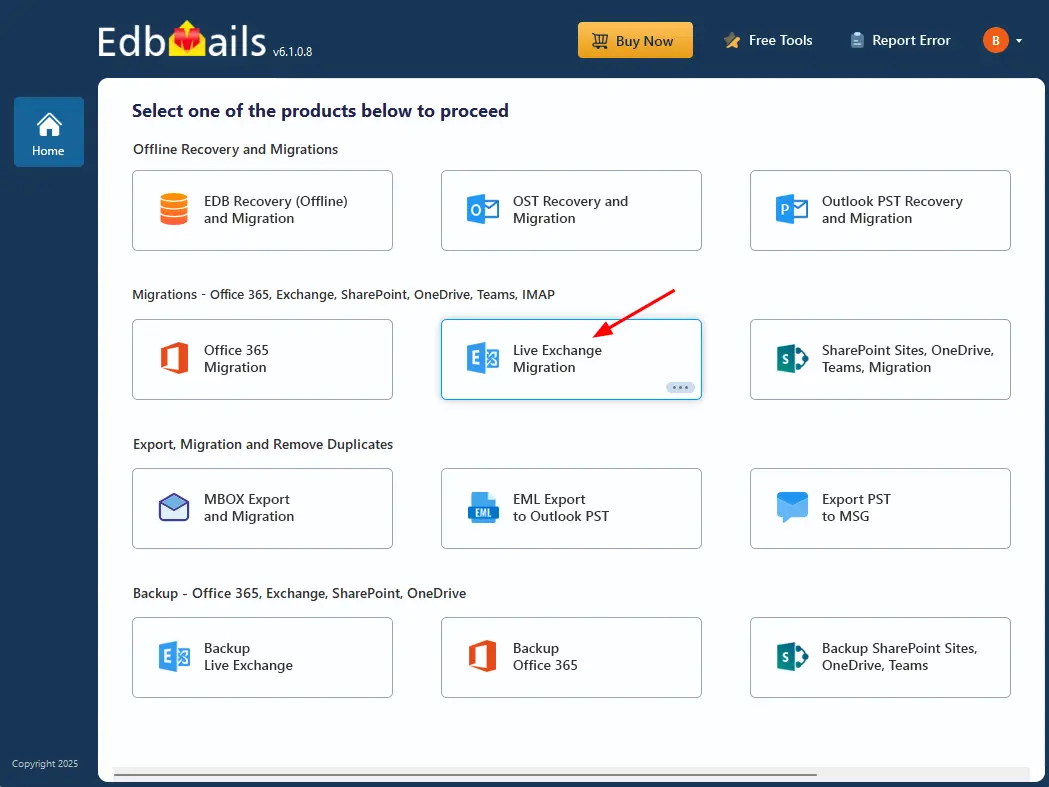
- Launch the EdbMails application and click the 'Login' button by entering the appropriate details or click 'Start Your Free Trial' to proceed.
- Select ‘Live Exchange Migration’.
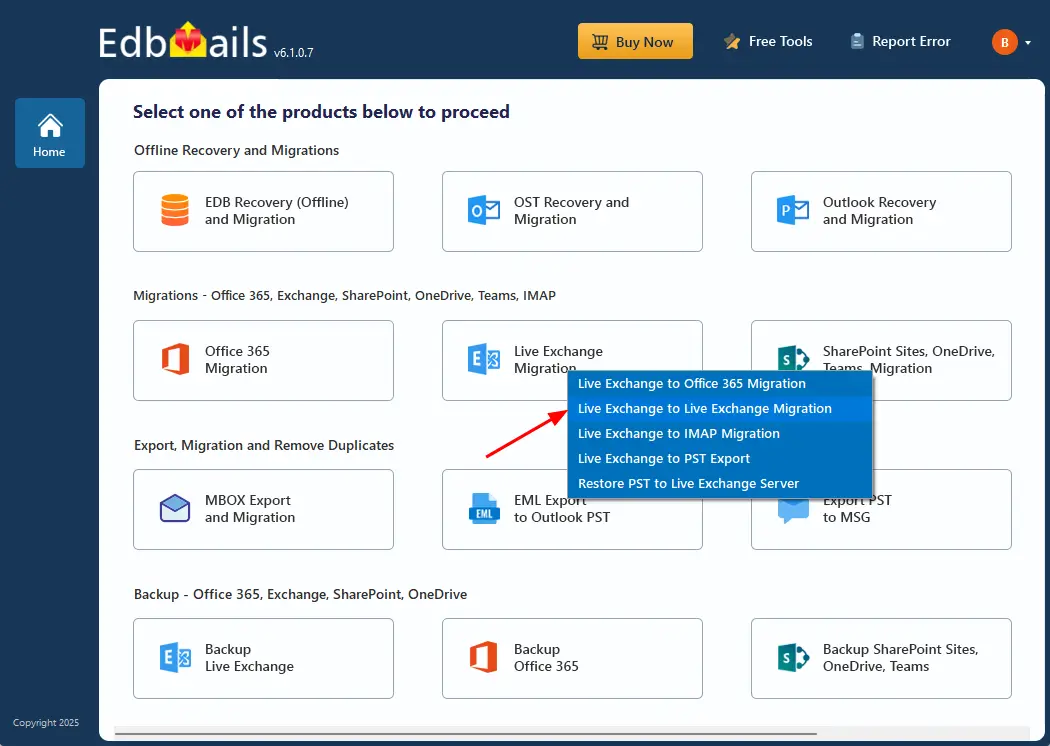
- Select 'Live Exchange to Live Exchange Migration'
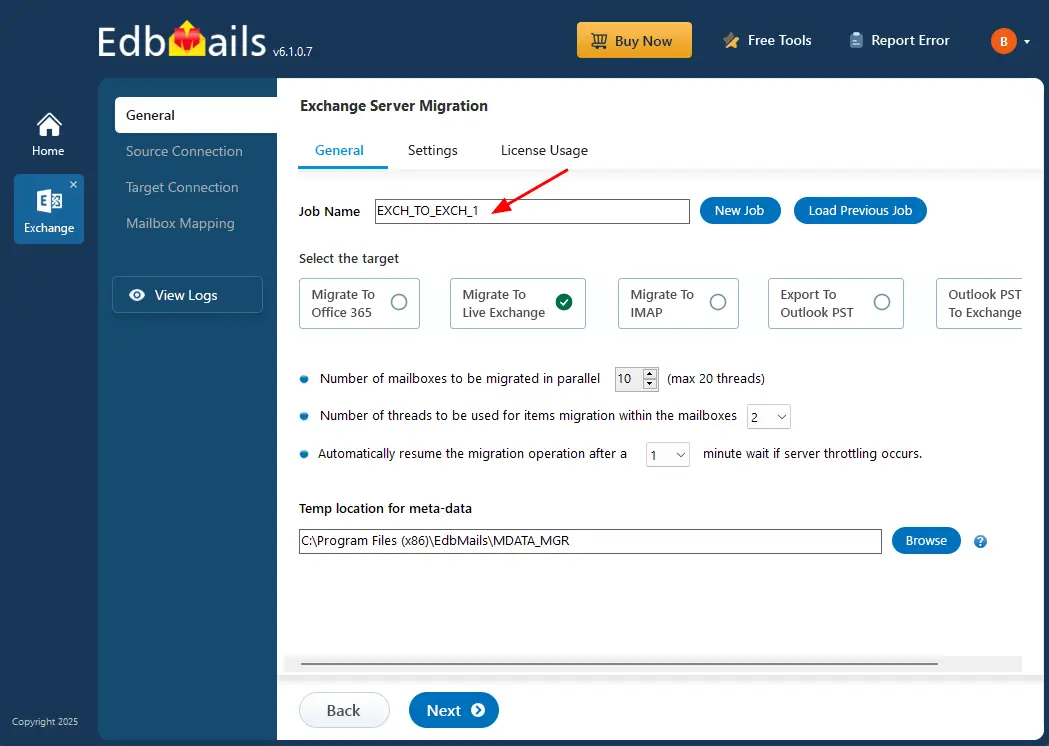
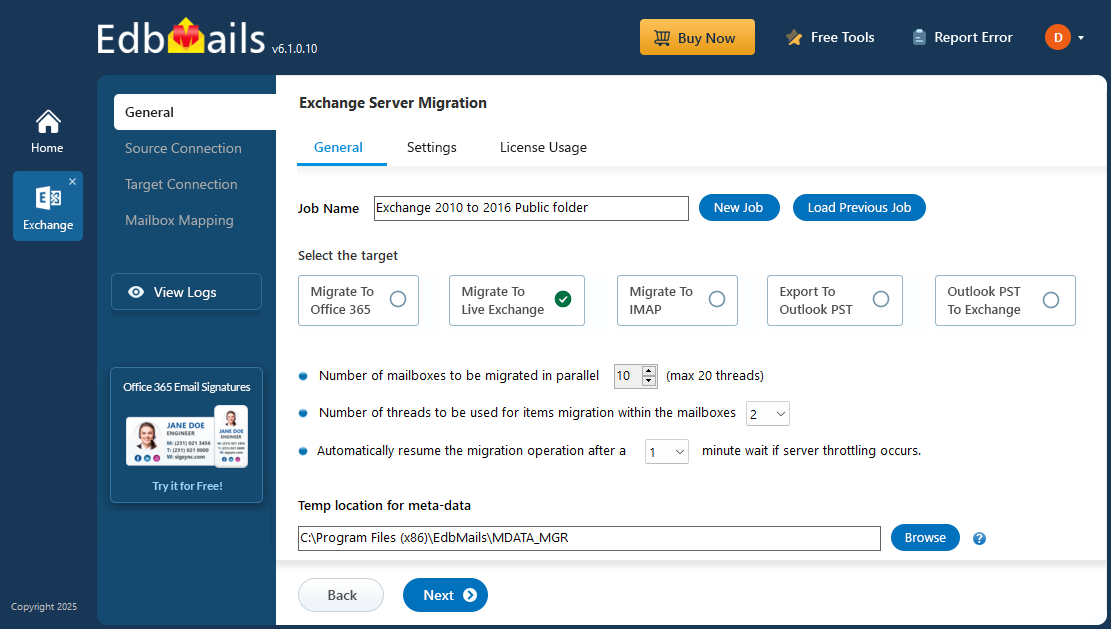
- You can go with the default job name or click on the ‘New Job’ button if you’d like to give it a custom name.
Ensure you have set the necessary admin permissions to all the public folders you wish to migrate.
Step 2: Connect to source Exchange 2010 server
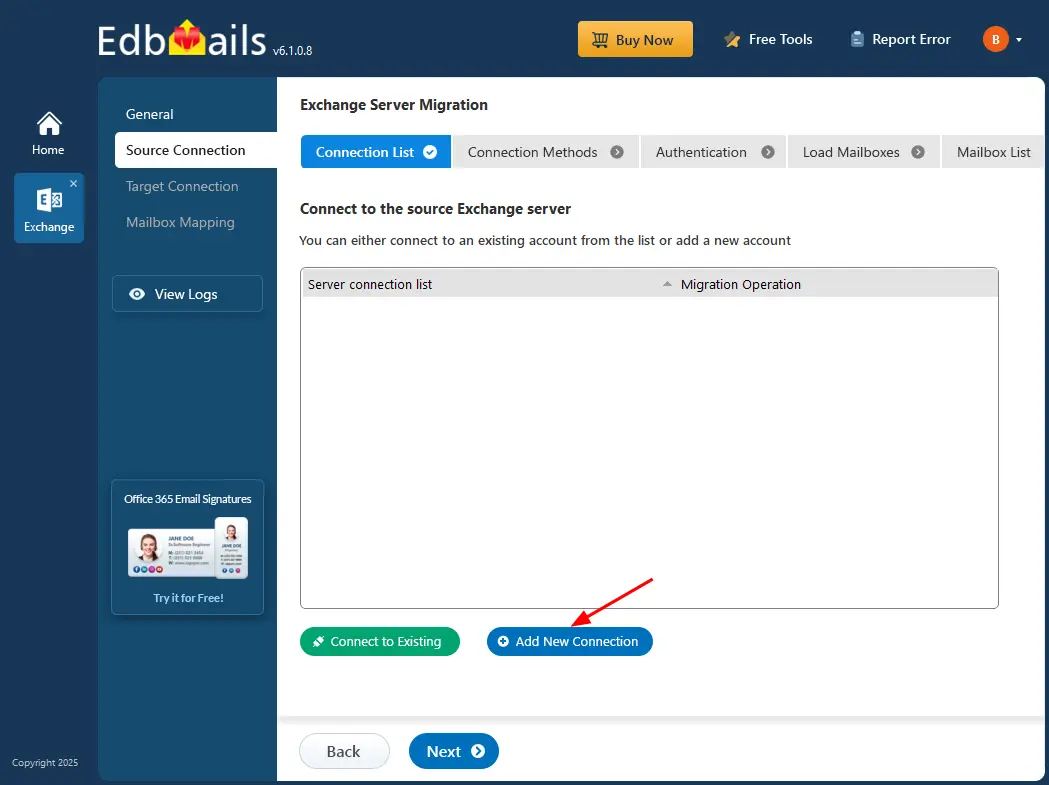
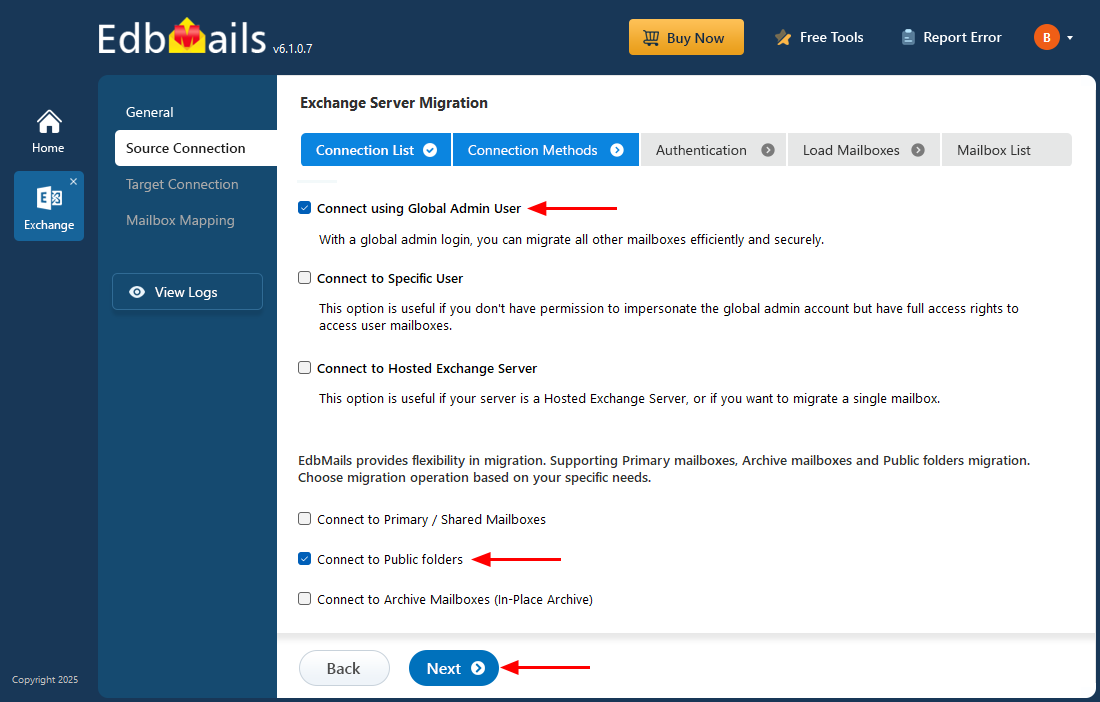
- To set up a new connection to the source Exchange server, click the ‘Add New Connection’ button. If you’ve connected before, simply choose the existing connection from the list and click ‘Connect to Existing’ to continue.
- Select ‘Connect to Public folders’ and click the ‘Next’ button.
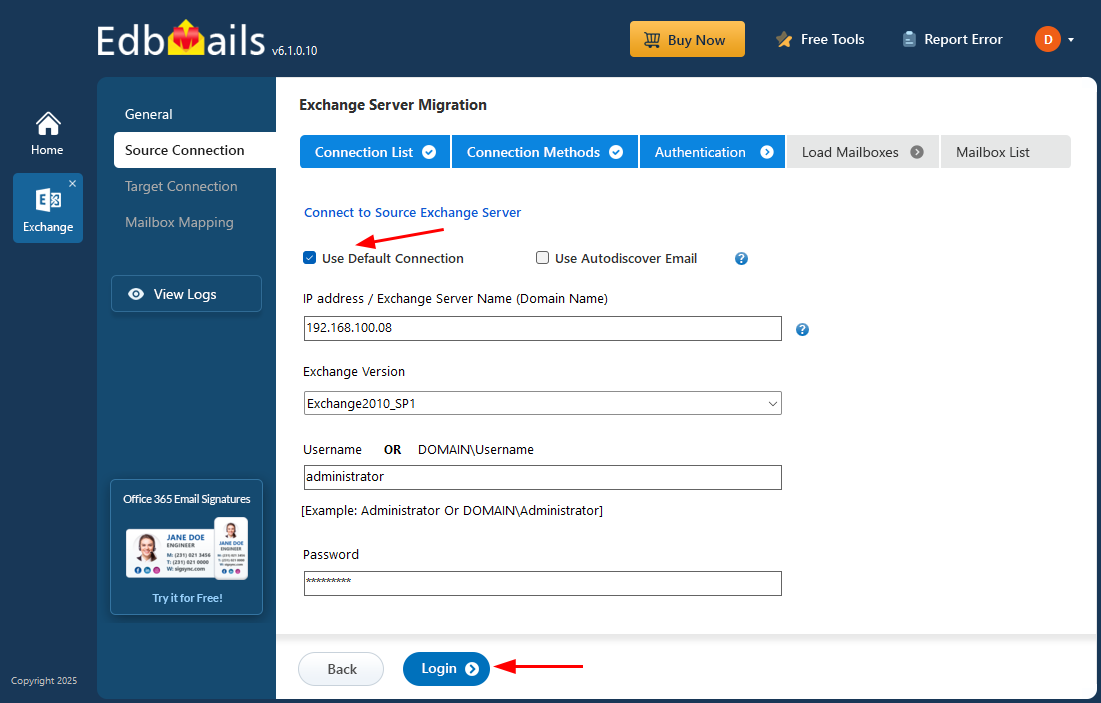
- Enter the source Exchange 2010 server details and click the ‘Login’ button
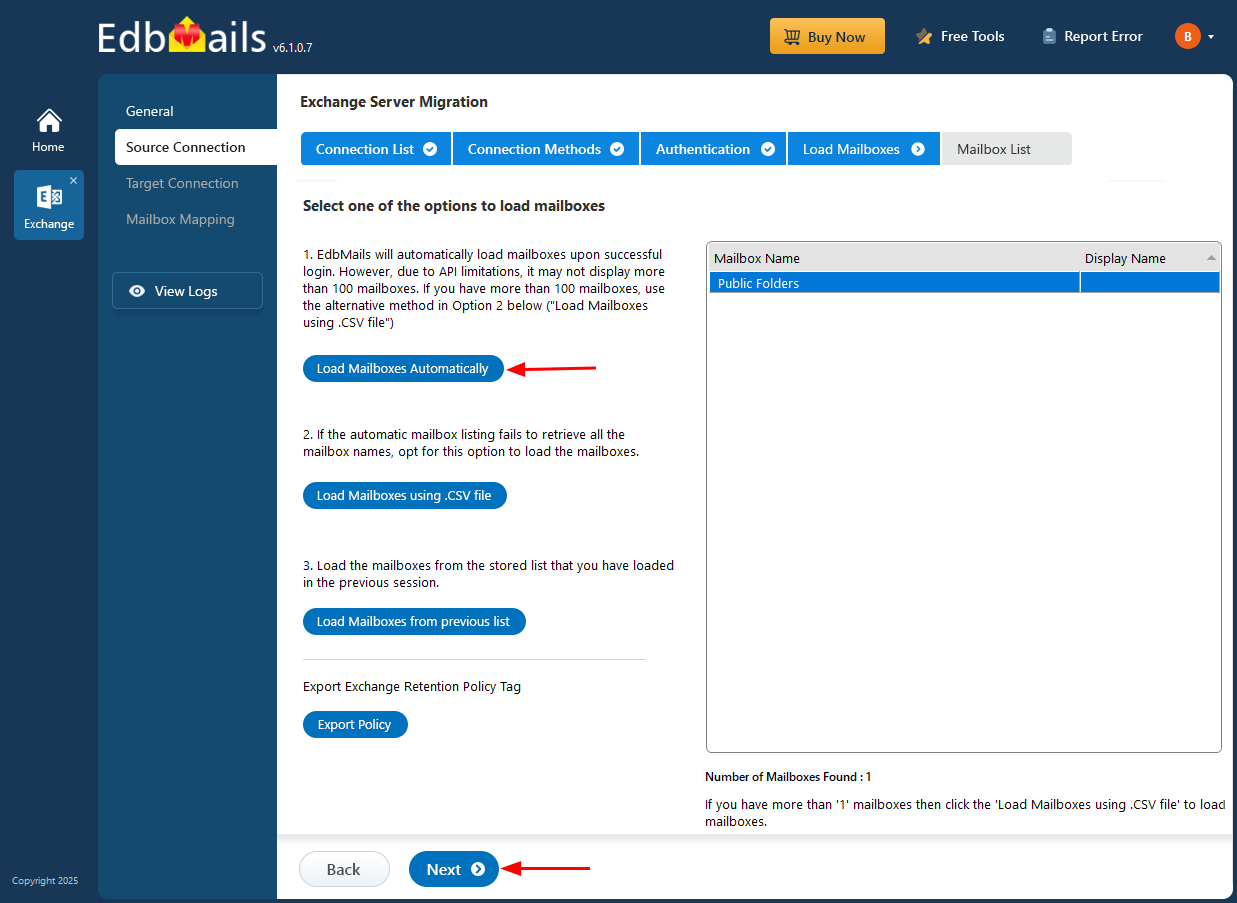
- Select a method to load the public folders, then click the ‘Next’ button to continue.
Step 3: Select Exchange 2010 public folders
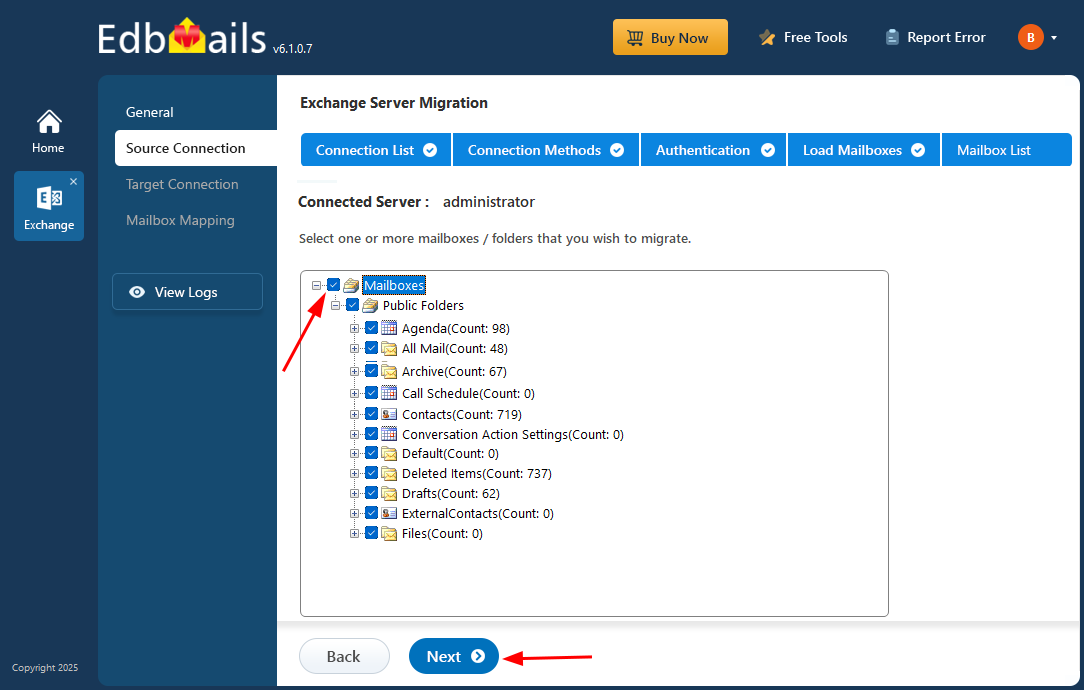
- After successfully logging into your source Exchange server, EdbMails automatically displays all the public folders and their subfolders. You can select all public folders or only the specific ones needed for migration.
- Then, click the 'Next' button
Step 4: Connect to target Exchange 2016 server
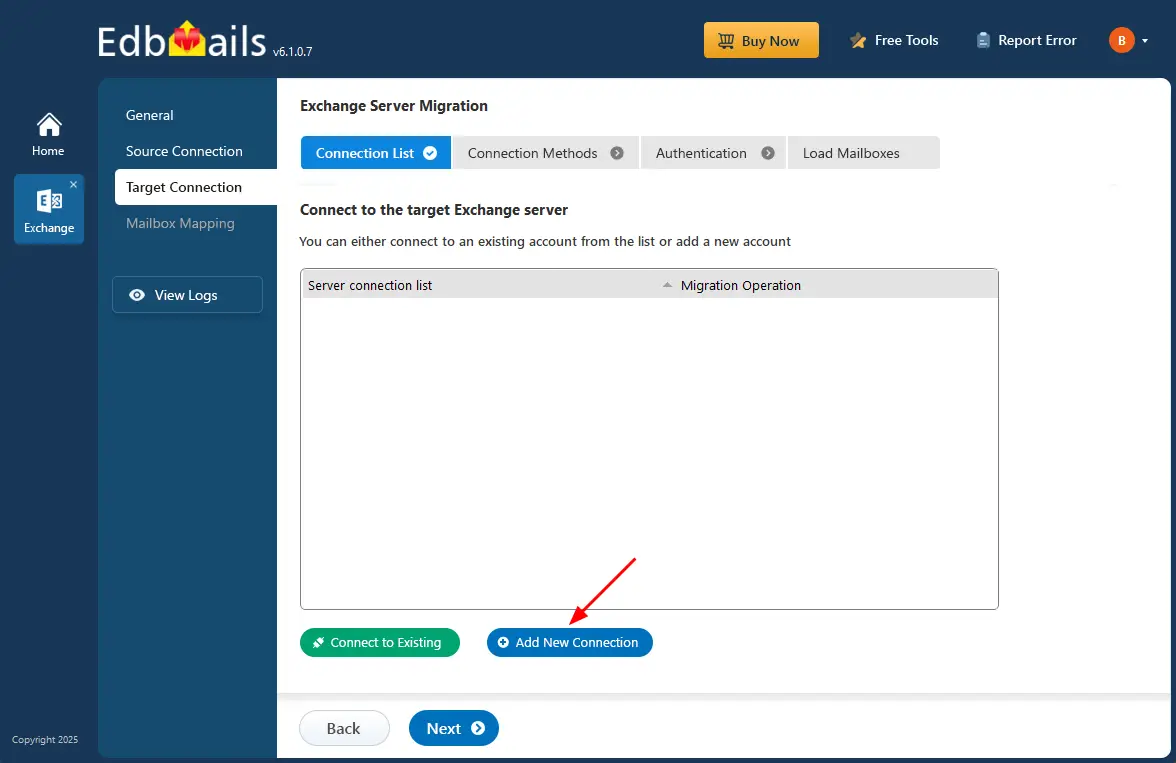
- To connect to the target Exchange server, click ‘Add New Connection’ to set up a new one. If you've already created a connection before, simply choose it from the list and click ‘Connect to Existing’ to move forward.
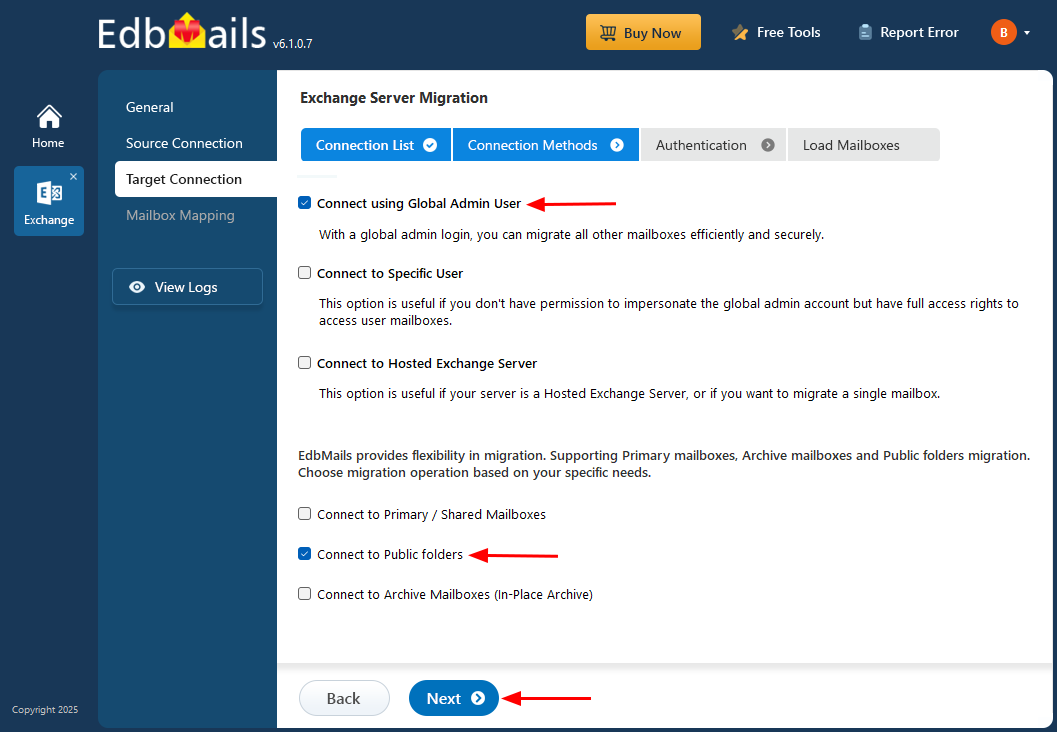
- Select ‘Connect to Public folders’ and click the ‘Next’ button.
Note: Before connecting to your target Exchange 2016 server, ensure that you have created mail-enabled public folders on your target Exchange server and set the necessary admin permissions for all the public folders you wish to migrate. For more details refer to the link below:
Steps to create Exchange Public folders and assign admin permissions.
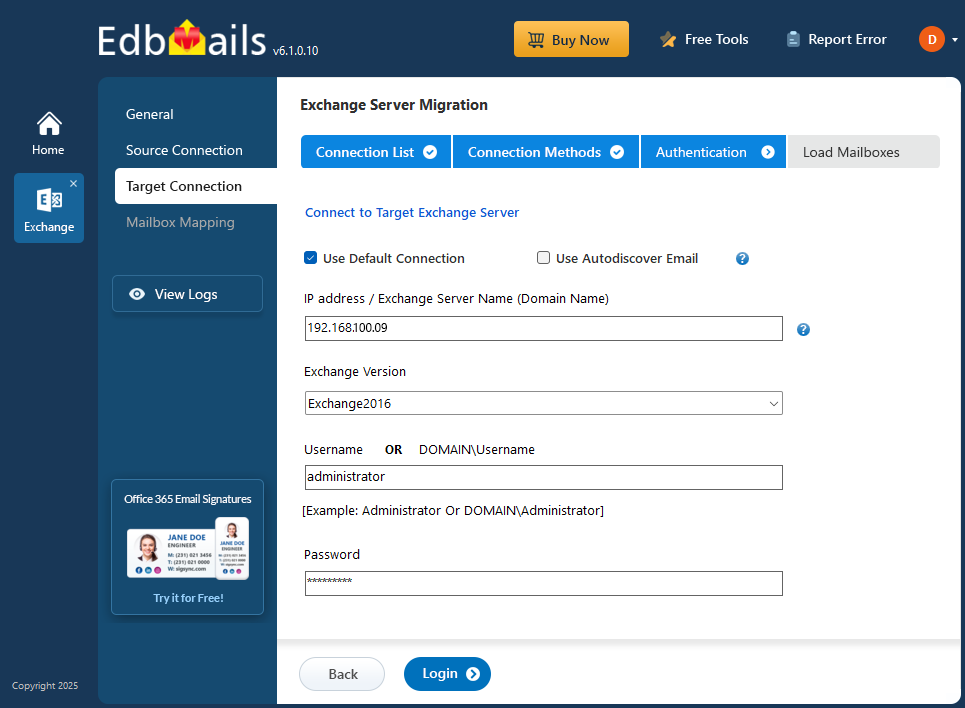
- Enter the Target Exchange 2016 server details and click the ‘Login’ button.
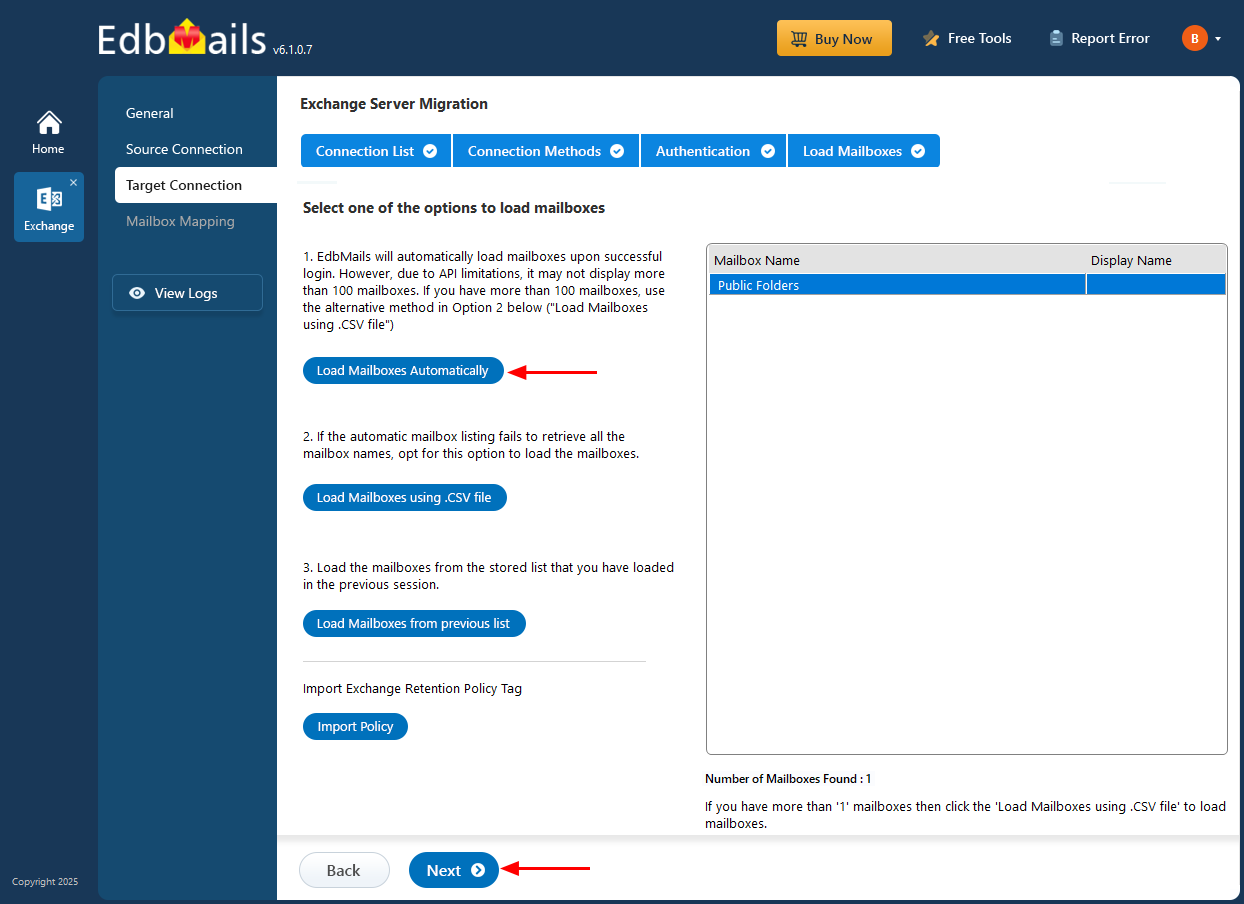
- Choose a method to load the public folders available on the target Exchange 2016 server.
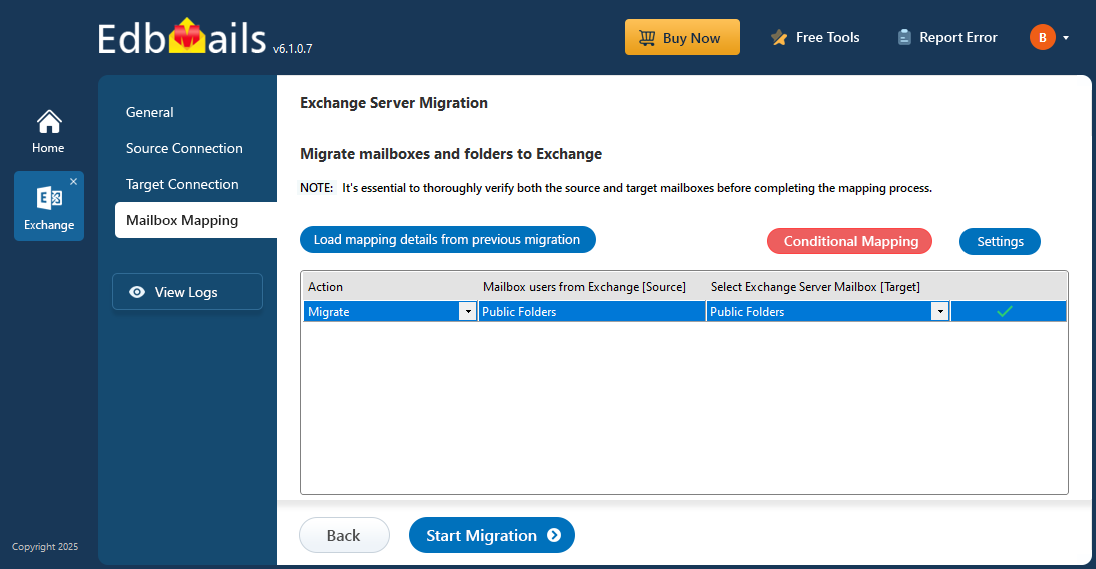
- EdbMails automatically maps public folders between the source and target servers. Alternatively, you can manually map the target public folders to the source public folders.
Note: EdbMails gives you the flexibility to tailor your migration process through the ‘Settings’ option. You can choose to migrate data within specific date ranges, exclude both standard and custom folders, and apply other customizations as needed.
Step 5: Exchange 2010 to 2016 public folder migration
- During the first migration with EdbMails, a complete data transfer is performed. Subsequent migrations from the same source to the target are incremental migrations, transferring only new or modified data. This method optimizes bandwidth usage and significantly reduces migration time, making the process more efficient.
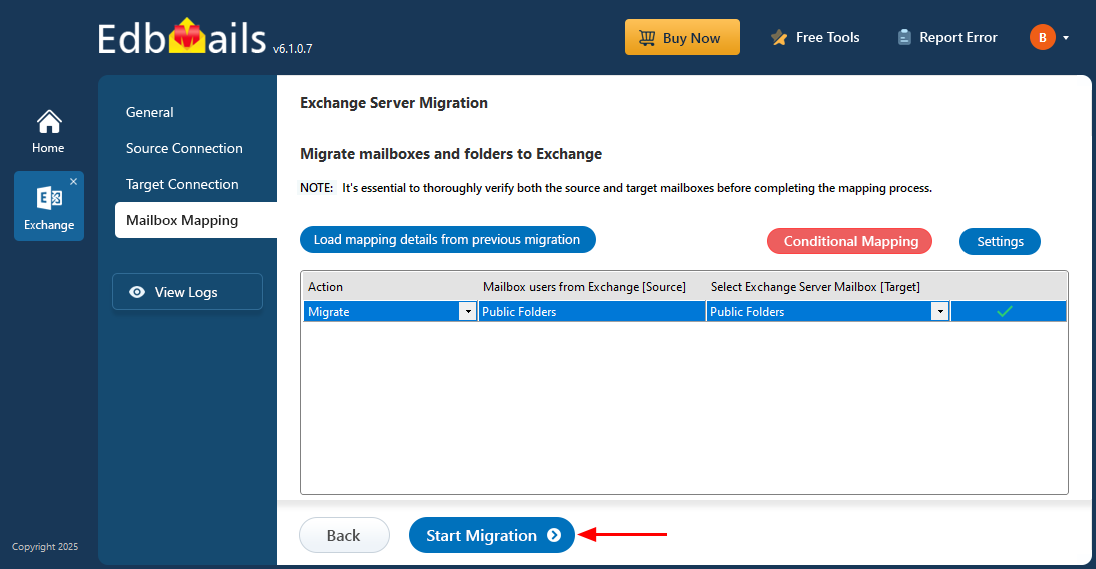
- Click the ‘Start Migration’ button to begin the process.
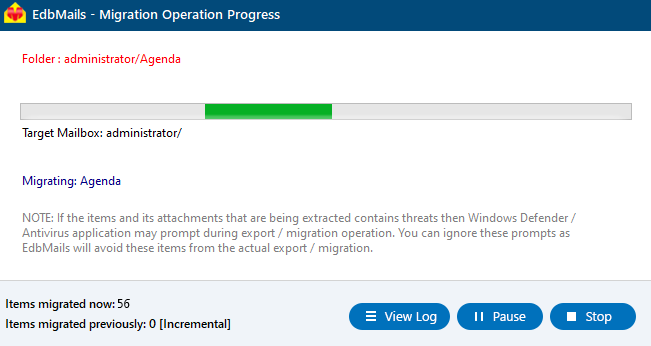
- You can monitor the progress of your migration in real-time. Once the migration is finished, a confirmation message will notify you of its successful completion.
- Click the ‘View Logs’ button to access the migration report, which includes details on the total number of migrated emails and the item count for each folder.
Exchange 2010 to 2016 public folder migration troubleshooting
For potential solutions to migration errors, refer to the Exchange migration troubleshooting guide and the Public folder troubleshooting section. Additionally, you can refer to the frequently asked questions for further assistance.
Benefits of using EdbMails for public folder migration 2010 to 2016
- EdbMails supports fast and efficient migration of public folders from Exchange 2010 to 2016 without any downtime, ensuring users remain unaffected.
- The software preserves the entire public folder hierarchy and permissions, maintaining data integrity throughout the migration process.
- EdbMails incorporates automatic throttling management to optimize bandwidth usage, ensuring a smooth migration experience.
- The incremental migration feature prevents duplicate items during subsequent migration operations, enhancing overall efficiency.
- EdbMails allows you to migrate public folders without the need for PowerShell scripts, significantly simplifying the process.
- Advanced filters facilitate selective migration of items within specified date ranges.
- The automatic mapping of public folders streamlines the migration from Exchange 2010 to 2016, making the process more efficient.
Additional resources:
- EdbMails Exchange migration software
- Exchange to Exchange migration
- Exchange to Office 365 migration
- Exchange public folder migration to Exchange server
- Exchange public folder migration to Office 365
- Hosted Exchange migration
- Exchange 2010 to 2019 migration
- Exchange 2010 to 2016 migration
- Exchange 2013 to 2019 migration
- Exchange 2016 to 2019 migration


