Hosted Exchange to Live Exchange Migration
Migrating from Hosted Exchange to Exchange server is a strategic move for organizations to gain greater control over their email infrastructure, reduce long-term costs, or enhance security and compliance. This process, however, involves several technical challenges, such as minimizing downtime, preserving mailbox permissions, and maintaining folder hierarchies. A successful migration requires a reliable solution that ensures mailbox transfers without data loss, supports large-scale migrations of emails, calendars, contacts, and other data. It is also crucial to retain permissions and attributes like shared mailboxes and public folders while safeguarding data integrity throughout the transition.
EdbMails Exchange migration software is purpose-built to meet these needs. It enables direct migration from Hosted Exchange to live Exchange servers including Exchange 2019, 2016, 2013, 2010 and 2007. With high-performance, concurrent migration and support for incremental migration, EdbMails ensures efficient, secure, and duplicate-free data transfer streamlining the entire migration process.
EdbMails ensures a smooth migration experience by preserving all mailbox permissions and folder structures, maintaining email functionality. Its built-in support for zero downtime allows users to continue their migration process. With advanced filtering options, EdbMails enables selective migration for example, transferring emails within a specific date range so only relevant data is migrated to the target server.
By addressing the technical complexities of Hosted Exchange to Exchange migrations, EdbMails delivers a secure, reliable, and user-friendly solution that simplifies the process while maintaining data integrity and complete migration process.
Hosted Exchange to on-premises Exchange: Pre-Migration Activities
- Step 1: Check that your system meets the Exchange server setup requirements.
The following links will help you set up your target Exchange server. Learn more about the network, hardware, coexistence scenarios, and operating system requirements for installing Exchange.
- Step 2: Prepare your system with the following prerequisites for Exchange server
Complete the following prerequisites for Active Directory, Windows Mailbox server, and Windows Edge Transport servers before installing the target Exchange server.
- Step 3: Set up the target Exchange server for migration
Given below is a list of key points for installing and preparing the Exchange server for migration.
- Prepare AD and domains
- Before installing the Exchange server you need to prepare your Active Directory forest and its domains for the new version of Exchange.
- If you have a separate team to manage the Active Directory schema, you need to first extend the active directory schema, else proceed to the next step to prepare the Active Directory.
- If you have multiple domains you need to additionally prepare the Active Directory domains.
- Install Exchange server on your computer
Before installing the Exchange server, ensure that you meet the server system requirements and prerequisites as outlined previously. Next, follow the link to install Exchange 2016 or install Exchange 2019 from the setup wizard based on which server you want to migrate to.
- Prepare a clean Exchange target environment
- Create and configure a Send connector to send mail outside the Exchange organization.
- By default, Exchange automatically creates receive connectors for inbound mail flow when the mailbox server is installed. If you need to configure receive connectors, follow the steps in the link.
- Add accepted domains to allow recipients to send and receive email from another domain.
- Configure the default email address policy to add the accepted domain to every recipient in the organization.
- Configure external URLs (domains) on the virtual directories in the Client Access (frontend) services on the Mailbox server to allow clients to connect to your server from the internet (outside the organization’s network).
- Configure internal URLs on the virtual directories in the Client Access (frontend) services on the Mailbox server to allow clients to connect to your server from the internal network.
- Configure SSL certificates from a third-party certificate authority for services such as Outlook Anywhere and Exchange ActiveSync.
- Verify the Exchange server installation by running the command Get-ExchangeServer on the Exchange Management Shell (EMS).
- Create trust relationship between forests (Optional)
A forest trust is an authentication between two domains within the same Active Directory forest which creates a trust between two root domains for exchanging information. By creating a trust in advance, it is possible to address the trust issues during or after the migration.
- Create mailboxes on the target Exchange server
Before starting the migration, ensure that mailboxes are created on the target Exchange server. If you’ve installed EdbMails on the target server, you can select the option to automatically create mailboxes during the migration setup. Alternatively, if you prefer to create them manually, refer to the links below for detailed steps.
- Assign management roles to the admin account
If you are using a global admin account to connect source and target Exchange servers, ensure to set impersonation rights.
- Configure the throttling and message-size limits
Create custom policies for EWS throttling and set the message size to the maximum value on the Exchange server by following the steps provided in the link below.
- Prepare AD and domains
- Step 1: Check that your system meets the Exchange server setup requirements.
Benefits of Hosted Exchange to Live Exchange Migration
1. Greater data control and ownership: Organizations have greater control over their mail data, configurations, and backups without depending on third-party service providers.
2. Enhanced customization of security and compliance policies: You can tailor security settings, retention policies, and compliance rules to match your company’s internal or industry-specific standards.
3. Reduced long-term operational costs: Owning your Exchange environment eliminates recurring hosted service fees, reducing costs over time for larger organizations.
Challenges and Solutions for Hosted Exchange Migration
Downtime Risk:
- Challenge: Migration downtime can interrupt email access and business operations.
- Solution: The EdbMail Exchange Migration Tool supports zero-downtime migration, allowing users to continue accessing their mailboxes during the transfer process.
Mailbox Permissions and Folder Structure Loss:
- Challenge: Incorrect migration methods can lead to loss of mailbox permissions, shared mailboxes, or folder hierarchy.
- Solution: EdbMails automatically preserves all mailbox permissions, folder structures, shared mailboxes, and public folders, ensuring a seamless user experience after migration.
Duplicate Items or Data Overlap:
- Challenge: Re-running migrations often causes duplication of emails and other items.
- Solution: EdbMails Exchange incremental (delta) migration feature transfers only newly added or modified items, preventing duplicates and optimizing bandwidth.
Complex Mailbox Mapping:
- Challenge: Manually mapping large numbers of mailboxes between source and target servers can be time-consuming and error-prone.
- Solution: EdbMails software offers automatic mailbox mapping, which aligns source and target mailboxes intelligently to reduce manual effort.
Performance Bottlenecks During Large-Scale Migration:
- Challenge: Migrating thousands of mailboxes can strain resources and extend migration time.
- Solution: With parallel mailbox migration and high-performance data transfer, EdbMails speeds up large-scale migrations efficiently.
Data Integrity Concerns:
- Challenge: Incomplete or corrupted data transfer can affect mailbox reliability.
- Solution: EdbMails ensures complete mailbox integrity and uses secure connection protocols (OAuth, TLS) for safe data transfer.
Steps to Migrate Hosted Exchange to Live Exchange Server
Step 1: Download and install EdbMails software
- Download and install EdbMails on your computer that has access to both the source and target servers.
System requirements for Hosted Exchange to on-premises Exchange migration
- Launch the EdbMails application and click the 'Login' button by entering your email address and password, or click 'Start Your Free Trial' button.
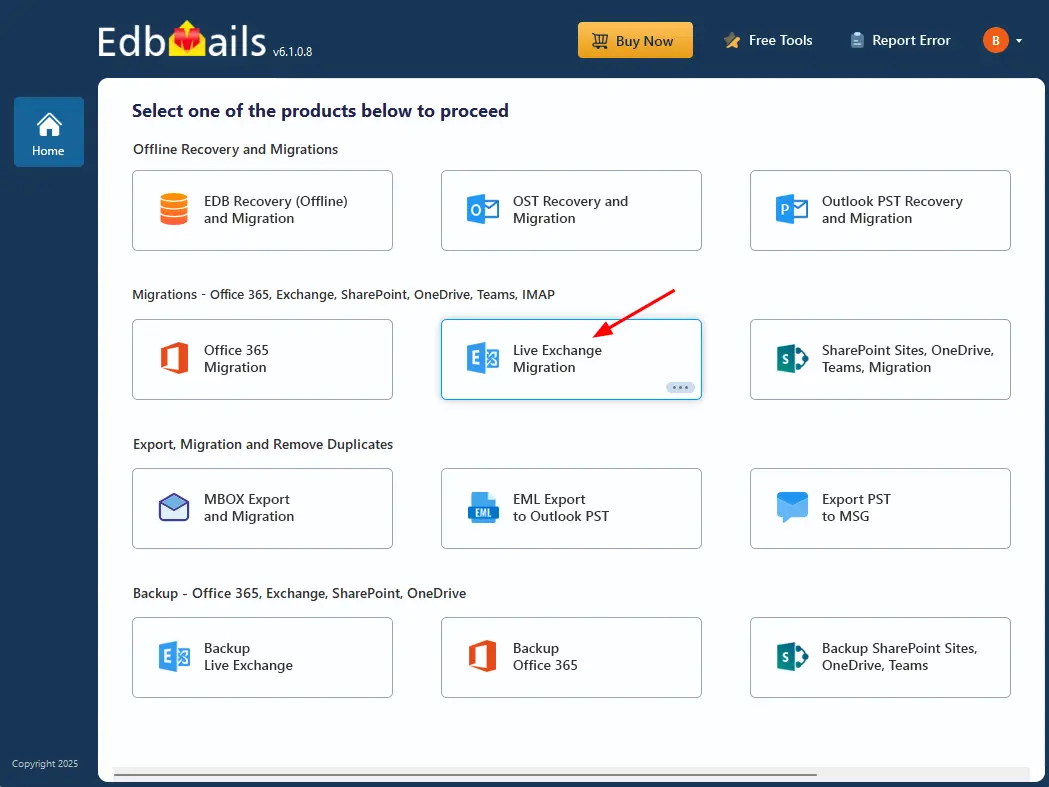
- Choose the ‘Live Exchange migration’ option.
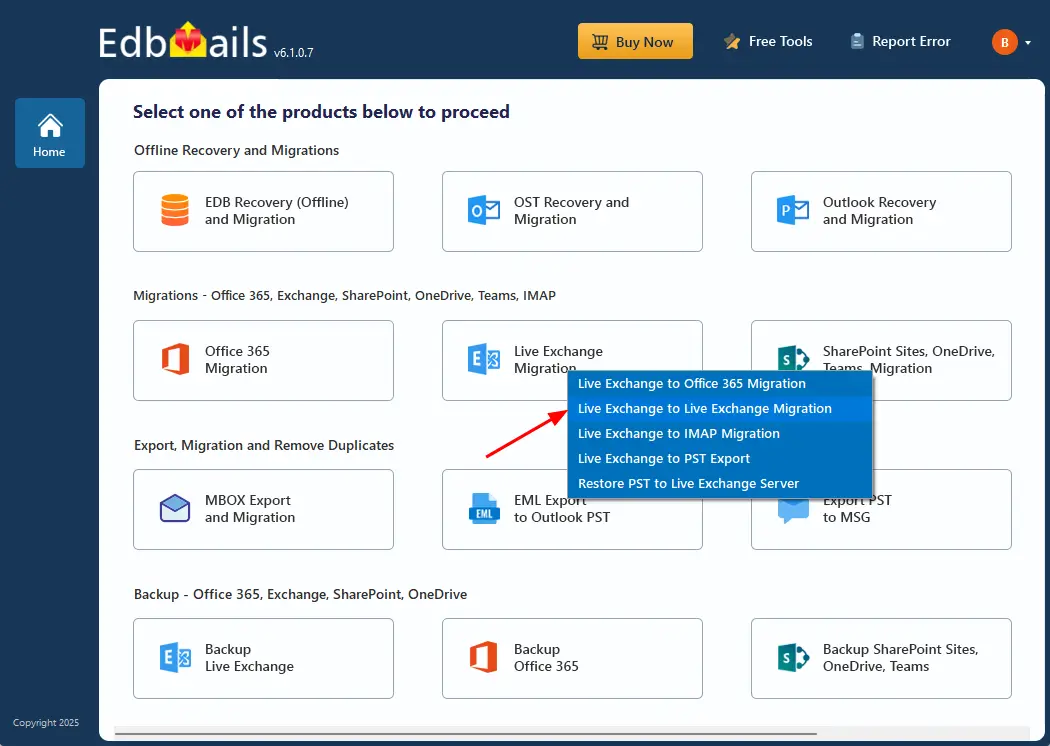
- Select 'Live Exchange to Live Exchange Migration'
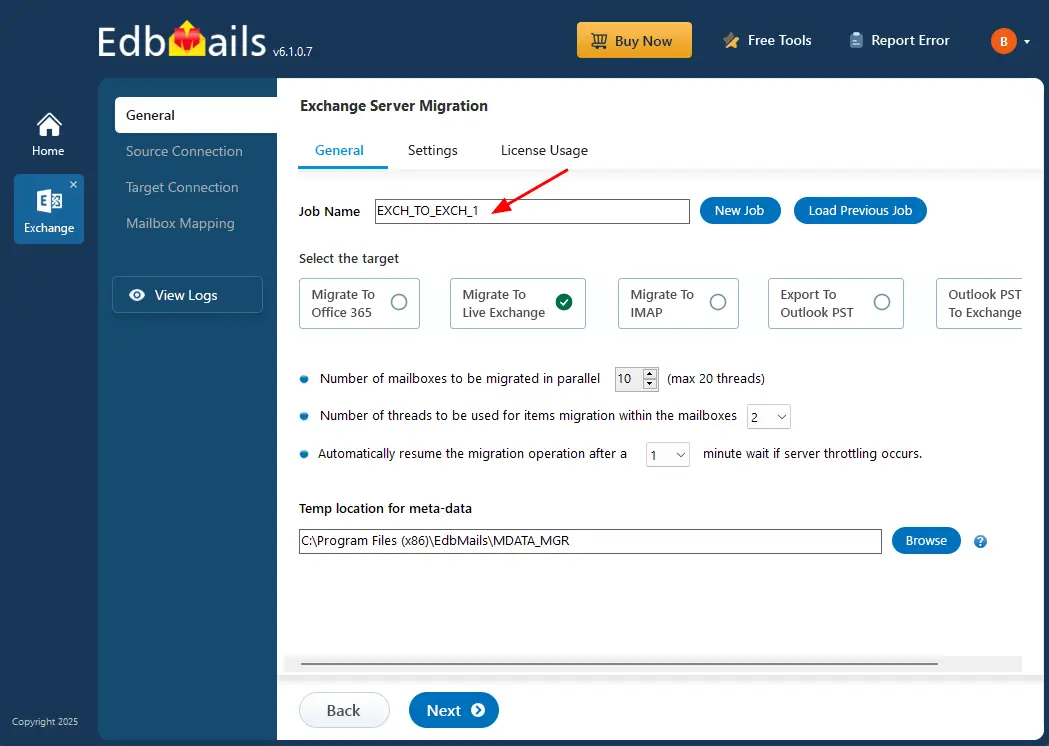
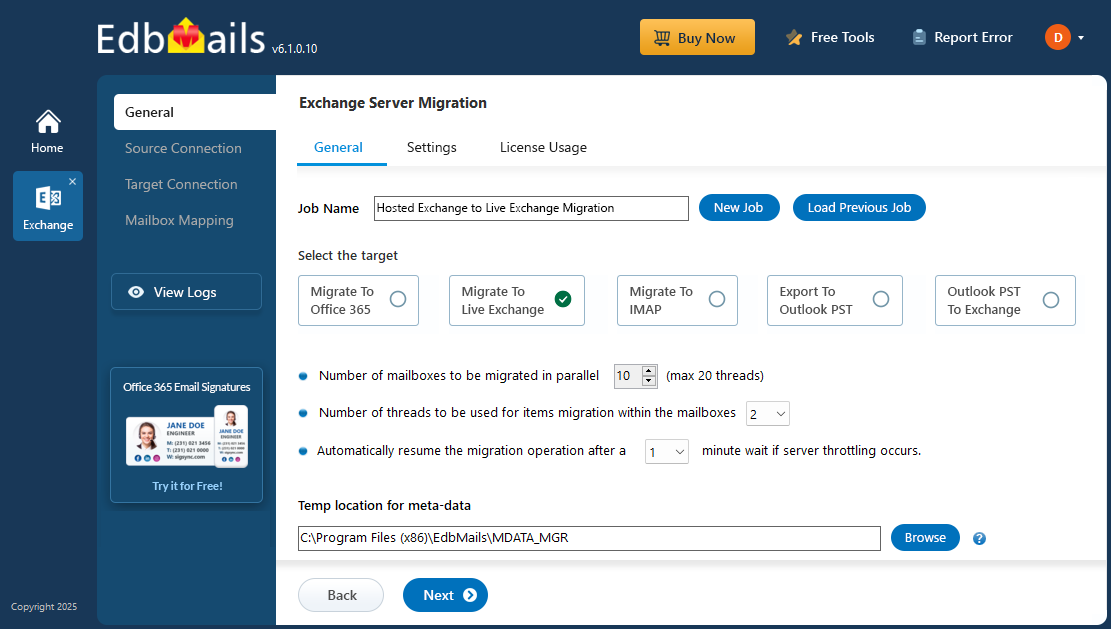
- Keep the default job name, or click ‘New Job’ to enter a name of your choice.
- Download and install EdbMails on your computer that has access to both the source and target servers.
Step 2: Connect to source Hosted Exchange server
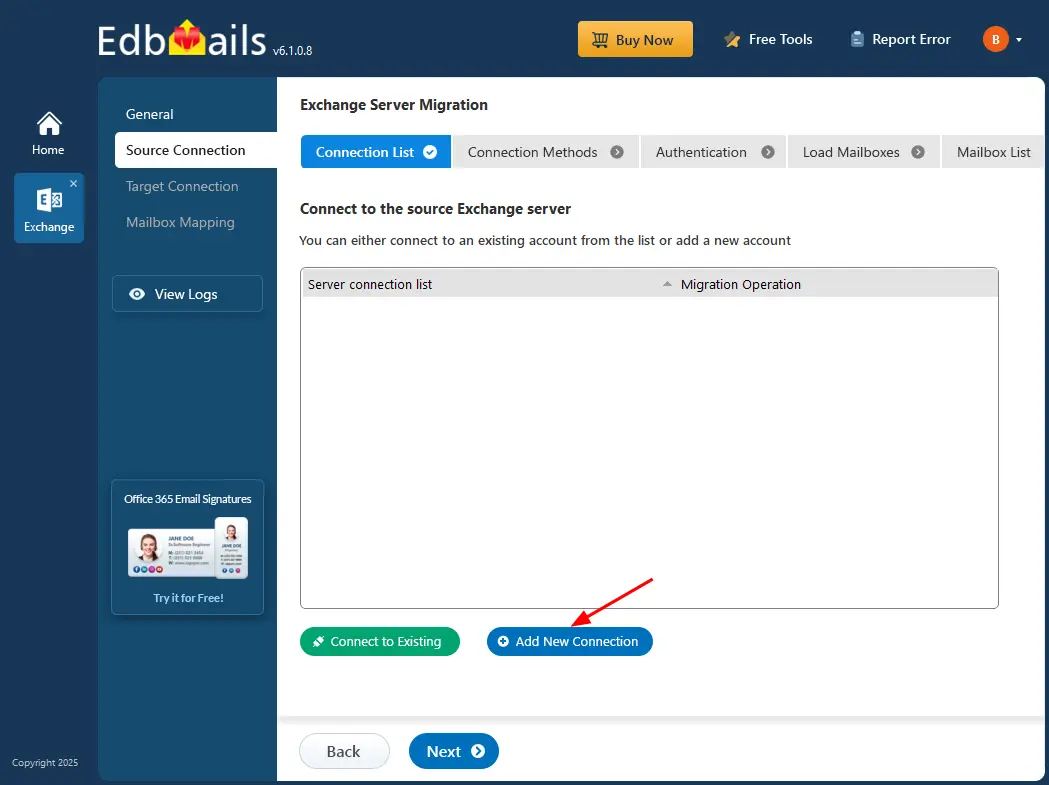
- To set up a new connection to the source Hosted Exchange server, click the ‘Add New Connection’ button. If you've connected before, simply select the existing connection from the list and click ‘Connect to Existing’ to proceed.
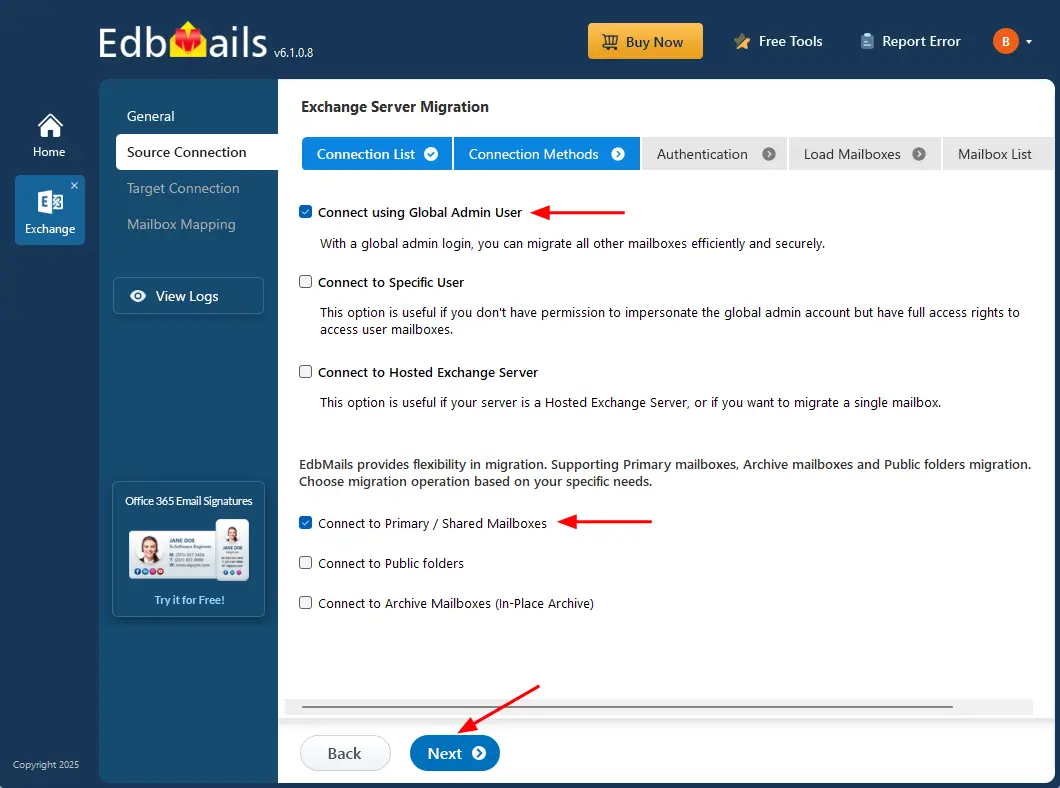
- Select ‘Connect to Hosted Exchange Server’ and the required migration option.
With EdbMails, you can easily migrate mailboxes, public folders, and archive mailboxes from Hosted Exchange to On-Premises Exchange server.
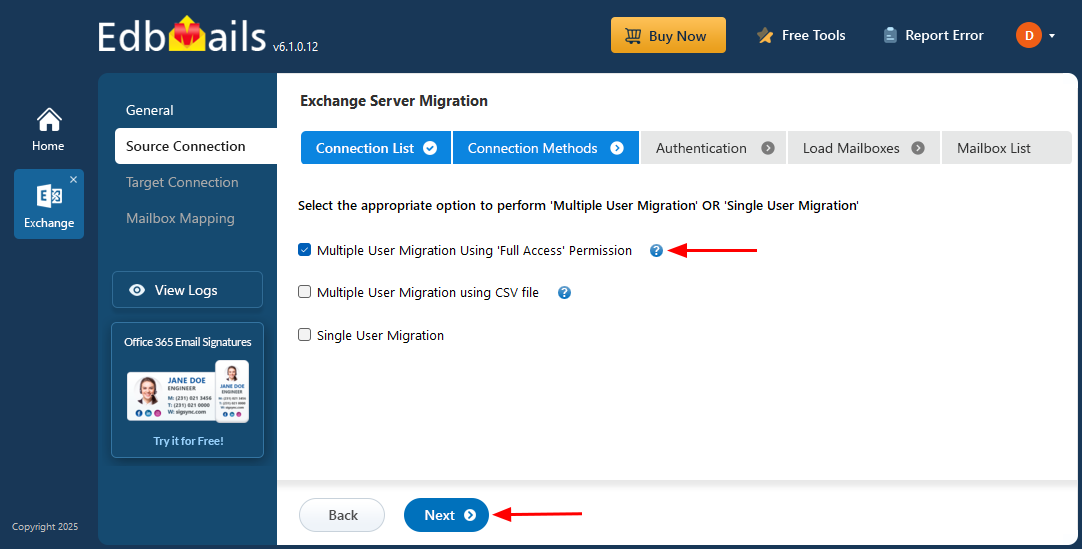
- Select the appropriate option to perform ‘Multiple user migration’ or ‘Single User migration’.
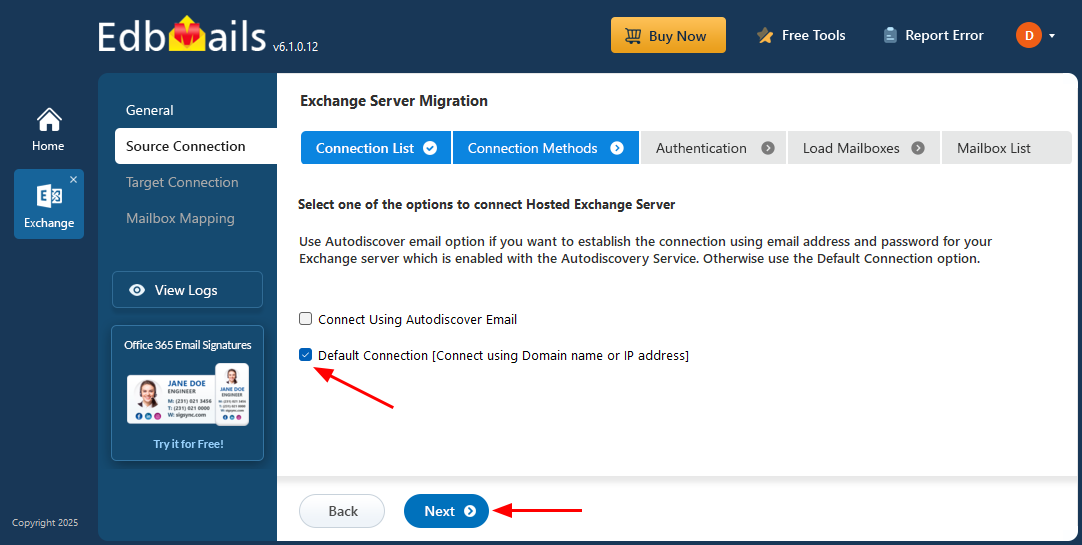
- Choose either 'Connect Using Autodiscover Email' with your email address or password for your Hosted Exchange server that has Autodiscover service enabled, or select 'Default Connection' using the domain name or IP address.
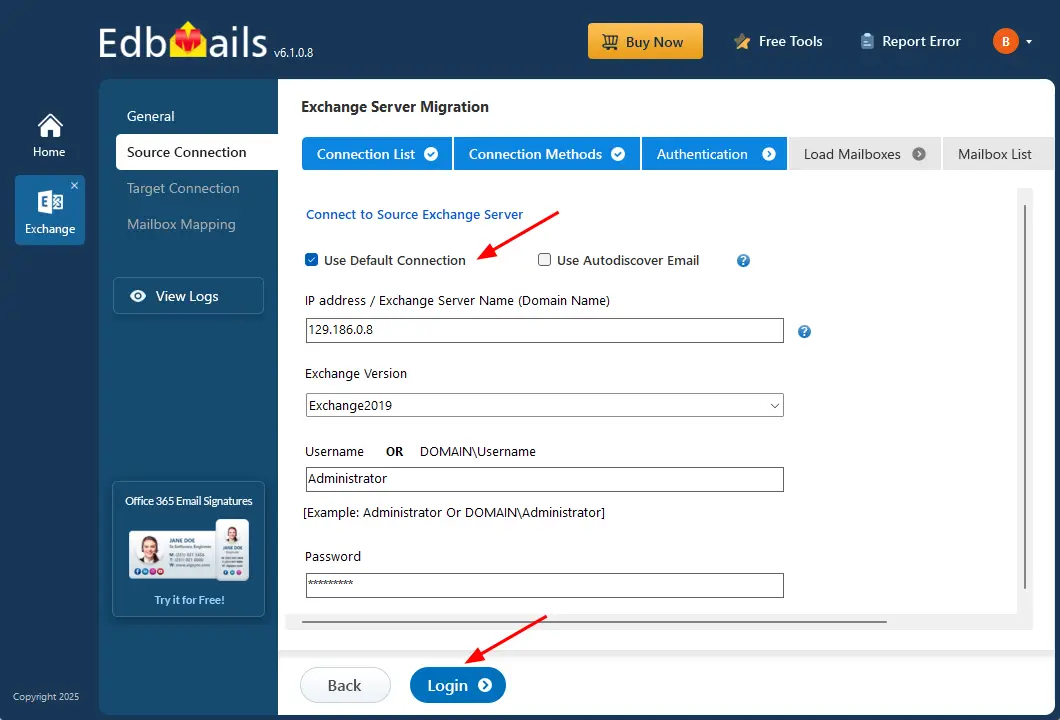
- Enter the required details and click the ‘Login’ button.
- Select the required option to load the mailboxes. EdbMails automatically loads mailboxes from your source Hosted Exchange server. You can also load mailboxes using a csv file.
Step 3: Select the Hosted Exchange server mailboxes
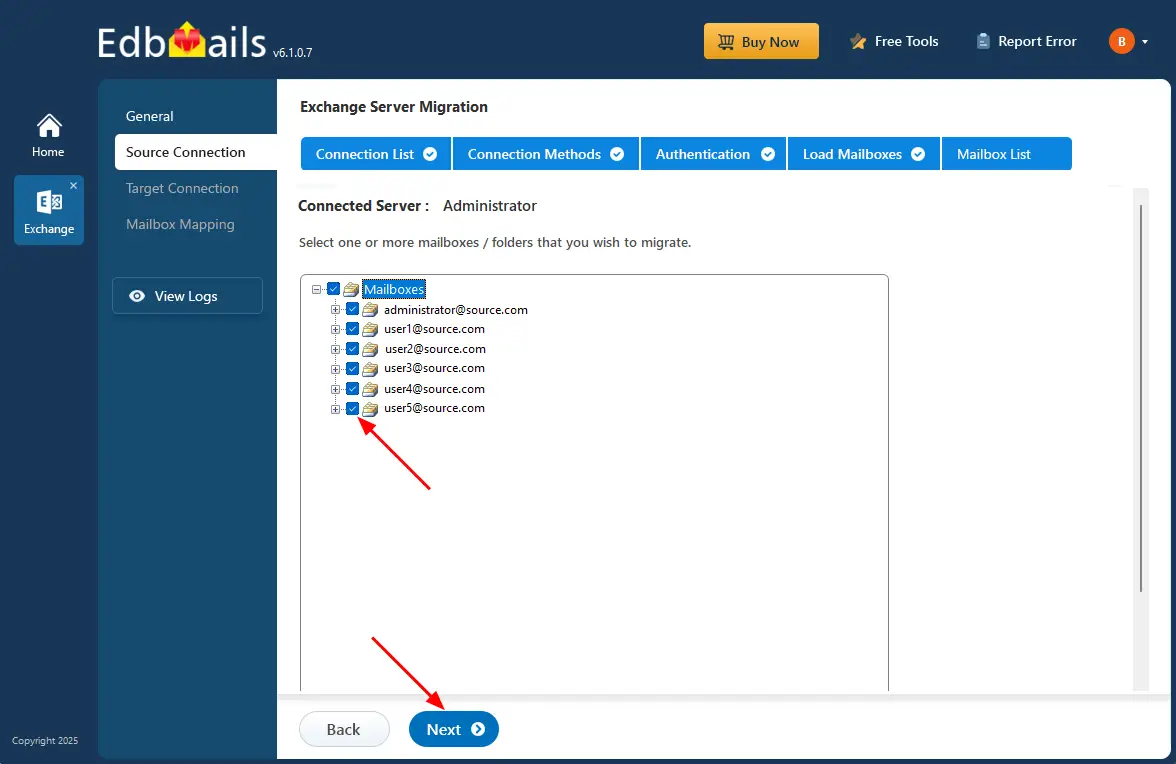
- Choose the mailboxes you want to migrate.
Step 4: Connect to the target on-premises Exchange server
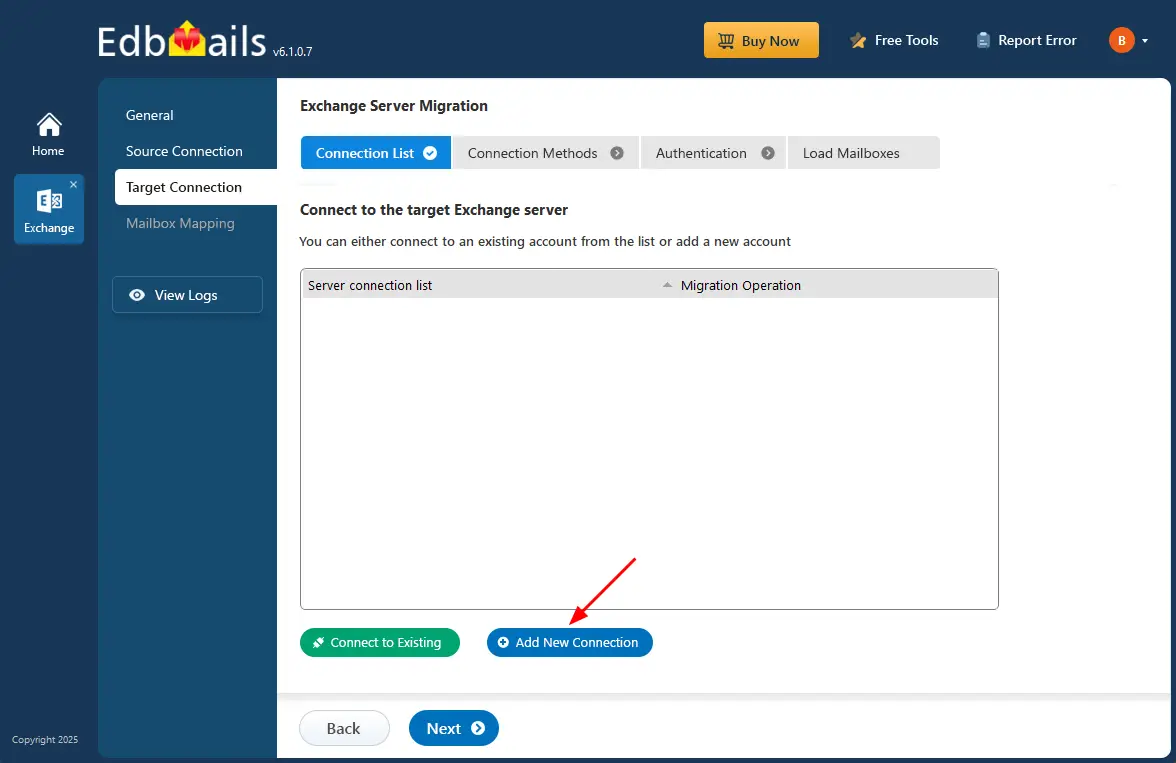
- To connect to the target Exchange server, click ‘Add New Connection’ for a fresh setup. If you've already created one, Select it from the list and click ‘Connect to Existing’.
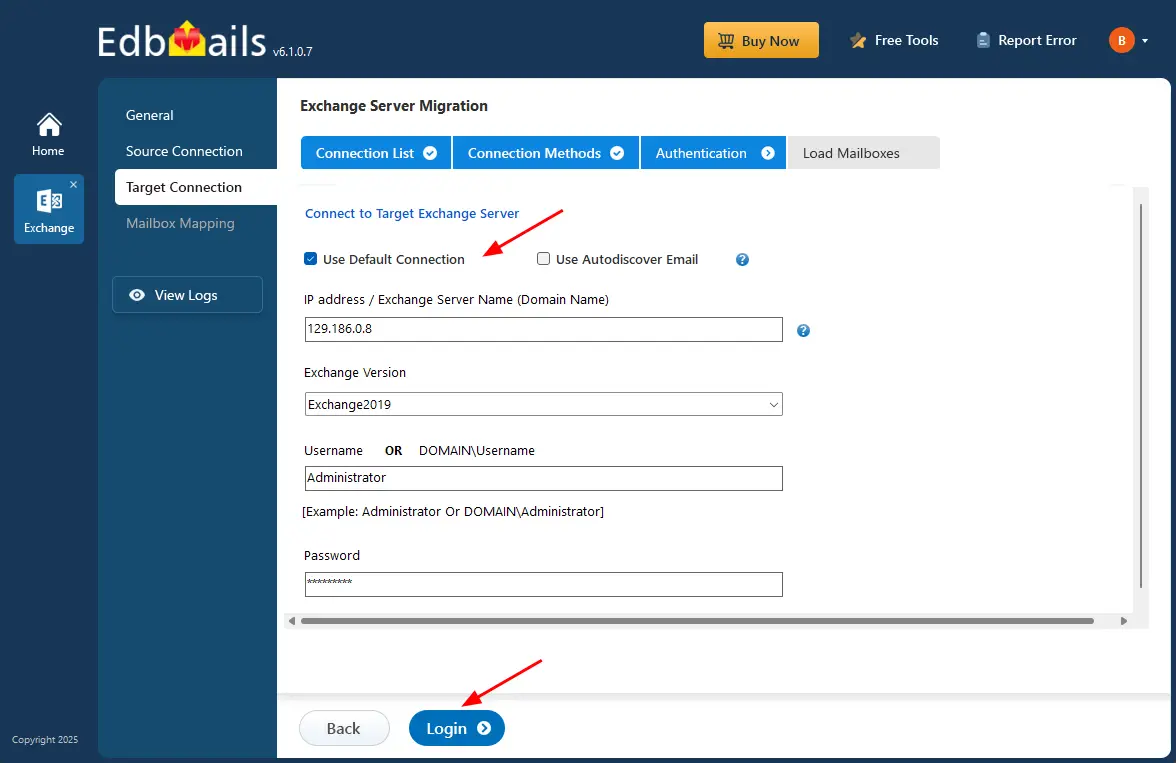
- Choose the required connection option.
- Enter the target Exchange server details and click the ‘Login’ button.
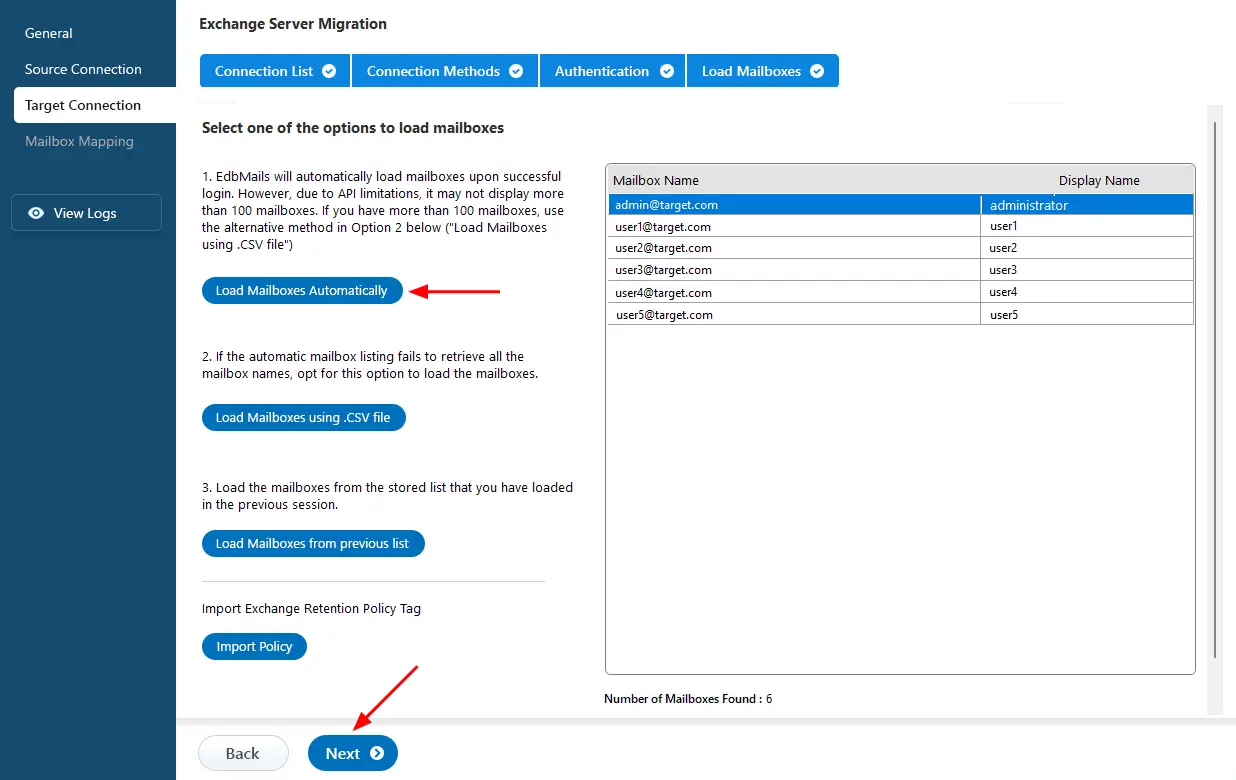
- Select the required option to load the mailboxes. EdbMails automatically loads your target server mailboxes. You can also load mailboxes using a csv file.
Step 5: Hosted Exchange to Live Exchange Mailbox Mapping
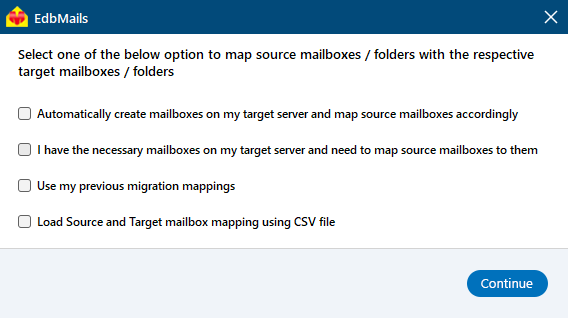
- Select the required mapping option..
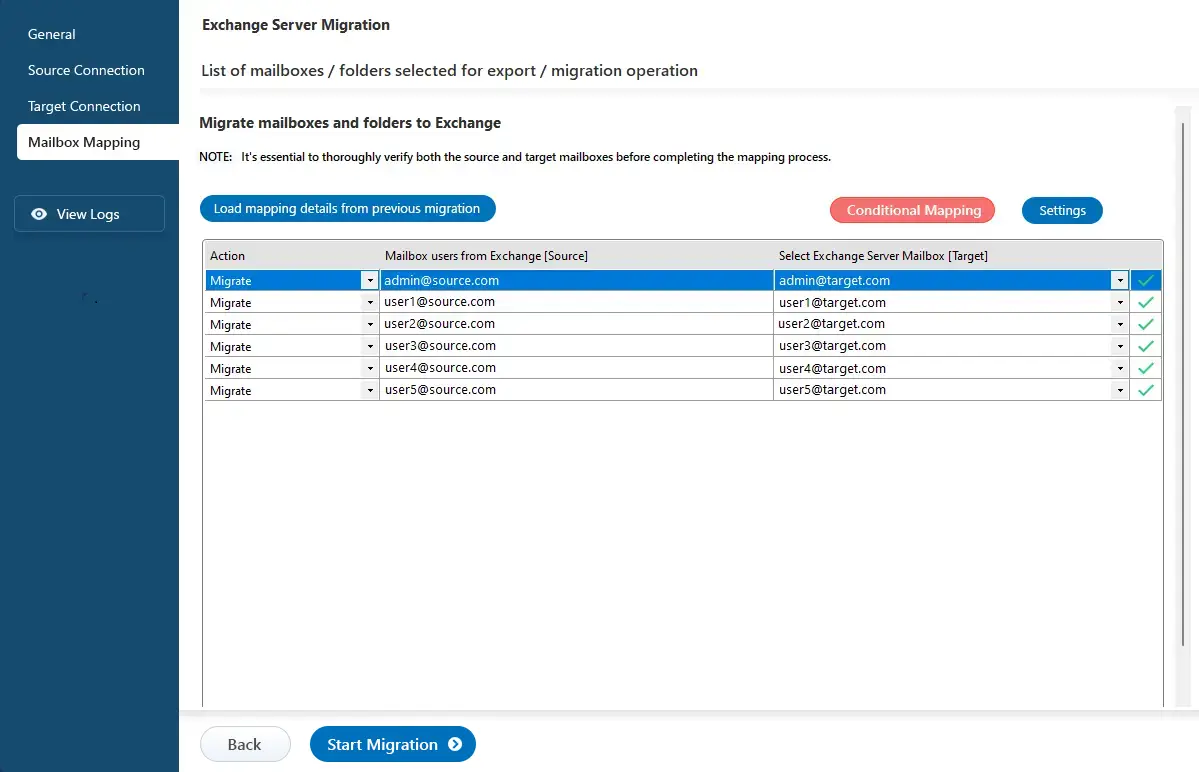
- EdbMails automatically maps the mailboxes from the Hosted Exchange server to the live Exchange server. This feature significantly reduces manual effort and the time required for large-scale migrations.
Step 6: Start Migration from Hosted Exchange to Live Exchange Server
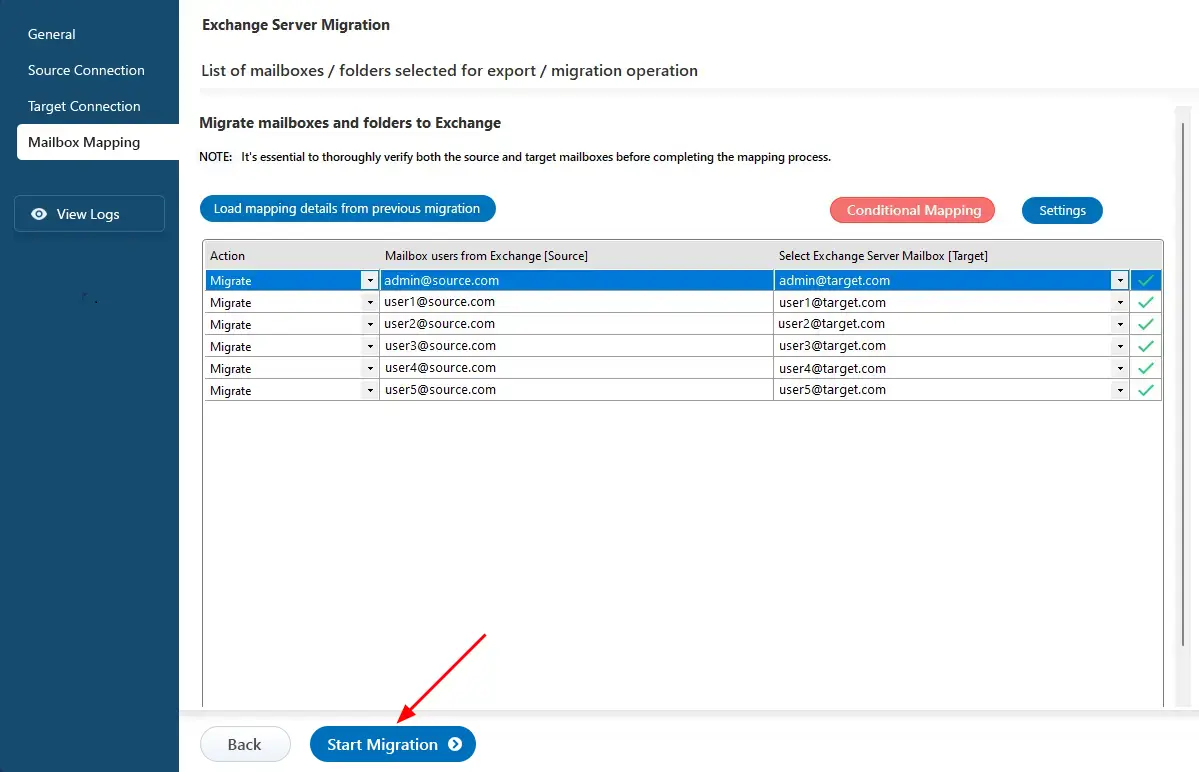
- Click the ‘Start Migration’ button to initiate the process.
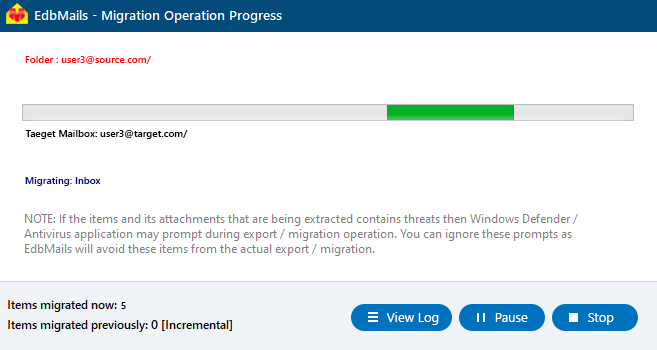
- Once the migration is successfully finished, EdbMails prompts the migration completion message. Click the 'View Log' button to check the migration report.
Hosted Exchange to live Exchange : Post-Migration Tasks
- Step 1: Update the MX records to point to target Exchange server
To receive messages on the target Exchange server, update the MX records to enable email to work with the new server you have migrated to. In addition, configure the Autodiscover record to allow Outlook to connect to the migrated mailboxes.
- Step 2: Create a new Outlook profile for users in the new domain
Configure the Outlook profile for each user in your domain if Outlook has problems connecting to the new Exchange server.
- Step 1: Update the MX records to point to target Exchange server
Hosted Exchange to live Exchange migration troubleshooting
For assistance with migration errors, refer to the Exchange migration troubleshooting guide, which offers potential solutions. Additionally, for more information about EdbMails Exchange migration, check the Frequently Asked Questions.
Advantages of using EdbMails for Hosted Exchange migration
- Concurrent Mailbox Migration : EdbMails allows for concurrent mailbox migration, enabling multiple mailboxes to be migrated simultaneously. This significantly speeds up the migration process, making it ideal for large-scale migrations.
- High-performance migration : EdbMails provides high-performance migration capabilities that facilitate faster and more efficient data transfers, reducing downtime and enhancing overall productivity.
- Migrate from any Hosted Exchange server : EdbMails allows for migration from any hosted Exchange server (such as Intermedia, Rackspace, and GoDaddy) to an on-premises Exchange server, providing flexibility and convenience for organizations transitioning their email infrastructure.
- Granular brick-Level migration : EdbMails enables the migration of individual items, such as emails, contacts, and calendar entries, allowing for precise control over data transfer.
- Incremental migration : EdbMails supports an incremental (delta) migration feature that ensures only new or modified items are migrated during subsequent operations, effectively eliminating duplicates and optimizing bandwidth usage.
- Advanced filtering options : EdbMails allow you to migrate only the emails, contacts, and calendar items you need by applying specific date ranges and excluding unwanted folders.
- Automatic mailbox mapping : EdbMails supports automatic mapping of source mailboxes to target mailboxes, ensuring accurate data alignment during migration.
- Direct migration : EdbMails enables direct migrations from any Exchange version (2007-2019) without the need for coexistence issues.


