Migrate Exchange to Hosted Exchange Server
Migrating from an on-premises Microsoft Exchange server to a Hosted Exchange server gives organizations the opportunity to greatly improve their email systems. Solutions like Microsoft 365, Rackspace, and Intermedia offer better performance, stronger security, and enhanced collaboration. However, moving to a hosted server requires careful planning and execution to ensure a smooth transition.
EdbMails Exchange migration software stands out as an effective solution for transferring mailbox data. It is designed to manage large data volumes effortlessly, ensuring that essential business communications such as emails, contacts, calendars, and tasks are moved securely to the new system without performance issues.
EdbMails minimizes network bandwidth usage and allows businesses to keep running without disruption during the migration. Additionally, the software’s ability to manage concurrent mailbox migrations simultaneously further enhances performance, enabling larger organizations to migrate numerous mailboxes in parallel without slowing down the transfer process.
EdbMails offers an intuitive, user-friendly interface that simplifies the migration process for both technical and non-technical users. Its easy-to-navigate dashboard provides real-time monitoring, giving administrators the ability to track progress and make decisions based on live data. This visibility helps identify any potential issues early, ensuring the migration stays on track.
A key advantage of EdbMails is its focus on data integrity. The software employs advanced verification methods throughout the migration to ensure that no data is lost or corrupted. This attention to detail is vital for businesses that rely on accurate information. Supporting various Exchange versions, including 2019, 2016, 2013, and 2010, EdbMails allows organizations to migrate efficiently from different legacy systems to a Hosted Exchange software, ensuring a smooth transition to the Hosted Exchange environments.
Common Challenges & Solutions during Live Exchange to Hosted Exchange Migration.
This section helps build credibility and trust by showing that EdbMails not only performs migrations efficiently but also handles the real-world issues businesses often face during Exchange migrations.
- Mailbox Throttling:
Challenge: Exchange servers often limit the migration speed per mailbox to prevent overload (Microsoft’s throttling policies).
Solution: EdbMails uses parallel migration and automatic throttling management to maintain optimal speed, ensuring continuous and efficient data transfer.
- Credential Authentication Errors:
Challenge: Incorrect credentials or permission issues can stop the migration from proceeding.
Solution: It supports Modern Authentication (OAuth 2.0), simplifying secure login and ensuring that global admin or impersonation rights are properly configured.
- Data Integrity and Loss Prevention:
Challenge: During large migrations, there’s a risk of data corruption or missing mailbox items.
Solution: EdbMails ensures complete data integrity by maintaining folder hierarchy, metadata, and message properties. It uses built-in verification to confirm all data is migrated accurately.
- Downtime and Service Disruption:
Challenge: Migration can affect user access and productivity if not managed properly.
Solution: EdbMails maintains zero-downtime migration and incremental sync, allowing users to continue working while migration happens in the background.
- Mailbox Mapping Complexity:
Challenge: Manually mapping large numbers of mailboxes between source and target can be error-prone.
Solution: It features automatic mailbox mapping, saving time and reducing manual errors.
- Mailbox Throttling:
Exchange to Hosted Exchange migration : pre-requisites
- Network configuration : Ensure that your network settings allow for secure communication between the on-premises Exchange server and the Hosted Exchange environment. This includes verifying firewall settings and configuring necessary ports.
- DNS settings : Update DNS records to facilitate proper name resolution and mail flow during and after the migration. This includes configuring MX records and ensuring Autodiscover is set up correctly.
- User accounts : Prepare user accounts in the Hosted Exchange environment. Ensure that all users who will be migrated have corresponding accounts created and properly licensed.
- Set impersonation rights : If you are using a Global Admin account to connect to the source and target servers, ensure that impersonation rights are set.
- Mailbox size and quotas : Review mailbox sizes and confirm that the Hosted Exchange environment meets the storage requirements for all mailboxes being migrated.
- Compatibility check : Verify that the versions of Exchange in use are compatible for migration. Ensure that all necessary service packs and updates are applied to the on-premises Exchange server.
- Testing environment : If possible, set up a testing environment to validate the migration process before executing it in the production environment.
Steps to migrate Exchange server to Hosted Exchange server
Step 1: Download and Install the EdbMails application
- Download and install EdbMails on your system.
Essential system requirements for Exchange to Hosted Exchange migration.
- Launch the EdbMails application and click 'Login' with your email ID and password or you can choose the 'Start Your Free Trial' option.
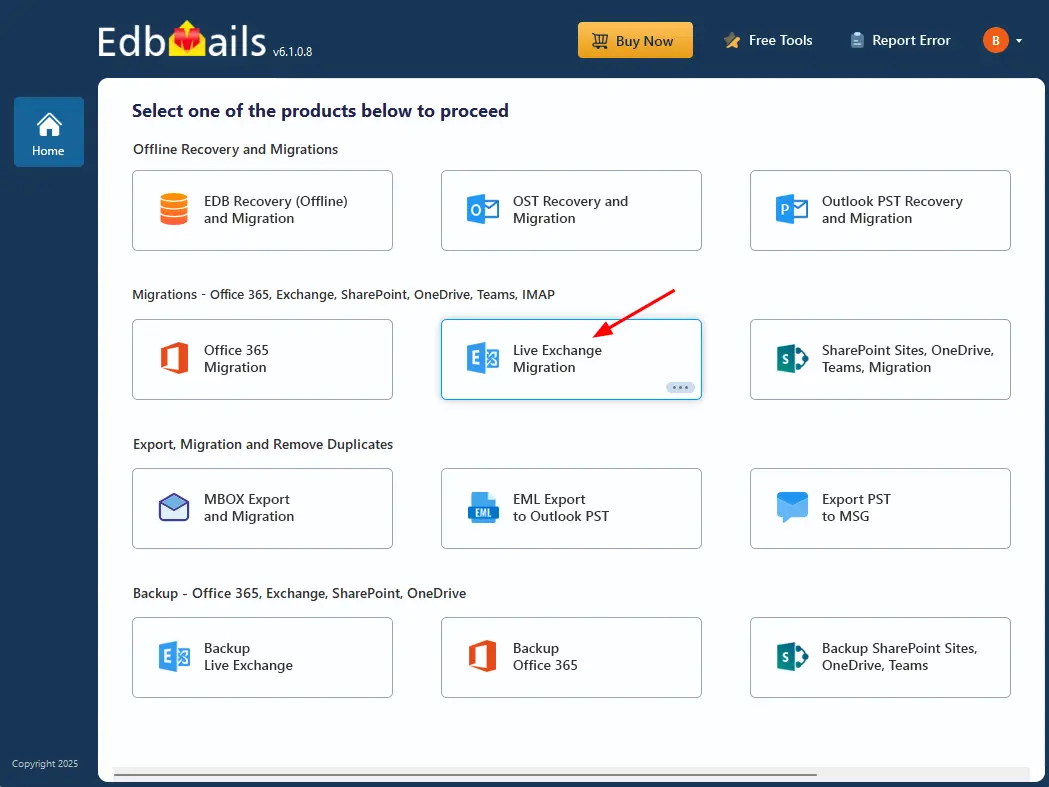
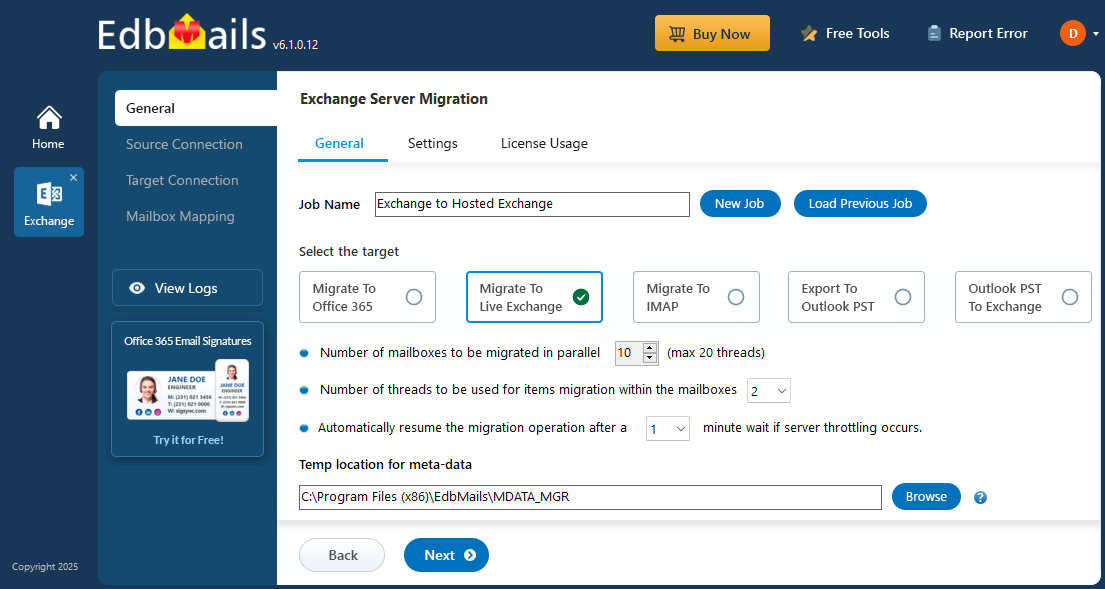
- Select ‘Live Exchange migration’ option.
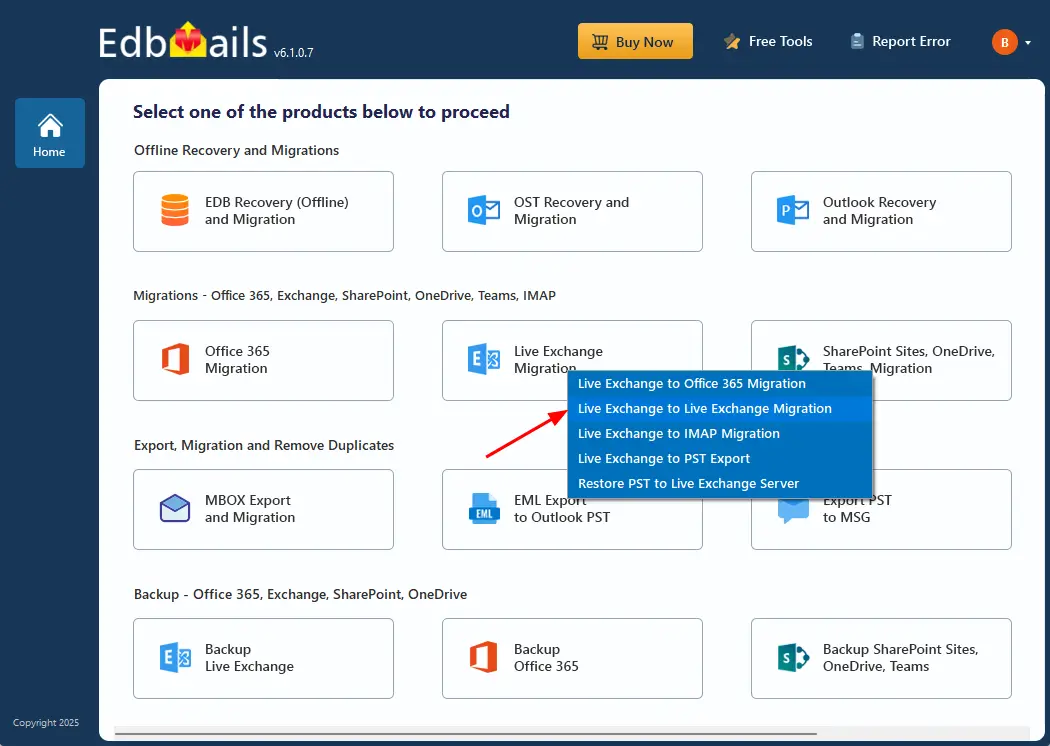
- Select 'Live Exchange to Live Exchange Migration' option.
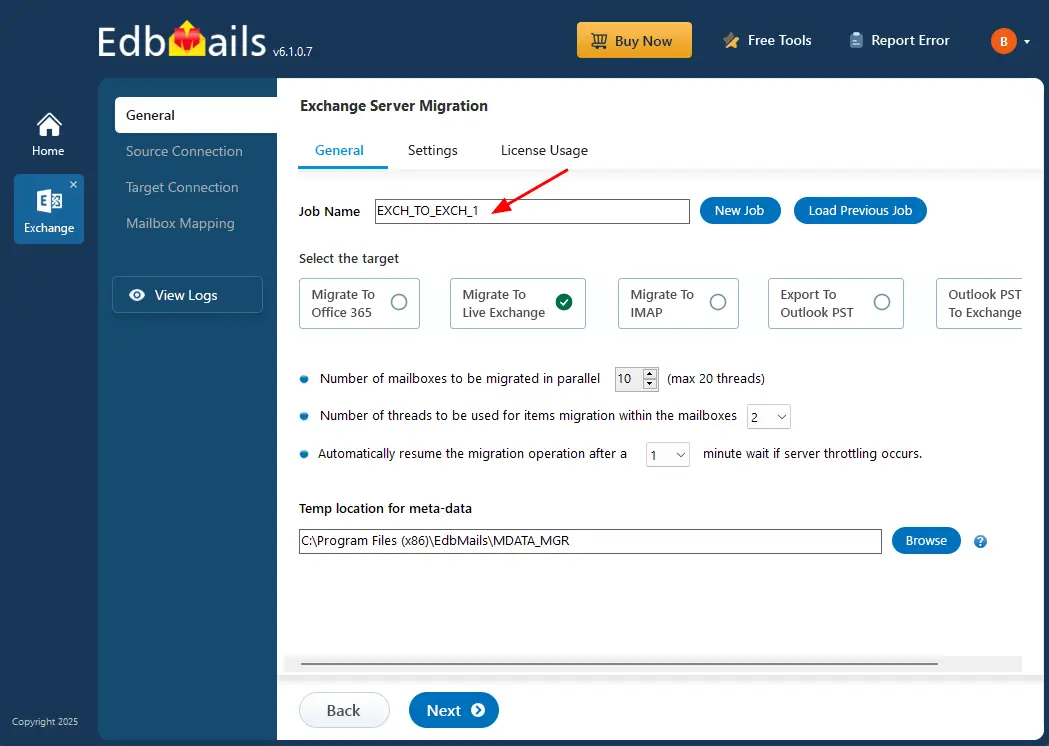
- Keep the default job name, or click ‘New Job’ to enter a name of your choice.
- Download and install EdbMails on your system.
Step 2: Connect to source Exchange server
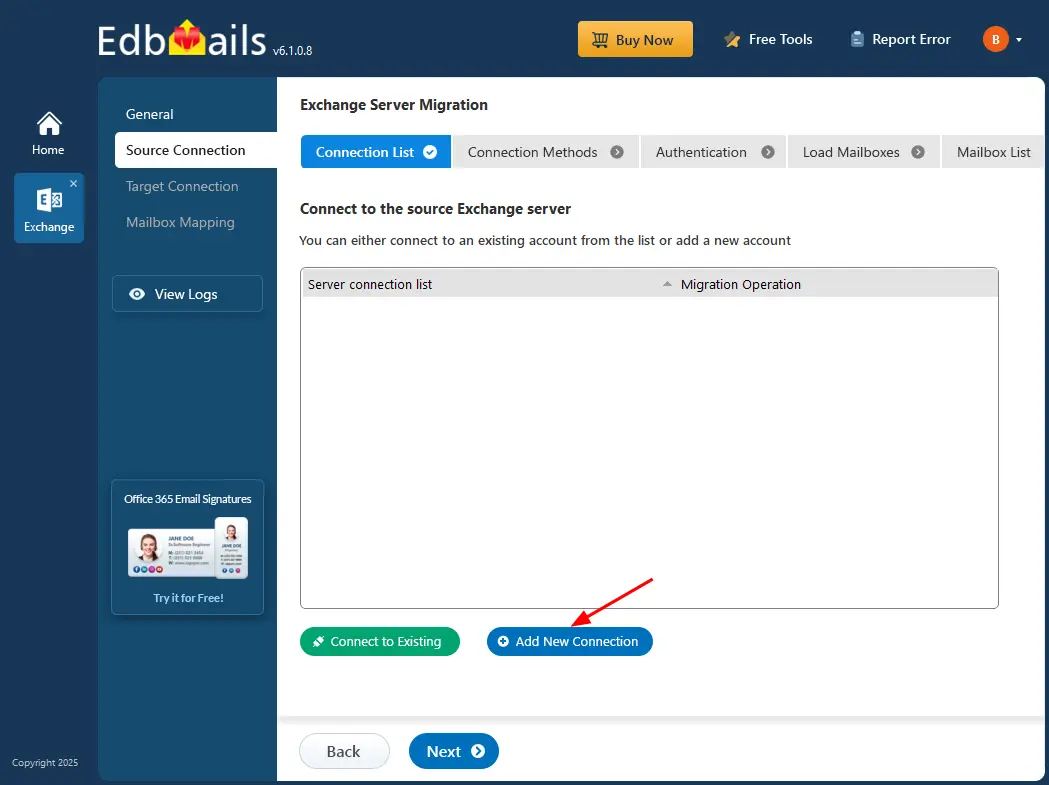
- To set up a new connection to the source Exchange server, click the ‘Add New Connection’ button. If you've connected before, simply select the existing connection from the list and click ‘Connect to Existing’ to proceed.
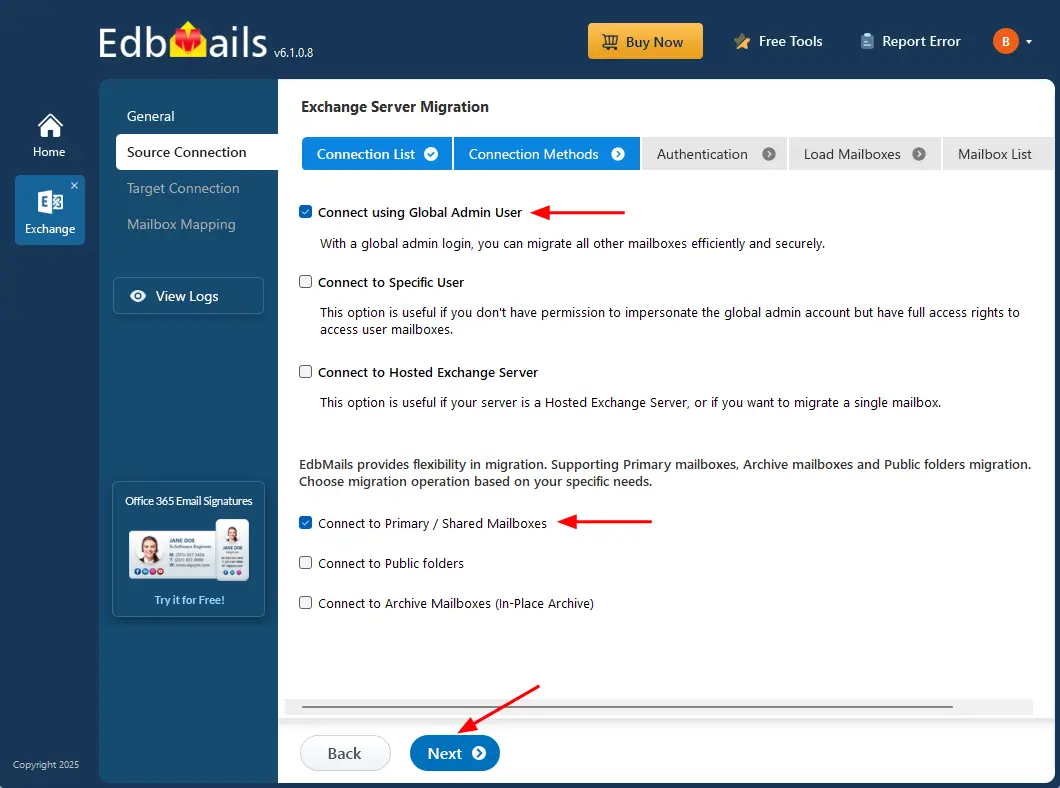
- Select the required connection options and click the ‘Next’ button.
Different options to connect to Exchange server in EdbMails
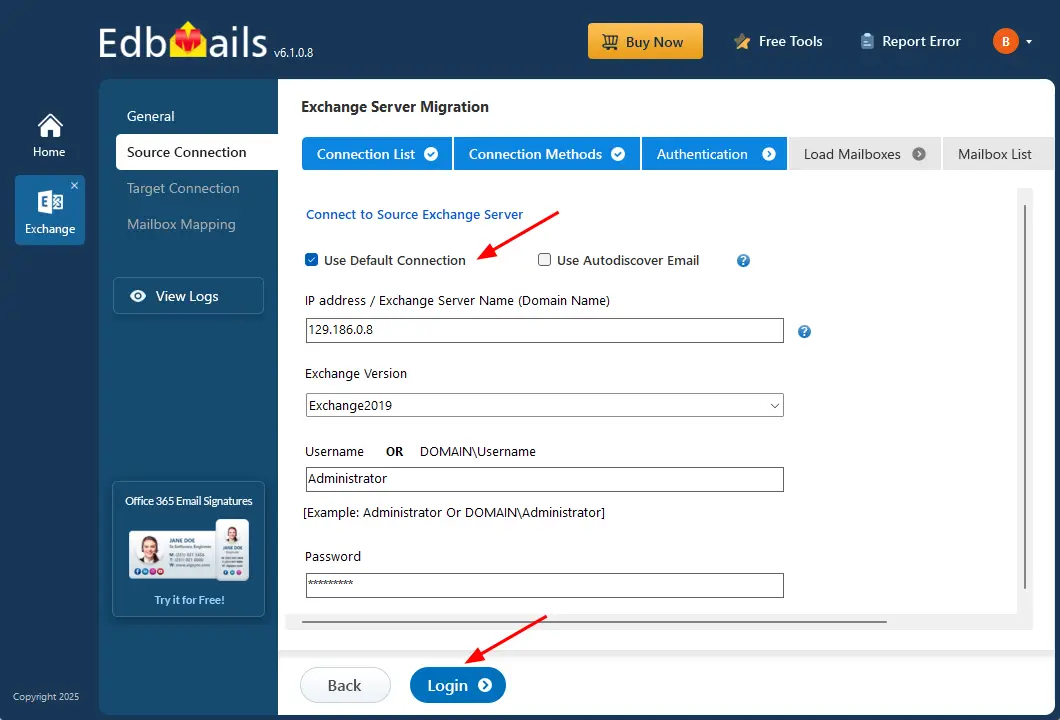
- Enter the source Exchange server details and click the ‘Login’ button.
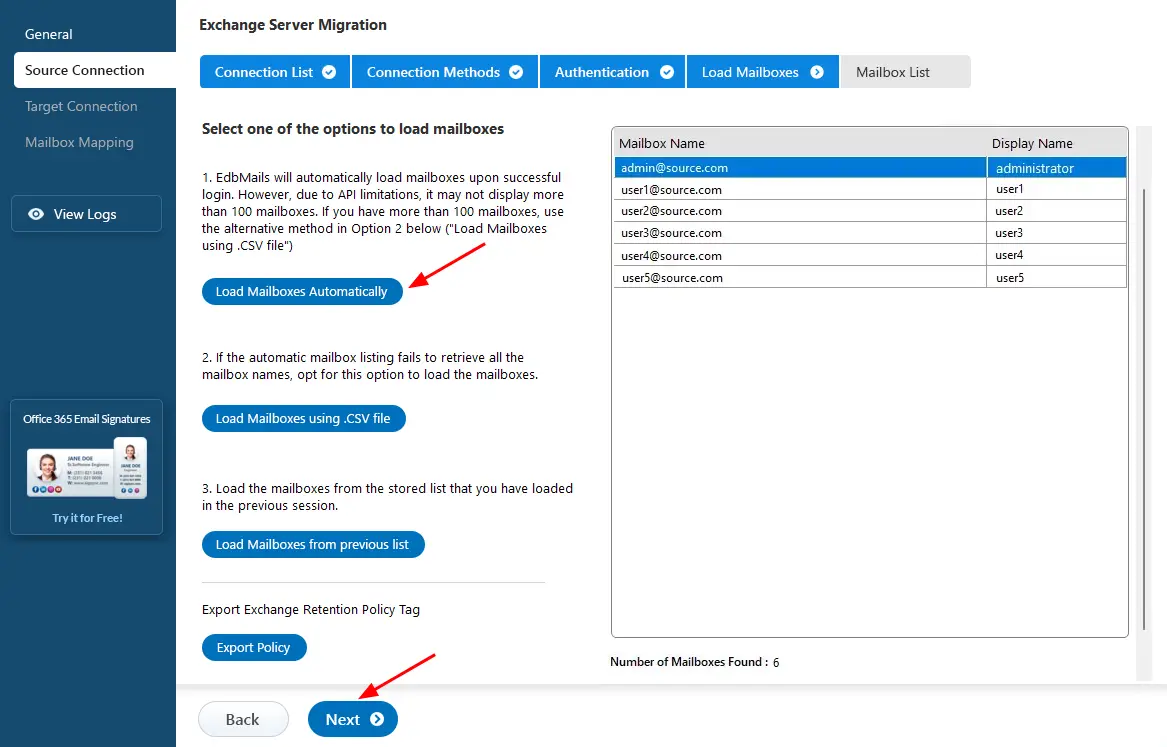
- Select the required option to load the mailboxes. EdbMails automatically loads mailboxes from your source Hosted Exchange server. You can also load mailboxes using a csv file.
See how to load Exchange server mailboxes using CSV file.
Step 3: Select Exchange server mailboxes
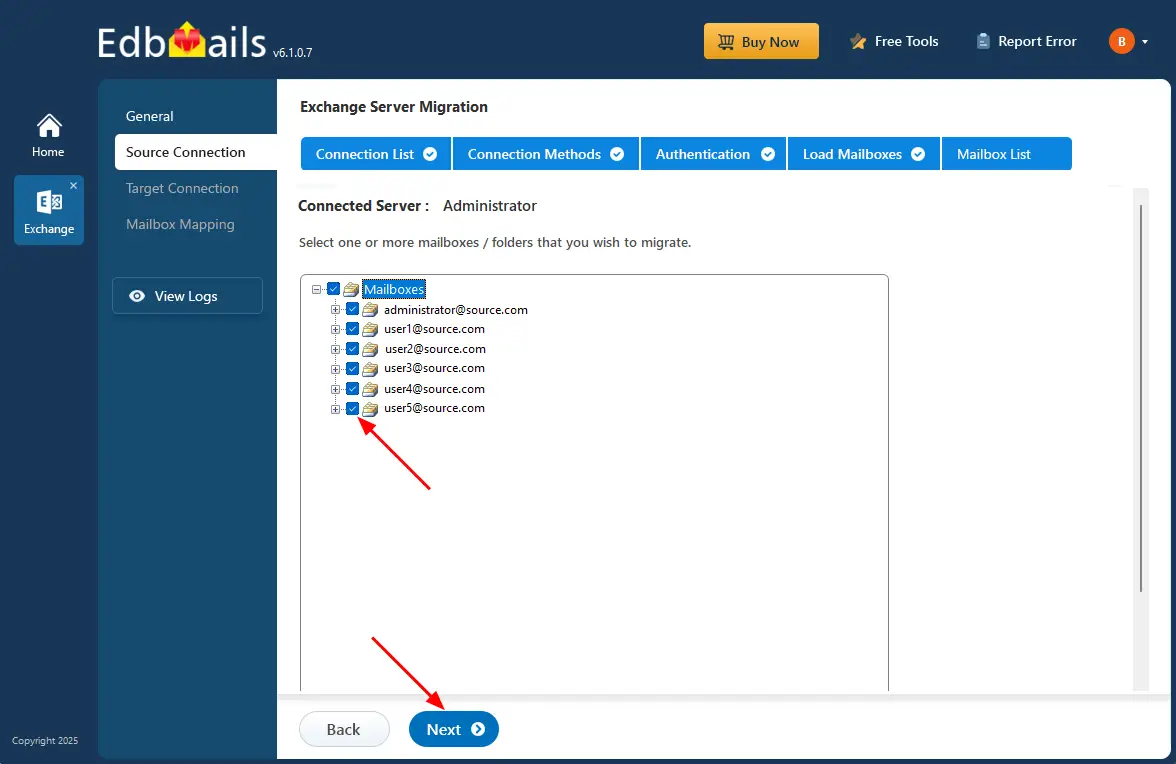
- Select the mailboxes/folders you want to migrate from the source Exchange server.
- Click the ‘Next’ button.
Step 4: Connect to target Hosted Exchange server
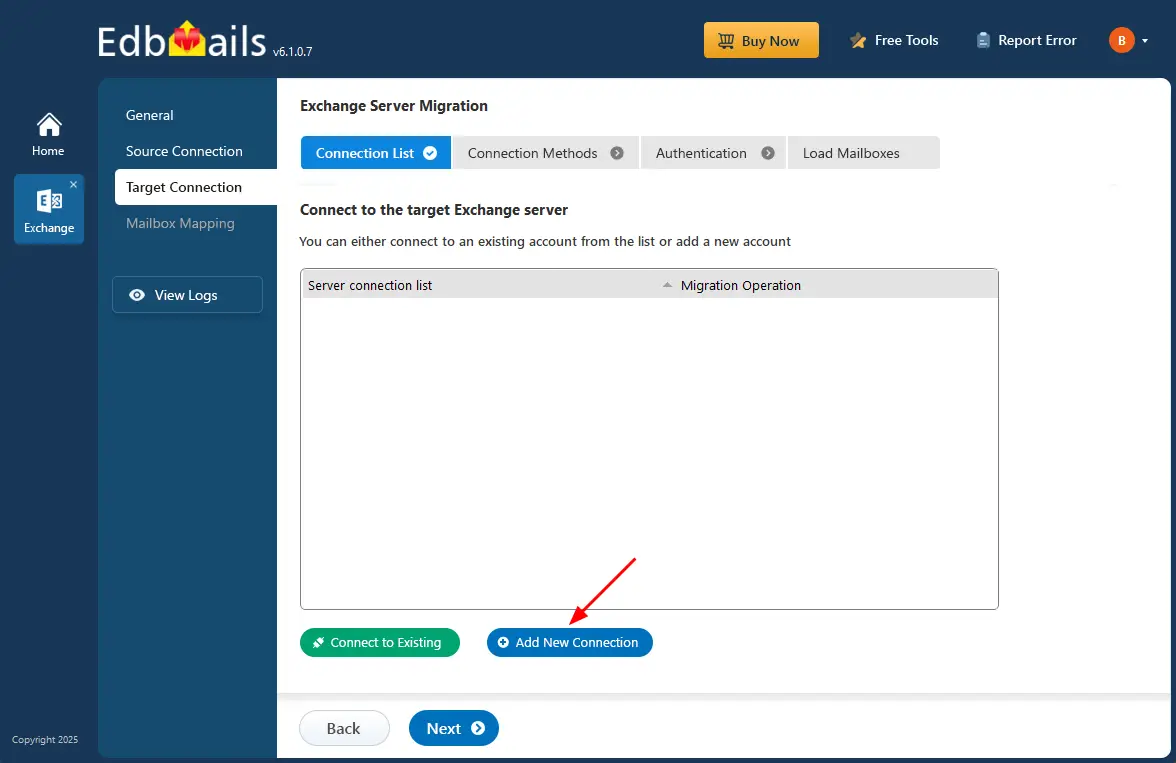
- To connect to the target server, click ‘Add New Connection’ for a fresh setup. If you've already created one, Select it from the list and click ‘Connect to Existing’.
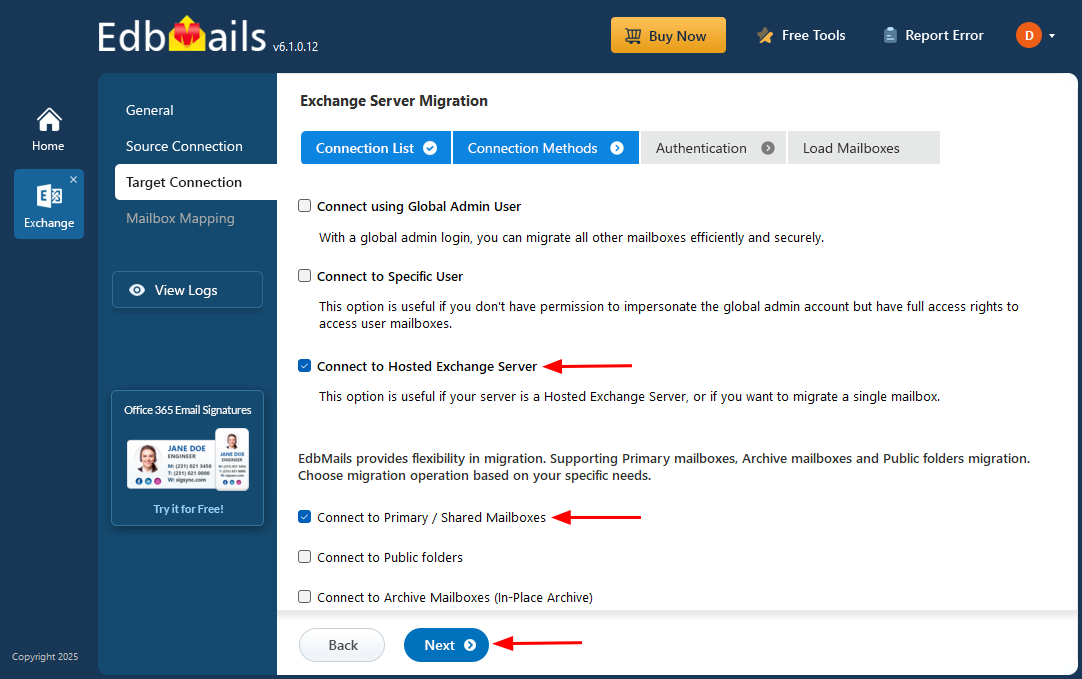
- Select ‘Connect to Hosted Exchange Server’ to connect to your Hosted Exchange server.
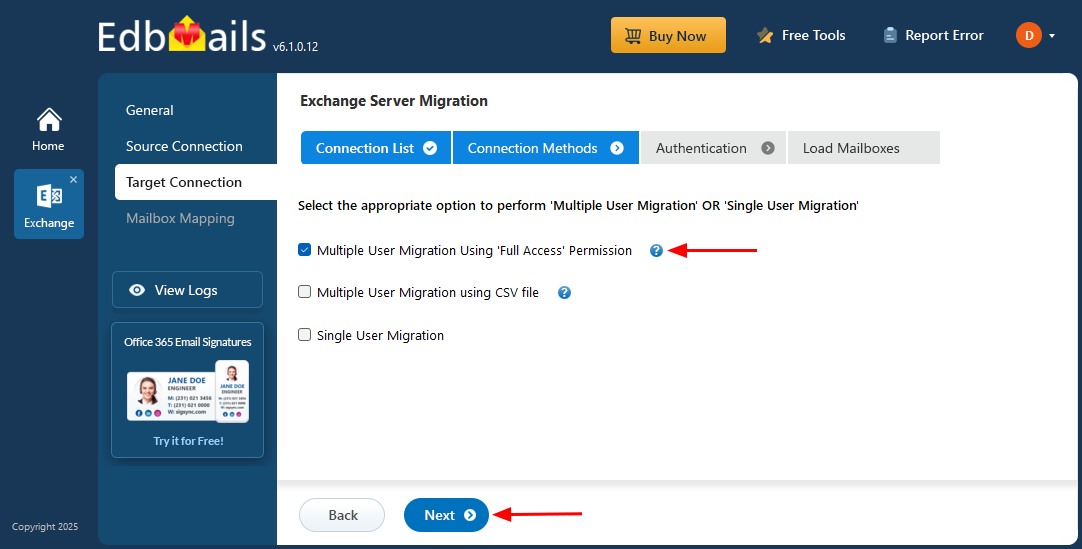
- Select the required options. And click the ‘Next’ button.
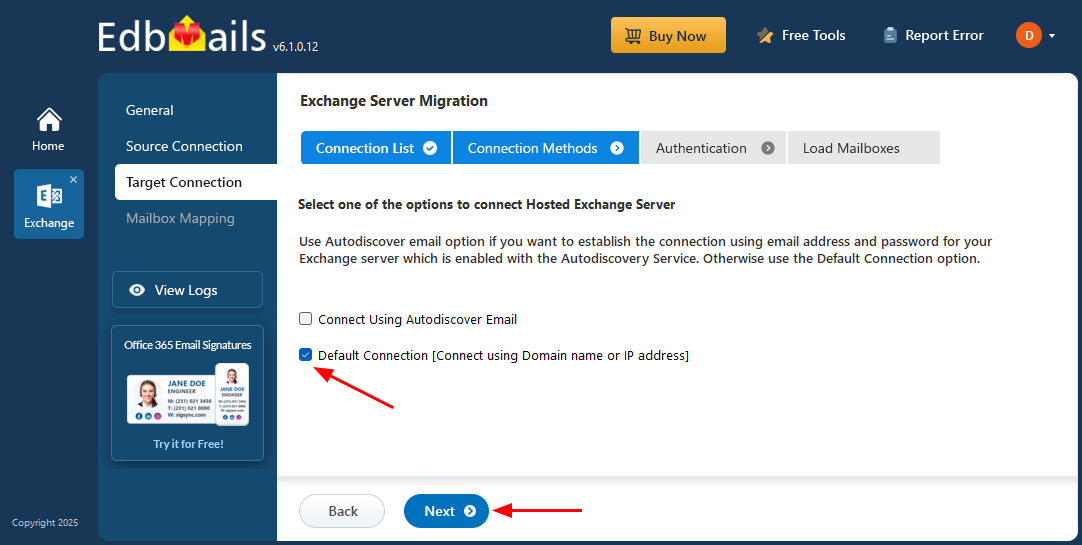
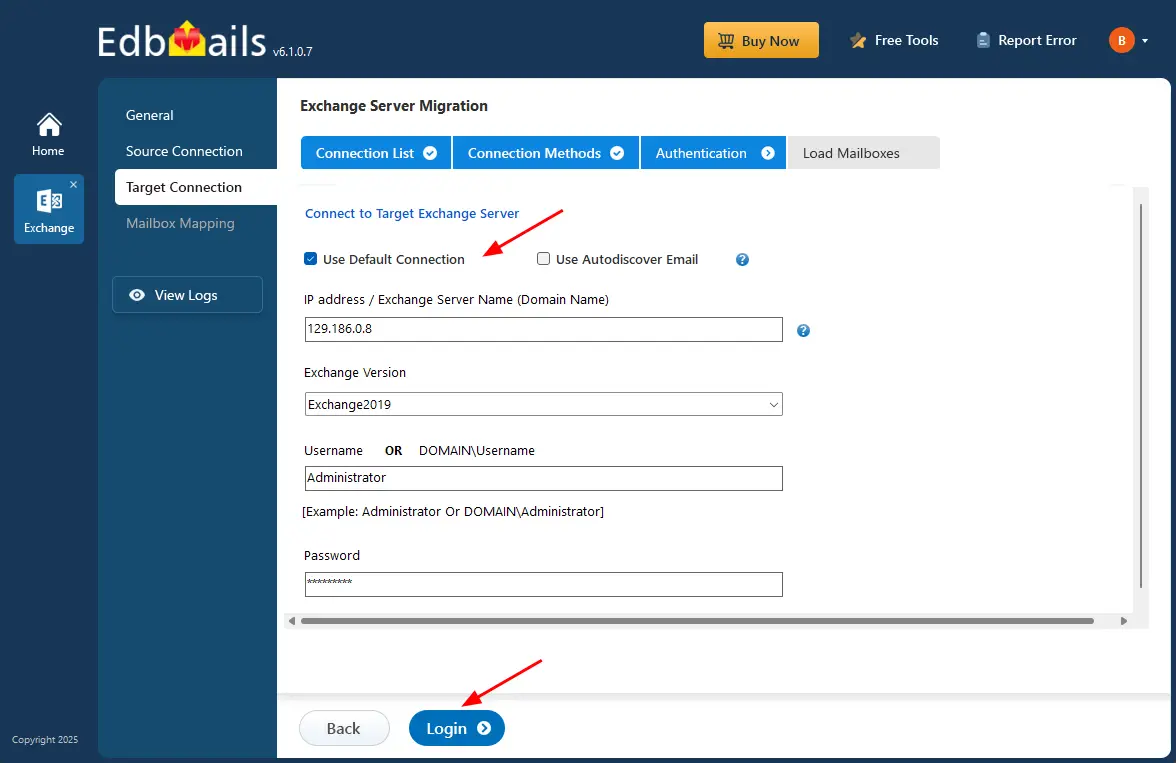
- Choose one of the following options to connect to your Hosted Exchange server. use ‘Connect Using Autodiscover Email’ with your email and password if Autodiscover is enabled, or select ‘Default Connection’ to connect using the server’s domain name or IP address.
- Enter the target Hosted Exchange server details and click the ‘Login’ button.
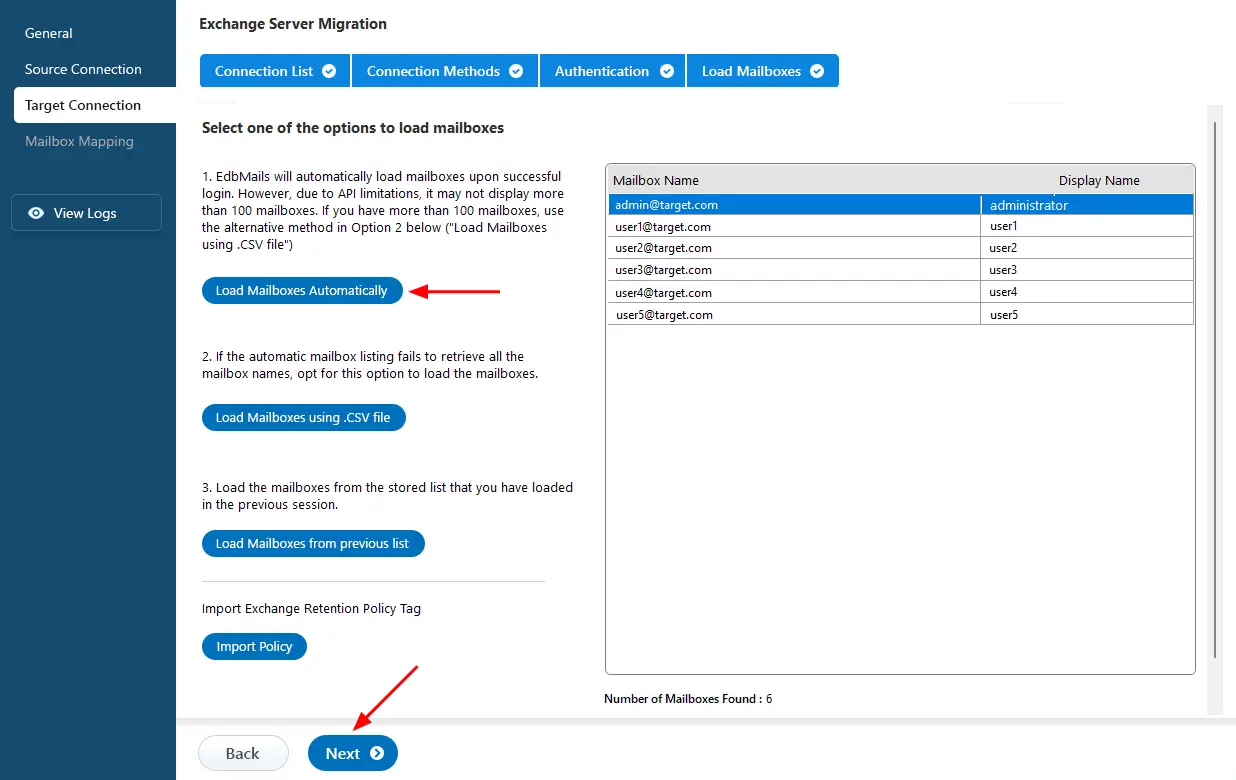
- Choose the required option to load your mailboxes. EdbMails will automatically load the mailboxes for your target server. Alternatively, you can also upload mailboxes using a CSV file.
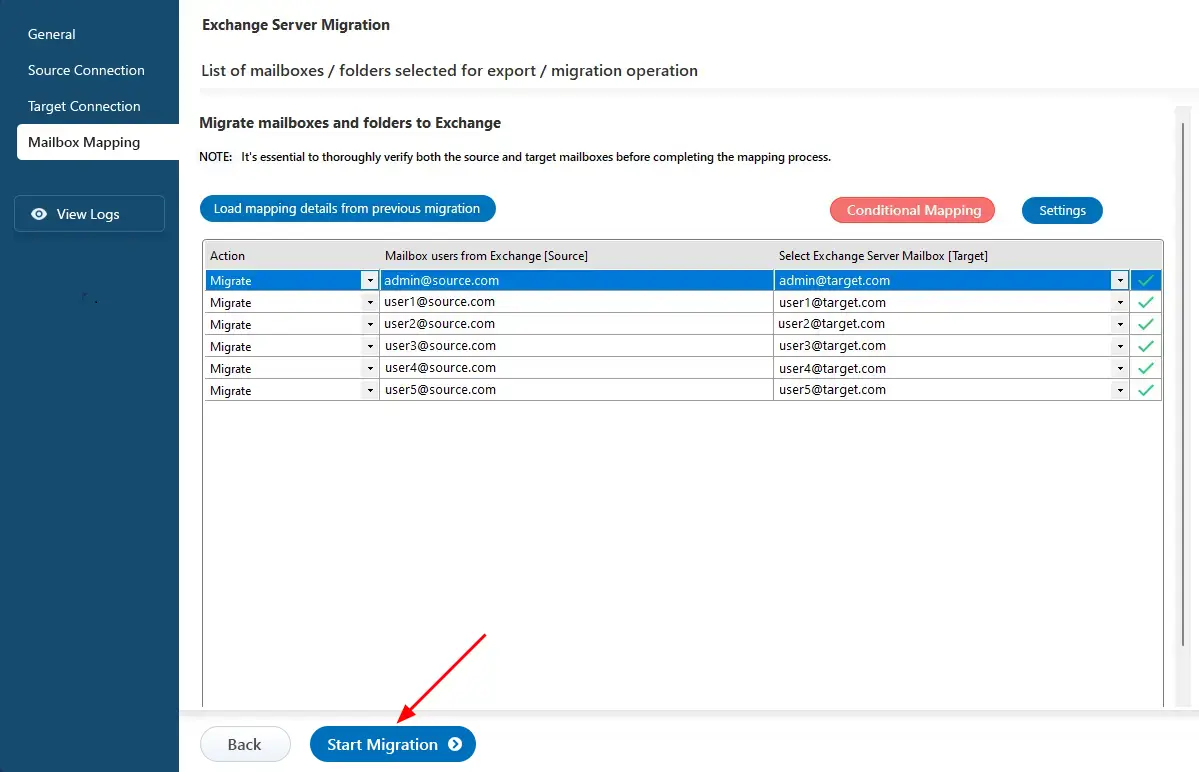
Step 5: Exchange to Hosted Exchange server mailbox mapping
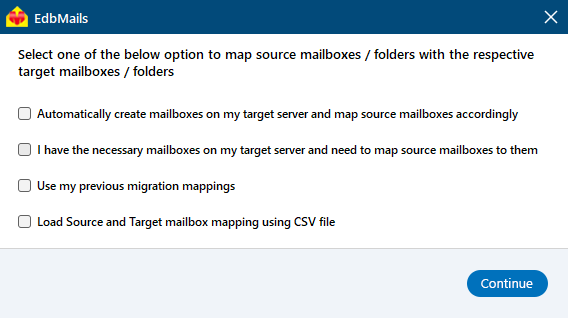
- Select the required mapping option.
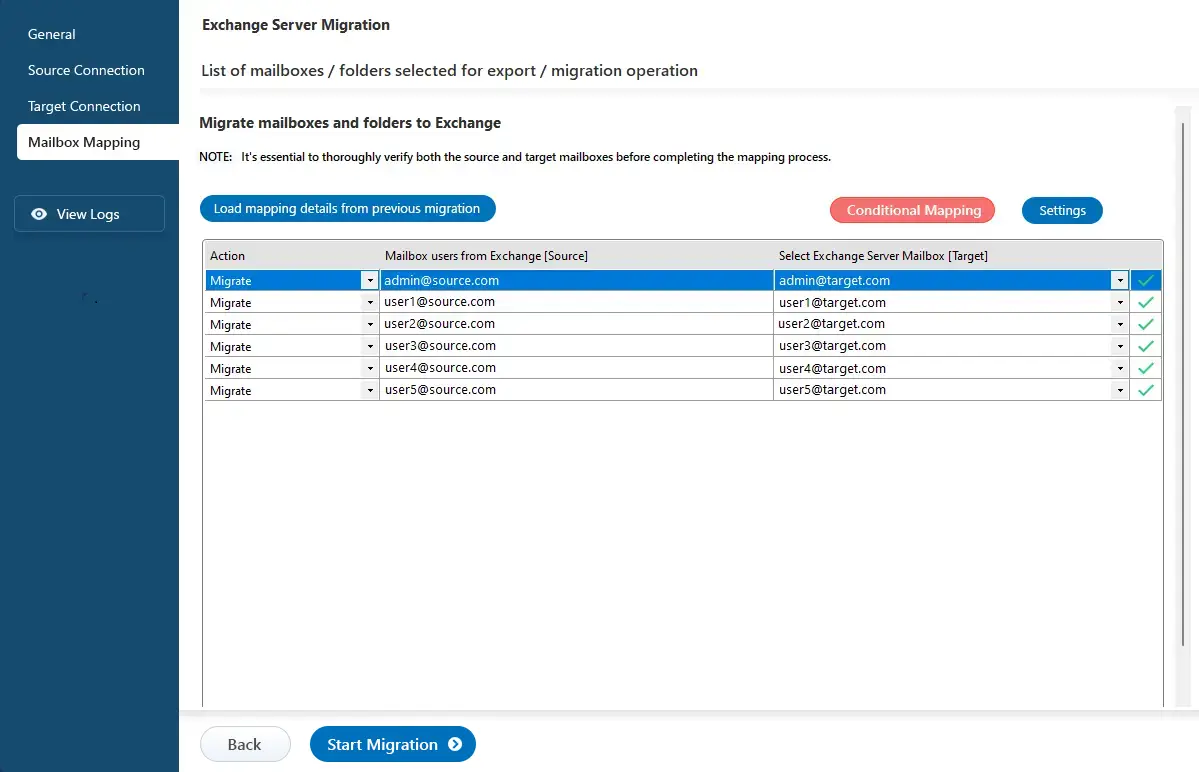
- EdbMails automatically maps mailboxes between the source and the target servers. This feature is especially useful when migrating a large number of mailboxes, as it reduces manual effort and saves time during the overall migration process.
Step 6: Start Exchange to Hosted Exchange migration
- After completing the mailbox mapping, click the ‘Start Migration’ button to initiate the migration process.
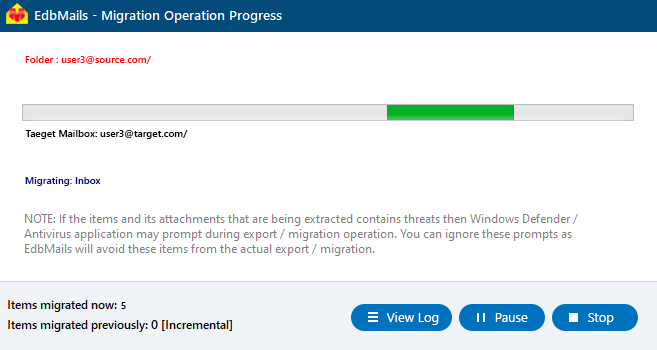
- Once the migration is successfully finished, EdbMails prompts the migration completion message. Click the 'View Log' button to check the migration report.
Exchange to Hosted Exchange: post-migration tasks
- Verify migration : Confirm that all emails, contacts, calendars, and tasks have been successfully transferred.
- Test mail flow : Send and receive test emails to ensure proper mail flow.
- User account configuration : Ensure all user accounts are correctly set up in the new environment.
- Update MX records : Modify MX records to direct emails to the new server.
- Email client setup : Assist users in configuring their email clients with the new server settings.
- Mobile device testing : Test connectivity for mobile devices using ActiveSync.
- Collect user feedback : Gather feedback from users regarding their experience post-migration.
- Decommission Exchange servers : Shut down Exchange servers after confirming successful migration and user satisfaction.
Exchange to Hosted Exchange migration troubleshooting
Review the Exchange migration troubleshooting guide for solutions to typical migration errors. For additional information regarding EdbMails Exchange migration, visit the frequently asked questions section.
Benefits of EdbMails for Exchange to Hosted Exchange migration
- Incremental migration : EdbMails features incremental migration, that is, it transfers only the newly added or modified items during the subsequent migration operations, significantly reducing the risk of duplicating existing data. It simplifies the migration process by focusing on relevant changes during Live Exchange migration to Hosted Exchange.
- Advanced filter options : Users can filter specific mailbox items and folders to include or exclude during migration, providing greater control over the data transfer. This level of precision ensures that only essential information is migrated, optimizing storage space.
- Automatic mailbox mapping : EdbMails automatically identifies and maps corresponding mailboxes between the source and target servers. This eliminates manual effort and saves overall migration preparation time.
- Direct migration support : The software supports direct migrations from any version of Exchange server from 2007 to 2019, ensuring compatibility without requiring a coexistence setup.
- Migration reports : EdbMails automatically generates detailed migration reports that provide insights into the number of items transferred, any errors encountered, and overall migration progress.
- Universal compatibility : EdbMails is designed to operate seamlessly across all Windows operating systems, ensuring consistent performance and reliability regardless of the environment.
- 24/7 Technical support : Users have access to 24/7 free technical support, providing assistance for any issues or queries that may arise during the migration process.


