Exchange Archive mailbox to Exchange migration
Many organizations choose to migrate their archive mailboxes to a new or upgraded on-premises Exchange server to keep up with evolving business and technical needs. Common reasons include hardware upgrades, server consolidation, regulatory requirements, and the end of support for older Exchange versions. Such migrations help centralize mailbox management, enhance server performance, and ensure long-term access to critical historical emails without depending on outdated systems.
Migrating archive mailboxes manually can be a complex and time-consuming process, especially when handling large data volumes, user permissions, and folder structures. Maintaining data integrity and minimizing downtime are crucial for a successful transition. Without the right migration solution, organizations risk encountering challenges such as data loss, inconsistent folder mapping, and extended downtime that may disrupt normal business operations.
EdbMails Exchange Migration software provides a reliable and high-performance solution to migrate archive mailboxes between Exchange servers. The software supports direct migrations without the need for intermediate steps like PST exports. It preserves folder hierarchy, user permissions, and supports both incremental migration and concurrent migration. With a user-friendly interface and features like automatic mailbox mapping and real-time progress tracking, EdbMails ensures a secure, efficient, and hassle-free migration experience for IT administrators and businesses alike.
EdbMails is built to handle even large mailboxes with ease, using multi-threaded technology to boost transfer speeds and minimize downtime. It offers precise control with granular options that let you migrate only the data you need—such as specific folders or messages filtered by sent/received date, attachment name, subject, CC/BCC fields, and read/unread status. Plus, with detailed real-time reports, you can monitor progress and quickly identify any issues during the migration process.
Exchange archive mailbox migration prerequisites
- Step 1: Check that your system meets the Exchange server setup requirements
The following links will help you to know about the network, hardware and operating system requirements for the Exchange server you want to install and migrate to.
Note: Exchange 2010 has reached the end of support on October 13, 2020 and Exchange 2013 will reach the end of support on April 11, 2023. Therefore it is highly recommended that you migrate your mail data and Archive mailboxes to Exchange 2016 and 2019.
- Step 2: Prepare your target system with the following prerequisites
Complete the following prerequisites for Active Directory, Windows Mailbox server, and Windows Edge Transport servers before installing the Exchange server.
- Step 1: Check that your system meets the Exchange server setup requirements
Set up the target Exchange server for migration
Given below is a list of key points for installing and preparing the Exchange server for migration.
- Prepare AD and domains
- Before installing Exchange Server, you need to prepare your Active Directory forest and its domains for the new version of Exchange.
- If you have a separate team to manage the Active Directory schema, you need to first extend the active directory schema, else proceed to the next step to prepare the Active Directory.
- If you have multiple domains you need to additionally prepare the Active Directory domains.
- Install Exchange server on your computer
Ensure that you meet the server system requirements and prerequisites as outlined previously. Next, follow the link to install Exchange 2016 or install Exchange 2019 from the setup wizard.
- Prepare a clean Exchange target environment
- Create and configure a Send connector to send mail outside the Exchange organization.
- By default, Exchange automatically creates receive connectors for inbound mail flow when the mailbox server is installed. If you need to configure receive connectors, follow the steps in the link.
- Add accepted domains to allow recipients to send and receive email from another domain.
- Configure the default email address policy to add the accepted domain to every recipient in the organization.
- Configure external URLs (domains) on the virtual directories in the Client Access (frontend) services on the Mailbox server to allow clients to connect to your server from the internet (outside the organization’s network).
- Configure internal URLs on the virtual directories in the Client Access (frontend) services on the Mailbox server to allow clients to connect to your server from the internal network.
- Configure SSL certificates from a third-party certificate authority for services such as Outlook Anywhere and Exchange ActiveSync.
- Verify the Exchange server installation by running the command Get-ExchangeServer on the Exchange Management Shell (EMS).
- Create mailboxes and enable archive mailbox on the Exchange server
Before you migrate Exchange archive mailboxes, ensure that you have mailboxes on the target Exchange server and have assigned suitable licenses to them. Ensure that you also have the In-Place archiving enabled. You can choose to automatically create mailboxes on your target Exchange servers in EdbMails. However, if you want to create the mailboxes manually refer to the below link.
Steps to create mailboxes in Exchange server
- Assign management roles to the admin account
Set the following permissions to the admin account on both the source and the target Exchange server.
- Application Impersonation
- View-Only Recipients
- View-Only Configuration
- Verify the mailbox of the admin account
Check to see if the admin account that has been assigned management roles has a valid and non-hidden mailbox on the Exchange server.
- Configure the throttling and message-size limits
Set custom policies for EWS throttling and set message size to a maximum value on the Exchange server by following the steps in the link.
Note: For migrating Office 365 Archive mailbox to Exchange with EdbMails, you do not require PowerShell scripts. The following steps describe the archive mailbox migration method from the application’s graphical user interface (GUI).
- Prepare AD and domains
Exchange Archive mailbox to Exchange migration steps
Step 1: Download and install EdbMails Exchange migration tool
- Download and install EdbMails on your computer.
System requirements for Exchange Archive mailbox to Exchange migration
- Start the application and ‘login’ with your email address and password, or select ‘Start Your Free Trial’.
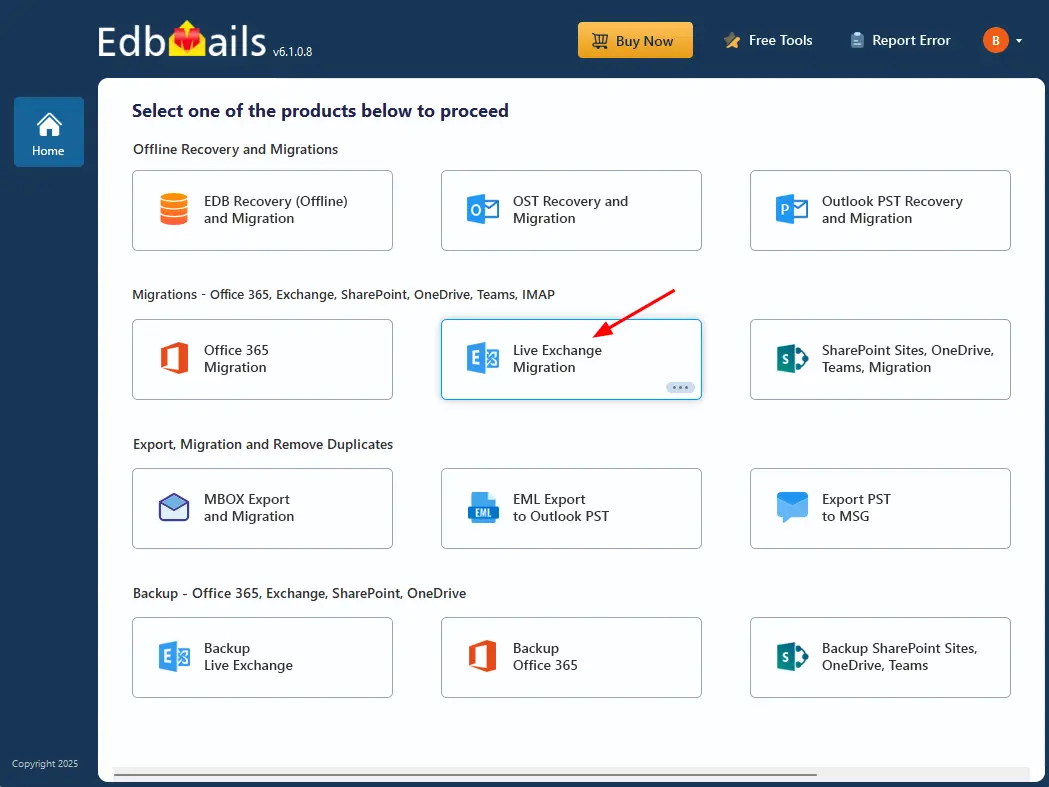
- Choose the ‘Live Exchange Migration’ option
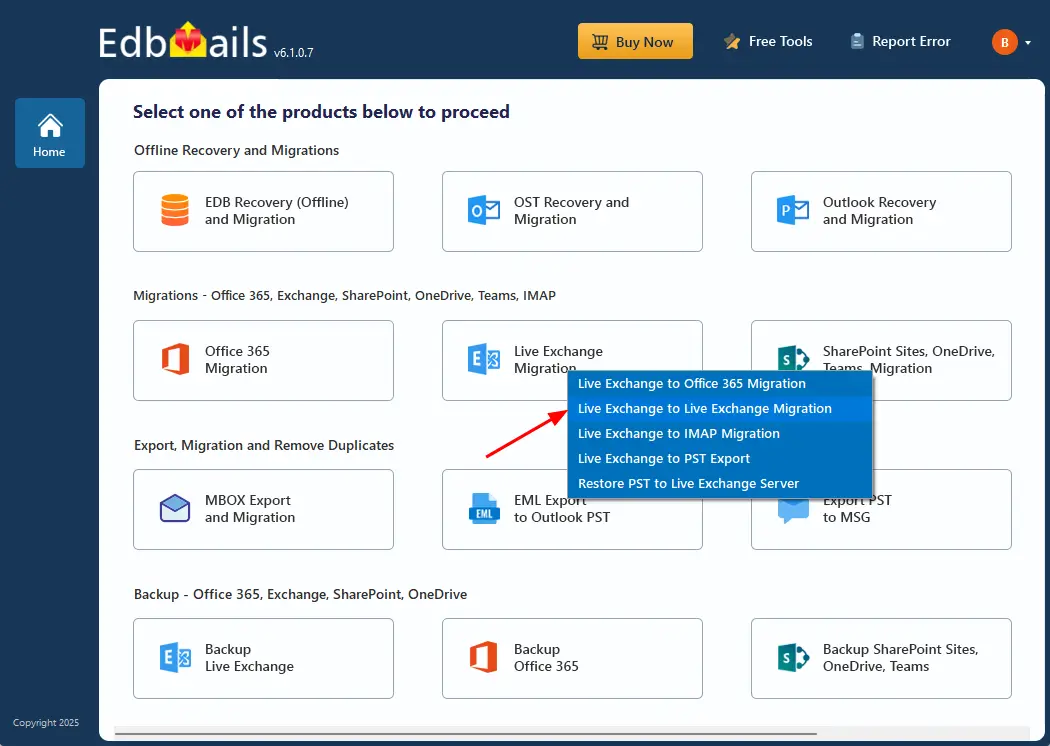
- Select 'Live Exchange to Live Exchange Migration' option
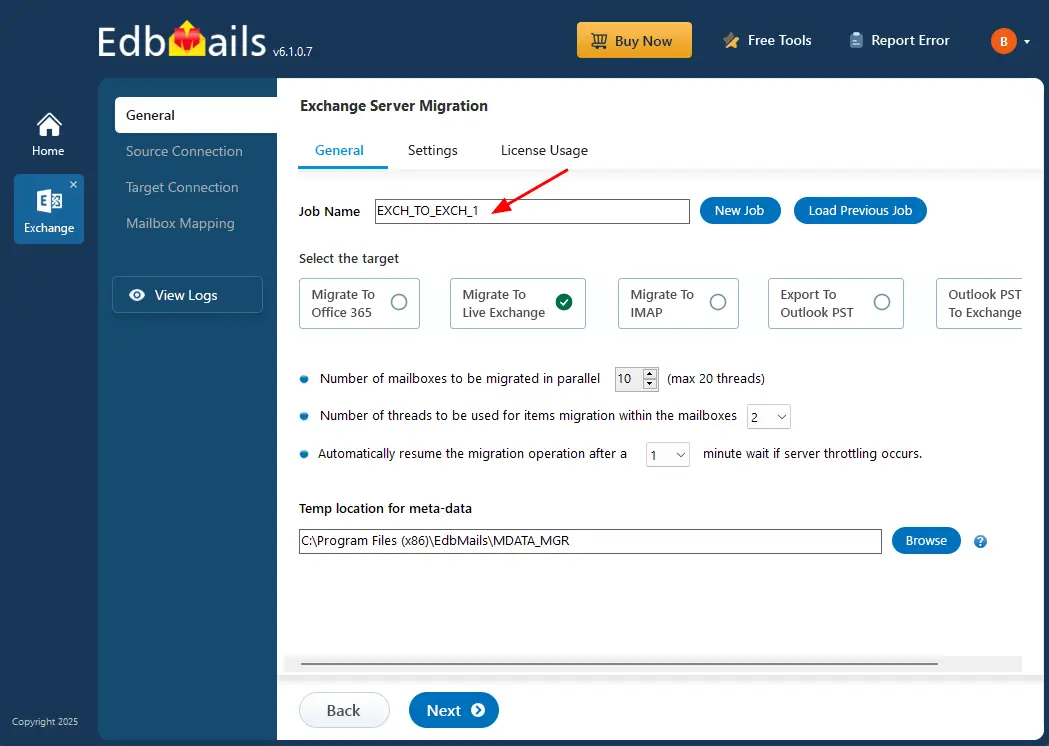
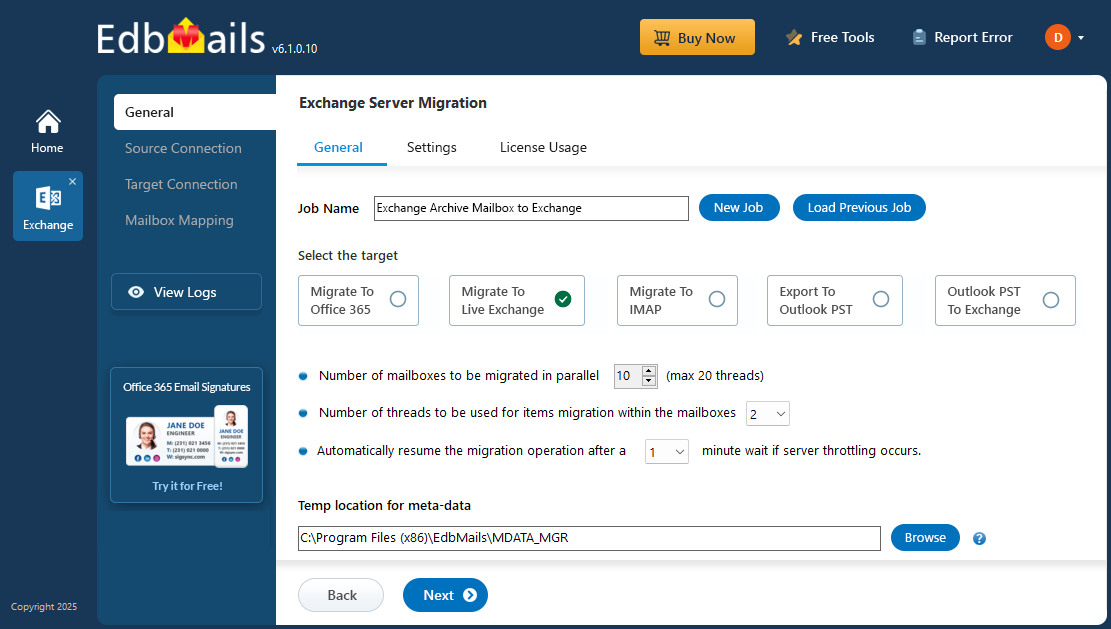
- You can either keep the default job name or click the ‘New Job’ button to change the job name.
- Download and install EdbMails on your computer.
Step 2: Connect to the source Exchange server
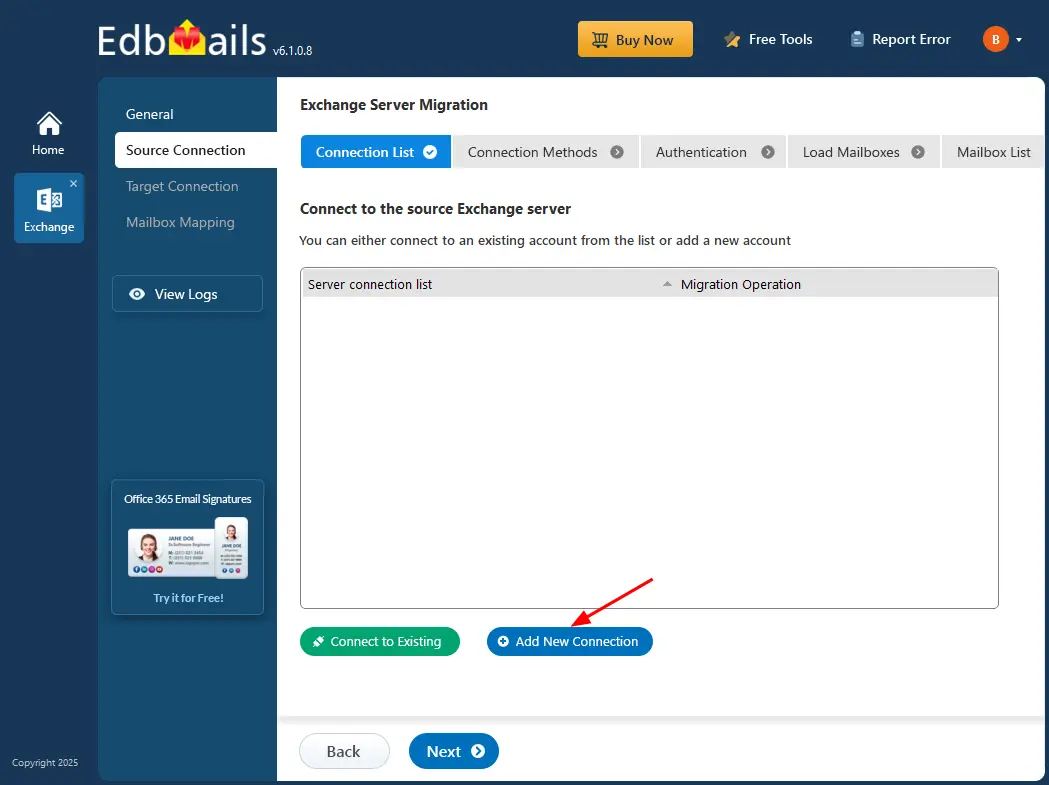
- Start a new connection to the source Exchange server by clicking ‘Add New Connection’. If there's a saved connection available, you can quickly reconnect by choosing it and clicking ‘Connect to Existing’.
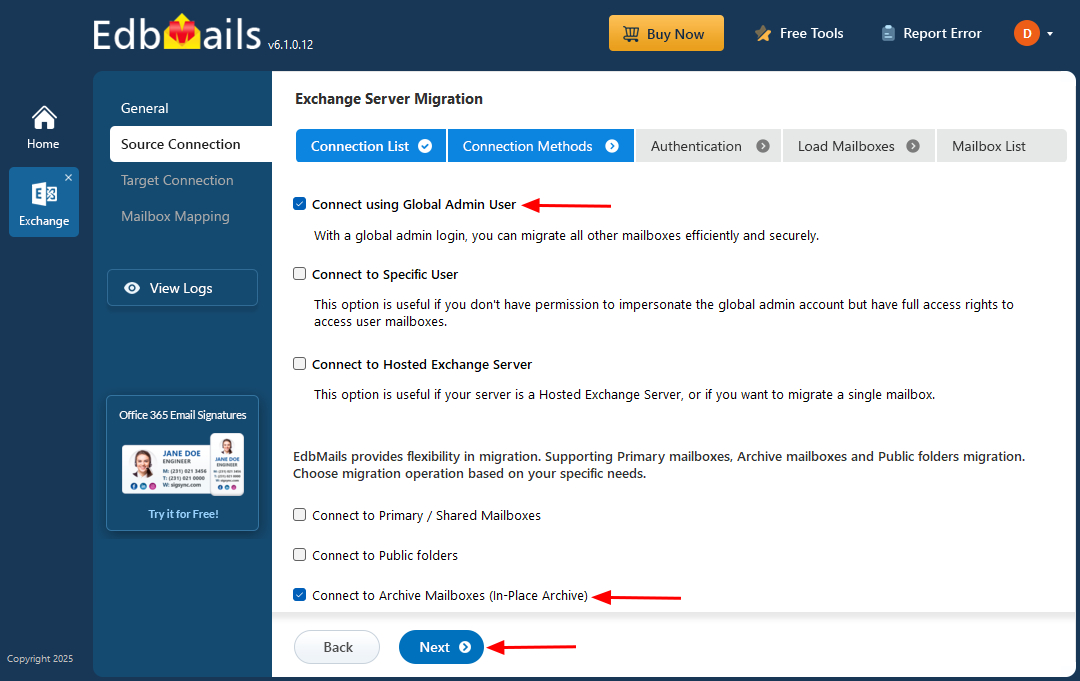
- Select ‘Connect to Archive Mailboxes (In-Place Archive)’ and click ‘Next’.
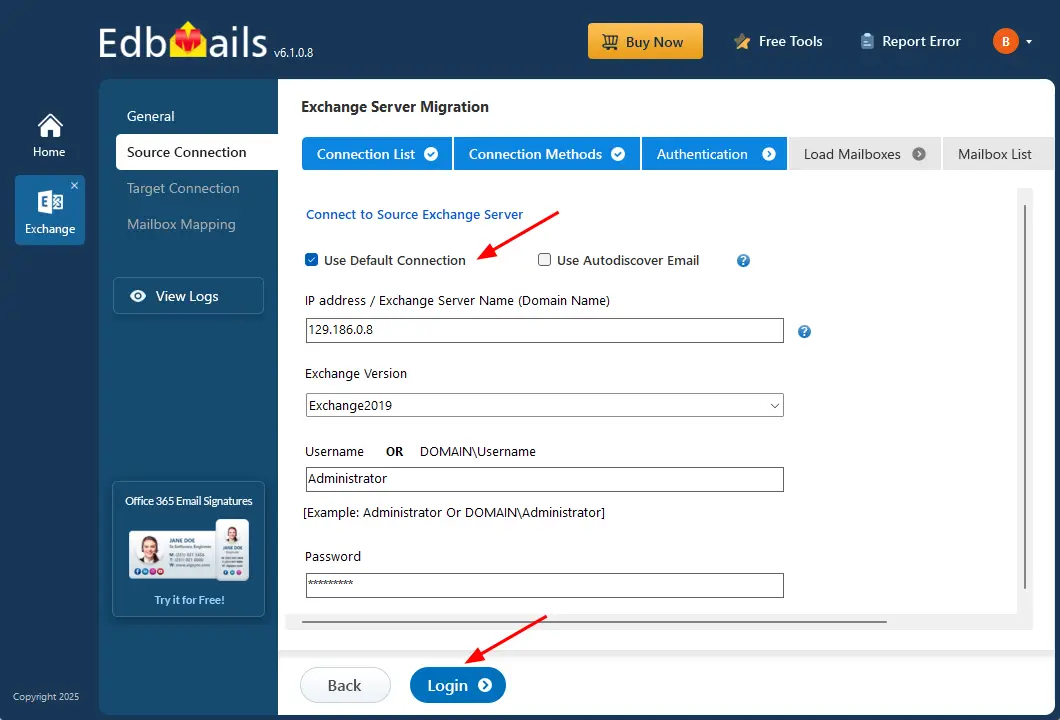
- Enter the source Exchange server details and click the ‘Login’ button
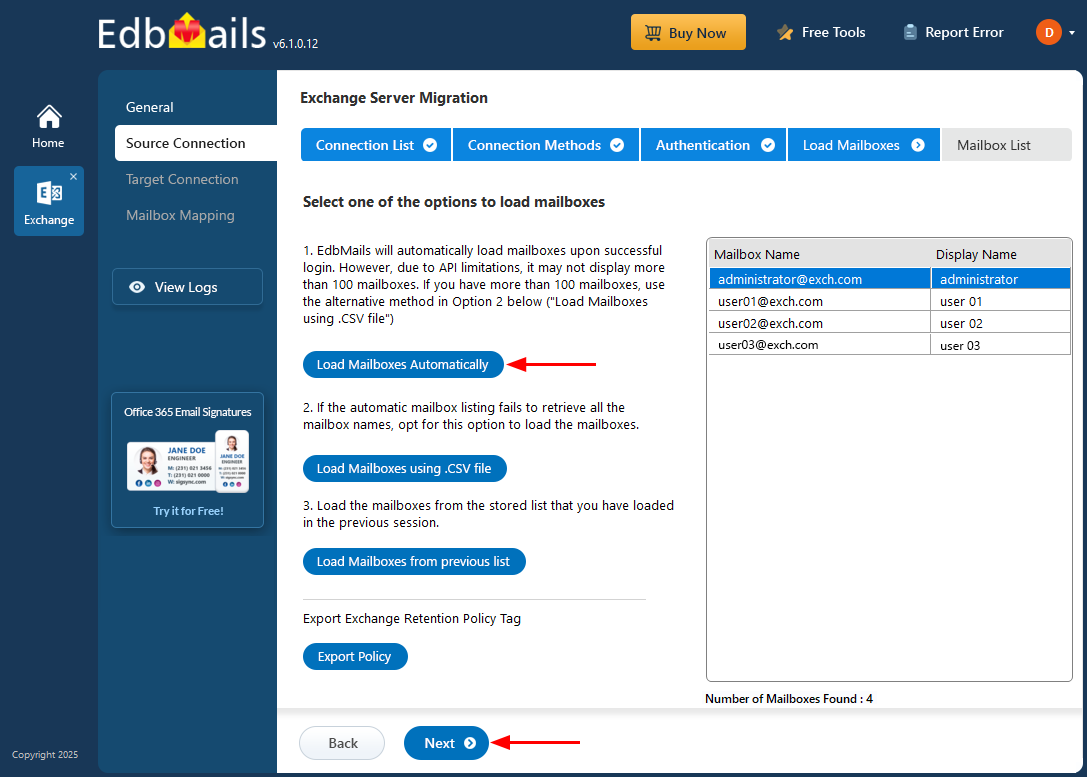
- Select the option to load the mailboxes.
- EdbMails can automatically load Exchange server mailboxes. Alternatively, you can also load the mailboxes using a CSV file.
Step 3: Select Exchange Archive mailboxes
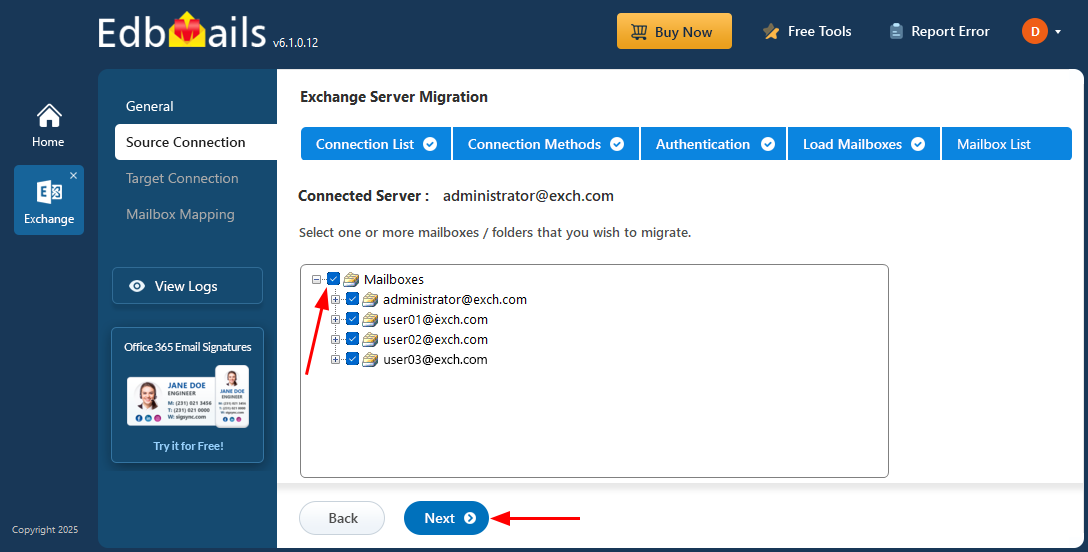
- Select the archive mailboxes/folders you want to migrate to the target Exchange server.
- Click the ‘Next’ button.
Step 4: Connect to target Exchange server
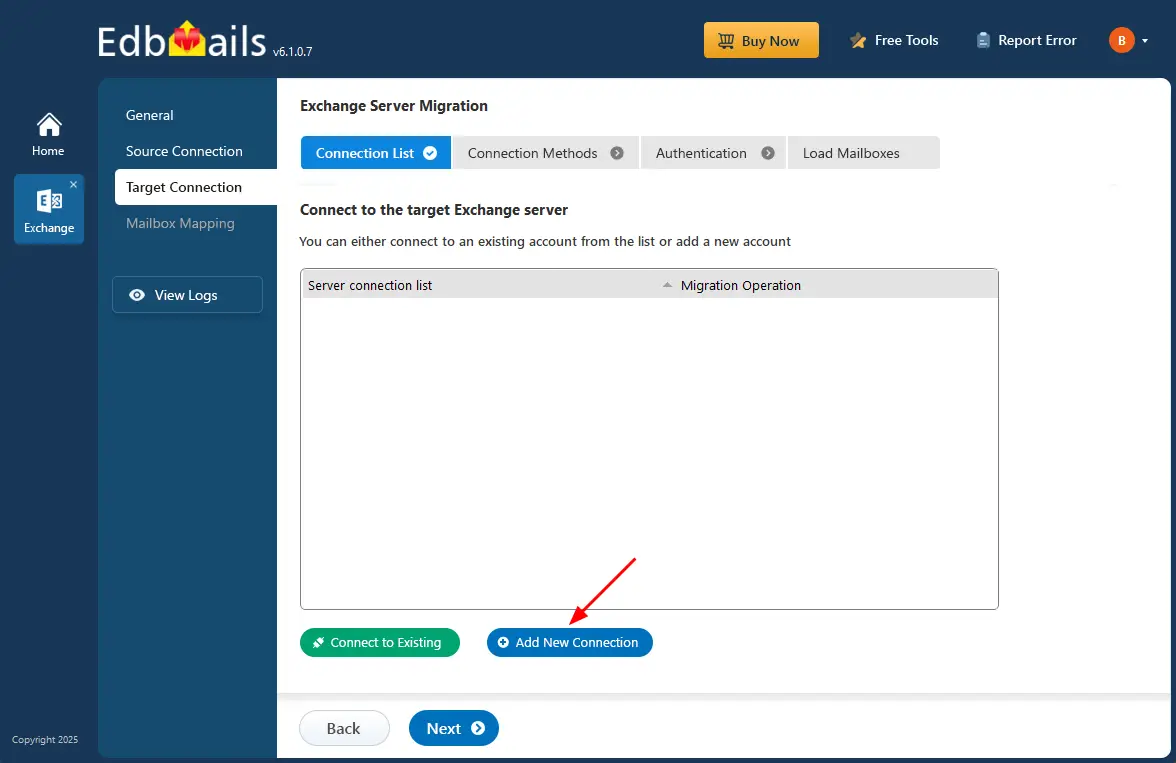
- Click the ‘Add New Connection’ button to set up a new connection to the source Exchange server. To reuse a previous connection, select it from the list and click the ‘Connect to Existing’ button to continue.
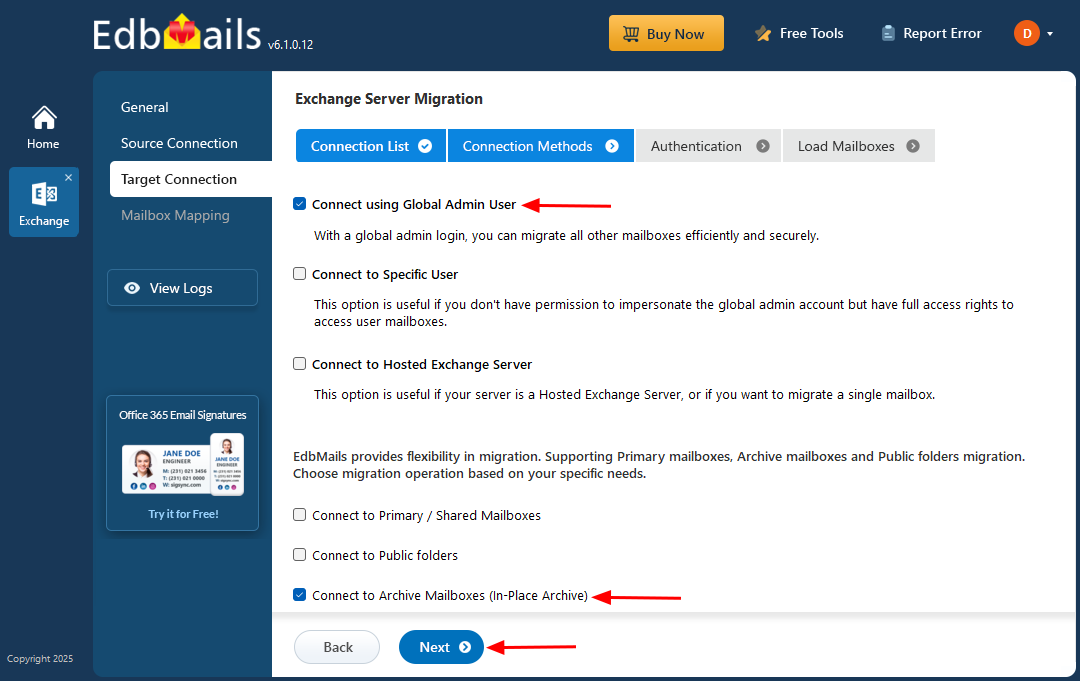
- Select ‘Connect to Archive Mailboxes (In-Place Archive)’ and then click ‘Next’.
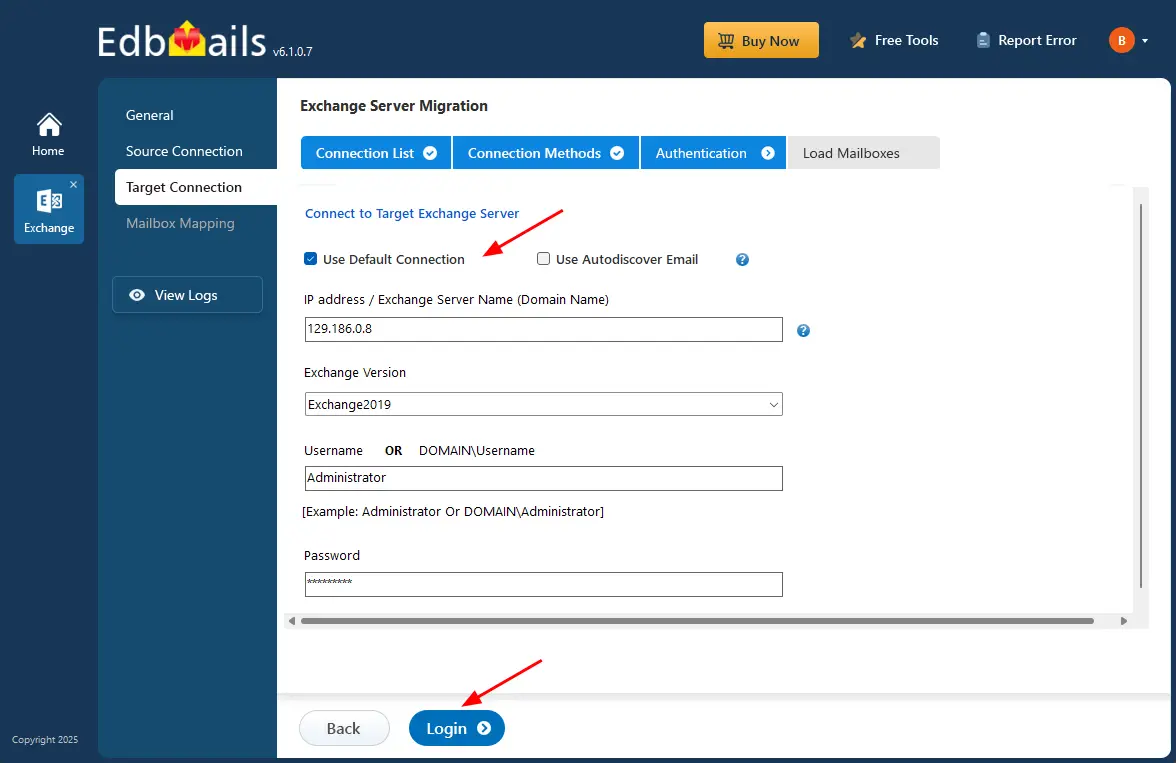
- Enter the target Exchange server details and click the ‘Login' button
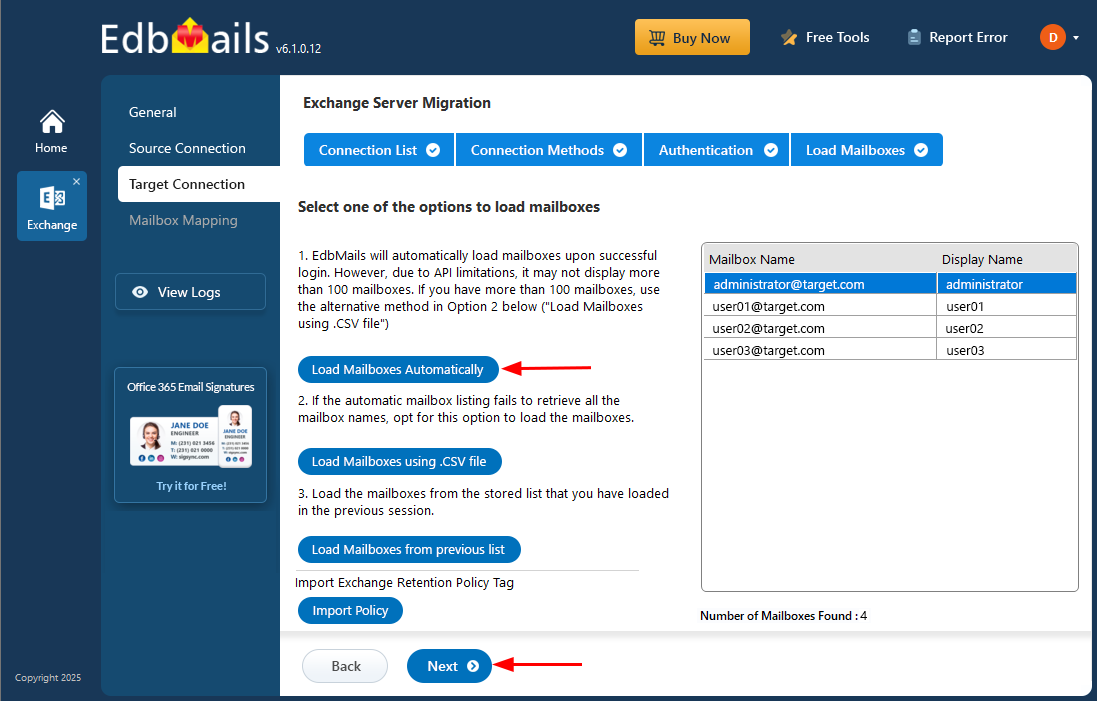
- Once you've successfully logged in, select one of the options for loading the target Exchange server mailboxes. You can also load mailboxes using a CSV file.
Step 5: Map source and target Exchange server mailboxes
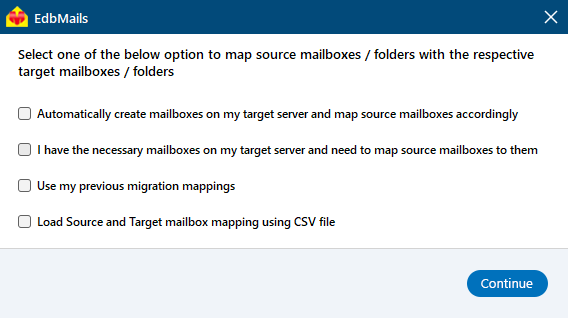
- Choose the required mailbox mapping option
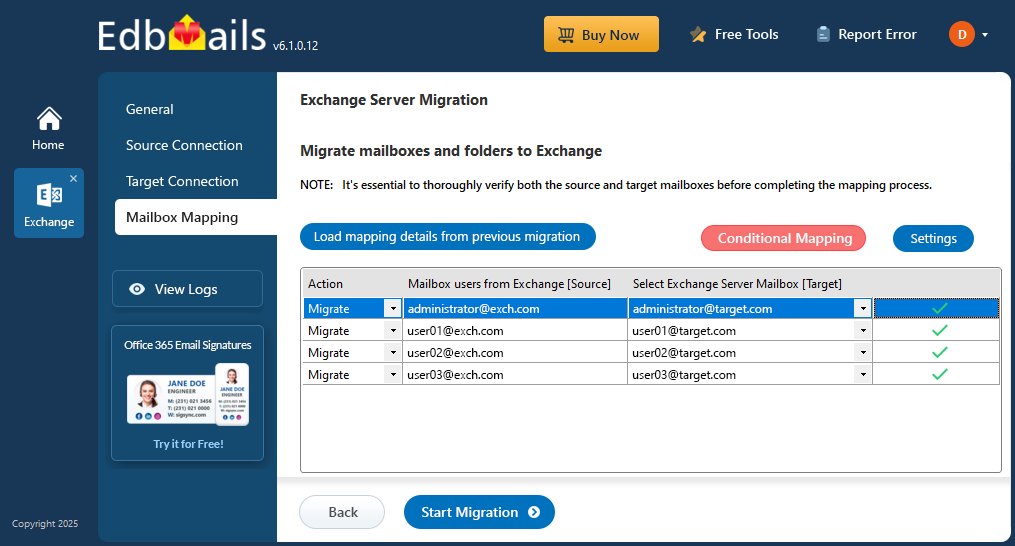
- EdbMails automatically maps mailboxes between the source and the target Exchange servers. This feature is especially useful when migrating a large number of mailboxes, as it reduces manual effort and saves time during the overall migration process.
Step 6: Start Exchange Archive mailbox to Exchange migration
- EdbMails offers advanced filtering settings to customize the Exchange archive mailbox migration.by clicking the ‘Settings’ button, you can apply a date filter to migrate only items within a specific date range.
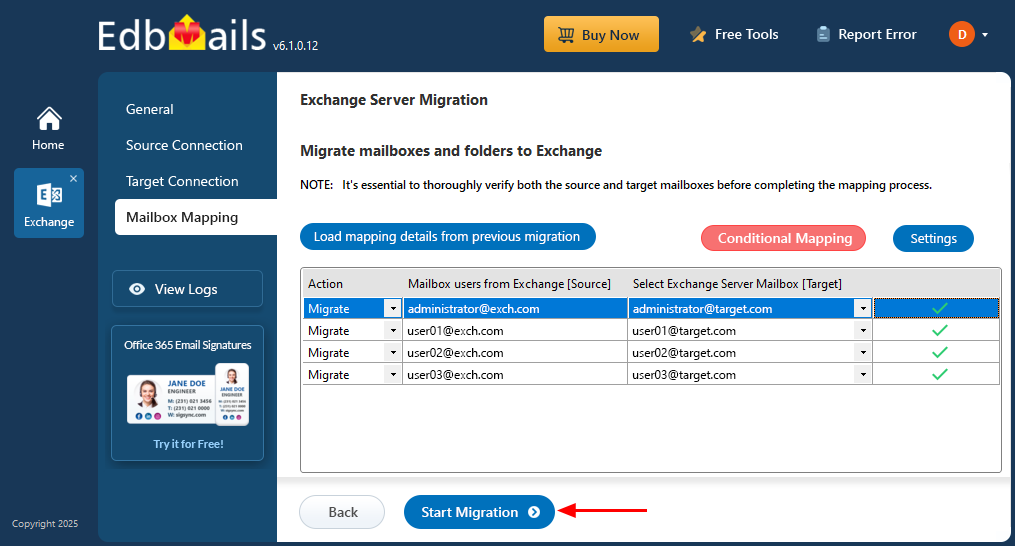
- After completing the mailbox mapping, click the ‘Start Migration’ button to initiate the process.
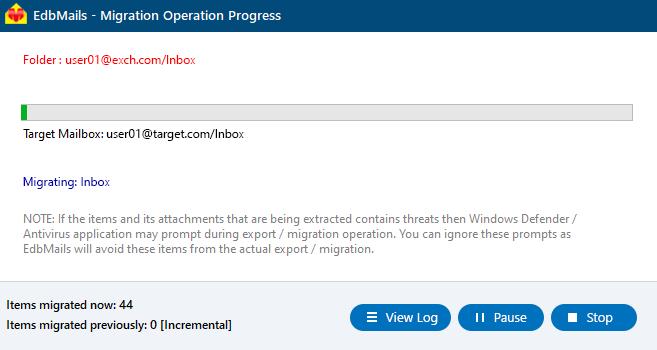
- Now that the migration has been initiated, you can see the migration status in the progress bar. Once the migration is complete, EdbMails will prompt you to review the migration status with logs.
- Once the migration process is complete, you can view the migration report by clicking the ‘View Logs’ button.
Exchange Archive mailbox to Exchange: post migration tasks
Step 1: Change the MX records to direct email to Office 365.Update MX records for directing email to the new server. Additionally, configure the Autodiscover record to ensure that migrated mailboxes connect smoothly with email clients like Outlook.
Step 2: Create a new Outlook profile for users under the updated domain.If users encounter issues connecting Outlook to Office 365 mailboxes, manually configure their Outlook profiles in the new domain.
Step 3: Disable and decommission the source Exchange server.The following steps outline the procedure for decommissioning an on-premises Exchange server:
- Ensure that all mailboxes have been migrated to Office 365.
- Verify the migration status using the Exchange admin center or the PowerShell command Get-MailboxStatistics.
- Confirm that all Outlook clients are properly configured to connect to Office 365 and check connectivity with the Test-OutlookWebServices cmdlet.
- Disable mail flow on the Exchange server by either removing the Receive Connector or stopping the SMTP service.
- Check that all public folders have been successfully migrated to Office 365 using the Get-PublicFolder cmdlet for status verification.
- Uninstall the Exchange server software via the Control Panel.
- Remove any remaining hardware or virtual machines related to Exchange.
- Ensure there are no leftover mailboxes or public folders on the Exchange server.
- Finally, remove the server from Active Directory and DNS.
- Once all these steps have been confirmed, you can proceed with decommissioning your on-premises Exchange server.
Troubleshooting guide to migrate Exchange Archive mailboxes
Check the Exchange migration troubleshooting guide for solutions to any migration errors you may encounter. For more details about EdbMails Exchange migration, check the frequently asked questions.
Solution to public folder migration failure due to permission issues.
Benefits of EdbMails for Exchange Archive mailbox migration
EdbMails Exchange migration tool streamlines the transfer of Archive mailboxes to Live Exchange. Unlike manual methods, its intuitive graphical user interface allows users to effortlessly select and migrate folders, mailboxes, and mail items without the need for PowerShell scripts.
- Migrate with high performance : EdbMails ensures a seamless Exchange archive mailbox migration by offering high-performance concurrent mailbox migration capabilities. This feature allows multiple mailboxes to be migrated simultaneously, significantly reducing the total migration time while ensuring no disruption to end users.
- Data integrity and uptime assurance : EdbMails delivers a seamless and dependable Exchange Archive mailbox migration experience with guaranteed data integrity and zero downtime. Its advanced technology ensures every mailbox item is securely transferred, maintaining business continuity and user productivity throughout the process.
- Scalability for large Archive mailboxes : EdbMails is built for scalability, effortlessly handling large Archive mailboxes of any size. Whether you’re migrating between on-premises or hosted Exchange servers, the tool ensures smooth performance and reliable data transfer, no matter how extensive your data volume is.
- Enterprise and SMB compatibility : EdbMails is designed to meet the migration needs of both small businesses and large enterprises. Its scalable architecture and advanced features ensure smooth, secure, and efficient Exchange server migrations, regardless of organization size or complexity.
- Incremental migration : EdbMails includes an advanced incremental migration feature that prevents duplicate items during subsequent migrations to the same target. This ensures data consistency, saves time, and makes every migration cycle more efficient.
- Automated software : EdbMails simplifies the migration process with powerful automation features. It automatically creating mailboxes on the target Exchange server, maps mailboxes and folders, and handles throttling to ensure a smooth and effortless migration experience.
- Reliable data replication : EdbMails ensures reliable data replication by accurately copying all mailbox items and folders from the source to the target while maintaining complete data integrity and consistency throughout the migration process.
- Free 24/7 tech support : EdbMails provides free 24/7 technical support to assist users at every stage of the migration. It also offers a free trial version, enabling organizations to explore and evaluate the software’s features before making a purchase.


