- Products Exchange EDB / Email Recovery Tools
- EDB Recovery and MigrationRecover EDB to PST, EDB to Office 365 and Exchange NO Duplicate Migration
- OST Recovery and MigrationRecover OST to PST, OST to Office 365 and Exchange Migration
- PST Recovery and MigrationRecover Outlook PST, PST to Office 365 and Exchange Migration
- MBOX Export and MigrationExport MBOX to PST, MBOX to Office 365 and Exchange Migration
- NSF Export and MigrationExport NSF to PST, NSF to Office 365 and Exchange Migration
- EML to PST ExportEML files export to Outlook PST format
- PST to MSG ExportOutlook PST files export to MSG format
- MSG to PST ExportExport MSG files Outlook PST files
Exchange and Office 365 Migration- Exchange Server MigrationMigrate Exchange 2007, 2010, 2013, 2016, 2019 to Office 365 tenants. Also, migrate between Exchange servers and PST
- Office 365 MigrationMigrate Source Office 365 tenants to Destination Office 365 tenants. Also, migrate to Exchange Server and PST
- IMAP Email Backup & MigrationMigrate all IMAP email servers (Gmail, Zimbra, Zoho, Yahoo etc.), Office 365, Exchange and Backup to Outlook PST
- SharePoint Online MigrationMigrate documents, files and folders from SharePoint sites
- OneDrive for Business MigrationMigrate documents, files and folders from OneDrive
- Microsoft Teams MigrationMigrate Teams, documents, files and folders etc.
Exchange and Office 365 Backup- Office 365 BackupIncremental, Granular, Encrypted and Compressed Office 365 Mailboxes Backup
- Exchange Server BackupIncremental, Granular, Encrypted and Compressed Exchange Mailboxes Backup
- SharePoint, OneDrive & Teams BackupBackup Online site collections, Team sites, Office 365 groups, all documents etc.
- Duplicate Remover - Office 365, Exchange, IMAP & Outlook Remove duplicate emails, calendars, contacts, journal etc. from Office 365, Exchange, IMAP, Outlook, Gmail, Zimbra, Zoho Mail etc.
- More Products
- Features
- FAQ

Exchange Server Migration
User Manual
User Manual
- Exchange Migration Overview
- Initial Setup
- System Requirements
- Migration Scenarios
- Installation
- FAQ
- Videos
- Screenshots
- Understanding the Application
-
How it works?
- Exchange to Exchange
- Exchange to Office 365
- Exchange to PST
- Exchange to IMAP
- Exchange Public Folder to Office 365
- Exchange Public Folder to Exchange
- Exchange 2010 to 2016 Public folder
- Exchange 2013 Public folder to Office 365
- Exchange 2016 Public folder to Office 365
- Exchange Public Folder to Shared Mailbox
- Archive Mailbox to Office 365
- Archive Mailbox to Exchange
- Hosted Exchange Migration
- Hosted Exchange to Live Exchange Migration
- Hosted Exchange to Office 365 Migration
- Live Exchange to Hosted Exchange Migration
- Hosted Exchange Public Folder to Office 365 Migration
- Cross-forest migration from Exchange 2013 to Exchange 2019/2016
- Hybrid Migration
- Public folder Migration in Hybrid Environment
- Disable msExchMailboxGuid
- Exchange to Gmail Migration
- Multiple PST files to Exchange server
- Connect to Exchange server for multiple mailboxes migration
- Connect to Hosted Exchange for its Migration
- Connect to Office 365
- Set Exchange Server Impersonation rights
-
Knowledge Base
- Exchange to Exchange Migration
- Exchange to Office 365 Migration
- Migrate Legacy Exchange to Latest Exchange
- Cross-forest and cross-domain migration
- Public folder, Shared mailbox migration
- Archive mailbox migration
- Hosted Exchange Migration
- Incremental migration
- Cutover, staged and hybrid migration
- Migrate SBS 2003, 2008, 2011 to a Modern Exchange Environment
- Export Exchange Mailbox to PST
- Secure Exchange Migration
- Selective Mailbox / Folder Migration
- Automatic Mailbox Mapping
- Assign Public Folder to one target destination
- Multiple PST Restore
- No Impact on users - Zero downtime
- Migrate Email Rules, Forwarding and Junk Email Configuration
- Exchange migration speed and throttling management
- Support for all the languages
- Advanced settings and options
- GAL and all address lists Migration
- Exchange migration reports
- Best Exchange Migration software
- Exchange migration checklist
- Exchange migration manager
- Feature rich Exchange migration software
- Exchange to Office 365 migration planning
- Exchange server migration tips
- Export Exchange server users to CSV
- Migration Types
- Map the Mailboxes
-
Migration Walkthrough
- From Exchange 2003
- From Exchange 2007
- From Exchange 2010 to Exchange 2019
- From Exchange 2010 to Exchange 2016
- From Exchange 2010 to Office 365
- From Exchange 2013 to Exchange 2019
- From Exchange 2013 to Exchange 2016
- From Exchange 2013 to Office 365
- From Exchange 2016 to Exchange 2019
- From Exchange 2016 to Office 365
- From Exchange 2019 to Office 365
- From Office 365
- Exchange 2013 mailbox to PST
- Exchange 2016 mailbox to PST
- Exchange 2019 mailbox to PST
- Exchange 2010 mailbox to PST
- Multifactor Authentication
Note: EdbMails application will automatically set Impersonation rights. If the automatic configuration is not successful then the appropriate message will be displayed to set the rights manually.
Exchange Management Shell (EMS) commands to set Impersonation rights for Exchange 2010, 2013, 2016, 2019
Note:
1. If the login through administrator user fails then try to impersonate any other User.
2. Make sure the impersonated user account has impersonation permissions to each associated Mailbox (Users). That's, impersonated user should have impersonation permissions to all associated Mailboxes.
Execute the below commands on your Exchange Management Shell (Run as Administrator)
- Step 1:
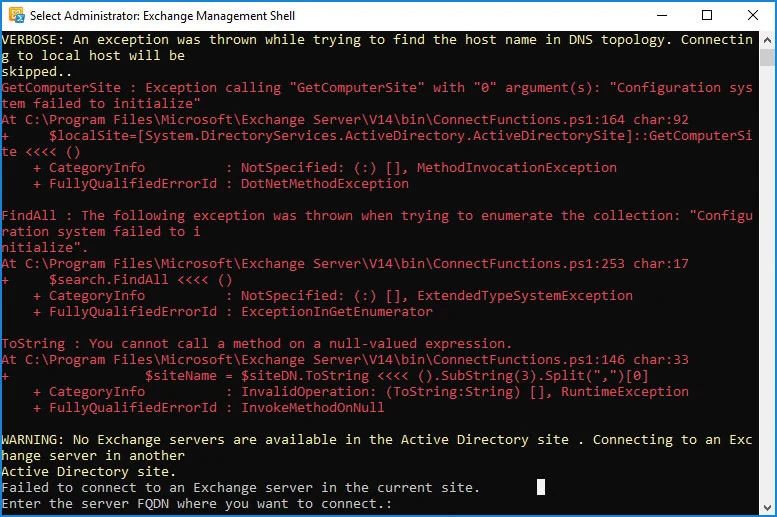
- If you are getting error in Exchange Management shell as shown below, You need to enter the FQDN.
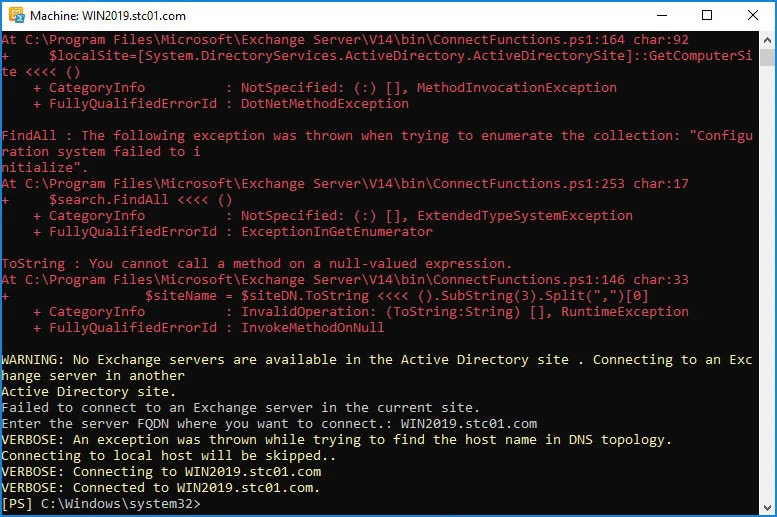
- Follow the below steps to get the FQDN
On the Windows Taskbar, click Start > Programs > Administrative Tools > Active Directory Domains and Trusts.
In the left pane of the Active Directory Domains and Trusts dialog box, look under Active Directory Domains and Trusts. The FQDN for the computer or computers is listed.
- Connection to the Exchange Server is established
- Step 2:Command: Copy & Paste it on EMS
Set-ExecutionPolicy Unrestricted
Result:

- Step 3:Command: Copy & Paste it on EMS
Enable-OrganizationCustomization
Ignore this results, if the error is "This operation is not required. Organization is already enabled for customization."
Result:

- Step 4:Command: Copy & Paste it on EMS & change User
New-ManagementRoleAssignment -Role "ApplicationImpersonation" -User administrator@domain.com
Result:

Note: Click here to know the steps to set Impersonation rights using GUI
Steps to set Impersonation Rights for Live Exchange user account for Exchange 2007 and Lower version
- Configure Exchange Impersonation for a user on a server
Open the Shell (Powershell/Exchange Management Shell). Run Add-ADPermission cmdlet to add the impersonation permissions on the server for the identified user.
For example, to grant User1 permission to impersonate all accounts on an Exchange Server named CAS-01, use the following command:
Command: Copy & Paste it on EMS
Get-ExchangeServer | where {$_.IsClientAccessServer -eq $TRUE} | ForEach-Object {Add-ADPermission -Identity $_.distinguishedname -User (Get-User -Identity User1 | select-object).identity -extendedRight ms-Exch-EPI-Impersonation}
- Configure Exchange Impersonation for a user on a specific user
Open the Shell. Run the Add-ADPermission Windows PowerShell command to add permission to impersonate an identified user.
For example, to grant User1 permission to impersonate User2, use the following command:
Command: Copy & Paste it on EMS
Add-ADPermission -Identity "User2" -User User1 -extendedRight ms-Exch-EPI-May-Impersonate


