Office 365 group mailbox to shared mailbox migration
Many administrators often ask how to migrate an Office 365 group mailbox to a shared mailbox without risking data loss or access issues. A group mailbox enables team collaboration by sharing conversations, files, and calendars, but it does not allow direct mailbox access. In contrast, a shared mailbox provides centralized access for multiple users through Outlook, making it ideal for departments like support or sales. When organizations restructure or require better permission control, migration becomes necessary. Microsoft offers a manual method using PowerShell commands, but it requires advanced technical skills and careful execution. Managing permissions, exporting data, and ensuring message consistency manually can be complex and error-prone, especially for large mailboxes.
A more efficient approach is to use an automated solution like EdbMails Office 365 migration tool. It migrates all items including emails, attachments, calendars, and contacts directly from a group mailbox to a shared mailbox. The tool preserves folder hierarchy, ensures complete data integrity, and eliminates the complexity of scripting. This enables administrators to achieve a seamless, accurate migration with zero downtime.
Why migrate from Office 365 Group mailbox to Shared mailbox
Migrating from an Office 365 Group mailbox to a Shared mailbox is a common requirement for organizations seeking better control, accessibility, and management. Here are six key reasons why this migration is important:
- Centralized access for teams: A Shared mailbox allows multiple users to access the mailbox directly in Outlook. Teams such as support or sales can manage emails efficiently without switching between multiple accounts.
- Simplified permission management: Unlike Group mailboxes, Shared mailboxes provide granular permission controls. Administrators can assign full access, send-as, or send-on-behalf permissions to specific users with ease.
- Better Outlook integration: Shared mailboxes appear directly in Outlook for all assigned users. This eliminates the need to access emails through the Groups section and improves workflow efficiency.
- Streamlined email monitoring: Organizations can monitor email flow and responses more effectively in a Shared mailbox. It ensures that no customer or internal emails are overlooked.
- Preserved data integrity and folder structure: Migrating to a Shared mailbox preserves all emails, attachments, calendars, and contacts while maintaining the original folder hierarchy. This ensures continuity and prevents data loss.
- Cost-effective and scalable: Shared mailboxes do not require separate licenses for users with assigned access. This makes it a cost-efficient solution while providing scalability for growing teams.
Office 365 Group mailbox to Shared mailbox migration- prerequisites
- To use Auto Registration authentication method, make sure you have a global admin account that has an active mailbox linked to your Entra ID (Azure Active Directory). If you prefer Manual Registration, you can proceed using either a global admin or any user account that has full access.
- Prepare your target Office 365 tenant. See tenant roadmap for Microsoft 365.
- Create Shared mailboxes on the target Office 365 tenant and set the required permissions
Steps to migrate from Office 365 Group mailbox to Shared mailbox
Step 1: Download and set up the EdbMails application
- Download and install the EdbMails Office 365 migration tool on your computer.
- Once the installation is complete, login using your email address and password or click ‘Start Your Free Trial’ to proceed.
See the detailed system requirements for Office 365 Group Mailbox to Shared Mailbox Migration.
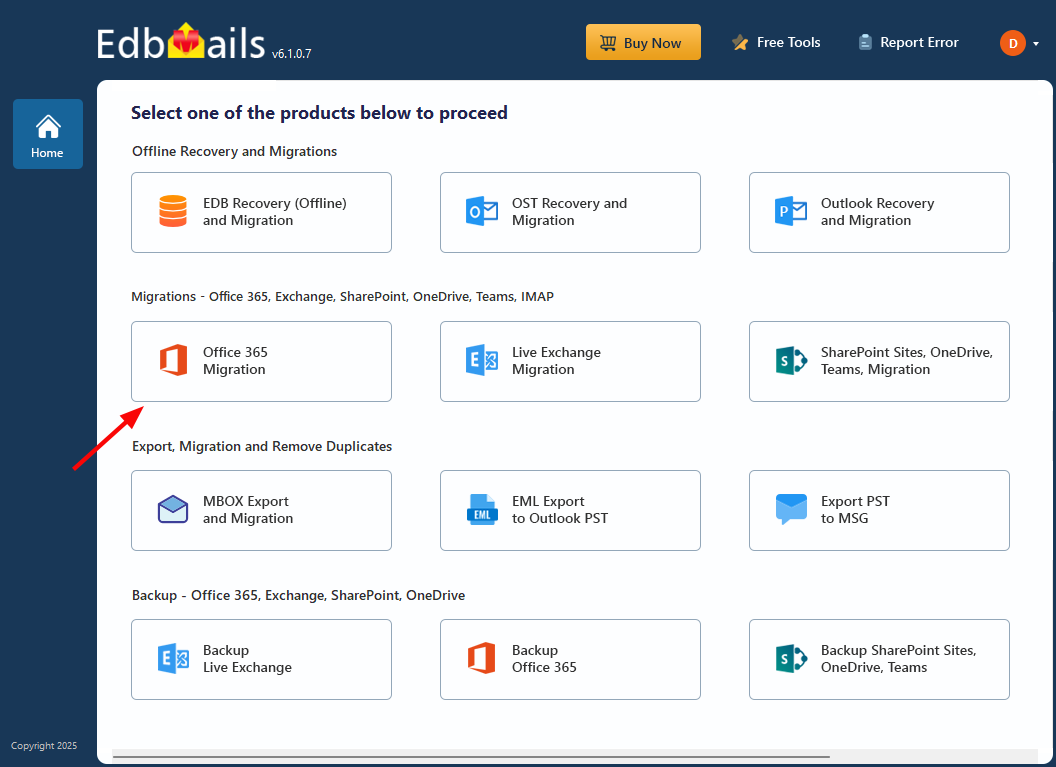
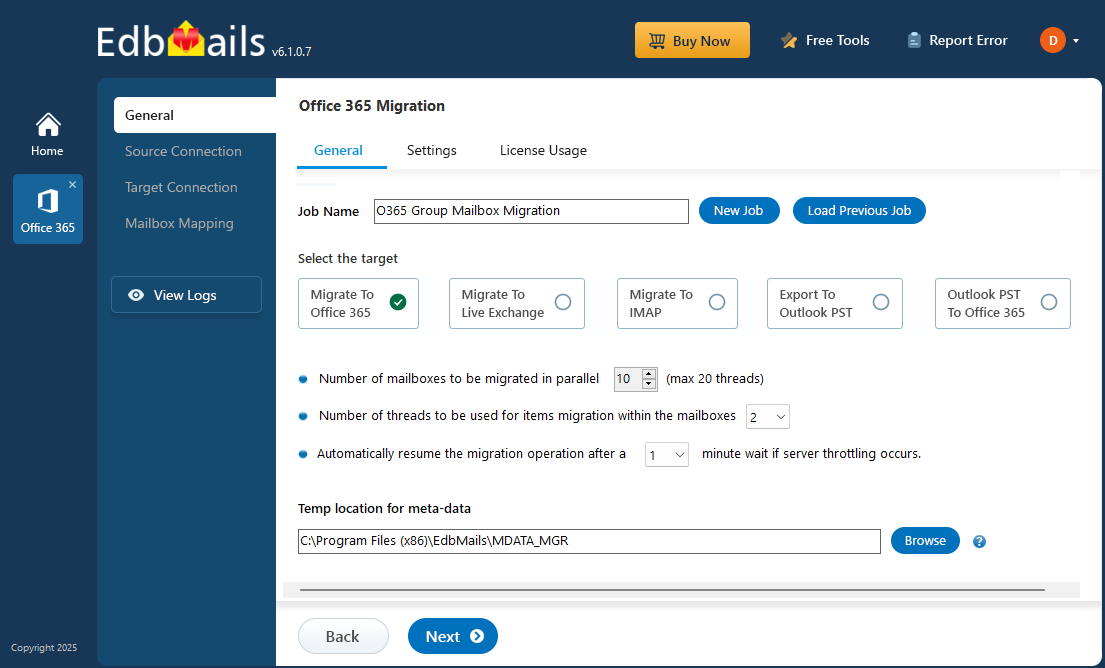
- Choose ‘Office 365 Migration’ from the main dashboard to continue.
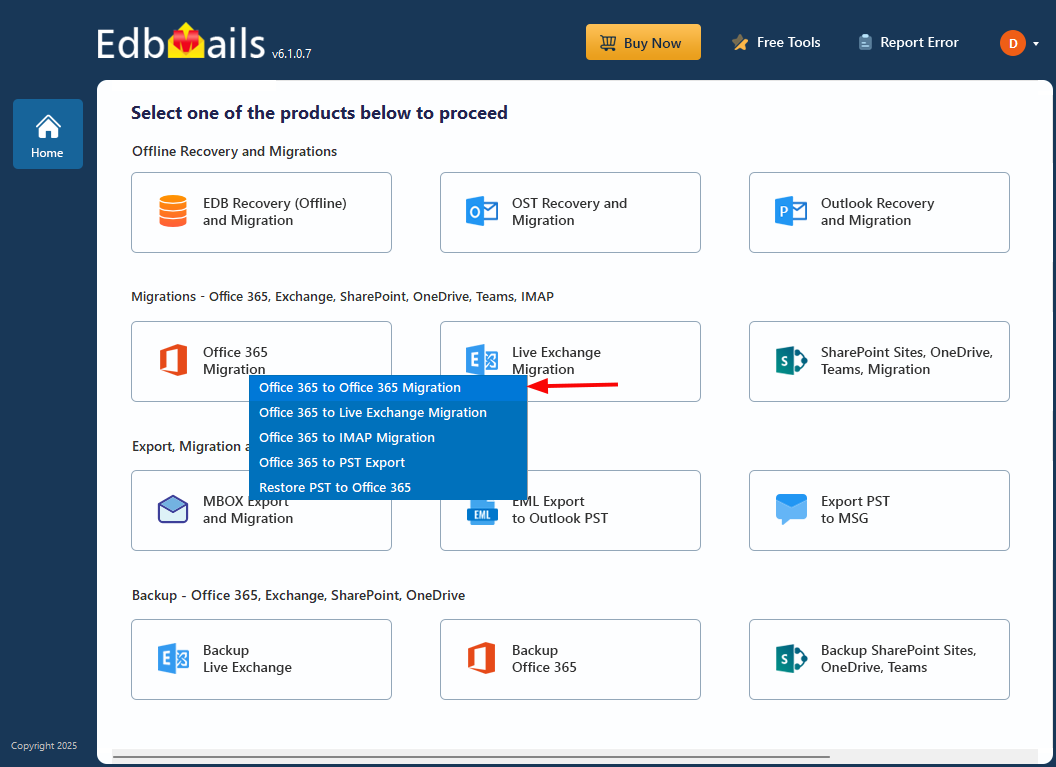
- Select the ‘Office 365 to Office 365 Migration’ option.
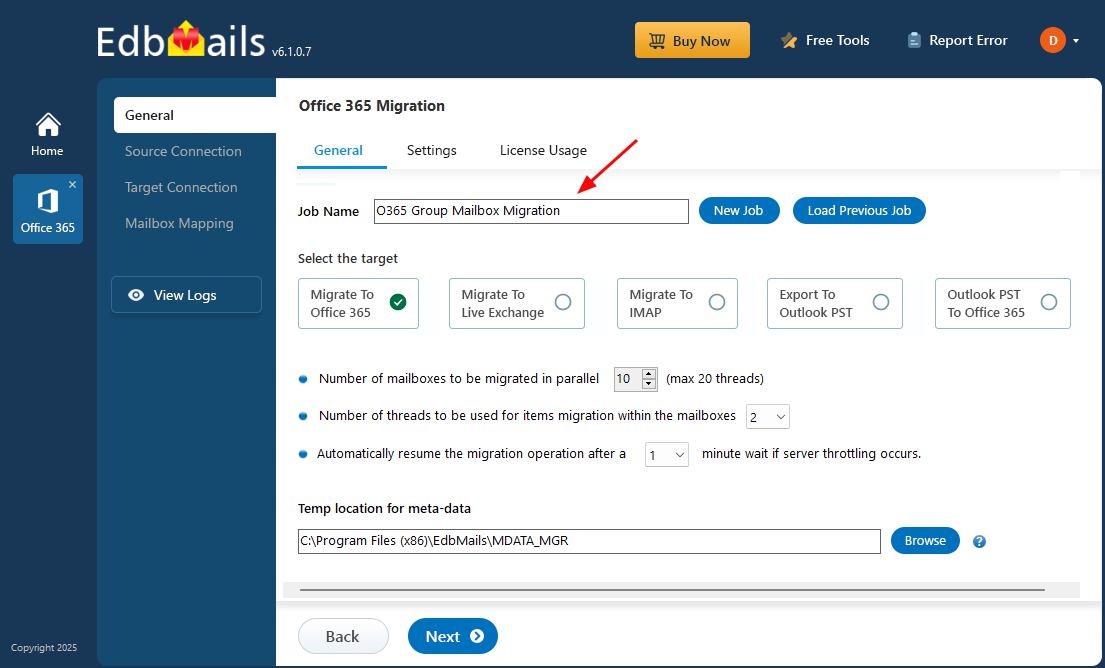
- You can keep the default job name or select ‘New Job’ to create a custom one.
- Then, click ‘Next’ to move forward.
Step 2: Connect to the source Office 365 account
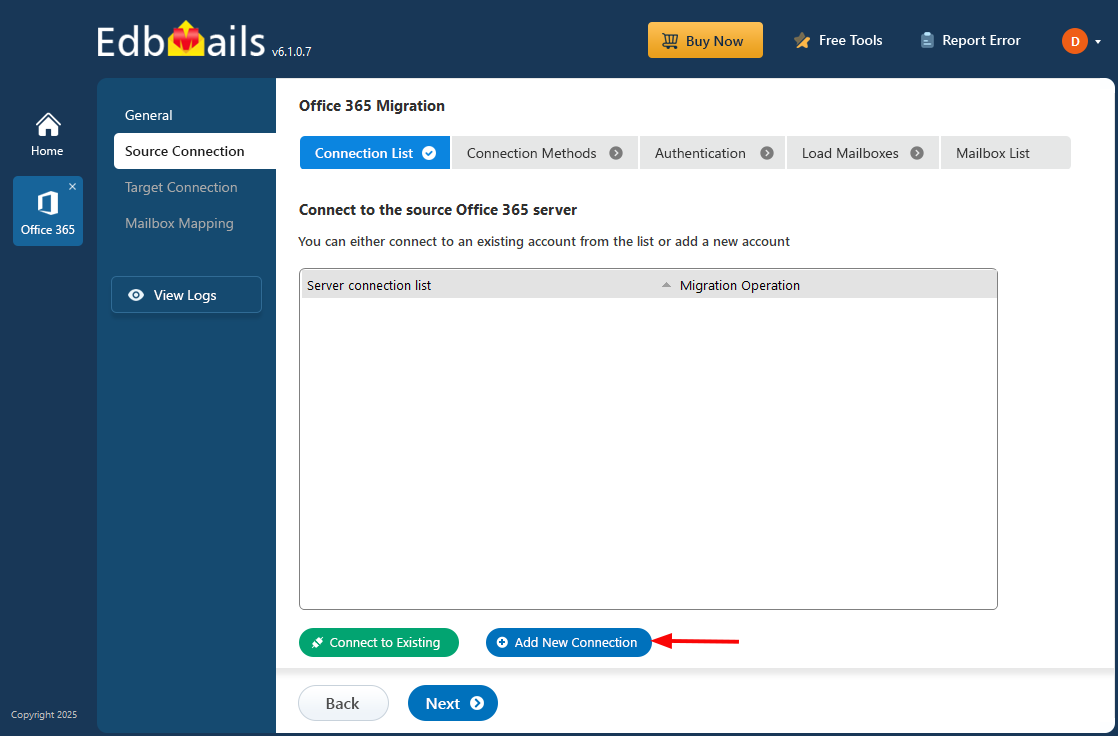
- Click ‘Add New Connection’ to set up a new source Office 365 connection, or choose an existing connection and select ‘Connect to Existing’ to continue.
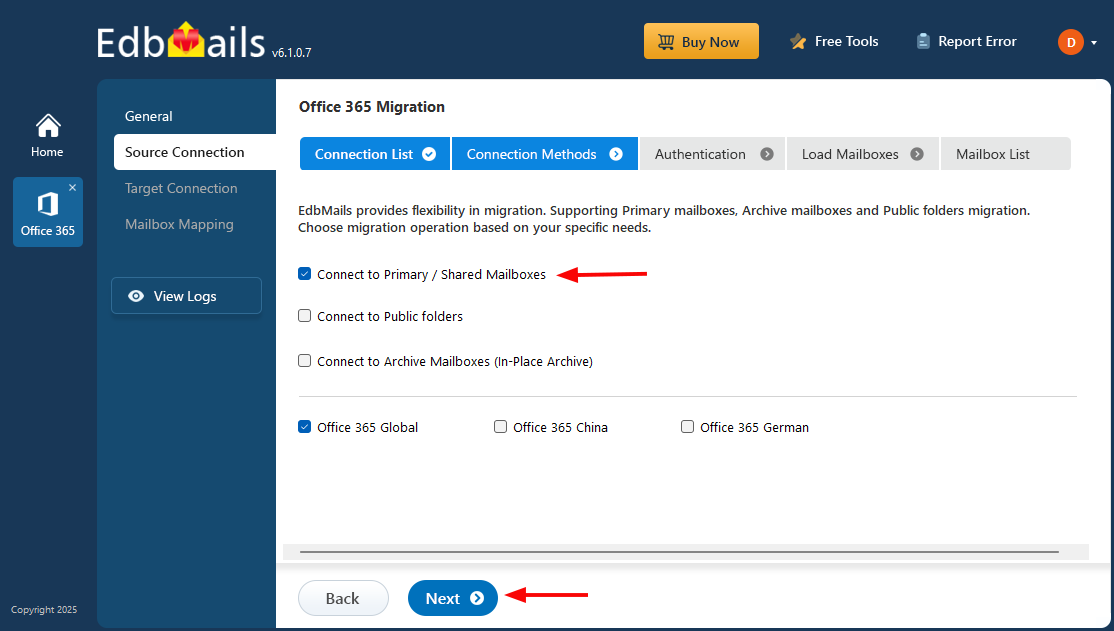
- Select ‘Connect to Primary/Shared Mailboxes’ and click ‘Next’
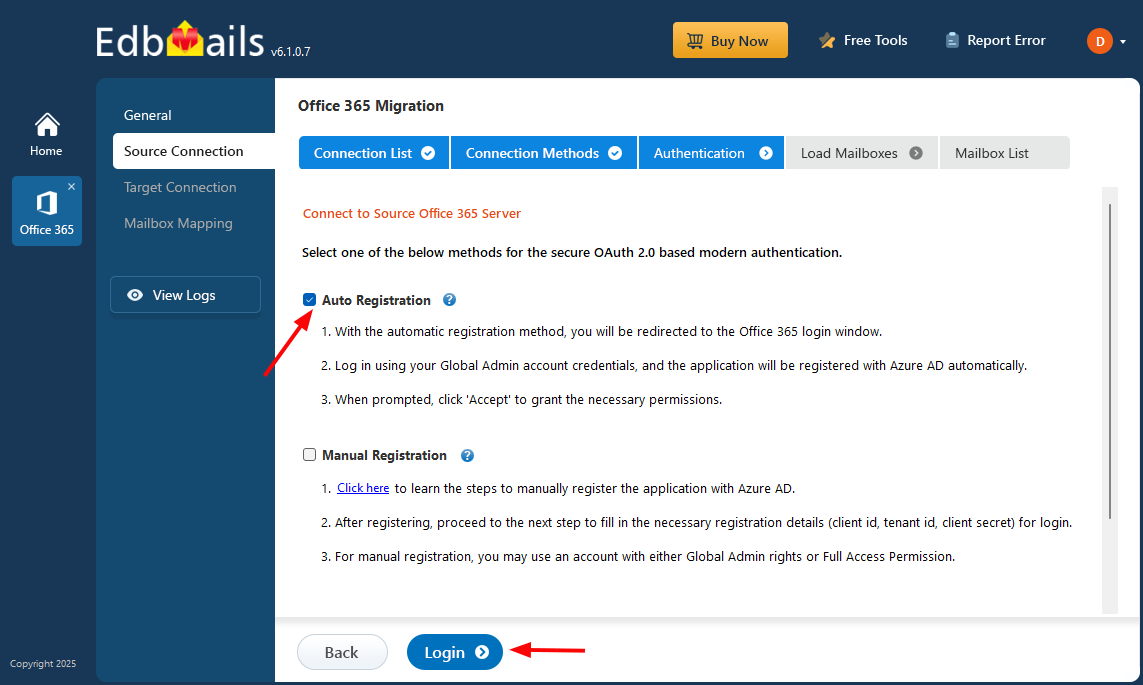
- Select an authentication method and click ‘Login’ to proceed.
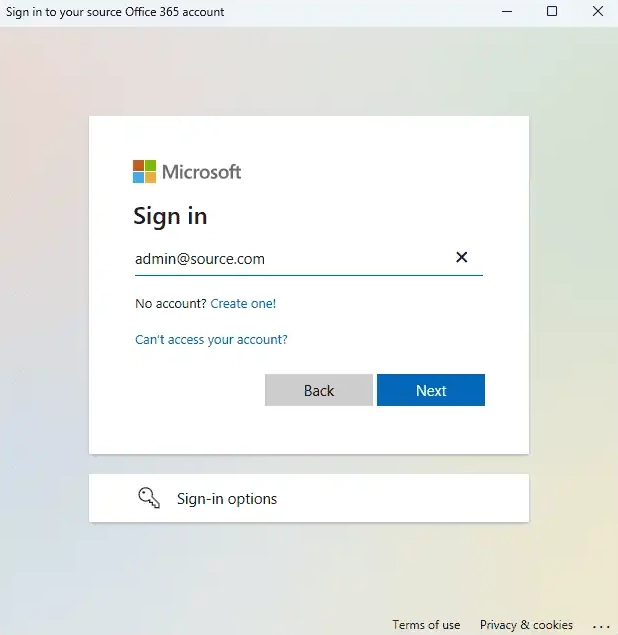
- Authenticate on Microsoft sign-in page.
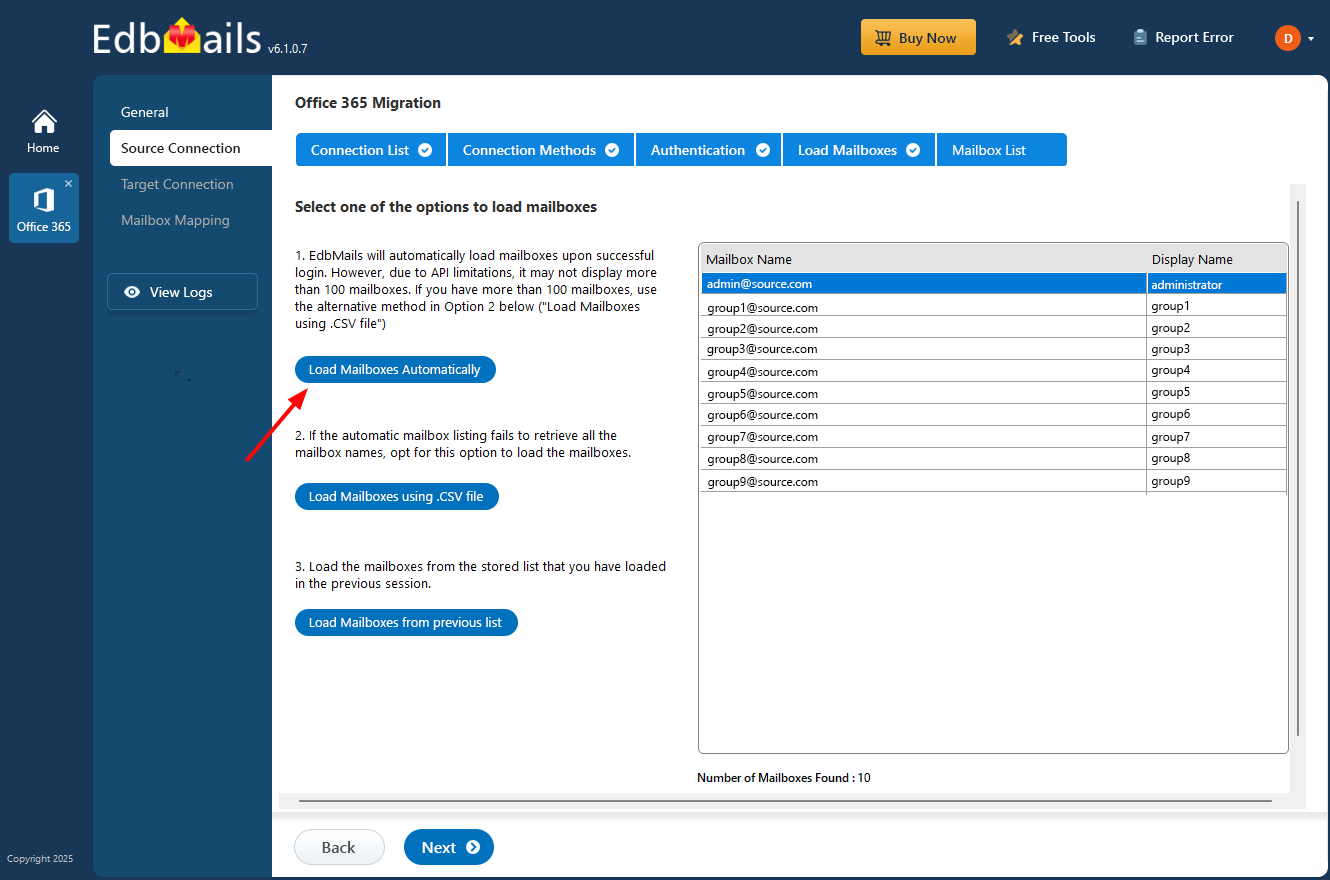
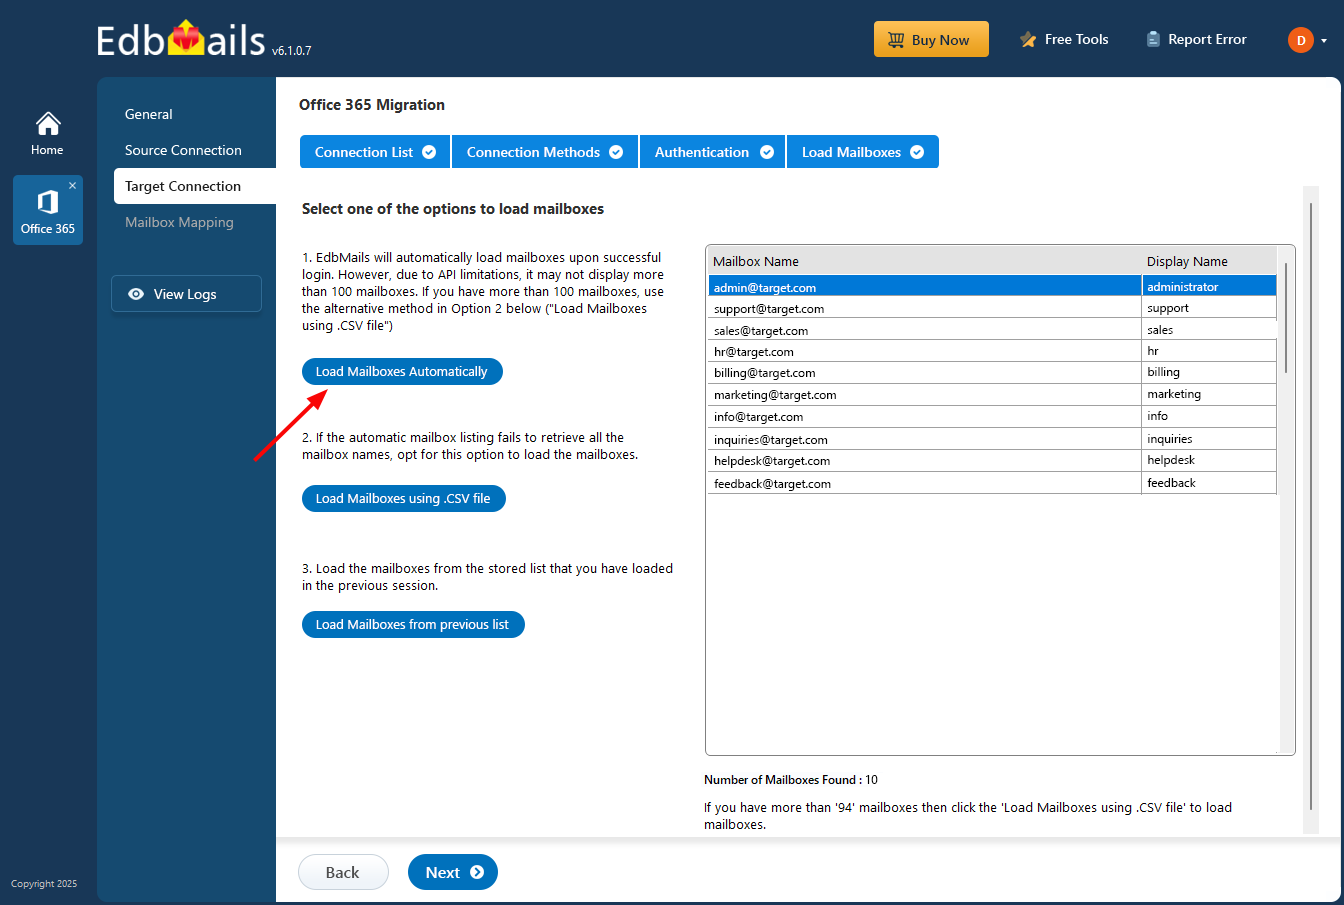
- Once authentication is successful, select a method to load the mailboxes. EdbMails automatically loads 100 mailboxes into the interface. If you have more than that, you can load those mailboxes using a CSV file.
Click here to know the methods to load mailboxes using CSV file
Step 3: Select source Office 365 Group mailboxes
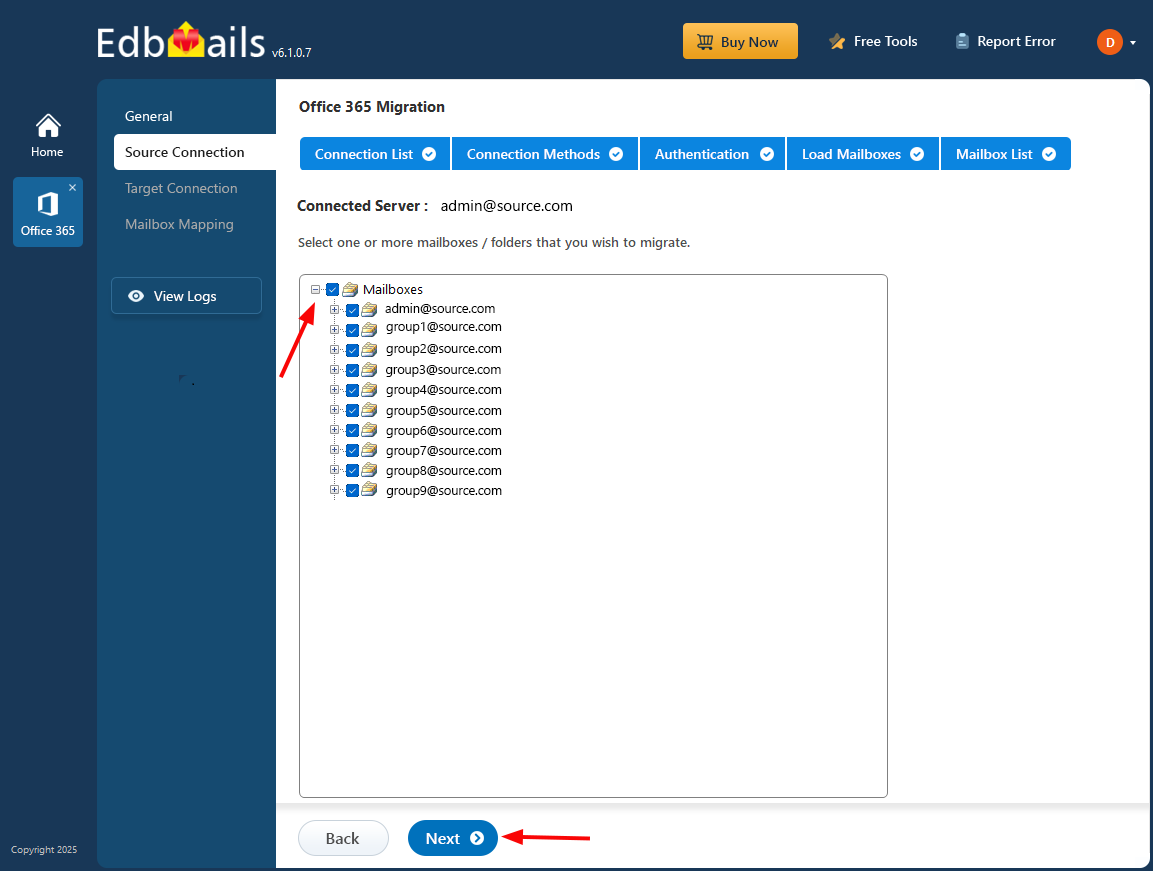
- Choose the Group mailboxes you want to migrate to the target and click ‘Next’.
Step 4: Connect to Target Office 365 Tenant
- Click ‘Add New Connection’ to create a new connection with the target Office 365 account. To use an existing connection, select it from the list and click ‘Connect to Existing’.
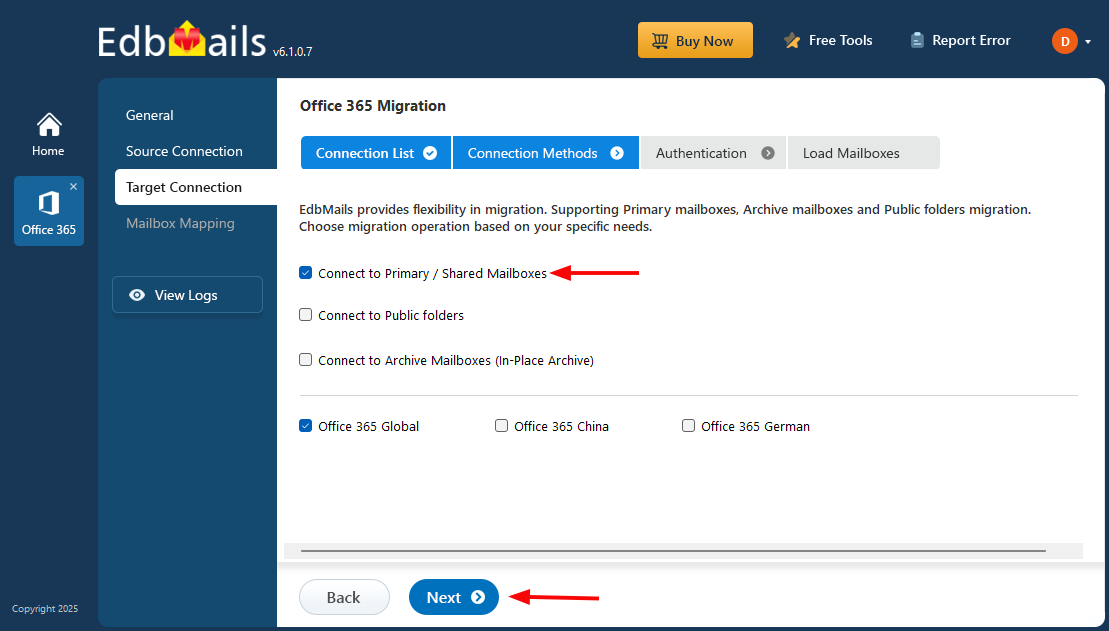
- Choose Connect to Primary/Shared Mailboxes and then click ‘Next’ to proceed.
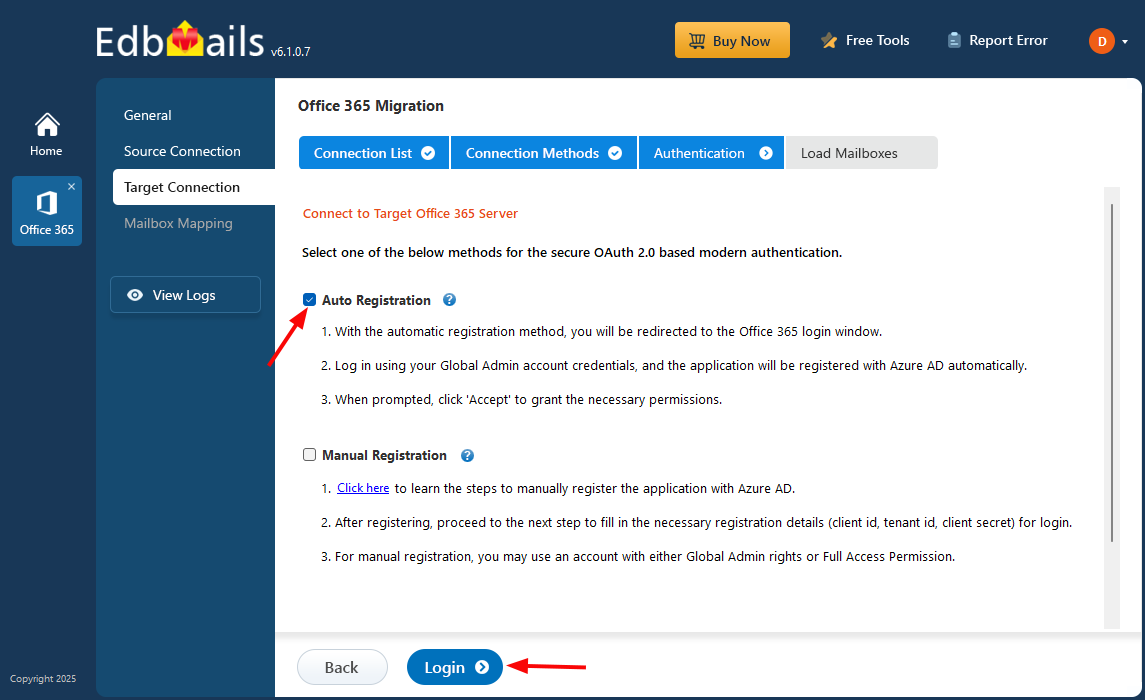
- Choose a secure OAuth 2.0-based modern authentication method to connect to the target server.
- Then, click ‘Login’ to continue.
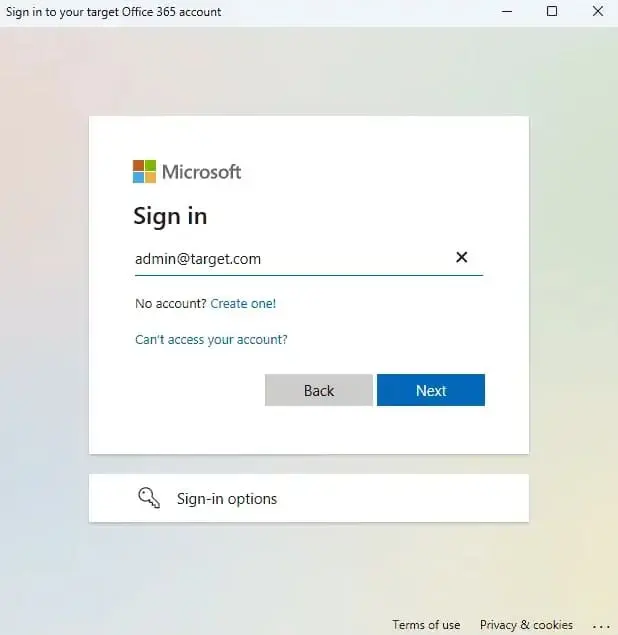
- Sign in on the Microsoft login page.
- Select a method to load the mailboxes. If the target shared mailboxes do not appear when using the automatic loading option, you can manually import them by uploading a CSV file.
Step 5: Map source and target mailboxes
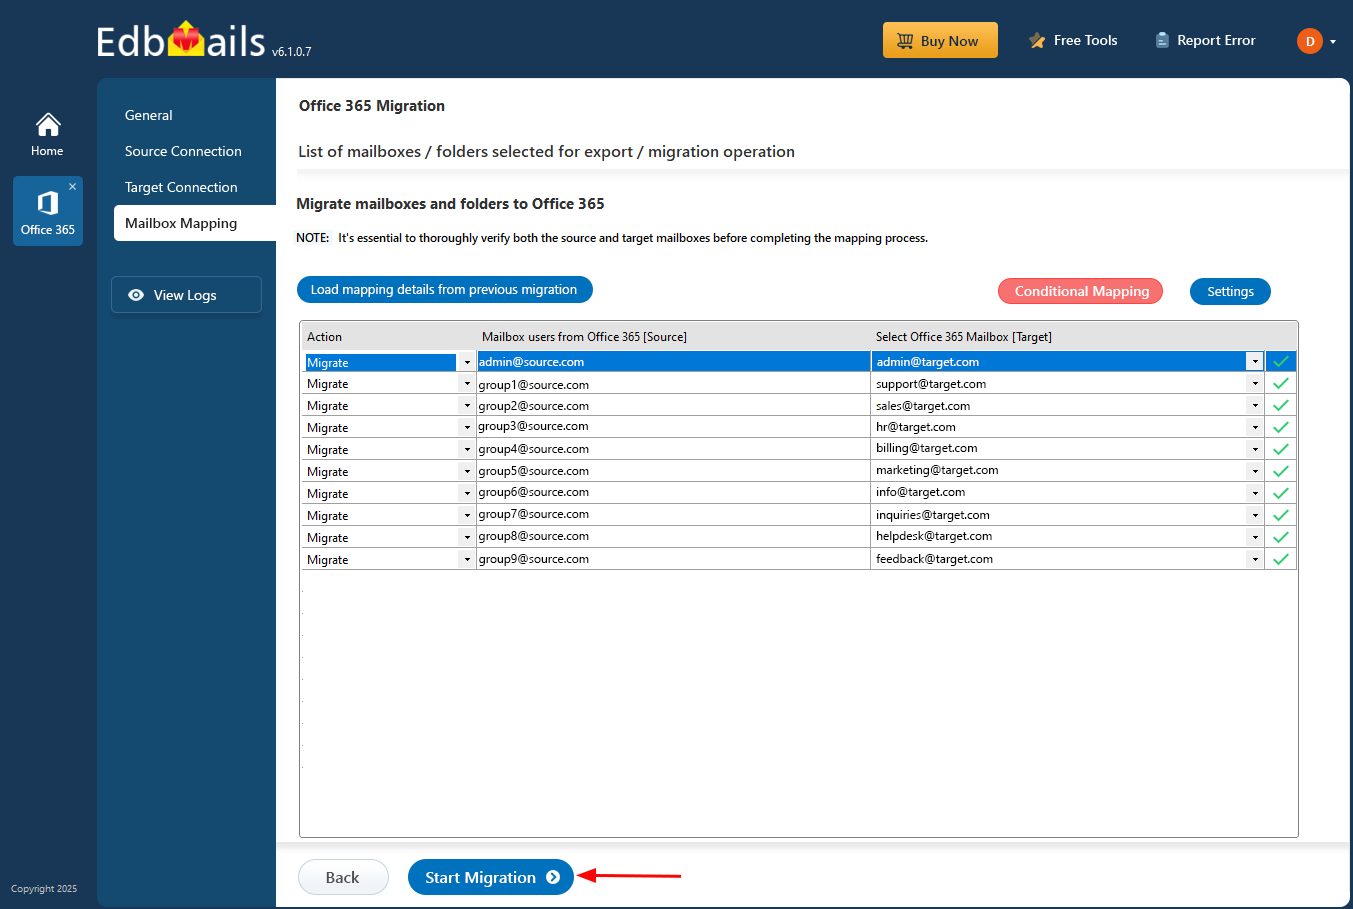
- Choose the mapping option that suits your requirements.
- EdbMails automatically maps mailboxes between the source and target servers. You can also manually map source Office 365 Group mailboxes to target Shared mailboxes if needed.
Step 6: Start Office 365 Group mailbox to Shared mailbox migration
- After mapping the mailboxes, click ‘Start Migration’ to initiate the migration process.
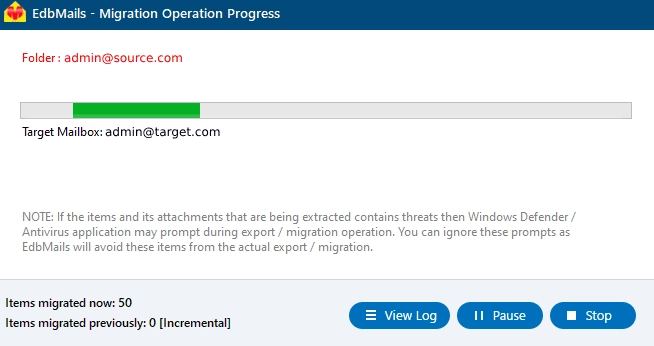
- EdbMails initiates the migration automatically and notifies you once it is complete. Click ‘View Logs’ to access the migration report that shows the number of items that have been migrated in each mailbox's folders.
Post migration tasks
If you are migrating group mailboxes from old domain to new domain follow the below post-migration steps
Step 1: Update the MX records to point to Office 365
Update the MX records to enable and receive email messages on the target Office 365 server. In addition to this setup, configure the Autodiscover record to allow Outlook to connect to the migrated mailboxes.
Step 2: Create a new Outlook profile for users in the new domain
Configure and recreate the Outlook profile for each user in your domain if Outlook has problems connecting to Office 365 mailboxes.
Common challenges and solutions
- Throttling limits: Microsoft enforces throttling to prevent excessive resource usage. Large migrations can slow down or fail due to these limits.
Solution: EdbMails automatically handles Microsoft throttling, allowing the migration to continue efficiently without interruptions. However, if you repeatedly migrate a single mailbox, Microsoft may still impose throttling restrictions. To avoid this, it is recommended to migrate multiple mailboxes simultaneously, as EdbMails fully supports concurrent mailbox migration and distributes the load effectively across multiple connections.
- Risk of data loss: Manual methods like PowerShell or eDiscovery can miss emails, attachments, or calendar items, especially in large mailboxes.
Solution: EdbMails guarantees complete migration of all mailbox items including emails, attachments, contacts, and calendars, preserving data integrity.
- Preserving folder structure: Manual migration can disrupt folder hierarchy, making it difficult for users to locate important data.
Solution: EdbMails maintains the original folder structure, ensuring a familiar and organized mailbox after migration.
- Time-consuming manual processes: PowerShell scripts and eDiscovery require advanced technical skills and extensive manual effort. Mistakes can lead to repeated migrations or inconsistencies.
Solution: EdbMails automates the entire process with a user-friendly interface, providing clear dashboards, progress monitoring, and detailed logs.
- Large mailbox challenges: Migrating very large mailboxes can be slow and prone to errors.
Solution: EdbMails supports incremental migration, transferring data in batches to reduce risk and ensure faster completion.
Why EdbMails for Office 365 Group mailbox to Shared mailbox migration
- Secure authentication using OAuth 2.0 and TLS encryption
EdbMails ensures secure access to both source and target Office 365 accounts using OAuth 2.0 modern authentication. All data transferred during the migration is protected with TLS encryption. This eliminates the risk of credentials exposure and safeguards sensitive mailbox content.
- Easy configuration of source and target Office 365 servers
Setting up EdbMails for migration is simple and intuitive. Administrators can easily connect to source and target Office 365 servers without complex configurations. The tool automatically detects mailboxes and provides seamless mapping options, saving time and reducing errors during migration.
- Pause or resume migration operation
EdbMails allows administrators to pause an ongoing migration at any point and resume it later without data loss. This flexibility is essential for large mailboxes or organizations with time-sensitive operations, ensuring minimal disruption while maintaining migration integrity.
- Multilingual support
EdbMails provides multilingual support to cater to global organizations. Administrators can use the application in their preferred language, making it easier to navigate settings, perform migrations, and troubleshoot issues. This ensures a smooth and user-friendly migration experience worldwide.
- CSV-based mailbox import
For organizations managing multiple mailboxes, EdbMails supports CSV-based mailbox import. Admins can upload a CSV file containing source and target mailbox details. This enables bulk migration, reduces manual effort, and ensures accurate mapping of multiple Group mailboxes to Shared mailboxes efficiently.
Frequently Asked Questions (FAQ)
What is the most efficient way to migrate an Office 365 Group mailbox to a Shared mailbox?
The most efficient method is using an automated tool like EdbMails Office 365 Migration, which transfers emails, attachments, calendars, and contacts while preserving folder hierarchy. It eliminates the complexity of PowerShell scripts and ensures complete data integrity with zero downtime.
Can I migrate multiple Group mailboxes at once?
Yes. EdbMails supports the migration of multiple Group mailboxes simultaneously. You can select and migrate several mailboxes in a single operation, and the software processes them concurrently to save time and improve performance. This parallel migration approach ensures faster transfer speeds and reduces the overall migration duration without affecting data integrity or causing downtime.
What if the migration process is interrupted or takes too long?
EdbMails is resilient to interruptions because it performs incremental (delta) migrations. If a migration is interrupted or takes too long, stop or exit the job, resolve the underlying issue (network, credentials, throttling, etc.), and then restart the same migration task. When you restart, EdbMails compares source and target and transfers only the items that were not yet migrated — it will not duplicate already-migrated data.
Recommended steps:
- Check the migration logs to identify the cause of interruption.
- Fix connectivity, credential, or throttling issues.
- Restart the same migration job — EdbMails will continue via incremental sync.
- For very large deployments, use batched or concurrent mailbox migration to shorten total time and reduce the chance of single-mailbox throttling.
Which license do I need to migrate an Office 365 Group Mailbox to a Shared Mailbox?
To migrate an Office 365 Group Mailbox to a Shared Mailbox using EdbMails, you need an Office 365 Migration license.


