


How to Fix Outlook Not Connecting to the Server
Check whether the mailbox works in webmail/OWA and whether classic Outlook says Disconnected, Working Offline, or Trying to Connect.
If webmail works, troubleshoot the local client or profile. If webmail also fails, investigate the service, account, or server itself before changing anything in Outlook.
Outlook plays a vital role in managing emails, calendars, contacts, and tasks, so maintaining uninterrupted access is essential for everyday communication and business productivity. When Outlook fails to connect to the server, messages stop syncing, responses get delayed, and overall productivity is affected. This problem can occur due to several factors, including server outages, incorrect account configuration, or issues within the Outlook data file.
Identify whether the fault is local to Outlook or affects the mailbox, account, service, or on-premises server before changing profiles or data files. OST recovery belongs at the end of the process and applies only when the normal mailbox/server path cannot supply required data.
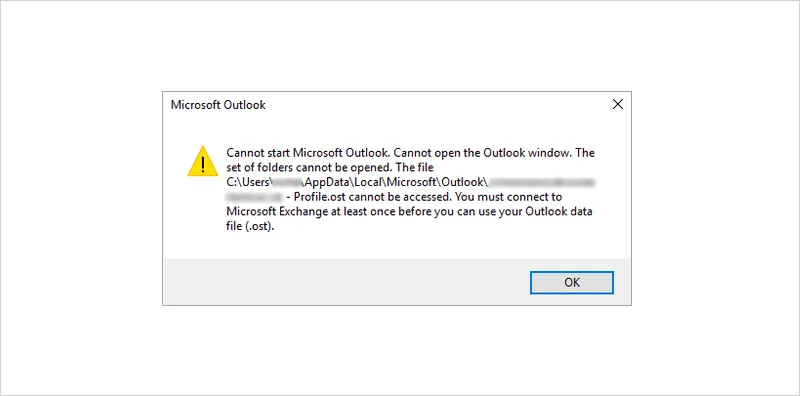
This section walks you through practical methods to troubleshoot and fix the ‘Outlook not connecting to server’ error, using classic Outlook for Windows. New Outlook for Windows and Outlook for Mac use different offline/profile models, so most of the profile, add-in, and data-file steps below are scoped to classic Outlook for Windows specifically rather than applying the same way across every platform. See current supported Outlook versions and system requirements rather than relying on a fixed version list.
Troubleshooting Decision Guide
| Observation | Action |
|---|---|
| Webmail works, Outlook shows disconnected | Client/profile/add-in/network troubleshooting |
| Webmail also fails | Service/account/server investigation |
| Working Offline is checked | Return to online mode |
| A new profile works | The old profile was the issue |
| Server restored, mailbox healthy | Rebuild/reconnect the cache |
| Mailbox gone, old OST has needed data | OST recovery |
Outlook Connection Triage
| Layer | Check | Owner |
|---|---|---|
| Service | Microsoft 365/Exchange service health and mailbox availability | Microsoft 365 or Exchange administrator |
| Network | Internet, VPN, proxy, DNS and firewall path | Network administrator |
| Identity | Password, MFA, Conditional Access and account status | Identity administrator/user |
| Outlook | Profile, credentials, add-ins, updates and connection state | Desktop support |
| OST cache | File lock, corruption, storage and synchronization condition | Desktop support/data-recovery owner |
Safe sequence: Confirm service → network → identity → Outlook profile → OST condition, in that order, before treating the OST as the cause.
How to resolve the issue Outlook is not connected to server
There are several methods to fix Outlook connection issues with the server.
Step 1: Check the Server Side First
- Method 1: Check Service Health and Account Status (Microsoft 365/Exchange)
Before changing anything in Outlook, confirm whether the problem is with the account/server rather than the local client. This applies to Microsoft 365 and Exchange accounts.
- Step 1: Check the mailbox via webmail
- Sign in to Outlook on the web (or your Exchange server's supported webmail) using the same account. If webmail works and shows current mail, the account and server are healthy — the problem is local to this Outlook installation.
- If webmail also fails, the issue is with the account, licensing, or server itself, not just the desktop client.
- Step 2: Check Microsoft 365 service health (if applicable)
- A Microsoft 365 admin can check the Microsoft 365 Service Health dashboard for ongoing incidents affecting Exchange Online.
- Confirm the mailbox's license is active and not suspended or expired — an account-status issue looks identical to a connectivity error from the client side.
- Step 3: If webmail works, continue with the checks below
- Work through Working Offline, internet connectivity, and the Outlook-side methods that follow.
See how to resolve Outlook not responding when it connects to an Exchange Online.
- Step 1: Check the mailbox via webmail
Step 2: Working Offline and Internet Connection
- Check this first: Working Offline / Disconnected Status
Outlook may have been working in offline mode at times. Follow these steps to determine whether Outlook is online or offline. If Outlook is in offline mode, you must disable it in order to connect to the server.
- Step 1: Open Microsoft Outlook
- Double-click the Microsoft Outlook icon on your desktop or in the Start menu to open the application.
- Step 2: Go to the Send/Receive tab
- In Microsoft Outlook, click on the ‘Send/Receive’ tab in the ribbon.
- Step 3: Disable Work Offline
In the ‘Send/Receive’ tab, look for the option to ‘Work Offline’. If this option is checked, click on it to disable it.
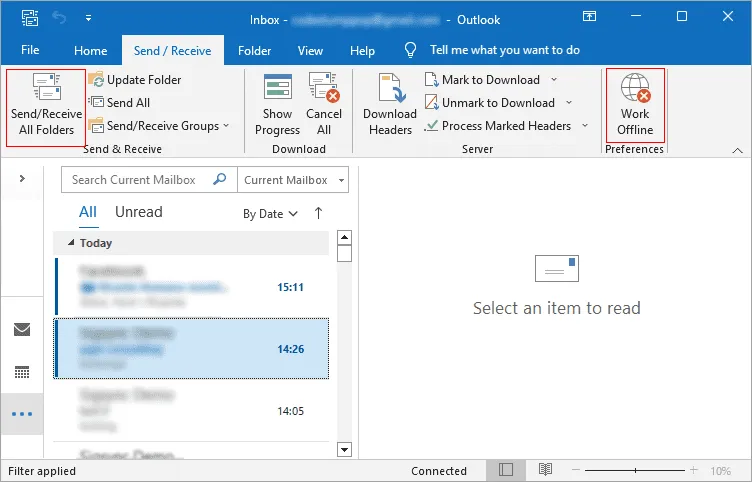
- Step 4: Try to connect to the server
After disabling the ‘Work Offline’ option, try sending and receiving emails in Outlook. If the server connection issue is resolved, you should be able to access your mailbox and sync with the Exchange server without further problems.
- Step 5: Check the connection status
If you are still unable to connect to the Exchange server, go to the ‘File’ menu in Microsoft Outlook and select ‘Info.’ Then, look for the connection status to see if there are any issues with the connection.
- Step 1: Open Microsoft Outlook
- Method 3: Check network connection and restart the computer
- Make sure your computer is connected to the internet and that the network connection is stable.
- You can perform this action by opening a web browser and attempting to access a website.
- Restart your computer by clicking on the ‘Start’ button in the bottom-left corner of the screen, then click on ‘Power’ and ‘Restart’.
- Reopen Microsoft Outlook and you should be able to access your email and other data stored in your Outlook account.
- Method 4: Close and relaunch Microsoft Outlook
Closing and reopening Outlook is one of the most common solutions for minor Outlook issues like the app hanging or failing to connect to the server. It frees up the memory and reloads the application.
- Step 1: Close Microsoft Outlook
- If you are using Microsoft Outlook on Windows, click on the ‘X’ in the top-right corner of the Outlook window to close it.
- If you are using Microsoft Outlook on a Mac, click on the Outlook menu in the top-left corner of the screen, then click ‘Quit Outlook’.
- Step 2: Wait for a few seconds for the processes to stop
- Allow a few seconds for Outlook to fully close and for all its processes to stop running.
- Step 3: Reopen Microsoft Outlook
- If you are using Windows, double-click on the Microsoft Outlook icon on your desktop to reopen it.
- If you are using a Mac, click on the ‘Launchpad’ icon in the Dock, then click on the Microsoft Outlook icon to reopen it.
- Step 4: Check the connection with the email server
- Once Outlook has reopened, check if the Outlook not connecting to Exchange server error has been resolved.
- You should be able to access your email and other data stored in your Outlook account.
- Step 1: Close Microsoft Outlook
Step 3: Account, Service and Authentication
- Method 5: Verify your email account settings in Outlook
In many cases, the account credentials entered in Outlook may not properly sync with your online account, resulting in the error message: ‘Outlook connection to server failed’.
- Step 1: Open Microsoft Outlook
- If you are using Windows, double-click on the Microsoft Outlook icon on your desktop to open it.
- Step 2: Go to Outlook Account Settings
- If you are using Windows, click on the ‘File’ menu, then click on ‘Account Settings’ and ‘Account Settings’ again as shown.
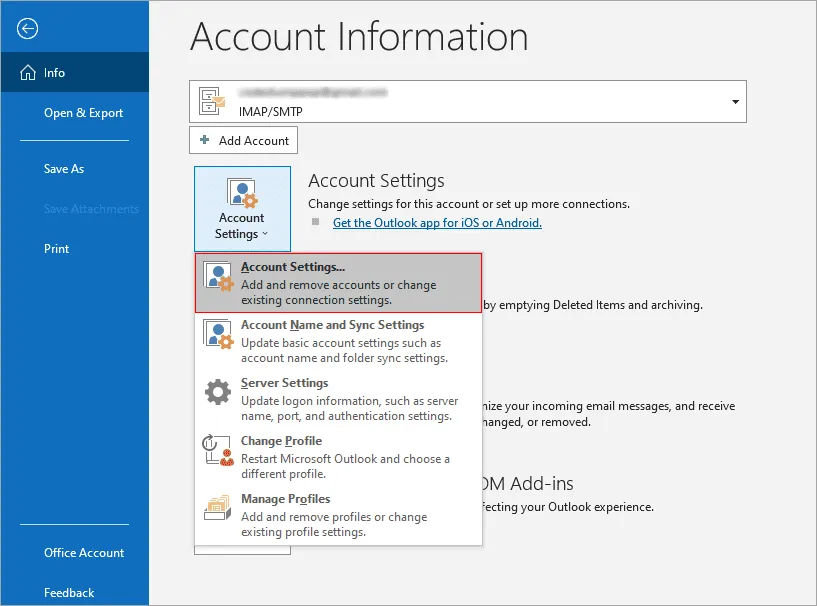
- If you are using Windows, click on the ‘File’ menu, then click on ‘Account Settings’ and ‘Account Settings’ again as shown.
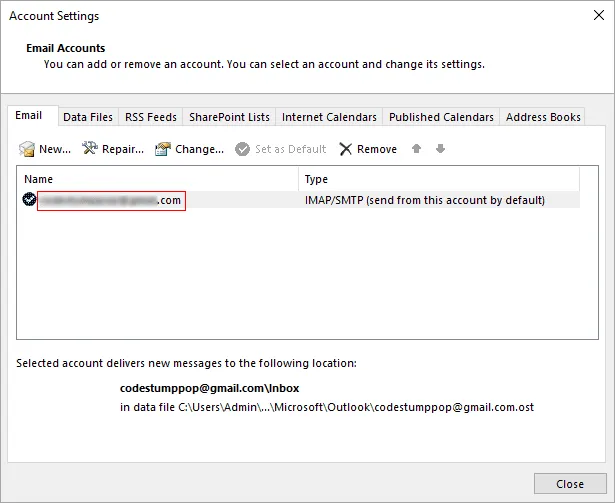
- Step 3: Verify your email account information
Double-click the account and confirm the email address and password are correct and the account shows as connected. Incoming/outgoing server names and port numbers matter mainly for POP or IMAP accounts — for a standard Exchange or Microsoft 365 account, verifying sign-in and account status is the more relevant check.
- Step 4: Test the working of the email account
- Try sending a test email to yourself to see if Outlook can successfully send and receive emails.
- If the test email doesn't go through, double-check your email account information to make sure everything is correct.
- Step 5: Restart Outlook
- Close and reopen Microsoft Outlook to apply any changes you made to your email account information.
- Step 1: Open Microsoft Outlook
- Method 6: Repair your Outlook email account
Repairing your email account is required in cases when Outlook fails to synchronize with the online email due to corruption.
- Step 1: Open Microsoft Outlook
- Double-click the Microsoft Outlook icon on your desktop or in the Start menu to open the application.
- Step 2: Go to the File menu
- In Microsoft Outlook, click on the ‘File’ tab in the ribbon.
- Step 3: Access Account Settings
- In the ‘File’ menu, select ‘Account Settings’. Then, select ‘Account Settings’ again in the drop-down menu.
- In the ‘File’ menu, select ‘Account Settings’. Then, select ‘Account Settings’ again in the drop-down menu.
- Step 4: Select the email account
- In the ‘Account Settings’ dialog box, select the email account that is associated with your server. Then, click ‘Repair’.
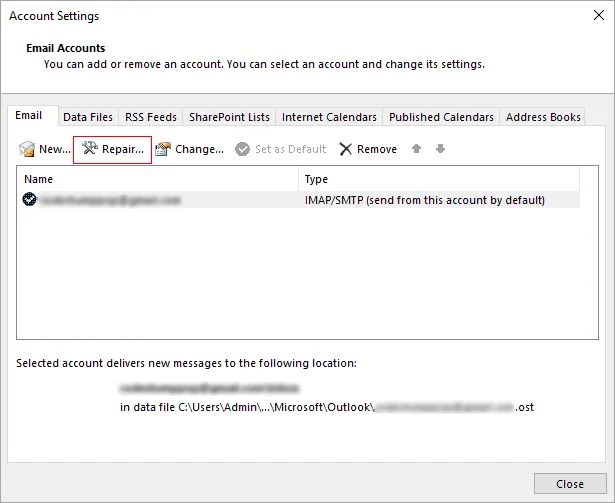
- In the ‘Account Settings’ dialog box, select the email account that is associated with your server. Then, click ‘Repair’.
- Step 5: Repair the email account
- Follow the prompts to repair the email account.
- You may also need to provide additional information or make changes to the account settings to resolve the issue.
- Step 6: Test the email account
If the issue is not resolved by repairing the email account, try the next troubleshooting method.
- Once you have repaired the email account, try to send and receive email in Microsoft Outlook.
- If the issue with Outlook has been resolved, you should now be able to connect to the Exchange server and access your email and other data.
- Step 1: Open Microsoft Outlook
- Method 7: Run Windows Update and Test Outlook User Connectivity
Running Windows Update and testing Outlook user connectivity are simple yet effective steps to fix outlook connection issues in Microsoft 365. Keeping your operating system, Outlook, and account settings up to date helps prevent disruptions and ensures smoother performance and reliable connectivity.
- Step 1: Check for Windows Updates
- Click the Search icon in your Windows computer
- Type ‘Check for updates’ and select the Windows updates in System settings.
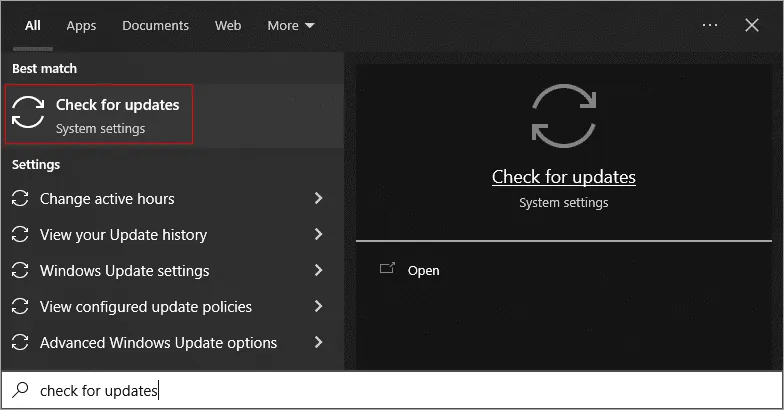
- Install any available updates to ensure that your operating system is up to date.
- Step 2: Test Outlook User Connectivity
- After updating Windows, you should now test your Outlook user connectivity.
- To do this, open the Microsoft Outlook application and go to the ‘File’ menu.
- Then, select ‘Account Settings’ and click on ‘Account Settings.’
- In the Account Settings window, select the email account and click on ‘Test Account Settings.’
- Step 3: Verify User Connectivity
- The Test Account Settings feature checks the connectivity between Outlook and the Exchange server.
- If the test is successful, you should see a message indicating that ‘All tests completed successfully’. If the test is not successful, you may need to try the next troubleshooting method.
- Step 1: Check for Windows Updates
- Method 8: Configure the Exchange server proxy connection
If you’re using a proxy connection and it’s not configured properly, Outlook may encounter connection errors. To resolve this, follow the steps below to adjust the proxy settings for Exchange.
- Open Microsoft Outlook and click on the ‘File’ tab.
- Select ‘Account Settings’ from the File menu.
- In the Account Settings dialog box, select your Exchange account and then click on ‘Change.’
- Click on ‘More Settings.’
- Go to the ‘Connection’ tab and select ‘Exchange Proxy Settings.’
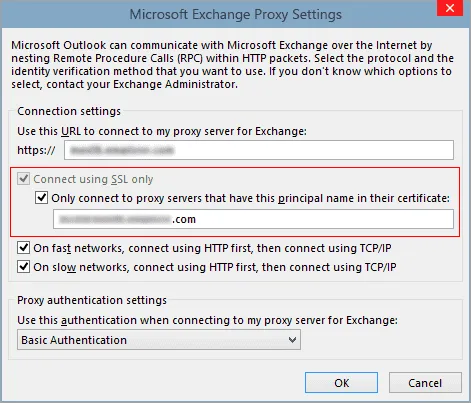
- In the Exchange Proxy Settings dialog box, enter the URL for your Exchange server in the ‘Use this URL to connect to my proxy server for Exchange’ field.
- Select the option ‘Only connect to proxy servers that have this principal name in their certificate’ and enter outlook.com
- Select the ‘On fast networks, connect using HTTP first, then connect using TCP/IP’ option.
- Click ‘OK’ to save the changes and close the dialog box.
- Return to the Change Account dialog box and click ‘Next.’
- Click ‘Finish’ and then ‘Close.’
- Restart Microsoft Outlook and see if it is able to connect to the Exchange server.
Step 4: Classic Outlook Add-ins and Profile
- Method 9: Disable Incompatible Outlook Add-ins (Classic Outlook for Windows)
Incompatible or outdated add-ins can sometimes cause issues with Outlook's connection to the server, so disabling them can often resolve the ‘Microsoft Outlook not connecting to server’ error. Open Outlook in safe mode and see if you can resolve the problem. In Safe Mode, only the essential add-ins and features are loaded, enabling you to troubleshoot issues and resolve problems with Outlook.
This is particularly useful if you suspect that an add-in or other feature is causing issues with your connection to the server. If Outlook successfully connects to the server in safe mode, the add-ins are most likely responsible. To find the problematic add-in, launch Outlook in normal mode and disable and enable the add-ins one at a time.
- Step 1: Open Microsoft Outlook in safe mode
- This uses outlook.exe /safe, a classic-Outlook-for-Windows switch. Press ‘Windows + R’, type outlook.exe /safe, and press Enter to launch Outlook in safe mode.
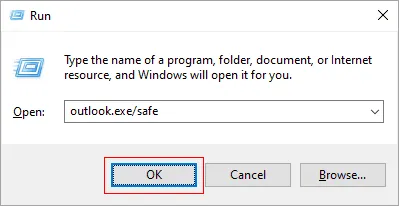
- This uses outlook.exe /safe, a classic-Outlook-for-Windows switch. Press ‘Windows + R’, type outlook.exe /safe, and press Enter to launch Outlook in safe mode.
- Step 2: Go to Options or Preferences
- If you are using Windows, click on the ‘File’ menu, then click on ‘Options’.
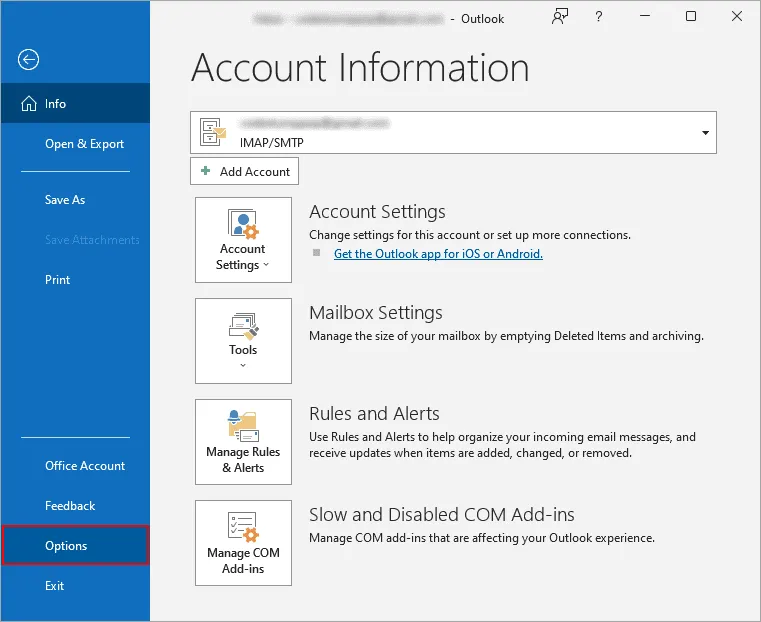
- If you are using Windows, click on the ‘File’ menu, then click on ‘Options’.
- Step 3: Go to the Add-ins section
- If you are using Windows, click on ‘Add-ins’ and click ‘Go’
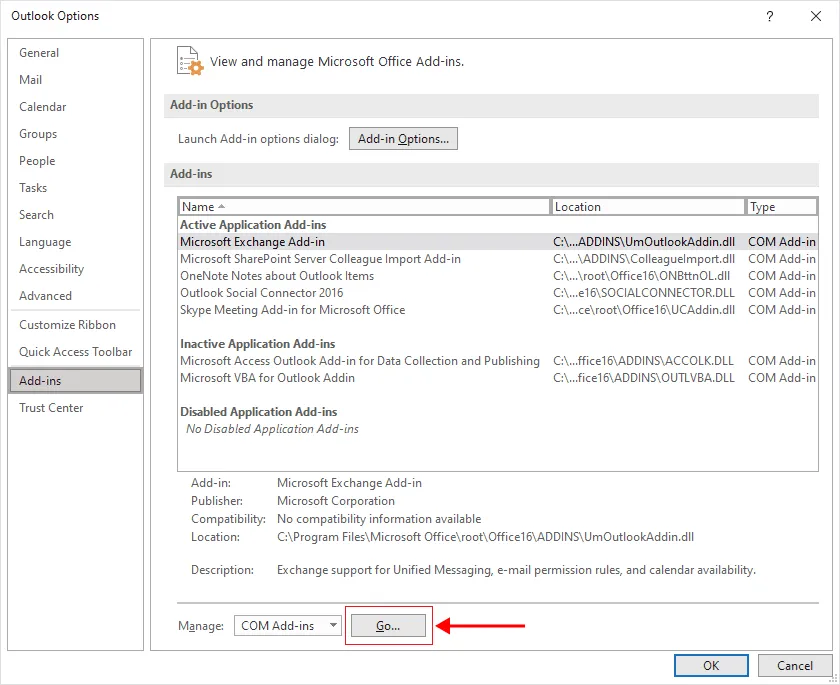
- If you are using Windows, click on ‘Add-ins’ and click ‘Go’
- Step 4: Check the connection to your server
Make a list of add-ins that are currently enabled in Outlook in the safe mode and check if Outlook is able to connect to the server. If you are able to connect to your email server, then the other add-ins are responsible for causing the issue.
- Step 5: Start Outlook in normal mode and Disable the add-ins
- Close Outlook and relaunch it in the normal mode
- Go to the add-ins section in Outlook. To disable an add-in, clear the checkbox and click ‘OK’
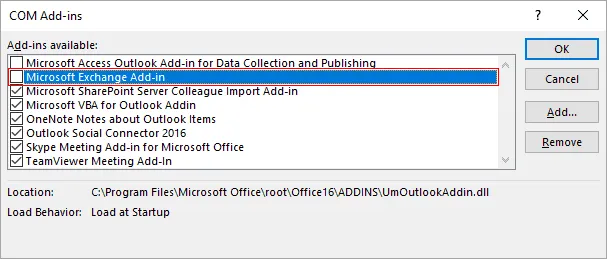
- Repeat the steps by disabling one Add-in at a time and checking if you are able to connect back to the server from Outlook.
- Finally select the problematic Add-in and click ‘Remove’
- Close and reopen Microsoft Outlook to apply any changes you made to your add-ins.
- Step 1: Open Microsoft Outlook in safe mode
- Method 10: Remove and create a new Outlook profile
If your Outlook profile is corrupted or fails to authenticate with the Exchange server due to incorrect credentials, Outlook may display a connection error with the server. In such cases, it is best to create a new Outlook profile by following these steps. Before removing the profile: if there's any chance the current OST holds data that never synced to the server, preserve a copy of the .ost file itself first — removing the profile deletes its cached data.
- Step 1: Close Microsoft Outlook if it is running
Close the Microsoft Outlook application if it is currently open.
- Step 2: Open the Control Panel
- Go to the Start menu and type ‘Control Panel’ in the search box.
- Then, click on the ‘Control Panel’ icon to open the application.
- Step 3: Access the Mail applet
In the Control Panel, click on ‘Mail’ to open the Mail applet.

- Step 4: Remove the Outlook profile
- In the Mail applet, click on ‘Show Profiles’ and then select the profile that is associated with your email account.
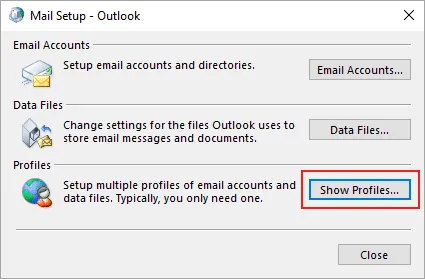
- Then, click ‘Remove’ to delete the profile.
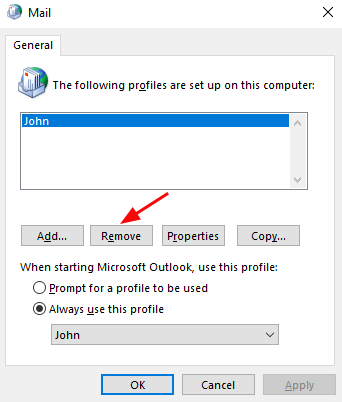
- In the Mail applet, click on ‘Show Profiles’ and then select the profile that is associated with your email account.
- Step 5: Create a new Outlook profile
- After removing the old profile, click on ‘Add’ to create a new profile.
- Then, follow the prompts to set up the new profile, including providing your email address, password, and Exchange server information.
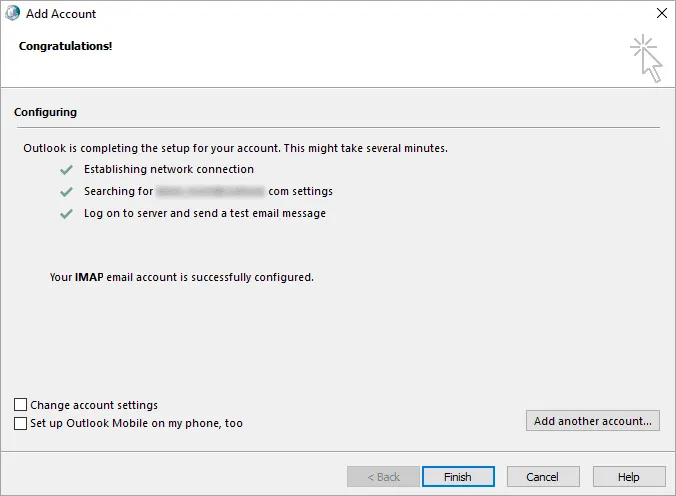
- Step 6: Test the new profile
- After you have created the new profile, Outlook synchronizes with your online account and creates a new OST file.
- Start Microsoft Outlook and try to send and receive email.
- If the issue with Outlook not connecting to server error has been resolved, you should now be able to connect to the Exchange server and access your email and other data.
- Step 1: Close Microsoft Outlook if it is running
- Method 11: Repair and reinstall Microsoft Outlook
If Outlook has crashed or has encountered problems due to faulty updates, you must repair Outlook, update it to the latest version or reinstall Microsoft Office.
- Step 1: Repair Microsoft Outlook from the Control panel
- Go to the Windows Start menu and click on ‘Control Panel.’
- Then, select ‘Programs and Features’ and find Microsoft Office in the list of installed programs.
- Right-click on Microsoft Office and select ‘Change.’
- In the next window, select ‘Repair’ and follow the on-screen instructions to complete the repair process.
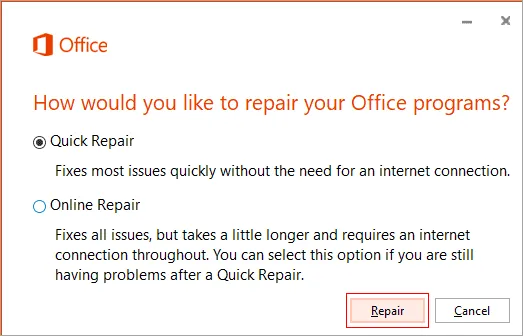
- Step 2: Restart your computer
After repairing Microsoft Outlook, restart your computer to ensure that any changes are properly applied.
- Step 3: Verify User Connectivity
- The Test Account Settings feature checks the connectivity between Outlook and the Exchange server.
- If the test is successful, you should see a message indicating that ‘All tests completed successfully’. If the test is not successful, you may need to try the next troubleshooting method.
- Step 4: Update to the latest Outlook version
- If repairing Microsoft Outlook does not resolve the problem, you might need to reinstall the application.
- Go to the Windows Start menu and click on ‘Control Panel.’ Then, select ‘Programs and Features’ and find Microsoft Office in the list of installed programs.
- Right-click on Microsoft Office and select ‘Uninstall.’ Follow the on-screen instructions to complete the uninstallation process.
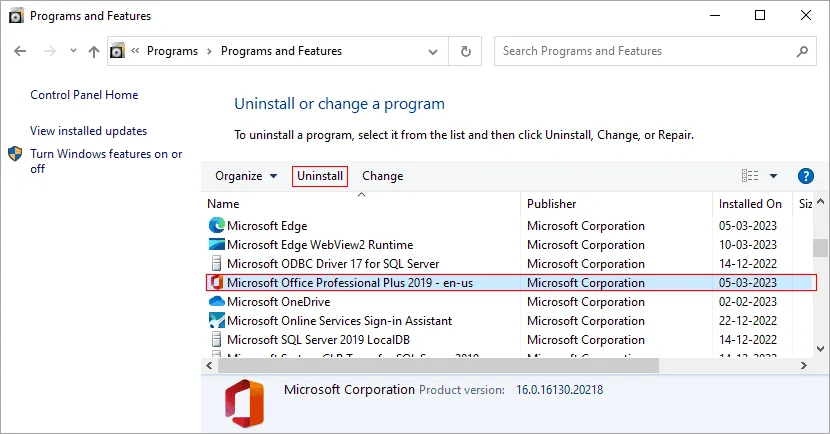
- Then, reinstall Microsoft Office and Outlook by downloading the latest version of the application from the Microsoft website.
- Step 5: Configure Microsoft Outlook profile
- After reinstalling Microsoft Outlook, you will need to reconfigure the application.
- Launch Microsoft Outlook and go to the ‘File’ menu.
- Then, select ‘Add Account’ and follow the on-screen instructions to set up your email account.
- Step 6: Test Outlook User Connectivity to the server
- After reconfiguring Microsoft Outlook, test your user connectivity. To do this, go to the ‘File’ menu and select ‘Account Settings.’
- In the Account Settings window, select the email account and click ‘Test Account Settings.’
- Step 1: Repair Microsoft Outlook from the Control panel
- Method 12: Check SSL/Encryption Settings (IMAP-Configured Accounts Only)
This applies specifically if your account is configured as IMAP rather than the modern Exchange/Microsoft 365 connection type — checking incoming/outgoing server ports and SSL settings isn't the default fix for a standard Exchange or Microsoft 365 account. If your account is IMAP-based and requires SSL, verify the encryption setting as follows.
- Step 1: Open Microsoft Outlook
Double-click the Microsoft Outlook icon on your desktop or in the Start menu to open the application.
- Step 2: Go to Account Settings
- In Microsoft Outlook, click on the ‘File’ menu and select ‘Info'.
- Then, click on ‘Account Settings’ and select ‘Account Settings’ again.
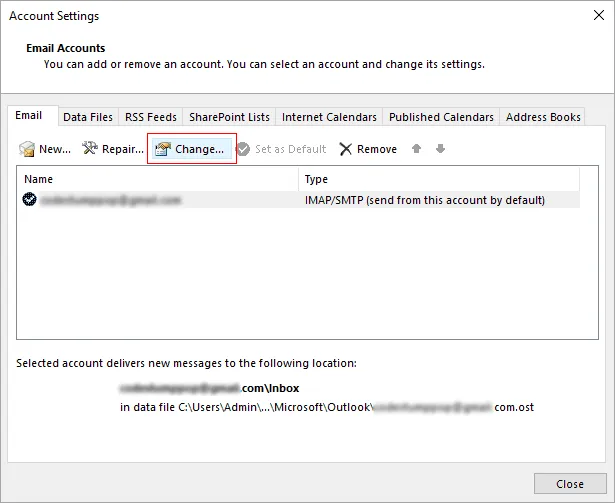
- Step 3: Edit the account settings
In the ‘Account Settings window’, select the email account and click ‘Change’
- Step 4: Change the connection type
- In the ‘Change Account’ window, select ‘More Settings’.
- Confirm that this is an IMAP account before changing incoming-server encryption settings.
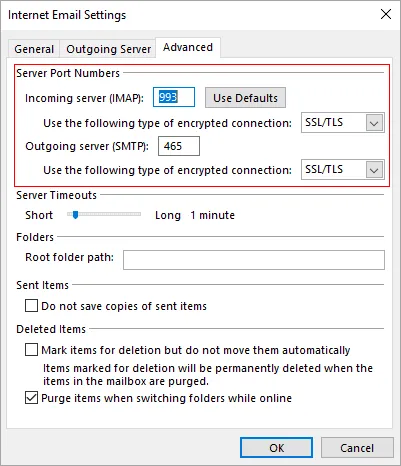
- Then, go to the ‘Advanced’ tab and select the option to ‘Use the following type of encrypted connection’
- Step 5: Choose the SSL encryption method
- From the dropdown menu, choose ‘SSL (Secure Sockets Layer)’ as the type of encrypted connection.
- Then, click ‘OK’ to save the changes.
- Step 6: Check the connection with the server
- Close the ‘Change Account’ and ‘Account Settings’ windows and then try to send and receive email.
- If the issue with the Outlook 365 cannot connect to Exchange server error has been resolved, you should now be able to connect to the Exchange server using SSL encryption.
- Step 1: Open Microsoft Outlook
Step 5: Local Data-File Corruption (Only If Evidenced)
- Method 13: Repair Outlook data file with ScanPST
ScanPST is a built-in Outlook tool that checks the local data file for structural errors — it does not analyze anything on the Exchange server, so it's not a connectivity repair tool. Use it only when file-level corruption is specifically suspected, not as a first response to a connection error. Note that orphaning and corruption are different problems: an orphaned OST is structurally fine but can't be reused as the live mailbox cache once the profile/server link is broken, which ScanPST can't fix. For that case, or for genuinely corrupted files ScanPST can't repair, use a third-party OST to PST converter or a PST repair tool to recover the data.
- Step 1: Close Microsoft Outlook
Close Microsoft Outlook to ensure that the data file is not in use.
- Step 2: Locate the ScanPST tool
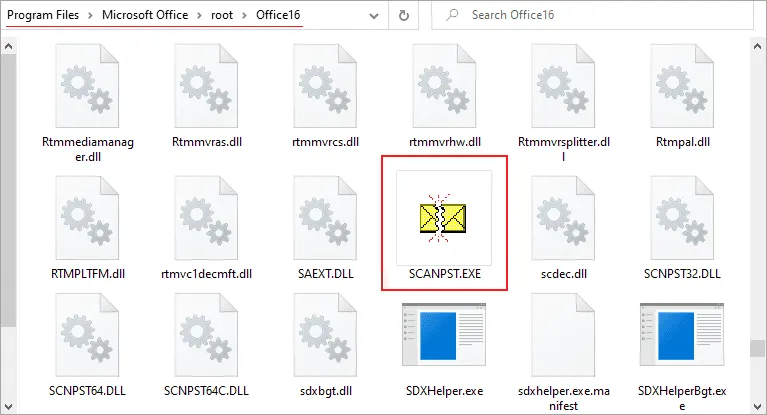
- The ScanPST tool is a built-in utility in Microsoft Outlook that can be used to repair damaged or corrupted Outlook data files.
- To find the ScanPST tool, open the Windows Start menu and search for ‘ScanPST.’ Then, select the ‘Microsoft Outlook Inbox Repair Tool’ or ‘ScanPST.exe’ to launch the utility.
- Step 3: Select the Outlook data file
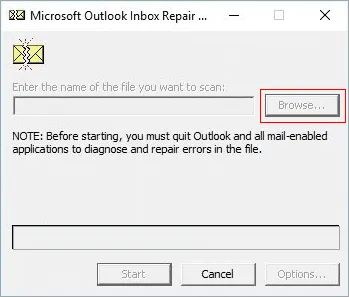
In the ScanPST tool, use the ‘Browse’ button to select the Outlook data file that is associated with your email account. The data file will typically be named ‘Outlook.pst’ or ‘Outlook.ost’. A PST is a portable Outlook data file usable for export, archive, or transfer; an OST is the offline, local synchronized cache tied to your Exchange or Microsoft 365 mailbox.
- Step 4: Repair the data file and test the email flow
- After you have selected the data file, click on the ‘Start’ button to begin the repair process.
- The ScanPST tool analyzes the data file for errors and repairs any issues that it finds. This process may take several minutes to complete, depending on the size of the data file.
- After the repair completes, reopen Outlook and check whether the data-file error is resolved. A successful ScanPST run does not by itself prove that server connectivity is fixed.
- If the issue has been resolved, you should now be able to connect to the Exchange server.
- Step 1: Close Microsoft Outlook
Step 6: If the On-Premises Exchange Server Itself Is Down
- Method 14: Rebuild the OST When the Server Mailbox Is Healthy
If the earlier methods point to the local OST rather than a server or profile issue — and the server-side mailbox is confirmed healthy (see Method 5 above) — rebuilding the OST lets Outlook redownload a fresh cache from the server. If the on-premises Exchange server itself is genuinely down rather than just this OST being damaged, that's a server-side issue for an administrator to resolve; see the note at the end of this method.
Rebuilding the OST file involves creating a new OST file and restoring normal functionality to Outlook. Rebuilding the OST file can also help to resolve synchronization errors.
- Step 1: Backup Your Outlook Data
Before rebuilding your Outlook data files, it’s essential to back them up by copying the existing files to a secure location. This ensures you don’t lose any important information during the process.
The location of the Offline Storage Table (OST) file varies depending on the version of Outlook.
In current classic Outlook for Windows, the OST file is typically located at C:\Users<username>\AppData\Local\Microsoft\Outlook. The exact path can vary by Outlook build — use File > Account Settings > Account Settings > Data Files > Open File Location to confirm it for your installation rather than relying on a fixed path.
- Step 2: Open Outlook in Safe Mode
- Start by opening Outlook in Safe mode.
- To do this, click on the Windows Start button, and in the search box, type ‘outlook.exe /safe’ and press Enter.
- Step 3: Delete the OST file from your computer
- In Safe mode, go to the ‘File’ menu, then select ‘Account Settings’ and ‘Account Settings’.
- Locate the email account and its associated OST file that is saved on your computer by selecting ‘Open File Location’
- Exit Outlook and delete the OST file from the location you noted
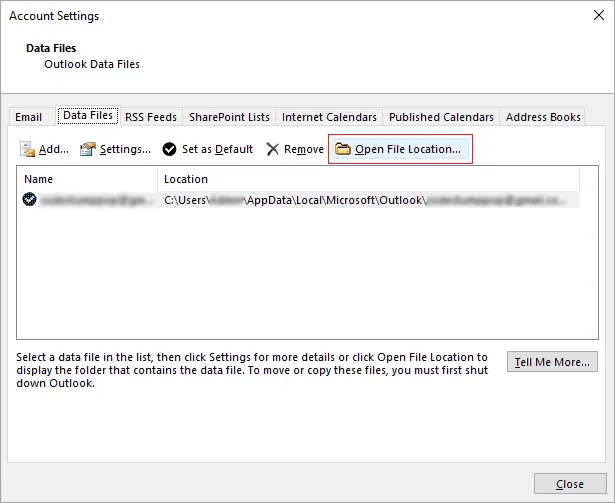
- Reopen Outlook and allow it to create and synchronize a fresh OST from the healthy server mailbox.
- Step 4: Reconnect to the Exchange Server
- Go to ‘Account Settings’ as described in the preceding step, locate the email account and click ‘Change’.
- Enter the required details to connect to the Exchange Server, and then click ‘Next’ and ‘Finish’.
- Step 5: Rebuild the Outlook Data File (OST)
- Outlook will automatically create a new OST file and start downloading all your data from the Exchange Server.
- This process may take some time, depending on the amount of data you have.
- Wait until the process is complete.
- Step 6: Test the Connectivity to the server
- After rebuilding the Outlook data files, go to ‘Account Settings’ again and click ‘Test Account Settings’.
- This activity tests the connectivity to the Exchange Server and verifies that the issue has been resolved.
- Go back to Outlook and check if all your recent emails and folders are present and the error message is no longer appearing.
Note: Content already synchronized to the server will redownload normally. Anything that existed only in the local OST and never synced will not come back this way — preserve a copy of the old OST first if that's a possibility. If the on-premises server itself has failed, follow the Exchange Server failure recovery guidance instead of treating cache rebuild as the server fix.
- Step 1: Backup Your Outlook Data
Step 7: OST Recovery Fallback
- Method 15: Recover data from an orphaned OST file
When Cached Exchange Mode is enabled, Outlook creates an OST linked to the Exchange or Microsoft 365 account and profile. A temporary connection loss does not make that OST orphaned. Use recovery only when the mailbox/server path cannot be restored or the old OST contains required data unavailable from the live mailbox.
To do this, download the OST to PST Converter, select the orphaned OST file and a destination folder, then preview and export the required mailboxes to PST. Once exported, import the PST file back into Outlook to restore your data.
For the complete walkthrough, see our convert OST to PST guide.
EdbMails can scan and preview an offline or orphaned OST without a live server connection. Outlook is needed only if you export to PST; direct migration to Exchange or Microsoft 365 does not require Outlook.
Frequently Asked Questions
Why does classic Outlook show Disconnected?
Disconnected usually means Outlook can't currently reach the server — this can be a network issue, a server/service problem, an account/authentication issue, or a local profile fault. Check webmail first to narrow down which side the problem is on.
What is the difference between Working Offline and Disconnected?
Working Offline is a setting you (or Outlook) turned on deliberately — Outlook isn't even trying to connect. Disconnected means Outlook is trying to connect but can't. Check the Working Offline toggle before troubleshooting anything else.
How do I know whether the server or Outlook is the problem?
Sign in to the same mailbox via webmail/OWA. If webmail works, the issue is local to this Outlook installation. If webmail also fails, the problem is with the account, service, or server.
Should I run ScanPST for a connection error?
Only if you specifically suspect local file corruption. ScanPST checks the data file itself, not server connectivity, so it won't help with an account, network, or service-side problem.
Should I recreate the Outlook profile?
If webmail works and other checks (Working Offline, add-ins, account settings) don't resolve it, a new profile is a reasonable next step. Preserve a copy of the old OST first if it might hold data that never synced.
When is OST recovery actually required?
When the server/mailbox can't be restored, or the old OST has unique data that the live mailbox can no longer provide. EdbMails can scan and preview an offline OST without a live server; Outlook is only needed for PST export, not for direct Exchange/Microsoft 365 migration.