Office 365 to Zoho Mail Migration
Many businesses choose Zoho Mail to reduce email management costs, gain greater administrative control, and simplify communication workflows. Zoho Mail’s ad-free interface, flexible pricing, and seamless integration with applications such as CRM, Projects, and Workplace make it a preferred choice for startups and growing organizations. EdbMails Office 365 Migration Tool supports Office 365 to Zoho Mail migration, enabling secure and efficient mailbox transfers.
Despite its benefits, migrating mailboxes between these platforms is not straightforward. Office 365 is built on Exchange technologies such as Exchange Web Services (EWS) and Microsoft Graph API with OAuth 2.0–based modern authentication, while Zoho Mail primarily relies on IMAP with OAuth 2.0 for mailbox access. These architectural differences introduce complexity, especially when handling large mailboxes, folder structures, metadata, and attachments.
To ensure data integrity and eliminate the risks of manual configuration, an automated migration approach is essential. EdbMails Office 365 Migration Software streamlines the migration process by automatically managing authentication, mailbox mapping, throttling, target mailbox creation, and data synchronization—delivering a smooth, accurate, and downtime-free experience.
Why migrate from Office 365 to Zoho mail?
Switching from Office 365 to Zoho Mail brings cost efficiency, simplicity, and advanced features tailored for small businesses and professionals. Here’s why users prefer Zoho Mail:
- Affordable plans: Zoho Mail offers subscription plans that fit startups and small teams without compromising features.
- Simple and intuitive interface: The platform provides a clean dashboard for managing emails, calendars, and tasks efficiently.
- Integrated Zoho ecosystem: Seamlessly connects with Zoho CRM, Projects, Books, and other applications for smooth workflow management.
- Custom domain support: Users can create branded email addresses quickly to maintain professional communication.
- Advanced security: Encryption, two-factor authentication, and spam filters protect sensitive business data.
- Reduced IT dependence: The user-friendly design allows teams to manage emails without heavy reliance on IT support.
- Workflow enhancements: Built-in rules, filters, and retention policies improve email organization and productivity.
These are the main reasons for migrating from Microsoft 365 to Zoho Mail. Let’s now move to the solutions
Challenges in Office 365 to Zoho migration
- Office 365 (Microsoft 365) uses Exchange Online accessible via EWS or Microsoft Graph API with OAuth 2.0, while Zoho Mail relies on IMAP with OAuth 2.0.
- Large mailboxes with emails and attachments can slow down migration.
- Maintaining folder hierarchy, timestamps, read/unread status, and metadata is critical.
- Improper migration may lead to missing emails or duplicate entries.
- Office 365 throttling can limit migration speed and cause interruptions.
- Mapping users, shared mailboxes, and groups accurately is challenging.
- Handling sensitive data manually increases security and compliance risks.
- Manual migration often requires downtime, affecting productivity.
- Native export-import options are slow and prone to errors.
- Advanced filtering, selective migration, and detailed reporting are not available in manual methods.
EdbMails addresses all these challenges, ensuring a secure, accurate, and uninterrupted migration.
Office 365 to Zoho mail migration: Pre-migration checklist
1. Prepare the source: Office 365
Before starting the migration, ensure the following tasks are completed on Microsoft 365:
- Make sure you have a global admin account with an active mailbox for automatic registration of the EdbMails application in your Entra ID (Azure Active Directory). Alternatively, for manual registration, you can use either a global admin account or any user account that has full access permissions.
- Make sure your network meets the bandwidth requirements.
- If your mailboxes contain large messages, increase the message size limit to accommodate.
2. Prepare the Target: Zoho Mail
On the Zoho Mail side, ensure the following:
- Create the corresponding email accounts (e.g., user@yourdomain.com) in Zoho Mail before the migration.
- Collect login credentials, IMAP hostname (e.g., mail.yourdomain.com), port (usually 993), email address, and password.
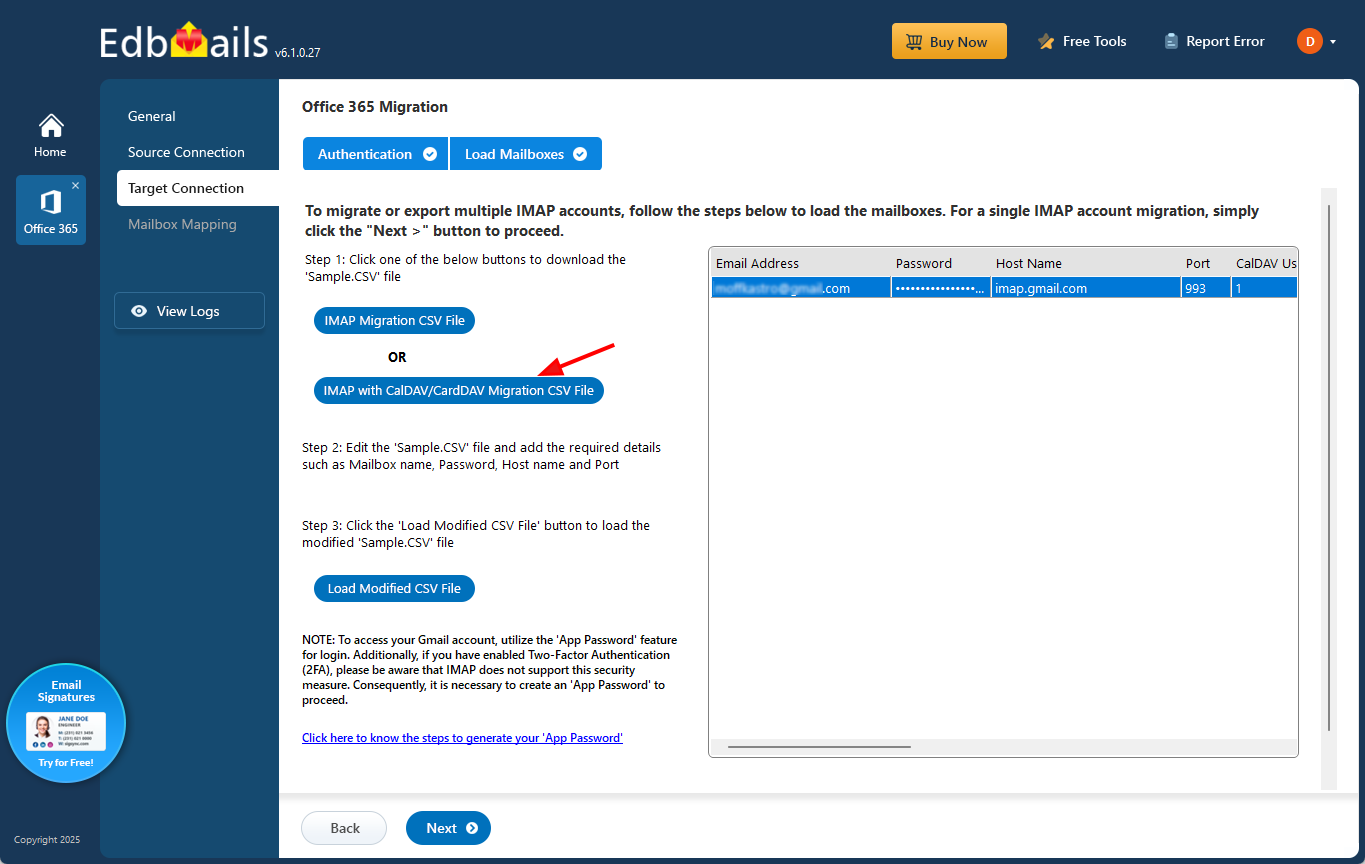
If you're migrating multiple users, download the sample CSV file from the EdbMails application and fill the users email address, password, IMAP host name, port number
Step-by-step guide to migrate from Office 365 to Zoho mail
Step 1: Install the EdbMails application
- Download the EdbMails setup file to your computer.
- Double-click EdbMailsSetup.exe and follow the guided instructions to complete the installation.
Check the EdbMails system requirements before starting to migrate from Office 365 to Zoho Mail.
- Open EdbMails and log in with your registered email and password. If you have not created an account yet, you can select ‘Start Your Free Trial’ to begin using the software
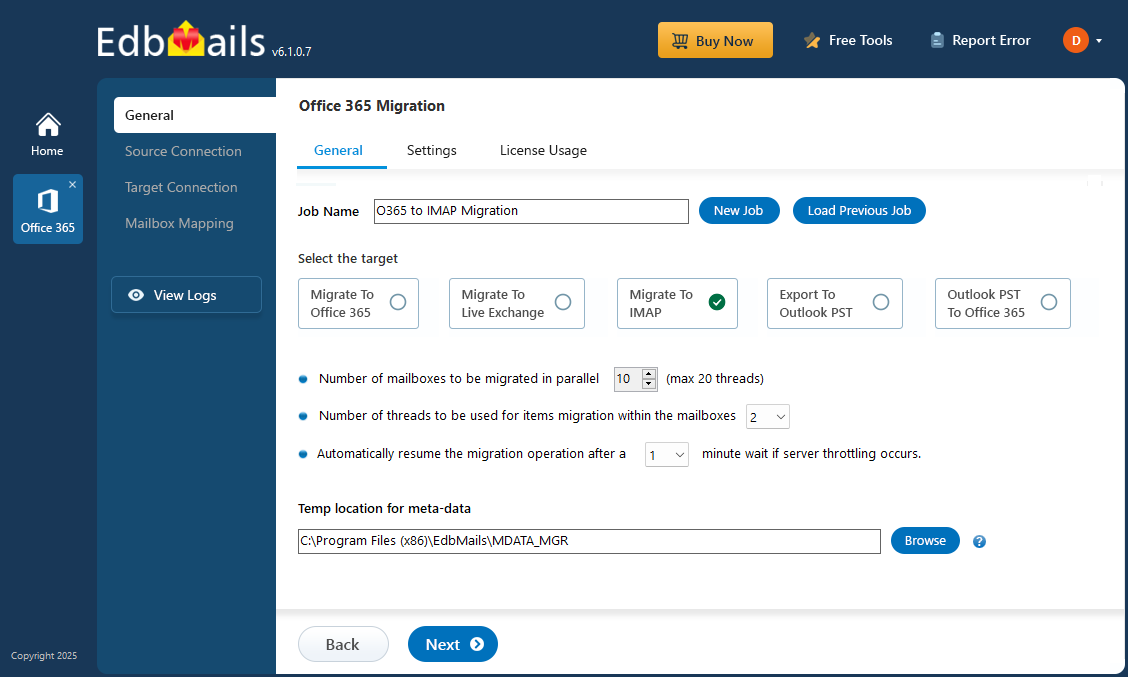
Step 2: Choose the Office 365 to IMAP migration
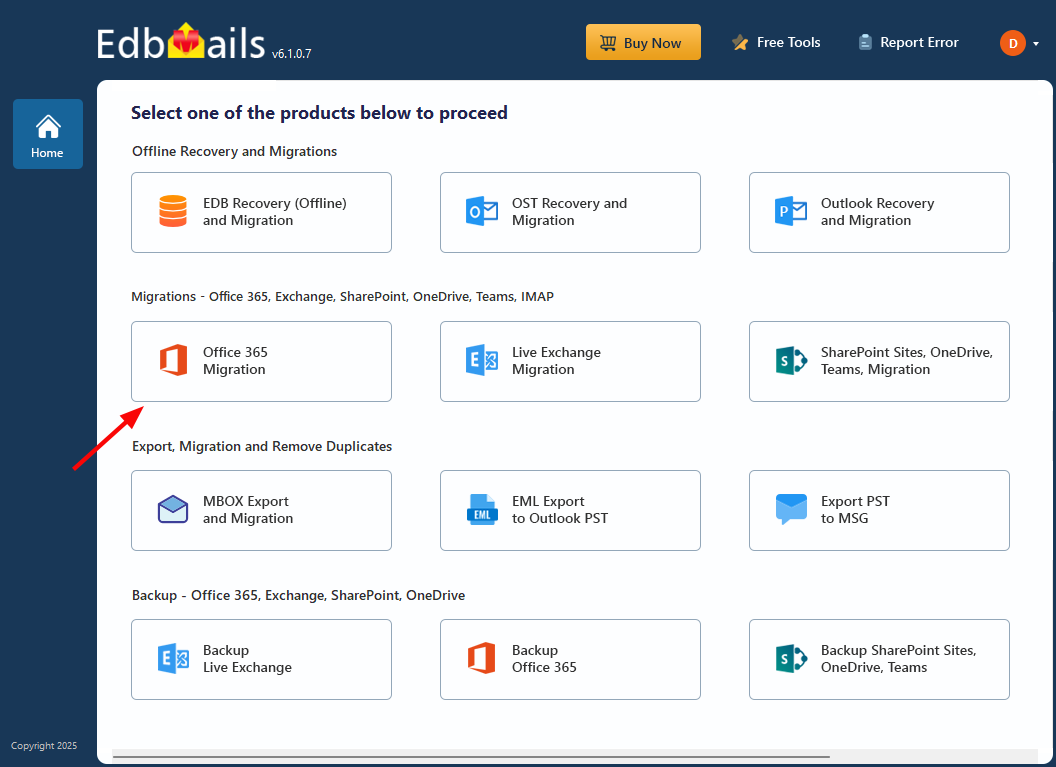
- Choose the ‘Office 365 Migration’ option to proceed.
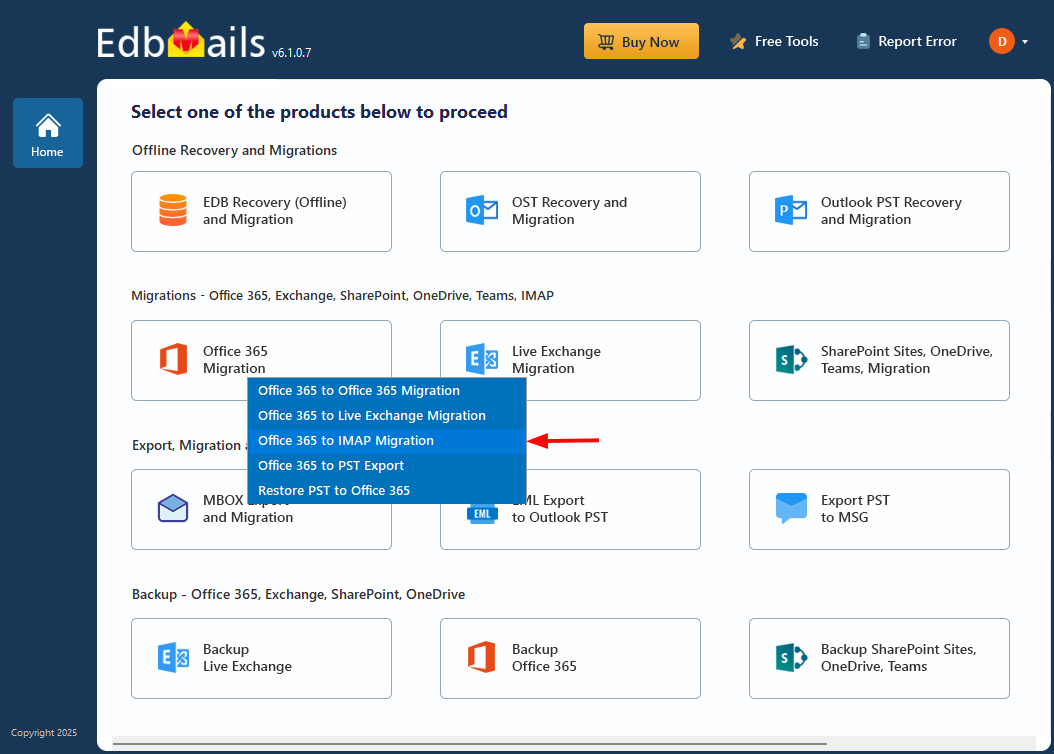
- Click on ‘Office 365 to IMAP Migration’
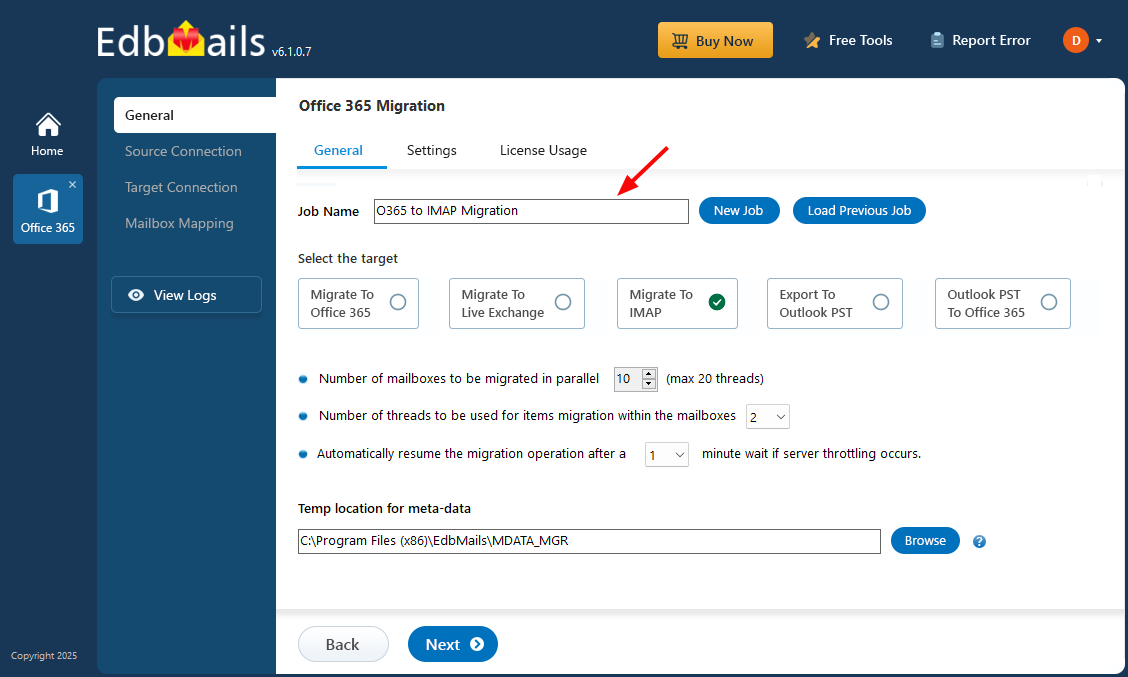
- Keep the default job name or type a custom one, then click ‘Next’ to proceed with the setup.
Step 3: Connect to the source Office 365 server
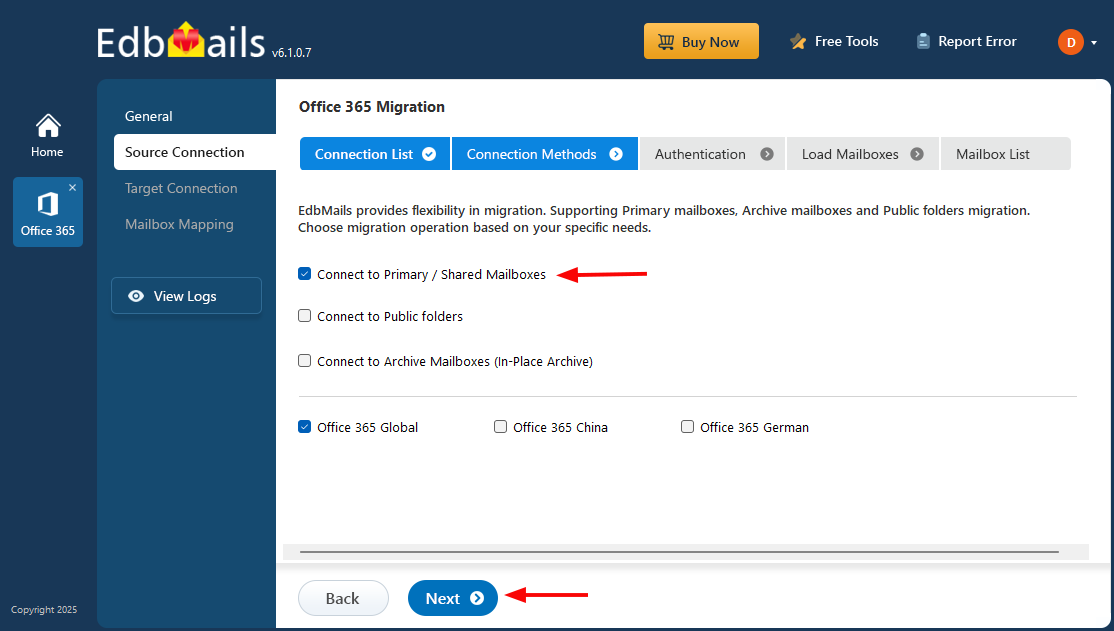
- Click ‘Add New Connection’ to create a new source setup, or choose an existing connection from the list and select ‘Connect to Existing’ to proceed.
- Select the appropriate connection options and then click ‘Next’ to continue.
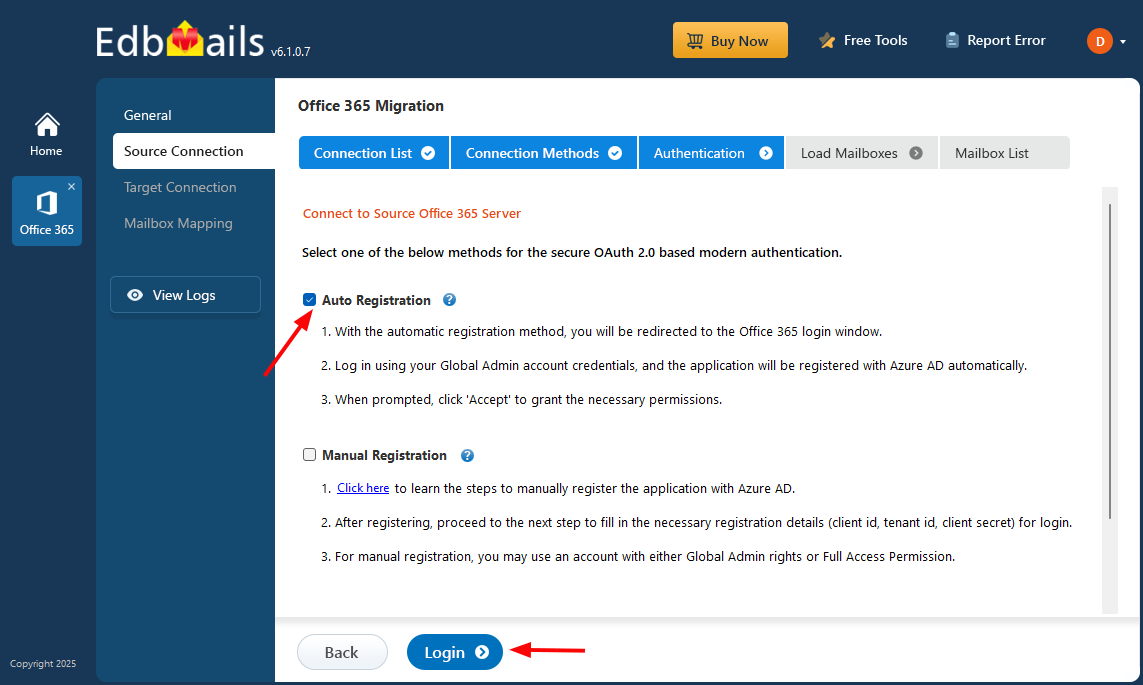
- Choose a secure OAuth 2.0 authentication method and click ‘Login’ to proceed.
Connect to Office 365 server using secure modern authentication
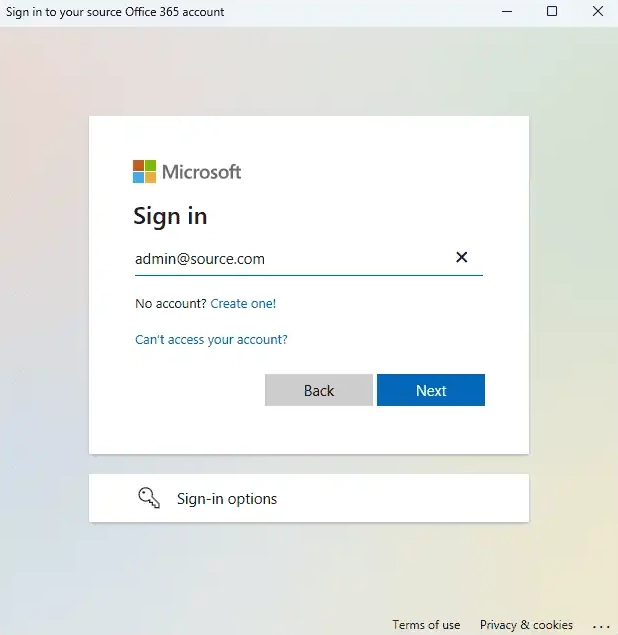
- Sign in on Microsoft page
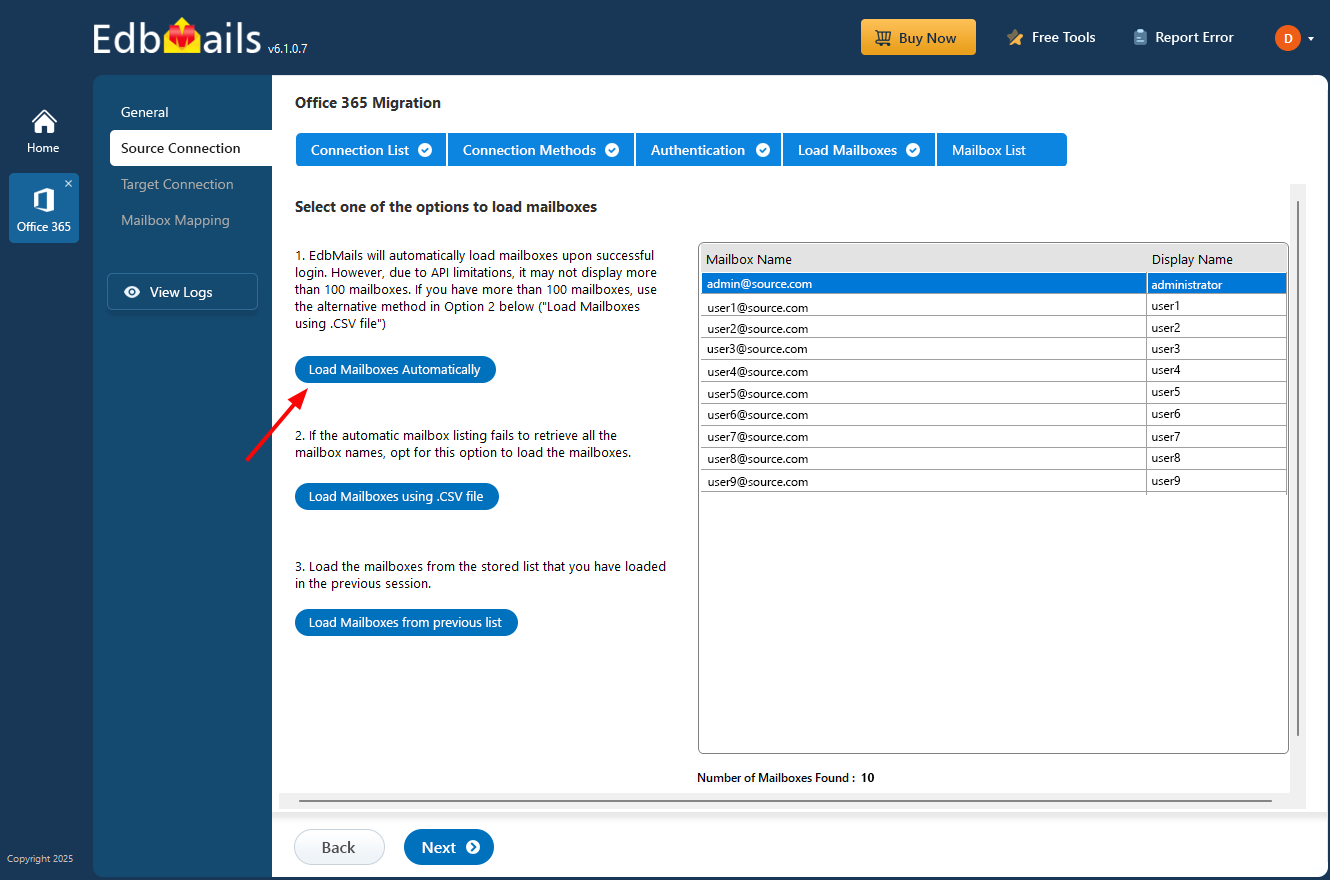
- Once authentication is complete, select a method to load your mailboxes, or use a CSV file to import and migrate them.
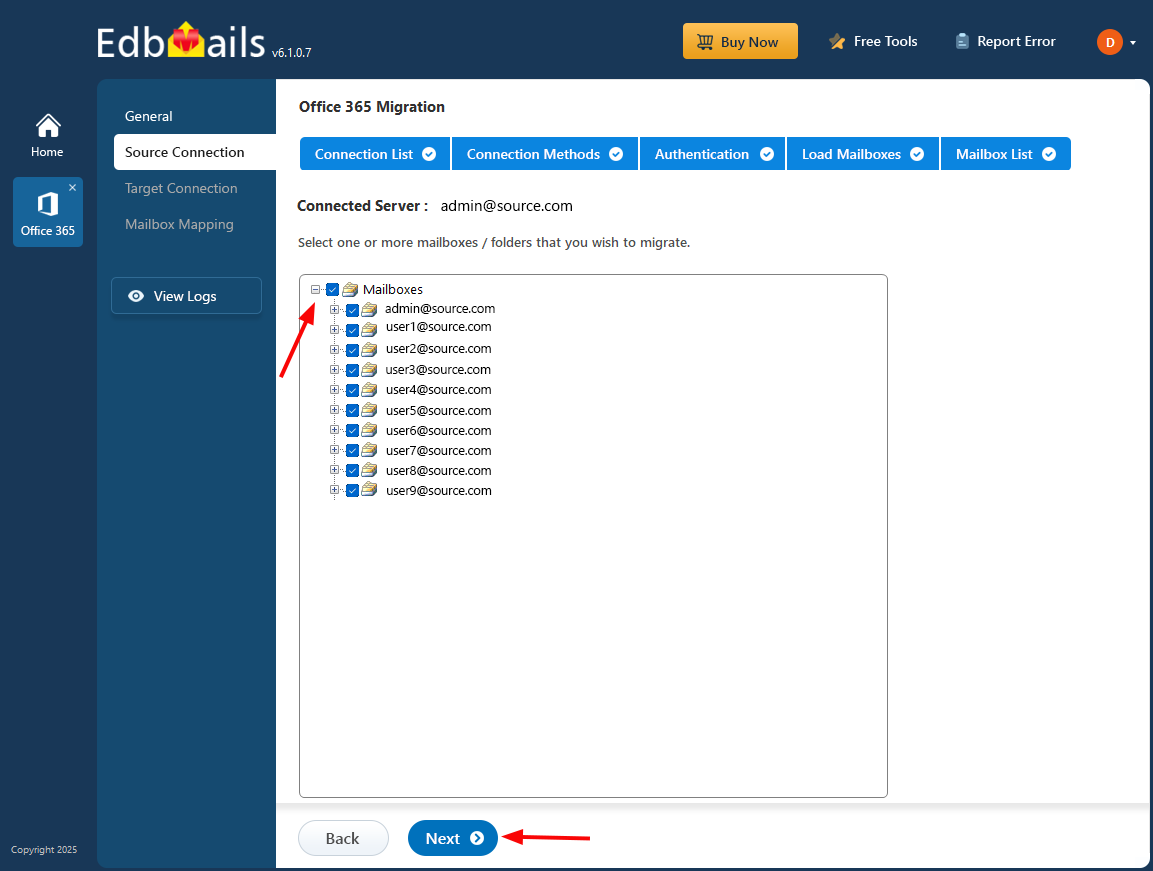
- Select the mailboxes from your Office 365 account that you want to migrate, then click ‘Next’ to continue.
Step 4: Set up and Connect to the Zoho Mail server (target)
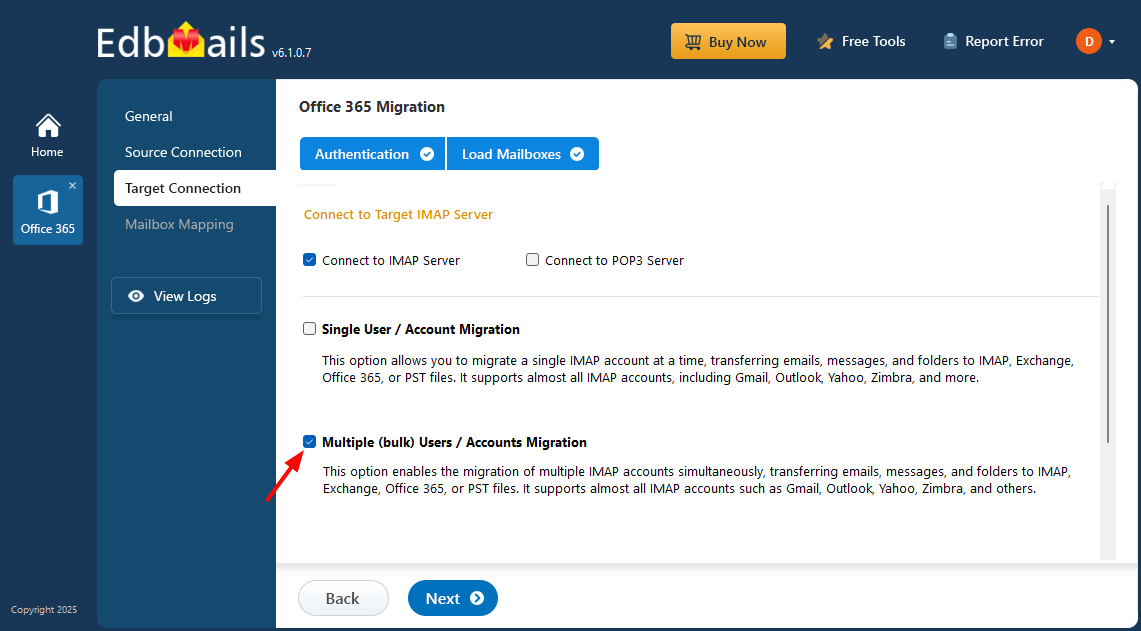
- Select the connection type that matches your target server, such as ‘Connect to IMAP Server’ or ‘Connect to POP3 Server’. If you’re migrating a single mailbox, choose the ‘Single User / Account Migration’ option.
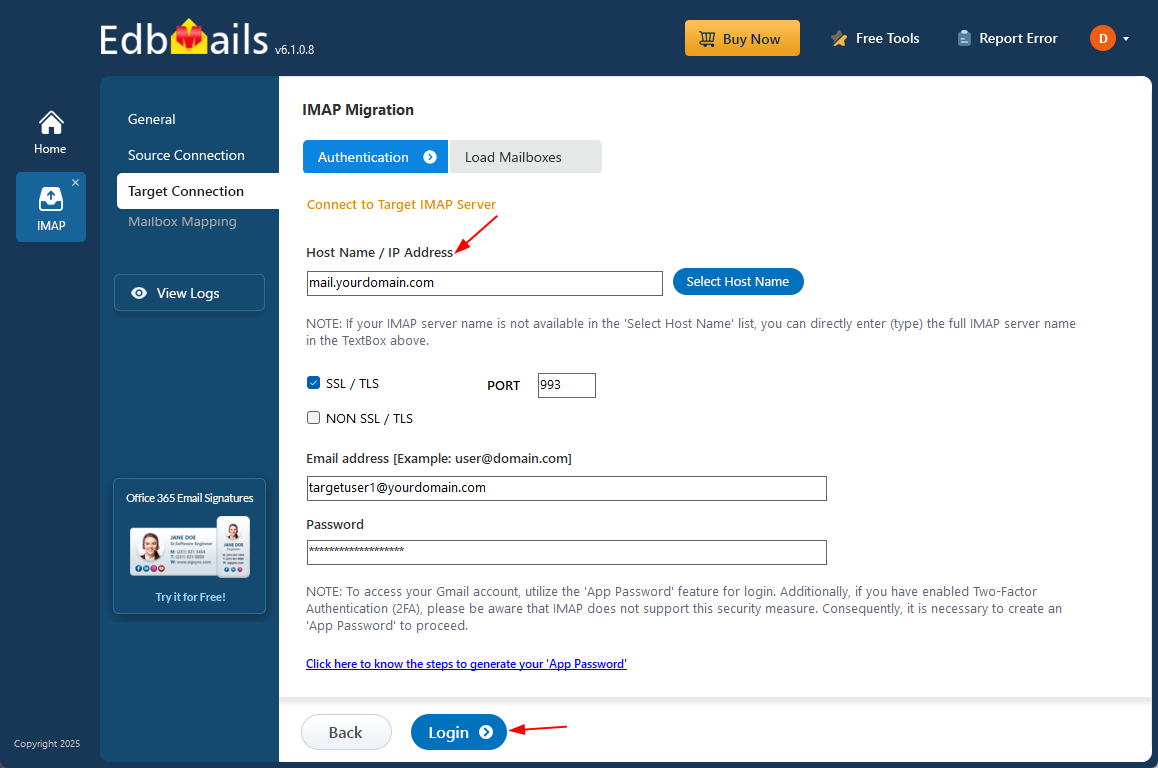
- Select the Zoho Mail IMAP server hostname from the list or enter it manually (e.g., mail.yourdomain.com). Then, provide the target Zoho Mail account’s email address and password. Make sure the mailbox exists and IMAP access is enabled in Zoho Mail settings.
- Click ‘Login’ to connect with the Zoho Mail server and allow the application to load the target mailbox.
- To migrate multiple mailboxes at once, select the ‘Multiple (Bulk) Users / Accounts Migration’ option and click ‘Next’ to continue.
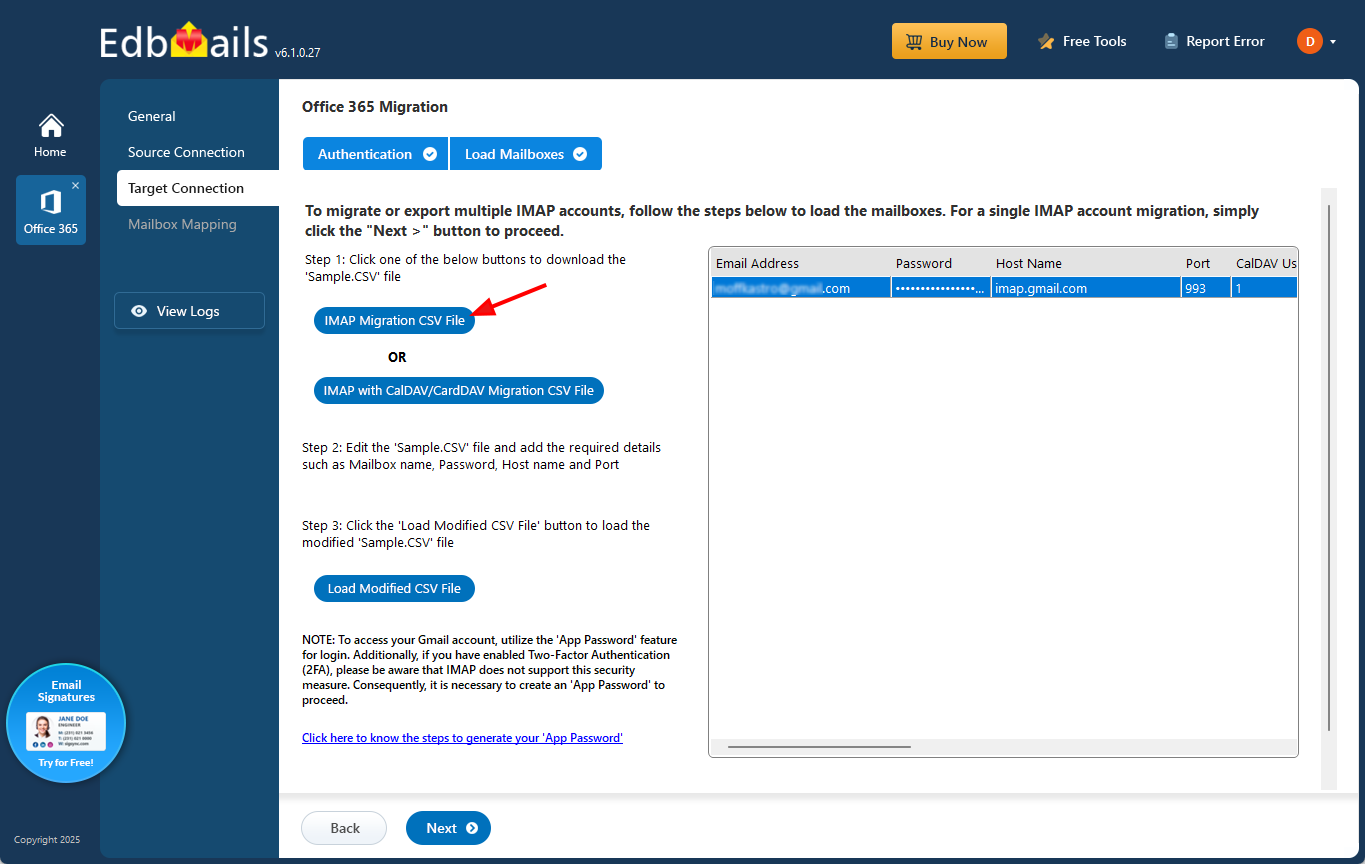
- Select ‘IMAP Migration CSV File’ to proceed.
- When prompted, download the sample .csv file and choose a location on your system to save it.
- Open the downloaded CSV file and fill in the required information, including the mailbox email address, password, Zoho Mail server hostname, and port number. For any fields that do not apply, enter ‘NA’. After completing the entries, save and close the CSV file.
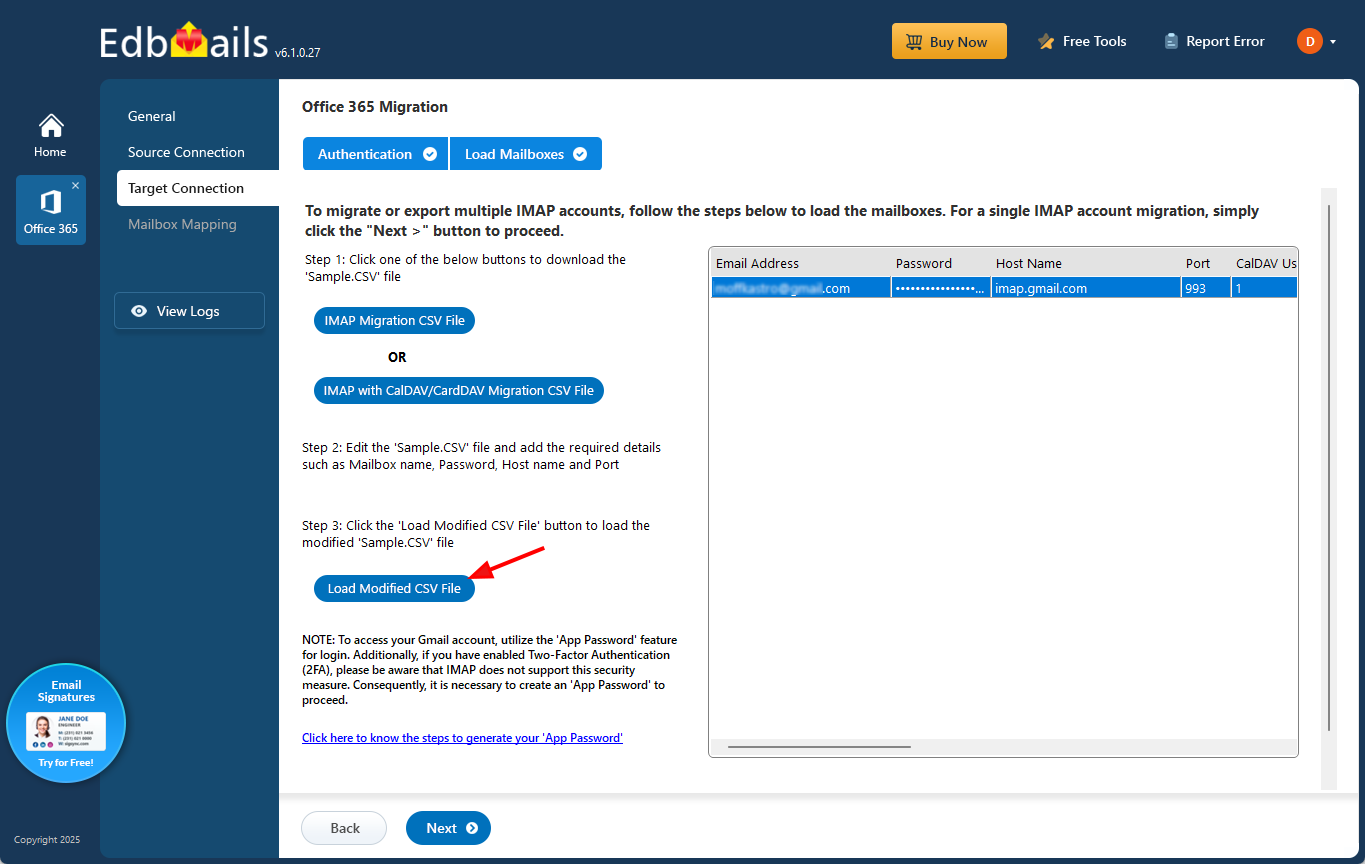
- Click ‘Load Modified CSV File’ to import the updated CSV into the application.
- Verify the loaded mailboxes and click ‘Next’ to continue the process.
CalDAV/CardDAV Migration
To migrate emails, calendars, and contacts from Office 365 to a Zoho Mail server with CalDAV/CardDAV support, select ‘IMAP with CalDAV/CardDAV Migration CSV File’ and proceed.- You will be prompted to download a sample CSV file. Choose a folder on your computer to save it
- Open the CSV file and enter the necessary details including Source Mailbox Name, Password, Host, Port, CalDAV Username, CalDAV Password, CalDAV Server, CalDAV Folder, CardDAV Username, CardDAV Password, CardDAV Server, and CardDAV Folder. After completing the entries, save and close the file.
- Click ‘Load Modified CSV File’, browse to the location of your updated CSV, and select it to import the file into the application.
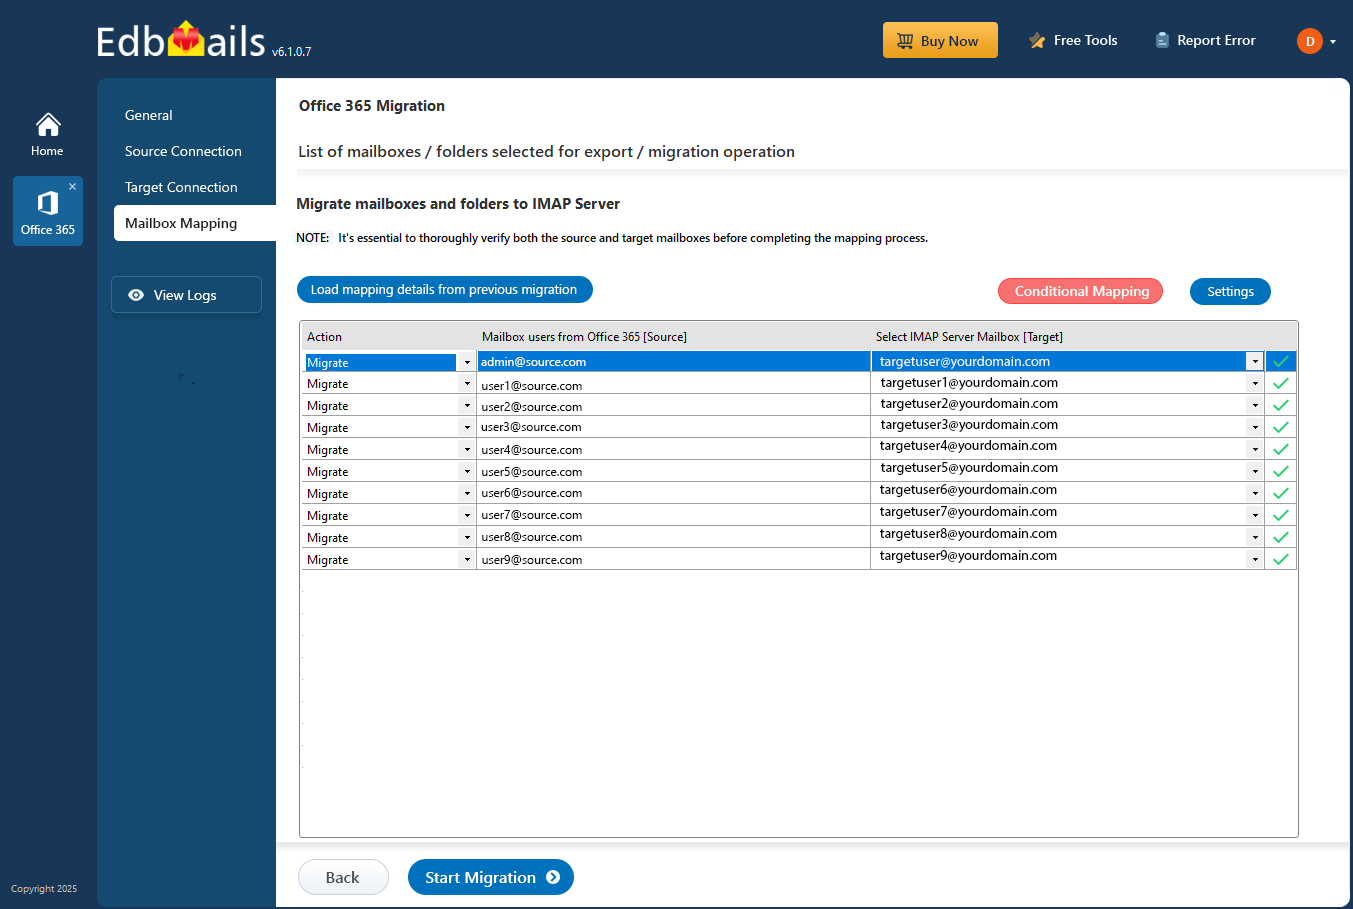
Step 5: Map source mailboxes to target accounts
- Select the mailbox mapping option that fits your migration needs.
- EdbMails can automatically match mailboxes between the source and target servers, or you can perform manual mapping if required.
Step 6: Initiate the Office 365 to Zoho Mail migration process
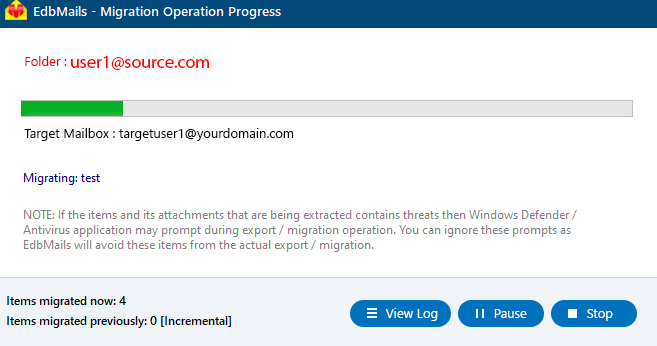
- Once mailbox mapping is complete, click ‘Start Migration’ to begin transferring your data.
- Click ‘View Log’ to access the migration report, showing a detailed summary of emails, folders, and mailbox items that were successfully transferred.
- Finally, sign in to your target server to access and view all the migrated items.
Post-migration tasks
After migration, update your domain’s MX records to route all new emails to Zoho Mail.
Frequently Asked Questions (FAQs)
Can I migrate only selected folders or items (not the entire mailbox)?
Yes. EdbMails allows selective email migration by choosing specific folders and applying filters such as date range or mail type.
Does EdbMails support large mailboxes or bulky mailbox data without limitations?
Yes. EdbMails is designed to migrate large mailboxes and archive folders efficiently.
Does EdbMails prevent duplicate items during re-migration?
Yes. EdbMails uses incremental migration to track previously migrated items and transfer only new or modified data during subsequent runs, helping prevent duplicate emails.
Can EdbMails handle cross-geo and different-language servers?
Yes. EdbMails supports cross-region migrations and correctly maps standard mailbox folders during migration, even when source and destination mailboxes use different display languages.
Which license do I need for Office 365 to Zoho Mail Migration?
You need an Office 365 Migration License to perform Office 365 to Zoho Mail migration using EdbMails.
Click here to know Office 365 to Zoho Mail migration pricing details


