Recover Emails from a Dismounted Exchange Database
When an Exchange database (EDB) is dismounted, access to essential mailbox data such as emails, contacts, calendars, and other items can be disrupted. This situation often arises due to database corruption, missing or damaged transaction logs, or database locking by other applications. As a result, users may see errors like ‘Failed to mount database Mailbox Database’, which can interrupt email communication and lead to workflow delays or potential data loss.
To resolve this issue, retrieving emails from a dismounted EDB file demands a reliable and effective method, especially when the database is in a Dirty Shutdown state. EdbMails EDB to PST Converter offers a trusted solution by repairing damaged EDB files and recovering mailbox data from dismounted or inaccessible databases. It enables smooth migration to PST files or migration to a live Exchange server without requiring access to the original Exchange environment.

This step-by-step guide explains how to use EdbMails to recover emails from a dismounted Exchange Server database. Whether the EDB file is in a Clean Shutdown or Dirty Shutdown state, EdbMails streamlines the recovery process, enabling you to regain access to critical mailbox data quickly and with minimal impact on your operations.
How to recover data from a dismounted Exchange server database?
To recover data from a dismounted Exchange server database, you can use Eseutil for both soft and hard recovery. However, if the database still fails to mount after a hard recovery, you will need to perform a dial tone recovery to temporarily restore email functionality. To fully recover the database and ensure no data loss, it's recommended to use a professional Exchange database recovery tool like EdbMails.
Steps to recover emails from a dismounted Exchange server EDB
Eseutil is a command-line tool and Microsoft Exchange server utility designed to repair Exchange database files. Before using it, it's highly recommended to create a full backup of the Exchange database file to prevent any potential data loss during the repair process.
- Step 1: Launch Eseutil from the Exchange server bin directory
Navigate to the directory where the Exchange server is installed and locate the eseutil tool in the bin directory. You can also perform a Windows search to locate the executable.
- Step 2: Check the status of the Exchange database from eseutil
Run the command eseutil/mh to check the status of your database. This command will scan for any errors and show whether the database is in a Clean or Dirty Shutdown state.
- Step 3: Remount the database if there are no errors
If the status from the previous step shows Clean Shutdown, it means the transaction logs have been successfully committed to the database. You can proceed by remounting the database using the command Mount-Database -Identity, which will restore your emails to the Exchange server.
- Step 4: Perform a soft and hard recovery if the database fails to mount
If the status shows Dirty Shutdown, you won't be able to mount the database without performing a recovery. To perform a soft recovery, copy paste the missing Exchange transaction log files into the database folder and run the command eseutil /r to replay the logs to the EDB.
If the log files are missing, the only option is to perform a hard recovery with the cmdlet eseutil/p.Remember that the hard recovery operation purges any unrecoverable data and results in a data loss.
- Step 5: Defragment the Exchange database after the recovery operation
Run the cmdlet eseutil /d to defragment the Exchange server database. After defragmentation, perform an integrity check using the IsInteg tool. This process not only optimizes the database but also helps reduce Exchange database file size.
- Step 6: Mount the EDB to the Exchange server
Finally mount the database to the Exchange server with the cmdlet Mount-Database –Identity. If the database still does not mount, perform a Dial tone recovery operation.
The method described above has a significant drawback—if the database is severely corrupted and in a Dirty Shutdown state, using the eseutil /p command for hard recovery can lead to irreversible data loss. Additionally, this process involves unavoidable downtime, and the database cannot be mounted again until the recovery is completed. In such situations, the most reliable and secure approach is to use EdbMails, a trusted Exchange server recovery tool that enables complete restoration of the database without risking your critical data.
- Step 1: Launch Eseutil from the Exchange server bin directory
Recover dismounted EDB file in Exchange server 2019, 2016, 2013, 2010 and 2007 using EdbMails
EdbMails EDB to PST Converter offers a reliable way to retrieve your emails and mailbox data from offline or dismounted Exchange server database files. If your EDB fails to mount, even after attempting soft or hard recovery, this tool can step in and recover the data without complications. It supports recovery from all major Exchange Server versions, including 2019, 2016, 2013, 2010, 2007, 2003, and even 2000.
Steps to restore a dismounted Exchange mailbox database to a new server
Step 1: Download and install EdbMails Exchange recovery setup
- Download and install EdbMails on any Windows computer—even if Exchange Server isn’t pre-installed. The software runs independently, allowing you to recover your data with ease.

- Launch the EdbMails application on your computer.
- ‘Login’ using your registered email address and password. If you’re a new user, click ‘Start Your Free Trial’ to continue with a trial version.Note: The free trial version allows exporting mailbox data with a limit of 30 items per folder. To export all mailbox items without restrictions, a valid license is required.
Click here to purchase the license from the EdbMails website.
Then close and reopen the application. Log in again using the email address and password used during the purchase to activate your license.

- Choose ‘EDB Recovery (Offline) and Migration’ from the list of available products.

- Select 'EDB to Live Exchange'.

- You may keep the default job name or select ‘New Job’ to create a custom name, making it easier to recognize and manage the job later.

- Download and install EdbMails on any Windows computer—even if Exchange Server isn’t pre-installed. The software runs independently, allowing you to recover your data with ease.
Step 2: Select the offline and dismounted EDB file
- Click the ‘Browse for EDB file’ button.

- Select the offline or dismounted EDB file from your local drive or a shared network location, ensuring you have the required read and write permissions to access the file.

- EdbMails performs a detailed scan of the offline EDB file to restore mailbox data affected by corruption. The duration of the recovery depends on the database size and its condition, so wait until the scan completes.

- After the recovery process finishes, click on the mailbox to expand its contents. You’ll be able to browse through folders like emails, contacts, calendars, tasks, journals, and notes. Simply click on any folder to see a detailed preview on the right-hand side.
- Select the specific mailboxes or folders you want to export. Once you've made your selection, click ‘Next’ to move forward with the export process.

- Click the ‘Browse for EDB file’ button.
Step 3: Connect to target Exchange server
- To connect to the target Exchange server, click on ‘Add New Connection’ to create a fresh setup. If you’ve previously configured a connection, simply select it from the list and choose ‘Connect to Existing’ to continue.
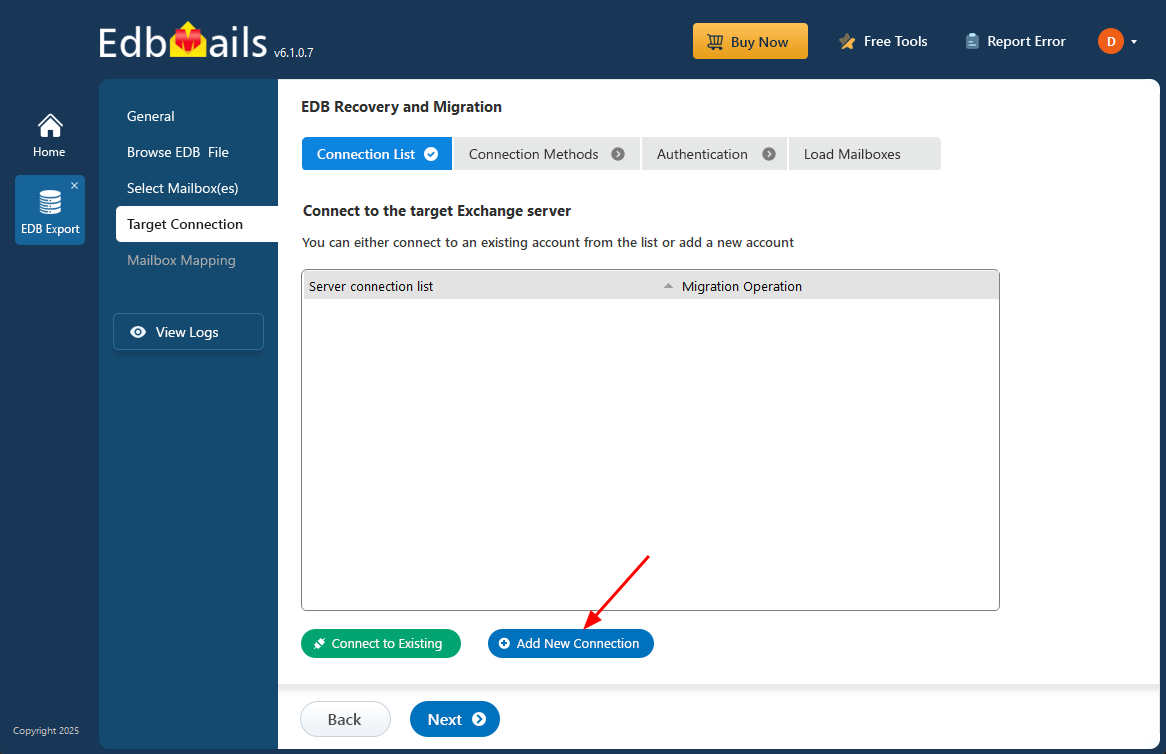
- Choose the appropriate connection settings based on your server configuration, then click ‘Next’ to proceed with the setup.
Different options to connect to Exchange server in EdbMails

- Provide the necessary Exchange server details to establish the connection. Once configured, click ‘Login’ to continue.

- EdbMails automatically loads up to 100 mailboxes from the target Exchange server, as per Microsoft’s API restrictions. If your organization has more than 100 mailboxes, you can effortlessly import the rest using a CSV file method. Choose the preferred method to continue loading all the required mailboxes.

- As an optional step, you can apply advanced filters to include or exclude specific emails, mailbox items, and folders during the Exchange migration. For instance, the Date filter allows you to export emails to PST based on a selected date range. Additional filters include Subject, Attachment name, Sender and Recipient addresses, and message content, with support for logical AND/OR conditions. You can also exclude emails or attachments exceeding a specified size or choose to generate separate PST files for each folder or subfolder when exporting to Outlook.

- To connect to the target Exchange server, click on ‘Add New Connection’ to create a fresh setup. If you’ve previously configured a connection, simply select it from the list and choose ‘Connect to Existing’ to continue.
Step 4: Map source and target mailboxes
- Choose the mailbox mapping option that aligns with your migration requirements.
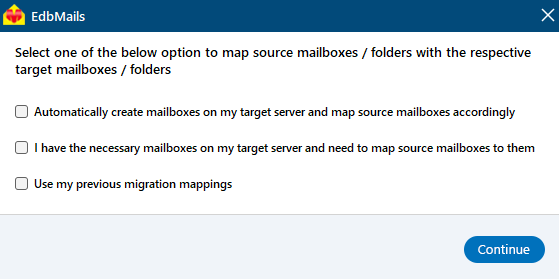
- EdbMails allows you to automatically create mailboxes on the target Exchange server when installed directly on it. It simplifies mailbox mapping by automatically matching display names between the source and target servers. For more precise control, you can manually map mailboxes and folders to customize the migration process to your needs.

- Choose the mailbox mapping option that aligns with your migration requirements.
Step 5: Start EDB to live Exchange migration
- Once the mailbox mapping is finished, click ‘Start Migration’ to initiate the transfer of mailbox data from the dismounted EDB file to the Exchange server.

- EdbMails performs a direct one-to-one migration and maintains the folder structure and data formatting throughout.
- Monitor the migration process in real-time through the progress bar. Once the migration is complete, EdbMails will display a confirmation message to notify you of the successful migration.

- Click the ‘View Logs’ button to open a detailed migration report, providing you with insights into the transferred items and any errors encountered during the process.
- Once the migration is verified, you can delete the Exchange server database file that is no longer needed.
- Once the mailbox mapping is finished, click ‘Start Migration’ to initiate the transfer of mailbox data from the dismounted EDB file to the Exchange server.

Key features and functions of EdbMails Exchange recovery
- EdbMails does not require any technical expertise or scriptlets to recover EDB
- A user-friendly tool for directly migrating an EDB file to Office 365 and Exchange server.
- Filter options to select and migrate only the specific items you need.
- Enables you to open and view an EDB file without Exchange server or Active Directory dependency.
- You can recover and convert an EDB file to PST without requiring log files.
- Fully compatible with all versions of Windows Operating System and Windows Server.
- You can recover deleted Exchange server mailboxes and also export Exchange Public folders to PST.
- Enables you to recover the Exchange server from Jet Engine Errors and restore your mailbox data.
- The application ensures complete data consistency throughout the recovery and migration process, maintaining accuracy before, during, and after the operation.
To summarize:
An Exchange server database may become dismounted for various reasons, and restoring it is critical to resume normal business communication. In some cases, the database may refuse to mount due to corruption caused by physical damage, logical errors, or malware attacks, making recovery more complex. While soft and hard recovery methods are available, manual hard recovery can be time-intensive and increases the risk of data loss.
EdbMails EDB Recovery Software provides a safer and more efficient alternative. As a Microsoft-partnered solution, it is designed to recover corrupted or dismounted EDB files while preserving mailbox data integrity. The tool also supports seamless mailbox migration to a live Exchange server, enabling organizations to restore operations quickly with minimal downtime and without data loss.

