Fix ‘Content Index State Failed and Suspended’ error in Exchange Server
The ‘Content Index State Failed’ error in Microsoft Exchange Server typically signals that the mailbox database’s search index is corrupted or not working properly. This issue can interfere with email searches, reduce server performance, and in some cases, stop the database from mounting altogether. It often occurs after unexpected shutdowns, hardware malfunctions, or replication failures in DAG (Database Availability Group) setups. For Exchange administrators, resolving this error is essential to maintain smooth access and reliable search functionality for users.
While Exchange includes built-in options such as rebuilding the content index or restarting related services, these approaches are not always successful, particularly when the EDB file is heavily corrupted or fails to mount. In such situations, standard recovery methods may no longer work, leaving administrators in need of a dependable alternative. EdbMails EDB to Exchange Migration tool addresses this challenge by enabling direct extraction and migration of mailbox data from damaged or offline EDB files to a healthy Exchange server, completely bypassing the problematic search index.

This step-by-step guide explains how to use EdbMails to fix the ‘Content Index State Failed’ error and regain full access to mailbox data. Whether you’re dealing with an inaccessible database or looking for a reliable recovery method with minimal downtime, this solution helps maintain Exchange stability and ensures uninterrupted access for users.
What is the Content Index State Failed error in Exchange server?
The 'Content Index State Failed' error occurs due to issues in the Exchange Server Information Store, or when the Store fails to access the database index file, causing disruptions in various user operations such as searching, saving messages, composing emails, and accessing mailboxes. This error can also be triggered by insufficient hard disk space, preventing the indexing function from reading or writing data correctly.
The error message typically appears as: "Database copy on server has content index catalog files in the following state: ‘Failed’" or “Mailbox database copy Failed or Suspended.”
To understand this conceptually, an Index file contains search data and is stored in the Exchange server database folder, usually identified by a long string of GUID. Whenever a user conducts a search or looks up an item in their mailbox, the Exchange Information Store retrieves and parses this information from the index file to display search results. When the Content Index State Failed error occurs, users are unable to perform searches, switch to a new Exchange server, or create passive database copies in the event of a failover.
How to fix the content index failed and suspended in Exchange server 2019, 2016 and 2013?
How to fix the content index failed and suspended in Exchange server 2010?
Fix the issue content index failed and suspended in Exchange server 2019, 2016, 2013, 2010 and 2007
EdbMails is a Microsoft-partnered Exchange recovery solution designed to resolve the Content Index Failed error by repairing and exporting mailboxes from EDB to PST. It also supports importing EDB files to Live Exchange servers (2019, 2016, 2013, and 2010) and can restore corrupted, offline, and dismounted database files. Additionally, EdbMails allows you to back up your mailboxes and mail items to local storage, helping you free up valuable server space.
Steps to fix error content index failed in Exchange server
Step 1: Download and launch EdbMails EDB converter software
- Download and install EdbMails on any Windows computer, even if Exchange Server isn’t installed on that system.

- Start by launching the EdbMails software on your computer.
- Enter your registered email address and password, then click ‘Login’. If you haven’t created an account yet, choose ‘Start Your Free Trial’ to continue with the trial versionNote: The Free Trial version allows mailbox export with a limit of 30 items per folder. To export all mailbox data without restrictions, you must purchase a license.
Click here to purchase the license from the EdbMails website.
After buying the license, close and reopen the application, then sign in using the same email credentials to activate full access.

- From the product list, select ‘EDB Recovery (Offline) and Migration’ to resolve the error.

- Select 'EDB to Live Exchange'.
- A default job name is assigned automatically, but you can select ‘New Job’ to create a custom name that is easy to recognize, unique, and tailored to your requirements.
- Then, click ‘Next’ to continue.

- Download and install EdbMails on any Windows computer, even if Exchange Server isn’t installed on that system.
Step 2: Select and repair the offline Exchange EDB file
- Click the ‘Browse for EDB file’ button.

- Select the offline Exchange EDB file that you’d like to import into the Exchange server.

- EdbMails analyzes the offline EDB file to restore mailbox data affected by corruption. The time required for recovery varies based on the database size and its condition, so wait until the scan completes.

- After the recovery process completes, expand the mailbox and click on any folder to view its contents like; emails, contacts, calendars, tasks, journals, and notes, displayed in the right side preview pane.
- Select the specific mailboxes or folders you wish to export, then click ‘Next’ to continue.

- Click the ‘Browse for EDB file’ button.
Step 3: Connect to target Exchange server
- To connect to your target Exchange server, click ‘Add New Connection’ to set up a new configuration. If a connection already exists, simply choose it from the list and click ‘Connect to Existing’ to move forward.
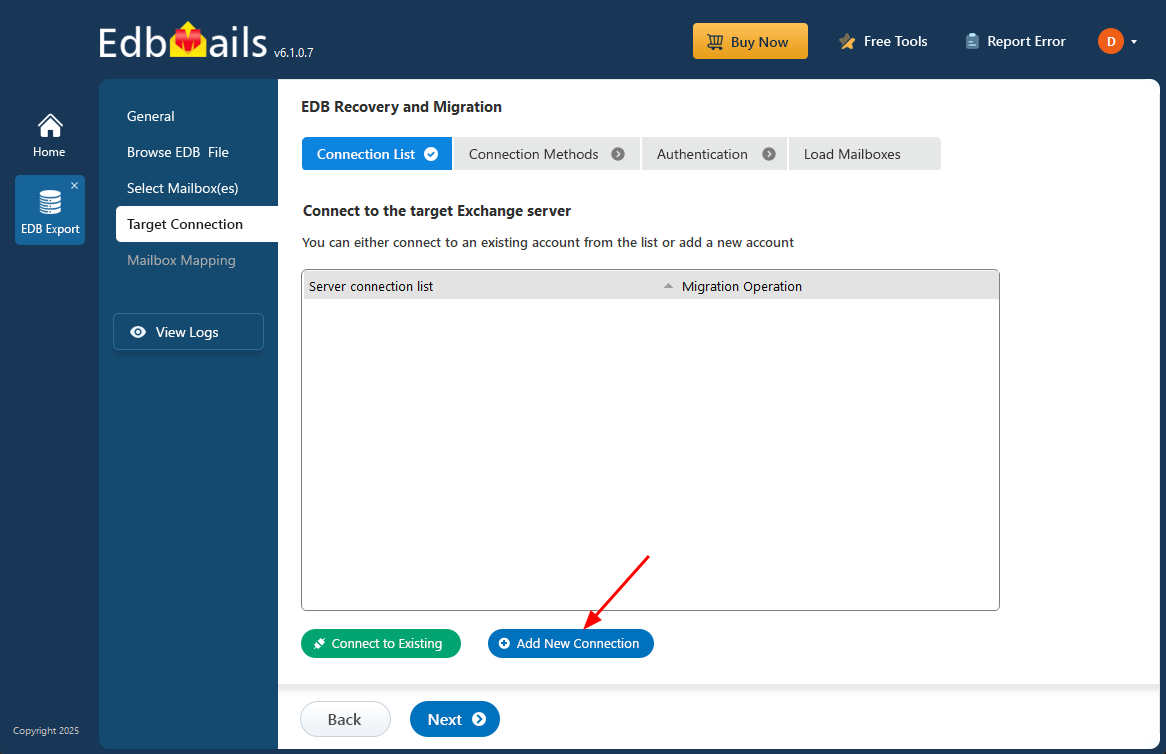
- Select the necessary connection settings and click the ‘Next’ button.
Different options to connect to Exchange server in EdbMails.

- Fill in the target Exchange server details to complete the connection setup, then click ‘Login’ to move forward.

- EdbMails automatically loads up to 100 mailboxes from the target Exchange server, as per Microsoft’s API limit. If your organization has more than 100 mailboxes, you can conveniently load the rest by importing them using a CSV file method. Just choose the method that suits you best to continue loading mailboxes.

- To connect to your target Exchange server, click ‘Add New Connection’ to set up a new configuration. If a connection already exists, simply choose it from the list and click ‘Connect to Existing’ to move forward.
Step 4: Map source and target mailboxes
- Select the mailbox mapping option that best fits your migration needs.
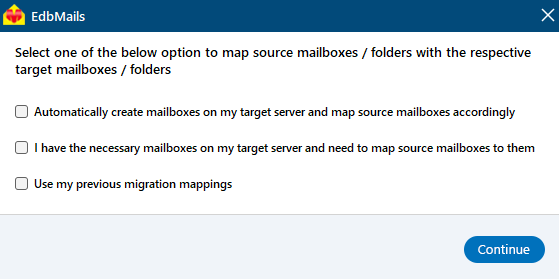
- When installed directly on the target Exchange server, EdbMails can automatically create the required mailboxes for you. It also streamlines the migration by automatically mapping mailboxes between the source and target based on display names. For more flexibility, you can manually map specific mailboxes and folders to match your migration plan.

- Select the mailbox mapping option that best fits your migration needs.
Step 5: Start EDB to live Exchange migration
- After completing the mailbox mapping, click ‘Start Migration’ to begin transferring the mailbox data from the EDB file to the Exchange server.

- Track the migration in real-time using the progress bar. Once the process is finished, EdbMails will show a confirmation message to let you know the migration was successful.

- Click the ‘View Logs’ button to access a detailed migration report, which offers insights into the transferred items and any errors that may have occurred.
- After completing the mailbox mapping, click ‘Start Migration’ to begin transferring the mailbox data from the EDB file to the Exchange server.

Conclusion
Exchange servers play a vital role in daily business communication, and issues that affect their performance can disrupt operations. One common problem administrators face is the ‘Content Index State Failed’ error, which occurs when the Exchange Information Store is unable to properly index the mailbox database. A common way to resolve this is by removing the affected index file and allowing Exchange to regenerate it automatically.
In environments using a Database Availability Group (DAG), additional steps may be required to repair the corrupted search catalog and restore the content index to a healthy state. If the problem persists or the database itself is damaged, EdbMails EDB Converter offers a reliable solution. It can repair Exchange EDB files and export mailboxes to PST or migrate data directly to an Exchange Server or Office 365. The tool also enables secure backup, storage, and archiving of mailboxes without interrupting user access or causing downtime.

