Resolve Exchange server database fails to mount error
The ‘Exchange database fails to mount’ error is a frequent and serious issue that can block users from accessing their mailboxes. It commonly occurs due to database corruption, unexpected server shutdowns, storage-related problems, or issues with dismounted EDB files. When an Exchange database cannot be mounted, email communication across the organization may be disrupted, and important mailbox data can become vulnerable. Addressing this error promptly is crucial to restoring Exchange Server functionality and reducing operational downtime.
An effective approach to resolving this issue is to use the EdbMails EDB to Exchange Migration Tool, which provides a simple and efficient way to recover and restore mailbox data even from dismounted or heavily corrupted databases. Rather than depending on complex native recovery commands or lengthy manual procedures, EdbMails enables direct access to damaged EDB files and allows flawless migration of mailbox data to a healthy, live Exchange server. With its user-friendly interface and compatibility across all major Exchange versions, the tool serves as a reliable solution for IT administrators dealing with Exchange database mounting problems.

The step-by-step guide below explains how to repair and recover EDB files using EdbMails. This process is designed for quick and secure data restoration, requiring minimal technical expertise. It helps you efficiently restore Exchange mailbox data and bring your Exchange server back to full functionality with minimal downtime or disruption.
Common causes of Exchange server database failure to mount
The most common cause of Exchange server database mounting failures is missing transaction log files, which are inconsistent with the database file. This error can also occur when an EDB file becomes corrupted, rendering user mailboxes inaccessible. Some other causes are as follows:
- The EDB file shows Dirty Shutdown on mount.
- The database file is locked or being used by another service or application.
- Exchange server crash or hard drive failure corrupts the EDB.
- Virus infection or malware attack renders the EDB useless.
- Conflicting applications with the Exchange server services.
- Corruption and mounting issues due to an oversized EDB file.
How to fix the error Exchange database (EDB) fails to mount?
To resolve the EDB mounting error, first, copy the missing log files to the database folder and use Eseutil to replay the logs files and repair the database. If the log files are missing and the database cannot be mounted, you can use EdbMails EDB to PST Converter to export the EDB file to an Outlook PST format. In this guide, we will explore various other methods to fix the issue effectively.
Solution 1: Repair the Exchange server database file using Eseutil
Steps to fix the error Exchange server database fails to mount
- Step 1: Take a complete backup of the Exchange server database
- Step 2: Locate and run the Eseutil.exe from the Exchange server’s directory
The eseutil is located in the following directory depending on the Exchange server version you use. (C\Program Files\Microsoft\exchsrvr\bin)
- Step 3: Run the cmdlet eseutil/mh to check the Database state.
If the status shows 'Clean Shutdown', it indicates that the database is error-free, and you can safely remount it. However, if it shows 'Dirty Shutdown', the Exchange database needs to be repaired. Additionally, an EDB file may fail to mount even with a clean shutdown if there’s insufficient storage space on your computer. In such cases, it is advisable to move the database file to a different drive to resolve the issue.
- Step 4: Go to 'Exchange admin center(EAC)' > 'servers' > click on 'databases'
In the preceding step, if your database status is 'Clean Shutdown', you can mount it normally to the server.
- Step 5: Select the database, click on the 'more option'(three-dots icon) and click 'Mount'
If the database mounts successfully, you can start your Exchange server. Else if the database failed to mount, you need to perform a deep database recovery which is explained in the following steps.
- Step 6: Run the cmdlet eseutil/r to perform a soft repair
To perform a soft recovery, copy the missing transaction log files to the Exchange server folder. This allows Eseutil to replay the logs and restore the database to a healthy state. If the soft recovery is successful and the database returns to a Clean Shutdown state, you can remount it. However, if the recovery fails or the transaction logs are missing, a hard recovery will be necessary.
- Step 7: If the soft repair fails, run the cmdlet eseutil/p to perform a hard recovery
Hard recovery is used only when all other recovery methods fail. It’s a risky option because it can lead to permanent data loss if Eseutil is unable to recover mailbox data from the EDB file. For this reason, it’s recommended to use it only when there’s no other way to bring the database back online.
- Step 8: Run the cmdlet eseutil/d to defrag the database and eseutil/g to check for the integrity.
Perform the integrity check and if no errors are found, run the cmdlet Mount-Database -Identity to mount the database.
It’s important to understand that running the Eseutil /p command for hard recovery permanently deletes any data that cannot be recovered from the database. During this recovery process, mailbox access is restricted, which may lead to downtime and affect user productivity. Use this method only when absolutely necessary, and always ensure you have a backup before proceeding.
Solution 2: Copy and replay the missing transaction log files
If the missing transaction log files are available, copy them to the Exchange server database folder. Then, use the Eseutil /r command to replay the logs and restore the database to a Clean Shutdown (healthy) state. Once the recovery is complete, run the Mount-Database -Identity command to mount the database back to the Exchange server and resolve the mounting issue.
Solution 3: Upgrade your Exchange server license
The Exchange Server Standard version has a limitation that allows only up to 5 databases to be mounted simultaneously. When this limit is exceeded, attempts to mount additional databases may result in an error such as:
“Couldn’t mount the database that you specified. Specified database: Error code: An Active Manager operation failed. Unable to mount the database.”
To resolve this issue, consider upgrading your Exchange Server license from Standard to Enterprise Edition, which supports mounting a larger number of databases concurrently and eliminates this restriction.
Solution 4: Increase the storage on your hard drive
Over time, the continuous buildup of emails, attachments, and large mailbox folders can cause the Exchange server database and its transaction logs to consume all available disk space. Since transaction logs are only cleared after a successful backup, they can quickly fill the drive, leaving little to no space for normal operations. When this happens, the Exchange server database may fail to mount. To restore business continuity, it becomes necessary to recover emails from the dismounted Exchange database using a reliable recovery solution.
Solution 5: Free up the database by taking a complete backup of the EDB
An Exchange EDB file can grow excessively large over time due to bulky attachments, numerous folders, and heavy mailboxes. This increase in size can lead to performance issues and raise the risk of database corruption. To prevent data loss and ensure smooth operation, it’s recommended to back up and export the EDB file to PST format. Archiving older or less critical emails to local storage can also help reduce the database size. EdbMails Exchange Recovery software offers a simple and effective way to export and back up your EDB files to PST, helping you manage mailbox data more efficiently.
Solution 6: Terminate conflicting applications on your computer
At times, Microsoft Update or other related services may access Exchange server components in the background, causing the EDB file to become locked or inaccessible. This can prevent the database from mounting properly and may interrupt normal server operations.
- Step 1 : Run the Task Manager and check for other running applications on your system.
- Step 2 : Disable automatic updates and reboot your system if necessary.
- Step 3 : Retry mounting the database to the server and see if the error is resolved.
Solution 7: Allow permissions to the Anti-virus program
Antivirus software can interfere with Exchange Server if it scans or modifies the transaction log files. It may quarantine or delete important logs, causing mounting errors and displaying messages like: “An internal processing error has occurred. Try restarting the Exchange System Manager or the Microsoft Exchange Information Store service, or both.”.
To fix this, update your antivirus settings and exclude the Exchange server log folder from automatic scans. Add the folder to the whitelist or configure the antivirus to scan it manually.
Solution 8: Force the Exchange server to use a specific domain controller
Sometimes the Exchange server displays the following error: Couldn’t mount the database that you specified. Specified database: Mailbox Database; Error code: An Active Manager operation failed. Unable to mount the database. (hr=0x8004010f, ec=-2147221233).
The following steps can help you resolve this issue:
- Step 1 : Mount the database from the Exchange Shell (EMS).
- Step 2 : If it fails to mount normally, ensure that your Exchange server version is connected to the correct Domain Controller.
- Step 3 : Run the cmdlet Set-AdServerSettings -PreferredServer to force set a specific domain controller.
The methods mentioned above will work only if your EDB file is intact and the Exchange server is accessible. However, if the database file is severely corrupted or fails to mount after attempting both soft and hard recovery, you will need to repair and restore the Exchange database using the EdbMails EDB Recovery Tool.
How to fix the error Failed to mount database in Exchange server using EdbMails?
To resolve the "Failed to mount database" error in any Exchange Server version (2019 – 2003), EdbMails offers an effective solution. As a Microsoft-partnered EDB to PST converter, it can fully repair corrupted or dismounted EDB files and directly migrate mailboxes and Public folders to on-premises Exchange server or Office 365. Additionally, EdbMails enables you to export mailbox data to Outlook PST and save specific emails or items in HTML, EML, and MHT formats for flexible backup and access.
Step 1 : Download and launch EdbMails EDB Recovery software application
- Download and install EdbMails on any Windows computer, even if Exchange Server isn't set up on that system.

- Start by opening the EdbMails software on your computer.
- Enter your email address and password, then click ‘Login’. If you’re new to EdbMails, click ‘Start Your Free Trial’ to continue with a trial version.Note: The free trial version allows mailbox export with a limit of 30 items per folder. To export complete mailbox data without restrictions, a valid license is required.
Click here to purchase the license from the EdbMails website.
After completing the purchase, close and relaunch the application, then sign in using the same credentials to activate the license successfully.

- From the list of the product select ‘EDB Recovery (Offline) and Migration’ to fix the error.

- Select 'EDB to Live Exchange' as recovery option.

- You can keep the default job name or select ‘New Job’ to assign a custom name, making it easier to recognize and manage in the future.
- Then, click ‘Next’ to continue.

- Download and install EdbMails on any Windows computer, even if Exchange Server isn't set up on that system.
Step 2: Select the offline EDB file that failed to mount on the Exchange server
- Click the ‘Browse for EDB file’ button.

- Choose the offline EDB file that you want to repair the mounting error for.

- EdbMails performs an in-depth scan of the offline EDB file to restore mailbox data affected by corruption. The duration of the recovery depends on the database size and its condition, so you should wait until the process finishes to ensure complete data retrieval.

- Once the recovery is done, expand the mailbox and click on any folder to view all its attributes, emails, contacts, calendars, tasks, journals, and notes in the right-side preview pane.
- Choose the mailboxes or folders you want to migrate, then click ‘Next’ to proceed.

- Click the ‘Browse for EDB file’ button.
Step 3: Connect to target Exchange server
- To connect to the target Exchange server, click ‘Add New Connection’ to set up a new connection. If you've already created one, just select it from the list and click ‘Connect to Existing’ to proceed.
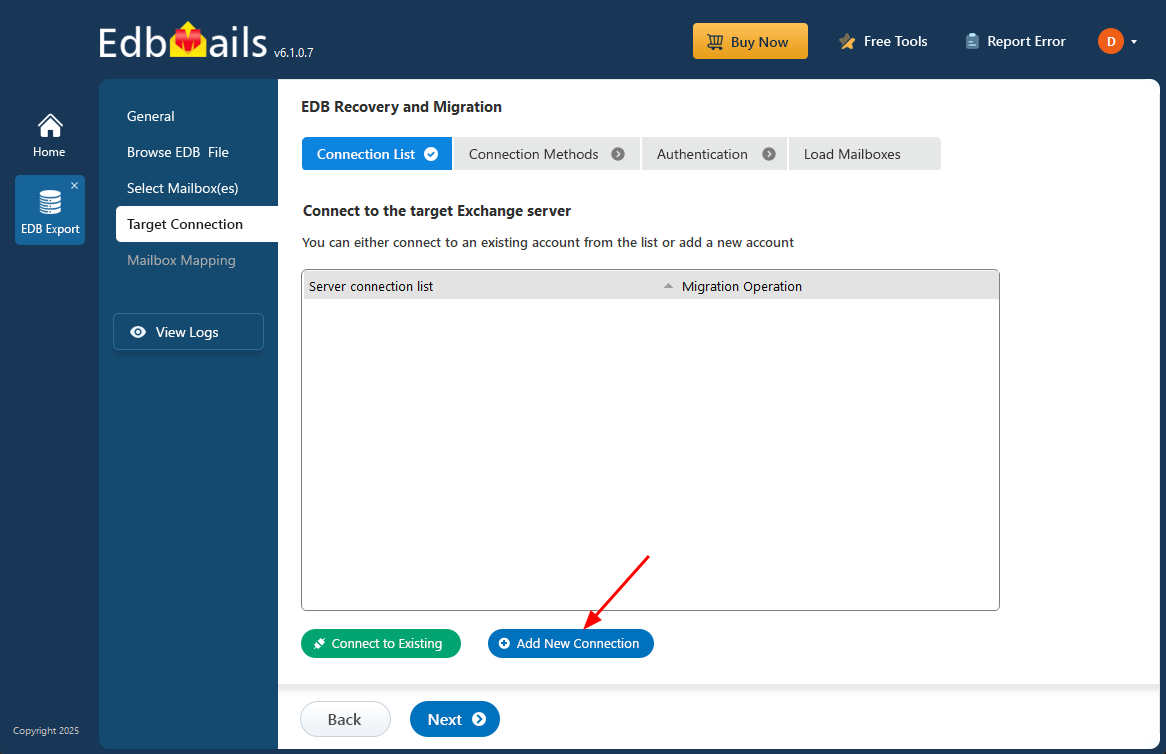
- Select the required connection options and click the ‘Next’ button.
Different options to connect to Exchange server in EdbMails

- Enter the target Exchange server details to finish setting up the connection, then click ‘Login’ to proceed.

- EdbMails can automatically load up to 100 mailboxes from your target Exchange server, adhering to Microsoft’s API limits. For organizations with more than 100 mailboxes, additional mailboxes can be imported using a CSV file method. You can select the method that best suits your needs to begin loading the mailboxes.

- To connect to the target Exchange server, click ‘Add New Connection’ to set up a new connection. If you've already created one, just select it from the list and click ‘Connect to Existing’ to proceed.
Step 4: Map the mailboxes from the source to the target servers
- Choose the required mailbox mapping option
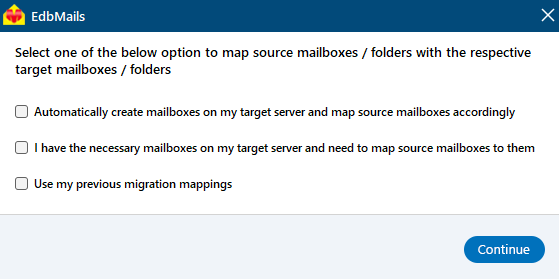
- EdbMails lets you automatically create mailboxes on the target Exchange server if the application is installed directly on it. It also performs automatic mailbox mapping by matching display names between the source and target servers. For more control, you can manually map mailboxes and folders to fit your migration needs.

- Choose the required mailbox mapping option
Step 5: Start EDB to live Exchange migration
- Once the mailbox mapping is finished, click ‘Start Migration’ to begin transferring mailbox data from the EDB file to the Exchange server.

- Monitor the migration in real-time using the progress bar. Once the process is complete, EdbMails will display a confirmation message indicating the migration was successful.

- Click the ‘View Logs’ button to access a detailed migration report, which provides insights into the items transferred and any errors encountered.
- Once the migration is verified, you can delete the Exchange server database file that is no longer needed.
- Once the mailbox mapping is finished, click ‘Start Migration’ to begin transferring mailbox data from the EDB file to the Exchange server.

Putting everything together
An Exchange Server database may not mount if it’s corrupted or if important log files are missing. A good first step is to use Microsoft’s Eseutil tool to try repairing the database, then attempt to mount it again. However, if the database is still not mounting or is badly damaged, a better solution is to convert the EDB file to PST using EdbMails. This tool allows you to recover mailboxes from a corrupted EDB file and export them to Outlook PST format. You can also directly migrate the data to another Exchange Server or Office 365 account. It supports Exchange versions from 2003 to 2019 and works smoothly on both Windows desktops and servers, making it a practical tool for quick and reliable recovery.

