Exchange Server 2019/2016/2013 Disaster Recovery Plan
Unexpected problems with Exchange Server can bring business operations to a halt—especially when email, calendars, and scheduling rely entirely on it. Issues like hardware failure, sudden power loss, or malware attacks can happen without warning and cause major disruptions. In industries such as finance, healthcare, and government, even a short interruption can lead to data loss, missed deadlines and compliance issues.
To avoid these risks, it's important to have a clear disaster recovery plan tailored to your version of Exchange Server—whether it’s 2019, 2016, or 2013. A solid plan ensures you can quickly recover mailbox data, databases, and log files in the event of a failure. This is where EdbMails EDB to PST Converter proves invaluable. It allows you to extract mailbox data from corrupt or offline EDB files, even when the Exchange server is completely unavailable.
This step-by-step guide will show you how to handle Exchange Server failures—from finding out what went wrong to getting your mail system up and running again. With the right tools and approach, you can reduce downtime and keep your business communications running smoothly—even during unexpected disruptions.
How to protect an Exchange server from disasters?
The following methods help you create an Exchange server disaster recovery plan and apply it to your environment.
Plan 1: Backup Exchange server data with Windows Server Backup
Windows Server Backup (WSB) is a built-in utility in Windows Server designed to back up volumes and Exchange servers. However, WSB performs backups at the volume level, meaning it requires the entire volume to be backed up in order to perform application-level backup and restore. This makes it essential to back up the full volume to ensure the integrity and recoverability of Exchange server data during a restore operation.
Note: When using Windows Server Backup (WSB) to take a backup, you may encounter an error message indicating an "Exchange database consistency check failure" if the EDB file is corrupted. In such instances, it's crucial to repair the database file before attempting to proceed with the backup to ensure successful data recovery and integrity.
Learn more about the Windows Server backup and its features
The following steps describe how to perform backup with WSB:
- Step 1: Start Windows Server Backup as an administrator
- Step 2: Select the required Backup option under Local Backup
You have two options to choose from, Backup Schedule and Backup Once
- Step 3: In the Select Backup Configuration page select Custom
For a complete backup of all the server data click on Full server. If you want to backup only the database and its related files, then the Custom option should be sufficient.
- Step 4: In the Select Items for Backup page, click Add Items
When selecting items, ensure that you select the complete volume and not just the folder where the files are located. For the application-level restore operation it is necessary to select the entire volume.
- Step 5: Click Advanced Settings to change the VSS settings and add Exclusions
In the Exclusions tab in the Advanced Settings page, add any files or folders to exclude from the backup. In the Volume Shadow Copy tab (VSS), select VSS full backup.
- Step 6: Schedule the backup (optional)
If you have selected the Backup Schedule option in Step 2, you can specify the backup time for the job to run automatically.
- Step 7: Specify the backup Destination Type
In this step, you can choose the destination location to save the backup. The following three options are available.
- Backup to a hard disk that is dedicated for backups (recommended)
- Backup to a volume
- Backup to a shared network folder
- Step 8: Review the backup settings and start the backup
In the Confirmation page, review the selections and settings such as Backup Time, Files excluded and Advanced options. Finally click Backup to start the operation.
See steps to use Windows Server backup to backup Exchange server
See steps to use Windows Server backup to restore the Exchange backup
Plan 2: Upgrade your computer hardware and storage space
Low disk space is a common cause of Exchange Server failures and database corruption. When the server runs out of available disk space, it cannot write new transactions to the database, which can cause the database to dismount and potentially become corrupted. To prevent this issue, it's recommended to either upgrade to a higher-capacity drive or move the database to a different volume with adequate free space.
Here are some best practices for managing Exchange Server storage effectively:
- For a standalone Mailbox server, store transaction log files on a RAID-1 (Redundant Array of Independent Disks)
- If disk space is limited, enable circular logging to reduce log file buildup by overwriting older transaction logs automatically.
- Use dedicated storage for Exchange data and avoid sharing the same physical disks with other applications to prevent performance issues and conflicts.
See Exchange server storage configuration options for single and multiple databases per volume.
Plan 3: Set up a Database Availability Group
A Database availability group (DAG) is a set of Exchange servers that provides automatic database-level recovery from server or network failures. DAG’s are supported in all the latest Exchange servers and creating a DAG improves site resilience and provides automatic recovery during an Exchange server disaster.
See steps to create a DAG from the Exchange admin center
Plan 4: Perform a periodic Exchange database health checkup
It’s important to regularly check the health of your Exchange database to keep things running smoothly and catch problems early. Exchange servers can sometimes run into issues like Jet Engine errors, which may cause the database to shut down improperly—known as a Dirty Shutdown. This can put your data at risk. To prevent data loss and keep your server reliable, you should keep the Exchange environment in good shape and create regular backups by exporting mailboxes from the EDB file. These simple, proactive steps help protect your data and make it easier to recover if something goes wrong with the server.
See steps to check the health of an Exchange database
Plan 5: Perform a recovery with a Recovery database
A Recovery Database (RDB) in Exchange Server lets you mount a backup copy of your mailbox database such as one created using Windows Server Backup, without affecting the active database. This is useful when your Exchange server fails or data needs to be recovered, as you can restore mailbox content directly from the backup. Keep in mind, this feature is only available in Exchange Server 2016 and newer versions.
See steps to restore Exchange mailboxes from recovery database
Plan 6: Perform Database portability and Dial tone portability
Another method for Exchange server disaster recovery is to use the database portability feature, which enables you to move the database to any other Exchange server with the same database schema. It reduces the recovery times for failure scenarios.
See steps to move mailbox database using database portability
In the dial tone portability feature, you create a temporary mailbox for sending and receiving messages while the original mailbox is restored. This method involves creating an empty database on the Exchange server to replace the failed database.
See steps to perform a dial tone recovery in Exchange
Plan 7: Manage the Messaging policy and compliance
Messaging policy and compliance in Microsoft Exchange help you manage the lifecycle of email communication, ensuring that messages are retained to meet legal, regulatory, and business requirements. These features are critical for preserving data in the event of investigations, litigation, or unexpected server disasters. Implementing a well-defined messaging policy enables smoother recovery and restoration of Exchange data. For instance, enabling the In-Place Archiving feature allows users to access older email data without relying on external .pst files. Additionally, configuring In-Place Hold protects messages from accidental deletion or unauthorized changes, while retention policies ensure that emails are preserved for a specified duration.
See Messaging policy and compliance and Data Loss Prevention in Exchange server.
Plan 8: Convert the EDB file to PST with EdbMails
Even with all the right precautions in place, Exchange Server can still crash, leaving the database inaccessible and administrators scrambling for a quick recovery. In such stressful situations, immediate data restoration becomes a top priority—and fortunately, it’s possible with the help of a reliable third-party solution.
EdbMails, a Microsoft-partnered Exchange recovery toolkit, is designed to recover mailbox data from corrupted or unmountable Exchange databases. Whether you're dealing with hardware failure, database corruption, or server crash, EdbMails allows you to convert EDB files to PST format, making it easy to restore mailbox contents. The tool supports Exchange Server versions 2019, 2016, 2013, 2010, and 2007.
Step 1: Download and install EdbMails EDB to PST Converter
- Download and install the EdbMails application on any Windows-based computer, no need for an active Exchange Server.
- Enter your registered email address and password to log in. If you haven't registered yet, click on ‘Start Your Free Trial’.
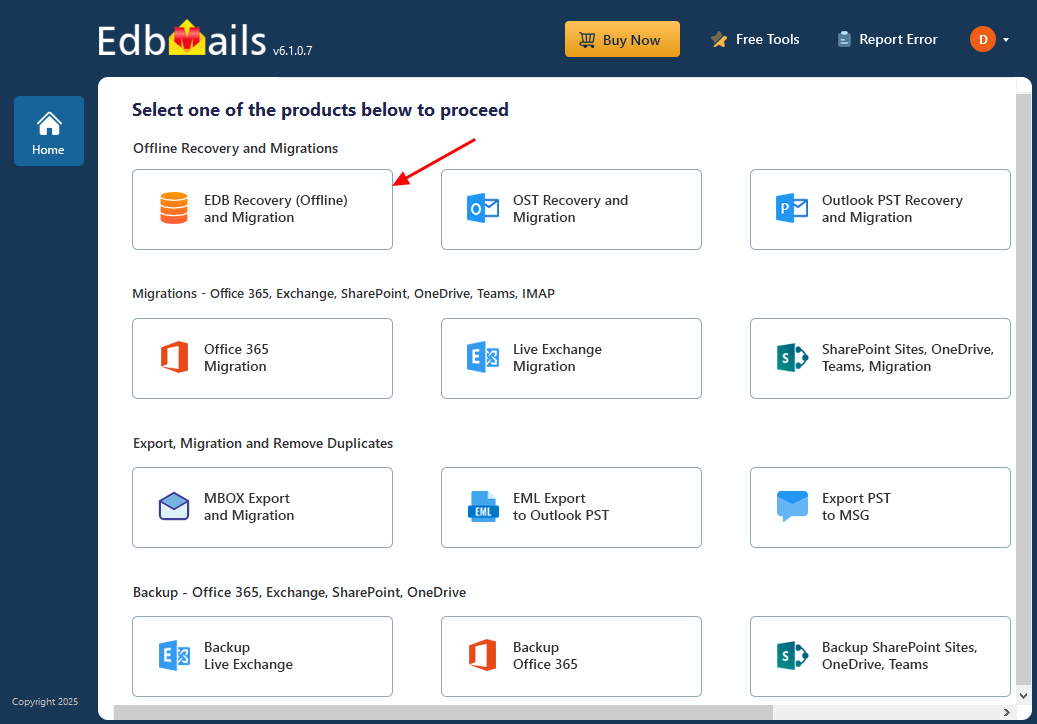
- Click on ‘EDB Recovery (Offline) and Migration’
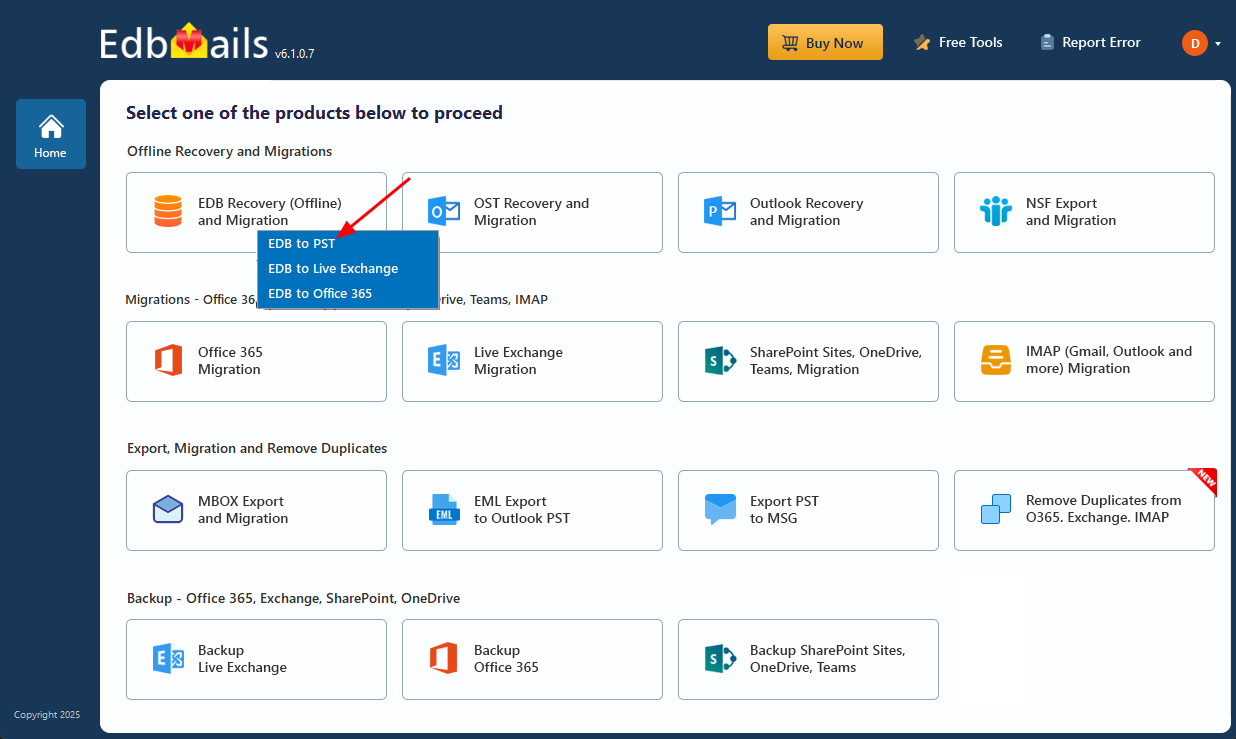
- Select ‘EDB to PST’ option
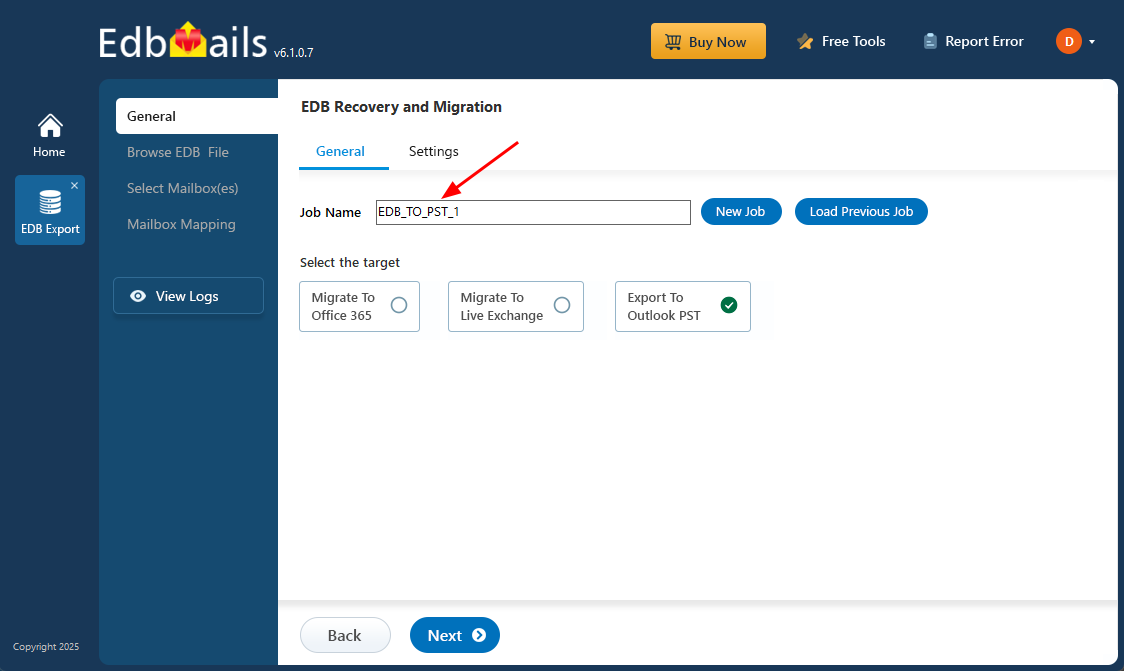
- You can proceed with the default job name or click ‘New Job’ to create a custom name, making it easier to identify and manage the task later.
Step 2: Select the offline EDB file
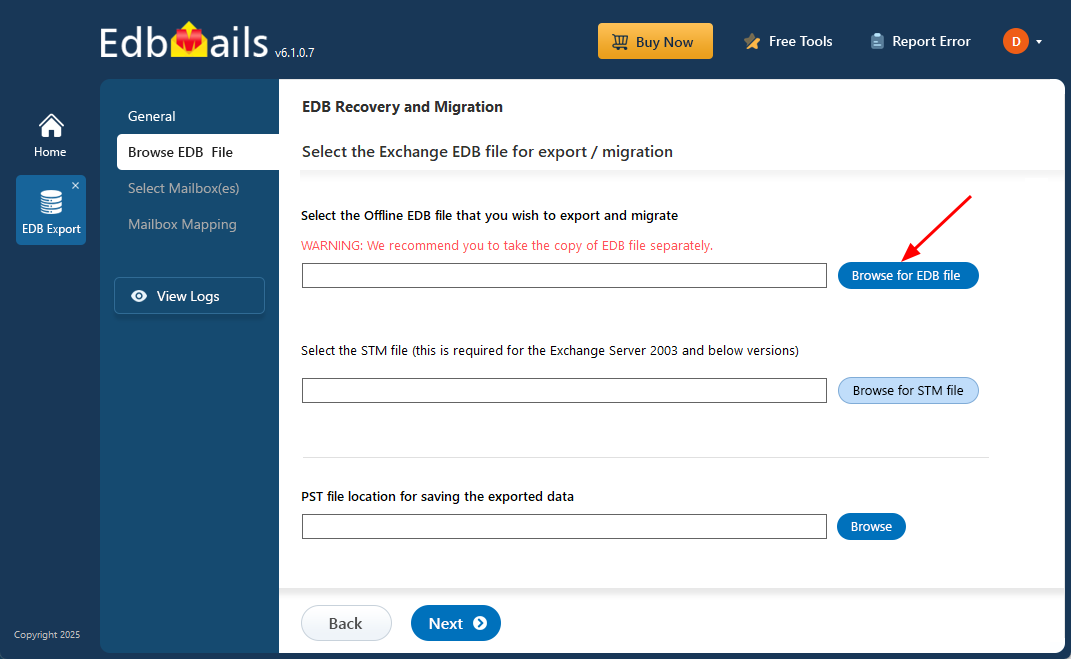
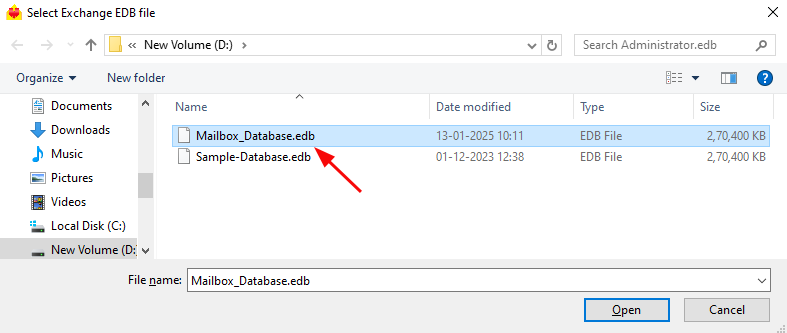
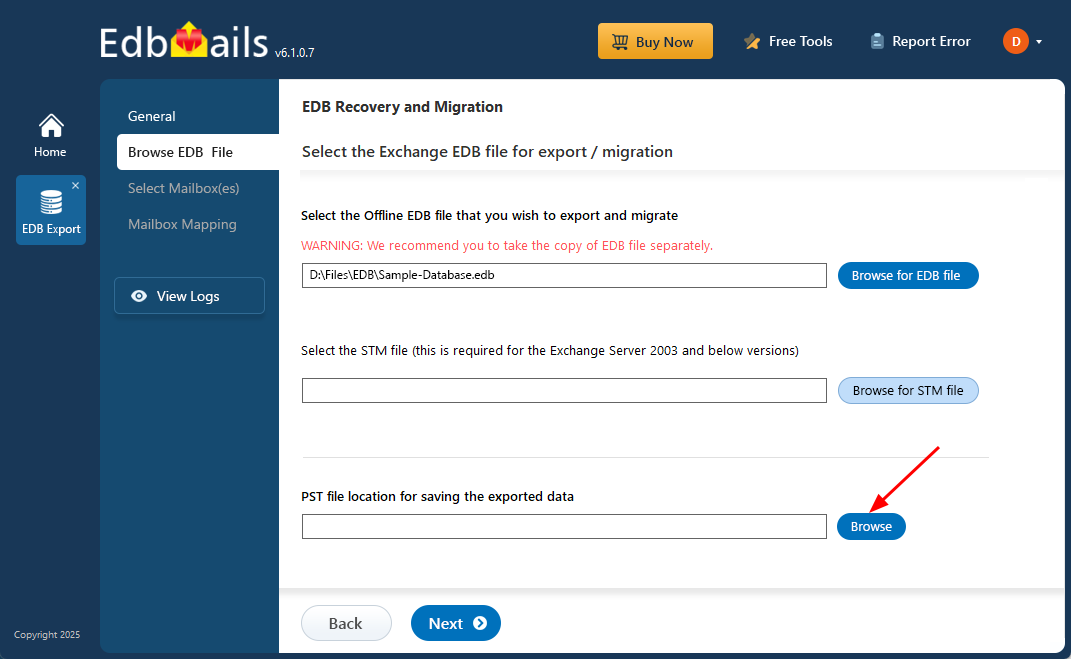
- Click ‘Browse for EDB file’
- Choose the offline or corrupted EDB file that you want to recover and export.
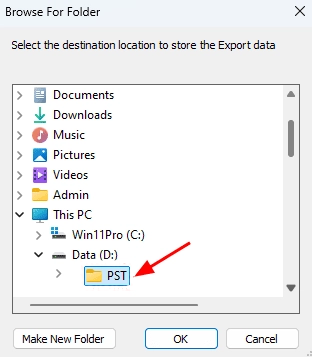
- Click ‘Browse’
- Choose the destination folder where you want to save the exported PST files. Ensure that the selected drive has enough free space to complete the export, then click ‘Next’ to continue.
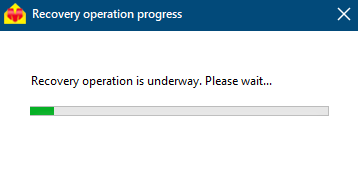
- EdbMails automatically scans and recovers damaged EDB files.
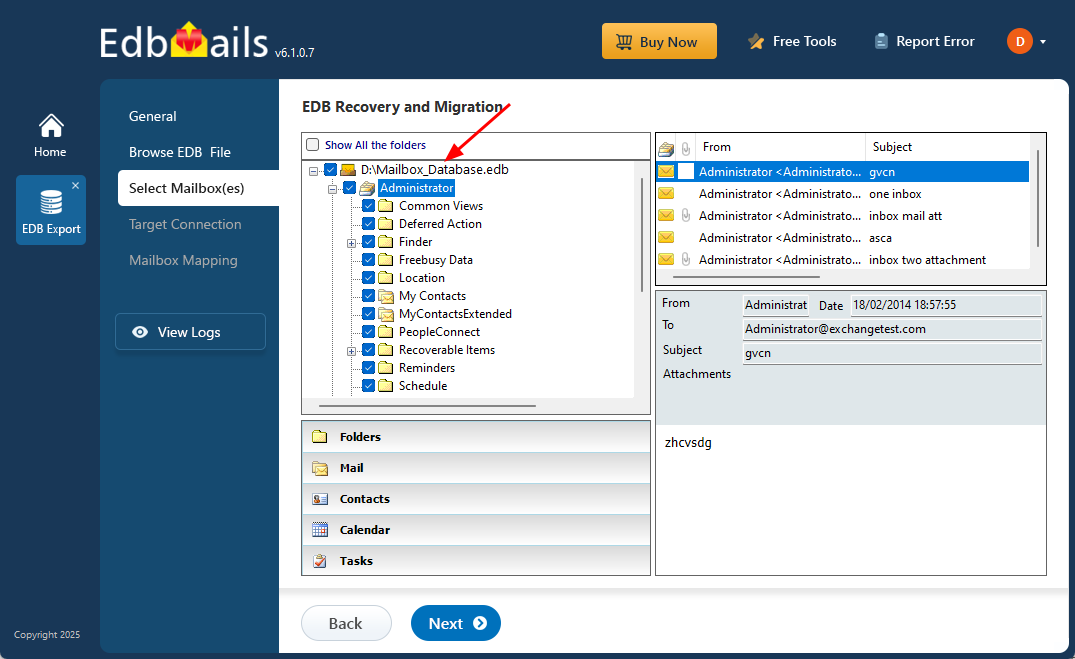
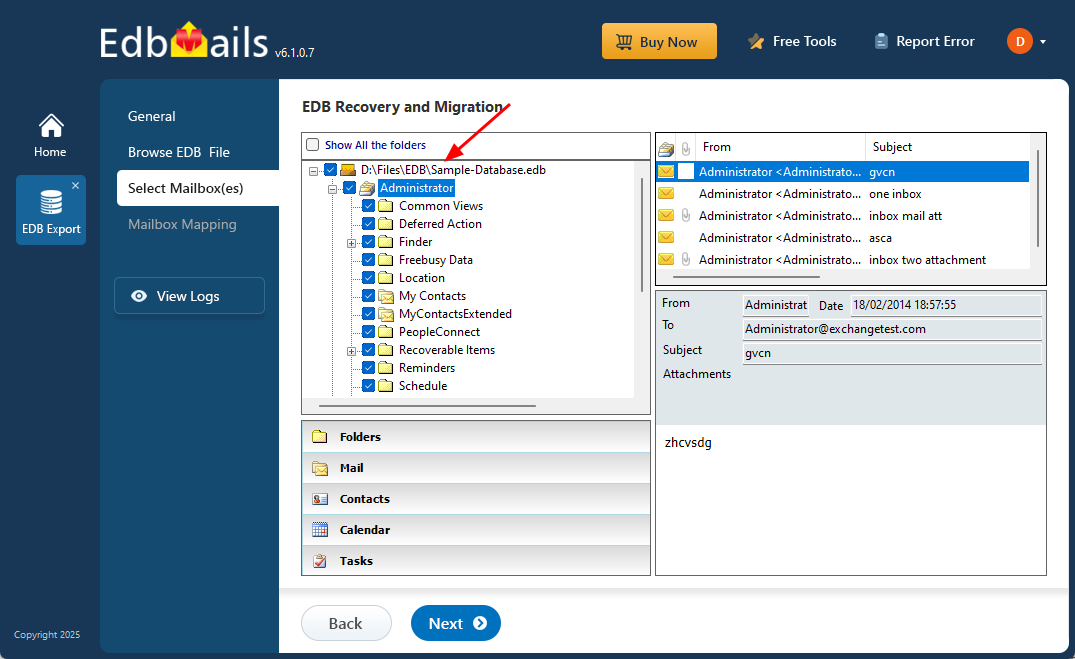
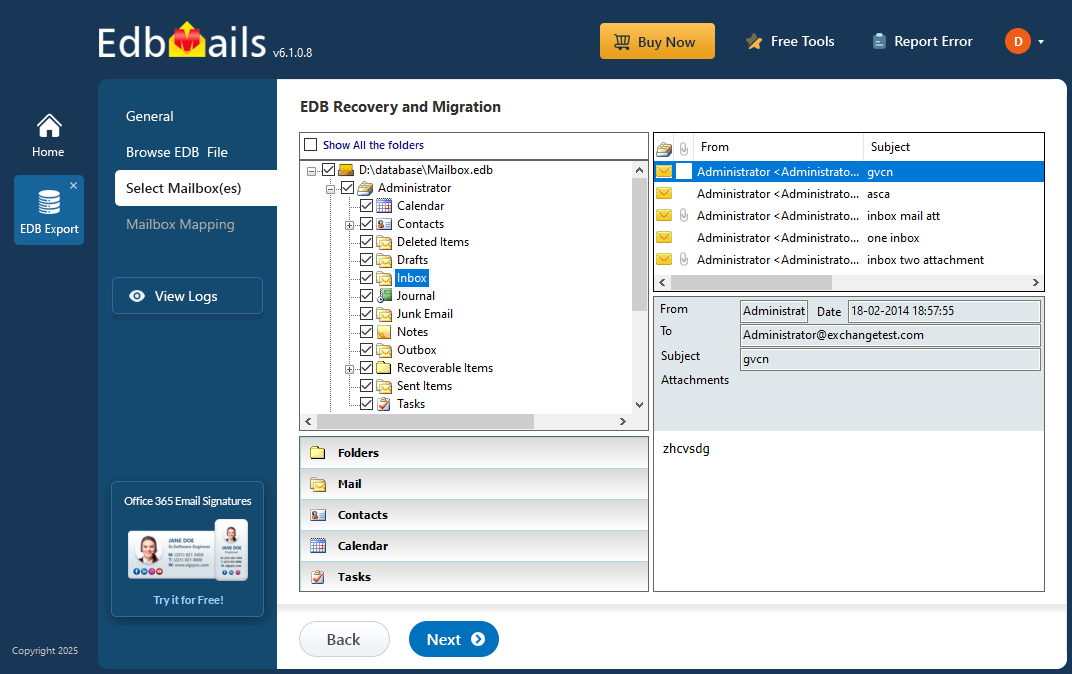
- Once the recovery is complete, click on the desired mailbox to expand it. You can then select any folder, such as Emails, Contacts, Calendars, Tasks, Journals, or Notes to preview its contents in the right-hand pane.
- Select the mailboxes or folders you want to export to PST, then click ‘Next’ to continue with the export process.
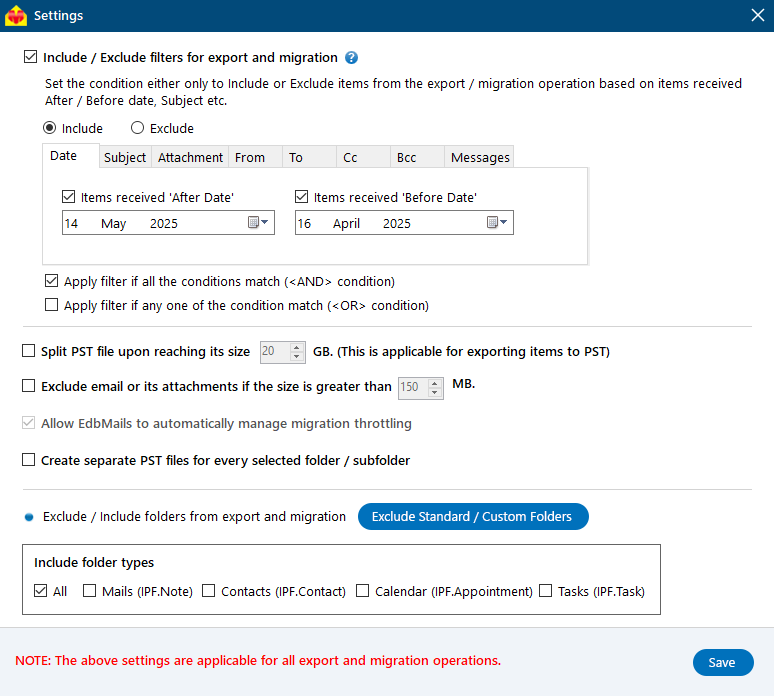
- You can use the advanced filter settings to export Exchange emails to PST based on criteria like date, subject, attachments, and so on.
- The 'Exclude Standard / Custom folders' option lets you leave out specific folders like Inbox, Sent, Drafts, Junk, Conversation History, and any custom folders—from the export process.
- EdbMails comes with other additional settings for the export such as splitting a PST file and excluding emails whose size is greater than a specified limit.
Step 3: Convert EDB to PST
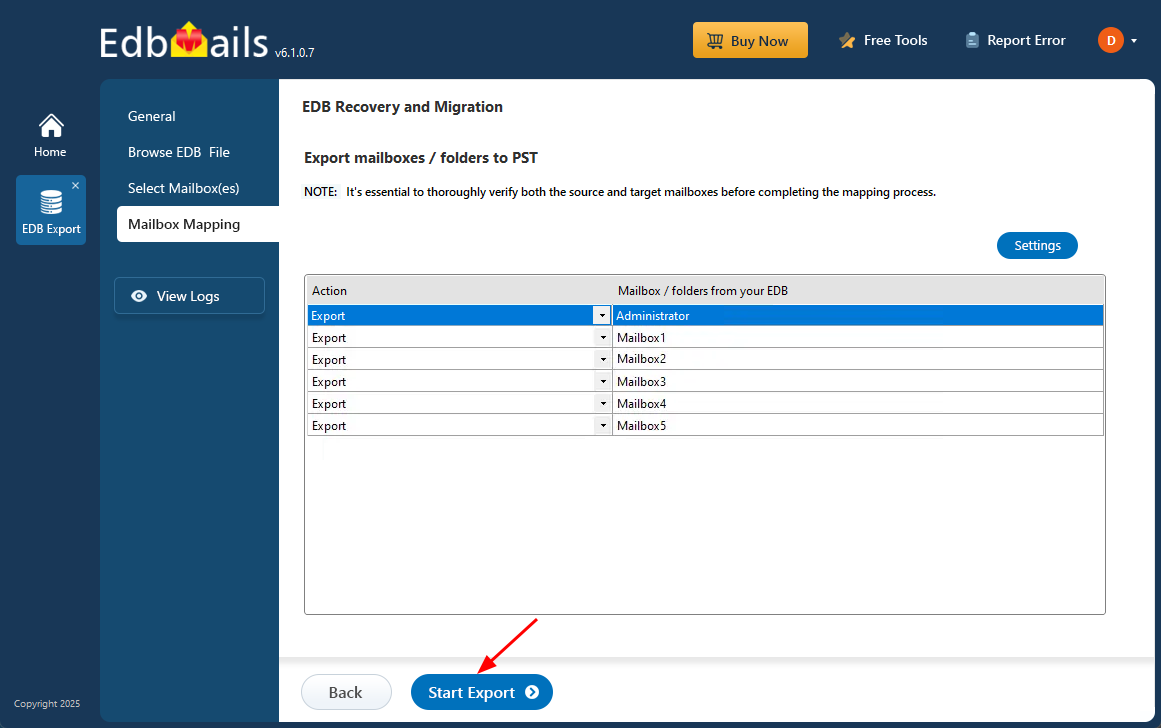
- Verify the selected mailboxes and folders for export. Make sure the 'Action' is set to 'Export', then click ‘Start Export’ to initiate the process.
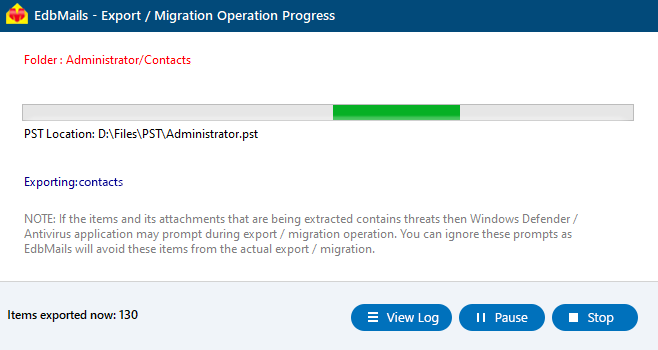
- During the export process, EdbMails displays a real-time progress window with options to pause or resume the operation. Once the export is complete, you can view a detailed summary report by clicking the ‘View Logs’ button.
To restore all your mailboxes and mail items, simply open the exported PST file in Outlook and let it sync with your Exchange account. For added safety, you can also store the PST file in a secure location or replicate it to a network drive as a backup. Additionally, EdbMails makes it easy to import EDB files directly into Exchange Server 2019, 2016 and 2013.
Plan 9: Create Exchange mailbox backup with EdbMails
EdbMails also enables you to create a secure AES-256 encrypted backup of your mailboxes and help you restore your data from the Exchange disaster. The following section describes the Exchange server backup with EdbMails.
Step 1: Select Exchange Backup in the application
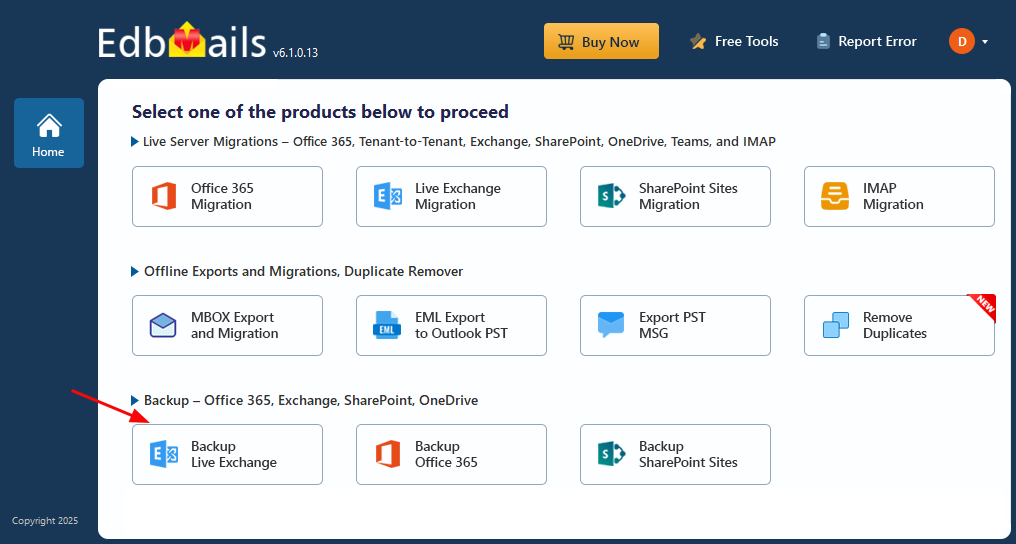
- Select ‘Backup Live Exchange’ from the available product options.
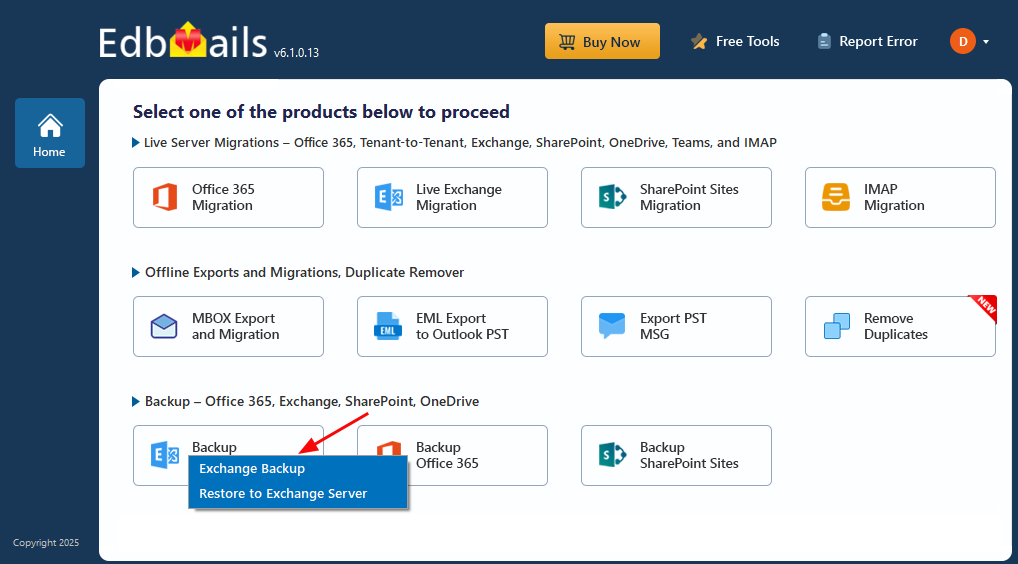
- Select the recovery technique as ‘Exchange Backup’.
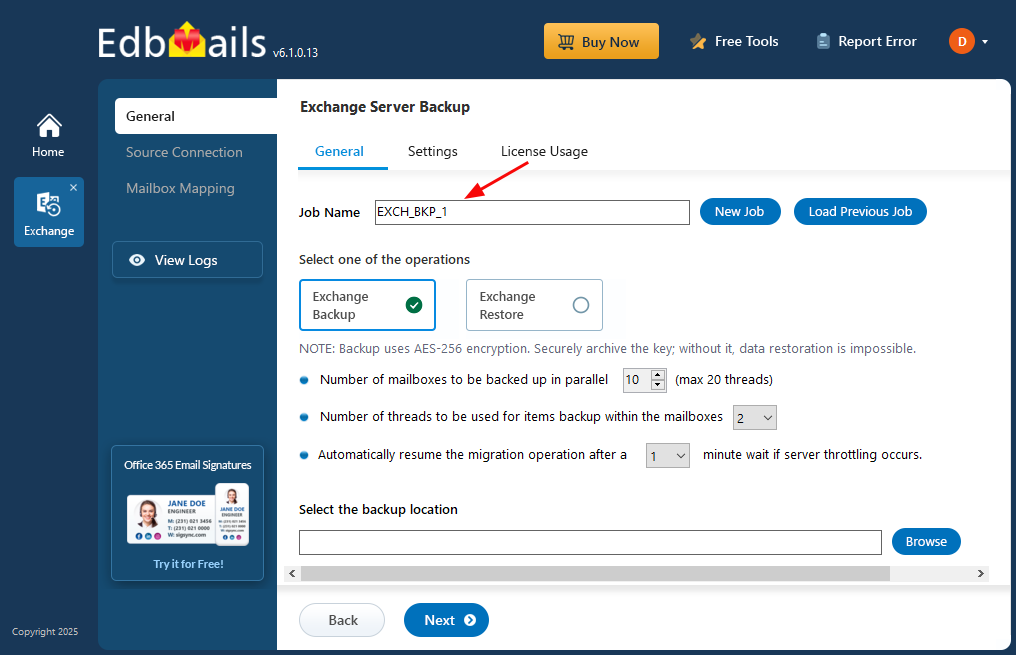
- You can proceed with the default job name or choose ‘New Job’ to assign a custom label, helping you keep your backup task clearly organized and easy to track.
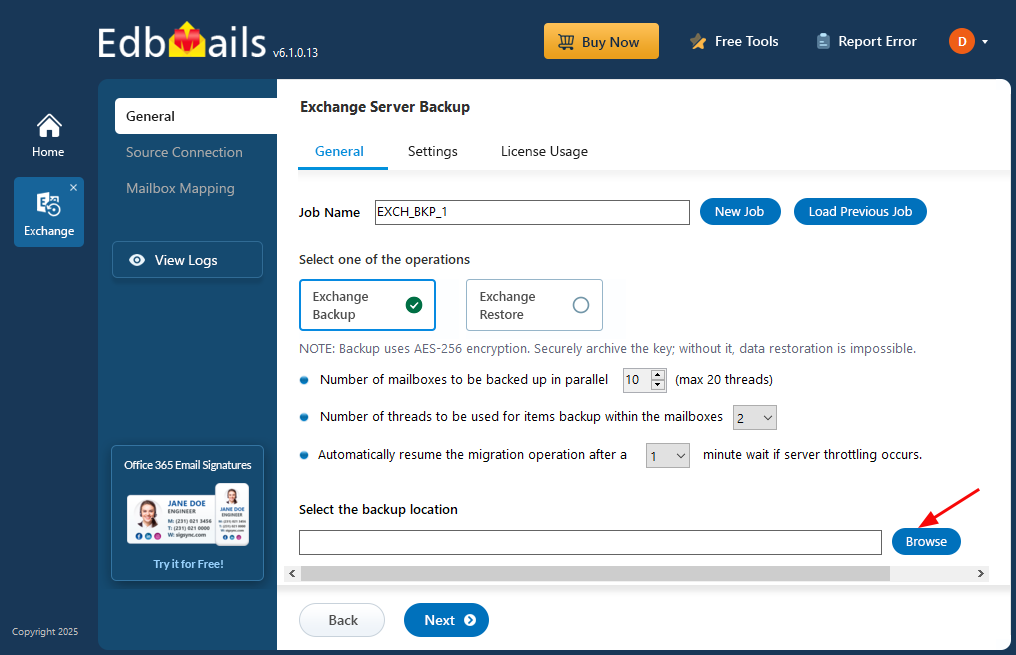
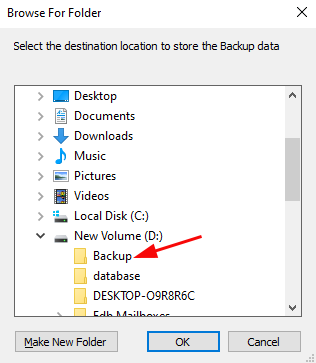
- Click ‘Browse’ to set a backup location.
- Choose a location to save the backup files and ensure there is enough available disk space on your computer. Then, click ‘Next’ to proceed.
Step 2: Connect to the source Exchange server
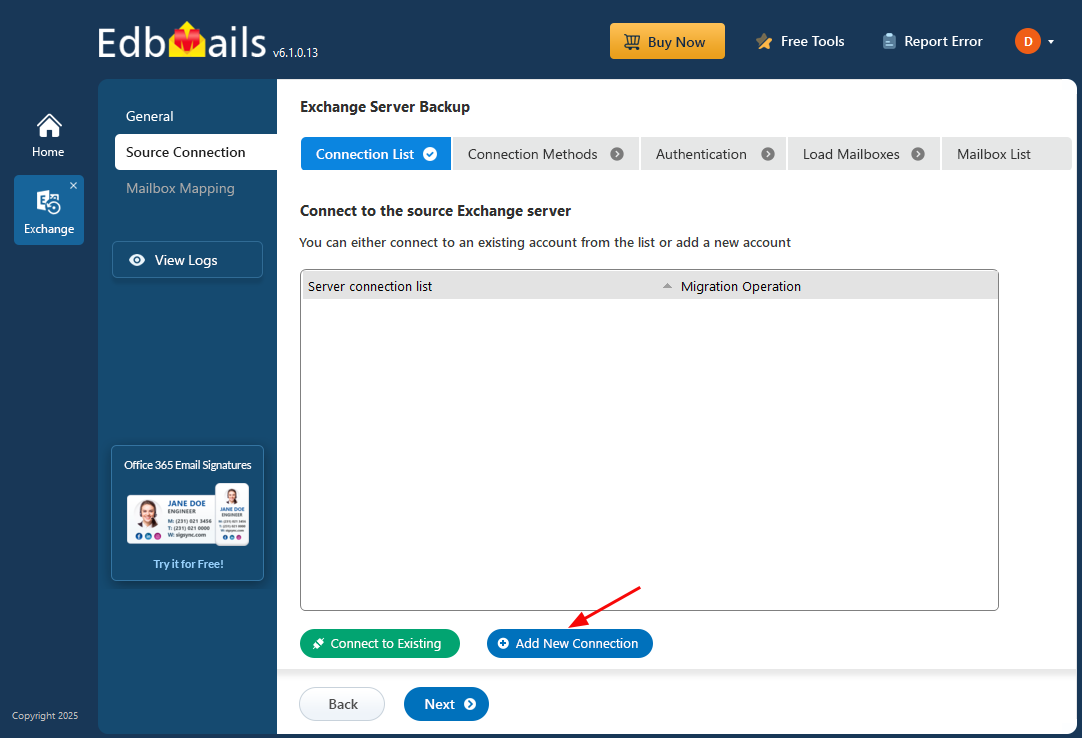
- Click ‘Add New Connection’ to set up a fresh connection to the source Exchange server. If you’ve previously configured a connection, simply select it from the list and click ‘Connect to Existing’ to continue.
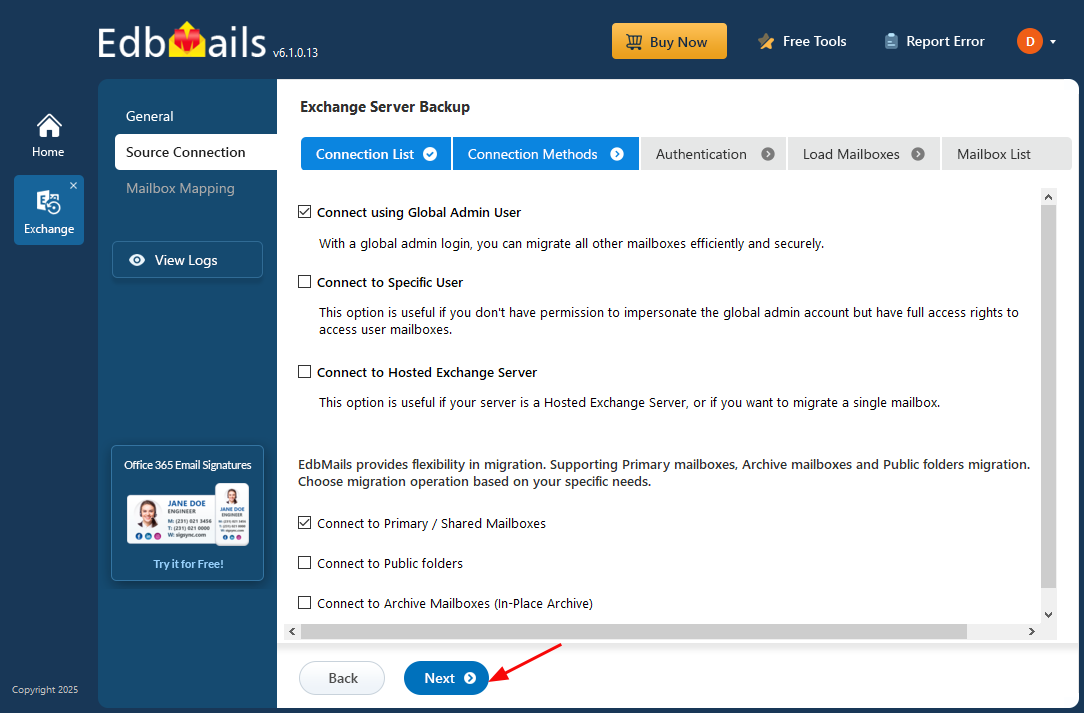
- Choose the appropriate connection options and click the ‘Next’ button.
Different options to connect to Exchange server in EdbMails
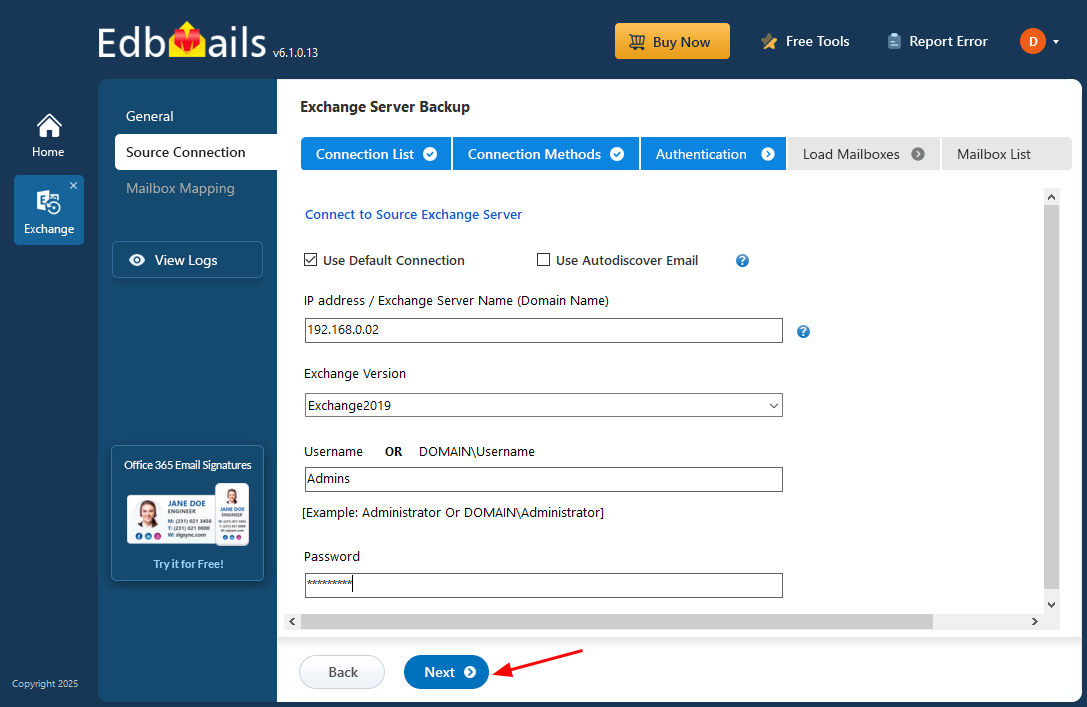
- Enter the required source Exchange server details and click ‘Login’ to continue.
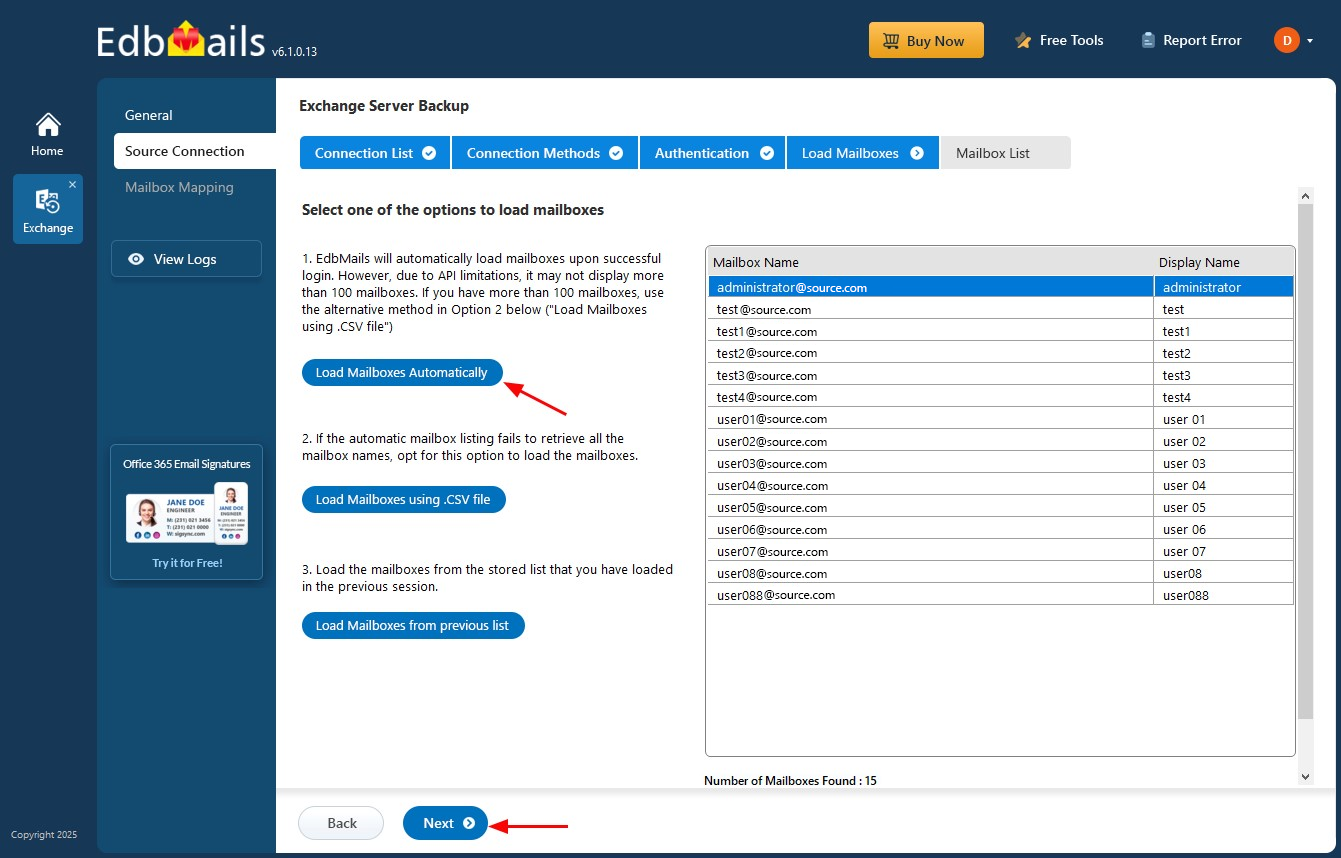
- EdbMails automatically loads up to 100 mailboxes from the source Exchange server, following Microsoft’s API limitations. To load more than 100 mailboxes, you can import a CSV file containing the additional mailbox list. Choose the method that best fits your setup, then click ‘Next’ to proceed.
- Select the items you want to backup and click the ‘Next’ button.
- EdbMails offers the option for either a Full Backup or Incremental Backup and allows you to exclude specific mailbox folders, such as Inbox, Drafts, Junk, and Conversation History.
Step 3: Backup Exchange server database
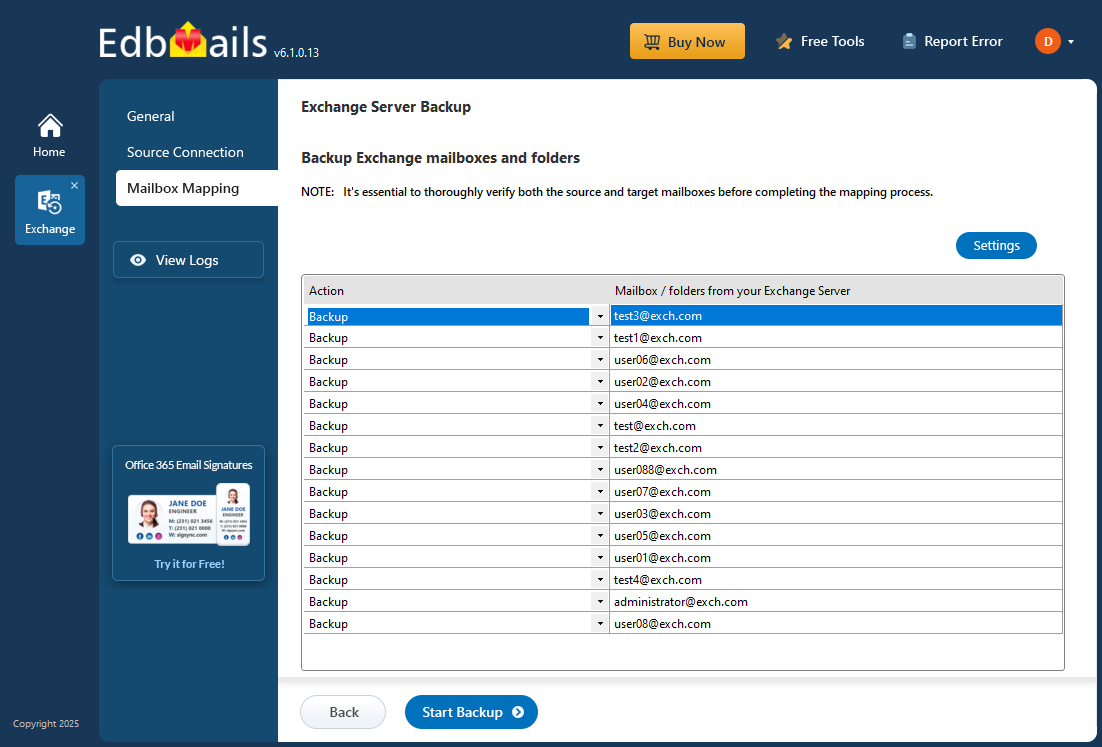
- Review the selected mailboxes and folders to ensure everything is correct. Make sure the ‘Action’ is set to ‘Backup’, then click ‘Start Backup’ to begin the process.
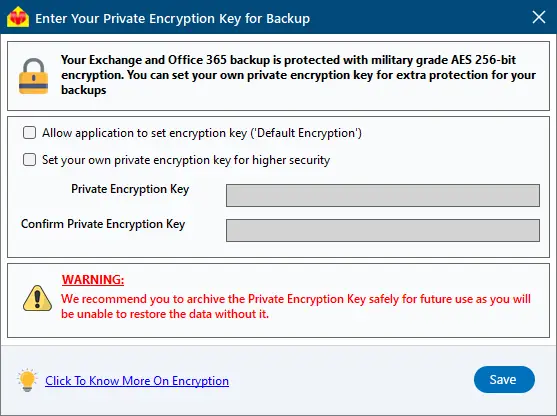
- You can either go with the default encryption or set up your own private key for added security. If you create a private key, make sure to store it somewhere safe as you’ll need it for future backups or restores.
- Click ‘Save’ to confirm your encryption settings.
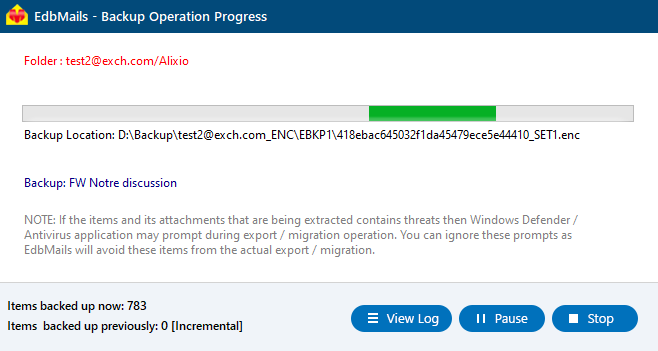
- During the backup, EdbMails displays a real-time progress window, allowing you to pause or resume the process as needed. Once the backup is complete, click ‘View Log’ to access a detailed summary report of the operation.
- You can restore the backup file anytime by following the restore operation with EdbMails.
See steps to restore Exchange server backup with EdbMails
Plan 10: Perform a test restore of the backup
Once you’ve created a backup using Windows Server Backup and EdbMails, it’s important to perform a test restore to confirm everything works as expected. One key limitation of Windows Server Backup is that it may not recognize or restore a backup if the EDB file is corrupted. In contrast, EdbMails can directly recover data from a corrupted EDB file or restore from its encrypted backup copy, as shown in the previous steps. To truly test your preparedness, try simulating a real-world Exchange server failure scenario and evaluate how effectively your recovery strategy holds up.
See steps to restore Exchange server backup with EdbMails
Conclusion
Throughout this guide, we explored various methods to plan and prepare for disaster recovery across Exchange Server versions 2019, 2016, 2013, and 2010. Having a well-structured recovery plan is crucial for minimizing the risks associated with data loss and unexpected server failures. However, when a disaster strikes without warning, having the right tool at your disposal makes all the difference. EdbMails offers a reliable solution to repair and convert EDB files to PST, as well as to back up Exchange mailboxes securely. If you have an offline or corrupted EDB file, you can directly restore its contents to Live Exchange or Office 365—without needing the original server. This makes EdbMails an essential addition to every Exchange administrator’s toolkit for fast, efficient, and dependable mailbox recovery.


