Lotus Notes to Exchange Migration - Step by Step Guide
Migrating from Lotus Notes to Exchange server has become essential for organizations seeking a more advanced and efficient email communication system. While IBM Lotus Notes was once popular for managing emails and workflows, many businesses are now shifting to modern, flexible platforms like Exchange Server, known for its robust email management that enhances productivity and streamlines operations.
For organizations looking to migrate, EdbMails Lotus Notes NSF to Exchange migration tool offers a seamless solution for transferring data from Lotus Notes to Exchange Server.. EdbMails ensures complete data transfer of emails, calendars, contacts, tasks, and attachments while being compatible with all Exchange versions, including 2019, 2016, 2013, 2010, 2007 etc. It uses incremental migration techniques to prevent duplicates, ensuring that only new or modified data is migrated after the initial transfer.
EdbMails eliminates Outlook dependencies. The software automatically creates mailboxes on the target server. Its granular filter settings allow users to filter emails, contacts, calendars, and other items by date, subject, or sender address, ensuring that only the necessary data is transferred. These features make EdbMails a smart choice for businesses seeking better performance and reduced costs.
The sections below cover the migration prerequisites, step-by-step procedure, and the benefits of using EdbMails for NSF to Exchange migration.
Prerequisites to migrate Lotus Notes to Exchange server
- Step 1 : Install IBM Lotus Notes Application on your computer
- Step 2 : Check that your system meets the Exchange server setup requirements
Note :Exchange 2010, Exchange 2013 reached the end of support. Therefore it is highly recommended that you migrate your mailboxes and Public folders to Exchange 2016 or 2019.
The following links help you to set up your target Exchange server. Learn more about the network, hardware, coexistence scenarios, and operating system requirements for installing Exchange.
- Step 3: Prepare your system with the following prerequisites for Exchange server
Complete the following prerequisites for Active Directory, Windows Mailbox server, and Windows Edge Transport servers before installing the target Exchange server.
- Step 4: Set up the target Exchange server for migration
Given below is a list of key points for installing and preparing the Exchange server for migration.
1. Prepare the AD and domains
- Before installing Exchange Server, you need to prepare your Active Directory forest and its domains for the new version of Exchange.
- If you have a separate team to manage the Active Directory schema, you need to first extend the active directory schema, else proceed to the next step to prepare the Active Directory.
- If you have multiple domains you need to additionally prepare the Active Directory domains.
2. Install Exchange server on your computer
Ensure that you meet the server system requirements and prerequisites as outlined previously. Next, follow the link to install Exchange 2016 or install Exchange 2019 from the setup wizard based on which server you want to migrate to.
3. Prepare a clean Exchange target environment
Configuring Exchange Server for Mail Flow and Connectivity
- Create and configure a Send connector to send mail outside the Exchange organization.
- By default, Exchange automatically creates receive connectors for inbound mail flow when the mailbox server is installed. If you need to configure receive connectors manually, follow the steps in the link.
- Add accepted domains to allow recipients to send and receive email from another domain.
- Configure the default email address policy to add the accepted domain to every recipient in the organization.
- Configure external URLs (domains) on the virtual directories in the Client Access (frontend) services on the Mailbox server to allow clients to connect to your server from the internet (outside the organization’s network).
- Configure internal URLs on the virtual directories in the Client Access (frontend) services on the Mailbox server to allow clients to connect to your server from the internal network.
- Configure SSL certificates from a third-party certificate authority for services such as Outlook Anywhere and Exchange ActiveSync.
- Verify the Exchange server installation by running the command Get-ExchangeServer on the Exchange Management Shell (EMS).
4. Create mailboxes and Public folders on the Exchange server
Before you migrate your mail data, ensure that you create mailboxes on the target server and assign suitable licenses to them. For the Public folder migration, create mail-enabled Public folders.
See how to create mailboxes in Exchange server
Steps to create Public folder in Exchange server
5. Assign management roles to the admin account
- Application Impersonation
- View-Only Recipients
- View-Only Configuration
Also assign the Organization Management role group to the admin user. It is an elevated permission that is required for mailbox and Public folder migration.
6. Verify the mailbox of the admin account
Check to see if the admin account that has been assigned management roles has a valid and non-hidden mailbox on the Exchange server.
7. Configure the throttling and message-size limits
Change the EWS throttling and message size limits manually on the Exchange server by following the steps in the link.
Steps to Migrate Lotus Notes to Exchange server using EdbMails
Step 1: Download and Install the EdbMails application
- Download and install EdbMails on your computer.
- Follow the on-screen steps to complete the installation process.
- Open the EdbMails software.
- Log in using your email address and password, or select the 'Start Your Free Trial’ option.
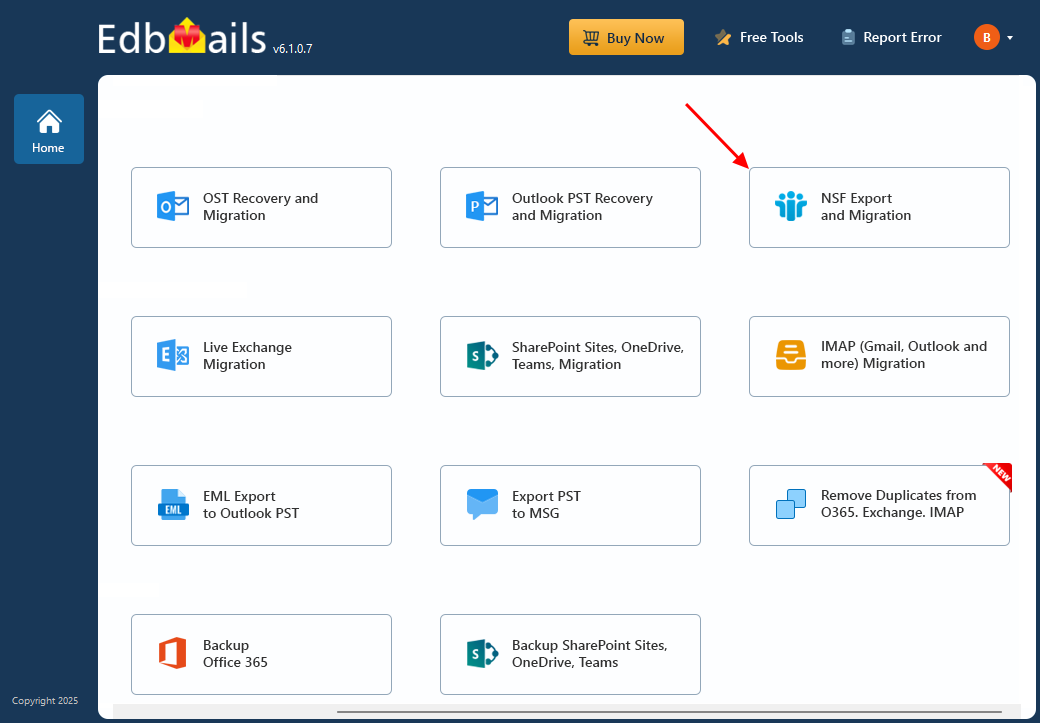
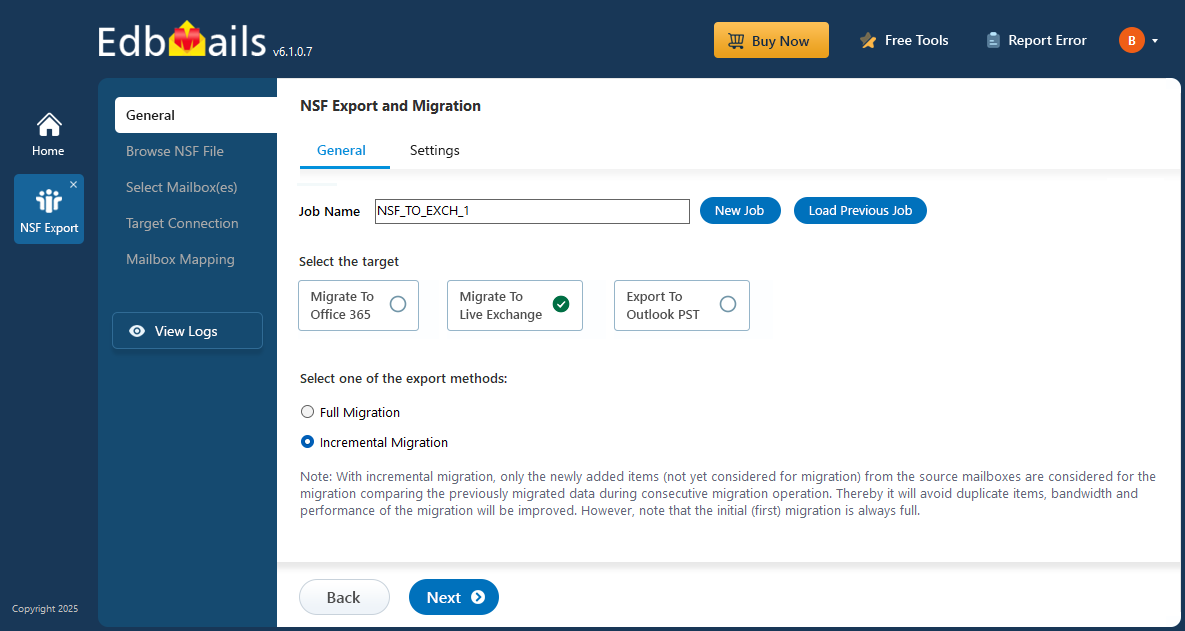
- Choose ‘NSF Export and Migration’
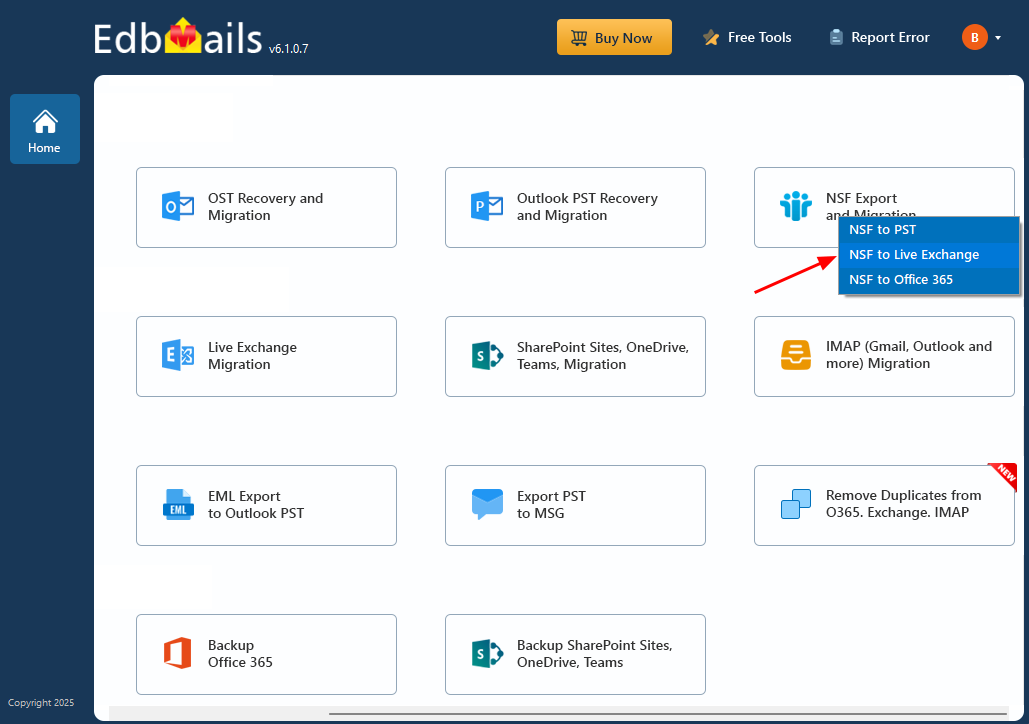
- Select 'NSF to Live Exchange’
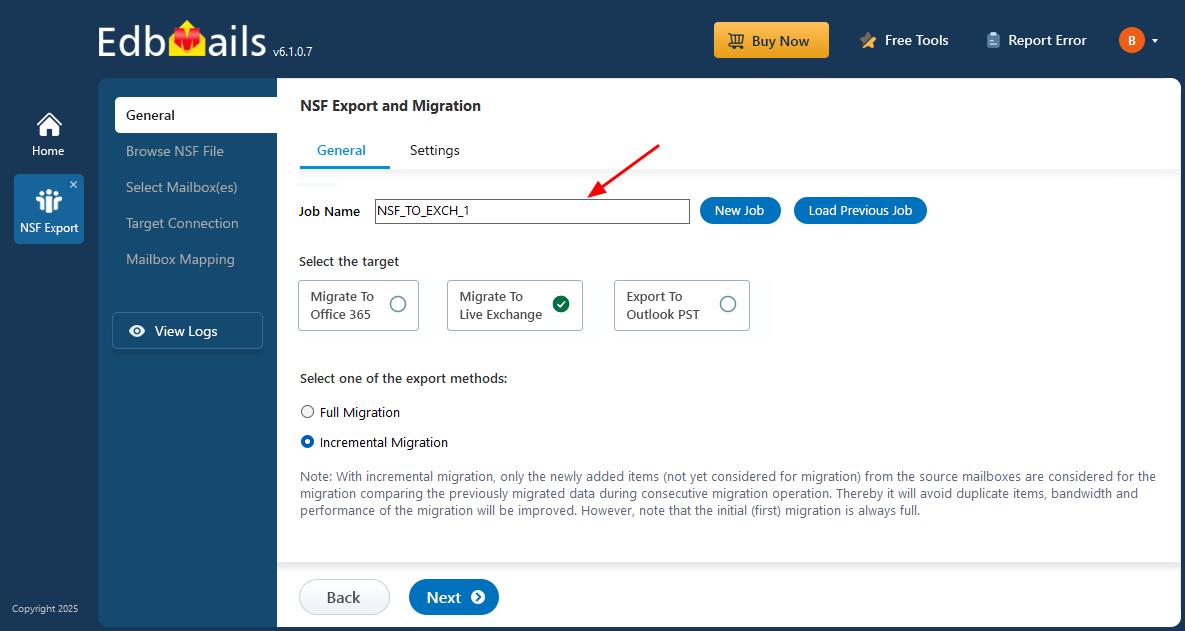
- You can either keep the default job name or click the ‘New Job’ button to rename it. Then, click ‘Next’ to continue.
Step 2: Add NSF files
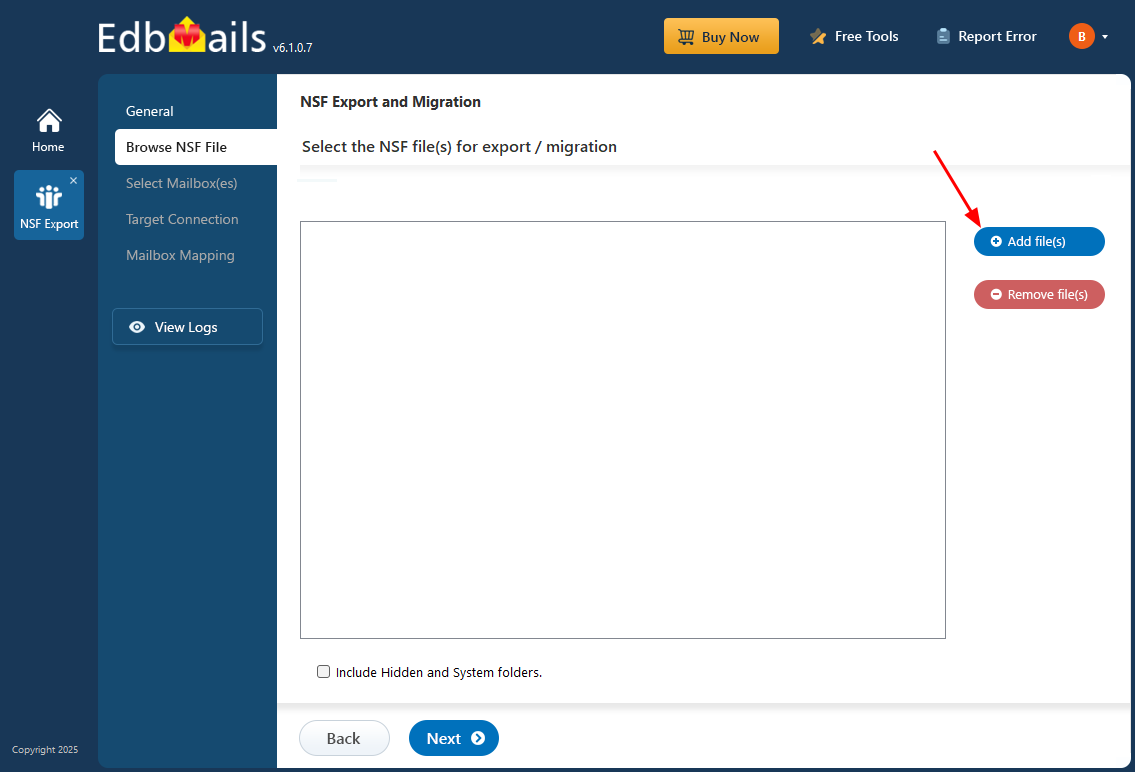
- Click the ‘Add file(s)’ button.
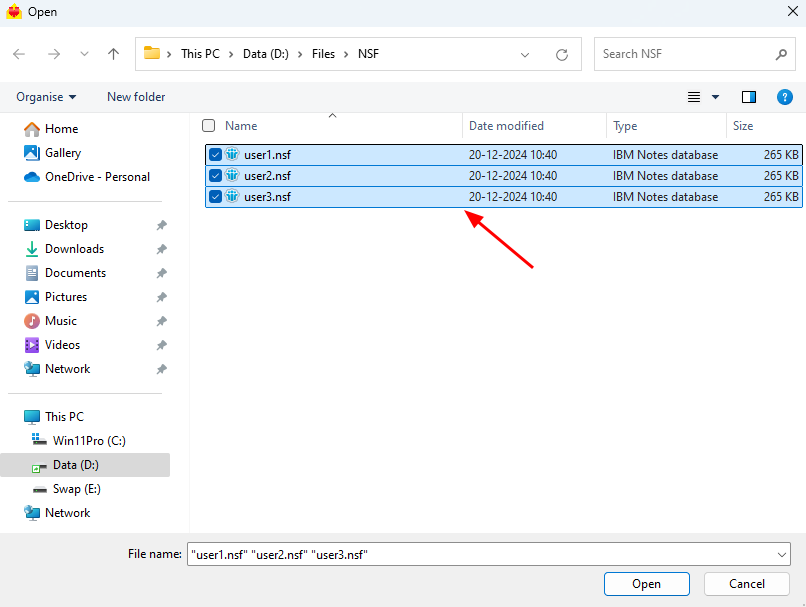
- Choose the NSF files from your computer drive and click ‘Next’ to continue.
- You can also share the offline NSF files on your network, assign read and write permissions to the file, and then proceed with the migration.
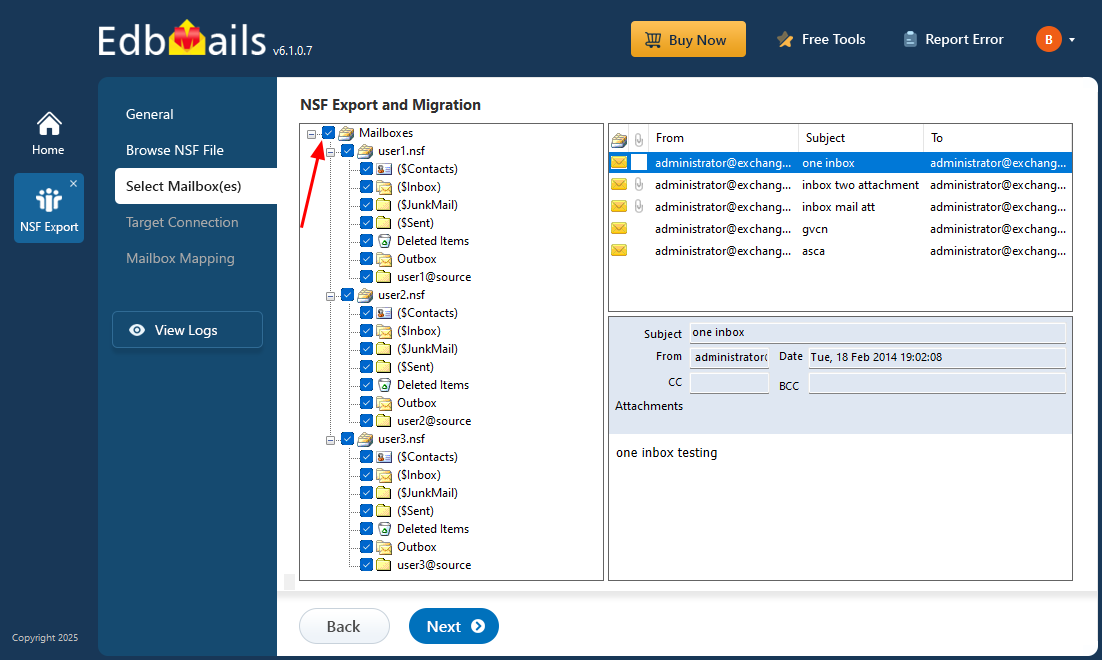
- Select the NSF files you want to migrate, then click ‘Next’ to continue.
Step 3: Connect to target Exchange server
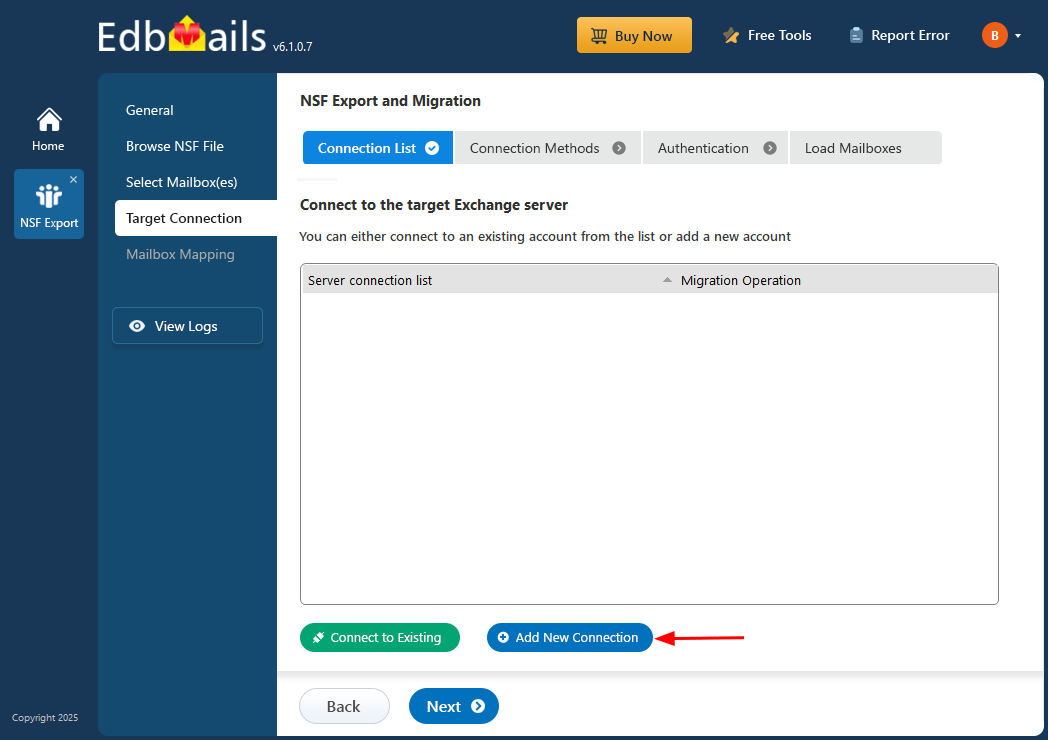
- Click the ‘Add New Connection’ button to establish a new connection to the target Exchange Server. To use the previous connection, select it from the connection list and click the ‘Connect to Existing’ button to proceed.
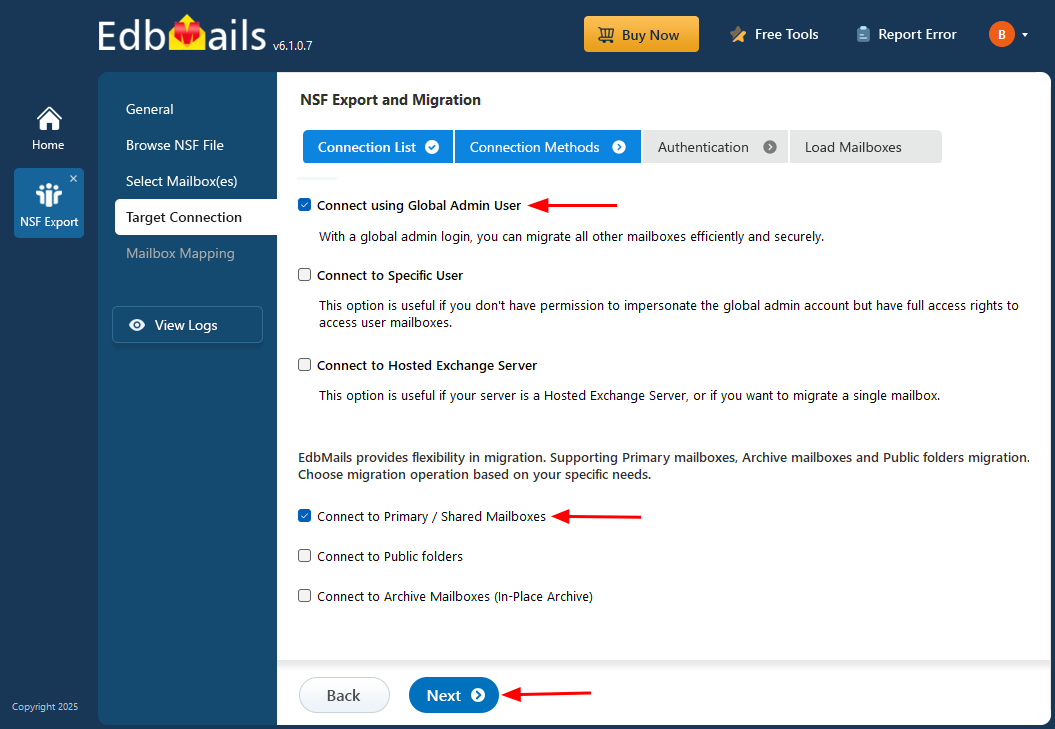
- Select the required connection options and click ‘Next’ to proceed. If you're using a Global Admin account to connect to the Exchange server, make sure impersonation rights are assigned.
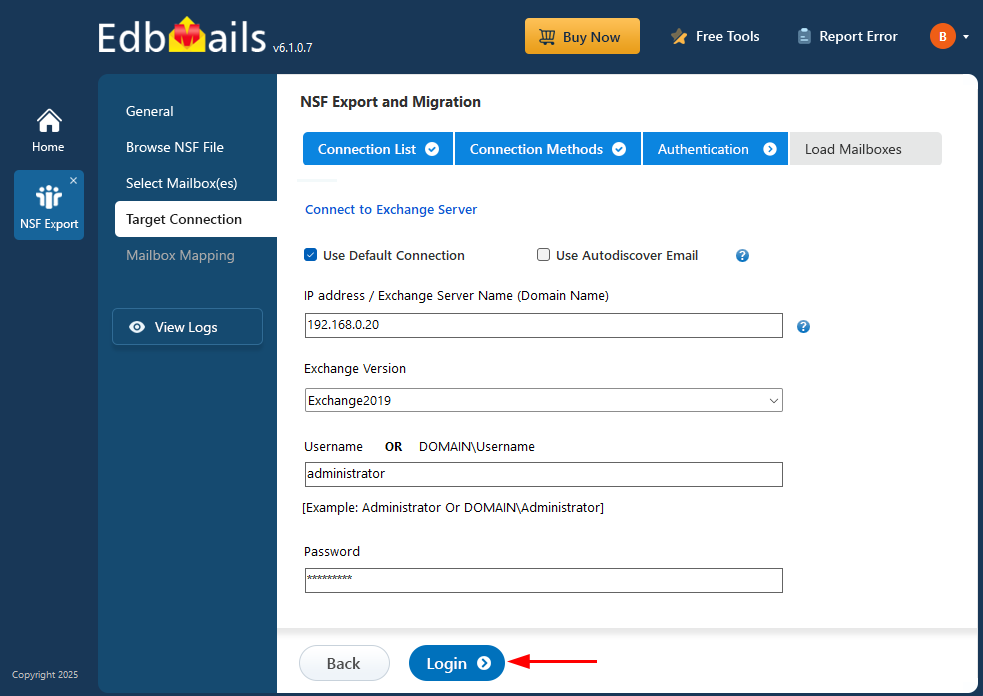
- Provide the target Exchange server details and click the ‘Login’ button.
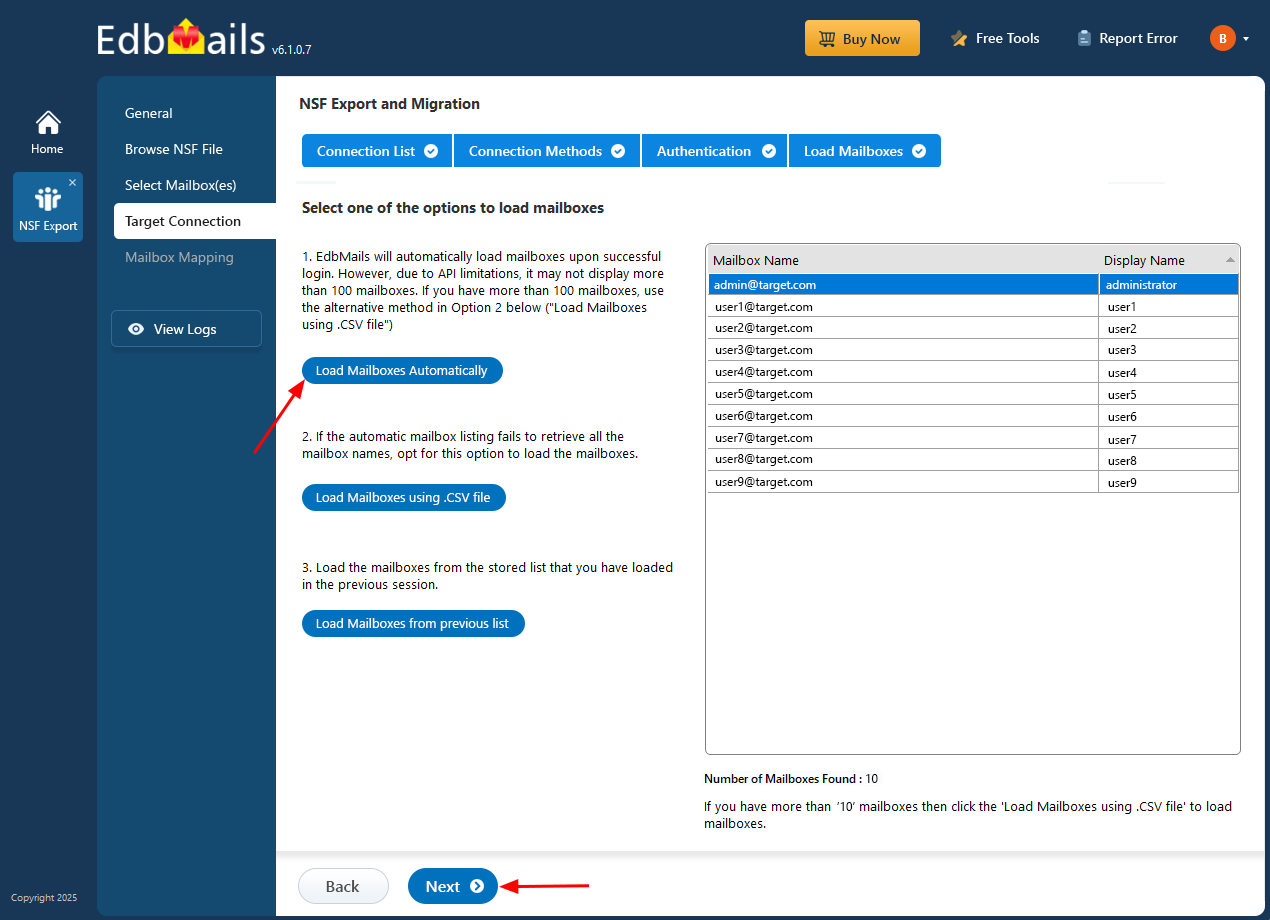
- Select one of the methods to load the mailboxes. Because of Microsoft API limits, the application can load only up to 100 mailboxes automatically. If you need to load more, simply use a CSV file to add the extra mailboxes, then click 'Next' to continue.
Step 4: Map source and target mailboxes
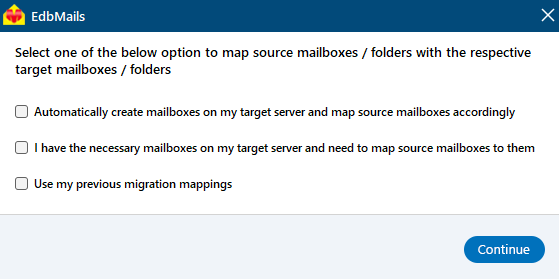
- Choose the required mailbox mapping option. If you have installed EdbMails on an Exchange server, you can option to let EdbMails automatically create mailboxes on your target Exchange server.
Learn how to automatically create mailboxes on the target Exchange server using EdbMails.
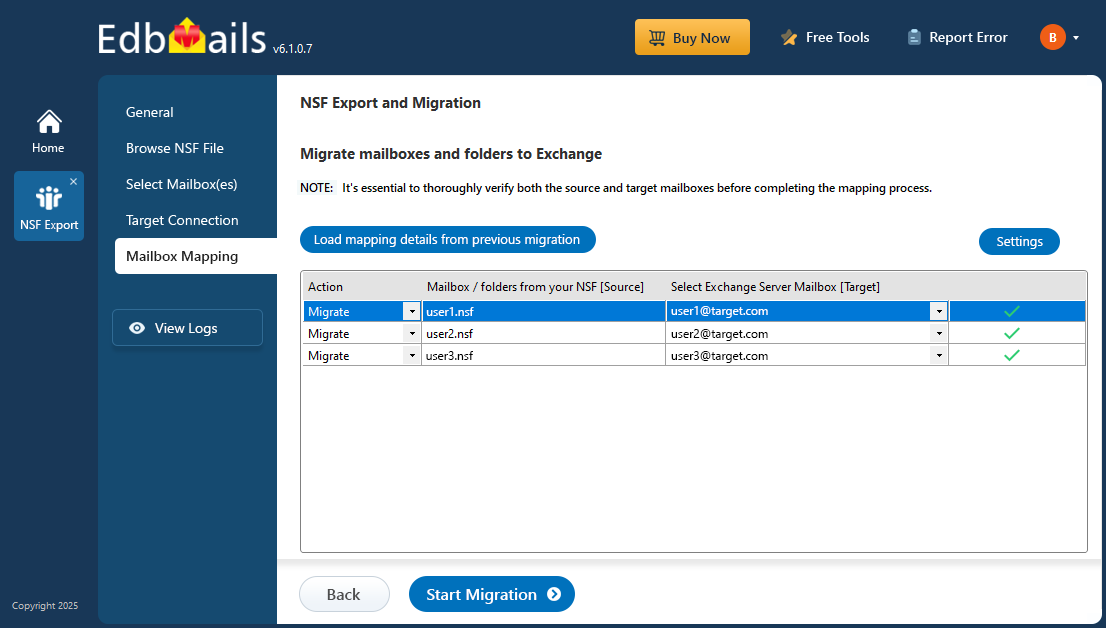
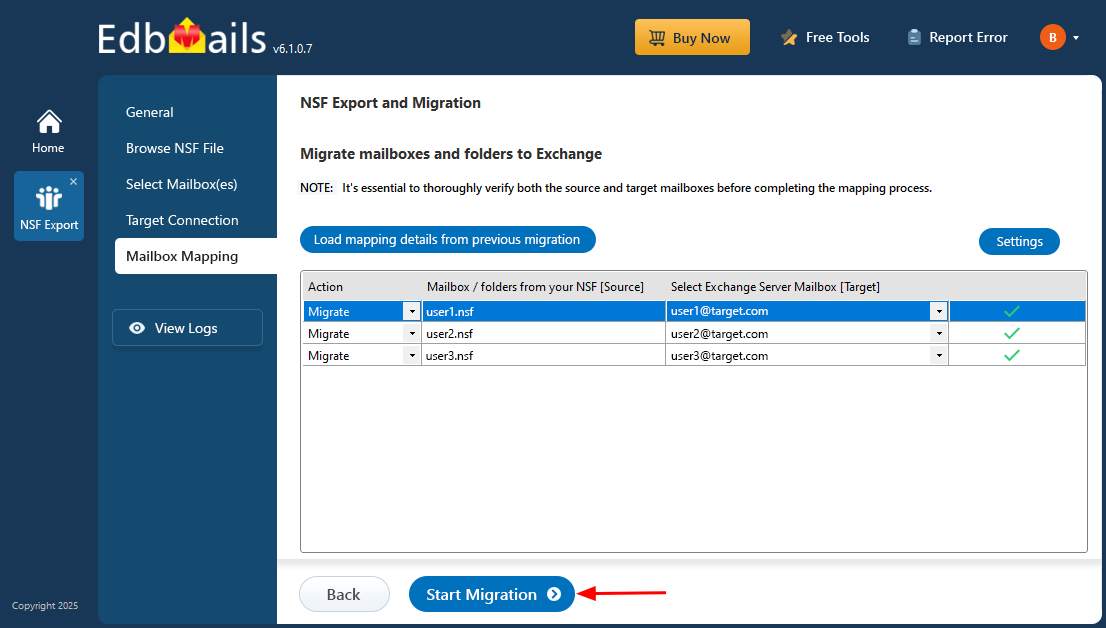
- EdbMails software automatically maps mailboxes and folders between the source and target servers, which is especially useful for large-scale migrations. Alternatively, you can manually map source folders and subfolders to specific target locations if needed.
- Choose the required mailbox mapping option. If you have installed EdbMails on an Exchange server, you can option to let EdbMails automatically create mailboxes on your target Exchange server.
Step 5: Start NSF to live Exchange migration
- Verify the NSF files you have selected for migration
- Click the 'Start Migration’ button to start the migration process.
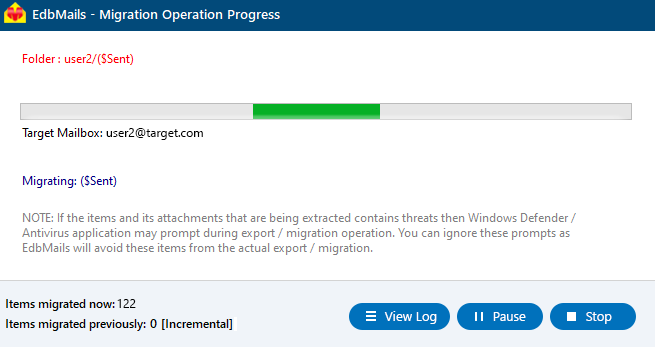
- You can now monitor the migration progress. Once the migration is complete, a confirmation message will appear to review the migration status. Click ‘View Logs’ to check the list of migrated folders and mailbox items, along with their item counts.
Benefits of using EdbMails for NSF to Live Exchange server migration
- EdbMails lets you directly migrate offline NSF files to Exchange server without Outlook dependency
- EdbMails provides filter options to select mail items based on date range, sender address, recipient address, subject, read and unread status of the messages.
- EdbMails is fully compatible with all versions of Exchange server, including Exchange 2019, 2016, 2013, 2010 and 2007
- Automatically creates target Exchange server mailboxes
- Free trial option to test NSF to Exchange migration features before purchasing
- EdbMails offers 24/7 Free tech support


